
Although using GUI elements, such as a cross-hair, is a valid way to allow players to aim, replacing (or combining) it with a projected laser dot might be a more interesting approach. In this recipe, we will use the Projector and Line components to implement this concept.
To help us with this recipe, it's been provided with a Unity package containing a sample scene featuring a character holding a laser pointer, and also a texture map named LineTexture. All files are inside the 1362_06_03 folder. Also, we'll make use of the Effects assets package provided by Unity (which you should have installed when installing Unity).
To create a laser dot aim with a Projector, follow these steps:
- Import
BasicScene.unitypackageto a new project. Then, open the scene named BasicScene. This is a basic scene, featuring a player character whose aim is controlled via mouse. - Import the Effects package by navigating to the Assets | Import Package | Effects menu. If you want to import only the necessary files within the package, deselect everything in the Importing package window by clicking on the None button, and then check the Projectors folder only. Then, click on Import, as shown:

- From the Inspector view, locate the
ProjectorLightshader (inside the Assets | Standard Assets | Effects | Projectors | Shaders folder). Duplicate the file and name the new copy asProjectorLaser. - Open
ProjectorLaser. From the first line of the code, changeShader "Projector/Light"toShader "Projector/Laser". Then, locate the line of code –Blend DstColor Oneand change it toBlend One One. Save and close the file.Note
The reason for editing the shader for the laser was to make it stronger by changing its blend type to Additive. Shader programming is a complex subject, which is beyond the scope of this book. However, if you want to learn more about it, check out Unity's documentation on the subject, which is available at http://docs.unity3d.com/Manual/SL-Reference.html, and also the book called Unity Shaders and Effects Cookbook, published by Packt.
- Now that we have fixed the shader, we need a material. From the Project view, use the Create drop-down menu to create a new Material. Name it
LaserMaterial. Then, select it from the Project view and, from the Inspector view, change its Shader to Projector/Laser. - From the Project view, locate the Falloff texture. Open it in your image editor and, except for the first and last columns column of pixels that should be black, paint everything white. Save the file and go back to Unity.

- Change the LaserMaterial's Main Color to red (RGB:
255,0,0). Then, from the texture slots, select the Light texture as Cookie and the Falloff texture as Falloff.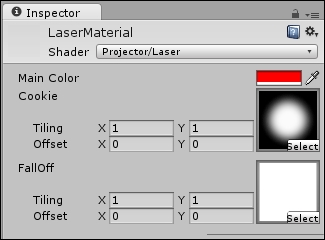
- From the Hierarchy view, find and select the pointerPrefab object (MsLaser | mixamorig:Hips | mixamorig:Spine | mixamorig:Spine1 | mixamorig:Spine2 | mixamorig:RightShoulder | mixamorig:RightArm | mixamorig:RightForeArm | mixamorig:RightHand | pointerPrefab). Then, from the Create drop-down menu, select Create Empty Child. Rename the new child of pointerPrefab as LaserProjector.
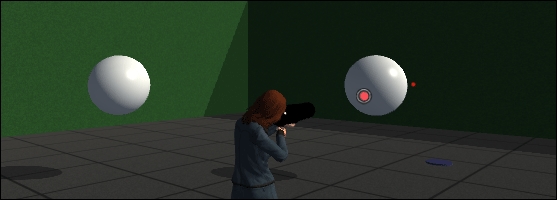
- Select the LaserProjector object. Then, from the Inspector view, click the Add Component button and navigate to Effects | Projector. Then, from the Projector component, set the Orthographic option as true and set Orthographic Size as
0.1. Finally, select LaserMaterial from the Material slot. - Test the scene. You will be able to see the laser aim dot, as shown:
- Now, let's create a material for the Line Renderer component that we are about to add. From the Project view, use the Create drop-down menu to add a new Material. Name it as Line_Mat.
- From the Inspector view, change the shader of the Line_Mat to Particles/Additive. Then, set its Tint Color to red (RGB:
255;0;0). - Import the
LineTextureimage file. Then, set it as the Particle Texture for the Line_Mat, as shown:
- Use the Create drop-down menu from Project view to add a C# script named
LaserAim. Then, open it in your editor. - Replace everything with the following code:
using UnityEngine; using System.Collections; public class LaserAim : MonoBehaviour { public float lineWidth = 0.2f; public Color regularColor = new Color (0.15f, 0, 0, 1); public Color firingColor = new Color (0.31f, 0, 0, 1); public Material lineMat; private Vector3 lineEnd; private Projector proj; private LineRenderer line; void Start () { line = gameObject.AddComponent<LineRenderer>(); line.material = lineMat; line.material.SetColor("_TintColor", regularColor); line.SetVertexCount(2); line.SetWidth(lineWidth, lineWidth); proj = GetComponent<Projector> (); } void Update () { RaycastHit hit; Vector3 fwd = transform.TransformDirection(Vector3.forward); if (Physics.Raycast (transform.position, fwd, out hit)) { lineEnd = hit.point; float margin = 0.5f; proj.farClipPlane = hit.distance + margin; } else { lineEnd = transform.position + fwd * 10f; } line.SetPosition(0, transform.position); line.SetPosition(1, lineEnd); if(Input.GetButton("Fire1")){ float lerpSpeed = Mathf.Sin (Time.time * 10f); lerpSpeed = Mathf.Abs(lerpSpeed); Color lerpColor = Color.Lerp(regularColor, firingColor, lerpSpeed); line.material.SetColor("_TintColor", lerpColor); } if(Input.GetButtonUp("Fire1")){ line.material.SetColor("_TintColor", regularColor); } } } - Save your script and attach it to the LaserProjector game object.
- Select the LaserProjector GameObject. From the Inspector view, find the Laser Aim component and fill the Line Material slot with the
Line_Matmaterial, as shown:
- Play the scene. The laser aim is ready, and looks as shown:

Note
In this recipe, the width of the laser beam and its aim dot have been exaggerated. Should you need a more realistic thickness for your beam, change the Line Width field of the Laser Aim component to
0.05, and the Orthographic Size of the Projector component to0.025. Also, remember to make the beam more opaque by setting the Regular Color of the Laser Aim component brighter.
The laser aim effect was achieved by combining two different effects: a Projector and Line Renderer.
A Projector, which can be used to simulate light, shadows, and more, is a component that projects a material (and its texture) onto other game objects. By attaching a projector to the Laser Pointer object, we have ensured that it will face the right direction at all times. To get the right, vibrant look, we have edited the projector material's Shader, making it brighter. Also, we have scripted a way to prevent projections from going through objects, by setting its Far Clip Plane on approximately the same level of the first object that is receiving the projection. The line of code that is responsible for this action is—proj.farClipPlane = hit.distance + margin;.
Regarding the Line Renderer, we have opted to create it dynamically, via code, instead of manually adding the component to the game object. The code is also responsible for setting up its appearance, updating the line vertices position, and changing its color whenever the fire button is pressed, giving it a glowing/pulsing look.
For more details on how the script works, don't forget to check out the commented code, available within the 1362_06_03 | End folder.