
The Mecanim animation system is capable of applying Root Motion to characters. In other words, it actually moves the character according to the animation clip, as opposed to arbitrarily translating the character model while playing an in-place animation cycle. This makes most of the Mixamo animation clips perfect for use with Mecanim.
Another feature of the animation system is Blend Trees, which can blend animation clips smoothly and easily. In this recipe, we will take advantage of these features to make our character walk/run forward and backwards, and also strafe right and left at different speeds.
For this recipe, we have prepared a Unity package named Character_02, containing a character and featuring a basic Animator Controller. The package can be found inside the 1362_07_02 folder, along with the .fbx files for the necessary animation clips.
To apply the Root Motion to your character using Blend Trees, follow these steps:
- Import
Character_02.unityPackageinto a new project. Also, importSwat@rifle_run, Swat@run_backwards, Swat@strafe, Swat@strafe_2, Swat@strafe_left, Swat@strafe_right, Swat@walking,and Swat@walking_backwards .fbxfiles. - We need to configure our animation clips. From the Project view, select Swat@rifle_run.
- Activate the Rig section. Change Animation Type to Humanoid and Avatar Definition to Create From this Model. Confirm by clicking on Apply.

- Now, activate the Animations section (to the right of Rig). Select the rifle_run clip (from the Clips list). The Preview area (at the bottom of the Inspector view) will display the message as No model is available for preview. Please drag a model into this Preview area. Drag MsLaser@T-Pose onto the Preview area to correct this.
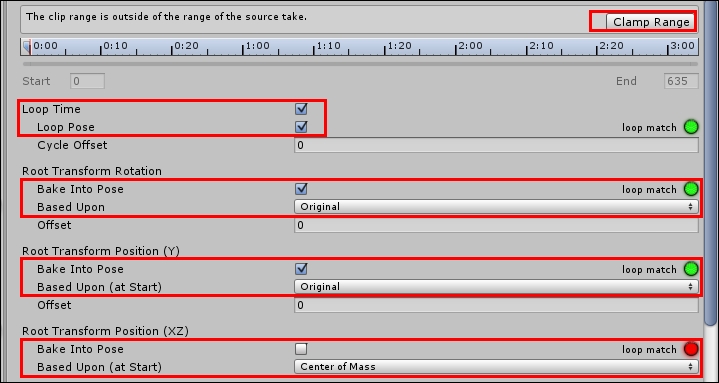
- With rifle_run selected from the Clips list, select the rifle_run clip (from the Clips list) and check the Loop Time and Loop Pose options. Also, click on the Clamp Range button to adjust the timeline to the actual time of the animation clip.
- Then, under Root Transform Rotation, check Bake Into Pose, and select Baked Upon (at Start) | Original. Under Root Transform Position (Y), check Bake Into Pose, and select Baked Upon | Original. Under Root Transform Position (XZ), leave Bake Into Pose unchecked, and select Baked Upon (at Start) | Center of Mass. Finally, click on Apply to confirm the changes.
- Repeat steps 3 to 6 for each one of the following animation clips: Swat@run_backwards, Swat@strafe, Swat@strafe_2, Swat@strafe_left, Swat@strafe_right, Swat@walking, and Swat@walking_backwards.
- From the Project view, select the MsLaser prefab and drag it onto the Hierarchy view, placing it on the scene.
- From the Hierarchy view, select the MsLaser GameObject and attach a Character Controller component to it (menu Component | Physics | Character Controller). Then, set its Skin Width as
0.0001, and its Center as X: 0, Y: 0.9, Z: 0; also change its Radius to 0.34 and its Height to 1.79.
- In the Project view, open the MainCharacter controller.
- In the top-left corner of the Animator view, activate the Parameters section and use the + sign to create three new Parameters (Float) named
xSpeed,zSpeed, andSpeed. - We do have an Idle state for our character, but we need the new ones. Right-click on the gridded area and, from the context menu, navigate to Create State | From New Blend Tree. Change its name, from the Inspector view, to
Move.
- Double-click on the Move state. You will see the empty blend tree that you have created. Select it and, in the Inspector view, rename it to
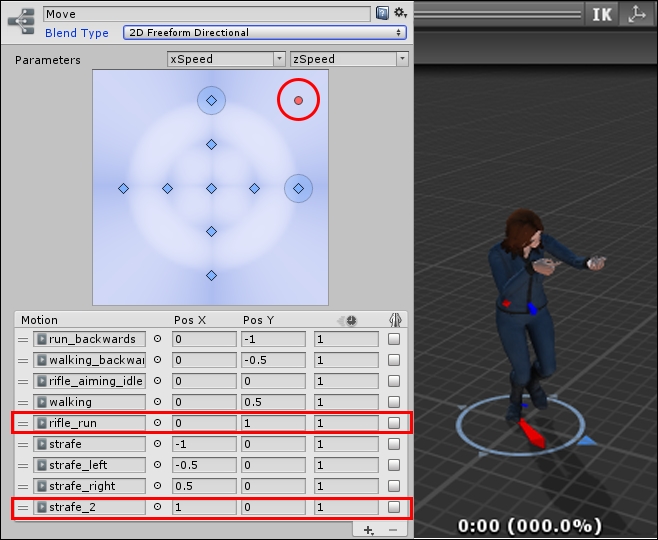
Move. Then, change its Blend Type to 2D Freeform Directional, also setting xSpeed and zSpeed in the Parameters tab. Finally, using the + sign from the bottom of the Motion list, add nine new Motion Fields.
- Now, populate the Motion list with the following motion clips and respective Pos X and Pos Y values: run_backwards,
0,-1; walking_backwards,0,-0.5; rifle_aiming_idle,0,0; walking,0,0.5; rifle_run,0,1; strafe,-1,0; strafe_left, -0.5,0; strafe_right,0.5,0; strafe_2,1,0. You can populate the Motion list by selecting it from the list or, if there are more than one clip with the same name, you can drag it from the Project view onto the slot (by expanding the appropriate model icon).
- Double-click on the gridded area to go from the Move blend tree back to the Base Layer.
- Since we have the
rifle_aiming_idleMotion clip within our Move blend tree, we can get rid of the original Idle state. Right-click on the Idle state box and, from the menu, select Delete. The Move blend state will become the new default state, turning orange.
- Now, we must create the script that will actually transform the player's input into those variables that are created to control the animation.
- From the Project view, create a new C# Script and name it as
BasicController. - Open your script and replace everything with the following code:
using UnityEngine; using System.Collections; public class BasicController: MonoBehaviour { private Animator anim; private CharacterController controller; public float transitionTime = .25f; private float speedLimit = 1.0f; public bool moveDiagonally = true; public bool mouseRotate = true; public bool keyboardRotate = false; void Start () { controller = GetComponent<CharacterController>(); anim = GetComponent<Animator>(); } void Update () { if(controller.isGrounded){ if (Input.GetKey (KeyCode.RightShift) ||Input.GetKey (KeyCode.LeftShift)) speedLimit = 0.5f; else speedLimit = 1.0f; float h = Input.GetAxis("Horizontal"); float v = Input.GetAxis("Vertical"); float xSpeed = h * speedLimit; float zSpeed = v * speedLimit; float speed = Mathf.Sqrt(h*h+v*v); if(v!=0 && !moveDiagonally) xSpeed = 0; if(v!=0 && keyboardRotate) this.transform.Rotate(Vector3.up * h, Space.World); if(mouseRotate) this.transform.Rotate(Vector3.up * (Input.GetAxis("Mouse X")) * Mathf.Sign(v), Space.World); anim.SetFloat("zSpeed", zSpeed, transitionTime, Time.deltaTime); anim.SetFloat("xSpeed", xSpeed, transitionTime, Time.deltaTime); anim.SetFloat("Speed", speed, transitionTime, Time.deltaTime); } } } - Save your script and attach it to the MsLaser GameObject in the Hierarchy view. Then, add Plane (menu option GameObject | 3D Object | Plane) and place it beneath the character.
- Play your scene and test the game. You will be able to control your character with the arrow keys (or WASD keys). Keeping the Shift key pressed will slow it down.
Whenever the BasicController script detects any directional keys in use, it sets the Speed variable of the Animator state to a value higher than 0, changing the Animator state from Idle to Move. The Move state, in its turn, blends the motion clips that it was populated with, according to the input values for xSpeed (obtained from Horizontal Axis input, typically A and D keys) and zSpeed (obtained from Vertical Axis input, typically W and S keys). Since Mecanim is capable of applying root motion to the characters, our character will actually move in the resulting direction.
For instance, if W and D keys are pressed, xSpeed and zSpeed values will rise to 1.0. From the Inspector view, it is possible to see that such combination will result in a blend between the motion clips called rifle_run and strafe_2, making the character run diagonally (front + right).
Our BasicController includes three checkboxes for more options: Move Diagonally—set as true, by default, which allows for blends between forward/backward and left/right clips; Mouse Rotate—set as true, by default, which allows for rotating the character with the mouse, changing their direction while moving; Keyboard Rotate—set as false, by default, which allows for rotating the character through simultaneous use of left/right and forward/backwards directional keys.
Our blend tree used the 2D Freeform Directional Blend Type. However, if we had only four animation clips (forward, backwards, left, and right), 2D Simple Directional would have been a better option. Learn more on the following links:
- Learn more about Blend Trees and 2D blending from Unity's Documentation at: http://docs.unity3d.com/Manual/BlendTree-2DBlending.html.
- Also, if you want to learn more about Mecanim Animation System, there are some links that you might want to check out, such as Unity's documentation at: http://docs.unity3d.com/Manual/AnimationOverview.html.
- Mecanim Example Scenes are available at Unity Asset Store at: https://www.assetstore.unity3d.com/en/#!/content/5328.
- Mecanim Video Tutorial are available at: http://unity3d.com/pt/learn/tutorials/topics/animation.