
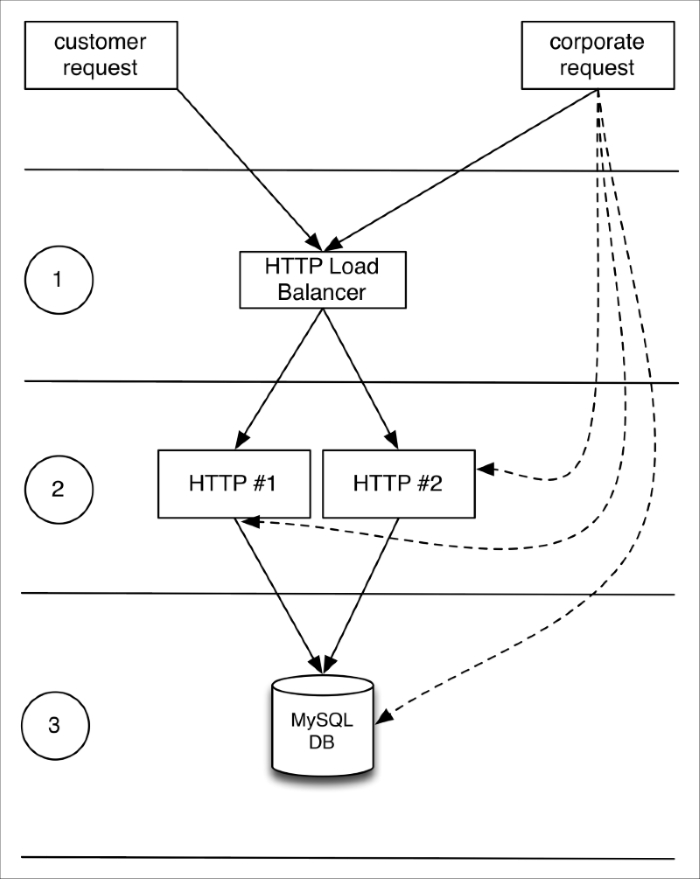
We'll provision a ready to use, three-tier, load-balanced web infrastructure on Google Compute Engine, using two CentOS 7.2 servers for the web and one master Google MySQL instance. The MySQL instance will allow connections only from the two web servers (with valid credentials), and all three instances (SQL and HTTP) will be accessible from a single corporate network (our company's network). The topology looks like this:
To step through this recipe, you will need the following:
- A working Terraform installation
- A Google Compute Engine account with a project
- An Internet connection
The first thing we need to do is to get our credentials from the console.
Navigate to your Google Cloud project, and in the API Manager, select Credentials | Create credentials | Service Account Key. Now choose Compute Engine default service account from the dropdown list, in the JSON format. Save this file as account.json at the root of the infrastructure repository.
Create the variables to define our credentials file in variables.tf, store the region we're running in, and the Google Compute project name:
variable "credentials_file" {
  default     = "account.json"
  description = "API credentials JSON file"
}
variable "region" {
  default     = "europe-west"
  description = "Region name"
}
variable "project_name" {
  default     = "default-project"
  description = "Project ID to use"
}
Don't forget to override those values in terraform.tfvars if you want to:
project_name = "iac-book-infra"
region = "us-east1"
Now, in a providers.tf file, add the google provider:
provider "google" {
  credentials = "${file("${var.credentials_file}")}"
  project     = "${var.project_name}"
  region      = "${var.region}"
}
Our google provider is now configured!
Here's the checklist of our requirements for these HTTP hosts:
- We want two of them
- Their type is
n1-standard-1(3.75 GB of RAM, one vCPU) - Their region and zone is: us-east1-d
- They are running CentOS 7.2 (official image is: centos-cloud/centos 7)
- The default SSH username is
centos - The SSH key known to us is (
keys/admin_key) - We want a fully updated system with Docker installed and running
Let's define generic variables for all these requirements in a variables.tf file:
variable "machine_type" {
  default     = "f1-micro"
  description = "Machine type"
}

variable "zone" {
  default     = "c"
  description = "Region Zone"
}

variable "disk_image" {
  default     = "centos-cloud/centos-7"
  description = "Disk image"
}

variable "ssh_key" {
  default     = "keys/admin_key"
  description = "SSH key"
}

variable "ssh_username" {
  default     = "root"
  description = "The SSH username to use"
}

variable "www_servers" {
  default = "2"
  description = "Amount of www servers"
}
Now let's override in terraform.tfvars the generic values we just set:
machine_type = "n1-standard-1"
zone = "d"
ssh_username = "centos"
Google Cloud instances are called from Terraform using the resource google_compute_instance:
Let's add what we already know in this resource:
resource "google_compute_instance" "www" {
  count        = "${var.www_servers}"
  name         = "www-${count.index+1}"
  machine_type = "${var.machine_type}"
  zone         = "${var.region}-${var.zone}"

  disk {
    image = "${var.disk_image}"
  }

  metadata {
    ssh-keys = "${var.ssh_username}:${file("${var.ssh_key}.pub")}"
  }
}
This could be enough, but we want to go much farther.
For example, we'll later add a firewall, whose rule will apply to a target defined by its tags. Let's add a tag right now, so we can use it later:
tags = ["www"]
We have to configure networking. It's necessary in our case to have a public IPv4, because we need to access the servers by SSH from outside. We might have chosen to not have publicly exposed servers and use a bastion host instead. To create a network interface in our default network, mapped behind a public IPv4, add the following to the google_compute_instance resource:
  network_interface {
    network = "default"

    access_config {
      nat_ip = ""
    }
  }
Let's finish by connecting automatically to each instance and fully update it, then install, enable, and start Docker. We do this using the remote-exec provisioner, correctly configured with the right SSH username and private key:
provisioner "remote-exec" {
    connection {
      user        = "${var.ssh_username}"
      private_key = "${file("${var.ssh_key}")}"
    }

    inline = [
      "sudo yum update -y",
      "sudo yum install -y docker",
      "sudo systemctl enable docker",
      "sudo systemctl start docker",
    ]
  }
We're finally done, with our two instances automatically provisioned!
Our goal is simple: we want to allow anyone (0.0.0.0/0) to access using HTTP (TCP port 80) any instance with the tag www in the default network. To do this, let's use the google_compute_firewall resource:
resource "google_compute_firewall" "fw" {
  name    = "www-firewall"
  network = "default"

  allow {
    protocol = "tcp"
    ports    = ["80"]
  }

  source_ranges = ["0.0.0.0/0"]
  target_tags   = ["www"]
}To load balance requests across our two instances, we'll need to create a pool of hosts, where membership will be handled by a simple health check: an HTTP GET on / every second, with an immediate timeout (1 second), and removal after 3 errors. We can do this in a file named pool.tf with the google_compute_http_health_check resource:
resource "google_compute_http_health_check" "www" {
  name                = "http"
  request_path        = "/"
  check_interval_sec  = 1
  healthy_threshold   = 1
  unhealthy_threshold = 3
  timeout_sec         = 1
}
Feel free to transform those values into variables for better tuning on your end!
Now, let's define the pool, which is defined by the results of the health checks and instances inclusion. This is done using the google_compute_target_pool resource:
resource "google_compute_target_pool" "www" {
  name          = "www-pool"
  instances     = ["${google_compute_instance.www.*.self_link}"]
  health_checks = ["${google_compute_http_health_check.www.name}"]
}Now we have our pool of hosts with health checks, let's create the load balancer itself. It's done using the google_compute_forwarding_rule resource, simply pointing to the pool of hosts we created earlier. Add the following in a loadbalancer.tf file:
resource "google_compute_forwarding_rule" "http" {
  name       = "http-lb"
  target     = "${google_compute_target_pool.www.self_link}"
  port_range = "80"
}Our typical target application needs a database to store and access data. We won't get into database replication here, but it can also be done quite simply with Terraform on Google Cloud.
Note
Double-check you have the SQL API activated in the Google Cloud Console: https://console.cloud.google.com/apis/library. By default, it isn't.
Here's a checklist of what we know about our MySQL database:
- It's running on us-east1 region
- It's running MySQL 5.6
- It's type is D2 (1 GB of RAM)
- Our own network and both HTTP servers can access it
- We want a database named
app_db - We want a user with a password to be allowed to connect from the HTTP servers
Let's put all these variables in the variables.tf file:
variable "db_type" {
  default     = "D0"
  description = "Google SQL DB type"
}

variable "db_authorized_network" {
  default     = "0.0.0.0/0"
  description = "A corporate network authorized to access the DB"
}

variable "db_username" {
  default     = "dbadmin"
  description = "A MySQL username"
}

variable "db_password" {
  default     = "changeme"
  description = "A MySQL password"
}

variable "db_name" {
  default     = "db_name"
  description = "MySQL database name"
}
Don't forget to override each generic value in the terraform.tfvars:
db_authorized_network = "163.172.161.158/32"
db_username = "sqladmin"
db_password = "pwd1970"
db_name = "app_db"
db_type = "D2"
Now we can build our database using the google_sql_database_instance resource in a db.tf file:
resource "google_sql_database_instance" "master" {
  name             = "mysql-mastr-1"
  region           = "${var.region}"
  database_version = "MYSQL_5_6"

  settings = {
    tier              = "${var.db_type}"
    activation_policy = "ALWAYS"         // vs "ON_DEMAND"
    pricing_plan      = "PER_USE"        // vs "PACKAGE"

    ip_configuration {
      ipv4_enabled = true

      authorized_networks {
        name  = "authorized_network"
        value = "${var.db_authorized_network}"
      }

      authorized_networks {
        name  = "${google_compute_instance.www.0.name}"
        value = "${google_compute_instance.www.0.network_interface.0.access_config.0.assigned_nat_ip}"
      }

      authorized_networks {
        name  = "${google_compute_instance.www.1.name}"
        value = "${google_compute_instance.www.1.network_interface.0.access_config.0.assigned_nat_ip}"
      }
    }
  }
}
Note
The pricing_plan "PACKAGE" is more interesting for a long-lasting database. Also, the authorized_network block doesn't currently support a count value, so we can't iterate dynamically over every HTTP host. For now, we have to duplicate the block, but that may very well change in a newer Terraform version.
Let's now create a database, using a google_sql_database resource:
resource "google_sql_database" "db" {
  name     = "${var.db_name}"
  instance = "${google_sql_database_instance.master.name}"
}
Finish by creating the SQL user with host restriction. Like the authorized_network block, the google_sql_user resource doesn't support a count value yet, so we have to duplicate the code for each HTTP server for now:
resource "google_sql_user" "user_www_1" {
  name     = "${var.db_username}"
  password = "${var.db_password}"
  instance = "${google_sql_database_instance.master.name}"
  host     = "${google_compute_instance.www.0.network_interface.0.access_config.0.assigned_nat_ip}"
}

resource "google_sql_user" "user_www_2" {
  name     = "${var.db_username}"
  password = "${var.db_password}"
  instance = "${google_sql_database_instance.master.name}"
  host     = "${google_compute_instance.www.1.network_interface.0.access_config.0.assigned_nat_ip}"
}It would be awesome to have some useful information such as IPs for all our instances and services and usernames and passwords. Let's add some outputs in outputs.tf:
output "HTTP Servers" {
  value = "${join(" ", google_compute_instance.www.*.network_interface.0.access_config.0.assigned_nat_ip)}"
}

output "MySQL DB IP" {
  value = "${google_sql_database_instance.master.ip_address.0.ip_address}"
}

output "Load Balancer Public IPv4" {
  value = "${google_compute_forwarding_rule.http.ip_address}"
}

output "DB Credentials" {
  value = "Username=${var.db_username} Password=${var.db_password}"
}$ terraform apply [...] Outputs: DB Credentials = Username=sqladmin Password=pwd1970 HTTP Servers = 104.196.180.192 104.196.157.246 Load Balancer Public IPv4 = 104.196.45.46 MySQL DB IP = 173.194.111.120
Simply deploy our application on the HTTP servers and we're done! To test drive the load balancer and the HTTP instances, you can simply deploy the NGINX container on each server and see the traffic flow:
$ sudo docker run -it --rm -p 80:80 --name web nginx