The Document Object Model (DOM) is a convention created by W3C in 1998 for documents written in HTML, XHTML, and XML in an object tree, which is used by the browsers throughout the rendering process. By means of the DOM API, it is possible to traverse the hierarchical structure of the tree to access and manipulate information.
Every time we access a web page, the browser sends a request to the server and then waits for the response. Once the content of the HTML document is received, the browser starts the analysis and the parse process in order to build the DOM tree. When the tree building is done, the AngularJS compiler comes in and starts to go through it, looking into the elements for special kinds of attributes known as directives.
The following diagram describes the bootstrapping process of the framework that is performed during the compilation process:
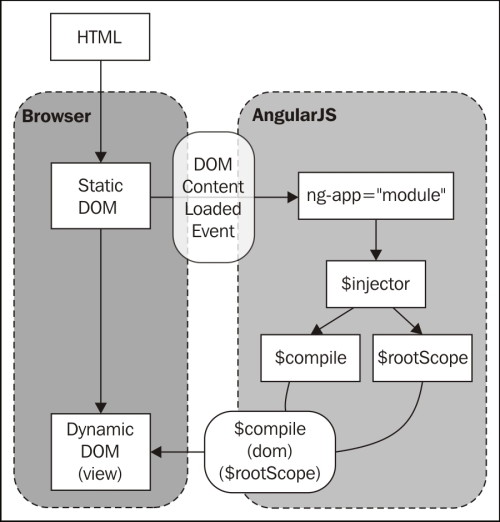
Source: Official documentation (www.angularjs.org)
This Lesson will present everything about directives, which is one of the most important features of AngularJS. Also, we will create our own directives step by step. The following are the topics that we'll be covering in this Lesson:
- What is a directive?
- Using built-in directives of AngularJS
- Refactoring application organization
- Creating our own directives
- Animation
A directive is an extension of the HTML vocabulary that allows us to create new behaviors. This technology lets the developers create reusable components that can be used within the whole application and even provide their own custom components.
The directive can be applied as an attribute, element, class, and even as a comment, using the camelCase syntax. However, because HTML is case insensitive, we can use a lowercase form.
For the ngModel directive, we can use ng-model, ng:model, ng_model, data-ng-model, and x-ng-model in the HTML markup.
By default, a framework brings with it a basic set of directives such as iterate over an array, execute a custom behavior when an element is clicked, or even show a given element based on a conditional expression, and many others.
The ngApp directive is the first directive we need to understand because it defines the root of an AngularJS application. Applied to one of the elements, in general HTML or body, this directive is used to bootstrap the framework. We can use it without any parameter, thereby indicating that the application will be bootstrapped in the automatic mode, as shown in the following code:
index.html

<!doctype html>
<html ng-app>
  <head>
    <title>[Packt] Parking</title>
    <script src="angular.js"></script>
  </head>
  <body>
  </body>
</html>
However, it is recommended that you provide a module name, defining the entry point of the application in which other components such as controllers, services, filters, and directives can be bound, as shown in the following code:
index.html

<!doctype html>
<html ng-app="parking">
  <head>
    <title>[Packt] Parking</title>
    <script src="angular.js"></script>
    <script>
      var parking = angular.module("parking", []);
    </script>
  </head>
  <body>
  </body>
</html>
There can be only one ngApp directive in the same HTML document that will be loaded and bootstrapped by the framework automatically. However, it's possible to have others as long as you manually bootstrap them.
In our first application in Lesson 1, Getting Started with AngularJS, we used a controller called parkingCtrl. We can attach any controller to the view using the ngController directive. After using this directive, the view and controller start to share the same scope and are ready to work together, as shown in the following code:
index.html

<!doctype html>
<html ng-app="parking">
  <head>
    <title>[Packt] Parking</title>
    <script src="angular.js"></script>
    <script>
      var parking = angular.module("parking", []);
      parking.controller("parkingCtrl", function ($scope) {
      });
    </script>
  </head>
  <body ng-controller="parkingCtrl">
  </body>
</html>
There is another way to attach a controller to a specific view. In the following Lessons, we will learn how to create a single-page application using the $route service. To avoid undesired duplicated behavior, remember to avoid the ngController directive while using the $route service.
Sometimes, our controller can become too complex, and it might be interesting to split the behavior into separated controllers. This can be achieved by creating nested controllers, which means registering controllers that will work only inside a specific element of the view, as shown in the following code:
<body ng-controller="parkingCtrl">
  <div ng-controller="parkingNestedCtrl">
  </div>
</body>
The scope of the nested controllers will inherit all the properties of the outside scope, overriding it in case of equality.
The ngBind directive is generally applied to a span element and replaces the content of the element with the results of the provided expression. It has the same meaning as that of the double curly markup, for example, {{expression}}.
Why would anyone like to use this directive when a less verbose alternative is available? This is because when the page is being compiled, there is a moment when the raw state of the expressions is shown. Since the directive is defined by the attribute of the element, it is invisible to the user. We will learn these expressions in Lesson 3, Data Handling. The following is an example of the ngBind directive usage:
index.html

<!doctype html>
<html ng-app="parking">
  <head>
    <title>[Packt] Parking</title>
    <script src="angular.js"></script>
    <script>
      var parking = angular.module("parking", []);
      parking.controller("parkingCtrl", function ($scope) {
        $scope.appTitle = "[Packt] Parking";
      });
    </script>
  </head>
  <body ng-controller="parkingCtrl">
    <h3 ng-bind="appTitle"></h3>
  </body>
</html>Sometimes, it might be necessary to bind a string of raw HTML. In this case, the ngBindHtml directive can be used in the same way as ngBind; however, the only difference will be that it does not escape the content, which allows the browser to interpret it as shown in the following code:
index.html

<!doctype html>
<html ng-app="parking">
  <head>
    <title>[Packt] Parking</title>
    <script src="angular.js"></script>
    <script src="angular-sanitize.js"></script>
    <script>
      var parking = angular.module("parking", ['ngSanitize']);
      parking.controller("parkingCtrl", function ($scope) {
        $scope.appTitle = "<b>[Packt] Parking</b>";
      });
    </script>
  </head>
  <body ng-controller="parkingCtrl">
    <h3 ng-bind-html="appTitle"></h3>
  </body>
</html>
In order to use this directive, we will need the angular-sanitize.js dependency. It brings the ngBindHtml directive and protects the application against common cross-site scripting (XSS) attacks.
The ngRepeat directive is really useful to iterate over arrays and objects. It can be used with any kind of element such as the rows of a table, the elements of a list, and even the options of select.
We must provide a special repeat expression that describes the array to iterate over the variable that will hold each item in the iteration. The most basic expression format allows us to iterate over an array, attributing each element to a variable:
variable in array
In the following code, we will iterate over the cars array and assign each element to the car variable:
index.html

<!doctype html>
<html ng-app="parking">
  <head>
    <title>[Packt] Parking</title>
    <script src="angular.js"></script>
    <script>
      var parking = angular.module("parking", []);
      parking.controller("parkingCtrl", function ($scope) {
        $scope.appTitle = "[Packt] Parking";

        $scope.cars = [];
      });
    </script>
  </head>
  <body ng-controller="parkingCtrl">
    <h3 ng-bind="appTitle"></h3>
    <table>
      <thead>
        <tr>
          <th>Plate</th>
          <th>Entrance</th>
        </tr>
      </thead>
      <tbody>
        <tr ng-repeat="car in cars">
          <td><span ng-bind="car.plate"></span></td>
          <td><span ng-bind="car.entrance"></span></td>
        </tr>
      </tbody>
    </table>
  </body>
</html>
Also, it's possible to use a slightly different expression to iterate over objects:
(key, value) in object
Beyond iterating, we might need to identify which is the first or the last element, what is its index number, and many other things. This can be achieved by using the following properties:
|
Variable |
Type |
Details |
|---|---|---|
|
|
number |
Number of the element |
|
|
Boolean |
This is true if the element is the first one |
|
|
Boolean |
This is true if the element is the last one |
|
|
Boolean |
This is true if the element is in the middle |
|
|
Boolean |
This is true if the element is even |
|
|
Boolean |
This is true if the element is odd |
The ngModel directive attaches the element to a property in the scope, thus binding the view to the model. In this case, the element can be input (all types), select, or textarea, as shown in the following code:
  <input
    type="text"
    ng-model="car.plate"
    placeholder="What's the plate?"
  />
There is an important piece of advice regarding the use of this directive. We must pay attention to the purpose of the field that is using the ngModel directive. Every time the field is a part of the construction of an object, we must declare the object in which the property should be attached. In this case, the object that is being constructed is a car; so, we will use car.plate inside the directive expression.
However, sometimes it may so happen that there is an input field that is just used to change a flag, allowing the control of the state of a dialog or another UI component. In this case, we can use the ngModel directive without any object as long as it will not be used together with other properties or even persisted.
In Lesson 5, Scope, we will go through the two-way data binding concept. It is very important to understand how the ngModel directive works behind the scenes.
The ngClick directive is one of the most useful kinds of directives in the framework. It allows you to bind any custom behavior to the click event of the element. The following code is an example of the usage of the ngClick directive calling a function:
index.html

<!doctype html>
<html ng-app="parking">
  <head>
    <title>[Packt] Parking</title>
    <script src="angular.js"></script>
    <script>
      var parking = angular.module("parking", []);
      parking.controller("parkingCtrl", function ($scope) {
        $scope.appTitle = "[Packt] Parking";

        $scope.cars = [];

        $scope.park = function (car) {
          car.entrance = new Date();
          $scope.cars.push(car);
          delete $scope.car;
        };
      });
    </script>
  </head>
  <body ng-controller="parkingCtrl">
    <h3 ng-bind="appTitle"></h3>
    <table>
      <thead>
        <tr>
          <th>Plate</th>
          <th>Entrance</th>
        </tr>
      </thead>
      <tbody>
        <tr ng-repeat="car in cars">
          <td><span ng-bind="car.plate"></span></td>
          <td><span ng-bind="car.entrance"></span></td>
        </tr>
      </tbody>
    </table>
    <input
      type="text"
      ng-model="car.plate"
      placeholder="What's the plate?"
    />
    <button ng-click="park(car)">Park</button>
  </body>
</html>
In the preceding code, there is another pitfall. Inside the ngClick directive, we will call the park function, passing car as a parameter. As long as we have access to the scope through the controller, it would not be easy if we just accessed it directly, without passing any parameter at all.
Keep in mind that we must take care of the coupling level between the view and the controller. One way to keep it low is to avoid reading the scope object directly from the controller and replacing this intention by passing everything it needs with the parameter from the view. This will increase controller testability and also make the things more clear and explicit.
Other directives that have the same behavior but are triggered by other events are ngBlur, ngChange, ngCopy, ngCut, ngDblClick, ngFocus, ngKeyPress, ngKeyDown, ngKeyUp, ngMousedown, ngMouseenter, ngMouseleave, ngMousemove, ngMouseover, ngMouseup, and ngPaste.
The ngDisable directive can disable elements based on the Boolean value of an expression. In this next example, we will disable the button when the variable is true:
  <button
    ng-click="park(car)"
    ng-disabled="!car.plate"
  >
    Park
  </button>
In Lesson 3, Data Handling, we will learn how to combine this directive with validation techniques.
The ngClass directive is used every time you need to dynamically apply a class to an element by providing the name of the class in a data-binding expression. The following code shows the application of the ngClass directive:
index.html

<!doctype html>
<html ng-app="parking">
  <head>
    <title>[Packt] Parking</title>
    <script src="angular.js"></script>
    <script>
      var parking = angular.module("parking", []);
      parking.controller("parkingCtrl", function ($scope) {
        $scope.appTitle = "[Packt] Parking";

        $scope.cars = [];

        $scope.park = function (car) {
          car.entrance = new Date();
          $scope.cars.push(car);
          delete $scope.car;
        };
      });
    </script>
    <style>
      .selected {
        background-color: #FAFAD2;
      }
    </style>
  </head>
  <body ng-controller="parkingCtrl">
    <h3 ng-bind="appTitle"></h3>
    <table>
      <thead>
        <tr>
          <th></th>
          <th>Plate</th>
          <th>Entrance</th>
        </tr>
      </thead>
      <tbody>
        <tr
          ng-class="{selected: car.selected}"
          ng-repeat="car in cars"
        >
          <td><input type="checkbox" ng-model="car.selected"/></td>
          <td><span ng-bind="car.plate"></span></td>
          <td><span ng-bind="car.entrance"></span></td>
        </tr>
      </tbody>
    </table>
    <input
      type="text"
      ng-model="car.plate"
      placeholder="What's the plate?"
    />
    <button
      ng-click="park(car)"
      ng-disabled="!car.plate"
    >
      Park
    </button>
  </body>
</html>
The ngRepeat directive can be used to create the options of a select element; however, there is a much more recommended directive that should be used for this purpose—the ngOptions directive.
Through an expression, we need to indicate the property of the scope from which the directive will iterate, the name of the temporary variable that will hold the content of each loop's iteration, and the property of the variable that should be displayed.
In the following example, we have introduced a list of colors:
index.html

<!doctype html>
<html ng-app="parking">
  <head>
    <title>[Packt] Parking</title>
    <script src="angular.js"></script>
    <script>
      var parking = angular.module("parking", []);
      parking.controller("parkingCtrl", function ($scope) {
        $scope.appTitle = "[Packt] Parking";

        $scope.cars = [];

        $scope.colors = ["White", "Black", "Blue", "Red", "Silver"];

        $scope.park = function (car) {
          car.entrance = new Date();
          $scope.cars.push(car);
          delete $scope.car;
        };
      });
    </script>
    <style>
      .selected {
        background-color: #FAFAD2;
      }
    </style>
  </head>
  <body ng-controller="parkingCtrl">
    <h3 ng-bind="appTitle"></h3>
    <table>
      <thead>
        <tr>
          <th></th>
          <th>Plate</th>
          <th>Color</th>
          <th>Entrance</th>
        </tr>
      </thead>
      <tbody>
        <tr
          ng-class="{selected: car.selected}"
          ng-repeat="car in cars"
        >
          <td><input type="checkbox" ng-model="car.selected"/></td>
          <td><span ng-bind="car.plate"></span></td>
          <td><span ng-bind="car.color"></span></td>
          <td><span ng-bind="car.entrance"></span></td>
        </tr>
      </tbody>
    </table>
    <input
      type="text"
      ng-model="car.plate"
      placeholder="What's the plate?"
    />
    <select
      ng-model="car.color"
      ng-options="color for color in colors"
    >
      Pick a color
    </select>
    <button
      ng-click="park(car)"
      ng-disabled="!car.plate || !car.color"
    >
      Park
    </button>
  </body>
</html>The ngStyle directive is used to supply the dynamic style configuration demand. It follows the same concept used with the ngClass directive; however, here we can directly use the style properties and its values:
<td>
  <span ng-bind="car.color" ng-style="{color: car.color}">
  </span>
</td>
The ngShow directive changes the visibility of an element based on its display property:
  <div ng-show="cars.length > 0">
    <table>
      <thead>
        <tr>
          <th></th>
          <th>Plate</th>
          <th>Color</th>
          <th>Entrance</th>
        </tr>
      </thead>
      <tbody>
        <tr
          ng-class="{selected: car.selected}"
          ng-repeat="car in cars"
        >
          <td><input type="checkbox" ng-model="car.selected"/></td>
          <td><span ng-bind="car.plate"></span></td>
          <td><span ng-bind="car.color"></span></td>
          <td><span ng-bind="car.entrance"></span></td>
        </tr>
      </tbody>
    </table>
  </div>
  <div ng-hide="cars.length > 0">
    The parking lot is empty
  </div>
Depending on the implementation, you can use the complementary ngHide directive of ngShow.
The nglf directive could be used in the same way as the ngShow directive; however, while the ngShow directive just deals with the visibility of the element, the ngIf directive prevents the rendering of an element in our template.
AngularJS provides a way to include other external HTML fragments in our pages. The ngInclude directive allows the fragmentation and reuse of the application layout and is an important concept to explore.
The following is an example code for the usage of the ngInclude directive:
<div ng-include="'menu.html'"></div>
As long as our application grows with the creation of new components such as directives, the organization of the code needs to evolve. As we saw in the Organizing the code section in Lesson 1, Getting Started with AngularJS, we used the inline style; however, now we will use the stereotyped style, as shown in the following code:
index.html

<!doctype html>
<html ng-app="parking">
  <head>
<title>[Packt] Parking</title>
<script src="js/lib/angular.js"></script>
<script src="js/app.js"></script>
<script src="js/controllers.js"></script>
<script src="js/directives.js"></script>
<link rel="stylesheet" type="text/css" href="css/app.css">
  </head>
  <body ng-controller="parkingCtrl">
    <h3 ng-bind="appTitle"></h3>
    <div ng-show="cars.length > 0">
      <table>
        <thead>
          <tr>
            <th></th>
            <th>Plate</th>
            <th>Color</th>
            <th>Entrance</th>
          </tr>
        </thead>
        <tbody>
          <tr
            ng-class="{selected: car.selected}"
            ng-repeat="car in cars"
          >
            <td>
              <input
                type="checkbox"
                ng-model="car.selected"
              />
         </td>
            <td><span ng-bind="car.plate"></span></td>
            <td><span ng-bind="car.color"></span></td>
            <td><span ng-bind="car.entrance"></span></td>
          </tr>
        </tbody>
      </table>
    </div>
    <div ng-hide="cars.length > 0">
      The parking lot is empty
    </div>
    <input
      type="text"
      ng-model="car.plate"
      placeholder="What's the plate?"
    />
    <select
      ng-model="car.color"
      ng-options="color for color in colors"
    >
      Pick a color
    </select>
    <button
      ng-click="park(car)"
      ng-disabled="!car.plate || !car.color"
     >
       Park
    </button>
  </body>
</html>

app.js

var parking = angular.module("parking", []);

controllers.js

parking.controller("parkingCtrl", function ($scope) {
  $scope.appTitle = "[Packt] Parking";

  $scope.cars = [];

  $scope.colors = ["White", "Black", "Blue", "Red", "Silver"];

  $scope.park = function (car) {
    car.entrance = new Date();
    $scope.cars.push(car);
    delete $scope.car;
  };
});Now that we have already studied a bunch of built-in directives of a framework, it's time to create our own reusable components! First, we need to know how to register a new directive into our module.
Basically, it's the same process that we use for the controller; however, the directives require the creation of something called Directive Definition Object that will be used to configure the directive's behavior:
parking.directive("directiveName", function () {
  return {
  };
});
Our first challenge involves the creation of an alert component. Following this, there is an image of the component that we are going to create together step by step:
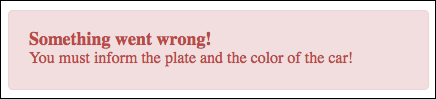
The original code consists of a group of elements associated with some styles. Our mission is to transform this code into a reusable directive using the following directive configuration properties: template, templateUrl, replace, restrict, scope, and transclude:
<div class="alert">
  <span class="alert-topic">
    Something went wrong!
  </span>
  <span class="alert-description">
    You must inform the plate and the color of the car!
  </span>
</div>Imagine the number of times you have had the same snippet of the HTML code repeated over your application code. In the following code snippet, we are going to create a new directive with the code to reuse this:
index.html

<div alert></div>

directives.js

parking.directive("alert", function () {
  return {
    template:   "<div class='alert'>" +
        "<span class='alert-topic'>" +
          "Something went wrong!" +
        "</span>" +
        "<span class='alert-description'>" +
          "You must inform the plate and the color of the car!" +
        "</span>" +
      "</div>"
  };
});
The output, after AngularJS has compiled the directive, is the following:
<div alert="">
  <div class="alert">
    <span class="alert-topic">
      Something went wrong!
    </span>
    <span class="alert-description">
      You must inform the plate and the color of the car!
    </span>
  </div>
</div>There is another way to achieve the same goal with more quality. We just need to move the HTML snippet to an isolated file and bind it using the templateUrl property, as shown in the following code snippet:
index.html

<div alert></div>

directives.js

parking.directive("alert", function () {
  return {
    templateUrl: "alert.html"
  });

alert.html

<div class="alert">
  <span class="alert-topic">
  Something went wrong!
  </span>
  <span class="alert-description">
    You must inform the plate and the color of the car!
  </span>
</div>Sometimes it might be interesting to discard the original element, where the directive was attached, replacing it by the directive's template. This can be done by enabling the replace property:
directives.js

parking.directive("alert", function () {
  return {
    templateUrl: "alert.html",
    replace: true
  };
});
The following code is the compiled directive without the original element:
<div class="alert" alert="">
  <span class="alert-topic">
    Something went wrong!
  </span>
  <span class="alert-description">
    You must inform the plate and the color of the car!
  </span>
</div>We attached our first directive by defining it as an attribute of the element. However, when we create a new directive as a reusable component, it doesn't make much sense. In this case, a better approach can restrict the directive to be an element.
By default, the directives are restricted to be applied as an attribute to a determined element, but we can change this behavior by declaring the restriction property inside our directive configuration object. The following table shows the possible values for the restriction property:
|
Restriction property |
Values |
Usage |
|---|---|---|
|
Attribute (default) |
|
|
|
Element name |
|
|
|
Class |
|
|
|
Comment |
|
|
Now, we just need to include this property in our directive, as shown in the following snippet:
index.html

<alert></alert>

directives.js

parking.directive("alert", function () {
return {
  restrict: 'E',
  templateUrl: "alert.html",
  replace: true
};
});
Also, it is possible to combine more than one restriction at the same time by just using a subset combination of EACM. If the directive is applied without the restrictions configuration, it will be ignored by the framework.
Our alert component is almost ready but it has a problem! The topic and the description are hardcoded inside the component.
The best thing to do is to pass the data that needs to be rendered as a parameter. In order to achieve this, we need to create a new property inside our directive configuration object called scope.
There are three ways to configure the directive scope:
|
Prefix |
Details |
|---|---|
|
|
This prefix passes the data as a string. |
|
|
This prefix creates a bidirectional relationship between a controller's scope property and a local scope directive property. |
|
|
This prefix binds the parameter with an expression in the context of the parent scope. It is useful if you would like to provide some outside functions to the directive. |
In the following code snippet, we will configure some parameters inside the alert directive:
index.html

<alert
  topic="Something went wrong!"
  description="You must inform the plate and the color of the car!"
>
</alert>

directives.js

parking.directive("alert", function () {
  return {
    restrict: 'E',
  scope: {
    topic: '@topic',
    description: '@description'
  },
  templateUrl: "alert.html",
  replace: true
};
});

alert.html

<div class="alert">
  <span class="alert-topic">
    <span ng-bind="topic"></span>
  </span>
  <span class="alert-description">
    <span ng-bind="description"></span>
  </span>
</div>
The left-hand side contains the name of the parameter available inside the directive's scope to be used in the template. The right-hand side contains the name of the attribute declared in the element, whose value will contain the expression to link to the property on the directive's template. By prefixing it with @, the literal value will be used as a parameter.
Following this, we are using the = prefix in order to create a bidirectional relationship between the controller and the directive. It means that every time anything changes inside the controller, the directive will reflect these changes:
index.html

<alert
  topic="alertTopic"
  description="descriptionTopic"
>
</alert>

controllers.js
parking.controller("parkingCtrl", function ($scope) {
  $scope.appTitle = "[Packt] Parking";
  $scope.alertTopic = "Something went wrong!";
  $scope.alertMessage = "You must inform the plate and the color of the car!";
});

directives.js
parking.directive("alert", function () {
  return {
    restrict: 'E',
  scope: {
    topic: '=topic',
    description: '=description'
  },
  templateUrl: "alert.html",
  replace: true
};
});
The last situation is when we need to execute something within the context of the parent scope. It could be achieved using the & prefix. In the following example, we are passing a function called closeAlert to the directive, defined by the controller to close the alert box:
index.html

<alert
  ng-show="showAlert"
  topic="alertTopic"
  description="descriptionTopic"
  close="closeAlert()"
>
</alert>

controllers.js
parking.controller("parkingCtrl", function ($scope) {
  $scope.appTitle = "[Packt] Parking";
  $scope.showAlert = true;
  $scope.alertTopic = "Something went wrong!";
  $scope.descriptionTopic = "You must inform the plate and the color of the car!";
  $scope.closeAlert = function () {
    $scope.showAlert = false;
  };
});

directives.js

parking.directive("alert", function () {
  return {
    restrict: 'E',
  scope: {
    topic: '=topic',
    description: '=description',
    close: '&close'
  },
  templateUrl: "alert.html",
  replace: true
};
});

alert.html

<div class="alert">
  <span class="alert-topic">
    <span ng-bind="topic"></span>
  </span>
  <span class="alert-description">
    <span ng-bind="description"></span>
  </span>
  <a href="" ng-click="close()">Close</a>
</div>
Note that if the name of the directive's scope property is the same as of the expression, we can keep just the prefix. By convention, the framework will consider the name to be the identical to the scope property name. Our last directive can be written as follows:
directives.js

parking.directive("alert", function () {
  return {
    restrict: 'E',
  scope: {
    topic: '=',
    description: '=',
    close: '&'
  },
  templateUrl: "alert.html",
  replace: true
};
});There are components that might need to wrap other elements in order to decorate them, such as alert, tab, modal, or panel. To achieve this goal, it is necessary to fall back upon a directive feature called transclude. This feature allows us to include the entire snippet from the view than just deal with the parameters. In the following code snippet, we will combine the scope and transclude strategies in order to pass parameters to the directive:
index.html

<alert topic="Something went wrong!">
  You must inform the plate and the color of the car!
</alert>

directives.js

parking.directive("alert", function () {
  return {
    restrict: 'E',
  scope: {
    topic: '@'
  },
  templateUrl: "alert.html",
  replace: true,
  transclude: true
  };
});

alert.html

<div class="alert">
  <span class="alert-topic">
    {{topic}}
  </span>
  <span class="alert-description" ng-transclude>
  </span>
</div>
Our second challenge involves the creation of an accordion component.
The next properties that we are going to study are considered more complex and reserved for advanced components. They are required every time we need to deal with the DOM or interact with other directives. These properties are link, require, controller, and compile.
Another important feature while creating directives is the ability to access the DOM in order to interact with its elements. To achieve this mission, we need to implement a function called link in our directive. The link function is invoked after the framework is compiled, and it is recommended that you add behavior to the directive. It takes five arguments as follows:
scope: This is the scope object of the directiveelement: This is the element instance of directiveattrs: This is the list of attributes declared within the directive's elementctrl: This is the controller of therequiredirective, and it will be available only if it is used with therequirepropertytranscludeFn: This is the transclude function
The following code shows the accordion directive using the link function:
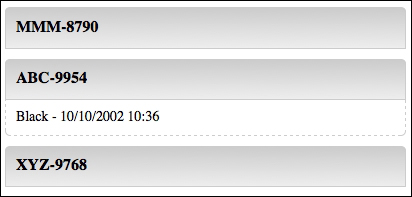
index.html

<accordion-item title="MMM-8790">
  White - 10/10/2002 10:00
</accordion-item>
<accordion-item title="ABC-9954">
  Black - 10/10/2002 10:36
</accordion-item>
<accordion-item title="XYZ-9768">
  Blue - 10/10/2002 11:10
</accordion-item>

directives.js
parking.directive("accordionItem", function () {
  return {
    templateUrl: "accordionItem.html",
    restrict: "E",
    scope: {
      title: "@"
    },
    transclude: true,
    link: function (scope, element, attrs, ctrl, transcludeFn) {
      element.bind("click", function () {
        scope.$apply(function () {
          scope.active = !scope.active;
        });
      });
    }
  };
});

accordionItem.html

<div class='accordion-item'>
  {{title}}
</div>
<div ng-show='active' class='accordion-description' ng-transclude>
</div>The require property is used to inject another directive controller as the fourth parameter of the link function. It means that using this property, we are able to communicate with the other directives. Some of the parameters are shown in the following table:
In our last example, each accordion is independent. We can open and close all of them at our will. This property might be used to create an algorithm that closes all the other accordions as soon as we click on each of them:
index.html

<accordion>
  <accordion-item title="MMM-8790">
    White - 10/10/2002 10:00
  </accordion-item>
  <accordion-item title="ABC-9954">
    Black - 10/10/2002 10:36
  </accordion-item>
  <accordion-item title="XYZ-9768">
    Blue - 10/10/2002 11:10
  </accordion-item>
</accordion>

directives.html

parking.directive("accordion", function () {
  return {
    template: "<div ng-transclude></div>",
  restrict: "E",
  transclude: true
  };
});

parking.directive("accordionItem", function () {
  return {
    templateUrl: "accordionItem.html",
    restrict: "E",
    scope: {
      title: "@"
    },
    transclude: true,
    require: "^accordion",
    link: function (scope, element, attrs, ctrl, transcludeFn) {
      element.bind("click", function () {
        scope.$apply(function () {
          scope.active = !scope.active;
        });
      });
    }
  };
});
Now, we need to define the controller inside the accordion directive; otherwise, an error will be thrown that says the controller can't be found.
The controller is pretty similar to the link function and has almost the same parameters, except itself. However, the purpose of the controller is totally different. While it is recommended that you use the link to bind events and create behaviors, the controller should be used to create behaviors that will be shared with other directives by means of the require property:
directives.js

parking.directive("accordion", function () {
  return {
    template: "<div ng-transclude></div>",
  restrict: "E",
  transclude: true,
    controller: function ($scope, $element, $attrs, $transclude) {
      var accordionItens = [];

      var addAccordionItem = function (accordionScope) {
        accordionItens.push(accordionScope);
      };

      var closeAll = function () {
        angular.forEach(accordionItens, function (accordionScope) {
          accordionScope.active = false;
        });
      };

      return {
        addAccordionItem: addAccordionItem,
        closeAll: closeAll
      };
    }
  };
});

parking.directive("accordionItem", function () {
  return {
    templateUrl: "accordionItem.html",
    restrict: "E",
    scope: {
      title: "@"
    },
    transclude: true,
    require: "^accordion",
    link: function (scope, element, attrs, ctrl, transcludeFn) {
      ctrl.addAccordionItem(scope);
      element.bind("click", function () {
        ctrl.closeAll();
        scope.$apply(function () {
          scope.active = !scope.active;
        });
      });
    }
  };
});During the compilation phase, the framework compiles each directive such that it is available to be attached to the template. The compile function is called once, during the compilation step and might be useful to transform the template, before the link phase.
However, since it is not used very often, we will not cover it in this book. To get more information about this directive, you could go to the AngularJS $compile documentation at https://docs.angularjs.org/api/ng/service/$compile.
The framework offers a very interesting mechanism to hook specific style classes to each step of the life cycle of some of the most used directives such as ngRepeat, ngShow, ngHide, ngInclude, ngView, ngIf, ngClass, and ngSwitch.
The first thing that we need to do in order to start is import the angular-animation.js file to our application. After that, we just need to declare it in our module as follows:
app.js

var parking = angular.module("parking", ["ngAnimate"]);The AngularJS animation uses CSS transitions in order to animate each kind of event such as when we add a new element the array that is being iterated by ngRepeat or when something is shown or hidden through the ngShow directive.
Based on this, it's time to check out the supported directives and their events:
|
Event |
From |
To |
Directives |
|---|---|---|---|
|
|
|
|
|
|
|
|
|
|
|
|
|
|
|
|
|
|
|
|
|
|
|
|
|
|
|
|
|
|
|
|
|
|
|
This means that every time a new element is rendered by an ngRepeat directive, the .ng-enter class is attached to the element and kept there until the transition is over. Right after this, the .ng-enter-active class is also attached, triggering the transition.
This is quite a simple mechanism, but we need to pay careful attention in order to understand it.
The following code is a simple example where we will animate the enter event of the ngRepeat directive:
app.css

.ng-enter {
  -webkit-transition: all 5s linear;
  -moz-transition: all 5s linear;
  -ms-transition: all 5s linear;
  -o-transition: all 5s linear;
  transition: all 5s linear;
  opacity: 0;
}

.ng-enter-active {
  opacity: 1;
}
That's all! With this configuration in place, every time a new element is rendered by an ngRepeat directive, it will respect the transition, appearing with a 5 second, linear, fade-in effect from the opacity 0 to 1.
For the opposite concept, we can follow the same process. Let's create a fade-out effect by means of the .ng-leave and .ng-leave-active classes:
app.css

.ng-leave {
  -webkit-transition: all 5s linear;
  -moz-transition: all 5s linear;
  -ms-transition: all 5s linear;
  -o-transition: all 5s linear;
  transition: all 5s linear;
  opacity: 1;
}

.ng-leave-active {
  opacity: 0;
}To animate the ngHide directive, we need to follow the same previous steps, however, using the .ng-hide-add and .ng-hide-add-active classes:
app.css

.ng-hide-add {
  -webkit-transition: all 5s linear;
  -moz-transition: all 5s linear;
  -ms-transition: all 5s linear;
  -o-transition: all 5s linear;
  transition: all 5s linear;
  opacity: 1;
}

.ng-hide-add-active {
  display: block !important;
  opacity: 0;
}
In this case, the transition must flow in the opposite way. For the fade-out effect, we need to shift from the opacity 1 to 0.
Why is the display property set to block? This is because the regular behavior of the ngHide directive is to change the display property to none. With that property in place, the element will vanish instantly, and our fade-out effect will not work as expected.
Another possibility is to animate the ngClass directive. The concept is the same—enable a transition, however this time from the .CLASS-add-class class to the .CLASS-add-class-active class.
Let's take the same example we used in the ngClass explanation and animate it:
app.css

.selected {
  -webkit-transition: all 5s linear;
  -moz-transition: all 5s linear;
  -ms-transition: all 5s linear;
  -o-transition: all 5s linear;
  transition: all 5s linear;
  background-color: #FAFAD2 !important;
}

.selected-add-class {
  opacity: 0;
}

.selected-add-class-active {
  opacity: 1;
}
Here, we added the fade-in effect again. You are absolutely free to choose the kind of effect that you like the most!