
Implementing Wireless Network Security
In the previous chapter, we learned about network protocols, such as LAN, IP, and TCP/UDP-based attacks, in which the attacker targets network-based protocols, and how to protect against them. This chapter talks about wireless-based attacks and how to harden your wireless networks against them. By the end of this chapter, you will understand the risks to wireless networks and devices and know how to protect against these risks.
In wireless networks, we focus on protocols such as IEEE 802.11, various bands, such as /b/g/n (as discussed in the Wireless standards – IEEE 802.11 section), encryption standards, such as WEP, WPA, and WPA2, and their key weaknesses, such as creating rogue Access Points (APs), dumping hashes, and automating complete tasks. We also need to know how we can protect ourselves against these attacks.
This chapter starts with an explanation of the WLAN protocol—what the WLAN frame constitutes, the frames to focus on, and a demonstration of the WLAN packets in a network. Then, we will discuss the various encryptions that wireless supports and the key weaknesses of those encryption standards. A few other attacks, such as rogue APs, Pair-wise Master Key Identifier (PMKID) attacks, and Man in the Middle (MITM), will also be discussed.
In this chapter, we will cover the following main topics:
- Wireless standards, protocols, and encryption standards
- Sniffing wireless networks
- Packet injection
- Discovering hidden SSIDs
- Compromising open authentication wireless networks
- WLAN encryptions and their corresponding flaws and attacks
- Network jamming – DOS/DDOS wireless network attacks
- Evil twin attack – honeypots
- Person-in-the-Middle (PITM) attacks
- Implementing a secure wireless architecture
Wireless standards, protocols, and encryption standards
In this section, we will talk about wireless standards, such as IEEE 802.11, and amendments, also known as wireless bands a/b/g/n/f, and their corresponding frequencies on which wireless or Wi-Fi operate in different countries or zones. So, let's try to understand the various standards of wireless and amendments.
Wireless standards – IEEE 802.11
IEEE stands for Institute of Electrical and Electronics Engineering. Now, the 802.11 standard is split up into two anomalies, named committees and working groups:
- 802 is a committee formed for all network-related norms.
- 11 is a working group specially designed for wireless LAN.
Now, these standards have some amendments built in and are represented as 802.11/b/g/n/ac/ad/a, which are normally in practice.
The following are some of the frequency bands that are commonly used around the globe:
|
Frequency Bands | |
|
Amendment |
Frequency |
|
802.11 /b/g |
2.4 GHz (most important) |
|
802.11 /y |
3.65 GHz (licensed) |
|
802.11 /a |
5 GHz |
|
802.11 /p |
5.9 GHz (licensed) |
For further details, please check https://en.wikipedia.org/wiki/List_of_WLAN_channels.
Let's analyze the types of wireless LAN infrastructure implemented using Wi-Fi Analyzer, which can be downloaded from the App Store or Play Store for mobile phones or Windows Store for Windows.

Figure 11.1 – Wi-Fi Analyzer
So, as shown in the preceding screenshot, the frequency band of 2.412 GHz with amendment 802.11n is currently being used on channel 1.
The channel is a very important part of the network as it is the path where the data packets are being transmitted. Now, the frequency bands defined previously are divided into multiple size ratios and are called channels in real time. The following diagram illustrates what a channel looks like in a network:

Figure 11.2 – Channel bonding
Important Note
Currently, channel bonding is not required for this book or this chapter, but it's an essential topic in order for network administrators to understand the core depth of frequency formations. Kindly follow this link to understand this better: https://www.rfwireless-world.com/Terminology/Advantages-and-Disadvantages-of-Channel-Bonding.html.
Before starting on the practical demonstrations, let's quickly understand the basics of WLAN frame architecture, which will require an understanding of wireless encryptions.

Figure 11.3 – WLAN frame architecture
Important Note
As this book talks about the security aspects of wireless networks, we assume that the WLAN frame architecture is already known to you. If it is not or you require a recap, it's time to revisit the frame architecture. To read more on this, please follow this link: https://subscription.packtpub.com/book/cloud_and_networking/9781119425786/16/ch16lvl1sec03/802-11-frame-body.
Now, from a wireless security perspective, the Type field is the most important field in the frame control and has three possible options:
- Management frame: These frames are responsible for the communication between the APs and the wireless client machines. These management frames are further divided into subtypes:
- Probe request
- Probe response
- Authentication
- Deauthentication
- Association request
- Association response
- Disassociation
- Beacon frames
- Reassociation request
- Reassociation response
- Control frames: These frames are responsible for the proper exchange of data between the APs and the wireless clients. Control frames are further divided into the following subtypes:
- Request to Send (RTS)
- Acknowledgment (ACK)
- Clear to Send (CTS)
- Data frames: These frames are the carriers of the actual data on wireless networks. Data frames have no subtypes.
Now, enough of the theory; we want to jump to the interesting part of actually performing wireless penetration testing. But before that, let's prepare our weapons, that is, get our lab set up.
Wireless lab setup
In red teams, there is a saying: behind every successful breach are hours or days that were spent on preparation and setting up the right tools, scripts, code, images, and so on. Wireless penetration is similar. So, before deep-diving into real-world scenarios to breach wireless networks, let's first prepare our lab. The bare minimum setup required is as follows:
- A system with a minimum of 16 GB RAM and an i7 processor.
- The external wireless card supports the /b/g/n/a frequency bands, or depends on your country's allocated frequency bands, and is capable of packet injection. For this book, I will be using an Alfa card; for your reference, it looks like this: https://www.amazon.ae/wifi-usb-adapter-AWUS036NH-Wireless/dp/B0893P53M3/ref=asc_df_B0893P53M3/?tag=googleshopp09-21&linkCode=df0&hvadid=406633403425&hvpos=&hvnetw=g&hvrand=18080746184453021662&hvpone=&hvptwo=&hvqmt=&hvdev=c&hvdvcmdl=&hvlocint=&hvlocphy=1000013&hvtargid=pla-1228114034850&psc=1.
- Windows installed on a base machine and Kali Linux installed on a virtual machine.
Important Note
Now, as this book is for those working on networks, pentesters, and red teamers, you are expected to do the installation and configuration. If you have an issue with the configuration, please follow the Kali Linux installation in the VMware guide: https://www.makeuseof.com/install-kali-linux-in-vmware/.
Now, I believe our lab is successfully set up, so let's test whether everything is ready for real action.
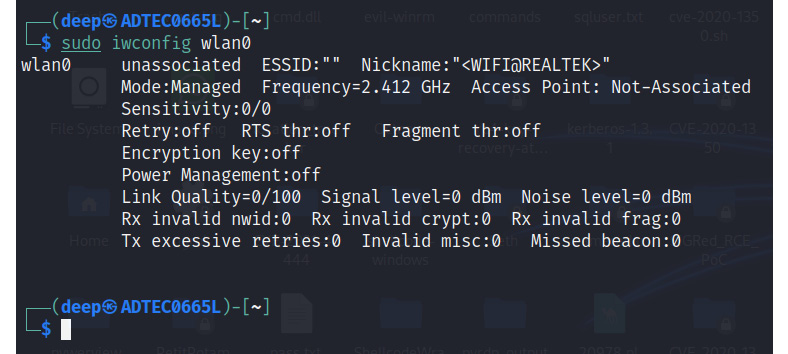
Figure 11.4 – Wireless card configured successfully
It is clear that our external WLAN card is working fine and is ready for some action.
So, let the games begin!
Sniffing wireless networks
Sniffing wireless networks is defined as reading the ongoing communication between wireless clients and APs. Sniffing wireless packets helps attackers to perform various attacks, such as MITM. Now, before jumping into the practical demonstrations, let's first understand some basic terminologies and tools that will be helpful here:
- airmon-ng: A tool in aircrack-ng to set up monitor mode.
- Monitor mode: Also known as RFMon (Radio Frequency Monitor) mode, this allows the Wireless Network Interface Card (WNIC), or wireless card, for short, to monitor ongoing traffic in the network onto the wireless card.
- airodump-ng: A tool in aircrack-ng to dump wireless packets.
- Wireshark: A tool to capture wireless packets.
- aireplay-ng: A tool to perform deauth, Denial of Service (DOS), and packet injection-related attacks, as well as others.
So, without wasting time, let's sniff some wireless packets or frames:
- Turn on the wireless card (alfa card) and make sure it is set to monitor mode using the airmon-ng start wlan0 command, as shown in the following screenshot:

Figure 11.5 – Wireless card configured successfully
- Now, turn on Wireshark and start sniffing the wireless packets. Let's apply the filter on wlan.fc.type == 0 for the management frames, as shown in the following screenshot:
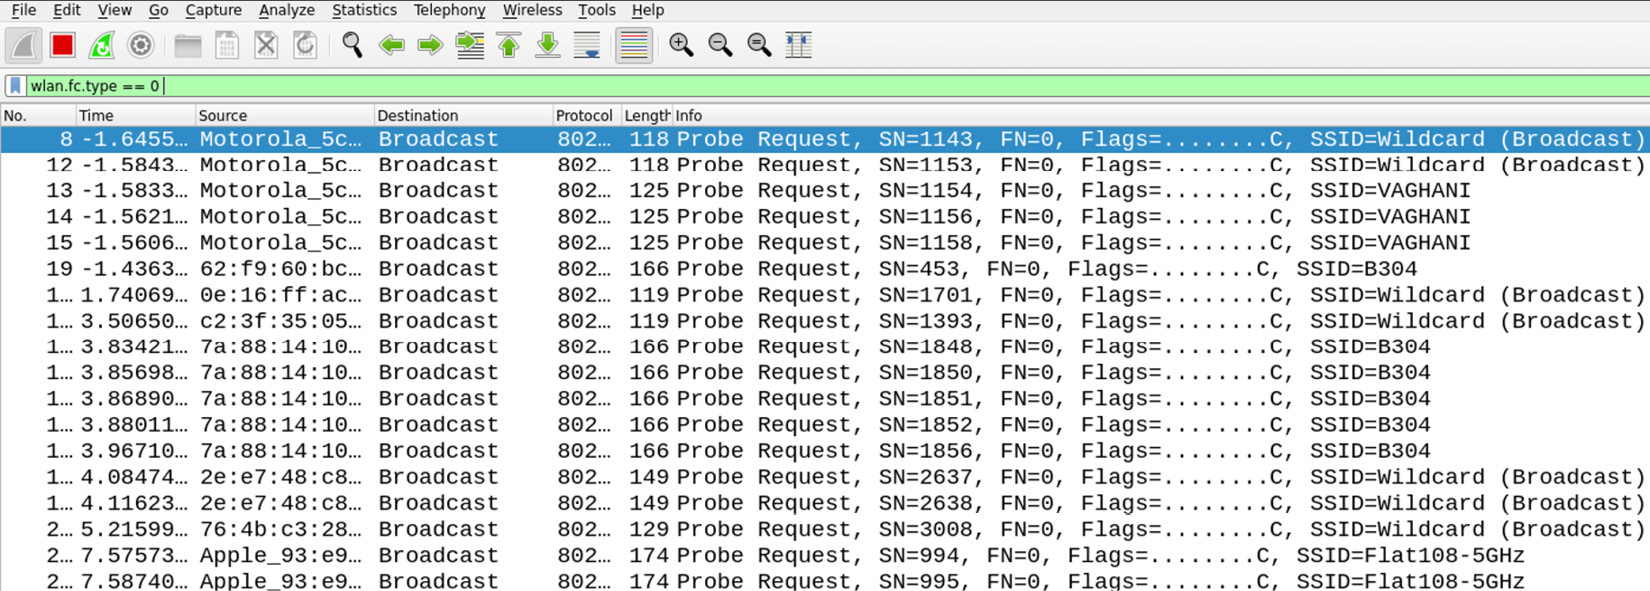
Figure 11.6 – Management frames revealing SSIDs

Figure 11.7 – Control frames
- For data frames, apply the filter on wlan.fc.type == 2.
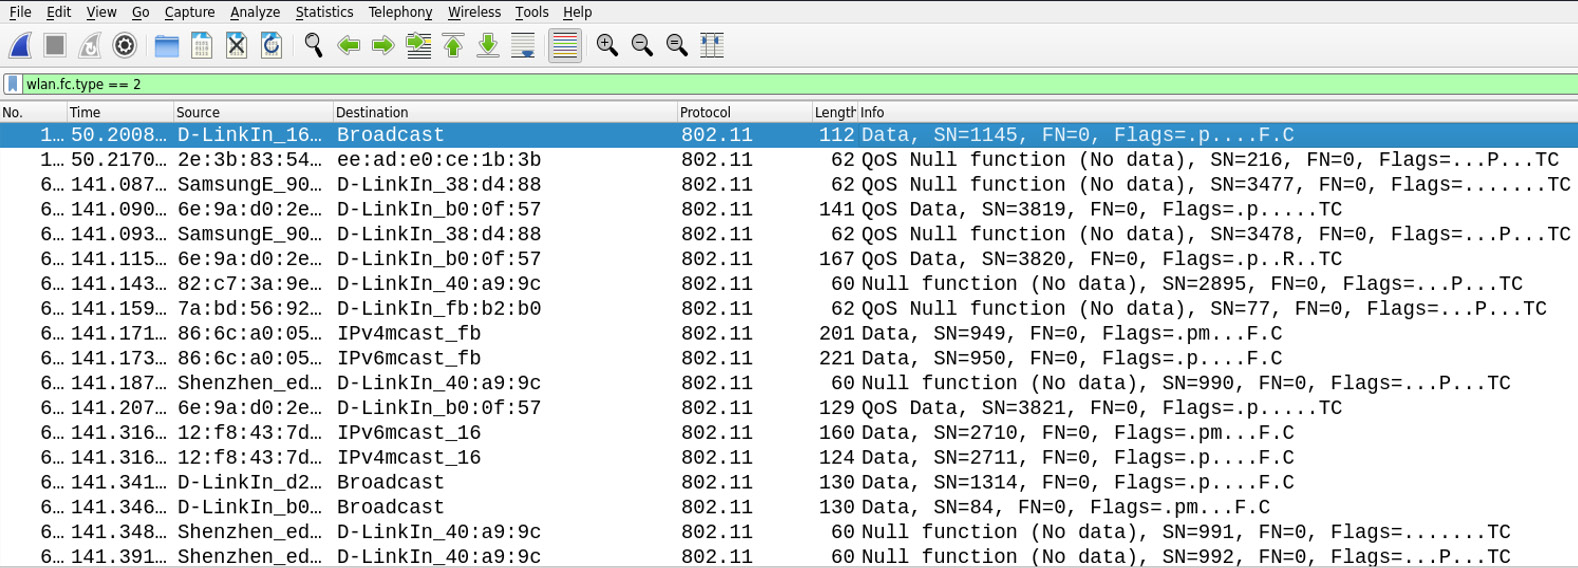
Figure 11.8 – Data frames
Now, as we have seen the various frames, let's sniff the wireless packets in real time.
Sniffing packets on the target AP
Now, before the action starts, let's understand some basic terms:
- Service Set Identifier (SSID) or ESSID: The name of the Wi-Fi. So, for this book, the SSID will be set to WirelessRed.
- Basic Service Set Identifier (BSSID): The MAC address of the wireless AP.
- STAtion (STA) MAC: The client-connected machines, also known as the wireless clients.
- Basic Service Set (BSS): These are the nodes that are connected in the wireless network that are communicating with each other.
- Extended Service Set (ESS): This is a set of connected BSSs.
To dump wireless packets, follow these steps:
- With monitor mode on, dump packets on the target SSID (here, WirelessRed) using airodump-ng --essid WirelessRed wlan0, as shown in the following screenshot:

Figure 11.9 – WirelessRed SSID
- Open Wireshark and set the filter on wlan.bssid == CA:58:C0:13:2E:5F.
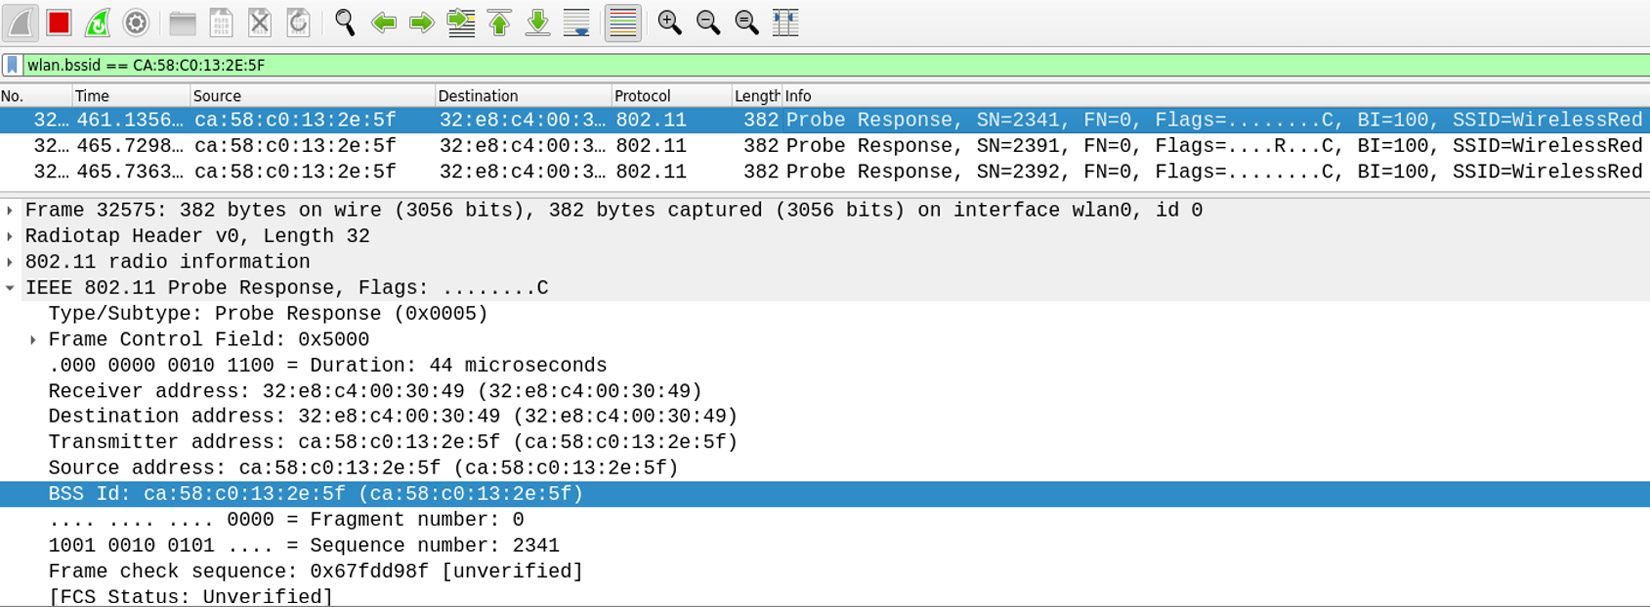
Figure 11.10 – WirelessRed SSID
- Let's try to analyze the ongoing traffic; we can see that the traffic in the network is within the RF range using Wireshark.

Figure 11.11 – Ongoing network traffic
Now that we have successfully performed sniffing in real time, let's move on to a more advanced topic where an attacker will inject malformed packets into an ongoing transmission in real time.
Key Point
We can now analyze ongoing packets on network channels. As we go deeper, we will analyze the packets in more depth. If you look carefully at the packets, there are DHCP requests and responses, followed by ARP requests. Many times, these packets help in analyzing network traffic in user hunting, brute-forcing the user's domain credentials, and much more during our red team assessments, especially when 802.1x Enterprise Wireless encryptions are being set up by the network administrators.
Packet injection
In wireless networks, packet injection is a technique in which an attacker injects malformed packets into an ongoing transmission. These packets will look like legitimate data packets to perform certain tasks, such as intercepting the communication. Packet injection can be performed by many means and methods, but for this chapter, we will use the Scapy module:
- Let's first check whether the packet injection is working successfully on our target AP. To perform this, we will be using aireplay-ng -9 -e WirelessRed wlan0.
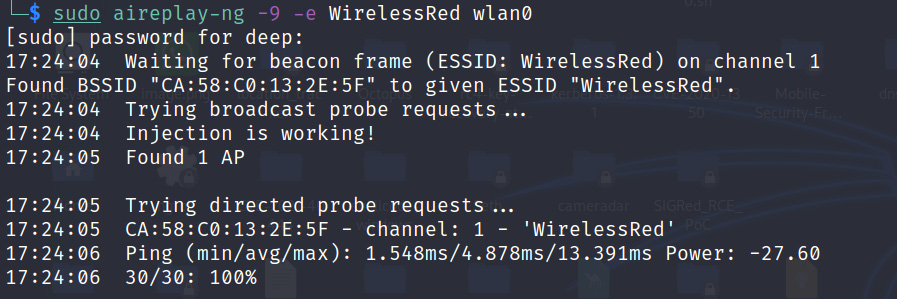
Figure 11.12 – Packet injection working successfully
Tip
This can be verified in Wireshark with filters – wlan.bssid == CA:58:C0:13:2E:5F) && !(wlan.fc.type_subtype == 0x08. Please feel free to explore this further.
Now, let's move forward and do some real stuff that red teamers do in real-time injections. There are many techniques available on the internet to create our packets to perform some specific tasks, but in Python, there is a very beautiful module named Scapy, which I will be using . But you are free to explore and come up with new techniques.
- Let's create our first probe packet using Scapy, as follows:
fake_attacker_addr = 'aa:bb:cc:dd:ee:ff' \ setting fake attacker's MAC address
target_access_point = 'CA:58:C0:13:2E:5F' \ setting up target access point
interface = 'wlan0' \ setting up the monitor mode wireless interface
Target_SSID = 'WirelessRed' \ Target SSID
probe_req_pkt = RadioTap() / Dot11(addr1=target_access_point, addr2=fake_attacker_addr, addr3=fake_attacker_addr) / Dot11ProbeReq() / Dot11Elt(ID='SSID', info=Target_SSID, len=len(Target_SSID)) \ creating fake probe packets
sendp(probe_req_pkt, inter=0.1, count=10, iface=interface) \sending packets in the network
- Now, based on the preceding script, let's send the packets, as shown in the following screenshot:

Figure 11.13 – Fake packet created successfully
- The following screenshot shows that the fake scripted packets were injected successfully:
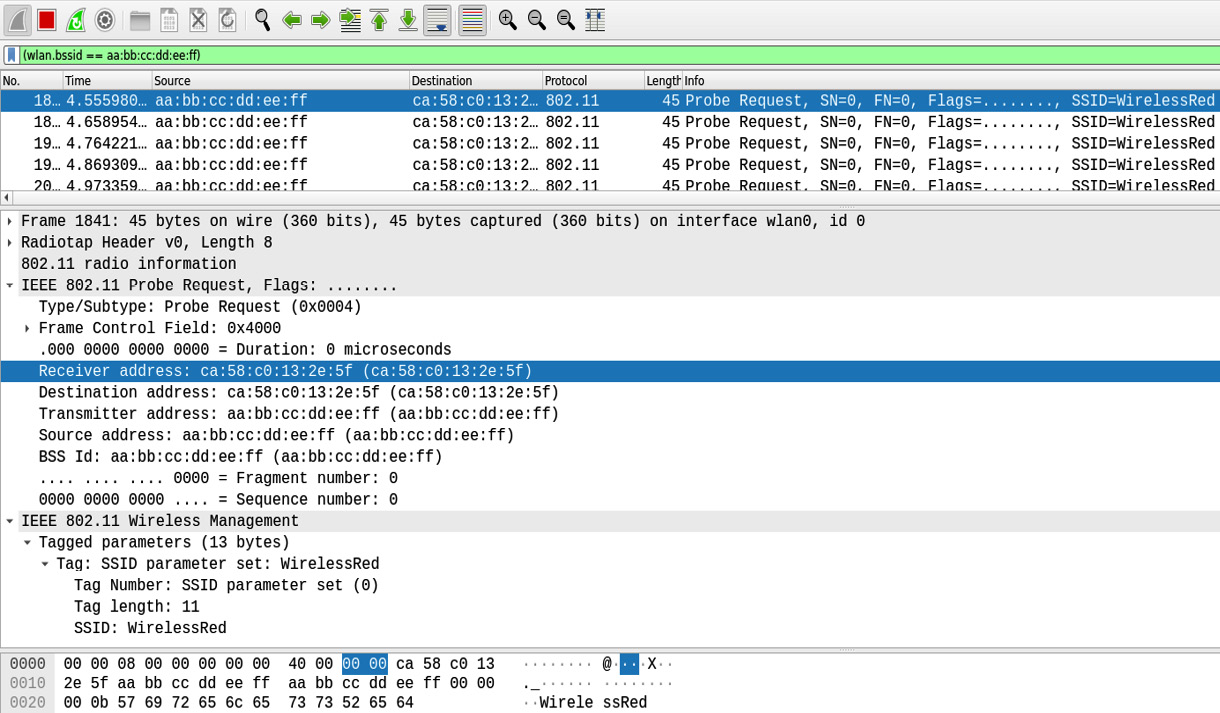
Figure 11.14 – 10 fake packets injected
Similarly, you can create fake packets with messages, to perform deauthentication attacks, replay attacks, fake beacon packets, packet flooding, and so on, and inject them into an ongoing wireless communication without even connecting to the wireless network. Please feel free to explore this further as it is very important in real-world scenarios.
Discovering hidden SSIDs
Now, most network administrators think that hiding wireless SSIDs is the most robust step in protecting a network against attacks. But this is not the case because within minutes, an attacker will discover the hidden SSIDs. How does this happen? Now, from the wireless frame architecture, we know that beacon frames contain the wireless SSIDs omitted by the APs. This helps client machines or wireless cards to discover the SSIDs in the network. In a hidden SSID configuration, these beacon frames do not contain the SSIDs, hence only clients who know the SSIDs can connect to it. But this hidden SSID security can be easily bypassed.
To bypass this, we need to wait for a legitimate client to connect to the wireless network. Once the user connects, based on the probe request and response, the hidden SSID will be discovered and will be visible on screen.
Or, during wireless penetration testing, the SSIDs are usually given by the customers, and hence filters using airodump-ng on SSIDs can also be applied with the -a attribute, which will display the STAs as soon as users connect to it.
There is another method where, if the SSID is known, then deauthentication packet requests using aireplay-ng or Scapy can be used to send the deauthentication packets:
Important Note
In my red team experience, to discover hidden SSIDs if <length+0> is seen, this can be a hidden network, and using the airodump-ng –bssid <> filter, you can apply to quickly discover the hidden SSIDs.
- The following screenshot shows that the <length: 0> SSID is discovered, and this could be our target SSID:

Figure 11.15 – Discovering hidden networks
- Let's apply a filter on the target BSSID using airodump-ng to resolve the SSID, as shown in the following screenshot:
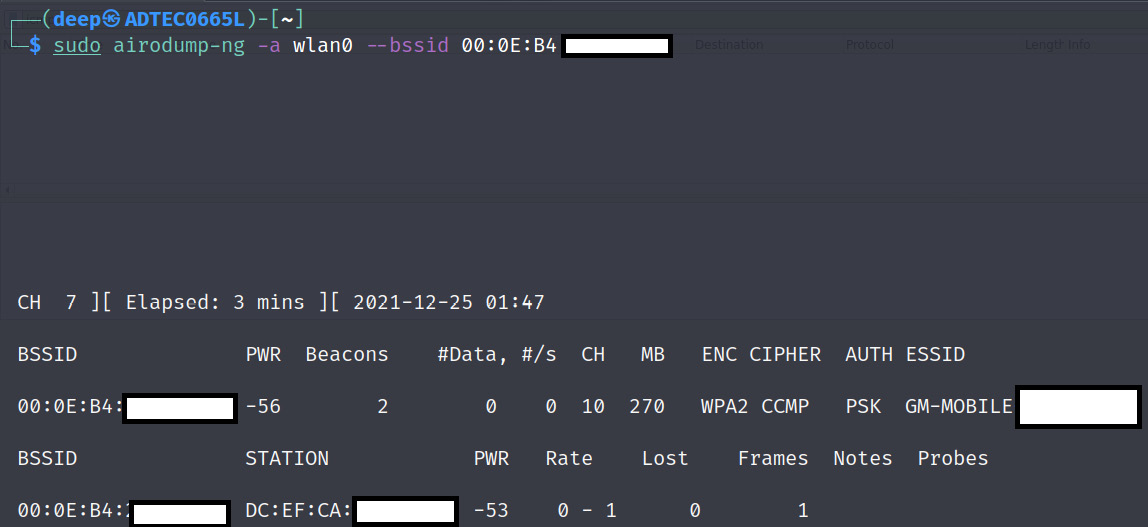
Figure 11.16 – Hidden network ESSID discovered
Now that we have successfully discovered hidden SSIDs, let's move on to the next section, on compromising open authentication wireless networks.
Compromising open authentication wireless networks
In my long experience of penetration testing and red team activities, I've often discovered open networks, also known as guest networks. These networks are usually designed to provide guests with internet access without having a password set to authenticate the wireless network. However, often, captive portals are implemented to authenticate customers or guests to the internet.
Captive portals are authentication portals that pop up when any user connects to an open authentication wireless network to enter the credentials provided by the owner. These captive portals are usually implemented in coffee shops, hotels, colleges, and so on.
Myth
Now, network administrators usually implement MAC filtering on open authentication networks; for example, they will take the MAC of the guest's phone or laptop and apply a filter on it as a security measure. Or, if there is a captive portal implemented, organizations will create a password and share it with guests, and then, once the guests connect to the open SSID and enter the provided password in the pop-up page (captive portal), the network administrators capture the MAC addresses and whitelist them to provide the network. Hence, this leads to network administrators thinking that MAC filtering will protect their wireless auth from breaches.
As explained previously, MAC filtering can be easily bypassed by spoofing the MAC address of already connected clients. So, let's first see how to bypass MAC filtering:
- Using airodump-ng, dump the packets, as shown in the following screenshot:
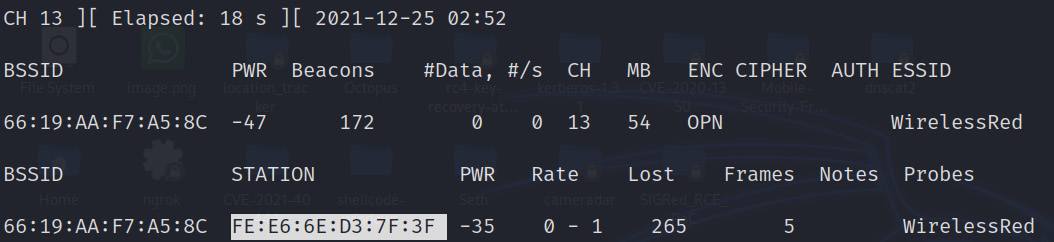
Figure 11.17 – Connected STAs discovered on OPN authentication
- As we can see, the BSSID of the connected STA is discovered successfully. Now, copy the BSSID of the connected STA and replace the MAC address of the wlan0 interface with the connected STA, as shown in the following screenshot, and then connect to the WirelessRed SSID. The MAC filtering will be bypassed and the user will be able to connect to the internet.

Figure 11.18 – MAC address spoofed successfully with the connected client's MAC
Now that we have successfully bypassed MAC filtering, let's see what else we can do in open authentication networks.
Open authentication – compromising low-hanging fruit
In my red team experience, many times I have seen network administrators implement guest networks on a parallel line to the corporate wireless network, via Wireless LAN Controllers (WLCs), which makes it easy for attackers to hop onto the different LAN where the corporate network is implemented via VLAN hopping techniques, then compromise corporate user machines, sniff their ongoing data, and so on. Hence, while implementing open authentication networks, administrators should properly implement the VLANs, or better, implement them via a completely different WLC.
Some of the steps that can be performed to compromise a corporate network via open authentication networks are as follows:
- Scan the whole subnet to check whether any internal user is connected to the guest wireless network. After connecting to the network, say we get the IP 192.168.1.64/24, but we scan the network as 192.168.0.1-192.168.254.255 with tools such as Advanced IP Scanner. This will resolve the NetBIOS names, which will help us to identify whether any strange-looking names relate to some organization's implemented machine name policy.
- Look for some open shares with write permissions of the connected machines.
- Identify the WLC and scan for open services, versions, and so on, which can help to bypass the WLC security using some Skinny Client Control Protocol (SCCP), default credentials, and so on.
- Perform VLAN-related attacks, such as double tagging or VLAN hopping. For example, during one of our red team activities, we identified a different VLAN (corporate) connected on the same channel, and using tools such as Yersenia, spoofed DHCP or ARP packets were sent in the network to identify MAC addresses and then spoof one of the client's connected MAC addresses, as shown in Figure 11.18, which helped us to land on the same VLAN as the corporate network.
- Another attack that can be performed is an MITM attack. MITM has often helped us in identifying whether any user in the guest network is connected to any of the servers that belong to the organization. For example, once when performing wireless penetration testing at the customer location, we identified that a user was trying to connect to a server using PuTTy. We were not able to dump the credentials, but this led to identifying the organization's jump server present outside the internal network. This information helped us to plan and launch further attacks. MITM can be performed using various tools, such as Cain and Abel, the arp spoof tool, Ettercap (the best tool to write our plugins that can help to focus on our primary target, such as writing our plugin to control bandwidth during an ARP spoofing attack), or Wireshark (to capture packets). An example of MITM is shown in the following screenshot:

Figure 11.19 – ARP spoof to perform MITM
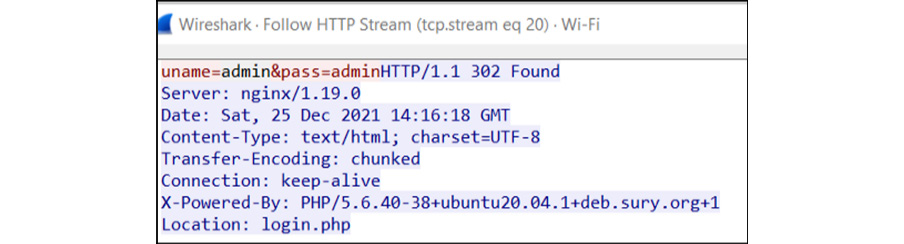
Figure 11.20 – ARP spoof to capture HTTP traffic credentials on the network
Now, as we performed the MITM attack in a wireless network, let's move on to another aspect of WLAN encryptions and how we can compromise wireless networks.
WLAN encryptions and their corresponding flaws and attacks
Even with the best research and implementation of highly protected algorithms, once algorithms are made public, there is always a way to penetrate them. This is especially true for wireless algorithms, as these algorithms were made with good intentions and to provide users around the globe with a secure channel to access data over the internet, but with time, the WLAN encryption algorithms started getting penetrated. The first algorithm that was broken was Wired Equivalent Privacy (WEP), which used a single key (static) to encrypt packets and then send them over the channel; hence, an attacker, after dumping a good amount of data packets, can decipher the key within a few minutes. Something better was required, and so WPA/WPA2 was introduced.
Important Note
WEP is outdated technology and is no longer used in organizations. Hence, we will focus on currently running wireless encryptions.
Wi-Fi Protected Access (WPA/WPA2)
WPA, or WPAv1, uses Temporal Key Integrity Protocol, better known as the TKIP encryption algorithm, which replaces WEP static key encryption without modifying or adding any new hardware. This encryption algorithm is not commonly used in organizations these days; however, in my experience, some small-scale industries still use WPA as a standard.
WPA2 runs on mandatory AES-CCMP encryption, which is robust and more influential than TKIP. Both WPA and WPA2 support the Pre-Shared Key (PSK) and RadiusX servers Enterprise as an authentication-based schema. Here, we will look into all the aspects from the red team perspective.
But before diving deep, let's first clear some of the basics. Both WPA and WPA2 work on a four-way handshake between the client and AP; the steps are as follows:
- The Pair-Wise Master Key (PMK) is derived from a passphrase that has been set by the network administrators in the AP (here, Authenticator) and is shared with the supplicants (here, Clients). This passphrase is sent to the PBKDF2 function (an algorithm to create a strong cryptographic random key by applying iterations to the passphrase and generating the required key) and derives the 256-bit PSK. This whole process is shown in the following diagram:

Figure 11.21 – 256-bit PSK derived from a passphrase
- The following diagram represents the WPA/WPA2 four-way handshake:
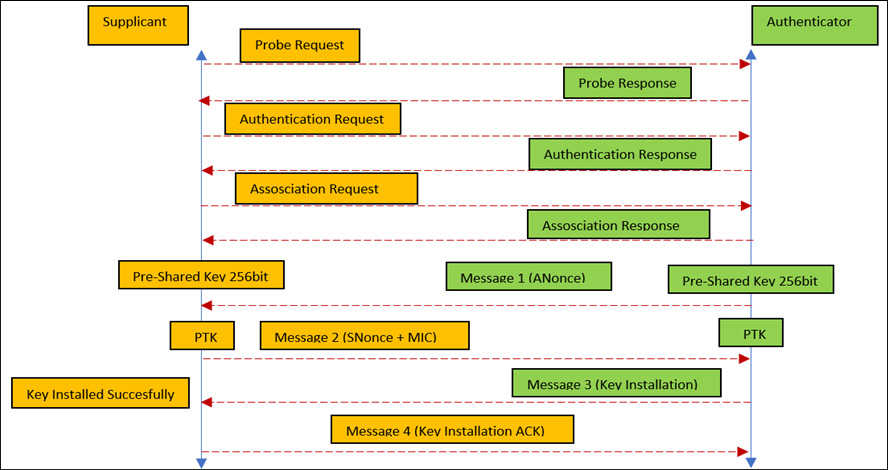
Figure 11.22 – WPA/WPA2 four-way handshake
Important Note
The whole four-way handshake and process of breaking WPA/WPA2 are largely the same; the only difference is in the encryption algorithms. In addition to this, we also expect you to know about four-way handshaking.
- The Pair-Wise Transient Key (PTK) is a random key that is derived by concatenating the PMK, ANonce (a random value generated by Authenticator), SNonce (a random value generated by Supplicant), the Authenticator MAC, and the Supplicant MAC.
This is what it looks like in Wireshark:
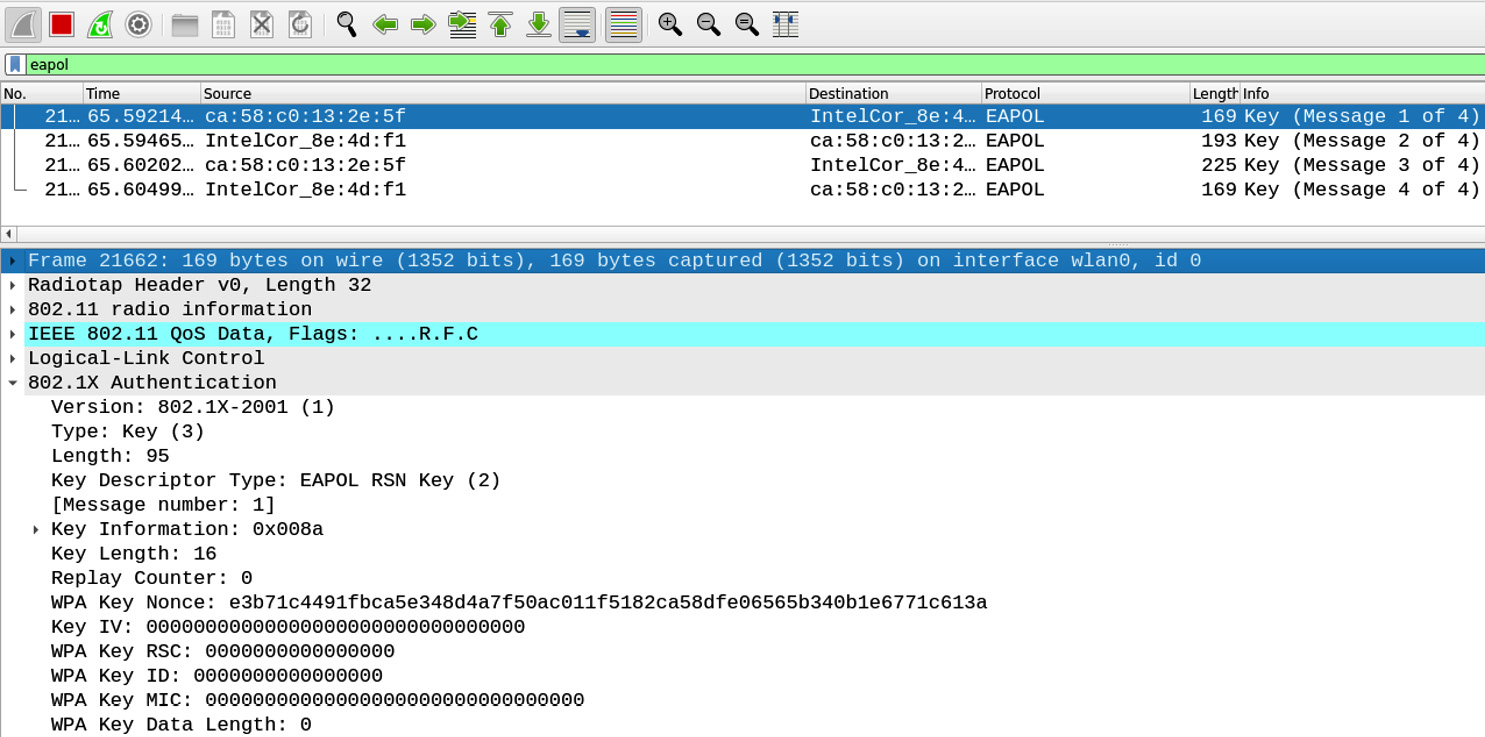
Figure 11.23 – WPA/WPA2 messages captured
The preceding screenshot shows that the four messages were successfully captured in Wireshark in real time using the eapol filter. Let's now move forward to crack the WPA2 encryption.
Cracking WPA/WPA2 by capturing the four-way handshake
To crack WPA/WPA2, the process is very simple:
- We will be using the airodump-ng tool to capture a huge chunk of data packets.
- Then, we will be feeding our random passwords dictionary file in the PBKDF2 function, which will generate the PSK for each passphrase.
- Then, this PSK is fed into the four-way handshake process, to generate the PTK, and this will be verified by checking the MIC.
- Now, of course, we will use the time and memory trade-off to make this whole process faster, but the best part is, we don't have to do all the mumbo-jumbo math, as we already have our aircrack-ng command handy with us.
So, without wasting time, let's simply crack the WPA/WPA2 encryption:
- Using airodump-ng, dump the data packets that contain the WPA handshake of the target SSID and write the data packets in a .cap file. The command is as follows:
sudo airodump-ng wlan0 --essid WirelessRed -a --bssid CA:58:C0:13:2E:5F --channel 1 --write WirelessRed-crack-WPA2-PSK
- Now, we have to wait for a client machine to connect to our target SSID. To make this process faster, we can send DEAUTH requests to the target BSSID, disconnect one or all of the clients, and wait for them to reconnect. Once they reconnect, we will get our handshake using the aireplay-ng tool; the command to do so is as follows:
aireplay-ng -a CA:58:C0:13:2E:5F wlan0 --deauth 0
- Once the handshake is captured successfully, we can then feed a randomly generated passphrase file and crack the WPA/WPA2, as shown in the following screenshot:

Figure 11.24 – WPA/WPA2 password key decrypted
Now that we have successfully cracked the WPA2 by brute forcing the four-way handshakes, let's move forward with more advanced techniques for cracking WPA2 using PMKID attacks.
Important Note
In my red team experience, I successfully cracked the wireless password many times, even if it was long or random, because organizations are often in the habit of keeping well-known passwords or passwords that are derived from the organization's name or even the SSID name itself. For example, if the organization's name is WirelessRed, using the crunch tool (https://linuxconfig.org/creating-wordlists-with-crunch-on-kali-linux), we can generate a huge list of passwords that contain WirelessRed in them.
Cracking WPA2 by capturing the PMKID
Now, as we have seen previously in our WPA/WPA2 cracking methodology, we can capture data packets that contain the four-way handshake, which is a bit of a complex method; for example, if there is no user connected, the attacker has to wait for a client to connect, or many times, no handshake gets captured as no client authenticates. Then, the attacker has to deauthenticate the clients and once they connect back, the attacker captures the four-way handshake. There could also be cases where a client types an incorrect password. So, to avoid this, there is a bit of an easier method to crack the key known as a PMKID attack, which can be achieved by using PMK caching.
PMK caching is a technique in which the routers or APs cache the PMKID so that if any user disconnects and re-authenticates, the AP will directly ask the client for PMK Security Association (PMKSA), and then the AP will verify and then re-associate the client with the AP rather than performing the complete four-way handshake. This usually helps in a corporate network for enhanced roaming, where, for example, an employee's laptop is connected to AP1 and, when they have to rush to a meeting room on a different floor, the employee will immediately get connected to AP2. This whole process happens if the AP caches the PMKID; otherwise, the client has to perform four-way handshaking every time.
So, what is a PMKID? A PMKID is a unique key identifier that is used by APs to keep track of the PMK that is being registered to the client's machine. So, the following formula is used to calculate the PMKID:
PMKID = HMAC-SHA1 [PMK, PMK Name + MAC (Authenticator) + MAC (Supplicant)]
Where:
- HMAC-SHA1 is the hashing algorithm used to calculate the hash.
- PMK is the pair-wise master key, as explained earlier, in the WLAN encryptions and their corresponding flaws and attacks section.
- PMK Name is the name of the SSID.
- MAC (Authenticator) is the MAC address of the AP.
- MAC (Supplicant) is the MAC address of the connected machine.
So, which APs or routers are vulnerable?
APs that have the roaming feature enabled are the only ones vulnerable. Hence, an attacker would send the associated packets to the APs, the APs would reply with the PMKID in the form of a hash, and then the attacker would crack the hash using the hashcat or John the Ripper tool.
The following screenshots show that the PMKID is captured successfully:

As shown in Figure 11.25, the PMKID is found. Let's check the PMKID value:
Figure 11.26 – PMKID captured at eaphammer
As shown in Figure 11.26, the PMKID value of the access point is captured. So, let's crack the captured hash.
The following screenshot shows that using the hashcat tool, the hash captured from the PMKID is decrypted:
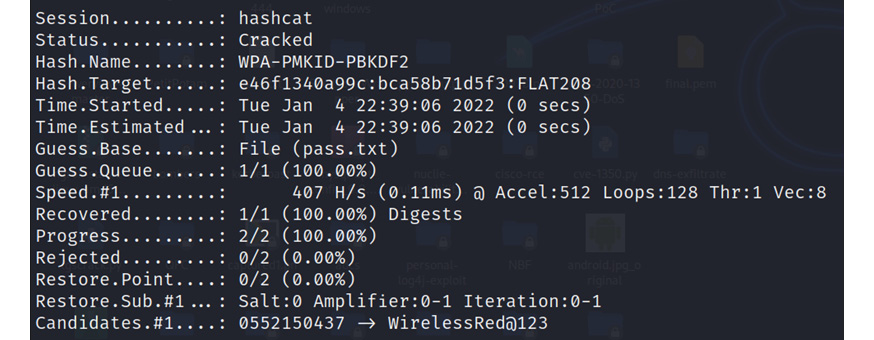
Figure 11.27 – Hash cracked
Now that we have successfully cracked WPA2 encryptions with basic techniques and looked at more advanced topics, such as the PMKID, let's compromise enterprise management protocols, such as PEAP.
Attacking enterprise management RadiusX protocols
Extensible Authentication Protocol (EAP) is an authentication mechanism protocol that is accepted by all organizations, as it provides a secure medium of communication and is also compatible with the Active Directory, which means employees can authenticate to the domain network with the same domain credentials. However, even if it provides a secure medium of communication, it is still vulnerable to many attacks, especially revealing internal domain information via probing. The following are the most common authentication mechanisms used by organizations:
- Protected Extensible Authentication Protocol (PEAP) is a widely accepted protocol as it provides the most secure tunnel to send authentication data between PEAP-configured clients and an authentication server. PEAP authenticates users using server-side certificates, which helps administrators to easily configure the PEAP. However, PEAP is vulnerable to many known attacks.
- Extensible Authentication Protocol Transport-Layer Security (EAP-TLS) is known to be one of the most secure wireless-secured tunneled communications and uses certificate-based authentication and dynamically generates WEP keys (user-based and session-based) to encrypt the communication between the supplicant and the authenticator.
- Extensible Authentication Protocol Tunneled TLS (EAP-TTLS) is an extension to EAP-TLS; it is easy to configure and provides much more secure and reliable mutual, server-side, certificate-based authentication and transmits via a secured tunnel.
Important Note
To understand more about 802.1x MGT (Management) protocols and authentication methods, please follow this link: https://www.intel.com/content/www/us/en/support/articles/000006999/wireless/legacy-intel-wireless-products.html.
The following attacks can be performed in MGT-based protocols:
- Username enumeration.
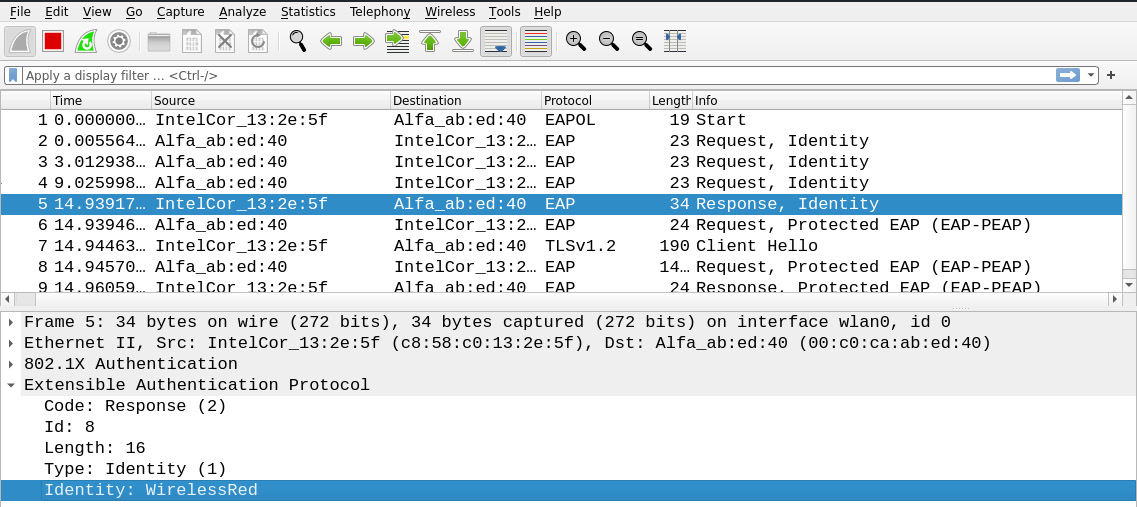
Figure 11.28 – Username enumeration
- Capturing and cracking the NTLM (domain) hashes along with the challenge and response.

Figure 11.29 – Domain hashes captured successfully
- Password spraying.

Figure 11.30 – Password spraying
Now that we have seen how we can crack or attack management wireless encryption protocols with various attacks, let's move forward to learn how we can perform network jamming via DOS/DDOS attacks.
Network jamming – DOS/DDOS wireless network attacks
The most common way of jamming a wireless network is by sending a continuous series of deauthentication packets, which will disconnect clients from the AP and also prohibit clients from connecting back to the AP. This attack is also helpful during honeypot attacks.
Another approach could be to send disassociation packets. The difference between these two management frames is that the deauthentication packet will inform the attacker that the user is disconnected from the network. However, the disassociation packet will disconnect any node that is connected to the AP while the AP is down or rebooting.
So, to perform this, we will be using aireplay-ng, as shown in the following screenshot:
Figure 11.31 – Deauthentication attack
Now that we have seen network jamming attacks using deauthentication or disassociation attacks, let's move forward with an advanced topic, honeypots, which attackers perform in real time to compromise wireless networks if the credentials are not being cracked.
Evil twin attack – honeypots
An evil twin attack is a very common attack where an attacker creates a rogue AP with the same ESSID and the same or different BSSID (depending on the security architecture of the victim's organization) to lure victims into thinking the attacker's AP is legitimate. The attacker does this by amplifying the rogue AP signals in such a manner that the victim's machines automatically connect to the fake AP.
The whole idea behind creating a fake AP is very simple but depends on the organization's implementation of the target SSID as well. Take the following examples:
- If the target SSID is configured with open authentication but with a captive portal, then the attacker will create a fake web page, connect that with a database, and once the victim starts putting credentials in that web page, the attacker from the backend, after capturing the credentials, will provide victims with internet access and the victim will think of it is as the legitimate wireless network.
- Another scenario is if the organization has implemented WPA2 PSK/EAP protocols, then the attacker would simply create a rogue AP with such encryption standards.
So, the whole picture looks like this:

Figure 11.32 – Evil twin block diagram
Important Note
In my penetration testing experience, choosing the SSID is very important because we might only have one chance of compromising the key or the password depending on the security solutions deployed to monitor the wireless networks. So, we generally choose our target as the organization's SSID (configured with EAP encryption protocols) that authenticates the users to the internal domain network. Once we are connected to the internal production or domain network, it is then a matter of time to compromise either low-hanging fruit or the complete data center.
So, let's create a fake AP with the WirelessRed SSID and capture the credentials, as shown in the following screenshot:

Figure 11.33 – Evil twin AP live
The following screenshot shows that once the user gets disconnected and tries to connect back to the rogue AP with their legitimate domain (production) credentials from their machine, the attacker immediately captures the credentials:

Figure 11.34 – Credentials captured successfully
Similar approaches can also be tried for other encryption protocols.
Person-in-the-Middle (PITM) attacks
These types of attacks in wireless networks are based on attacking users rather than APs; this includes users who might have connected to open networks or our target networks anytime in the past. These attacks come in handy when we are targeting the users of an organization. Let's say we are targeting organization A, and we know an employee who goes to Starbucks at the end of the day to grab a cup of coffee, work on their emails, and open some of their internal organization's websites, perhaps for timesheet entry. So, rather than directly targeting the organization, we can target that user by probing the list of the organization's wireless network, and then capturing or monitoring the user's activity.
The following are some of the attacks that we can perform in our day-to-day red team activity:
- KARMA: KARMA is a different type of evil twin attack in which an attacker listens to all the probe messages that the client's machine is sending to the network and then creates a rogue AP with the same SSID (here, WirelessRed) to let the victim client be connected to the attacker's fake AP. But nowadays, modern STAs are protected from sending out probe messages onto the network. The following link explains KARMA-based attacks: https://posts.specterops.io/modern-wireless-attacks-pt-i-basic-rogue-ap-theory-evil-twin-and-karma-attacks-35a8571550ee.
- MANA: MANA is an improved version of the KARMA-based attack, as modern devices stopped responding to directed probe responses from APs that haven't responded at least once to the broadcasted request. In this attack, the directed probe responses from nearby APs are constructed from the victim's Preferred Name List (PNL). So, this whole attack works like this: when the APs are receiving the probe requests, they first check whether it's a broadcasted request from the client or a directed request. Once the AP learns it's a directed request, then the sender's MAC address is added to the hash table and the ESSID to the device's PNL. For this, we will be using the EAPHammer tool, and the command is as follows:
eaphammer -i wlan0 --cloaking full --mana --mac-whitelist mac.txt --auth WPA-PSK –creds
- Loud MANA: MANA attacks, in my general experience, don't work as expected as many assumptions need to be fulfilled, such as the device's previous PNL entry or whether the device is sending any of the directed requests in air. Hence, another attack in this category is the loud MANA attack, in which victims in a certain physical proximity have some common PNL entries, and the attacker's rogue AP would likely send probe responses across all devices that it has seen before. The command is as follows:
eaphammer -i wlan0 --cloaking full --mana --loud --auth WPA-PSK –creds
- Known beacon attacks: This category of attack works with a technique of brute forcing the ESSIDs and then letting the victim connect back to the attacker's rogue AP. The idea behind this is that an attacker would generally create a list of ESSIDs, and then start sending fake beacon frames containing the ESSIDs, which may or may not be present in the device's PNL. If the broadcasted ESSID is present, then the victim will directly connect to the attacker's AP. The command is as follows:
eaphammer -i wlan0 --mana --loud --known-beacons --known-ssids-file known-ssids.txt --auth WPA-PSK --creds
Important Note
As part of this book, our primary targets to attack are the wireless AP, encryption standards, and protocols. However, please feel free to try out new methods for KARMA-based attacks.
Now, as we have successfully performed various wireless attacks, such as WPA/WPA2 cracking, sniffing wireless networks, and creating honeypots, let's focus on some points that can be helpful while implementing wireless networks.
Implementing a secure wireless architecture
While implementing a secured wireless network, choosing the best encryption standard or a centralized approach is a bit of a difficult task because there will be a lot of parameters that will be required to be taken into consideration. Let's focus on a few parameters that will help us to implement and keep the wireless network secure from attackers:
- Always choose a certificate-based authentication (EAP-TLS/TTLS) mechanism in an organization that will secure the environment even in the case of credential theft.
- The segmentation of the corporate LAN and the guest LAN should be separate from each other, and internal users should not be allowed to connect on the guest or any other networks except for corporate networks. We have seen many times that on the guest network, users can access the resources from the corporate network.
- Rogue AP detection mechanisms should be implemented properly. It should not only be based on the SSIDs; a list of whitelisted BSSIDs will also increase the level of protection.
- Implement proper packet filtering. Along with that, dynamic ARP inspection, present in almost all the Cisco catalyst series, should be configured properly.
- Management Frame Protection (MFP) is a mechanism that protects configured STAs from forged management frames by the attacker to disrupt client communications.
- Wireless Intrusion Prevention Systems (WIPSs) play a vital role in capturing and protecting the network and users against many wireless attacks.
- The password or the passphrase configured should be strong enough, and there should be no corporate name or known names used.
Summary
In this chapter, we have learned about various wireless standards and loopholes or misconfigurations that can lead to serious network hijacks. As, nowadays, almost all organizations implement production environments or corporate networks on wireless networks, it is very important to protect wireless perimeters from attackers. The most common way to compromise a wireless network is by cracking the password; once the attacker has guessed the password, there is no way to stop them from compromising the corporate network. Hence, the passphrase implemented should be strong. Another common attack that attackers use if they are not able to compromise the wireless network is to create an evil twin to let users connect to that evil twin's SSID. Therefore, to protect against such attacks, WIPS plays an important role, triggering a fake AP based on multiple parameters, such as BSSID. Implementing a secure wireless network is a bit of a tedious task, but not that difficult. Therefore, choosing a strong authentication mechanism with a secure protocol and setting different VLANs with proper segmentation keeps wireless networks secure from attackers and attacks such as VLAN hopping.
This chapter helps network administrators, network penetration testers, and red teamers to perform security testing in real time and identify flaws in their currently implemented wireless network architecture to implement it more securely.
The next chapter will talk about network routing protocols, where we will learn about the workings of the Open Shortest Path First (OSPF), Border Gateway Protocol (BGP), Interior Gateway Protocol (IGP), and other related protocols, their flaws, how an attacker would identify loopholes to exploit them, and how to protect networks from such attacks.
Questions
- PEAP works on which of the following?
- WPA-PSK
- Fake certificates
- Anonymous credentials
- All of the above
- The EAP-TLS protocol works on which of the following?
- Client-side certificates
- Server-side certificates
- Credentials
- Both A and B
- A rogue AP can be detected using which of the following?
- WIPS
- Management frame protection
- MAC addresses
- All of the above
- A wireless MITM attack works on which of the following?
- ARP spoofing
- DNS spoofing
- SSL stripping
- All of the above
- FreeRadius-WPE is used to set up which of the following?
- WPA2 encryption
- MITM
- 802.1x protocols
- All of the above
- A honeypot AP would typically use which of the following?
- WPA/WPA2 encryption
- Open authentication
- WEP encryption
- All of the above
- DOS in wireless is defined as what?
- A deauthentication attack
- A disassociation attack
- A beacon frame attack
- Both A and B
- In which of the following cases can WPA be cracked?
- Management frames are compromised.
- A weak passphrase is being set up.
- Unpatched firmware is being used.
- All of the above.