
Finding Protocol Vulnerabilities
To put it simply, our purpose in finding protocol vulnerabilities is to find weaknesses in the network before someone else finds them. One of the tools that we use for this purpose is called fuzz testing or fuzzing.
In previous chapters, we learned about the data network structure and protocols, security protocols that are implemented in order to protect network resources, and we talked about what tools are available for scanning and testing networks and network devices' vulnerabilities.
In this chapter, we will take you a few steps forward, learning about fuzzing tools and how to use them to exploit the vulnerabilities in network protocols. In this chapter, we will talk about the tools and which one to use in each one of the network layers, while later in this book, we will examine the details of the protocols and learn about vulnerabilities in each one.
In this chapter, we're going to cover the following main topics:
- Black box, white box, and gray box testing
- Black box and fuzzing
- Common vulnerabilities
- Tools and code for fuzzing
- Crash analysis – what to do when we find a bug
Let's start with black box and fuzzing, see what they are, and learn how to use them.
Black box, white box, and gray box testing
Fuzzing is what's called black box testing, but before getting into the details, let's understand black box, white box, and gray box testing.
White box testing, also called open box, clear box, or glass box testing, is tests that are performed when we get all the information on the system under test, including software architecture, modules, source code, and so on. White box testing is usually used for software testing, and it is not in the scope of this book.
Black box testing is when you know that the device and/or software you are testing is there, but you don't have any further knowledge of it. You control the input you send into the device; you can see the output that is received, but you don't have any knowledge of the inner architecture and software of the device.
Gray box testing is when you have partial knowledge of the system's internal design and code, such as when we have knowledge of the device architecture but not of the code itself, and we test the device as a user logging into the system and not as a software tester like in white box testing.
When referring to security testing, in a black box penetration test the tester is not provided with any information on the network structure and devices, so the tester has to start from scratch, map the target network, and try to find vulnerabilities in it.
Black box and fuzzing
In this book, we will focus on how to protect our network and network devices. In this regard, we will see how to use fuzz testing or fuzzing, a testing technique that inputs data into the device under attack, expecting one of the following results:
- Breaking into the system under attack
- Getting secure information from the device under attack
- Crashing the system under attack
Although the classical use of fuzzing tools is for software testing, in this chapter we will see a special aspect of it, in which we use it for breaking into, crashing, and manipulating communication devices.
Another important issue is that, unlike servers, communication equipment connects networks and Virtual Local Area Networks (VLANs) and therefore usually has several interfaces that are connected to several VLANs and/or to several networks. Risks can come from each one of them, so the test should be performed from different locations on different physical ports.
Networking devices can be configured to accept or drop specific requests from specific interfaces. For example, access by Simple Network Management Protocol (SNMP) can be allowed only from the organization's management station identified by its IP address, the Open Shortest Path First (OSPF) routing protocol can be allowed from specific routers, Telnet or Secure Shell (SSH) login can be allowed from the internal network, and so on. The process of fuzzing should be performed by first scanning the network and finding open ports, and then going to the next level and using fuzzing tools in order to manipulate the device under attack through the Transport Control Protocol (TCP) or User Datagram Protocol (UDP) ports it is listening to.
Enterprise networks testing
In enterprise networks, as seen in Figure 5.1, we should perform the following tests:
- Test on firewalls, from the internal network, the Demilitarized Zone (DMZ), and the internet – in more complex topologies, from every network that the firewall is connected to.
- In routers, tests should be performed from the Local Area Network (LAN) and, if possible, also from the Wide Area Network (WAN) interfaces. For example, when we connect our test device, usually a laptop with Windows or Linux on it, to the Secured Zone (SZ) switch in the data center network, we will be able to scan and fuzz both the firewall and the routers that connect us to the WAN and remote offices.
- LAN switches can be accessed when you are directly connected to them or by accessing the switch management from external networks.
- Wireless networks (Wi-Fi) can be accessed from any point from which you see the network, which is every place that you enable your Wi-Fi adapter and see the network on the list:
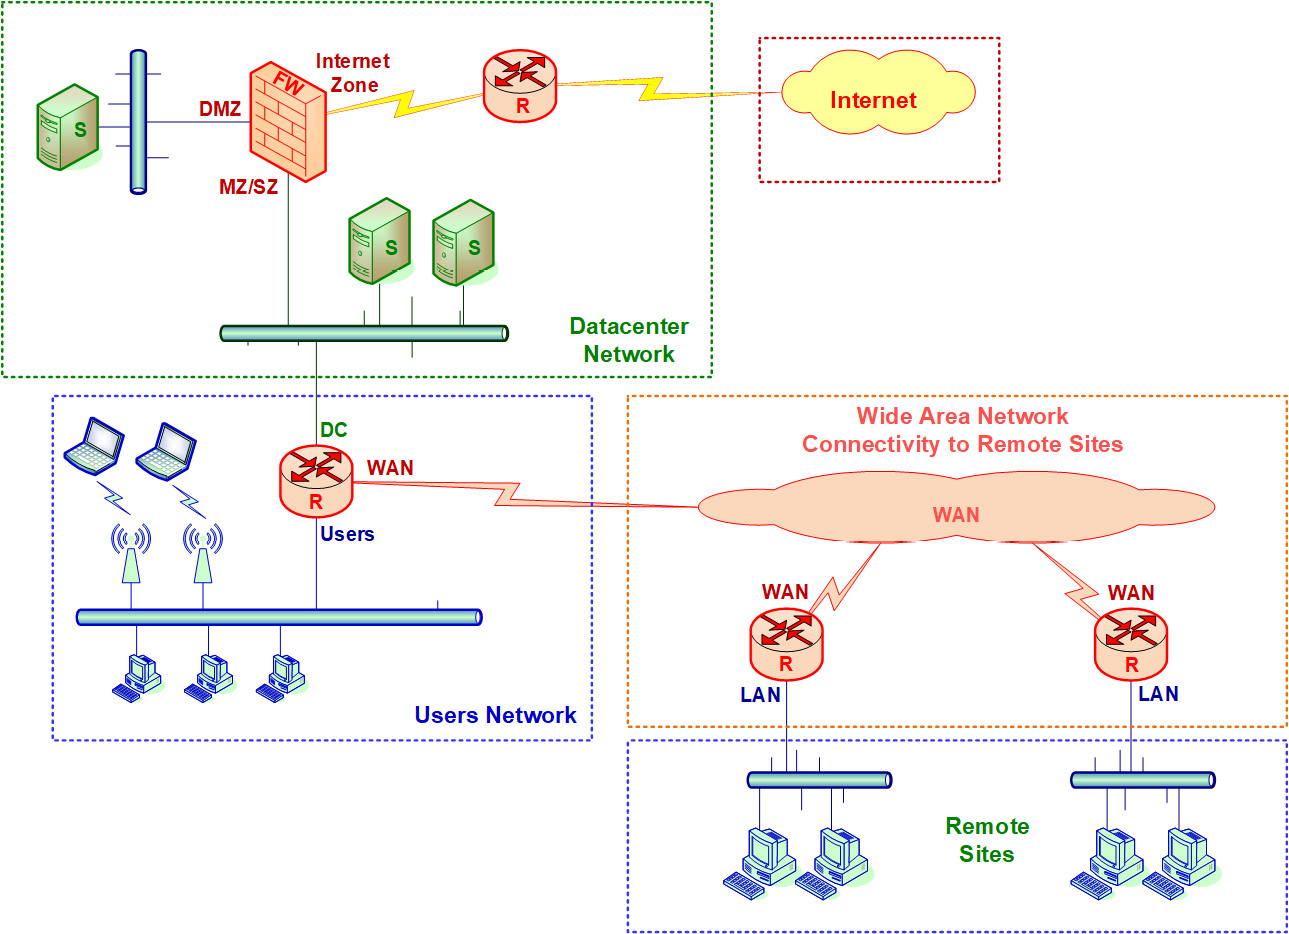
Figure 5.1 – Attacking points and enterprise networks
Provider networks testing
In provider networks, such as cellular or landline communications providers, the network is usually divided between the data plane and the control plane. As we see in Figure 5.2, there are two passes – the data pass and the signaling pass. In this example, the cellular network is connected both to the internet and to our enterprise network. Connecting to the internet through the cellular network is what all of us do every day (and every hour); connecting to our enterprise network requires a dedicated Virtual Private Network (VPN) or Access Point Name (APN) n the cellular definitions that allows us to connect to it. In the following figure, we can see the structure and the main components of a cellular network:
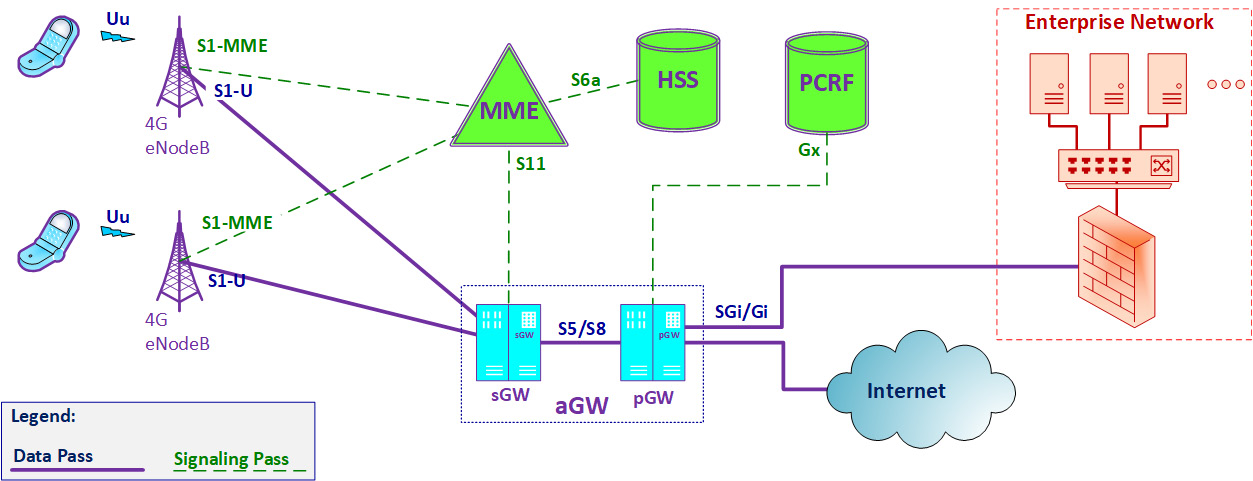
Figure 5.2 – Attacking points and service provider networks
A cellular network is composed of two types of devices and passes:
- The first part of the network contains the devices and connections that forward the user data. This is called the data plane (full continuous line in the figure).
- The second part contains the devices that control the network and are responsible for user registration, call forwarding, authorizing user operations, and so on. This is called the control plane (dashed line in the figure).
When we connect with our cellphone to the network, a 4G cellular network in this example, our data goes through the data pass, so our information goes through the aGW, which contains the sGW and the pGW routers, which are the cellular network routers. In short, the Serving Gateway (sGW) is the router attached to the cell site (eNodeB) that forwards packets to and from the user, while the Packet Data Network (PDN) Gateway (pGW) is a router that is responsible for policy and quality of service enforcement, packet filtering, and other features. The term Access Gateway (aGW) refers to the functionality of the two devices – the sGW and the pGW. The signaling pass that contains the cellular databases and management servers is out of our reach.
Although the network components in 5G cellular networks are called functions, they have some similarities to 4G – the cell site that was called eNodeB is becoming gNodeB, the sGW functions are implemented by the Access and Mobility Management Function (AMF) in 5G, the pGW is implemented by the Session Management Function (SMF) and User Plane Function (UPF), and so on. The important thing is that there will always be routers that carry the user packets, and these routers must be protected.
As a cellular network provider, these servers are also under our control and should be tested as any other device in the network. Now, let's look at the different phases in fuzzing.
Fuzzing phases
Fuzzing is a very flexible process. It depends on the target system, on the tools you use, and on your knowledge in programming and scripting, but in any case, you should follow the following phases:
- Identify the target.
- Define possible inputs.
- Generate and execute fuzzing data.
- Execute and watch results.
Let's get into the details and see some examples.
Phase 1 – identifying the target
In this phase, we find out where the target is (IP address), what services are open on it (TCP/UDP ports), and what the target is (OS fingerprints or prior knowledge).
Phase 2 – defining possible inputs
In this phase, we check what can be sent to the target. Exploitable vulnerabilities are usually discovered by processes running on the target that accept input from external devices without checking and verifying their source and legitimacy and applying validation procedures. Inputs that we send to the target device are called input vectors.
In the following example, you can see a simple Network Mapper (Nmap) used to scan a remote firewall using the nmap -O -A <target-system> command (firewall address erased for obvious reasons):
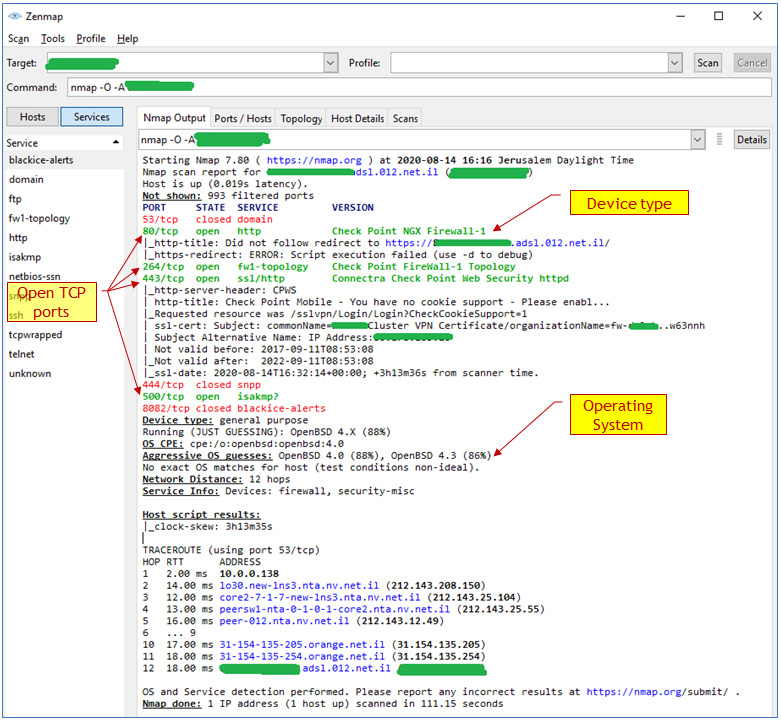
Figure 5.3 – Basic NMAP scan on a target firewall
From this scan, we see that we have a checkpoint firewall, we can see its open TCP ports (80, 264, 443, and 500), we can see that the operating system it is running is OpenBSD Unix/Linux version 4.0 or 4.3, and for the device type, we can see that the software version is NGX.
From this information, we can go to a vulnerability database and find out vulnerabilities that were detected on this device type.
Important Note
A vulnerability database is a list of publicly known cybersecurity vulnerabilities. There are many websites holding these lists, among them https://cve.mitre.org/index.html, in which you should go to the search engine at https://cve.mitre.org/cve/search_cve_list.html, https://www.securityfocus.com/vulnerabilities, and others.
For example, on https://www.securityfocus.com/vulnerabilities, you will find various vulnerabilities on the vendors' equipment (not so much in our case), and you can start to see directions for the fuzz tests:
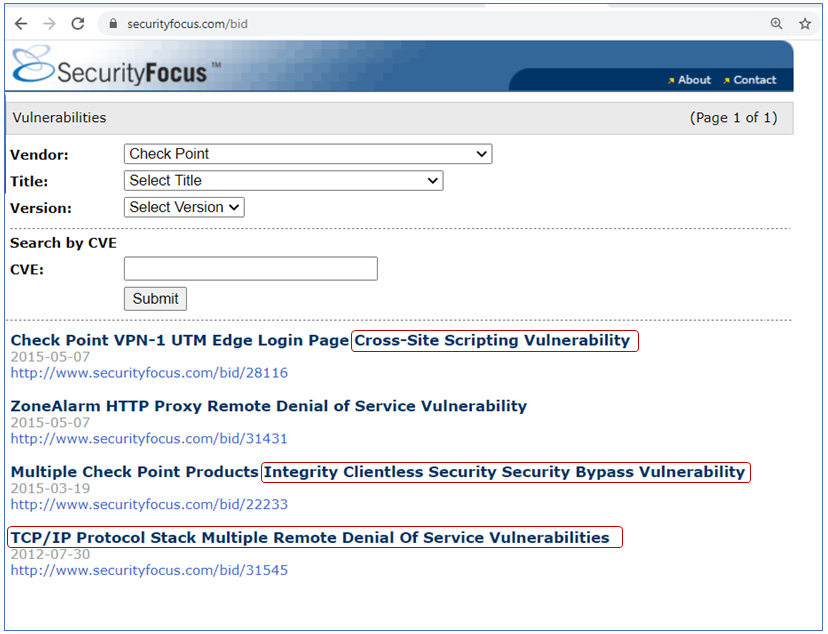
Figure 5.4 – A vulnerabilities list
As we saw in Figure 5.3, using NMAP we found on the firewall the following opened TCP ports:
- 80 (HTTP): This can be accessed with various HTTP application analyses; you can find a list of them under the Kali Linux menu of web application analysis (number 3 in the Kali Linux tools list, provided in the Commercial, open source, and Linux-based tools section of Chapter 4, Using Network Security Tools, Scripts, and Code).
- 264 (Border Gateway Multicast Protocol (BGMP)): Checkpoints use this port number for secure remote clients – these are connections established by remote clients to connect to the organization network.
- 443 (Secured HTTP – HTTPS): This is open for remote management of the firewall. Secured HTTP is a connection over HTTP, secured by Secured Socket Layer (SSL)/Transport Layer Security (TLS).
- 500 IP Security (IPSec)/Internet Security Association and Key Management Protocol (ISAKMP): This is used for a VPN connection between this firewall and remote firewalls or remote clients.
Phase 3 – generating and executing fuzzing data
In this phase, we create data that will be sent to the tested system. It can be predefined strings (for example, NMAP predefined scripts), data that is usually accepted by the device but with changes, or just random data, such as TCP SYN packets, random HTTP commands, and so on.
Phase 4 – executing and watching results
In this phase, we send the information to the tested system and watch the results. Figure them out and think about the next measures. There are always some.
Next, let's go ahead and discuss some common vulnerabilities.
Common vulnerabilities
With network protocols, we refer to protocols in the OSI Layers 2-7. In the following diagram, you can find a reminder of the OSI reference model and its functionality:
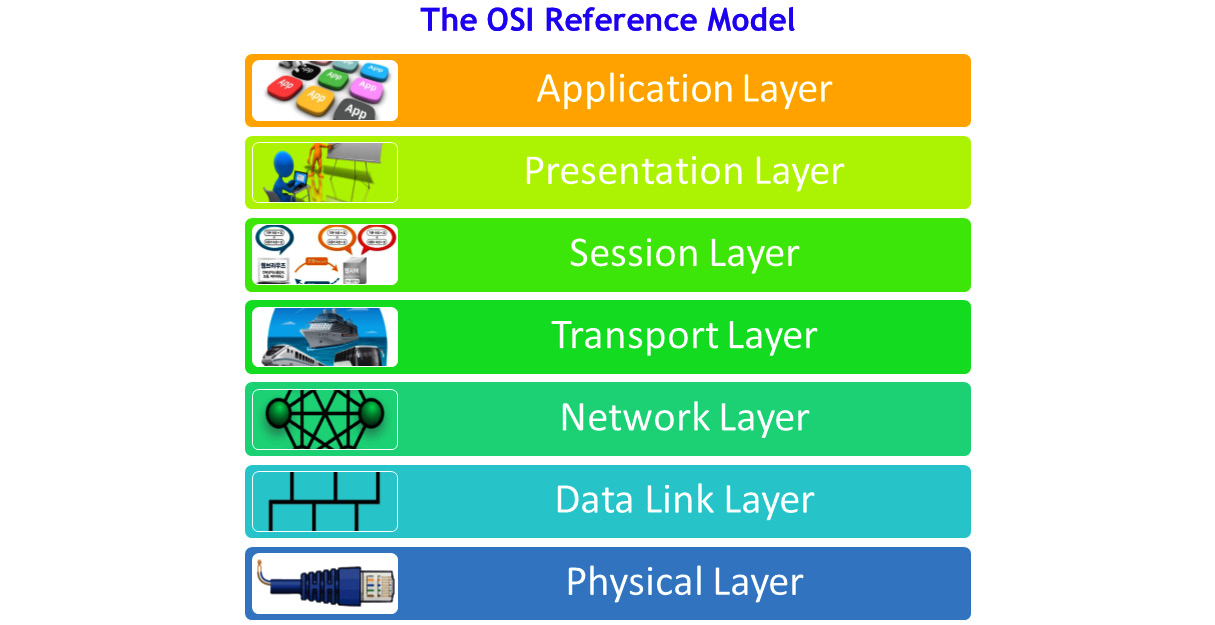
Figure 5.5 – The OSI reference model
These are the details of the OSI reference model:
- Layer 1, the physical layer, is responsible for the physical connectivity, such as cables, connectors, and frequencies, in wireless and cellular networks.
- Layer 2, the data link layer, is responsible for the connectivity between directly attached network elements. Ethernet is the main protocol in landline networks.
- Layer 3, the network layer, is the layer that is responsible for carrying the information from end to end. IP is the only protocol in this layer.
- Layer 4, the transport layer, is the layer that is responsible for connecting end processes. TCP and UDP are the main protocols in this layer and, in recent years, Quick UDP Internet Connections (QUIC) and Google QUIC (GQUIC) from Google have also joined them.
- Layer 5, the session layer, is the layer that is responsible for connectivity in the upper layers (Layers 5, 6, and 7). Remote Procedure Call (RPC) is an example of a protocol in the session layer.
- Layer 6, the presentation layer, is responsible for the data structure and representation of the data. Encryption and coding protocols are presentation layer protocols.
- Layer 7, the application layer, holds the applications, such as HTTP, Simple Mail Transfer Protocol (SMTP), Session Initiation Protocol (SIP), and thousands of other applications.
Knowing the layers, we can consider the following vulnerabilities in each one of them.
Layer 2-based vulnerabilities
These are vulnerabilities in the data link layer protocols, such as wired and wireless Ethernet. Searching the CVE database (https://cve.mitre.org/cve/search_cve_list.html) for Ethernet will bring you a long list of vulnerabilities.
You will see here vulnerabilities in Ethernet adapters, such as the following:
- A vulnerability in the Access Control List (ACL) in Cisco IOS XR software that allows an unauthenticated remote attacker to reach the configured IP addresses on the standby route processor management Gigabit Ethernet Management interface (CVE-2020-3364).
- A vulnerability in the Medicon M340 controller, in which truncated SNMP packets on port 161/UDP that are received by the device could cause a DoS.
Important Note
It is important to note that in most cases, especially with brands mentioned in this book, it is likely that bugs and vulnerabilities will be handled efficiently and in a short time. Nevertheless, watching vulnerabilities that come from a specific vendor can give you a good direction for potential vulnerabilities with that vendor.
Layer 3-based vulnerabilities
These are vulnerabilities in network layer protocols, such as the IP protocol, including vulnerabilities in Dynamic Host Configuration Protocol (DHCP), Internet Control Message Protocol (ICMP), routing protocols, and multicast protocols. Searches for IP, ICMP, OSPF, BGP, or DHCP bring many issues discovered in systems from various vendors, including the leading ones. Issues here include things such as the following:
- The possibility that an unauthenticated remote attacker can view sensitive information on Cisco IP 7800 and 8800 series phones (CVE-2020-3360). Juniper devices with some line cards can become disabled upon receipt of large packets requiring fragmentation (CVE-2020-1655).
- A vulnerability in the Border Gateway Protocol (BGP) Message Digest 5 (MD5) implementation. Cisco NX-OS software can allow an unauthenticated, remote attacker to bypass MD5 authentication and establish a BGP connection with the device, which can cause a network failure (CVE-2020-3165).
Layer 4-based vulnerabilities
These are vulnerabilities in transport layer protocols, such as TCP, UDP, QUIC, GQUIC, or SCTP, which can cause system crashes and allow connection hijack and other attacks. The following are examples:
- A stream of TCP packets sent to the Routing Engine (RE) on a Junos OS device from Juniper Networks can cause a memory buffer leak, which can lead a system to crash and restart (CVE-2020-1653).
- Moxa NPort 5150A firmware version 1.5 and earlier allows attackers to obtain various configuration data by sending a UDP packet to port 4800 (CVE-2020-12117).
Layer 5-based vulnerabilities
These are vulnerabilities in session layer protocols, such as RPC, Telnet, SSH, and others. The following are examples:
- A vulnerability in the Telnet service in Cisco Small Business RV110W Wireless-N VPN firewalls that can allow an unauthenticated attacker to take full control of the device with a high-privileged account (CVE-2020-3330).
- A stack-based buffer overflow in Advantech WebAccess/SCADA version 8.4.0 allows an unauthenticated attacker to execute arbitrary code by sending an IOCTL 81024 RPC call (CVE-2019-3954).
Layer 6-based vulnerabilities
These are vulnerabilities in presentation layer protocols that define data structures and presentation, such as HTML, XML, encryption protocols, and others. There are many issues here, most of them in web applications, conference and cooperation applications such as Webex and Zoom, access to web browsers, and other issues that are not in the scope of this book. Here is an example:
- A vulnerability in the Cisco Webex Network Recording Player and Player for Microsoft Windows that possibly enables an attacker to cause a process crash, which will result in a Denial of Service (DoS) condition for the player application on an affected system (CVE-2020-3322)
Layer 7-based vulnerabilities
These are vulnerabilities in the application layer, and in the context of communications protocols, there are issues in HTTP access to communication devices, vulnerabilities in VoIP servers and mail servers, DNS vulnerabilities, and many other issues. The following are examples:
- A vulnerability in the web services interface of the Adaptive Security Appliance (ASA) firewall and Firepower Threat Defense (FTD) software. The software allows an unauthenticated, remote attacker to conduct directory traversal attacks and read sensitive information from the targeted system (CVE-2020-3452).
- Configuring an F5 BIG-IP load balancer with a large number of parameters can cause excessive CPU usage (CVE-2018-5541).
Let's see what tools can be used for finding these vulnerabilities.
Fuzzing tools
When testing network protocols and devices security, fuzzing can be used for several purposes:
- Breaking usernames and passwords (brute-force attacks)
- Crashing the target device or some of its functionality
- Manipulating communication processes running on the device
Let's dive into the details.
Basic fuzzing
Basic fuzzing can be just to send data to a device and see what happens. There are several options for this.
Windows
For Windows/Linux, you can use NMAP features, such as IP address scanning, TCP port scanning, and various scripting tools. NMAP for Windows was covered in the Information gathering and packet analysis tools section in Chapter 4, Using Network Security Tools, Scripts, and Code.
Linux
For Linux, you can use simple tools such as Netcat. In the following example, you can see a Netcat script that generates random traffic and is sent to <target-host> <target-port>:
while [ 1 ]; do cat /dev/urandom | nc -v <target-host> <target-port>; done
We have the following:
- while [ 1 ]: Send data endlessly (can be any number or letter).
- do cat /dev/urandom: Perform random number generation.
- nc or netcat – Netcat: Send data to destination.
- -v – verbose: Print the output to the screen.
- target-host and target-port: As the names imply.
- done: To end the script.
This simple command on my home router, 10.0.0.138, as you can see in the following screenshot, was enough to cause the router to chunk. You can see that from the Wireshark [TCP Window Full] indications on traffic sent from 10.0.0.23 (my Linux laptop) to 10.0.0.138 (target router):
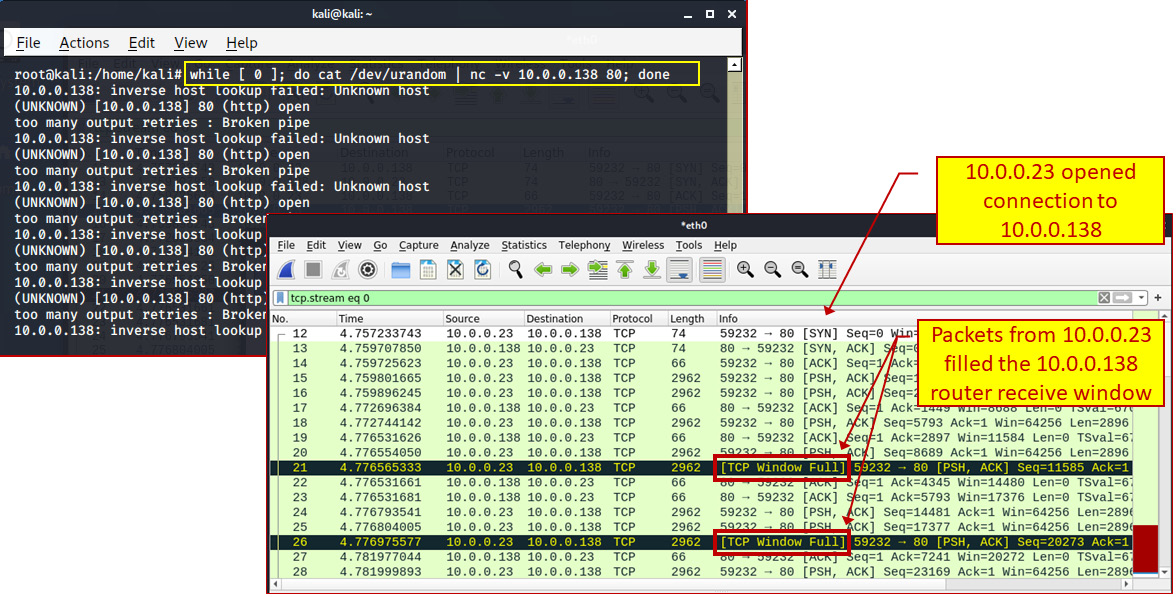
Figure 5.6 – Using a Netcat example
You can see from this that a home router can be overloaded with a simple script, and this is before we have tried any sophisticated scripts. With a real network, we will of course have to try harder.
Breaking usernames and passwords (brute-force attacks)
For breaking usernames and passwords, we can still use NMAP in Windows, or any option under the 4 - Password Attach menu in Kali Linux. In the following examples, we will see some common tools for Windows and Linux.
Cracking passwords is basically done by guessing them. There are various mechanisms to do so efficiently but, basically, when we have a good starting point, the guessing process will be faster, and therefore we need wordlists. A wordlist, also called a password dictionary, is a text file that has a list of possible passwords that are used in the guessing process.
Using wordlists makes the cracking process much faster. You can find wordlists on the John the Ripper website (https://www.openwall.com/wordlists/), on GitHub (https://github.com/berzerk0/Probable-Wordlists), and in other places, and you can write them yourself. The better the wordlist is, the quicker you will be able to crack the passwords on the device you are targeting. There are also predefined wordlists that you can use. These files are under /usr/share/wordlists.
Important Note
Writing a wordlist is a scientific issue, and how to write an efficient one is a subject for mathematicians and psychologists. If, for example, we want to guess passwords of 8 characters that are made only from English lowercase letters, we will have 26^8 possibilities (208 billion possibilities). If we add the uppercase letters, we will have 52^8; if we use uppercase and lowercase letters, with passwords of 1 to 8 characters, we will have 52^1 + 52^2 + 52^3 + … 52^8; and if we add special characters (!@#$....), we will get much more.
There are many websites that focus on this subject, which is out of the scope of this book.
Windows
In Windows, you can use NMAP options for brute force (Profile menu, New Profile or Command or Edit Selected Profile, under the Scripting tab). In the following screenshot, you can see a brute-force attack on 10.0.0.138, using NMAP scripting:
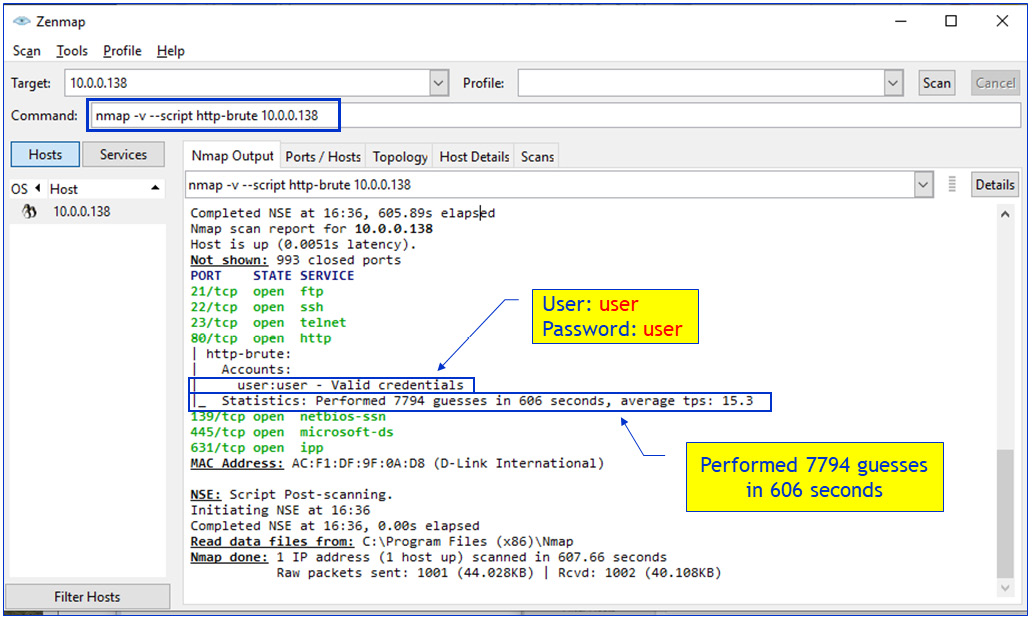
Figure 5.7 – Using Netcat example
For smarter cracking, we can use additional tools such as John the Ripper, which can be found on https://www.openwall.com/john/, Hydra, and others. You can also use the GUI version, Johnny. You can get the installation files from https://openwall.info/wiki/john/johnny#Features.
Linux
There are various Linux tools for password cracking, including NMAP, John the Ripper, Ncrack, Hydra, Crunch, and others. Let's see a simple example, using Hydra to crack Telnet to 10.0.0.138:
sudo hydra -l user -P /usr/share/wordlists/rockyou.txt telnet://10.0.0.138
Here, the following apply:
- sudo: Switch to the superuser (highest privilege user).
- hydra: Cracker command.
- -l user: Username is user.
- -P /usr/share/wordlists/rockyou.txt: Use the rockyou.txt password file.
- telnet://10.0.0.138: Service name and IP address of the stacked system.
Let's see how these tools can be used.
Fuzzing network protocols
There are two major ways to attack network protocols and devices:
- Brute-force or mutation-based fuzzing: Here, we send data to the device, focusing on parameters that we know this device accepts, such as username and password, or information that we gather prior to fuzzing, for example, data that we capture with Wireshark that is sent and received by the device and then used to manipulate the sender.
- Smart protocol fuzzing: Some communication protocols are simple, some are complex, and some are very complex, and there are cases (many of which I remember from my 30 years in this area) where not all protocol functionalities are implemented, and the ones that are present are sometimes not implemented precisely according to the standard. Smart usage of fuzzers here can check for protocol vulnerabilities that were not expected by the vendor.
In the next sections, we will see some Windows and Linux tools that can be used for communication protocol fuzzing.
Windows tools
There are some cases in which you can use NMAP for network protocol fuzzing, among them dns-fuzz, which can be used for attacking a DNS server (not so successfully, I must say), the http-form-fuzzer command used against forms found on websites, and some others. We will use NMAP scripts later in the book when we talk about communications protocol security.
Linux tools
In Linux, we can use the Spike tool, with predefined or custom scripts for network protocols.
Spike is a fuzzer creation tool that can create customized fuzzers for network protocols using the C programming language. Spike defines several primitives that can be used with C, which allows it to build fuzzed messages called SPIKE instances that can be sent to network services for testing.
There are many predefined Spike scripts under /usr/share/spike/audits. These files end with .spk. To find them, type the locate .spk command.
The spike commands are located under /usr/bin. We will focus on the following commands:
Generic_send_tcp
Generic_send_udp
You can run the command as follows:
cd /usr/bin
./generic_send_tcp <destination-address> <destination-port> <file-name> 0 0
Here, the following apply:
- ./generic_send_tcp: Command name
- <destination-address>: Target address
- <destination-port>: Target port
- <file-name>: Spike file to run
- 0 0: Timing parameters
cd /usr/bin
./generic_send_tcp 10.0.0.138 80 /usr/share/spike/audits/SSL/ssl.spk 0 0
Here, you can use Kali Linux predefined scripts, download scripts from the internet, or write your own. Let's see some examples:
cd /usr/bin
./generic_send_tcp 10.0.0.16 139 usr/share/spike/audits/CIFS.netbios1.spk 0 0
The preceding will fuzz the CIFS protocol on target 10.0.0.16 port 139.
The following will do the same on port 137:
cd /usr/bin
./generic_send_tcp 10.0.0.16 137 usr/share/spike/audits/CIFS.netbios1.spk 0 0
In this section, we talked about what tools to use and what to send to the tested device. Now, let's see what we do with the results.
Crash analysis – what to do when we find a bug
The most common way to report a system vulnerability is to issue it to the vendor and make sure they publish it so that all potentially affected users can download a fix for it when it's published. The issue is that not all vendors have an ordered methodology in which they fix the vulnerability, publish it, and notify their customers.
Important Note
An important issue is that in many countries, hacking into systems is illegal. In the US for example, it is a federal crime to intentionally access a protected computer without authorization, and as a result of such conduct, recklessly cause damage (section 5B); or intentionally access a protected computer without authorization, and as a result of such conduct, cause damage and loss (Section 5C) and more (https://uscode.house.gov/view.xhtml?req=granuleid:USC-prelim-title18-section1030&num=0&edition=prelim) (Computer Fraud and Abuse Act: Fraud and related activity in connection with computers - 18 U.S.C. 1030). In countries such as the US, be careful and ideally consult a lawyer before acting.
Not all vendors are so organized. Some of them fix bugs silently, without informing their customers. Some of them will ignore you and some will try to keep you silent.
You can also publish bugs in places such as the Zero Day Initiative (ZDI) (https://www.zerodayinitiative.com/) or other sites that reward security researchers for bug findings (you can get up to tens of thousands of USD at the higher levels). Google, for example, has paid security researchers and hackers over $21 million for bug bounties, $6.5 million in 2019 alone (https://venturebeat.com/2020/01/28/google-has-paid-security-researchers-over-21-million-for-bug-bounties-6-5-million-in-2019-alone/). Microsoft has paid security researchers and hackers $13.7 million for bug bounties in a single year (https://itcareersholland.nl/microsoft-has-paid-security-researchers-13-7-million-for-bug-bounties-in-12-months/), and so have Facebook and many others.
Summary
In this chapter, we talked about dedicated tools that are used for hacking into networks and network protocols, and which of them should be used in each one of the OSI reference model layers. Understanding the usage of each one of these tools will later help you to understand where to use which tool.
In the next chapters, we start to dig into specific protocols, starting from Layer 2, Wi-Fi and Ethernet, and continuing to IP, TCP/UDP, and the upper-layer protocols and applications.
Questions
- Black box testing is when:
- All information about the target is known.
- There is no information about the target.
- The target is kept in the dark.
- Only part of the information about the target is known.
- Fuzz testing or fuzzing is:
- Guessing what the target system is
- Sending random data to the device under test and analyzing the results
- Sending predefined data to the device under test and analyzing the results
- Guessing passwords and trying to break into the device under test
- The right order to perform a fuzz test is:
- Identify the target, define the inputs, generate data, execute, and watch the results.
- Identify the target, generate data, execute, and guess the results.
- Try to get the password, identify the target, define the inputs, execute, and watch the results.
- Find the proper tools, identify the target, generate data, execute, and watch the results.
- A vulnerability in the OSI reference model Layer 5 could be:
- Connectivity failure to application protocols
- Session hijacking and a connection with a guessed password
- Misconfiguration of the TCP/IP protocol stack
- Buffer overflow
- A brute-force attack:
- Sends a huge amount of traffic in order to crash the target
- Scans the target network in order to find the gateway to the network
- Is a type of DDoS attack
- Uses password-guessing mechanisms to break into systems