
For this section, we'll create a new API and smoke-test it using GUI-based tools. This is the best way to introduce the required steps, and it's good to be able to see the feedback straightaway on the console.
Let's create a new RESTful API:
- Create a new API with a regional endpoint type and give it a useful name. The API will be created but with no resources or methods—let's change that.
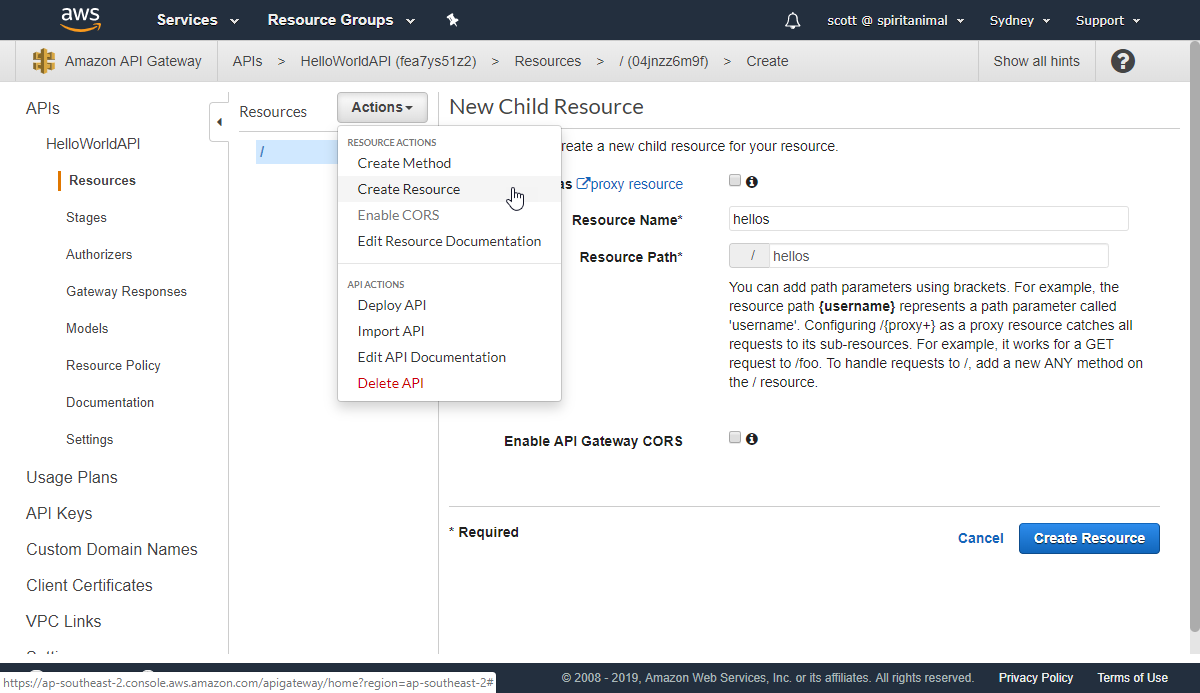
- Make a new resource by clicking Actions | Create Resource. Don't worry too much about the resource name or path, we're not trying to create the most RESTful API in the world here.
The following screenshot shows where to find the Create Resource action:
- Next, we need a new method, so we can perform actions against the resource we just created. Let's go with a simple GET method. There's a little tick icon that appears when creating a method—it's hard to see and you need to click it to confirm the method type.
The following shows the settings I've used for the GET method. We want to connect this new API to use our Lambda function as a backend integration, so specify the function you created earlier and click Save:

API Gateway will automatically add the IAM permissions that are needed for API Gateway to be allowed to invoke your Lambda function.
It's good practice to make ourselves an API key to use when doing our development. We might only be using test or public data during this process but it's important to still control the traffic to the endpoint.
To be able to enable some basic API management, we first need a usage plan, so let's create one:
- Log in to the management console and head over to the API Gateway console.
- Click on Usage Plans and create a new plan using values that you think would be sensible.
I'm going to pick a request rate of 100 requests per second with a burst capacity of 500 requests. Because we only have one developer working on this API, I'm also going to limit the total quota down to accepting only 1,000 requests per day.
The following shows an example of my usage plan. You can copy my settings or use your own sensible values:

We can skip adding an API stage for now but we'll need to come back to this later to associate the usage plan with a stage.
- On the next screen, let's create a new API key and include it in this new usage plan. You can also create keys any time using the Usage Plan API Keys screen:

Cool, now we've got a credential to call our API with. You can find the value of the key under the API Keys screen:

Great, so we've created our new resource, method, usage plan, and API key. Feel free to click around and explore the options for the method execution as well. Before we deploy or publish our API, let's make sure that the resource is properly secured with the API key we created:
- In the Method Execution screen, click into Method Request. Change API Key Required to true. The following screenshot indicates which settings to update. Remember to click the little tick when done:

- Now, we will create a new stage and deploy it to our endpoint. Click Actions | Deploy API and create a new stage called dev. Done! That's how simple it is to author a new RESTful API and deploy it to an endpoint.
- The last thing we need to do is hook our usage plan up to the new stage so we can access it with an API key. Head back over to the Usage Plan page, select the plan we created, and follow the steps to add an API stage to the plan.
Okay, it's time to test it. I'm going to use a tool called Postman to send a GET request to our resource. Notice here that I've included the API key as the value of the x-api-key header. You'll need to do the same with your key.
The following shows Postman with an example request to my API. The bottom section shows the response data:

Oh no! It's responded with an error. Looking at the logs of the function execution in CloudWatch Logs, we can see the error trace.
I've included a screenshot of my log output in CloudWatch logs. It looks like there is an issue at line 4:

Our function code is expecting two input fields, text and repeat. The code doesn't know how to handle it when those fields aren't present and therefore terminates the execution. Let's add a line to our function so that it returns something when there is no input. Given that we are now using this function as a backend to a RESTful API, we should also make sure we are returning a JSON response.
Let's extend the hello-world-python function code a little bit and save it:
import os, json

def hello_handler(event, context):
    if not event:
        return {
            "body": "Hello, world!"
        }

    text_input = event["text"]
    repetitions = event["repeat"]

    if text_input and repetitions > 0:
        response = {}
        for i in range(0, repetitions):
            print(text_input)
            response[i] = text_input
        return {
            "body": response
        }

    return None
Now when we perform the same request in Postman, we get a nice HTTP 200 response and our message. What we have managed to do here is make changes and redeploy our backend implementation logic independently of our API Gateway deployment. That's pretty cool. We also saw what happens when we make a mistake and where to troubleshoot errors. Don't be afraid to deploy often and make lots of mistakes—it's all part of the fail-fast mentality.
After we have developed and deployed via the management console a few times, we start to wonder whether there is a more efficient workflow for development. There absolutely is. In the next section, we will see how we can build on our example but this time using the AWS command-line interface.