
In this section, we are going to create a simple bot that uses Lambda as a code hook integration. We'll continue with our airline customer service desk example and make a bot that can book a flight:
- Jump into the Lex console, making sure you're in a supported region. If you haven't created a chatbot before, you will be presented with a welcome page.
- Click Get Started and select Custom bot.
- We're going to create the airline example we've been using throughout this section. Create the bot using the values shown in the following screenshot:

When you click Create, a service-linked IAM role is created for you with enough permissions to get you going. You're then presented with a screen with not much going on. A chatbot isn't much without at least one intent, so let's create one.
- Click Create Intent and add one called BookFlight. Now, we have a blank form where we need to add our utterances, slots, and fulfillment integrations.
- Let's start with the slots because we'll need them when we write our sample phrases. Use the following slots in your intent. I've used the AMAZON.US_CITY slot type for the locations and the AMAZON.DATE slot type for the time of the flight:

You can also create your own custom slot type and populate it with valid cities, but we're not going to go into that in this example. For the prompts, you can optionally configure more prompts by clicking the Settings button on each slot. It is good to add a bit of variation into the conversation.
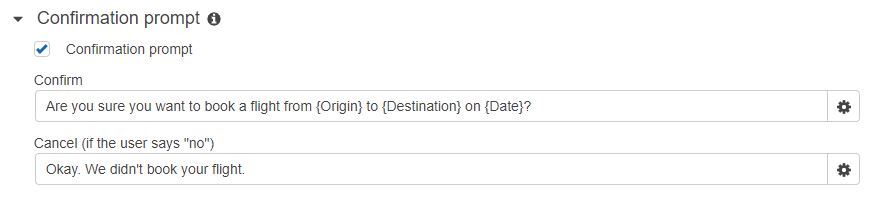
- It's usually a good idea to ask for confirmation when we're doing something as important as booking a flight. Therefore, we should enable the Confirmation prompt. This is also where we get to use variables for our slots. Notice in the following screenshot that I have used the slot names as placeholders. The syntax for this uses curly braces around the slot name:
- You can keep Fulfillment set to Return parameters to client for now. We're going to go back later and connect it up to our Lambda function once we create it.
- We're not finished yet, though. Let's circle back and add some sample utterances to our intent so that the bot understands more about which intent to match a phrase to. Notice that I've used slot placeholders here as well, and this time they automatically color-code themselves to make it easier for us to see them. I've gone with a range of phrases in order to cover each level of detail that we expect our airline users to include:

We're almost ready to rock. The last thing we need to do is save the intent so that we can come back to the Lex console later to connect our Lambda function.
- Hit Save Intent at the bottom of the page and then jump over to the Lambda console.
What we're going to do now is create a simple Lambda function that will respond to a fulfillment event generated by Lex. To keep it simple, all our function will do is respond with a Close fulfillment type. In a real chatbot, this is where you would include all the logic and integrations to book a flight in the airline's system. Let's get started:
- Create a new function using a Node.js runtime.
- Update the function code to the following. This code takes the slot values that were passed in the event during the invocation from Lex and sets them as session attributes. This is an optional step and we will find out more about session management later on in this chapter. dialogAction is where we create the response format that Lex will be looking for. Here, you can see we have used the Close type, which will let Lex know that the conversation has come to an end:
exports.handler = async (event) => {
  let res = {
    "sessionAttributes": {
      "destination": event.currentIntent.slots.Destination,
      "origin": event.currentIntent.slots.Origin,
      "date": event.currentIntent.slots.Date
    },
    "dialogAction": {
      "type": "Close",
      "fulfillmentState": "Fulfilled",
      "message": {
        "contentType": "PlainText",
        "content": "We have booked your flight from " + event.currentIntent.slots.Origin+ " to " + event.currentIntent.slots.Destination+ " on " + event.currentIntent.slots.Date
}}} return res;  };
- Once you've saved this function, head back to the Lex console and find your AmazonianAirways chatbot. Now, we need to add our new function as a fulfillment integration for the BookFlight intent:

- Now that everything has been connected, go ahead and click Build on the top right of the console. This will build the model behind the scenes and also initialize the chatbot in the same console screen so that we can test it.
- It will take a few moments to build. Let's test it using the dialog box that pops up from the right-hand side of the screen:

Our bot works! If we wanted to improve our experience even more, we could respond with a more readable date. So, now that you know how to create a conversational bot, can you think of a use for one?
In the next section, I will introduce a different type of bot that can help automate operational tasks just like another member of your team.