
Chapter 8: Using the Project Feature with Git
What you will learn in this chapter is a very useful Project feature. The project feature of Node-RED is a kind of version management tool with Git on a Node-RED flow editor. This is actually disabled by default. Enabling this allows you to manage your flows in a new way. I believe many developers are familiar with Git services such as GitHub and GitLab. The project feature of Node-RED uses Git and GitHub for version control, so I think it's very easy to understand.
Here are the topics that we will be covering in this chapter:
- Enabling the project feature
- Using the Git repository
- Connecting a remote repository
By the end of this chapter, you will be able to understand how to use the project feature, how to connect your own Git repository to your Node-RED flow editor, and how to manage flows as projects with version control tool Git.
By the end of this chapter, you will have mastered how to use the project feature and make your applications with it. You can use it in any hosted Git service such as GitHub or GitLab.
Technical requirements
To progress in this chapter, you will require the following:
- A GitHub account, which you can create via the official website: https://github.com/.
- A Git client tool, which you need to install via the official website: https://git-scm.com/downloads.
Enabling the project feature
For example, in situations where you want to manage your own flow while sharing it with others, or you want to update the flow created by others, it is difficult to develop when a team uses only the Node-RED flow editor.
The project function of Node-RED is a method/function for managing the files that are relevant with each flow you make. It covers all the files needed to create applications with Node-RED shareable.
These are supported by the Git repository. That is, all files are versioned. This allows developers to collaborate with other users.
On Node-RED version 1.x, the project feature is disabled by default, so it must be enabled in the config file named settings.js.
Important note
When creating a project in the local environment of Node-RED, the flow created so far may be overwritten with a blank sheet. You can download the JSON files of the flow configurations for all the flows created in this document via the internet, but if the flow you created yourself exists in Node-RED in the local environment, it is recommended to export the flow configuration file.
All of the flow definitions and JSON files that we created in this book are available to download here: https://github.com/PacktPublishing/-Practical-Node-RED-Programming.
Now let's try the project function. We will use a standalone version of Node-RED on a local environment such as macOS or Windows. In order to use the project feature, we first need to enable it. Let's enable it by following these steps:
- It is necessary to rewrite the settings.js file to enable/disable the project function. Look for this file first. The settings.js file can be found in the Node-RED user directory where all of the user configurations are stored.
By default, on a Mac, this file is available under the following path:
/Users/<User Name>/.node-red/settings.js.
By default, on Windows, this file is available under the following path:
C:Users<User Name>.node-redsettings.js
- Edit the settings.js file. It is OK to open settings.js with any text editors. I have used vi here. Open settings.js with the following command:
$ vi /Users/<User Name>/.node-red/settings.js
Important note
Please replace the command with the one specific to your environment.
- Edit your settings.js file and set the projects.enabled element to true in the editorTheme block within the module.exports block in order for the project feature to be enabled:
module.exports = {
uiPort: process.env.PORT || 1880,
…
editorTheme: {
projects: {
enabled: true
}
},
…
}
- Save and close the settings.js file.
- Restart Node-RED to enable the settings we modified by running the following command:
$ node-red
We have now successfully enabled the project feature of Node-RED.
To use this feature, you need to have access to Git and ssh-keygen command-line tools. Node-RED checks them at startup and notifies you if any tools are missing.
If the settings are completed without any problems and you have restarted Node-RED, the project feature will be available. Next, let's set up the Git repository to use.
Using the Git repository
We enabled the project feature in the previous section. Reopen the flow editor and you will be prompted to create your first project using the contents of the flow you created at that time. This will be the welcome screen:

Figure 8.1 – Welcome screen
We need to set up a version control client such as Git. As already explained, the project function of Node-RED uses Git as a version control tool. As with regular Git, you can manage file changes on a project-by-project basis and synchronize with remote repositories as required.
Git keeps track of who made the change. It works with your username and email address. The username does not have to be your real name; you can use any name you like.
If your local device already has a Git client configured, Node-RED will look up those settings.
First, perform version control in your local environment. It takes advantage of the features of the Git client installed in your local environment. If you do not have Git installed, please install it in advance.
Now, follow these next steps to create a project on your Node-RED flow editor:
- First, let's create a project. This is very easy. Enter a project name and a description in the project creation window.
- Name the flow file. By default, it is already named flow.json.
In other words, Node-RED automatically migrates the flow currently configured on the flow editor to a new project as it is. It is OK to keep the default name. Of course, you may choose to rename it here if you so wish.
If you publish your project on a public site such as GitHub, it's a good idea to encrypt your credentials file.
If you choose to encrypt, you must create a key to use for encryption. This key is not included in the project, so if you share the project with someone, you will need to provide the credential file decryption key separately to the user who cloned the project.
- After adding the required information, click the Create Project button:

Figure 8.2 – Projects screen
Congratulations! You have created your first project.
- Next, check the project history. We can use the version control feature on our Node-RED flow editor. You can access the project history panel by clicking the project history button in the top-right corner:

Figure 8.3 – Project history panel
- You can see no changed items on this panel. To check whether the change history feature is enabled, make a flow on this workspace.
If you are a regular user of Git or GitHub, you should be able to understand the meaning and role of each item just by looking at the structure of this panel. If there is a change in the file structure or contents under the project, the target file will be displayed in the Local Changes area. When you move the change to the commit stage (that is, when you add it), the display of the target file moves to the Changes to commit area. If you enter a commit message and complete the commit, the version will be incremented by one.
This is exactly the same as what the Git client does.
- Create a flow and keep it simple. You can make any flow of your choice, for example, here I have used an inject node and a debug node. Place these two nodes, wire them, and then click the Deploy button:

Figure 8.4 – Sample flow to check the project history feature
Following deployment of this flow, you can see the flow.json file in the Local Changes area. This means that a flow consisting of an inject node and a debug node has been added (deployed) on the flow editor, and the flow.json file, which is the configuration file for this entire flow, has been updated. As a result, flow.json has been recognized as a file to be changed in Git management:
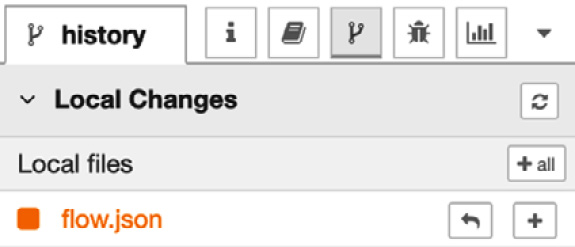
Figure 8.5 – Node-RED recognizes that flow.json has been changed
- Now, let's follow Git etiquette and proceed with the process. First, put the changed file on the commit stage. This is the git add command of Git.
- Click the Stage all changes button at the top right of the Local Changes area:
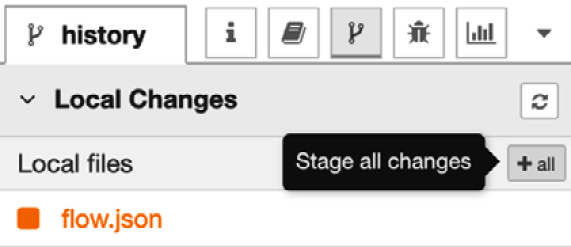
Figure 8.6 – Clicking the Stage all changes button to add the file
You can see that the flow.json file has moved from the Local Changes area to the commit area.
- Next, let's commit the changes in flow.json. Click the commit button at the top right of the Changes to commit area. This is exactly the equivalent of Git's git commit command:

Figure 8.7 – Clicking the commit button to commit the file
- After clicking the commit button, the commit comment window will be opened. Please enter a commit comment here and then click the Commit button:

Figure 8.8 – Clicking the Commit button to complete the commit process
- The commit is now complete. Finally, let's check the Commit History area. You can see that a new version has been created as a change history:

Figure 8.9 – New history has been added
As you learned, after creating your project, it will be possible to use the Node-RED editor the same as usual.
Now, let's add a new user interface to the Node-RED flow editor for project functionality.
Accessing project settings
The project you are working on will appear at the top of the right-hand pane. Next to the project name, there is also a Show project settings button:

Figure 8.10 – Project information on the info panel
You can also access the Project Settings screen from the Projects | Project Settings option under the main menu:

Figure 8.11 – How to access Project Settings via the main menu
When the Project Settings panel is shown, you will see that it has three tabs for each setting:
- Project: Editing the README.md file of this project
- Dependencies: Managing the list of nodes for your project
- Settings: Managing the project settings and the remote repositories:
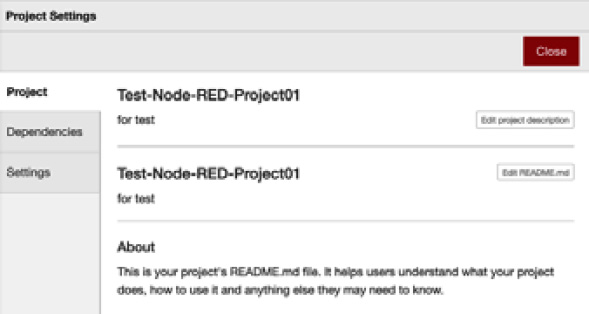
Figure 8.12 – The Project Settings panel
If you want to check and modify the Git settings, you can access the settings panel via the main menu:
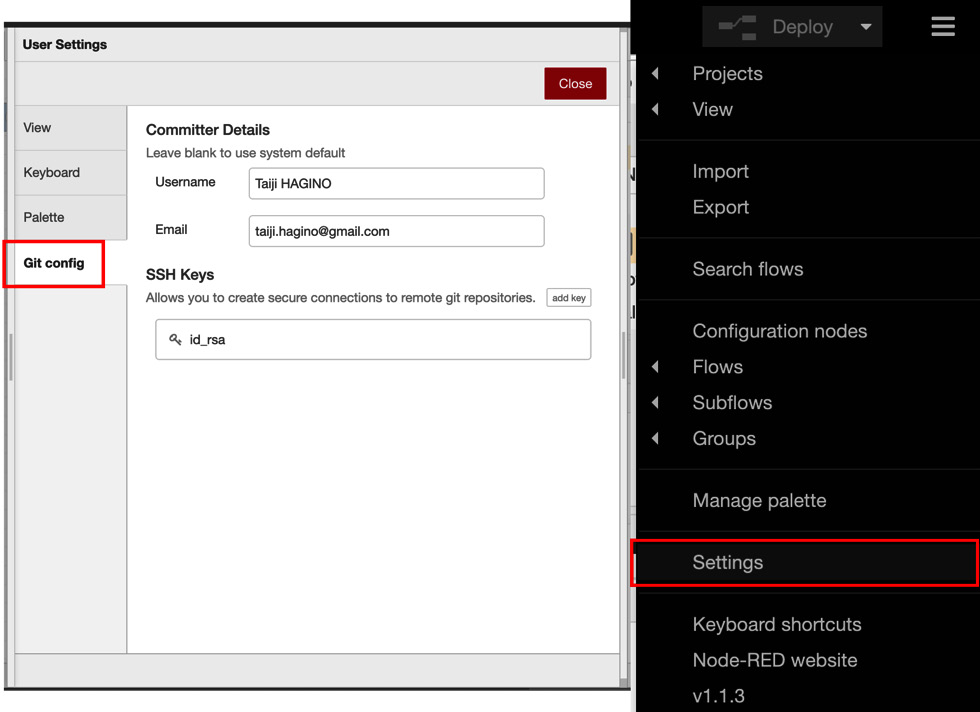
Figure 8.13 – Git config on the User Settings panel
Now you know how to version control in your local environment. The next step entails understanding how to connect a remote repository such as a GitHub service.
Connecting a remote repository
Now, let's learn how to connect Node-RED to a remote repository such as GitHub. Here, we will use the GitHub service for the remote repository. This is like connecting local Git and remote GitHub via Node-RED. This is nothing special. It is familiar to people who use Git/GitHub on a regular basis, but it's very similar to the situation where GitHub is used as a client tool. It is very easy for you to manage the version with Node-RED.
Create a remote repository of your Node-RED project on GitHub with the help of the following steps:
- First, go to your GitHub account and create a repository.
It's a good idea to use a project name similar to your local repository. We won't go into details of how to use GitHub here, but since it is a service that can be used intuitively, I believe that anyone can use it without any problems:

Figure 8.14 – Creating a repository on your GitHub
- Configure the project settings of your Node-RED. To do this, return to the Node-RED flow editor and then go to Project Settings to connect the local and remote repositories. When the Project Settings panel is opened, click the add remote button to configure the remote repository information:

Figure 8.15 – Clicking the add remote button on the Project Settings panel
- Please enter the repository URL you created on GitHub and then click the Add remote button:

Figure 8.16 – Setting your GitHub repository's URL
- Click the Close button at the top right of the settings panel to complete this configuration.
- Next, merge the repositories.
The remote repository on GitHub is now linked to the Git repository in your local environment. But they are not yet in sync. All you have to do is pull the remote locally and merge it. To do this, select the history panel on the side information menu, and then click the Manage remote branch button on the Commit History panel to connect to your remote repository:
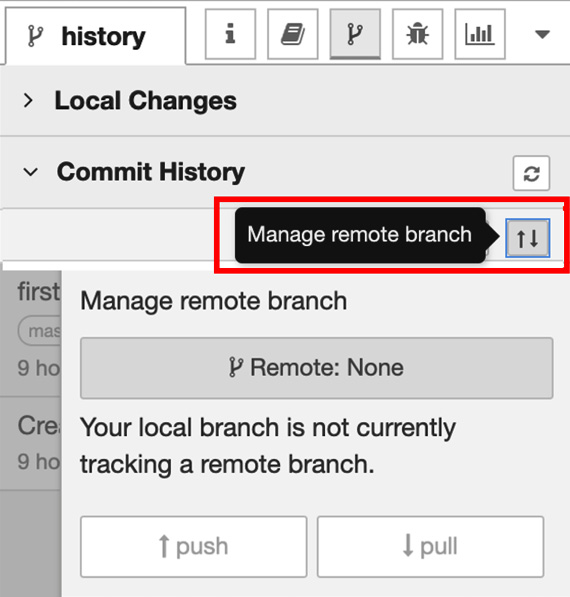
Figure 8.17 – Setting your GitHub repository's URL
- Select your remote branch. Usually, the origin/master branch is selected:

Figure 8.18 – Selecting your remote branch
Here, there is a difference between remote and local because we have already created the flow locally and versioned it with local Git. In this case, you need to pull the remote content locally before you can push the local content to the remote.
- Click the pull button:

Figure 8.19 – Pulling the commits from the remote repository
A message indicating a conflict will be displayed en route, but proceed with the merge as it is. During the merge, you will be asked whether you want to apply the remote changes or the local changes. In that case, apply the changes on the local side to complete the merge.
Following the operation, you will see that your local branch has been merged with your remote branch on the Commit History panel:

Figure 8.20 – Merged remote and local repositories
- After this, select the Manage remote branch button (the up and down arrows):

Figure 8.21 – Clicking the Manage remote branch button
- Select the branch you want to push and then click the push button to send (push) these changes to a remote repository:

Figure 8.22 – Sending the changes to the remote repository
Congratulations! Now you have learned how to use the project feature on Node-RED and you can also connect a remote repository from your local repository of Node-RED.
Summary
In this chapter, you learned how to enable the project feature of Node-RED and integrate local version control using Git with a remote repository created on GitHub. This will be very useful when you develop a team using Node-RED in the future.
In the next chapter, we will use this project feature to clone the repository of a to-do application locally. By studying this chapter and the next chapter together, you should have a greater in-depth understanding of the project feature.