
Overview
This chapter teaches you how to design a chatbot using Amazon Lex. You will start by learning the basics of Conversational Artificial Intelligence and some of the best practices that go behind using that technology to design custom chatbots. Then, you will use Amazon Lex to create a custom chatbot that gets the latest stock market quotes by recognizing the intent in text. By the end of this chapter, you would be well-versed with the basics of chatbots, and the process that goes into designing them. Using this knowledge, you will be able to create your own chatbots to solve a variety of business challenges.
Introduction to Conversational AI
Like the other chapters in this book, this chapter spans the conceptual aspects as well as pragmatic hands-on building – this time, the domain is Conversational AI. From many reports, it's stated that the conversational AI market will grow more than 30% per year and that the majority of customers, as well as employees, will be interacting with digital assistants.
The challenge in creating responsive, intelligent, and interactive bots is that, for machines, conversation is very hard to achieve. Let's look at the top three reasons why this is the case:
- Conversation conveys only the essential information – most of the information that's derived from a conversation is not even in the conversation. That is because humans have common sense, reasoning, shared context, knowledge, and assumptions at hand. We also overload a conversation with meanings derived from tonality, facial expressions, and even non-verbal communication, that is, via body language. These factors make conversations hard to comprehend, even though fewer words are exchanged. So, a conversational AI that looks at only the words that are exchanged probably misses 90% of the embedded information.
- It is not just a bunch of computer algorithms – the computer theoretic view is only part of a conversation exchange. We also need to incorporate linguistics, conversation implicature, and other domains. Again, this is a very hard task for computers – they can do neural networks very well, but grammar, not so much.
- Consumers are spoiled by extremely good conversation interactions. While the conversation domain is very complex, products such as Alexa, Siri, and Google Assistant are achieving huge progress in conversational AI. This adds a degree of high expectation for a business that is developing interactions based on conversational AI. Even for the most mundane tasks oriented around conversational interactions, consumers expect the sophistication of Alexa, Siri, or Google Assistant. So, your conversational systems have to cross that barrier.
This brings us nicely to the start of this chapter: Amazon Lex uses the same technology as Alexa and the Amazon Contact Center uses Amazon Connect, which means that we get to deploy their best practices. In fact, Amazon Connect was developed in order to meet the strict requirements of their customer service departments. So, we are in luck – we can leverage the state-of-the art interactions that our customers are used to in their daily lives.
Interaction Types
When we talk about conversational AI, there are two main types – task-oriented and open-ended conversation. As the name implies, task-oriented conversations function to fulfill a task (for example, query balances in an account, order an item, check the weather, check the price of a stock, and find out how many vacation days are remaining). Open-ended general conversations are broader as they cover various topics – this could be the weather, movies, financial well-being, investing, and so on. In this chapter, we will focus on task-oriented conversations.
Omnichannel
Another point to keep in mind is the omnichannel aspect of conversations – conversations can be had via a chatbot with a text interface or via a voice UI (VUI); they can jump from one to the other, and with the new concept of Visual IVR, they might even be concurrent. That is why we will cover chatbots and then voice in this chapter. Multimodality is an important part of conversational AI.
In short, in this chapter, you will learn how to build a chatbot using Amazon Lex. We will also cover the design of conversational AIs. We will then dive into Amazon Connect and explore adding voice to our bots. First, we'll talk about how to design a chatbot. Then, we will dive into exploring the Amazon Lex service by creating a sample chatbot.
What Is a Chatbot?
A chatbot is a specific instance of a task-oriented conversational AI – the goal is to be able to hold a conversation with the user to the extent required in order to resolve customer queries, perform a task that the customer requests, or suggest a way to move forward from them.
As in normal conversation, the means by which we interact with the bot can be written text or speech. Often, the chatbots are integrated with messaging platforms, such as Slack, Facebook, Kik, and WeChat. This can also be integrated with a custom web or mobile interface.
It is easier, of course, to integrate within an existing messaging platform, since the user is likely to be familiar with the interface. Moreover, these platforms provide support to the chatbot developers with infrastructure and development tools.
Some examples of chatbots include systems for ordering products, reporting, internal communication, and scheduling.
What Is Natural Language Understanding?
NLP is the general term for a set of technologies that deal with natural language. Natural Language Understanding (NLU) is a focused subset of NLP that deals with actual conversational input.
NLU can handle unstructured inputs and convert them into a structured, machine-understandable form. Words that the user enters are transformed into intents and entities, or slots. The NLU chatbot is further able to infer intents and slots from user input, which may be similar to – but not the same as – the examples it has been trained with.
Core Concepts in a Nutshell
Before we can get started with building chatbots, you will need to understand some concepts first. Let's take a look at the technical meaning of the term chatbot and the names of the pieces that make up a chatbot and work together to deliver a conversational experience to the user.
Chatbot
A chatbot, also known as a bot or artificial conversation entity, is a piece of software that can converse using natural language with the user. The goal is for the user to believe that they can interact freely and naturally with the bot, almost as if speaking with another person.
Utterances
Things that the user says to the bot are called utterances. The bot regards the utterances from the user as input and is able to parse them into machine-recognizable formats. Some examples of utterances are as follows:
- I'd like to see the dentist.
- Can you tell me what the weather is like today?
Intent
An intent is something that a user wants to do, based on the content of their utterances. An intent can be a single step (for example, get a balance) or a multi-step process (for example, booking a trip that includes booking tickets, booking a hotel, booking transportation, and so on). The bot infers the intent from the user's utterances as well as the context and supports them based on its internal set of business rules or application flow, with the result of either a change in its internal state or an action being performed. These also typically result in a response being provided to the user as feedback or information.
So, from the preceding utterance examples, a bot may infer intents such as the following:
- I'd like to see the dentist => SeeDentist.
- Can you tell me what the weather is like today? => GetWeather.
Inferring intent is a large part of what NLU platforms such as Lex do behind the scenes. A number of training examples, in the form of sentences that the user might provide, are fed to the platform, and a probabilistic model is built from these examples. This means that, in practice, the platform should be able to infer the correct intent from input, which is similar to, but not necessarily a part of, the examples that the system was trained on.
Prompts
When the bot requires more information from the user or is unclear about an intent, it can ask the user follow-up questions, in order to collect more data. These are called prompts. Prompts typically fill in slot values that are required, although your application logic may attempt to fill in values that are optional as well if you desire.
Slot
A slot is a piece of information, or parameter, that is associated with an intent. Information can be provided within the initial user request, and Lex will be able to parse out the information and correctly assign it to the corresponding slot correctly. If this information is not provided as a part of the request, then the bot should be able to prompt the user for the information separately. Slots may be optional or required.
The type of information represented by a slot is known as the slot type. There are a number of built-in slot types within Lex that represent common types of information, such as a city or state. The following are a few examples of common slot types that are incorporated into Lex:
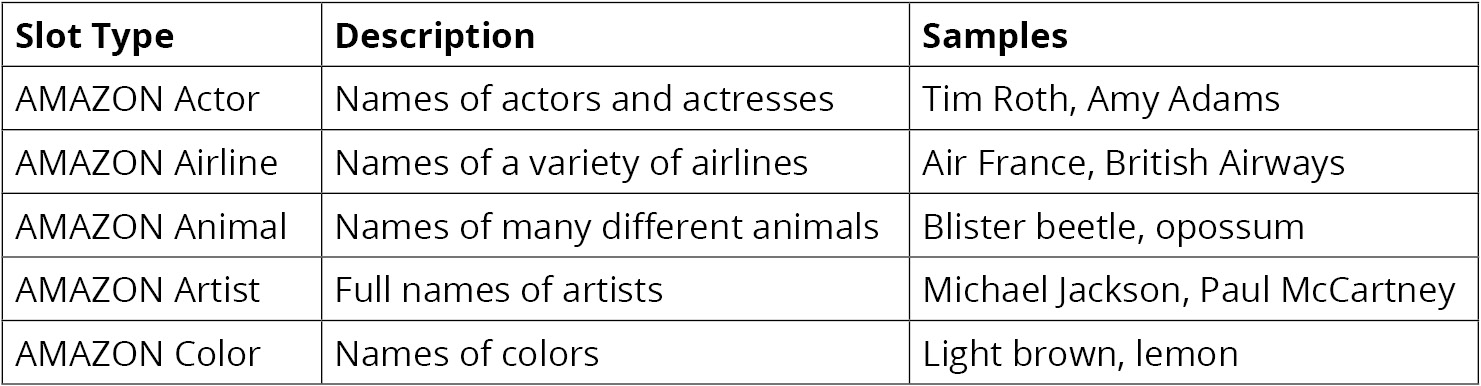
Figure 4.1: Table of slot types built into Lex
Of course, this is just a very limited subset of examples. There are many more built-in types, as well as different types for different languages.
Note
You can refer to the following link to get a full list of built-in intents and slots: https://docs.aws.amazon.com/lex/latest/dg/howitworks-builtins.html.
Most of the built-in intents and slots are documented as part of the Alexa Skills Kit documentation, with some differences for Lex, which are documented at the preceding link. Make sure to keep the link bookmarked and refer to the page regularly, since Amazon keeps updating the service and things may change.
If the type of information that you would like your bot to handle is not represented by one of these built-in types, you can define your own, along with the actual values that the slot is allowed to take.
Fulfillment
Note that the bot will not be able to proceed to the next step until it fills in all of the required slot values. Naturally, this does not apply to slot values that are optional.
When all of the required slots for an intent have been filled, the slot is then ready for fulfillment. At this stage, the bot is ready to execute the business logic that's required to fulfill the intent. Business logic may be any of the following actions:
- Changes in the internal state
- Running code internally
- Calling an internal or external service to get information from it
- Calling an internal or external service to post information to it
The fulfillment action can be performed with or without some feedback to the user, but as a matter of best practice, it is always better to err on the side of more feedback to the user, rather than less.
Best Practices for Designing Conversational AI
Before we dive into some of the best practices, we will go over two quick points. We are only covering the most important ones and there are excellent materials and books available for a more in-depth study. Second, you will encounter situations where these tips might need to be ignored – this may include delivery pressures and resource constraints, but they may just be wrong due to advances in technologies. However, we need to be aware of the potential technical debt that can be created and document them somewhere for future reference. A few best practices are as follows:
- When thinking about bots, think Search, not a single question-answer session. This requires a little thought — the bot should want to understand what the user wants and participate in an iterative collaborative interaction to facilitate what the user is looking for. For example, a user might ask "How much money do I have?" and you can resolve this to the balance in the checking account and returning an answer. However, the user might be looking to invest based on a stock tip or may be contemplating a large purchase. So, a follow-up question such as "Does this make sense? What are you thinking of?" might be a good strategy. The quintessential example is the question "What is the nearest restaurant?". For this, you can give a clinically correct answer based on distance, but the restaurant might be closed. So, volunteering more information such as "The nearest restaurant is x minutes away, but it is closed now. Are you looking for an open restaurant to go to now?" might be a good response.
- Conversation is a continuum from simple commands and notifications to deep nested conversations, as shown in the following diagram:
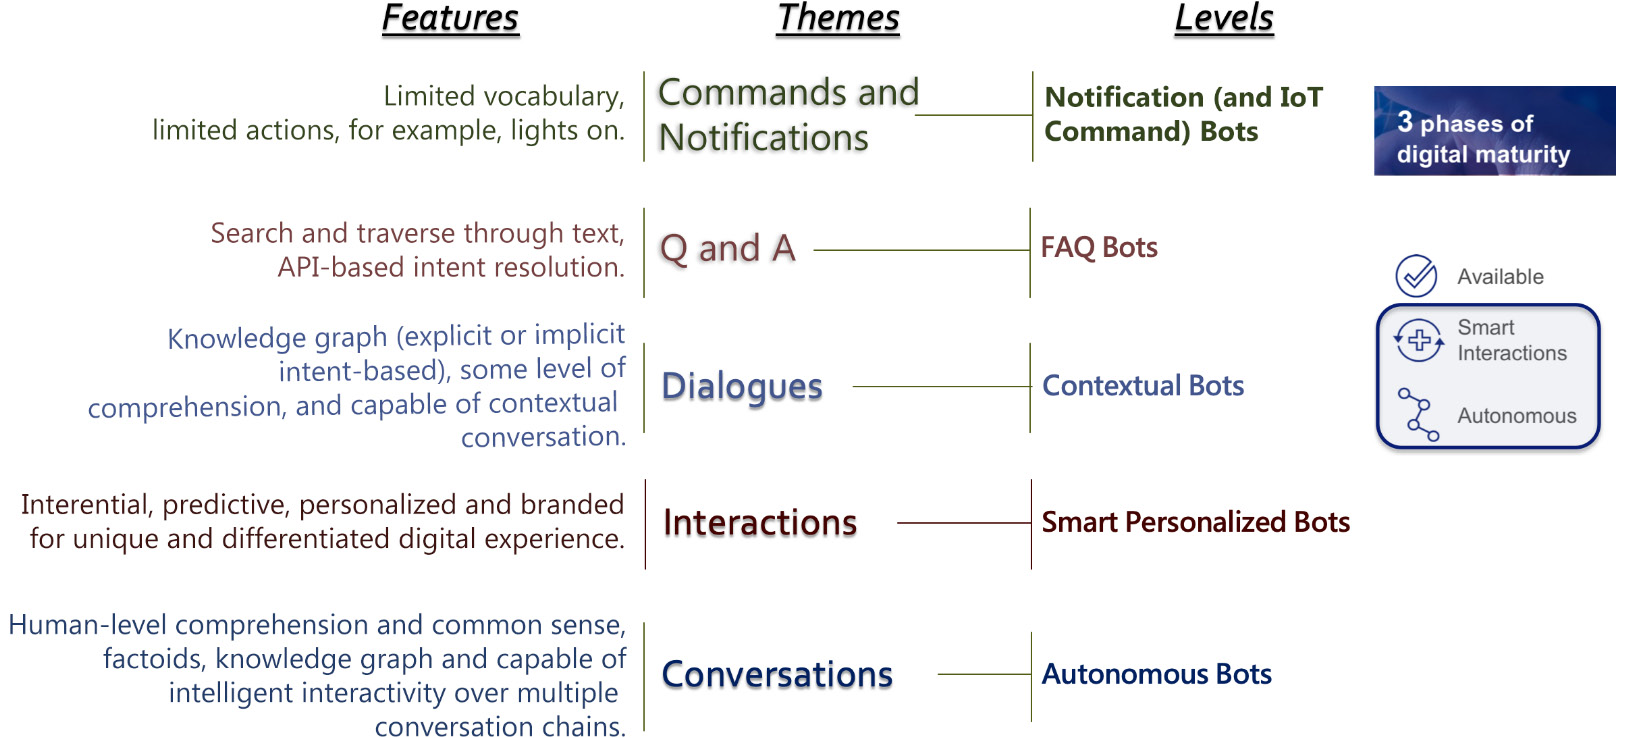
Figure 4.2: Levels of conversational AI
At the current maturity of technologies, we are at level 3 – Dialogues via Contextual Bots, which is at its very initial stages. Understanding these levels and positioning your bot service in the continuum is very important for estimating what is possible as well as the effort required, especially when it comes to the expectations of users.
- Think of conversational AI – chatbots or voice assistants or a combination of the two, as interactions of Available, Smart, and Autonomous.
- A bot (chatbot, voice, or even the Visual IVR) is an experience. This means that you need to develop a minimum lovable product — it shouldn't be too ambitious and complex with lots of features; also, it shouldn't be too narrow such that it doesn't serve a good purpose completely. Keep the steps small and show value while ensuring that they do what they need to do.
- There is a misconception that bots do not have visual branding. The conversational UX, as a "transparent" user experience, still provides a good amount of visual aspects that impact the branding of your bot.
- Monitor, adapt and improve — the utterance monitoring log is your friend. Use analytics extensively to ask questions about the user's learning curve — How long does it take for the user to understand the scope of the bot?
- Visual designers spend time on aesthetics and, like them, conversation designers spend a lot of time writing content and functionality that fits the scope and audience of your bot. We do not speak the way we write, so you can't literally turn your website into a bot.
- Think about the engagement trio, that is, Attract-Engage-Delight. Be very crisp and clear about your bot's purpose and core functionality. Surprise your users with Acuity and Serendipity.
- Bots are very iterative — you have to keep on improving them as you learn, as well as the users. Build the user's trust and confidence slowly. Expose users to new functionalities continuously; a welcome area with talks about new features is a good idea. Alternatively, suggest new contextual features for original questions.
- Think of bots as a gateway — an interface to services. You still need the backend to fulfill the services — queries et al.
- Plan for learning from real users and improve your bot. Once your assistant is able to handle a few happy path stories, it is time to let it loose into the real world to steer the direction of development.
- Follow Grice's maxims, viz. the maxim of quality, the maxim of quantity (as informative as required and not more), the maxim of relation (or relevance – be relevant), the maxim of manner (be brief and orderly), and the maxim of smartness.
Creating a Custom Chatbot
In this section, we will create a custom chatbot to get stock market quotes using Amazon Lex. The bot will listen to our utterances for a valid intent: GetQuote. This signals to the bot that, for example, we had to get a stock market quote for a given stock ticker symbol, which will reside in a slot named ticker. The bot will then look up the quote for that ticker symbol from a freely available financial API named IEX, and will return the information to the user via a conversational response:
Note
A stock ticker symbol is the standard way in which stocks that are traded on an exchange, such as the New York Stock Exchange or NASDAQ, are represented. A sequence of alphabetical letters represents the company's stock that is being traded.

Figure 4.3: The chatbot's workflow
We can create a flowchart for this process, as shown in the following diagram. Let's go over it in further detail:
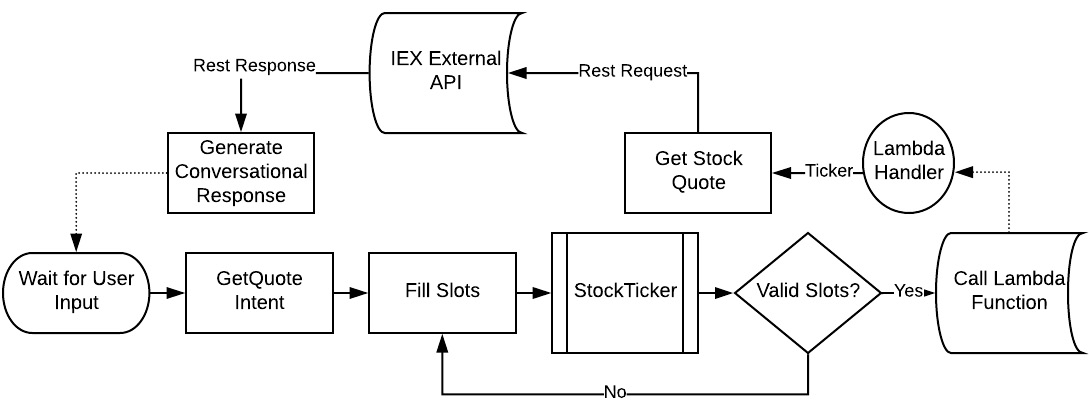
Figure 4.4: Flowchart of the chatbot's workflow
Recognizing the Intent and Filling the Slot Value
As a first step, the bot waits for the user's input in order to recognize a valid intent. When it extracts the GetQuote intent as the intent from an utterance posted by the user, it will then try to fill the required slots. In our case, we only have one slot of the StockTicker type (which is a custom slot type). The bot will issue a prompt, asking the user to provide the value of the slot and parse the utterance in response, in order to fill the slot value.
Valid slots are those that the system recognizes. If the slot value is not part of the list of permitted values, or if the system does not recognize what is entered for the slot value, it is said to be invalid, or not valid.
If the slot value is not valid, it will go back to trying to fill the slot (at least up to the number of times we have specified it should try before giving up and going back to the beginning). Once the bot has a slot filled with a valid value, it then proceeds to fulfill the intent.
Fulfilling the Intent with a Lambda Function
While the default fulfillment action is to return the intent and slot value to the user so that they can proceed to work with it within their own application, we will instead choose to set up a Lambda function on AWS that can handle the intent and run the business logic required to fulfill it.
At this point, the bot process running within Lex proceeds to call the Lambda function, which we have written and specified for fulfillment:
Lambda_function.Lambda_handler
When Lex calls out to the function for fulfillment, it sends a JSON payload containing various pieces of information about the sender, as well as the intent and slot value. The Lambda_handler() method parses the intent and slot parameter value from the JSON payload, and then dispatches another function call to the method, which gets the market quote value that we're looking for from the external API.
Finally, the Lambda function also packages the response as another JSON string and returns it to Lex. Lex parses the JSON response behind the scenes and presents the response message to the user.
We will go through all of these elements in a lot more depth in the next two exercises. In the first exercise, we will set up the new chatbot, and in the second one, we will implement our Lambda handler function so that it returns back to the user the actual value of the market price of the ticker symbol that the user asks the bot for.
A Bot That Recognizes an Intent and Filling a Slot
In the next exercise, you will create a custom chatbot that recognizes the intent, named GetQuote, in order to get a market price quote for a given ticker symbol. The bot will prompt the user for the value of the ticker symbol that the user is interested in, until the slot is filled. You will also learn how to state the intent and fill the slot in the same utterance. This chatbot can be tested via a conversational interface.
Exercise 4.01: Creating a Bot That Will Recognize an Intent and Fill a Slot
In this exercise, we will create and test an Amazon Lex-based bot with a custom intent and slot. The steps that have to be performed to create a bot with a custom intent and slot are as follows:
- The first step is to navigate to Amazon Lex service from the Amazon Management Console. Usually, this entails going to aws.amazon.com, then My account, and then clicking AWS Management Console.
- You can select Services by clicking Amazon Lex under Machine Learning.
- The next step is to select the Create button. This will take you to the bot creation screen:

Figure 4.5: Amazon Lex Console
- At this point, you can create a custom bot by clicking the Custom bot option button. This reveals the bot's details, which can be filled out, as shown in the following screenshot:
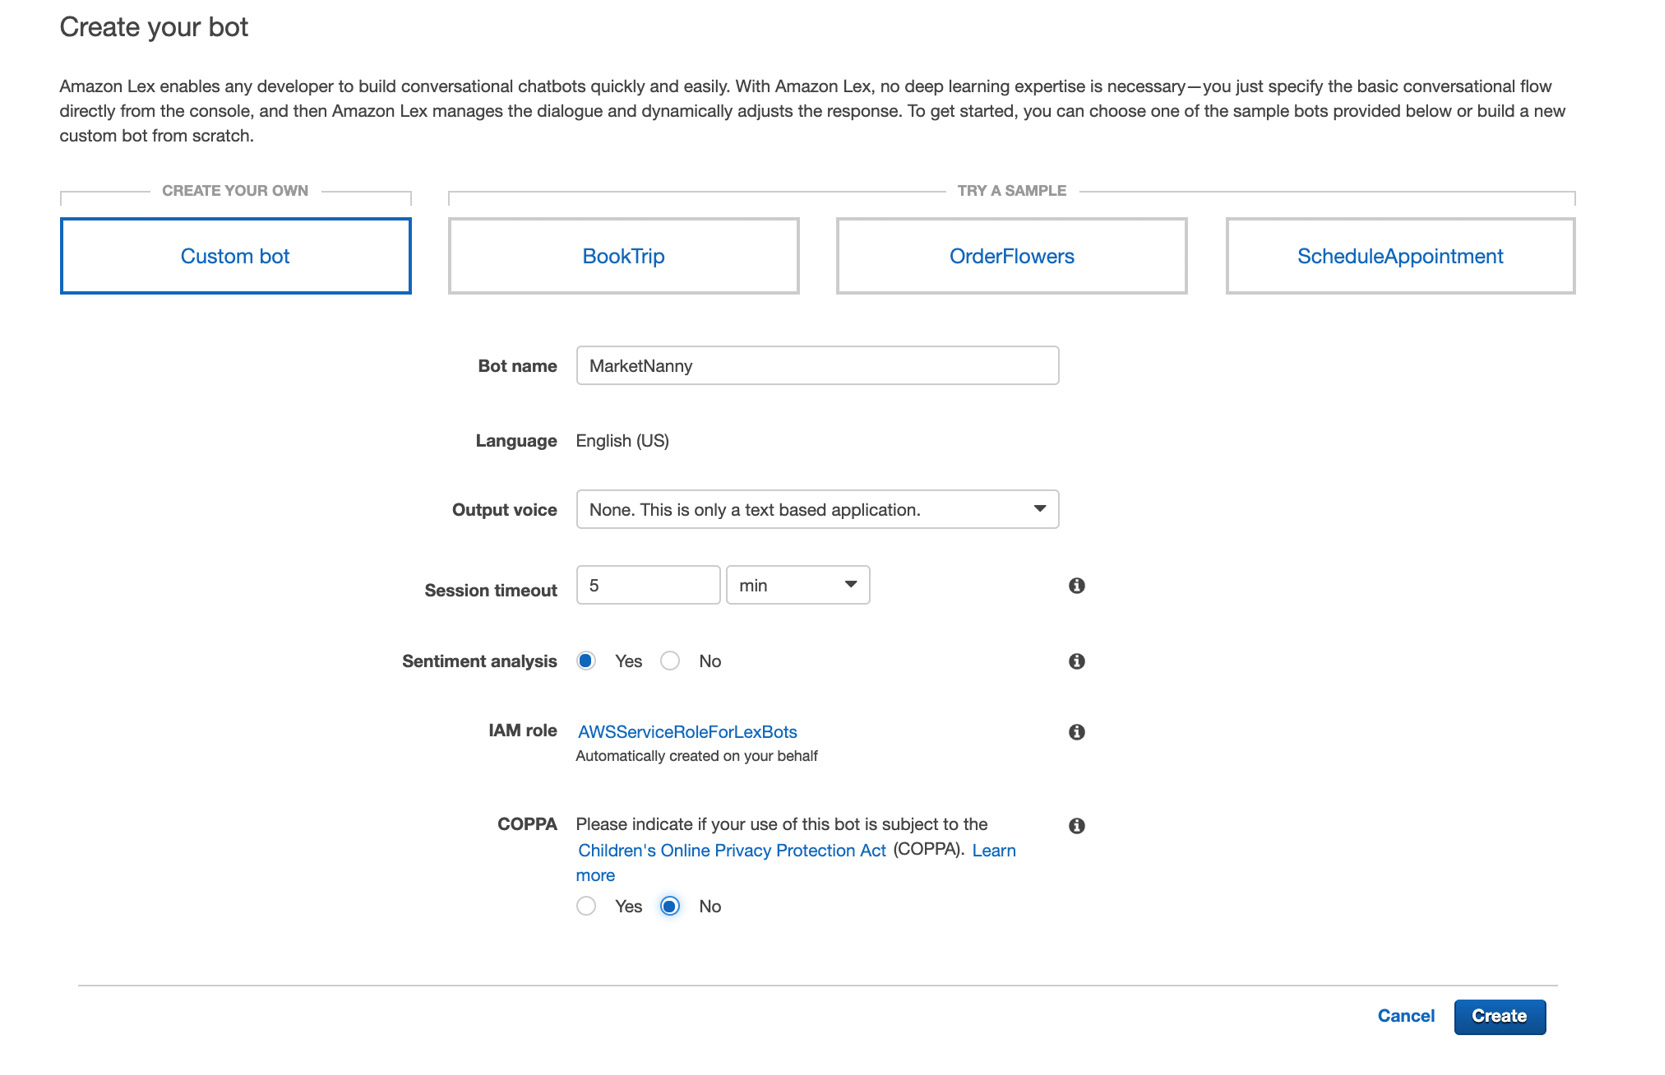
Figure 4.6: Custom bot option
- The bot name field can be set to MarketNanny. The Output voice field is set to None. This is only a text based application, because we will only be interacting with the bot with text in this section, and not with voice just yet.
The session timeout can be set to the default of 5 min. The IAM role field displays the name of the IAM role, which is automatically created by Lex for use by bot applications. Let's set Sentiment Analysis to Yes.
- Finally, the COPPA field pertains to the Children's Online Privacy Protection Act, which is what online applications must conform to. Assuming that no children under 13 are present in the class, you can click No. If, however, you are a student under 13 or intend to have someone under 13 use your chatbot, then you should click the Yes option instead.
Note
A law was passed in 1998 to protect the privacy of children under 13. It states that online sites may not collect personal information from users younger than 13 years of age without parental consent, among other provisions. You can learn more about the COPPA act at https://www.ftc.gov/enforcement/rules/rulemaking-regulatory-reform-proceedings/childrens-online-privacy-protection-rule.
- Finally, clicking the Create button will create the chatbot and bring you to the bot Editor screen. This screen will allow you to create and define an intent for the bot, as well as a slot with a custom Slot type.
- Click the Create Intent button to bring up an Add Intent pop-up dialog window:
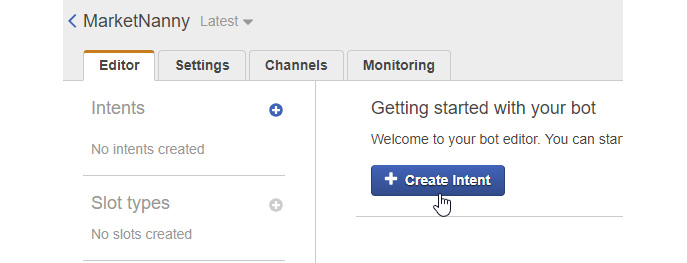
Figure 4.7: MarketNanny bot editor
- Conversely, if you already have an intent defined, you can create a new one by clicking on the + sign next to the Intents heading in the left-hand side column on the screen.
- The Create Intent window offers a few options that we can use to add an intent to the bot. The Import intent link allows us to import an intent from a ZIP file containing one or more JSON files with intents in the Lex format.
- The search for existing intents allows you to reuse the intents that you may have defined or imported previously, as well as the built-in intents defined by Amazon Lex.
- Click on the Create Intent link to get to the dialog box shown in the following step.
- In the Create intent dialog box, name your new intent GetQuote. The bot will recognize this intent when you let it know that you are interested in a market quote. Click the Add button to complete this step:
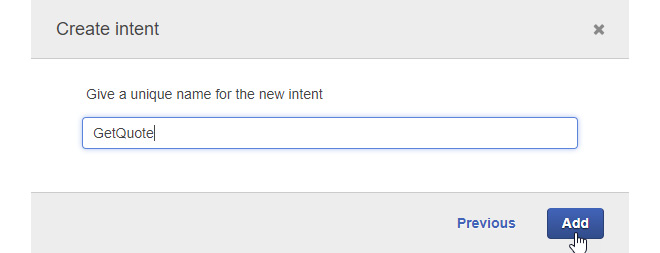
Figure 4.8: Creating an intent screen
- You should be back at the Editor screen at this point, and you should see the GetQuote intent in the left toolbar portion of the screen, as shown in the following screenshot. The Editor screen also contains a number of fields that are used to define and customize the new intent.
- The first thing to do is to fill in some sample utterances to train the NLU system behind Lex to recognize the utterances you will provide to the bot as signaling the GetQuote intent:

Figure 4.9: Creating the intent
- After entering some sample utterances, click on the Build button near the top of the page in order to initiate the training process for the bot:

Figure 4.10: Building the bot
- There will be a follow-up dialog box with another Build button, which you should also click:
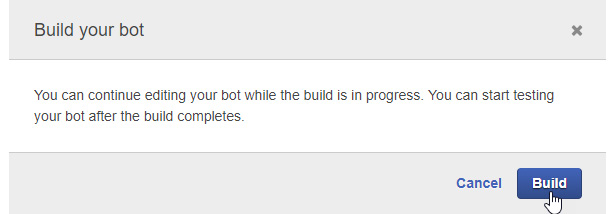
Figure 4.11: Build confirmation
- After this, you should wait until you see the MarketNanny build was successful message box. This might take anything from a few seconds to a couple of minutes:

Figure 4.12: Bot build is successful
You can test your new intent within the bot in the Test bot pane, in the upper right-hand corner of the screen.
Note
If the Test bot pane is not visible, you may have to click on an arrow button in order to expand it and make it visible.
- Type utterances into the pane to verify that the bot is able to recognize the correct intent from the utterances:
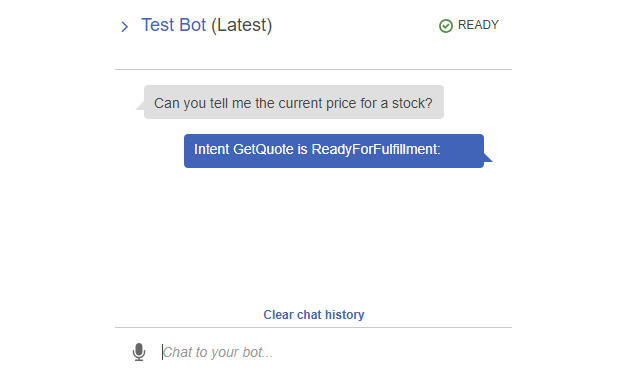
Figure 4.13: Test bot
- You know that it has recognized the intent correctly when it returns the following response: Intent GetQuote is ReadyForFulfillment. Feel free to experiment with different utterances, based on your sample utterances, in order to verify that the NLU engine is working correctly.
At this point, your bot doesn't do anything much apart from try to recognize the GetQuote intent and flag that it is ready for fulfillment. This is because we have not added any slots to the intent.
- Your next step will be to add a slot, along with a custom slot type for the slot:
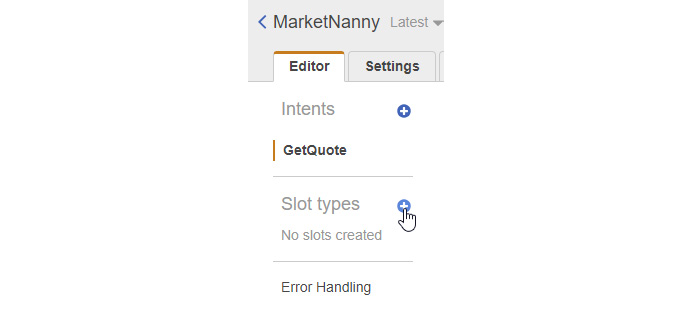
Figure 4.14: Adding a Slot
- Adding a slot type. This can be done by pressing the + button next to slot types in the left toolbar section of the Editor screen. This brings up an Add slot type dialog box, where we can also choose to import the slot type as before with intents by using the Lex JSON structure. However, before we do that, we will click on the Create slot type link to create a new slot type:
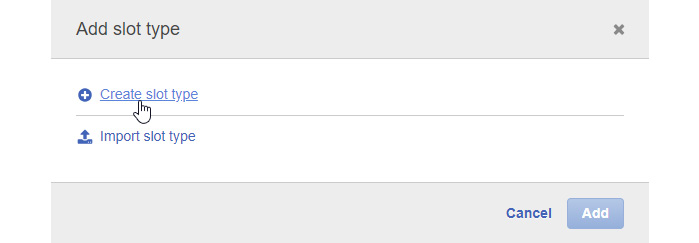
Figure 4.15: Creating a slot type
- In the Add slot type dialog box that pops up, enter the slot type name as StockTicker. This is the name of the slot type that we are defining. Optionally, you can enter a description in the Description field and leave the Slot Resolution option as Expand Values.
- Under the Value field, enter a few stock ticker symbols, as shown in the following screenshot, to provide sample values for the StockTicker slot type. You can add some of your own, as well, if you wish:
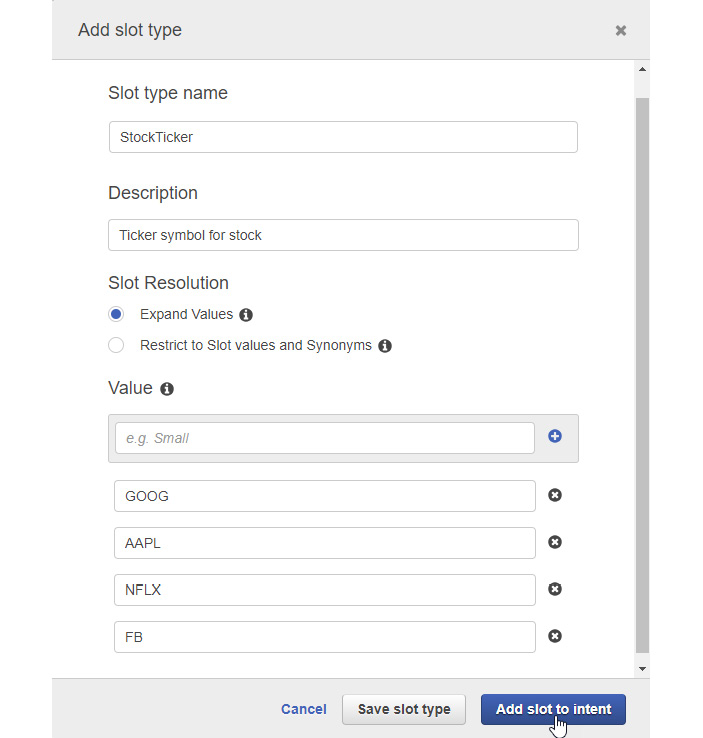
Figure 4.16: Adding a slot type
- Finally, click on the Add slot to intent button in order to add the slot type to the intent, and close the dialog.
- We could have also clicked on the Save slot type button and added the slot to the intent in a separate step, but using the button is the shortcut to accomplishing both actions in a single step.
- When you close the dialog box, you will find that Lex has added a new slot entry as well, under the slots section. It is helpfully prefilled with the StockTicker slot type, and you should change the name of the slot to ticker under the Name field for the entry.
- Click the wheel under the Prompt field to expand it to a new dialog box:
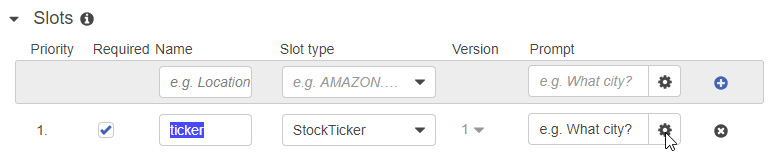
Figure 4.17: Editor dialog box
- The prompts editor dialog box (named ticker Prompts or ticker Settings) allows us to enter prompts for the Slot, which the bot will use to store the user inputs and corresponding sample utterances that the user would typically provide to the bot while the bot is trying to elicit the information from the user with the prompts.
- The placement of the slot value within the corresponding utterances for the slots is denoted by curly braces {} and the name of the slot within the braces. In this case, since the slot is named ticker, it is denoted by {ticker} within the sample utterances.
- Fill in the prompts (a single prompt is fine – if you add more prompts, the bot will use them randomly, for variety) in the Prompts section.
- Then, add some utterances to the Corresponding utterances section, denoting the placement of the slot value using the placeholder token of {ticker} in each sample statement.
- Leave the Maximum number of retries field as the default value of 2. This means that it will try to get the value for the slot twice before signaling an error:
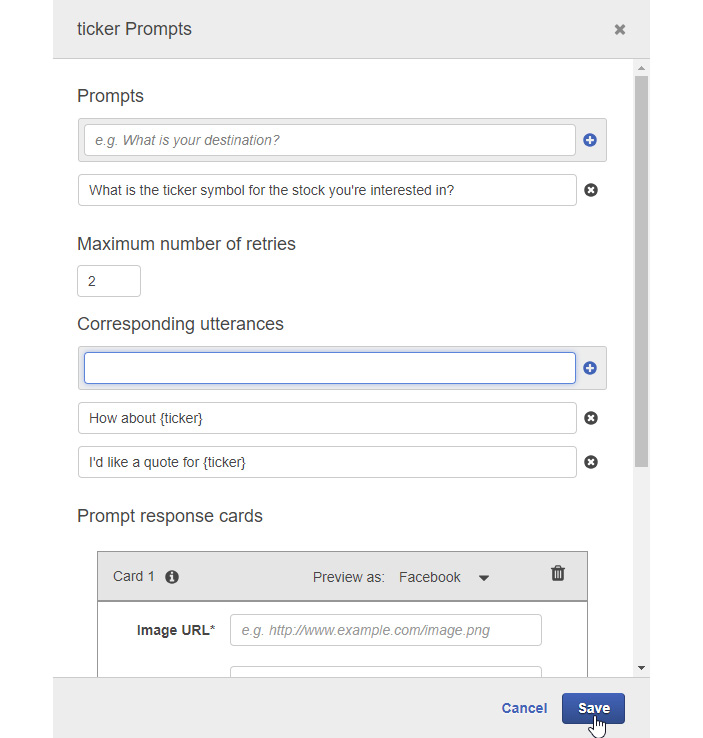
Figure 4.18: Ticker prompt screen
- Next, click the Save button to save the slot prompts and the corresponding utterances definitions.
- Finally, click the Save Intent button at the bottom of the screen, and then the Build button at the top of the screen, in order to initiate the training process with the new slot and slot type that we have defined. Wait for the completion dialog to display when the training is done:

Figure 4.19: Saving the Intent
- Your updated intent is now ready to be tested in the Test Bot pane:

Figure 4.20: Updated intent test bot
- At the end of the bot flow, when all the information it requires has been filled in, it returns the intent in the same format as before. However, it follows this response line with another line, containing the name and value of the slot parameter:
ticker:GOOG
- This indicates that the ticker Slot has been filled with the GOOG value. So, that's great; our intent with slot is working.
- While you're having fun playing around with the bot to verify that the intent and slot are working as they should, why not try something a little bit different? Enter some utterances that are not a part of the sample utterances that you previously entered to train the bot.
- Type Can I get a market quote? as your initial utterance and see whether the bot can recognize the intent. Bear in mind that the sentence, though similar to the sample utterances, is not one of those utterances:
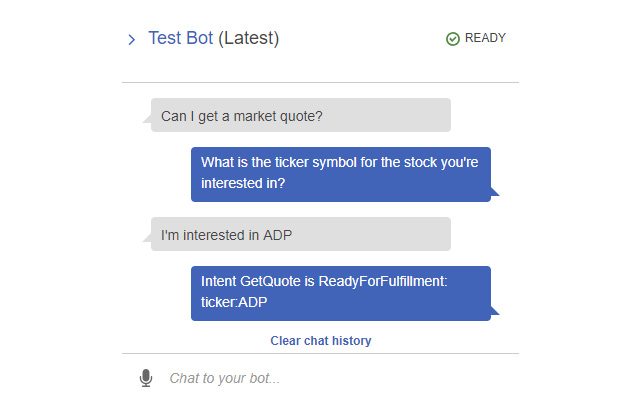
Figure 4.21: Test bot screen
As you can see from the testing shown in the preceding screenshot, not only does Lex recognize the correct intent from an utterance it has not been trained on, but it also recognizes a new symbol that it has not seen before (ADP) correctly as the value for the ticker slot.
- Now, let's try a conversational form of a corresponding utterance for the slot prompt by inserting a random interjection as a part of the sentence, again using a new ticker symbol (VZ) that the bot has not been previously trained on. Again, it is correctly processed and recognized:
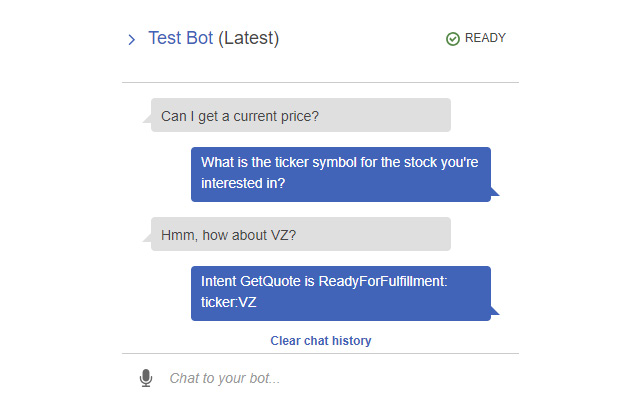
Figure 4.22: Test bot screen
Clearly, quite a bit of flexibility is possible between training and realworld examples of conversational input with an NLU engine.
Natural Language Understanding Engine
NLU demonstrates the advantage of using an NLU engine that has been trained on a huge set of conversational sentences and has formed a large inference model.
It is able to connect sentences that are not the same as the ones it has specifically been trained on. In fact, they can be significantly different, but the model is large enough to infer that the semantic meanings are similar.
There is one more trick that you can use to make it easier for the user to interact with your bot. You can fill the slot value with the same utterance as the one that establishes intent. This can be accomplished by simply including the slot placeholder token ({ticker}, in this case) in your sample utterances. Perform the following steps to do so:
- Add a new sample utterance to your GetQuote intent, as follows:
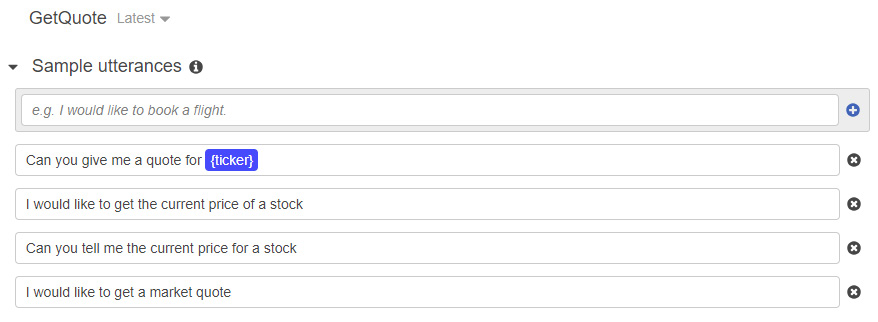
Figure 4.23: GetQuote screen
- The ticker placeholder token denotes that the slot may be filled directly within the initial utterance, and that, in this case, a prompt doesn't need to be generated:

Figure 4.24: Build screen for the bot
- Click on the Build button to train your updated intent as before, and then test it in the Test Bot pane, as follows:

Figure 4.25: Test Bot screen
You can see that the intent is ready for fulfillment and that the slot value is filled appropriately, in a single step.
We have now gone through the process of defining a custom chatbot, complete with a custom intent, slot type, and slot, within Amazon Lex. Furthermore, we have trained and tested the bot to verify that it is able to classify the correct intent and correctly infer the slot values from conversational input to a high degree of accuracy.
Finally, we added a shortcut method to fill in the slot value directly in the initial utterance by inserting the placeholder token for the slot value in the sample utterance to train the NLU engine behind Lex.
Lambda Function – Implementing Business Logic
You can create AWS Lambda functions that can be triggered from your Amazon Lex bot. As we discussed in Chapter 2, Analyzing Documents and Text with Natural Language Processing, serverless computing and Lambda functions are a good match for implementing the fulfillment and validation functions in your Lex bot. The Lambda functions integrate better and faster and scale better than returning the intent to a backend application for every step, such as validation. Once the intent has been validated and you are satisfied with the parameters, you can call a backend API to fulfill the request. You can implement simple fulfillment requests as Lambda functions, thereby making your bot responsive and scalable.
In the next exercise, you will learn how to implement the business logic behind the bot as a Lambda function in AWS and call a real-world REST API to get information that you can return to the user from an external service.
Exercise 4.02: Creating a Lambda Function to Handle Chatbot Fulfillment
In this exercise, we will handle chatbot fulfillment business logic with a Lambda function that is created and deployed on AWS. In the previous exercise, we created a chatbot with a GetQuote intent and ticker slot. Perform the following steps to implement business logic:
- Navigate to the AWS Lambda screen via AWS Management Console – Services and then Lambda under Compute.
- If you have never used Lambda before, you should be presented with a welcome screen:
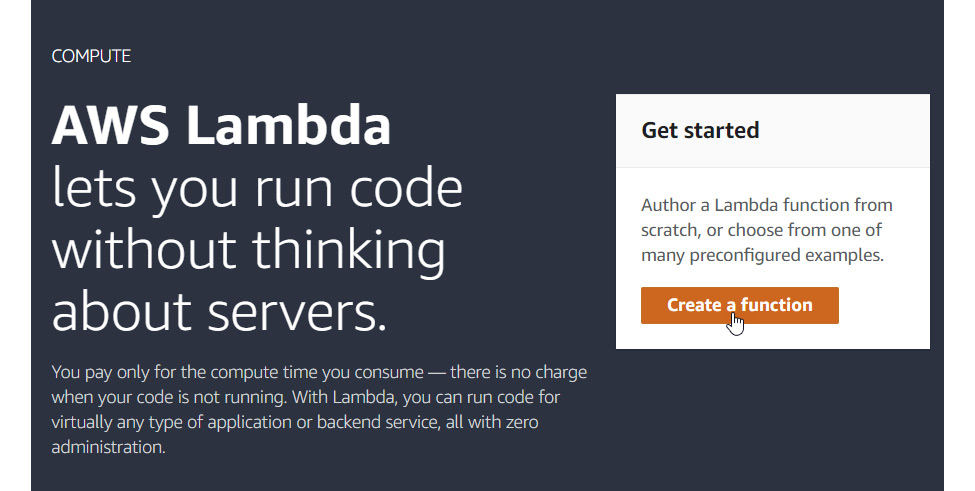
Figure 4.26: AWS Lambda start up screen
- Click the Create a function button to get started.
- Select the Author from scratch option on the next page:
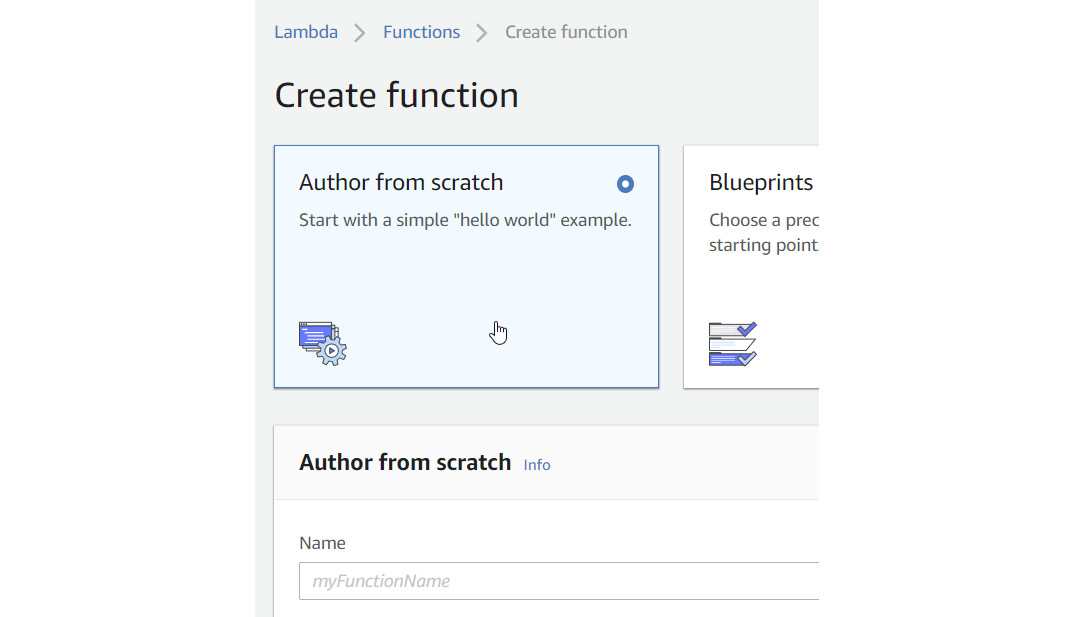
Figure 4.27: Selecting an author
- For the runtime, choose Python 3.6 from the drop-down menu as you will be implementing the handler in the Python language for this exercise. In the Name field, fill in marketNannyHandler:

Figure 4.28: Filling in the values
- Click Choose or create an execution role and choose the role field. Then, choose the Create a new role from AWS policy templates radio button:
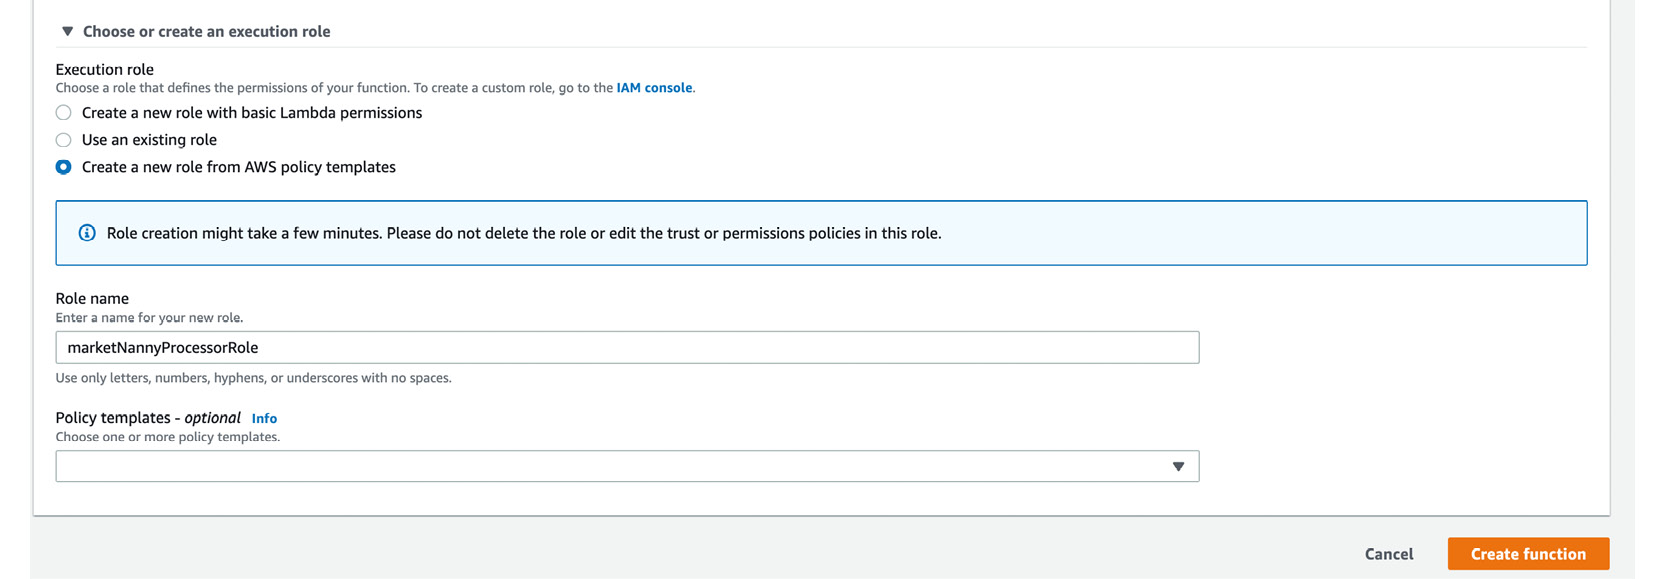
Figure 4.29: Role selection screen
- Enter the name marketNannyProcessorRole in the Role name field. Then, click the Create function button to create the Lambda function in AWS. You should see a confirmation screen, as follows:
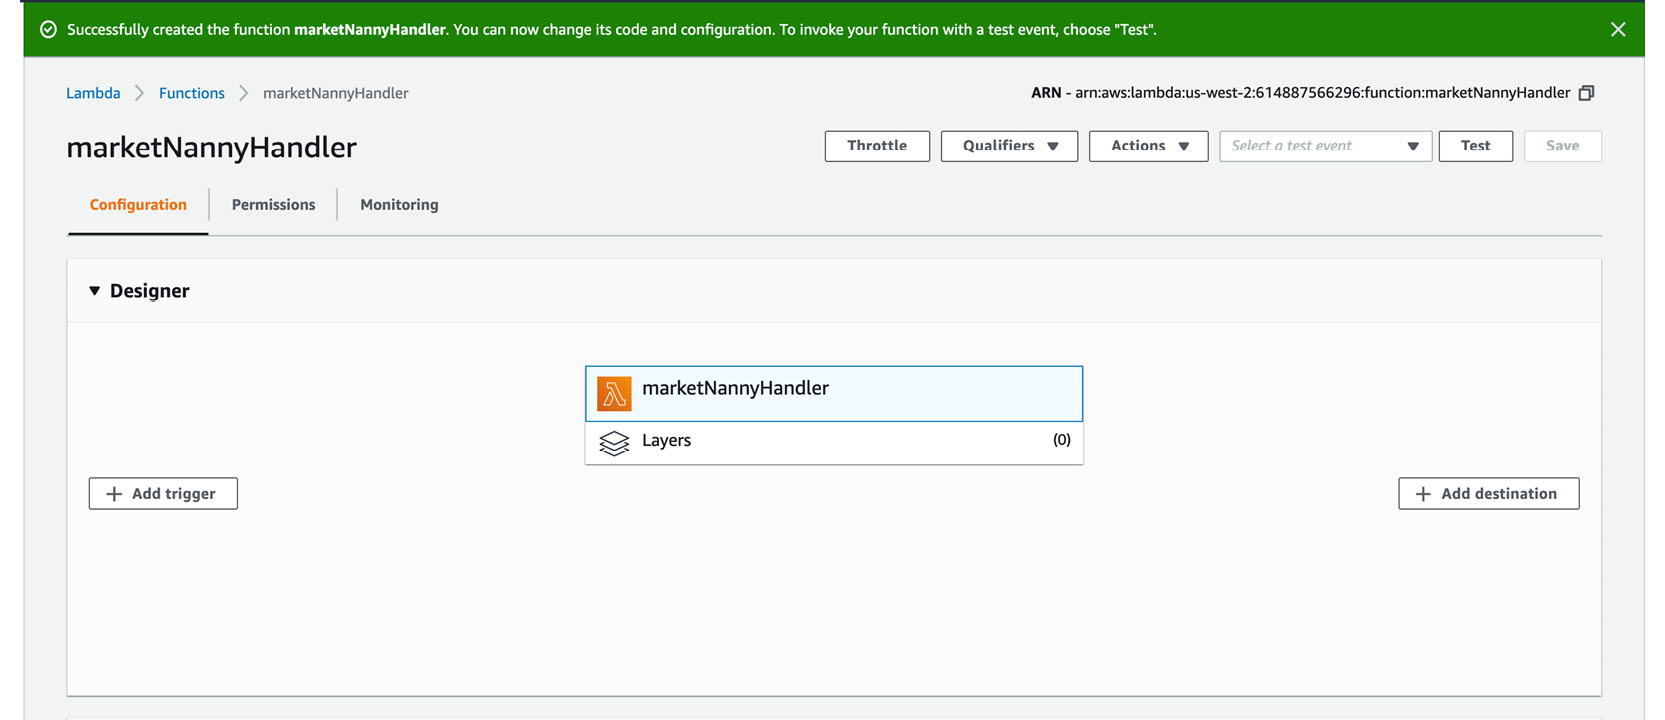
Figure 4.30: Confirmation screen
In this exercise, you learned how to handle chatbot fulfillment business logic with a Lambda function created and deployed on AWS.
Implementing the Lambda Function
Here, you will use the Lambda Function editor entirely in-line, which means that you can enter and modify the code directly without having to upload any files to AWS. The code that you enter will be executed when the Lambda function is invoked:
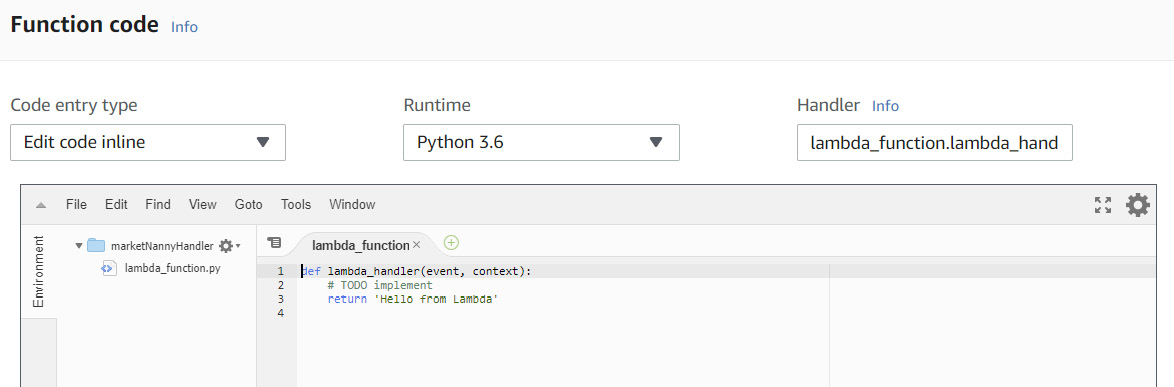
Figure 4.31: Function code screen
First, let's look at the structure of the Lambda function.
When you created the marketNannyHandler function, AWS created a folder with the same name, with a Python file named Lambda_function.py within the folder. This file contains a stub for the Lambda_handler function, which is the entry point of our Lambda function. The entry point takes two parameters as arguments:
- The event argument provides the value of the payload that is sent to the function from the calling process. It typically takes the form of a Python dict type, although it could also be one of list, str, int, float, or NoneType.
- The context argument is of the LambdaContext type and contains runtime information. You will not be using this parameter in this exercise.
The return value of the function can be of any type that is serializable by JSON. This value is returned to the calling application after serializing.
Input Parameter Structure
Now, let's take a closer look at the structure of the event argument that gets passed to the Lambda_handler function. If we are asking for a market quote with a ticker value of GOOG, the JSON value of the intent section within the parameter will appear as follows:
{
…
"currentIntent":
{
"name": "GetQuote",
"slots":
{
"ticker": "GOOG"
},
…
}
}
The relevant values that we are interested in for processing are name and the single ticker value within the slots section under currentIntent.
Since our JSON input gets converted to a Python dictionary, we can obtain these values within the Lambda function as follows:
event['currentIntent']['name']
event['currentIntent']['slots']['ticker']
Implementing the High-Level Handler Function
Note
The lambda_function.py file contains the full source code. It is available on GitHub at https://packt.live/2O8TUwA. You can refer to it as you type in the code in the Lambda editor. We have included debugging tips at the end of this example. It might be a good idea to read through the example as well as the tips first before you start implementing.
The first step in implementing our handler is to identify the intent name and call the corresponding function that implements it. The pseudocode for this looks as follows:
import json
def get_quote(request):
return "Quote handling logic goes here."
def lambda_handler(event, context):
# TODO implement
print(event)
intent = event['currentIntent']['name']
if intent == 'GetQuote':
return get_quote(event)
return {
'statusCode': 200,
'body':
json.dumps("Sorry, I'm not sure what you have in mind. "
"Please try again.")
}
This is sufficiently complete to actually be tested against your chatbot at this point, if you so desire, but let's press on with the implementation.
To test, you should add a test event, as shown in the instructions that follow:
Go to Configure test events:

Figure 4.32: Configure test events drop-down box
Edit it as shown here. The Lambda function requires the JSON structure as shown:

Figure 4.33: Editing the Lambda test event
Implementing the Function to Retrieve the Market Quote
The next step will be to implement the get_quote function, which does the work of actually getting the market quote information and returning it to the calling handler function:
def get_quote(request):
Slots = request['currentIntent']['slots']
ticker = Slots['ticker']
price = call_quote_api(ticker)
Note that we have named the parameter request, so the object event to which we send the function is referred to as a request within this function. It contains the same value and structure, just renamed. Therefore, we can get the value of the ticker Slot, as mentioned previously, by getting the value of the item with the ticker key under it by using the following code:
request['currentIntent']['Slots']
Then, we call the call_quote_api() function to retrieve the value of the market quote for the value of the ticker item. We haven't implemented call_quote_api() yet, so let's do this next.
We will implement the call_quote_api function as follows:
def call_quote_api(ticker):
response =
urlopen('https://www.alphavantage.co/query?'
'function=GLOBAL_QUOTE&symbol={}'
'&apikey=3WIN88G0AVG7RZPX'.format(ticker))
response = json.load(response)
''' Sample Response:
{'Global Quote': {'01. symbol': 'AAPL',
'02. open': '316.2700',
'03. high': '318.7400',
'04. low': '315.0000',
'05. price': '318.7300',
'06. volume': '33454635',
'07. latest trading day': '2020-01-17',
'08. previous close': '315.2400',
'09. change': '3.4900',
'10. change percent': '1.1071%'}} '''
return response['Global Quote']["05. price"]
Here, ticker is the value of the ticker parameter (in this specific example, it would be GOOG). We use Alpha Vantage, which provides a static endpoint on the internet at https://www.alphavantage.co/, to retrieve a quote. We have also captured a sample response as an example. You should get your own API key.
Since it is implemented as a simple GET request, with the ticker parameter embedded within the URL, with the API key, we can simply use the built-in urlopen method in the urllib.request module (which we will have to remember to import) to receive a response from the URL with the ticker embedded within it.
Since the response is also in JSON format, we need to import json module and load the response using the json.load function. The only field we are interested in within the response is 05. price, so we return that as the return value from our function.
Returning the Information to the Calling App (the Chatbot)
Now that we have the market quote value, we can return it to our calling application, which is the chatbot that we implemented. We have to do a couple of small things, however, to return this value. First, we need to format it as a conversational response, as shown in the following string:
message = 'The last price (delayed) of ticker {} was {}'
.format(ticker, price)
This should let the chatbot display the following message:
The last price (delayed) of ticker GOOG was 1107.32
There is one final step, which is to construct an Amazon Lex JSON return format that contains our message and a couple of other items of information. We will use the close helper function to do this:
return close(message)
Our close function takes a single parameter, which is the string that we wish to return to the chatbot (in this case, this is the value of the message variable). It generates a JSON wrapper around the content, which conforms to the structure that our Lex-based bot is expecting and from which it can extract the content and deliver it to the user. The structure of the wrapper is not important at this stage, but if you are curious, you can look at the implementation of the close function. As we mentioned earlier, the lambda-function.py file contains the full source code for the lambda function. It is available in GitHub at https://packt.live/2O8TUwA.
The code window should look as follows:
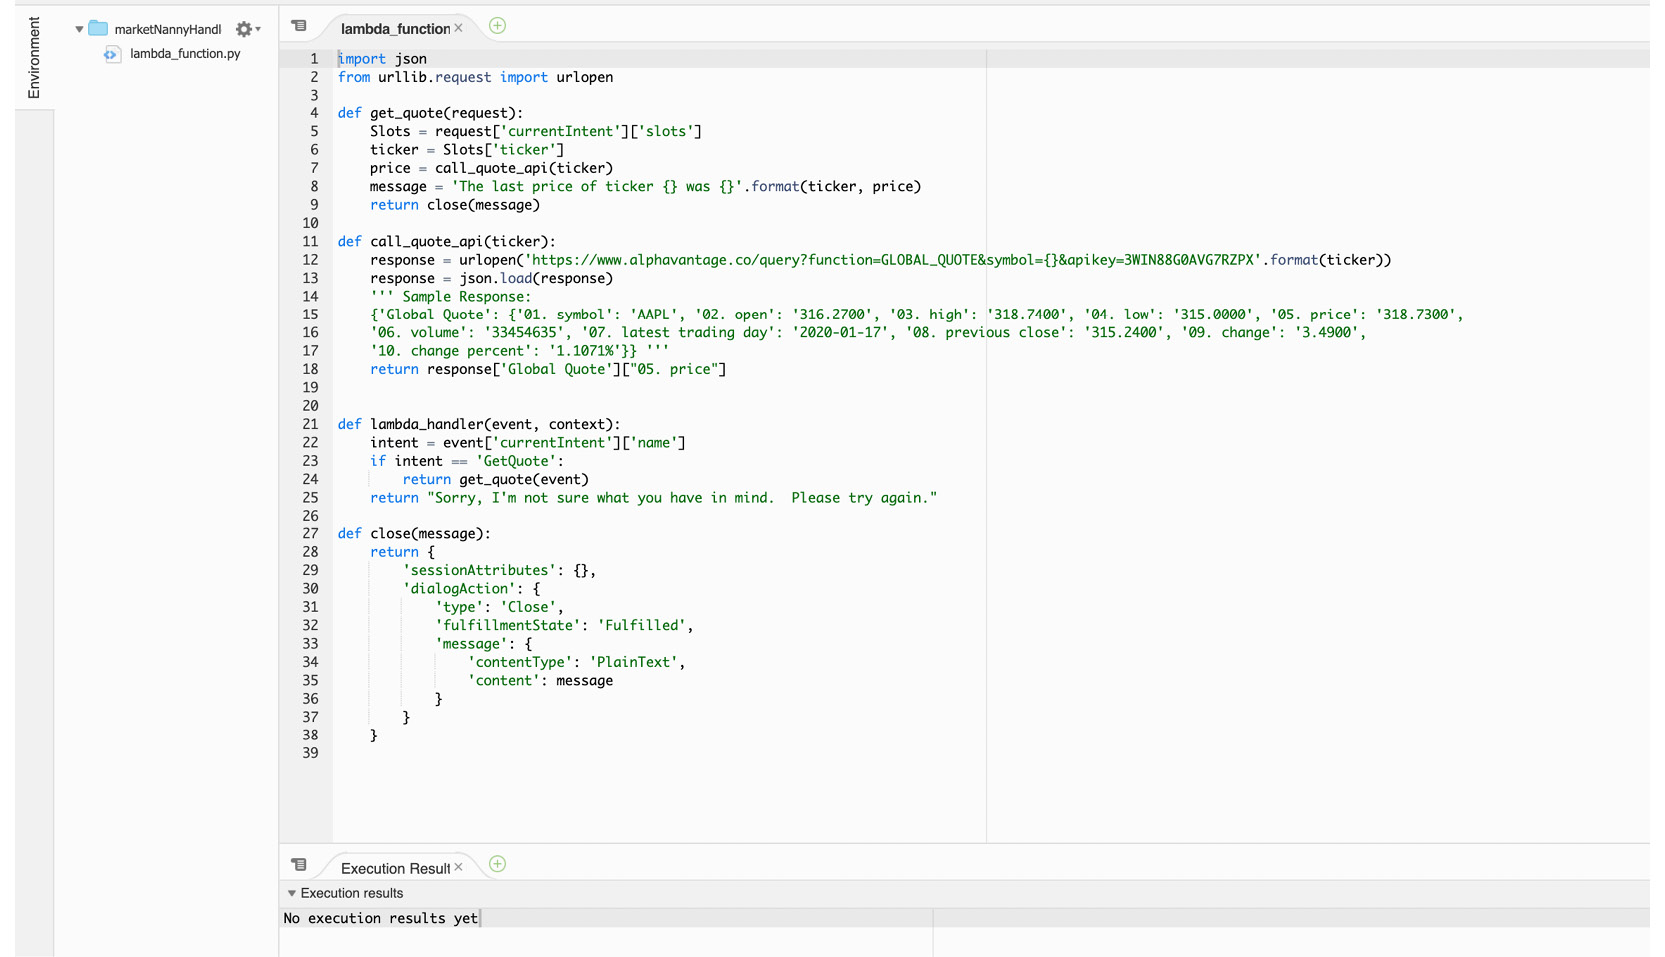
Figure 4.34: Code window
Connecting to the Chatbot
At this point, the only task remaining is to connect the Lambda function to the chatbot and test it. Perform the following steps to do so:
- Navigate back to the Amazon Lex dashboard and select the MarketNanny bot:
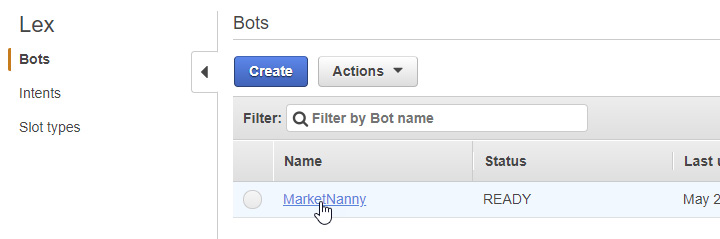
Figure 4.35: Connecting to the bot
- Then, scroll down to the Fulfillment section and select the AWS Lambda function option. Next, select the marketNannyHandler function from the Lambda function drop-down menu and leave Version or alias as the default value of Latest:
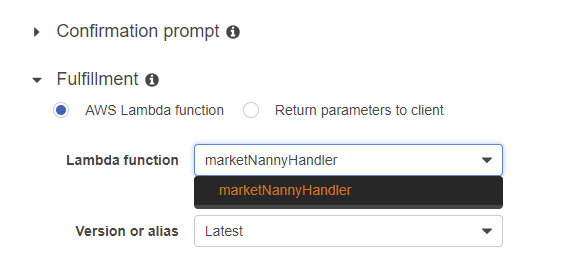
Figure 4.36: Confirmation prompt
- Rebuild the intent by clicking on the Build buttons, and test the chatbot together with the Lambda handler in the Test Chatbot pane:
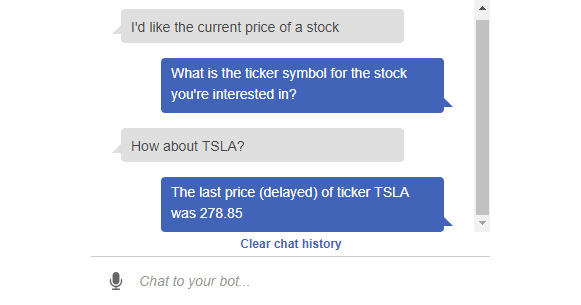
Figure 4.37: Chatbot updated
- The following screenshot shows the interaction with the bot to find out the current price of AAPL:
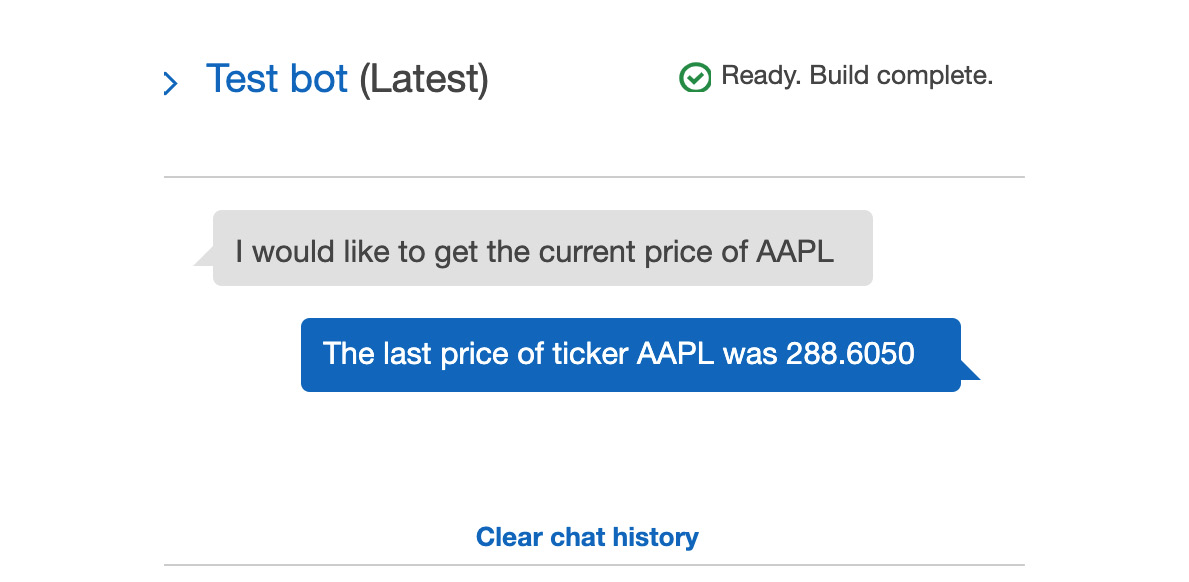
Figure 4.38: Chatbot updated
Debugging Tips
Here are some debugging tips that will help you:
- The logs from the monitoring tab on the Lambda pane are very useful:

Figure 4.39: CloudWatch metrics
- The logs are collected at the CloudWatch Logs insight:
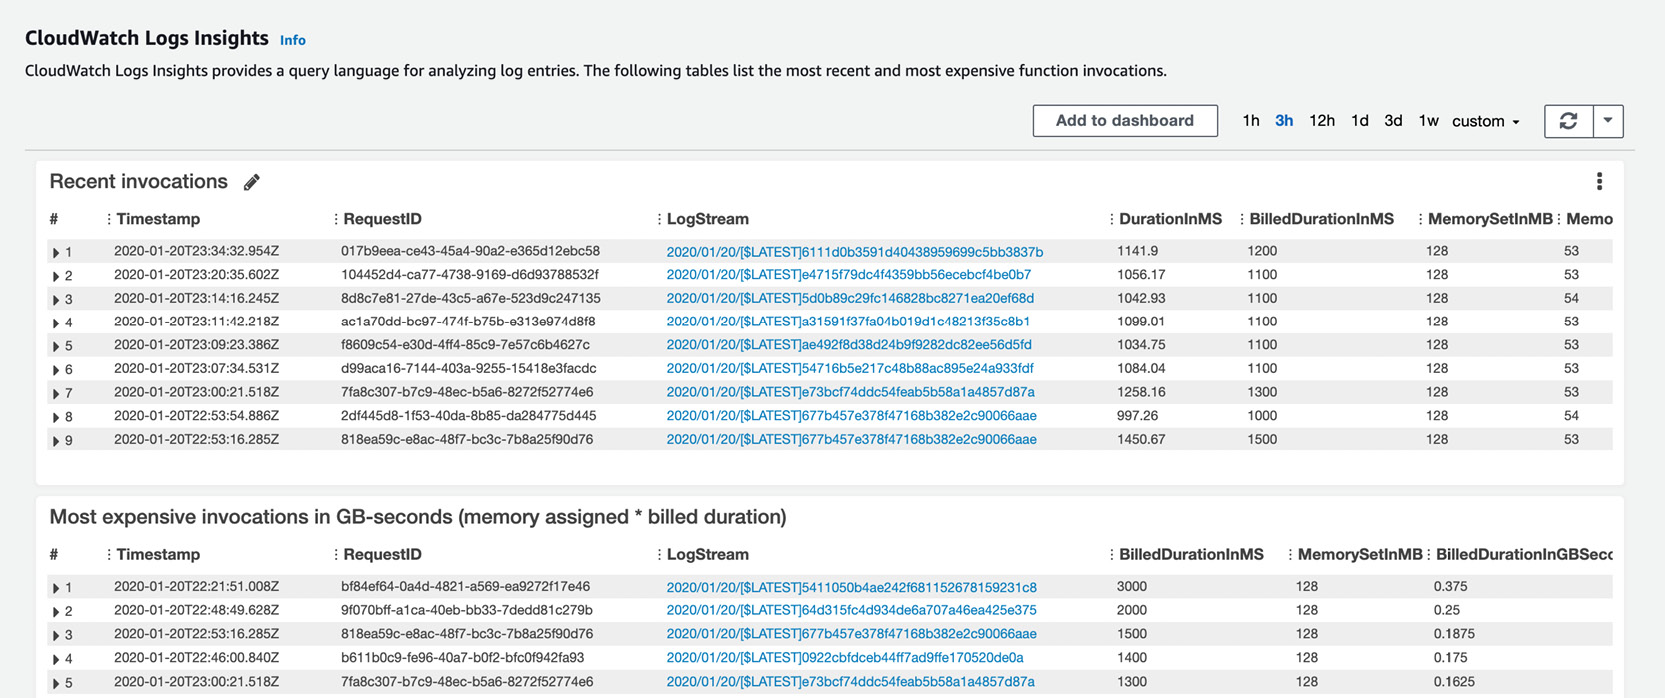
Figure 4.40: CloudWatch logs insights
- As you can see, this took us quite a few attempts. we used print statements inside the Lambda that print out the contents. A couple of sample logs can be seen in the following screenshot, along with the printout of the request JSON from the Lex bot, as well as the http response from the stock quote API. This makes it easy to see where the various information pieces are nested:
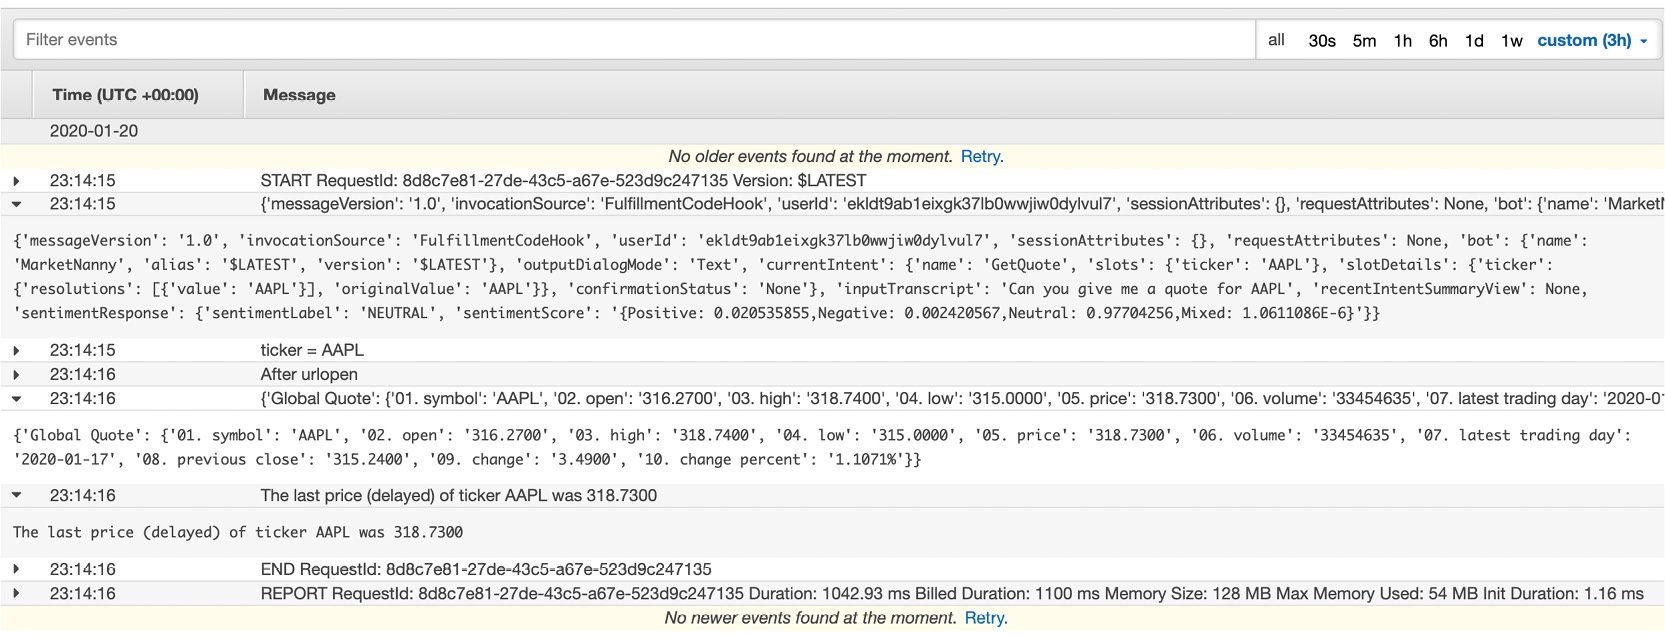
Figure 4.41: CloudWatch logs with output from print statements
- You can see an error that I encountered in the following screenshot. The stock API returns the values in a nested JSON, so you have to use the response ['Global Quote']["05. price"], and not just the response ["05. price"]:
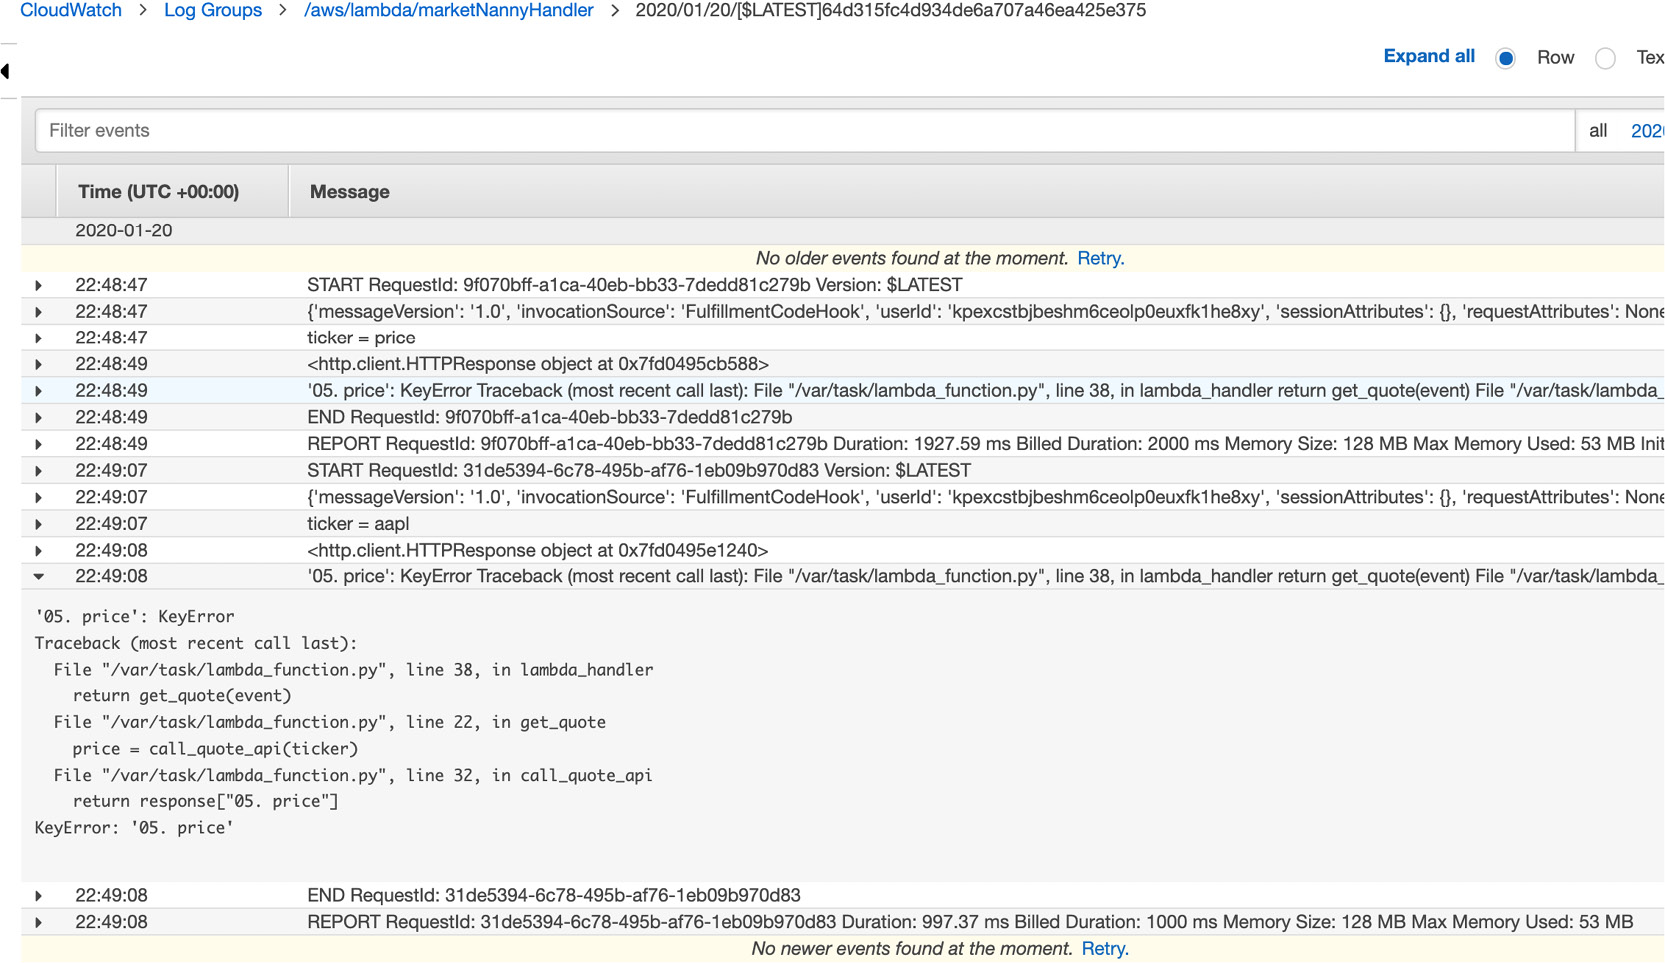
Figure 4.42: CloudWatch logs showing KeyError
- The Lambda logs are extremely useful and capture the errors. Develop incrementally and test every change. If there are too many moving parts or changes, debugging will be difficult.
- It will take a little time to get used to the various consoles of the AWS ecosystem, understand the permissions, and so on, but if you persist, you will reap the benefits.
Summary
We started this chapter with an introduction to Conversational Artificial Intelligence and learned how different aspects of this technology help us build a good, useful chatbot. We also learned some core concepts, such as utterances, intents, plots, and so on, that serve as the foundation for building a chatbot. Later, right before we built our first chatbot, we discussed some best practices that come in handy while designing Conversational AI. Equipped with this knowledge, we performed an exercise to create a bot to recognize intent and fill a slot to retrieve stock prices. We then created a Lambda function in AWS to help us implement the business logic behind the bot. In the next chapter, we will learn how to use speech with chatbots.