
Overview
This chapter describes the Amazon Rekognition service for analyzing the content of images using various techniques. You will be introduced to the Rekognition service for image analysis using computer vision, through which you will be able to detect objects and scenes in images. You will learn how to analyze faces and recognize celebrities in images. You will also be able to compare faces in different images to see how closely they match with each other.
By the end of this chapter, you will be able to apply the Amazon vision and image processing AI services in fields such as biology, astronomy, security, and so on.
Introduction
In the preceding chapters, you have done lots of interesting exercises and activities with the Amazon Web Services (AWS) Artificial Intelligence (AI) and Machine Learning (ML) services. You combined the serverless computing paradigm and conversational AI to construct chatbots, as well as a fully functional contact center that enables anyone to converse with the chatbots through a voice interface that's available by dialing a local phone number. You also learned about text analysis and topic modeling, all using the AWS services.
In this chapter, you will use the Amazon Rekognition service to perform various image processing tasks. First, you will identify objects and scenes within images. Then, you will test whether images should be flagged as needing content moderation. Next, you will analyze faces using Rekognition. You will also recognize celebrities and well-known people in images. You will compare faces that appear in different images and settings (for example, in groups or isolation) and recognize the same people in different images. Finally, you will extract text from images that might have some text displayed in them.
Amazon Rekognition Basics
Amazon Rekognition is a deep learning-based visual analysis service from AWS that allows you to perform image analysis on pictures and videos using machine learning. It is built on the same scalable infrastructure as AWS itself and uses deep learning technology to be able to analyze billions of images daily if required. It is also being updated constantly by Amazon and is learning new labels and features.
Some of the use cases for Amazon Rekognition are as follows:
- Searching across a library of image content using text keywords.
- Confirming user identities by comparing live images with reference ones.
- Analyzing trends based on public images, including the sentiments and emotions of the people in the images.
- Detecting explicit or suggestive content and automatically filtering it for your purposes.
- Detecting and retrieving text from images.
Note
Amazon Rekognition is also a HIPAA-eligible service for healthcare applications. If you wish to protect your data under HIPAA, you will need to contact Amazon customer support and fill out a Business Associate Addendum (BAA). For more information about HIPAA, go to the following link: https://aws.amazon.com/compliance/hipaa-compliance/.
Free Tier Information on Amazon Rekognition
For this book, you will be using the free tier services of Amazon Rekognition. Be aware of the limits of the free tier services and the pricing options. These are the free services you can use for image processing:
- New Amazon Rekognition clients can break down up to 5,000 pictures a year.
- With the complimentary plan, you can utilize all of Amazon Rekognition's APIs and use up to 1,000 images that have faces free of charge.
Note
You should not need to use more than the free tier limits, but if you do go beyond the limits of the free tier, you will get charged by Amazon at the rates published at this link: https://aws.amazon.com/rekognition/pricing/.
Rekognition and Deep Learning
Deep learning is a branch of artificial intelligence and a subfield of machine learning. Deep learning works by inferring high-level abstractions from raw data by using a deep neural network graph with many layers of processing.
Deep learning structures such as Convolutional Neural Networks (CNNs) and Recurrent Neural Networks (RNNs) have been employed in natural language processing, audio recognition, speech recognition, and computer vision to deliver significant results. Neural Machine Translation has replaced all human-curated translation engines, object detection in autonomous cars uses CNN-based architectures extensively, and conversational AI is powering a variety of customer interactions.
The Rekognition service employs deep learning to provide its various features behind the scenes. It uses pre-trained models so that users do not have to train the system. The exact details are proprietary and confidential to Amazon, but we will learn how it works and how to use Rekognition in this chapter. As we mentioned earlier, one interesting aspect of Amazon Rekognition is the fact that the algorithms are monitored and trained periodically to increase their accuracy and capabilities. It can also be extended with custom labels and models trained with your images.
Note
For any questions you have, the Amazon Rekognition FAQ page (https://aws.amazon.com/rekognition/faqs/) is an excellent resource.
Detecting Objects and Scenes in Images
Amazon Rekognition provides a feature that can detect objects and scenes in an image and label them. This label may be an object, scene, or concept such as a person, water, sand, a beach (scene), and the outdoors (concept).
Each label comes with a confidence score, which measures, on a scale from 0 to 100, the probability that the service got the correct answer for that label. This allows you or your application to judge the threshold against which to allow or discard results for itself.
Rekognition supports thousands of labels from categories such as those shown in the following table:
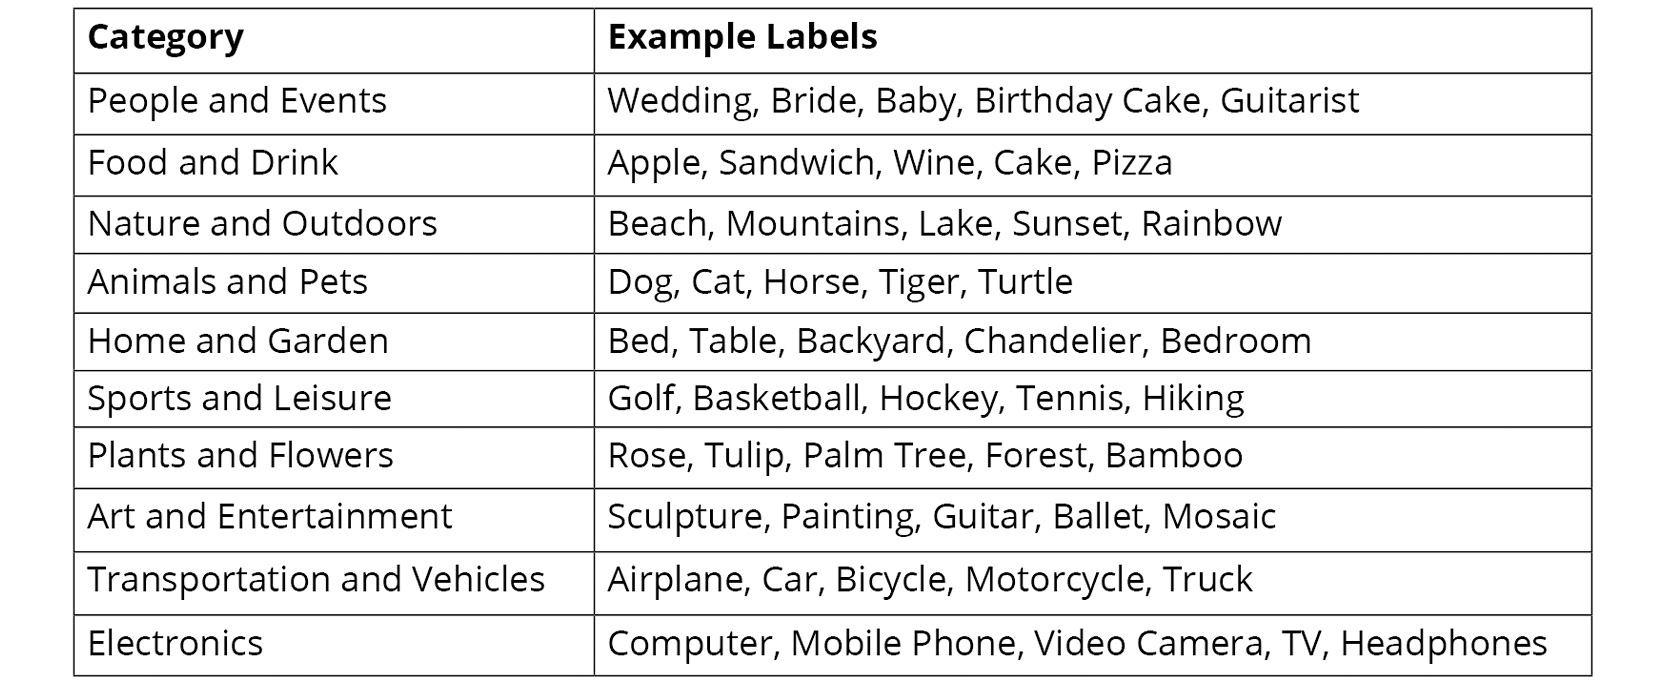
Figure 6.1: Labels supported by Amazon Rekognition
Additionally, Amazon is continuously training the system to recognize new ones, and you can request labels that you might wish to use that are not in the system through Amazon customer support.
To create an Amazon Rekognition analysis of a sample image, you can do the following:
- Navigate to the Amazon Rekognition Service web page in the AWS Management Console and click Services at the top of the left-hand side. It also has a search box:

Figure 6.2: Selecting the Rekognition service in the AWS Management Console
- You can find Rekognition under the Machine Learning section. When you are on the Rekognition page, click on the Object and scene detection link in the left-hand side toolbar to navigate to the Object and scene detection page:

Figure 6.3: Amazon Rekognition service page
- Next, choose the textbox under the Use your own image panel and enter the following URL: https://images.unsplash.com/photo-1540253208288-6a6c32573092?w=800:

Figure 6.4: Use the image URL input textbox
The result for the image is as follows:
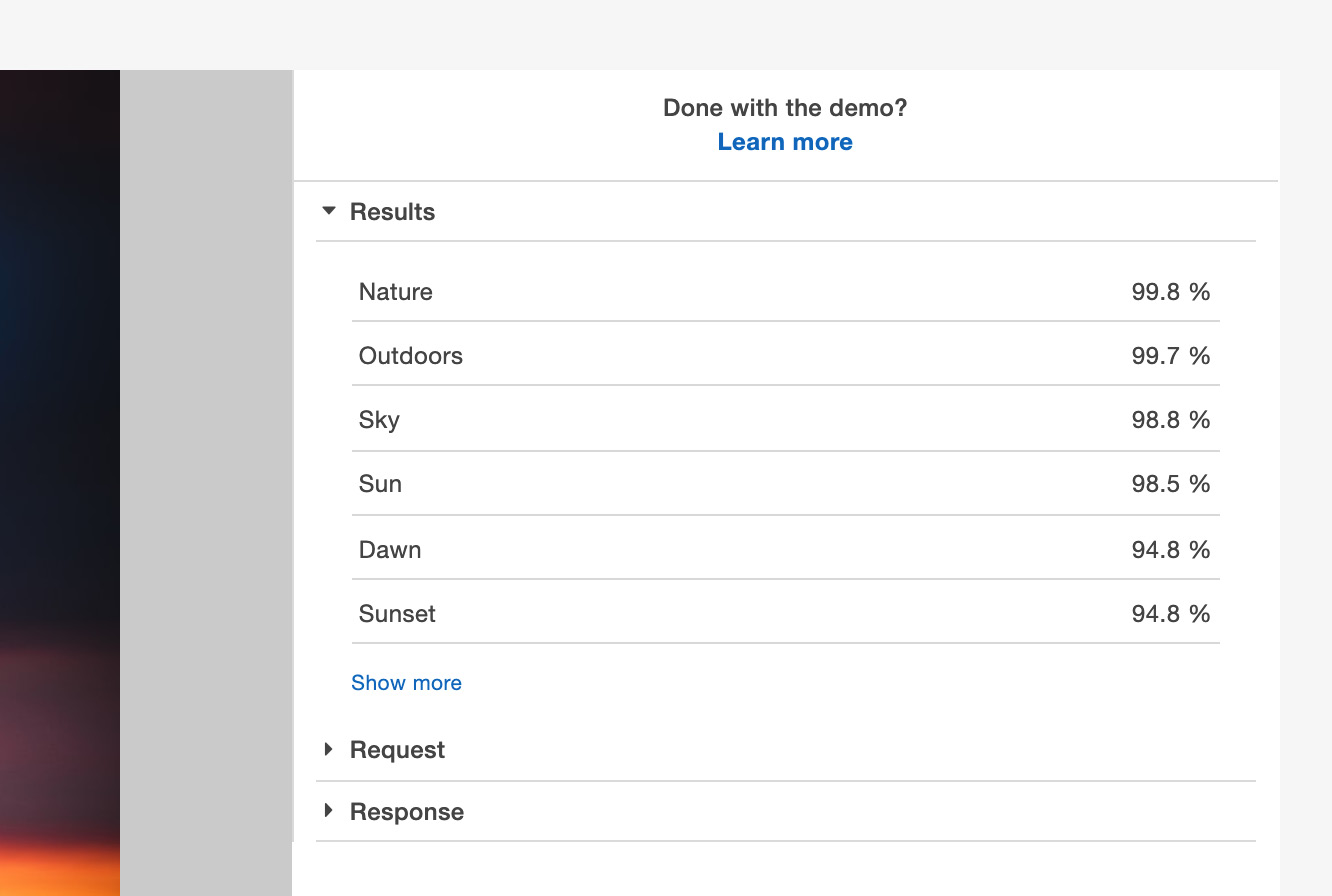
Figure 6.5: Results for the sample image
- You can see that, within the image, the objects that have been detected with greater than 90% confidence are as follows:
Nature
Outdoors
Sky
Sun
Dawn
Sunset
- Click the Show more link to show more results with lower confidence levels. This will show more objects have been detected:
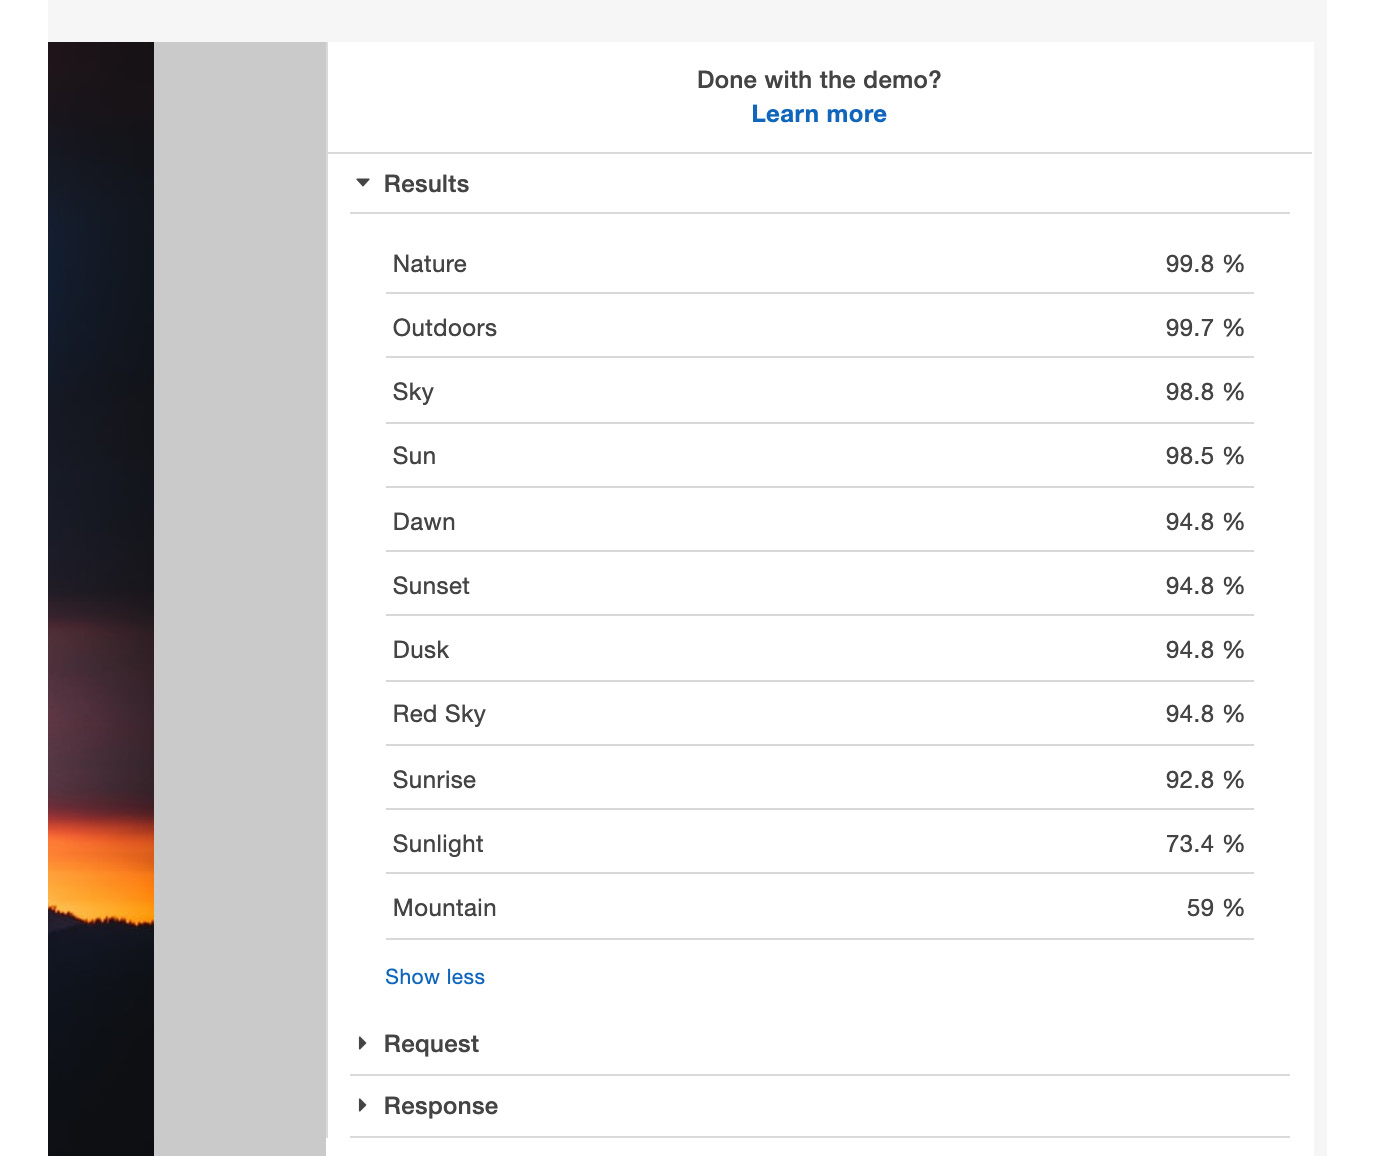
Figure 6.6: Full set of labels for our sample image from Object and scene detection
You can choose the threshold amount of the confidence level at which you would like to cut off the results for your application.
Exercise 6.01: Detecting Objects and Scenes Using Your Images
In this exercise, we will detect objects and scenes of custom images using Amazon Rekognition. The custom images can be either taken from online sources, or you can upload them from your local machine. The following are the steps for detecting objects and scenes:
- Navigate to the Amazon Rekognition service page from the AWS Management Console or go directly to the following URL: https://console.aws.amazon.com/rekognition.
- Click the Object and scene detection link in the toolbar to navigate to the Object and scene detection page.
- Next, choose the textbox under the Use your own image panel.
- Enter the following URL so that you have an image to analyze: https://images.unsplash.com/photo-1522874160750-0faa95a48073?w=800. The following is the image on the Rekognition page. You can see that it was able to zero-in on the image:

Figure 6.7: The first test image for Object and scene detection
Note
We have collected images from a stock photo site called https://unsplash.com/, which contains photos that can be downloaded for free and used without restrictions for this book. Always obey copyright laws and be mindful of any restrictions or licensing fees that might apply in the jurisdiction where you reside (if applicable). You may view the license for images from unsplash.com here: https://unsplash.com/license.
- You may view the results of the object detection under the Results panel on the right-hand side of the image. In this case, it is an image of a camera, and the results should look as follows:

Figure 6.8: Results for the first test image from Object and scene detection
- As you can see, the results are quite accurate. Next, you can try the following images and verify that the results are as shown in the tables that immediately follow each image, that is, https://images.unsplash.com/photo-1517941875027-6321f98198ed?w=800 and https://images.unsplash.com/photo-1500111709600-7761aa8216c7?w=800.
The following are the images. This is the second test image:

Figure 6.9: The second test image for Object and scene detection
The following are the results of the second image provided:

Figure 6.10: Results for the second test image from Object and scene detection
This is the third test image:

Figure 6.11: The third test image for Object and scene detection
The following are the results of the third image provided:

Figure 6.12: Results for the third test image from Object and scene detection
The results for the second image did indicate it was a human head with > 83% confidence. Looking at the third image of the Golden Gate Bridge, it had more classes before Bridge with 96.5% confidence.
Image Moderation
In addition to object and scene detection, Rekognition also provides the ability to filter out objectionable content. You can use moderation labels to give point-by-point subclassifications, enabling you to tweak the channels that you use to figure out what sorts of pictures you consider satisfactory or shocking. Amazon Rekognition Image provides the DetectModerationLabels operation to detect unsafe content in images.
You can utilize this component to enhance photograph-sharing destinations, gatherings, dating applications, content stages for youngsters, online business stages and commercial centers, and more. In this book, we will not use any adult or nude images, but we can show the use of this feature with content that may be considered racy or suggestive in some locales featuring women in revealing clothing such as swimsuits or clubwear.
The images are blurred by default in this section, so you do not have to view them unless you press the View Content button.
Note
If you find any racy or suggestive images offensive, please skip this section based on your own personal, moral, religious, or cultural norms.
Amazon Rekognition uses a hierarchical taxonomy to label categories of explicit and suggestive content. The two top-level categories are Explicit Nudity and Suggestive. Each top-level category has many second-level categories. The types of content that are detected and flagged using this feature are as follows:
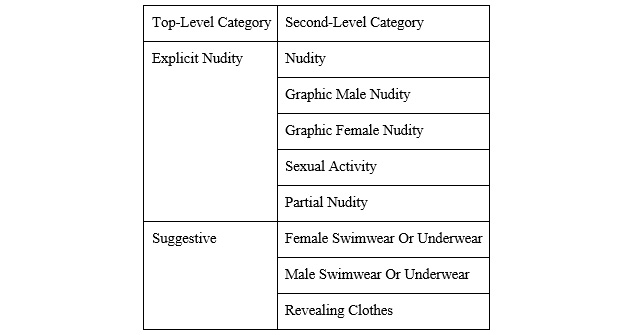
Figure 6.13: Content type categories
To create an Image Moderation of a sample image, you can do the following:
- Navigate to the Amazon Rekognition service page in the AWS Management Console or go directly to the following URL: https://console.aws.amazon.com/rekognition.
- Click the Image Moderation link in the toolbar to navigate to the Image Moderation page.
- You will see sample images on the bottom left. Click one of them.
- You will notice right away that the content is blurred, as shown in the following screenshot. The image being analyzed is the first image to the left, which was already selected. You will see that the service has correctly identified Suggestive content in the image of the Female Swimwear Or Underwear type with a confidence of 94.9%:
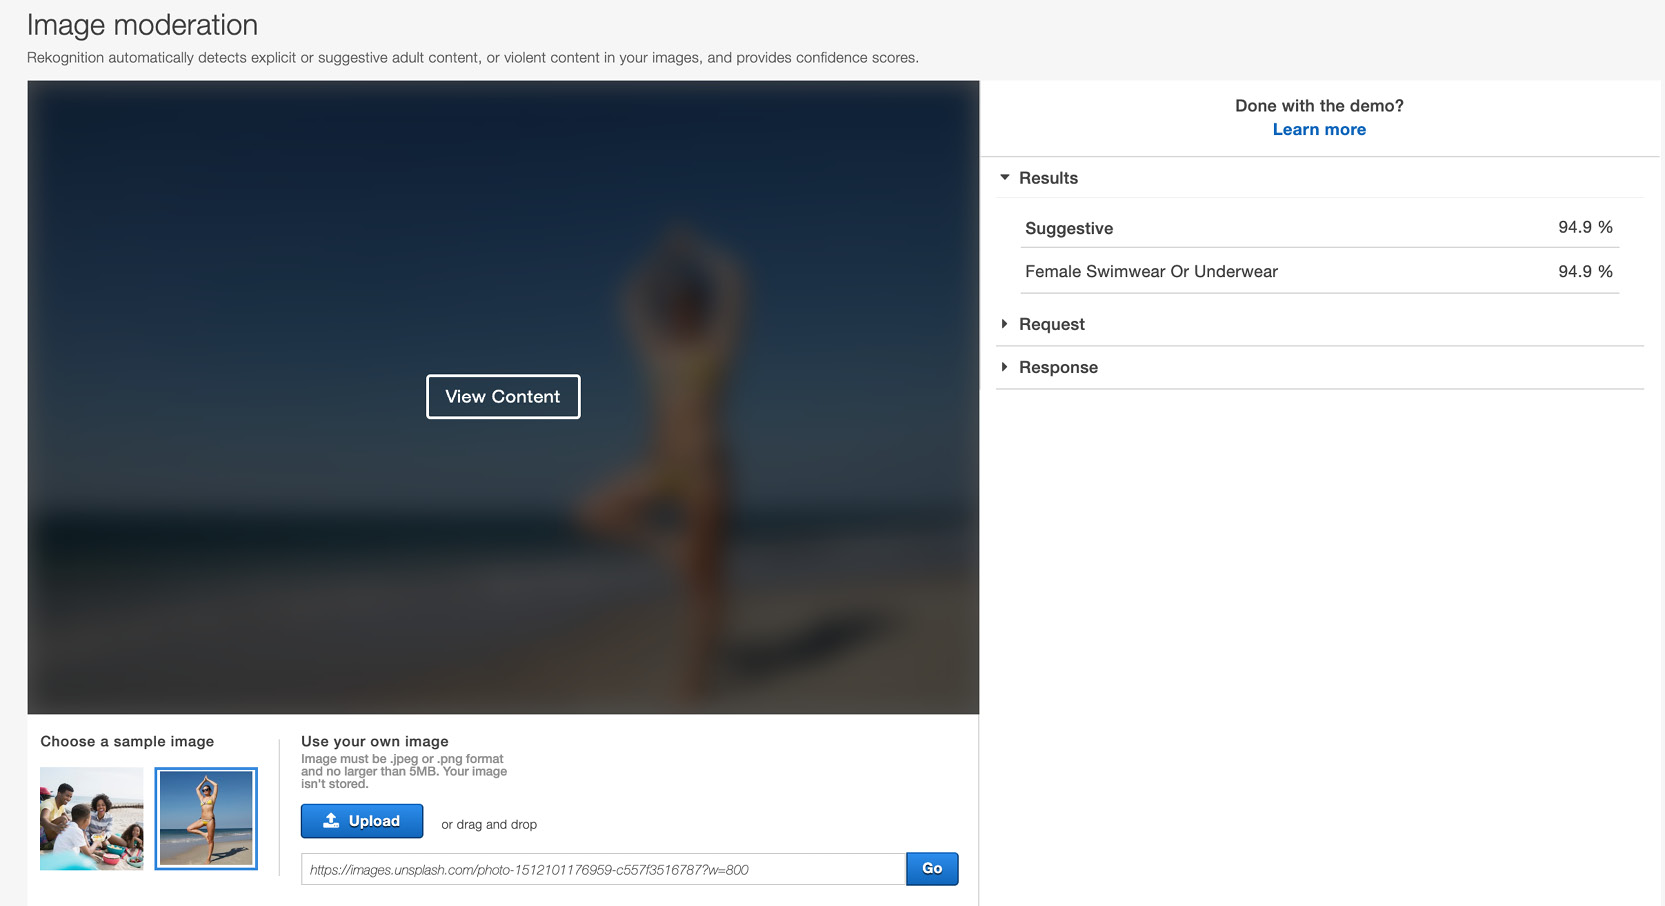
Figure 6.14: Results for image moderation
With this, we've seen how Amazon Rekognition can filter out suggestive content, but let's see how it does when it comes to detecting objectionable content in images.
Exercise 6.02: Detecting Objectionable Content in Images
In this exercise, we will detect objectionable content in images. You can try this service on your images. We have selected three images that we will try out with this feature. Follow these steps to complete this exercise:
- Copy and paste or type the following URL into the Use image URL textbox under the Use your own image section at the bottom of the page, and press the Go button to receive results from the service – https://images.unsplash.com/photo-1525287957446-e64af7954611?w=800:
Figure 6.15: Use image URL upload textbox
- You should receive a result stating that the service has found Female Swimwear Or Underwear content with a 99.4% degree of confidence:
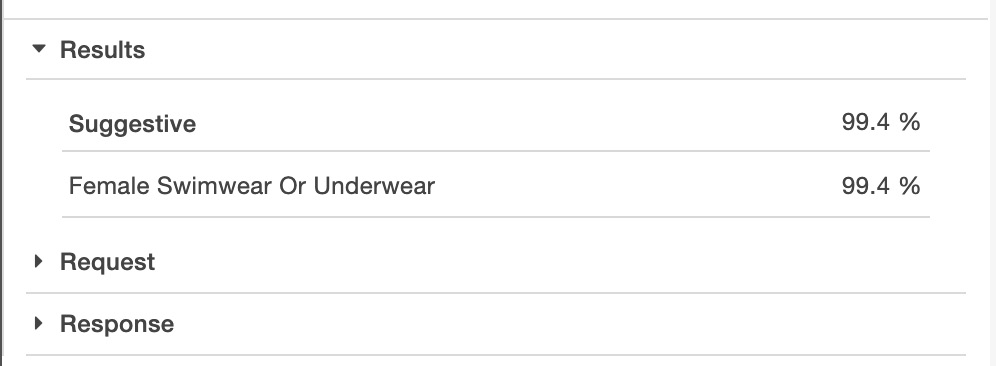
Figure 6.16: Result that the image moderation service has found
- The image URL to provide to the service is https://images.unsplash.com/photo-1509670811615-bb8b07cb3caf?w=800.
- Just as before, enter it in the Use image URL textbox and press the Go button. This image has no objectionable content:
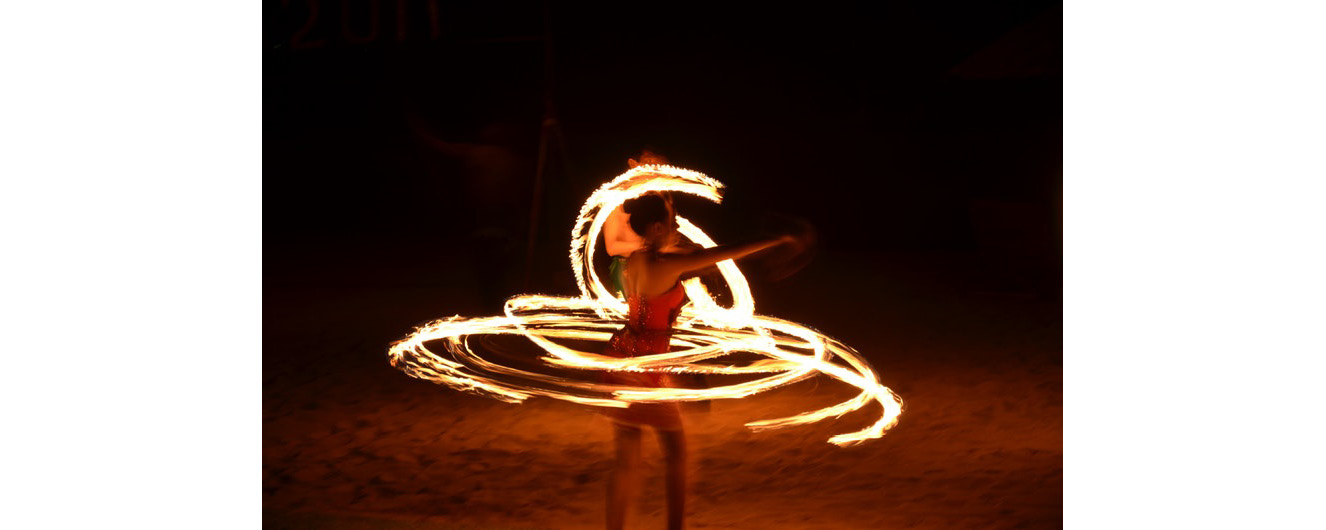
Figure 6.17: First test image for image moderation
You should see that Rekognition correctly returns no results:

Figure 6.18: Results of the first test image from image moderation
- Finally, we will use an image that should, again, return some results: https://images.unsplash.com/photo-1518489913881-199b7c7a081d?w=800.
This one should have, once again, correctly been identified as containing content with Female Swimwear Or Underwear with a 99.6% degree of confidence:

Figure 6.19: Results of the second provided image for image moderation
As you've seen, Amazon Rekognition has powerful image analysis capabilities – including content moderation. As a suggestion, you can try some more images that may or may not be suggestive and check the results. You might find some gaps in the object detection deep learning algorithms.
Facial Analysis
Rekognition can perform a more detailed analysis of faces as well. Given an image with a detectable face, it can tell whether the face is male or female, the age range of the face, whether or not the person is smiling and appears to be happy, and whether they are wearing glasses or not.
It can also detect more detailed information, such as whether the eyes and mouth are open or closed, and whether or not the person has a mustache or a beard.
To create a facial analysis of a sample image, you can do the following:
Note
Click on the Facial Analysis link in the left toolbar to navigate to the Facial Analysis page.
- We will use the upload capability to upload images and analyze the images:

Figure 6.20: The image upload button
- The first image to be analyzed can be found at https://packt.live/3f5ipH0.
You can either save the image onto your disk or download this book's GitHub repository, as we covered in Chapter 1, An Introduction to AWS.
- Click Upload; you will be shown the standard explorer window. Navigate to the directory where you have the Chapter06 folder and select the Rekognition-05.jpeg file:

Figure 6.21: The explorer with the upload window
- For this image, you will see that the main image box displays a bounding rectangle that shows the region in which the face was detected. Within the bounding box, there are also three dots to identify the locations of key facial features – the mouth and nose:
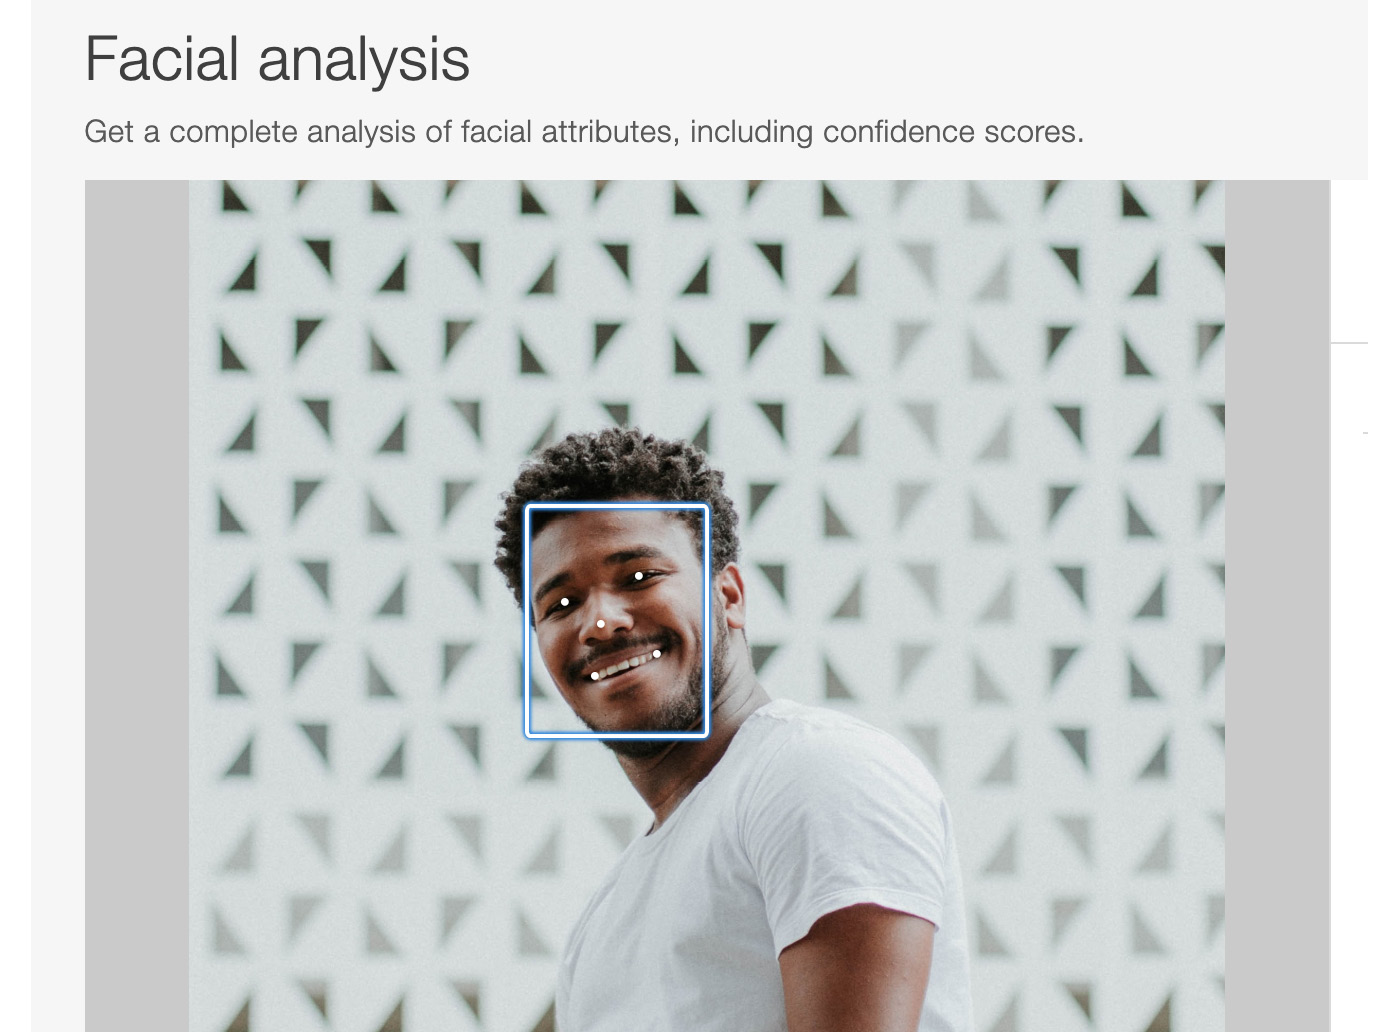
Figure 6.22: First sample image for facial analysis
- Under the Results section to the right of the image, you will see that Rekognition has detected the following attributes of the face in the image:

Figure 6.23: Results of the first sample image for facial analysis
You can click the Show more link in order to look at the other attributes that have also been identified.
All these identified qualities have an extremely high degree of confidence, showing that the service is very confident about its findings.
Exercise 6.03: Analyzing Faces with Your Own Images
In this exercise, you have been provided with three images in the book's GitHub repository (https://packt.live/31X6w1Z) so that you can try out the Amazon Rekognition service with sample images. The images are provided courtesy of https://unsplash.com/ and Pinterest. Let's find out if they can identify the prominent facial attributes. Follow these steps to complete this exercise:
Note
Click the Facial Analysis link in the left toolbar to navigate to the Facial Analysis page.
- We will use the upload capability to upload images and analyze them:
Figure 6.24: The image upload button
- The first image to be analyzed can be found at https://packt.live/3edZZCx.
You can either save the image onto your disk or download this book's GitHub repository, as we covered in Chapter 1, An Introduction to AWS.
- Click Upload and it will show the standard explorer window. Navigate to the directory where you have the Chapter06 folder and select the Rekognition-01.jpeg file:

Figure 6.25: The explorer with the upload window
- You can see from the bounding box and the dots that Rekognition is able to recognize the face easily:

Figure 6.26: Bounding box for the first image provided for facial analysis
- Under the Results section, it quite accurately displays the attributes of the face in the image as well:
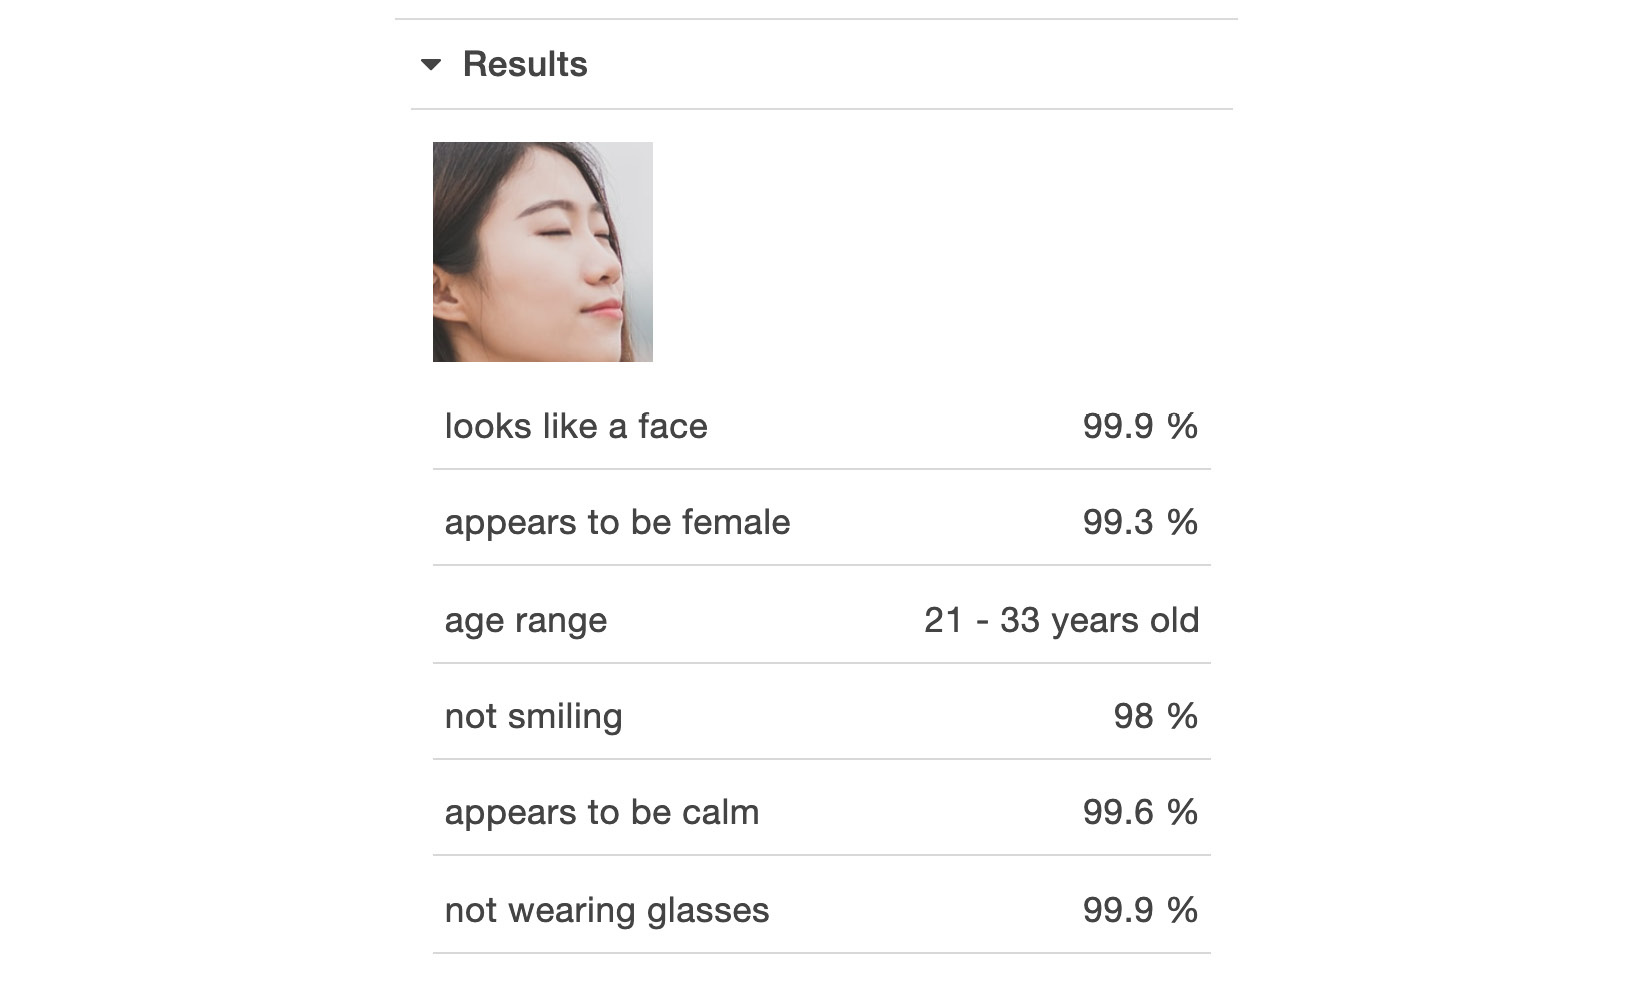
Figure 6.27: Results for the first image provided for facial analysis
- Let's see if Recognition can detect multiple faces and the facial features of each face. The second image contains multiple faces. The file can be found at https://packt.live/3gDSzu5.
- Click Upload and it will show the standard explorer window. Navigate to the directory where you have the Chapter06 folder and select the Rekognition-02.jpeg file.
- Rekognition once again does a good job of identifying the faces:

Figure 6.28: Bounding box for the second image provided for facial analysis
- Now, the Results view has a right arrow button and shows the first face:

Figure 6.29: Results for the second image provided for facial analysis
- Click the right arrow and you will get the details of the second face:
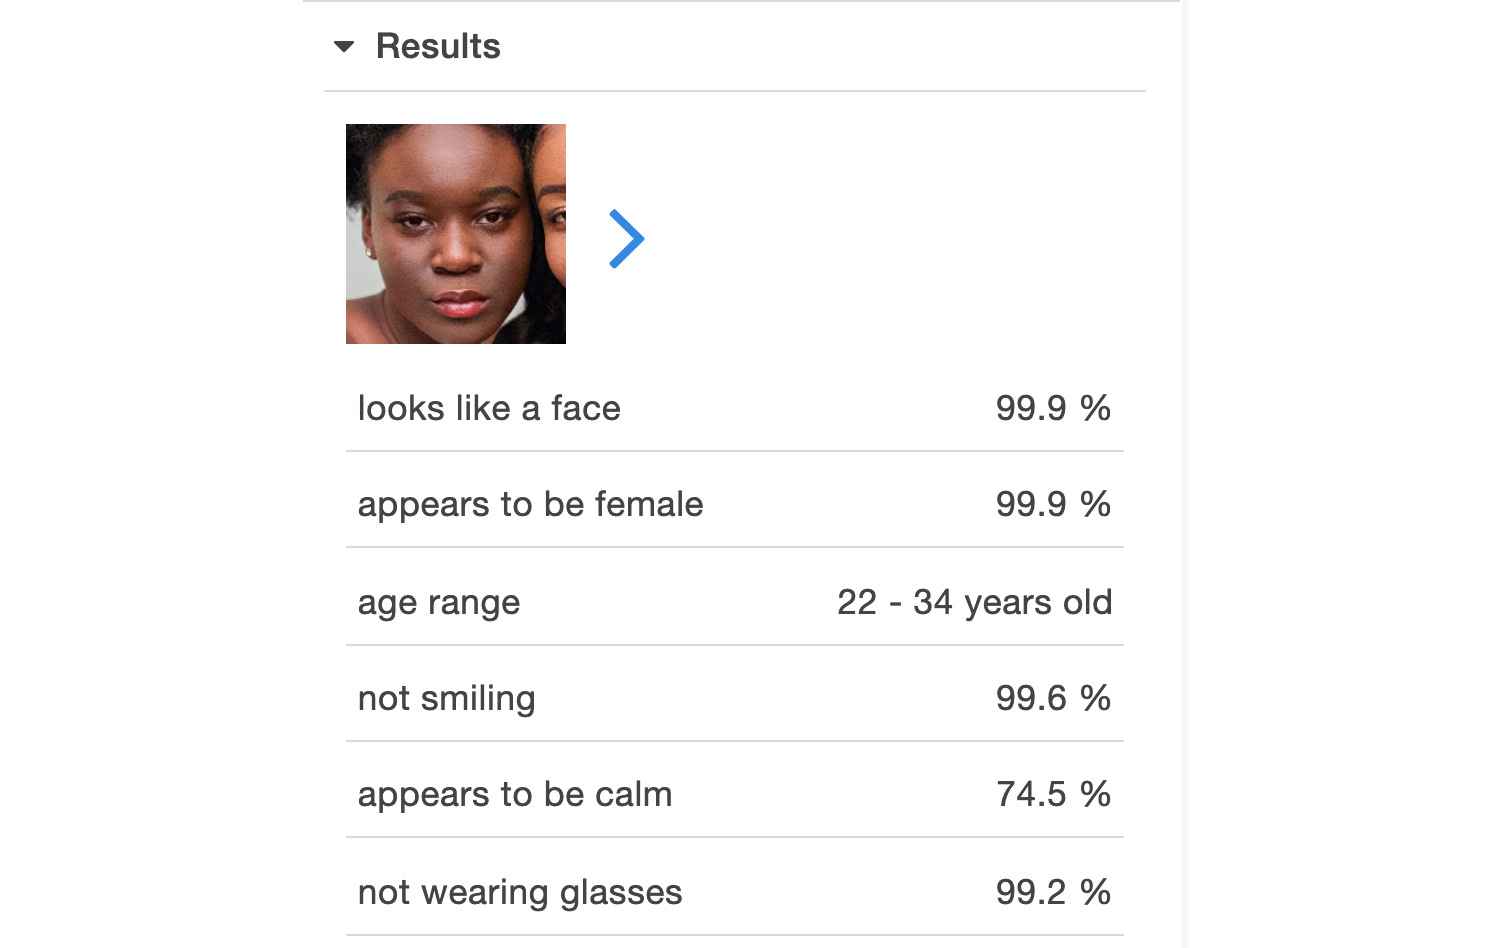
Figure 6.30: Results for the second image provided for facial analysis – second face.
- Finally, we will give Rekognition an image with a neutral emotion to see how it does. We will be using the image at the following link – https://images.unsplash.com/photo-1472099645785-5658abf4ff4e?w=1000:
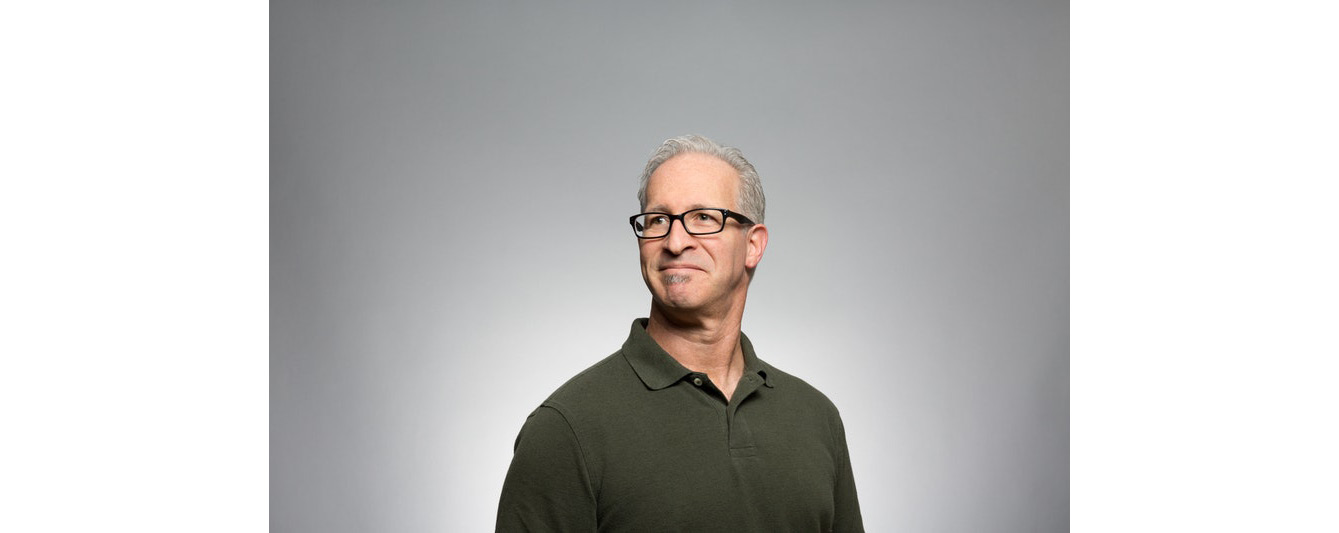
Figure 6.31: Third image provided for facial analysis
- As expected, the service can recognize both males and females. It identifies the face with the bounding box:

Figure 6.32: Bounding box for the third image provided for facial analysis
- It also displays results with a high degree of confidence (97.7%) that the face is male. It also updates the age range accordingly:
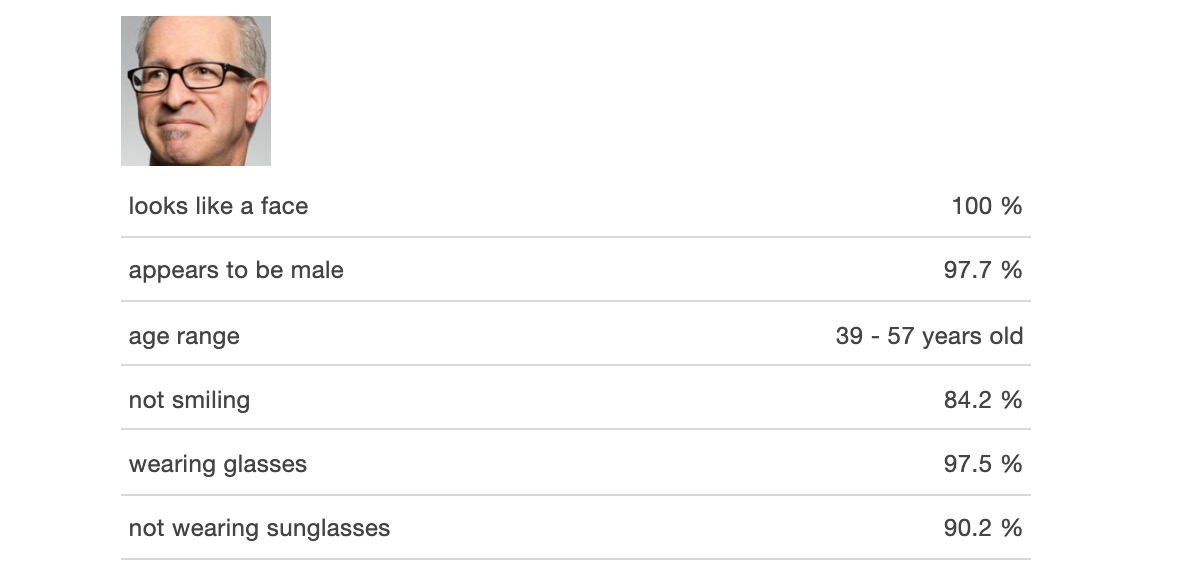
Figure 6.33: Results for the third image provided for facial analysis
It is 84.2% confident that the man is not smiling, and we can see from the image that he is not smiling very much, if at all. Finally, the service is 97.5% sure that he is wearing glasses, but it also says with 90.2% confidence that he is not wearing sunglasses. It shows that there is still room for lots of improvement and we should apply human logic and rules to validate the results from the image detection services. In this case, we can take the one with the larger confidence score (that is, wearing glasses) to show that we can use the relative score to evaluate the results.
As we all know, humans are born with extremely good object detection and image analysis capabilities, which we enhance as we grow. But this is very hard for machines as they do not have the capability to reason or perform semantic analysis. The image analysis domain is relatively new, with the bulk of advances coming in the last 5 to 6 years. New algorithms are being researched, new ways of training are being explored, and optimizations are being sought. Therefore, Amazon Rekognition is extremely effective—it has wrapped the algorithms and mechanisms in a set of useful and practical interfaces, masking the underlying algorithmic and computer theoretic complexities, and Rekognition learns and evolves by leveraging the current best practices and research. In this section, you were introduced to the capabilities of Amazon Rekognition's image analysis service. You will see more regarding this service in the following sections.
Celebrity Recognition
Rekognition provides us with the ability to recognize and label celebrities and other famous people in images. This includes well-known individuals from a variety of fields, such as sports, business, politics, media, and entertainment.
It is important to remember that Rekognition can only recognize faces that it has been trained on, and so does not cover a full, exhaustive list of celebrities. However, since Amazon continues to train the system, it is constantly adding new faces to the service.
Note
Click the Celebrity recognition link in the left toolbar to navigate to the Celebrity recognition page.
To create a celebrity recognition of a sample image, you can do the following:
- Click the Upload button. We will use a picture whose file can be found at https://packt.live/38CmbVM. You can either save the image onto your disk or download this book's GitHub repository, as described in Chapter 1, An Introduction to AWS.
- It will show the standard explorer window. Navigate to the directory where you have the Chapter06 folder and select the Rekognition-04.jpeg file:
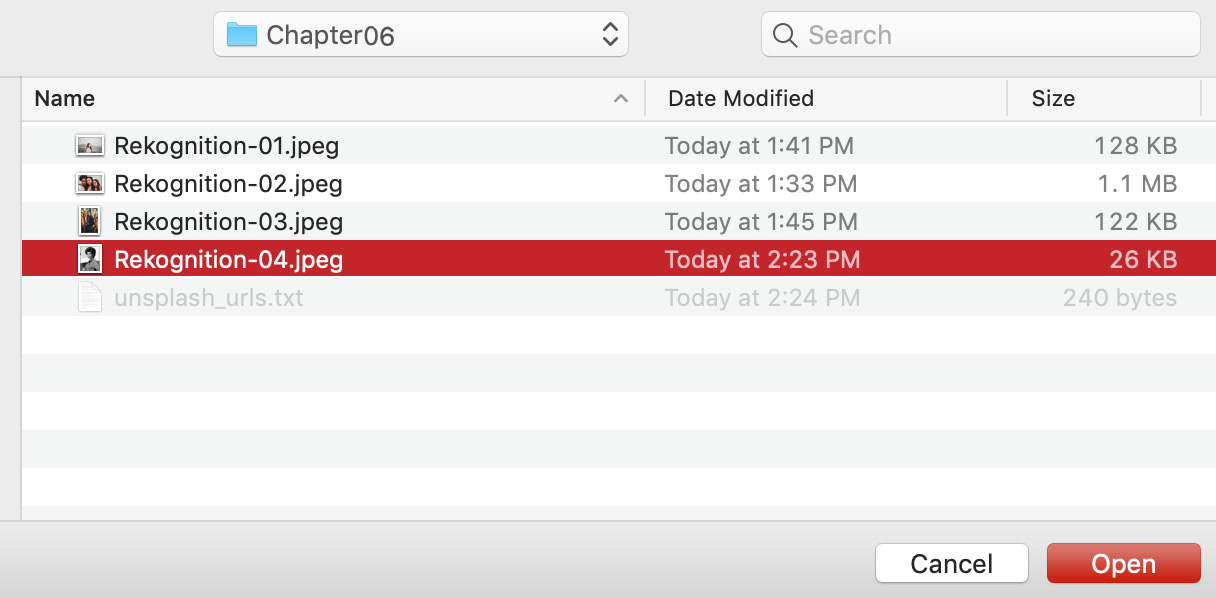
Figure 6.34: The explorer with the upload window
- Amazon Rekognition does an excellent job of recognizing Nichelle Nichols (famous for playing Lieutenant Nyota Uhura in the Star Trek movies):

Figure 6.35: First sample image for celebrity recognition, with results
- Clicking the Learn More link in the Results box takes you to the IMDb page for Nichelle Nichols:

Figure 6.36: The Learn More link for the first sample image
Exercise 6.04: Recognizing Celebrities in Your Images
In this exercise, we will use another site that has a larger collection of celebrity images. You can also use these for free without restrictions. You can also try out this service on your own images. We have selected three images that we will try out with this feature.
You may view the license for images from pexels.com here: https://www.pexels.com/creative-commons-images/. Follow these steps to complete this exercise:
Note
Click the Celebrity recognition link in the left toolbar to navigate to the Celebrity recognition page.
- Copy and paste or type a URL into the Use image URL textbox under the Use your own image section at the bottom of the page, and press the Go button to receive results from the service:
Figure 6.37: The Use image URL input textbox
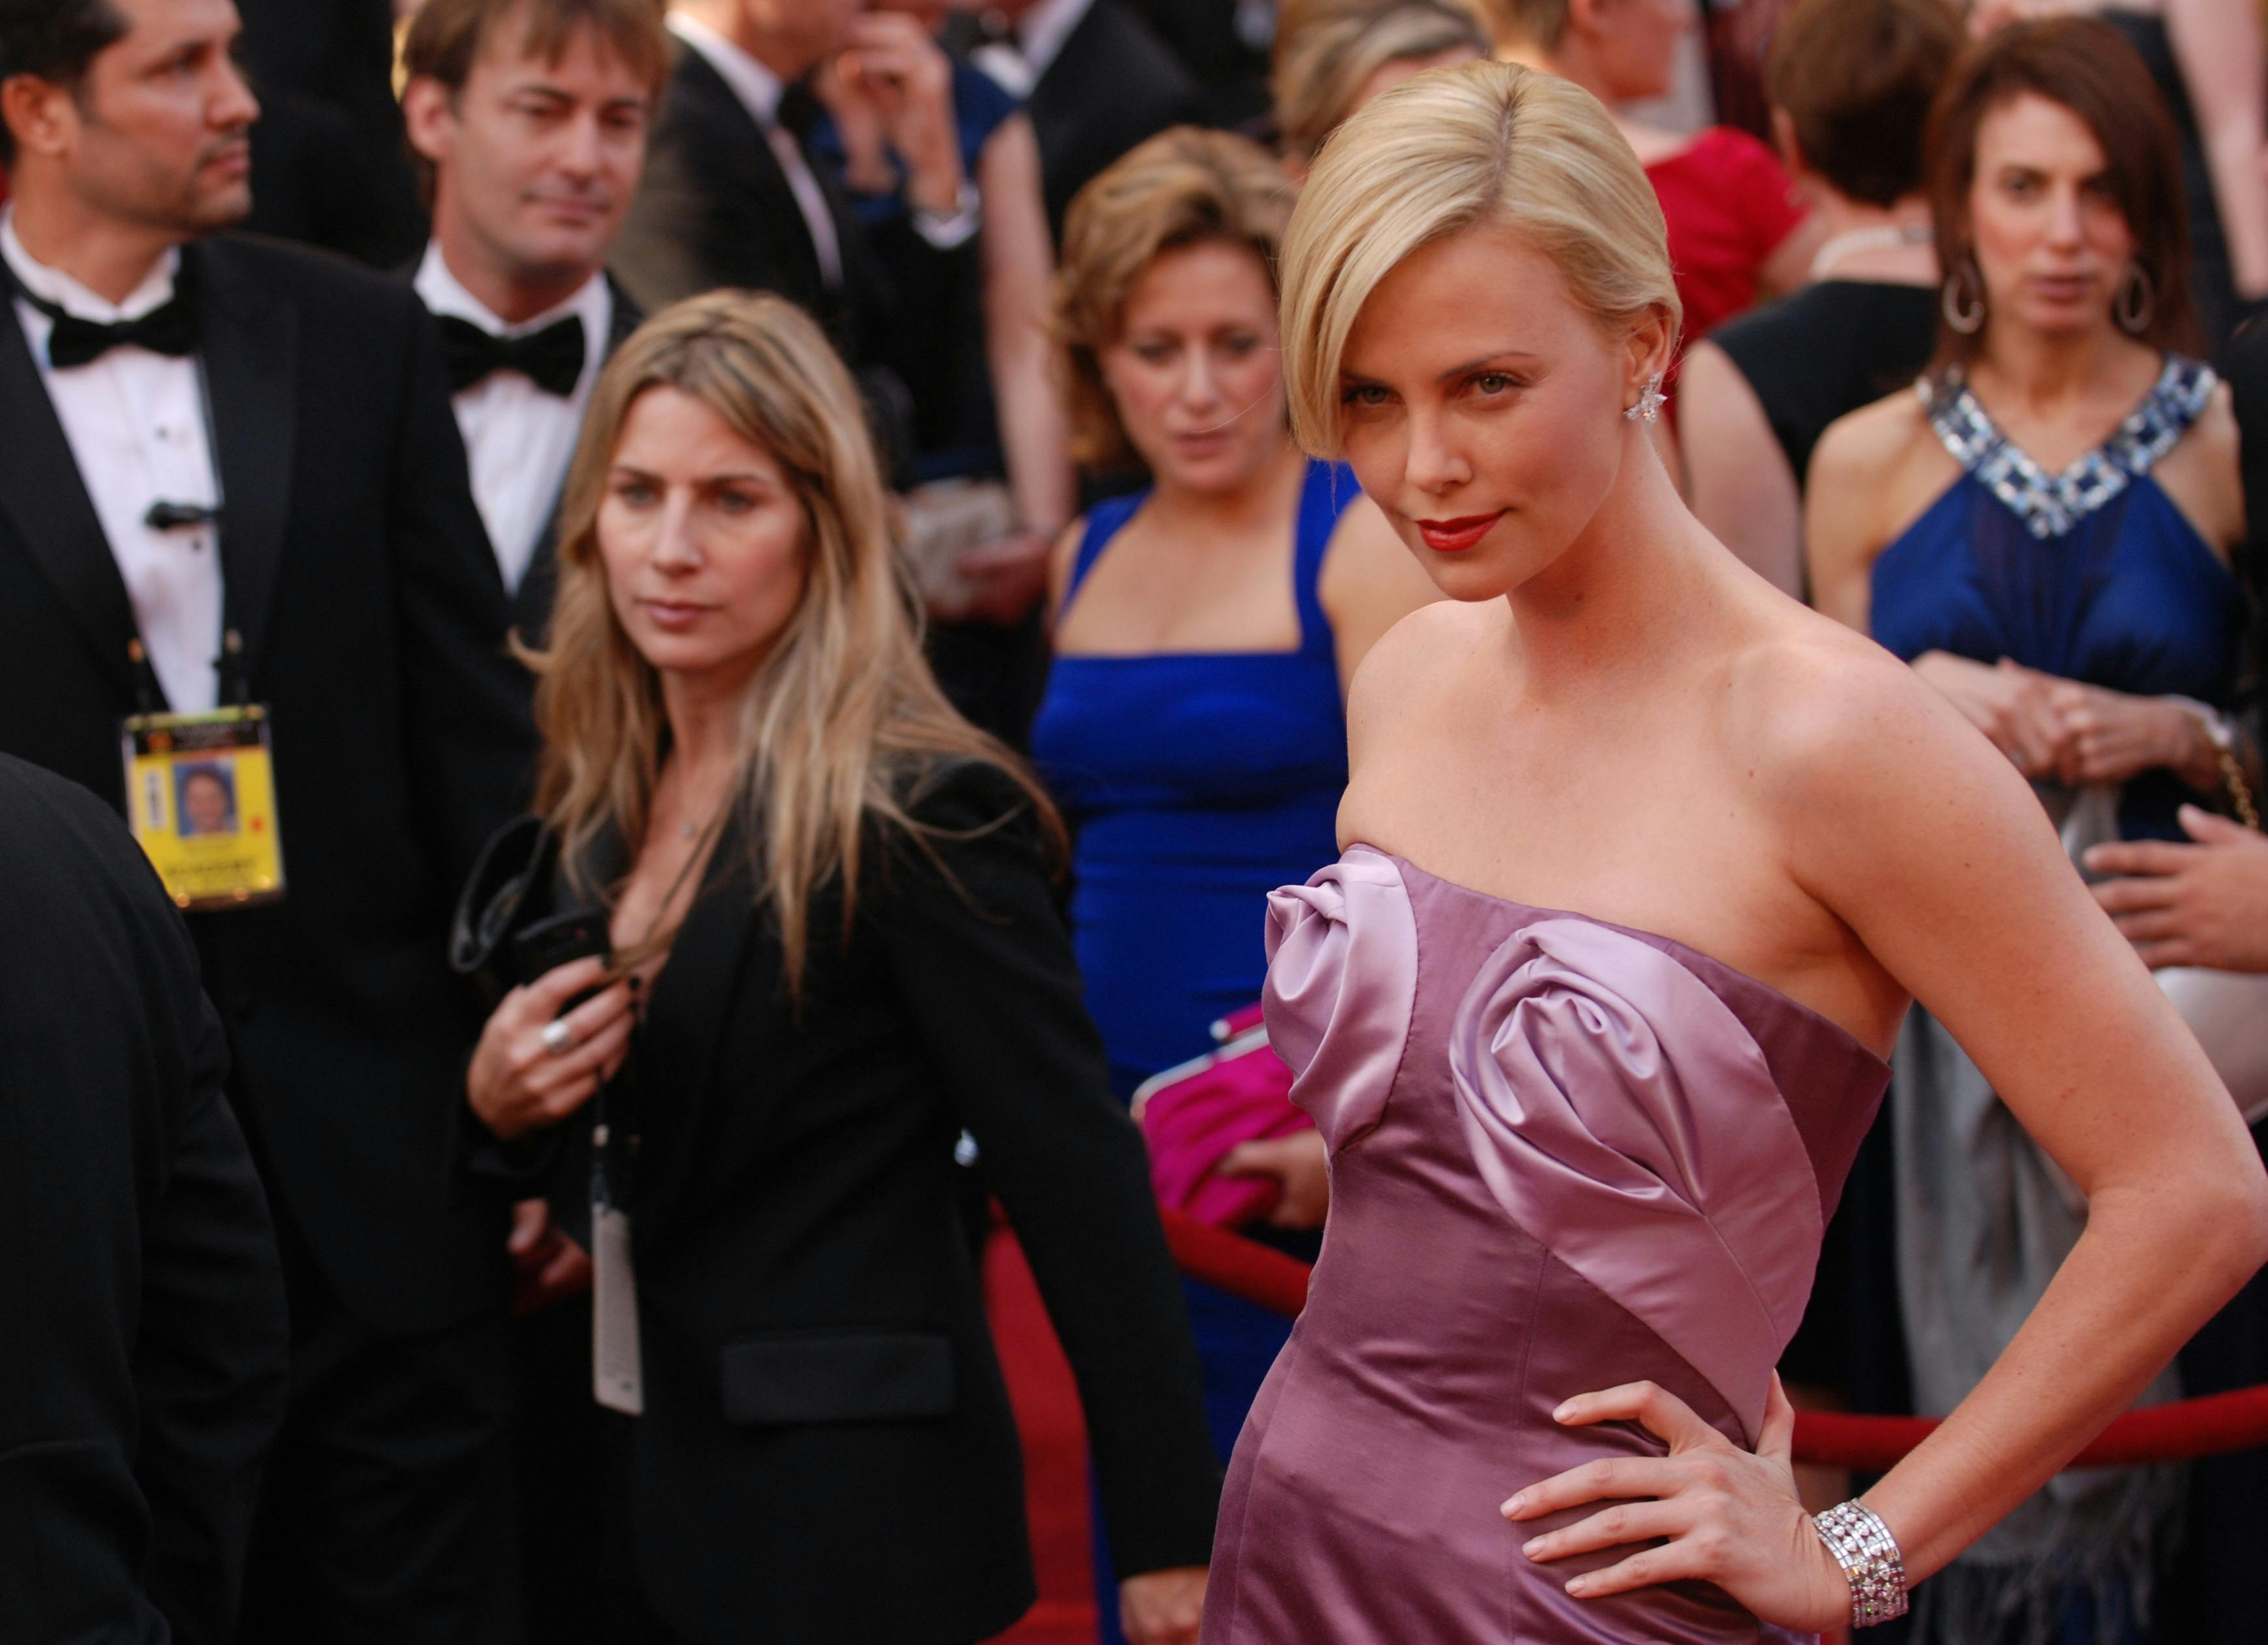
- The first URL to enter into the textbox is https://images.pexels.com/photos/276046/pexels-photo-276046.jpeg:
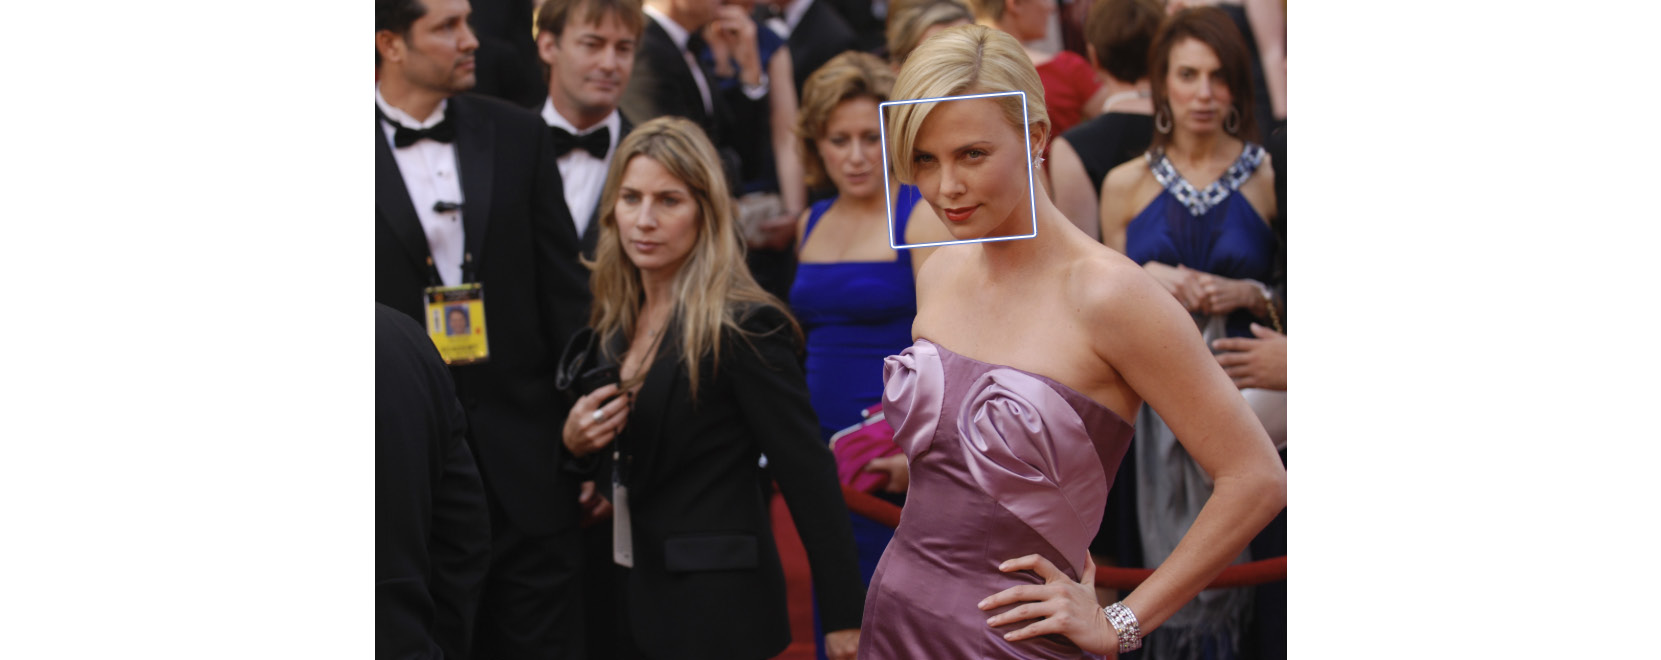
Figure 6.38: First image provided for celebrity recognition
- This is an image of the well-known actress Charlize Theron. The Results section will display her name and a Learn More link, which will take you to her IMDb page:

Figure 6.39: The Learn More link for the first image provided for celebrity recognition
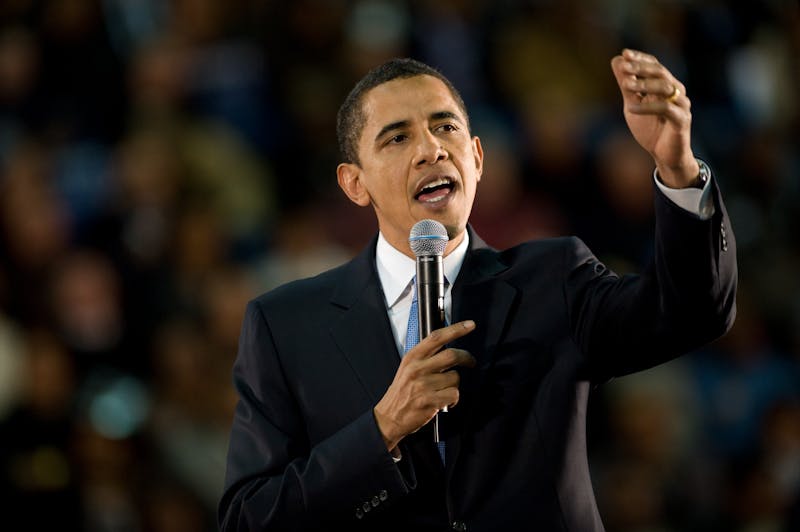
- The second image you can enter in the textbox can be found at https://images.pexels.com/photos/2281/man-person-suit-united-states-of-america.jpg?w=800 and gives us the following image:
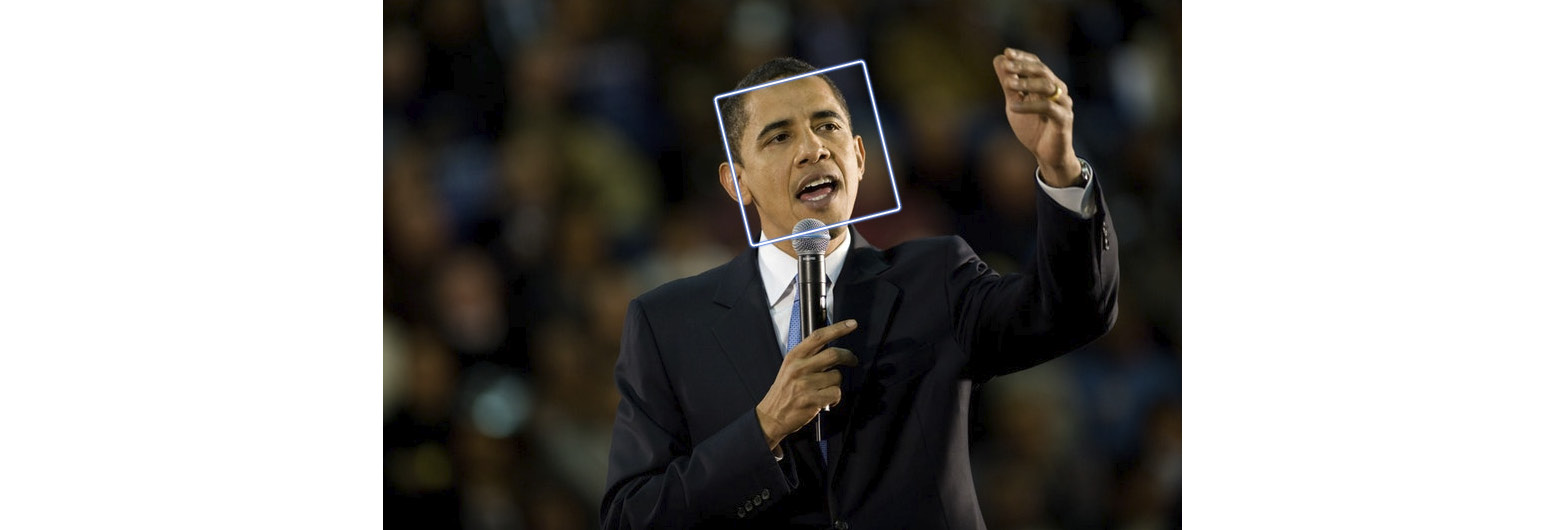
Figure 6.40: The second image provided for celebrity recognition
- This image displays former US President Barack Obama. Rekognition can easily detect him as well and displays his name in the Results section. The Learn More link, once again, links to his IMDb page:

Figure 6.41: The Learn More link for the second image provided for celebrity recognition
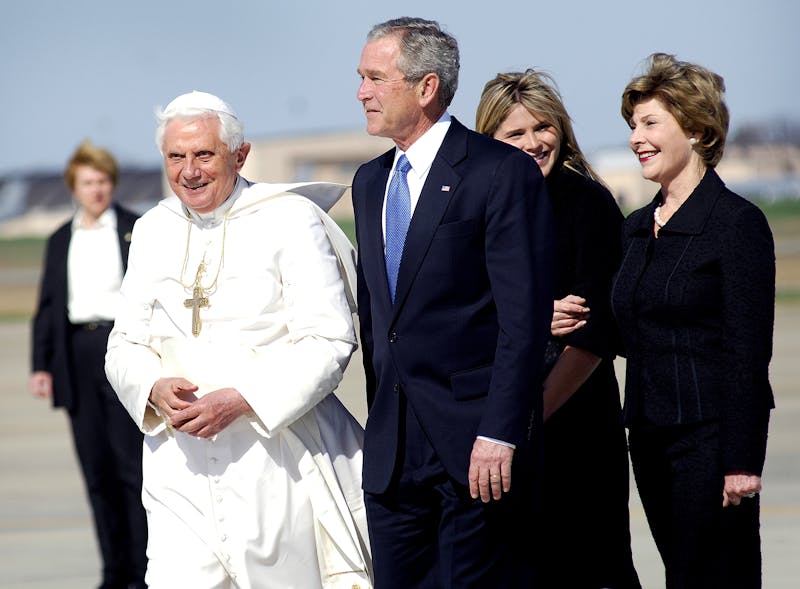
- The final image contains multiple famous people. Enter the following URL into Rekognition: https://images.pexels.com/photos/70550/pope-benedict-xvi-president-george-bush-laura-bush-andrews-afb-70550.jpeg?w=800. This gives us the following image:
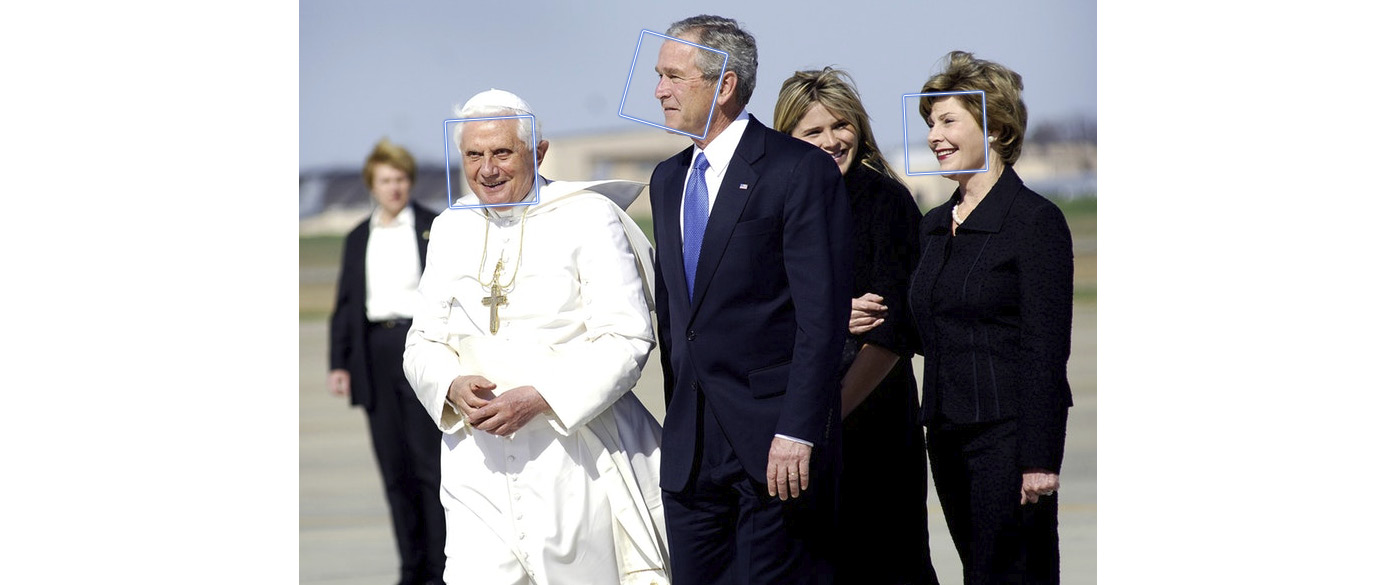
Figure 6.42: The third image provided for celebrity recognition, with three bounding boxes
- In the Results section, you can see that Rekognition recognizes all three famous people in the image:
- George W Bush
- Pope Benedict XVI
- Laura Bush
The following image shows the result of celebrity recognition:

Figure 6.43: Results of the third image provided for celebrity recognition
The Learn More links under their names go to their respective IMDb pages. As we have done previously, we can verify this by clicking on them.
Face Comparison
Rekognition allows you to compare faces in two images. This is mainly for the purpose of identifying which faces are the same in both images. As an example use case, this can also be used for comparing images with people against their personnel photo.
This section demonstrates industry standards so that you can utilize Amazon Rekognition to analyze faces inside an arrangement of pictures with different faces in them. When you indicate a Reference face (source) and a Comparison face (target) picture, Rekognition thinks about the biggest face in the source picture (that is, the reference) with up to 100 countenances recognized in the objective picture (that is, the examination images) and, after that, discovers how intently the face in the source picture matches with the appearances in the target picture. The closeness score for every examination is shown in the Results sheet.
Some restrictions on the usage of this feature are as follows:
- If the source image contains multiple faces, the largest face is used to compare against the target image.
- The target image can contain up to 15 faces. The detected face in the source image is compared against each of the faces detected in the target image.
Note
Click the Face comparison link in the left toolbar to navigate to the Face comparison page.
With the face comparison feature, there are two sections with images, side by side. You can choose to compare images in the left-hand section with images in the right-hand section. To create a facial analysis of a sample image, you can do the following:
- Go to the textbox under the Use your own image panel on the left-hand side.
- Enter the following URL to get an image to analyze: https://images.unsplash.com/photo-1524788038240-5fa05b5ee256?w=800.
- Go to the textbox under the Use your own image panel on the right-hand side.
- Enter the following URL to get an image to analyze – https://images.unsplash.com/photo-1524290266577-e90173d9072a?w=800.

Figure 6.44: First sample images provided for face comparison
- With the default selections, in the Results section, you will see that it identifies the girl in the left image on the right-hand side with a 99.8% degree of confidence, as shown here:

Figure 6.45: Results for the first sample images provided for face comparison
Activity 6.01: Creating and Analyzing Different Faces in Rekognition
In this activity, you can try out Rekognition with your own images. For example, we have provided links to two sets of images that display the same people. You can enter the sets of images into the left- (comparison) and right-hand (comparison) sides by using the Upload button. Remember that there are two this time, so there are two Go buttons to press as well. Follow these steps to complete this activity:
- Navigate to the Amazon Recognition service from the Amazon Management Console and choose Face comparison from the left toolbar.
- You will see two sets of Upload buttons, as shown in the following screenshot:

Figure 6.46: Upload buttons for face comparison
- Upload the first set of images to Rekognition so that it can recognize and compare the faces. We have three images, face-01-01, face-02-02, and face-01-03, under different lighting conditions and angles. Interestingly, Rekognition can detect that they are all the same face!
The images to be analyzed can be found in the https://packt.live/31X6IP6 and https://packt.live/3ebuSYz, https://packt.live/2ZLseUd files.
You can either save the images onto your disk or download this book's GitHub repository, as we covered in Chapter 1, An Introduction to AWS:

Figure 6.47: The explorer with the upload window
- Upload https://packt.live/31X6IP6 and https://packt.live/2ZLseUd.
- Compare the first set of images with the following parameters:
- Degree of confidence
- Comparing with different angles
- Lighting
- Position of glasses on the face
- Compare the second set of images for face similarity parameters.
Additional Challenge
As an additional challenge you can try the same steps on these two images from Unsplash as well: https://images.unsplash.com/photo-1526510747491-58f928ec870f and https://images.unsplash.com/photo-1529946179074-87642f6204d7:
The expected output is the degree of confidence that the corresponding two images from the image sets are of the same person, even with different angles, lighting, and the position of the face. You will see that in the results section. This activity shows the image analysis capabilities of the Amazon Rekognition service.
Note
The solution for this activity can be found on page 348.
Text in Images
In the previous chapters, you learned how to extract text from scanned documents such as tax returns and company statements. Amazon Rekognition can detect and extract text from images as well—for example, street signs, posters, product names, and license plates. Of course, this feature is made to work with real-world images instead of document images. The Text in image link, which is accessible from the left toolbar, is where this capability resides in Amazon Rekognition.
For each image provided, the service returns a text label and bounding box, along with a confidence score. This can be extremely useful for searching text across a collection of images. Each image can be tagged with the corresponding text metadata based on the results from this and other capabilities of the service.
For now, the only texts that are supported are Latin scripts and numbers (Western script). Up to 50 sequences of characters can be recognized per image. The text must be horizontal with +/- 90 degrees rotation.
Note
Click on the Text in image link in the left toolbar to navigate to the Text in image page.
To identify a "text in image" of a sample image, you can do the following:
- Go to the textbox under the Use your own image panel on the left-hand side.
- Enter the following URL of an image to analyze: https://images.unsplash.com/photo-1527174744973-fc9ce02c141d?w=800. You will see the following image:
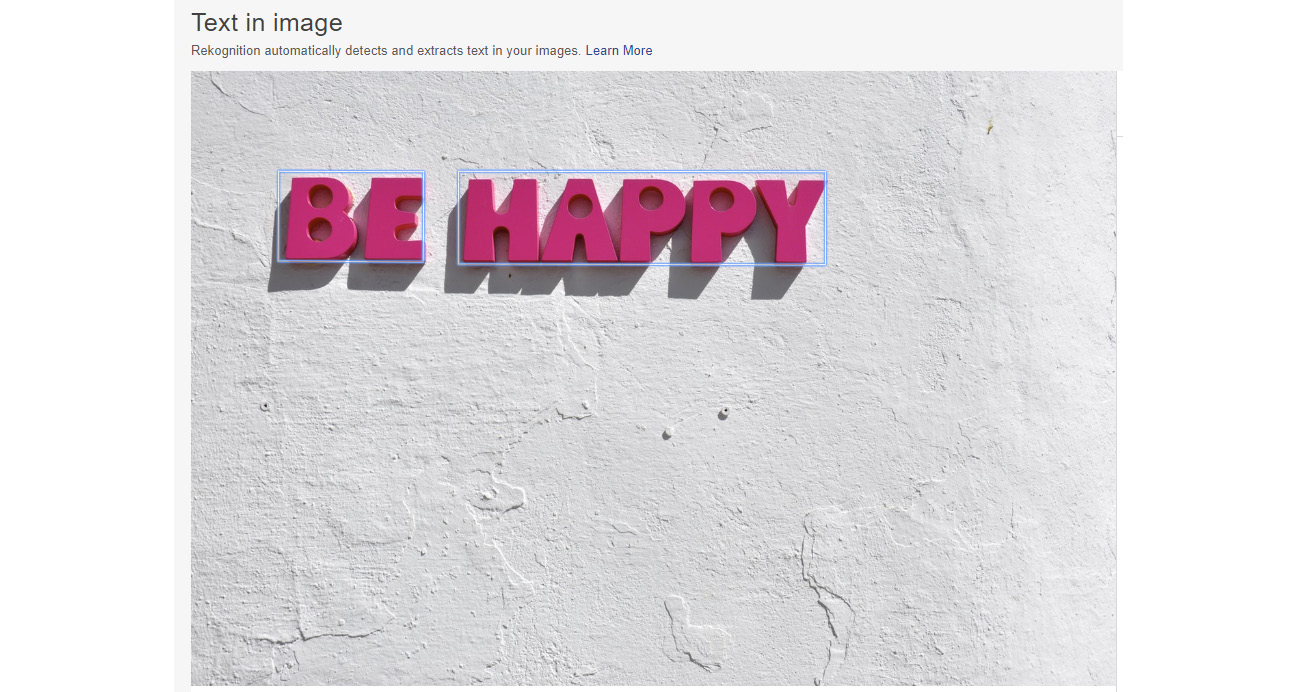
Figure 6.48: The first sample image provided for text in image
Rekognition surrounds the detected text with borders so that you can identify which text regions it has recognized. You can see the results of text extraction in the Results section:

Figure 6.49: Results for the first sample image provided for text in image
Rekognition was able to find text in the image and put a box around it; then, it was able to "read" the text and even understand that there are two words! The Rekognition service has extracted text from the image with separators (|) between words in separate regions. Even though the sign's font is unique, with shadows, it was still able to extract the text.
Next, let's try out this capability with our own images from different real-life situations such as storefronts and license plates at different angles. As you will see, Amazon Rekognition does very well on photos taken from below store signs, as well as on photos taken at an angle above license plates.
Exercise 6.05: Extracting Text from Your Own Images
In this exercise, you will extract text from your own images. Let's see how well Amazon Rekognition works with a variety of different text in images. We have provided three royalty-free images for you to use. Follow these steps to complete this exercise:
- Click on the Text in image link in the left toolbar to navigate to the Text in image page.
- Copy and paste or type the following URL into the Use image URL textbox under the Use your own image section at the bottom of the page: https://images.unsplash.com/photo-1521431974017-2521d1cdcd65?w=800. You will see the following image:
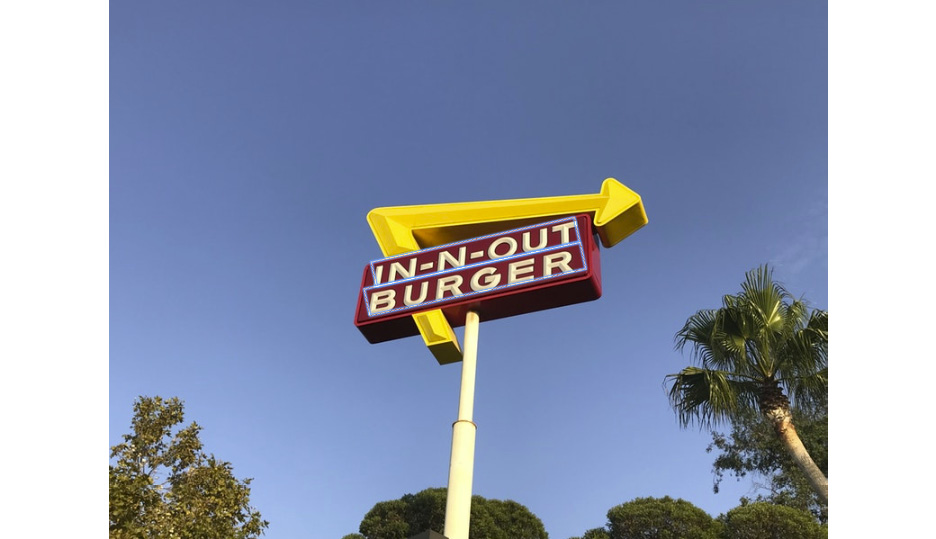
Figure 6.50: The first image provided for text in image
Note
Your results may not be as precise as the ones that we've got here.
You can see the bounding boxes around the image, which signify that Rekognition has recognized the text in the image. The results can be viewed in the Results panel to the right of the image. It did miss one hyphen between N and OUT, but didn't miss the I in IN, which is barely in the picture and slanted:

Figure 6.51: Results of the first image provided for text in image
- The next image can be found at the following URL. Copy and paste or type it into the Use image URL textbox as before: https://images.unsplash.com/photo-1528481958642-cd4b4efb1ae1?w=800. You will see the following image:
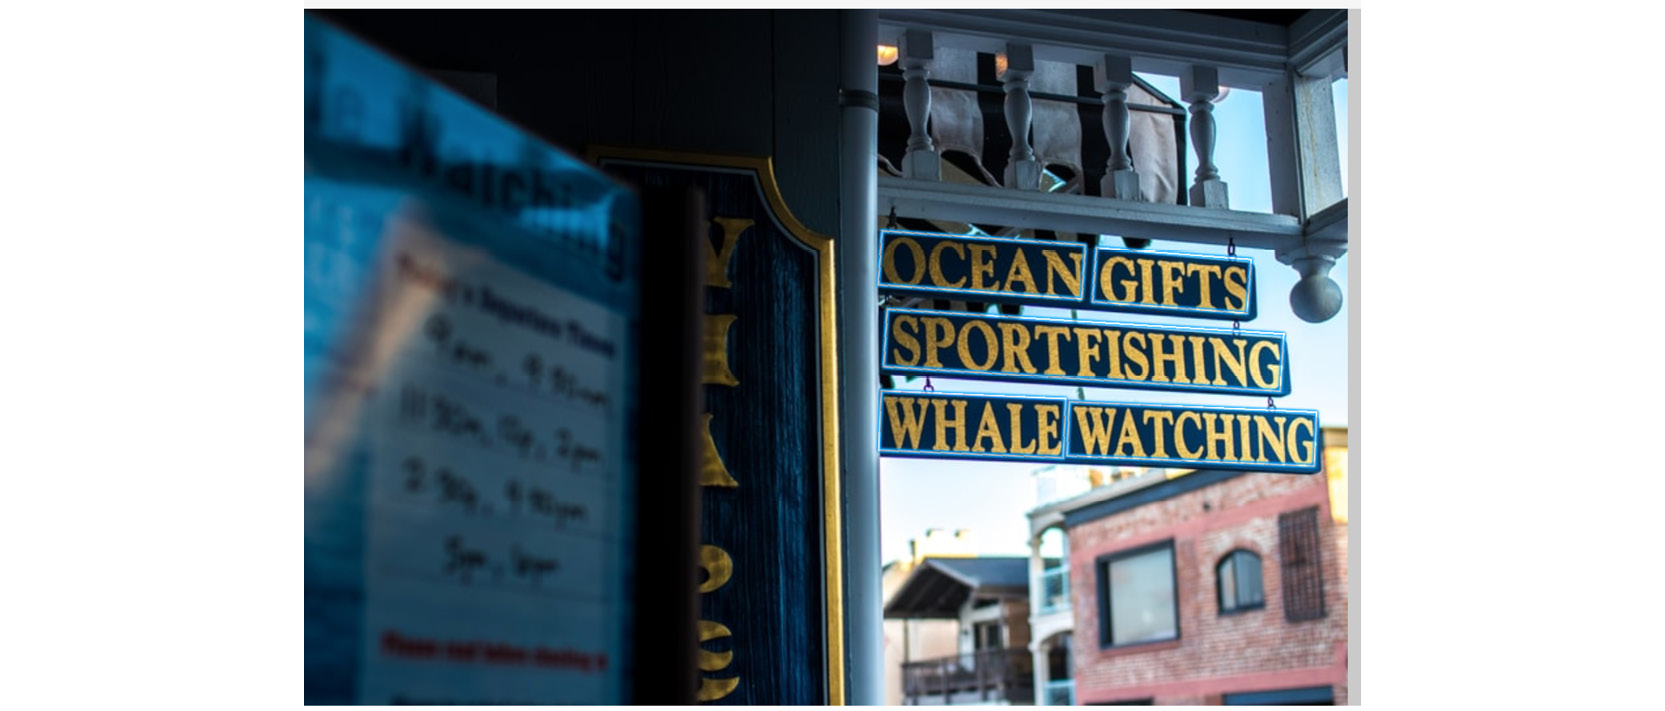
Figure 6.52: The second image provided for text in image
You can see that Rekognition has recognized the main text in the window of the shop: OCEAN GIFTS SPORTFISHING WHALE WATCHING and the separation between the words:

Figure 6.53: Results of the second image provided for text in image
Even though the results are extremely good, Rekognition can get confused. This is something you should be aware of and watch out for in your results. It is possible for Rekognition to get confused and return spurious results.
- Finally, copy and paste or type the following URL into the Use image URL textbox: https://images.unsplash.com/photo-1456668609474-b579f17cf693?w=800. You will see the following image:
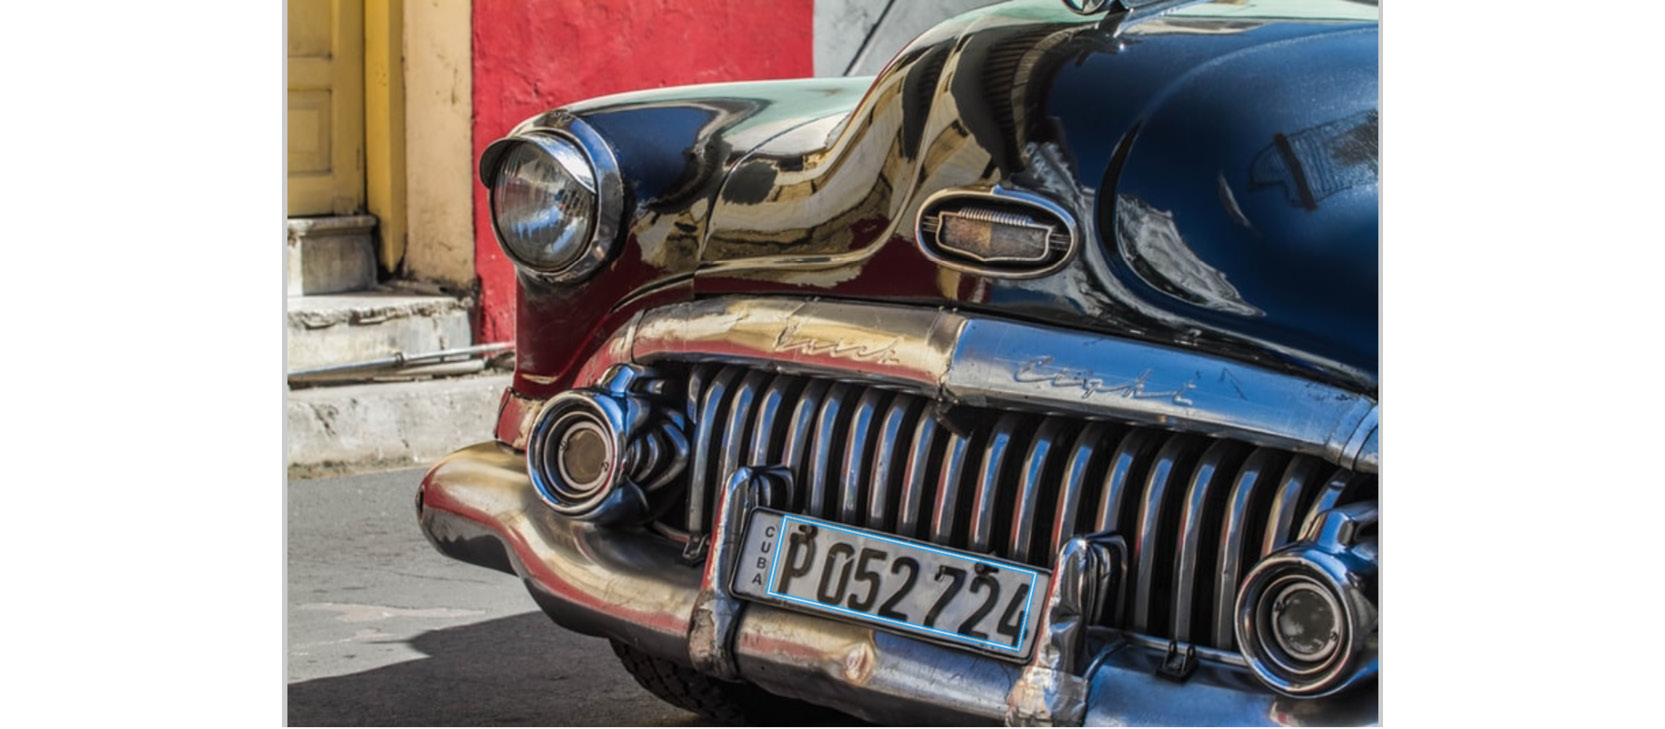
Figure 6.54: The third image provided for text in image
This is another example of a license plate. The results are as follows:

Figure 6.55: Results of the third image provided for text in image
It has done a good job isolating the number plate.
In this exercise, we learned that Amazon Rekognition can pick out text from images, even with different angles, fonts, shadows, and so forth. You should try this feature out with multiple images with different angles, lighting, and sizes.
Summary
In this chapter, you learned how to use various features of the Amazon Rekognition service and applied this to images. First, you used the service to recognize objects and scenes in images. Next, you moderated images that might have objectionable content by using Rekognition to recognize the objectionable content in the images.
You were able to analyze faces with Rekognition and were also able to identify their gender, age range, whether they were smiling, and whether they were wearing glasses.
You also recognized celebrities and famous people with the service and compared faces in different images to see whether they were the same. Finally, you were able to extract text that was displayed in images.
With this, we have come to the end of this chapter and this book. We hope it was an interesting journey discovering the enormous capabilities of serverless computing, Amazon AI and ML services, text analysis, image analysis, and so forth.
These types of features would have seemed unbelievable just a few years ago. The nature of machine learning and artificial intelligence is such that immense strides have been made, and will continue to be made in the foreseeable future, in terms of what computers are going to be able to do—and AWS will be able to provide these services for you and your applications.