
Overview
This chapter describes the use of Amazon Comprehend to summarize text documents and create Lambda functions to analyze the texts. You will learn how to develop services by applying the serverless computing paradigm, and use Amazon Comprehend to examine texts to determine their primary language. You will extract information such as entities (people or places), key phrases (noun phrases that are indicative of the content), emotional sentiments, and topics from a set of documents.
By the end of this chapter, you will able to set up a Lambda function to process and analyze imported text using Comprehend and extract structured information from scanned paper documents using Amazon Textract.
Introduction
Since 2005, when Amazon formally launched its Elastic Compute Cloud (EC2) web service, cloud computing has grown from a developer service to mission-critical infrastructure. The spectrum of applications is broad—most highly scalable consumer platforms such as Netflix are based on AWS, and so are many pharmaceuticals and genomics, as well as organizations such as the BBC and The Weather Channel, BMW, and Canon. As of January 2020, there are about 143 distinct AWS services spanning 25 categories, from compute and storage to quantum technologies, robotics, and machine learning. In this book, we will cover a few of them, as shown in the following diagram:

Figure 2.1: Amazon AI services covered

S3 is the versatile object store that we use to store the inputs to our AI services as well as the outputs from those services. You have been working with S3 since Chapter 1, An Introduction to AWS.

Lambda is the glue service that makes serverless computing possible. You will use Lambda later in this chapter to analyze text using Comprehend.

API Gateway is a delivery service that can enable you to create microservices that can be accessed by various clients, such as web, mobile, and server applications, via internet protocols such as HTTP, WebSocket, and REST. API Gateway gives you the ability to expose your microservices in a secure and scalable way. In the age of microservices and the "API-first" approach, the greatest challenge is the creation, publishing, monitoring, and maintenance of API endpoints. Almost all AWS services are APIs and use the API Gateway infrastructure.
Amazon's machine learning services, the main focus of our book, are a set of 16 services as of January 2020. They are also called AI services, and currently, the terms are interchangeable. Let's take a quick look at the ones we are interested in.

Comprehend, the topic of this chapter, is a very versatile text analytics service. It performs a variety of tasks—keyphrase extraction, sentiment analysis (positive, negative, neutral, or mixed), syntax analysis, entity recognition, medical Named Entity Recognition (NER), language detection, and topic modeling. You will see this in action later in this chapter.

Lex is a platform for building conversational AI, bots, or intelligent assistants. Conversational AI capabilities such as automatic speech recognition (ASR) and natural language understanding (NLU) are built into the Lex framework. Lex provides a very intuitive object model consisting of bots, utterances, slots, and sessions, as well as integration with Amazon Lambda, thus enabling you to develop interesting, intelligent bots in a serverless environment. We will see more of Lex in Chapter 4, Conversational Artificial Intelligence.

Personalize is a very useful service that allows you to personalize your bots. For example, incorporating personalized recommendations/content delivery, personalized searching based on previous interactions, or even personalized notifications and marketing based on user behavior! While we will not be using Amazon Personalize in this book, we wanted to bring your attention to services closely related to the ones covered in this book. That way, you can add extremely rich features as you expand the power of your bots and NLP services.

Polly is a text-to-speech service using neural text-to-speech (NTTS) technologies. It is very flexible and powerful, offering two styles: a newscaster reading style and a normal conversational style. The voice need not be monotone—Amazon Polly supports Speech Synthesis Markup Language (SSML), which enables you to adjust the speaking style, volume, speech rate, pitch, phrasing, emphasis, intonation, and other characteristics.

Textract, as the name implies, extracts text from documents. It is an optical character recognition (OCR) solution that is suitable for process automation. It can extract key-value pairs or tables from documents such as tax forms, legal documents, medical forms, bank forms, patent registration, and so forth.

Transcribe is a speech-to-text Automatic Speech Recognition (ASR) service and is very versatile; for example, it can recognize multiple speakers and you can filter out words. It is very useful in medical transcription, for time-stamped subtitle generation, and for transcribing customer interactions.

Translate is another very useful service that's able to translate more than 50 languages in a scalable, real-time fashion.

Rekognition, of course, is a visual analysis and image detection service capable of a variety of tasks, such as facial recognition, video analysis, object detection, and recognizing text in images. Chapter 6, Computer Vision and Image Processing is dedicated to Amazon Rekognition.

Unlike the AI services we have looked at so far in this chapter, Amazon Connect is a very feature-rich contact center application. It consists of an omnichannel cloud contact center with high-quality audio, web/mobile secure chat, and a web-based contact control panel. The Contact Lens for Amazon Connect is a set of Contact center analytics services that adds capabilities such as full-text search and sentiment analysis, with forthcoming features such as theme detection and custom vocabulary. The integration with Amazon Lex for chatbots is an interesting capability where we can leverage the flexibility of Lex to create intelligent and useful bots.

Amazon Alexa, of course, is a platform for a conversational interface as well as a set of hardware devices such as smart speakers that leverage the Alexa service to become smart assistants.
The reason for including customer engagement platforms such as Connect and Alexa is to show the wider possibilities of the work we are doing in this book. While we will not be directly showing how to develop bots for an Amazon Connect or Amazon Alexa-based bot voice user interface (VUI), we want to open your mind to the possibility of an omnichannel customer experience across different integration points—web, mobile, smart speakers, and so forth.
As you can see, the services cover a wide variety of layers, from the storage and infrastructure layer to the AI services layer, and finally extending to the UX.
Serverless Computing
Serverless computing is a relatively new architecture that takes a different spin on the cloud application architecture. Let's start with a traditional on-premise server-based architecture.
Usually, a traditional application architecture starts with a set of computer hardware, a host operating system, virtualization, containers, and an application stack consisting of libraries and frameworks tied together by networking and storage. On top of all this, we write business logic. In essence, to maintain a business capability, we have to maintain the server hardware, operating system patches, updates, library updates, and so forth. We also have to worry about scalability, fault tolerance, and security at the least.
With cloud computing, the application architecture is free of computer hardware as well as having elasticity. We still have to maintain the OS, libraries, patches, and so on. This where serverless computing comes in—in the words of Amazon, serverless computing "shifts more of your operational responsibilities to AWS."
Serverless computing improves upon cloud computing, eliminating infrastructure management, starting from provisioning to scaling up and down, depending on the load, as well as the patching and maintenance of the whole runtime stack. As Amazon depicts it, serverless computing definitely "reduces cost and increases agility and innovation" as well as enabling automated high availability, if designed properly.
An O'Reilly report defines serverless computing as "an architectural approach to software solutions that relies on small independent functions running on transient servers in an elastic runtime environment." So, there are servers—serverless is not the right term, but in some sense, the servers are transparent, managed by Amazon during the execution of a Lambda function, which is usually in milliseconds.
Amazon Lambda and Function as a Service
Essentially, serverless computing is enabled by functions, more precisely, Function as a Service (FaaS). Amazon Lambda is the prime example of an enabling platform for serverless computing.
You write the business logic as a set of Lambda functions that are event-driven, stateless, fault-tolerant, and autoscaling. A Lambda function has an upstream side and a downstream side—it responds to upstream events; the runtime processor executes the embedded code and the results are sent to downstream destinations. The upstream events could be generated by something put into a queue or something that is dropped into an S3 bucket or a Simple Notification Service (SNS) message. And the downstream can be S3 buckets, queues, DynamoDB, and so forth. The runtime supports multiple languages, such as Python, Go, Java, Ruby, Node.js, and .NET.
A Lambda function is much more granular than a microservice—you can think of it as a nano service. It is charged on a 100 ms basis and will time out after 15 minutes. The payload size is 6 MB. That gives you an estimate of the size of a Lambda function. Also, as you have noticed, there are no charges when a Lambda function is idling – that means we can scale down to zero. And you can implement data parallelism easily—trigger a Lambda function for each row of data. As one Lambda function can trigger another Lambda function, you can even do task parallelism. Of course, all of this requires careful architecture, but it's worth the effort.
Amazon's serverless platform covers compute, storage, networking, orchestration, API proxy, analytics, and developer tooling. We will look at some of these components—Lambda for compute, S3 for storage, API Gateway for networking.
Serverless Computing as an Approach
Industry analysts and technologists consider serverless computing as an approach and a set of principles. Amazon Lambda is not serverless computing but an enabler of the approach. The serverless computing architecture does reduce what you have to build—some of the traditional code that we write now manifests as a function chaining pipeline, the configuration of events, triggers, and attributes of Lambda functions. The essential business logic does need to be written, and that will reside inside the Lambda functions. As a result, there is a very well-defined separation between the platform and the business code, and that is the value of serverless computing.
Amazon Comprehend
Amazon Comprehend is a text analytics service. It has a broad spectrum of capabilities. Amazon Comprehend can extract key phrases and entities. It can do language detection and topic modeling. It can also perform sentiment analysis as well as syntax analysis. Amazon Comprehend is multilingual. Some of the applications of Amazon Comprehend include:
- Understanding the main themes and topics of various unstructured text items such as support tickets, social media posts, customer feedback, customer complaints, and business documents such as contracts and medical records.
- Knowledge management by categorizing business documents such as internal procedures, white papers, notes and descriptions, media posts, and emails.
- Brand monitoring—effectively responding to social media posts, reviews, and other user-generated content from various channels. Respond faster by prioritizing the content as well as routing the content to the appropriate person or process. To prioritize and respond faster, businesses need to analyze the content for language, topics, and the entities mentioned in the media – all of which are capabilities of Amazon Comprehend.
- One important capability of Comprehend is the fact that underneath the hood, it improves models by monitoring errors and training AI models with new and improved data.
- Also, you can fine-tune models with your domain-specific data, thus increasing the accuracy to fit your application while leveraging the general capability of the AI models.
- One interesting application of Comprehend is to extract information from business documents such as contract numbers, terms of contracts, various codes, and even the dosage of medication
An interesting end-to-end use case is to use Amazon Comprehend to analyze a collection of text documents and organize the articles by topic, identify the most frequently mentioned features, and group articles by subject matter, to enable personalized recommendations for website visitors.
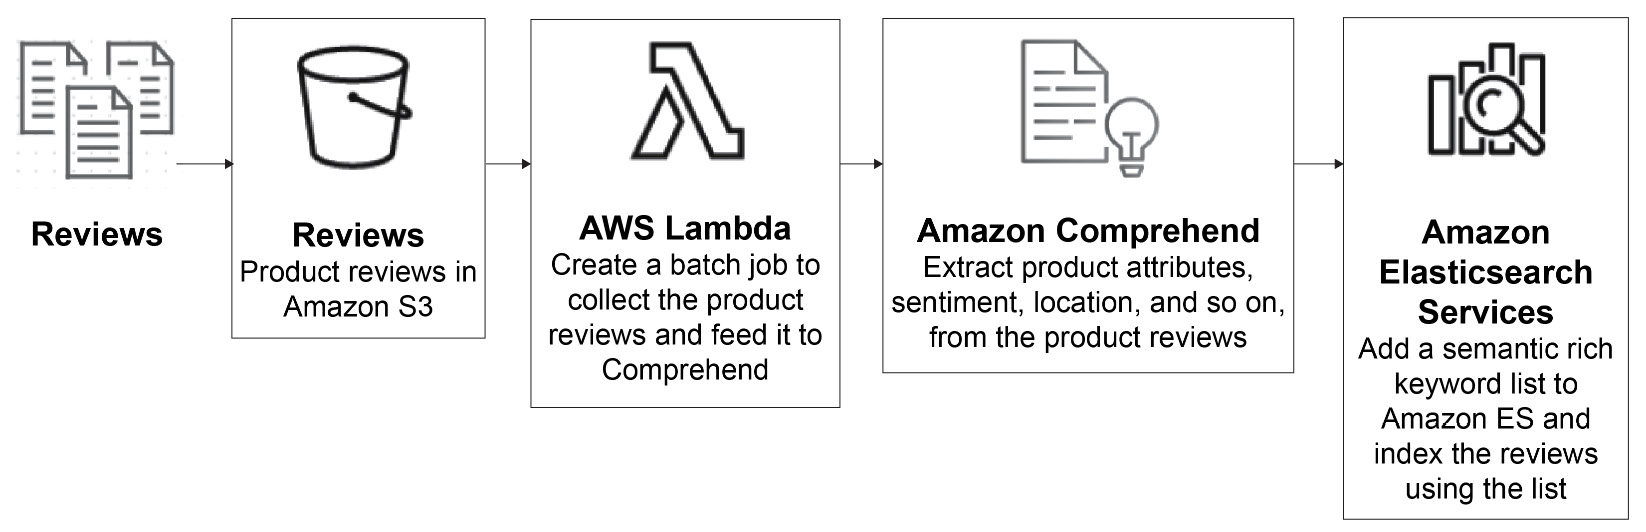
Figure 2.2: Amazon Comprehend search flow
Amazon Comprehend Medical is a feature-rich service for analyzing patient health records, doctor's notes, and reports from clinical trials as well as links to medical ontologies. It can even figure out medication dosages, test results, and treatment information that can be used for analysis by healthcare professionals:

Figure 2.3: Amazon Comprehend Medical flow
The Amazon Comprehend service continually learns from new data from Amazon product descriptions and consumer reviews, and thus, it perpetually improves its ability to understand a variety of topics from government, health, media, education, advertising, and so on.
In Chapter 1, An Introduction to AWS, you learned how to use Amazon Comprehend to extract insights by using Natural Language Processing (NLP) from the contents of documents. In this chapter, we will dig deeper and you will learn how to use the Amazon Comprehend API to produce insights by recognizing the language, entities, key phrases, sentiments, and topics in a document. This will allow you to understand deep learning-based NLP to build more complex applications, which we will cover further.
In the second part of this chapter, you will learn about AWS Lambda, and how to integrate this service with Amazon Comprehend. You will also integrate a database to provide the foundation to build scalable NLP processing applications.
What Is an NLP Service?
Amazon Comprehend is an NLP service. The overall goal of an NLP service is to make machines understand our spoken and written language. Virtual assistants, such as Alexa or Siri, use NLP to produce insights from input data. The input data is structured by a language, which has a unique grammar, syntax, and vocabulary. Thus, processing text data requires identifying the language first and applying subsequent rules to identify the document's information. NLP's general task is to capture this information as a numeral representation. This general task is split into specific tasks, such as identifying languages, entities, key phrases, emotional sentiments, and topics.
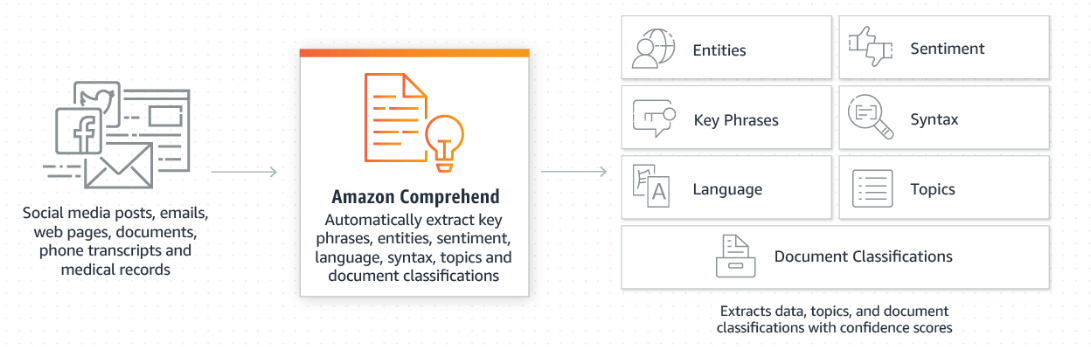
Figure 2.4: Amazon Comprehend data flow
As we discussed earlier, Amazon Comprehend uses pre-trained models to perform document analysis tasks. This is very good because it enables a business to develop capabilities without going through an exhaustive AI model training effort. And Amazon keeps up with the latest developments in ML and AI, constantly retraining the models—so the models get better without any work from users. Also, there are capabilities for fine-tuning the models by training them with your domain-specific content.
Using Amazon Comprehend to Inspect Text and Determine the Primary Language
Amazon Comprehend is used for searching and examining texts and then gathering insights from a variety of topics (health, media, telecom, education, government, and so on) and languages in the text data format. Thus, the first step to analyze text data and utilize more complex features (such as topic, entity, and sentiment analysis) is to determine the dominant language. Determining the dominant language ensures the accuracy of more in-depth analysis. To examine the text in order to determine the primary language, there are two operations (DetectDominantLanguage and BatchDetectDominantLanguage).
Both operations expect the text in the UTF-8 format with a length of at least 20 characters and a maximum of 5,000 bytes. If you are sending a list, it should not contain more than 25 items.
The response includes what language was identified using a two-letter code. The following table shows the language codes for different languages:
Note
Check out https://docs.aws.amazon.com/comprehend/latest/dg/how-languages.html for an updated list of the supported languages.
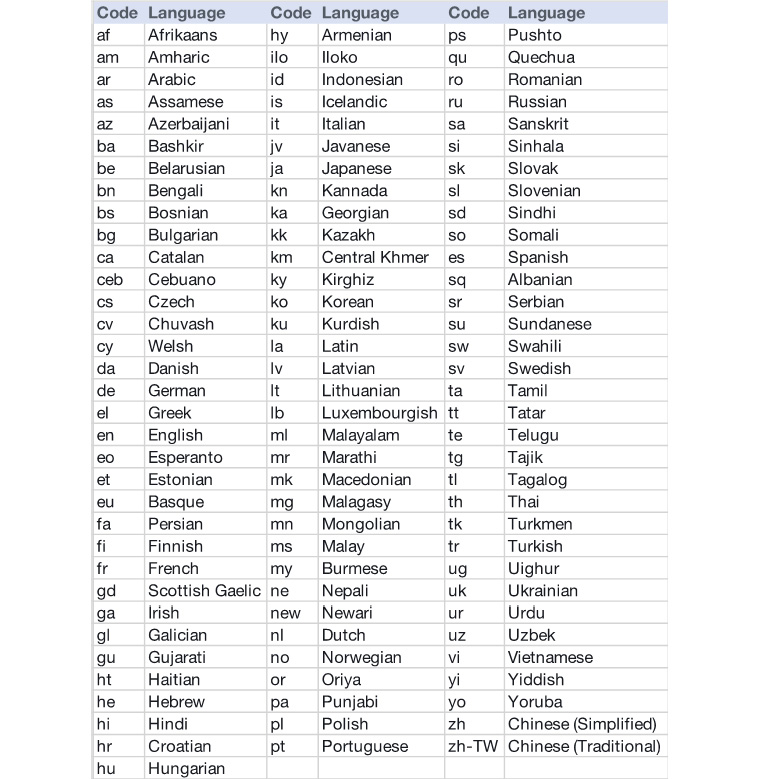
Figure 2.5: Amazon Comprehend's supported languages
There are three ways to invoke dominant language detection. The result is the code for the dominant language in the content and a confidence score determined by the Comprehend algorithms:
- DetectDominantLanguage will return the dominant language in a single document.
- BatchDetectDominantLanguage works on a set of documents and will return a list of the dominant language in each of the documents.
- While both of the preceding APIs work in synchronous mode, that is, you send the content to the API and it will return the results, StartDominantLanguageDetectionJob works on a collection of jobs asynchronously. This API is well suited to large jobs that take more time.
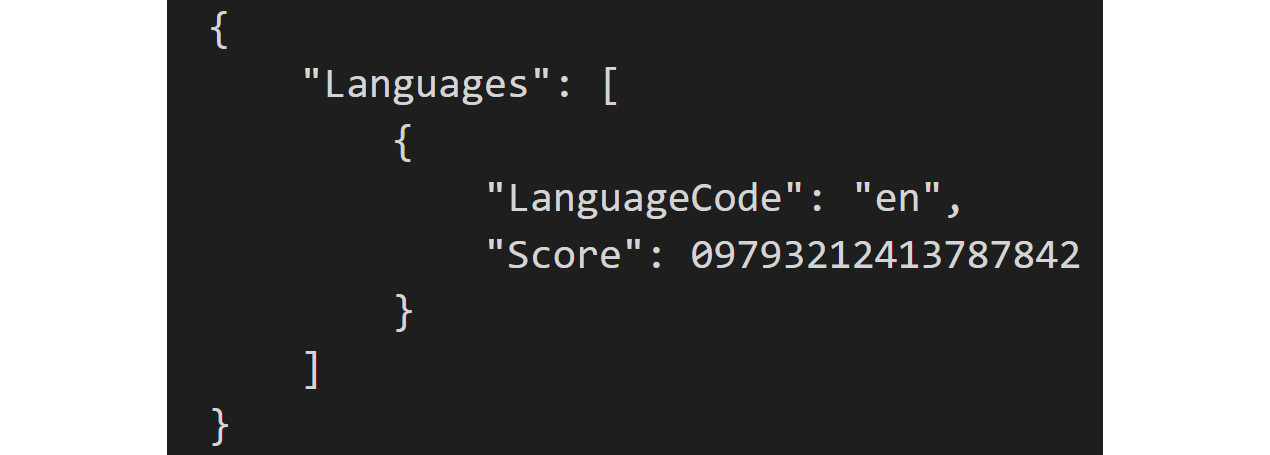
Figure 2.6: Dominant language score confidence output
Exercise 2.01: Detecting the Dominant Language in a Text Document Using the Command-Line Interface
In this exercise, you will learn how to detect the dominant language in a text using Comprehend's DetectDominantLanguage function. The following steps describe how to detect the dominant language:
Note
The source code for the Jupyter notebook is available via GitHub in the repository at https://packt.live/2O4cw0V.
The files for this chapter are located in the Chapter02 folder in the GitHub repository https://packt.live/31TIzbU. As we mentioned in Chapter 1, An Introduction to AWS, you should have downloaded the GitHub files into a local subdirectory.
As an example, we have downloaded the files in the Documents/aws-book/The-Applied-AI-and-Natural-Language-Processing-with-AWS directory.
- Open a new Jupyter Notebook.
Note
For configuration instructions, refer the section titled Pre checkup on GitHub: https://packt.live/2O4cw0V.
- Before we begin, the boto3 library must be installed. On a fresh Jupyter Notebook cell, type in the following command to install it:
!pip install boto3
- Now, let's go ahead and import Boto3. Boto3 is nothing but the AWS SDK for Python. (https://boto3.amazonaws.com/v1/documentation/api/latest/index.html):
import boto3
- Then, import the JSON module to serialize the JSON (https://docs.python.org/3.6/library/json.html):
import json
- Instantiate a new Comprehend client:
comprehend = boto3.client(service_name='comprehend')
- Next, we assign English and Spanish strings to be analyzed by Comprehend:
english_string = 'Machine Learning is fascinating.'
spanish_string = 'El aprendizaje automático es fascinante.'
- Next, we print a string to indicate the respective variable that our script is about to execute:
print('Calling DetectDominantLanguage')
print('english_string result:')
- Lastly, call Comprehend's detect_dominant_language method with the english_string and spanish_string variables (https://docs.aws.amazon.com/comprehend/latest/dg/API_DetectDominantLanguage.html).
json.dumps() writes the JSON data to a Python string in the terminal:
print(' English string result:')
print(json.dumps(comprehend.detect_dominant_language
(Text = english_string), sort_keys=True,
indent=4))
print(' spanish_string result:')
print(json.dumps(comprehend.detect_dominant_language
(Text = spanish_string), sort_keys=True,
indent=4))
print('End of DetectDominantLanguage ')
Note
The code snippet shown above uses a backslash ( ) to split the logic across multiple lines. When the code is executed, Python will ignore the backslash, and treat the code on the next line as a direct continuation of the current line.
- Save the notebook.
- Press Shift + Enter to run the two notebook cells. Executing the cells will produce the following output (see the following screenshot):
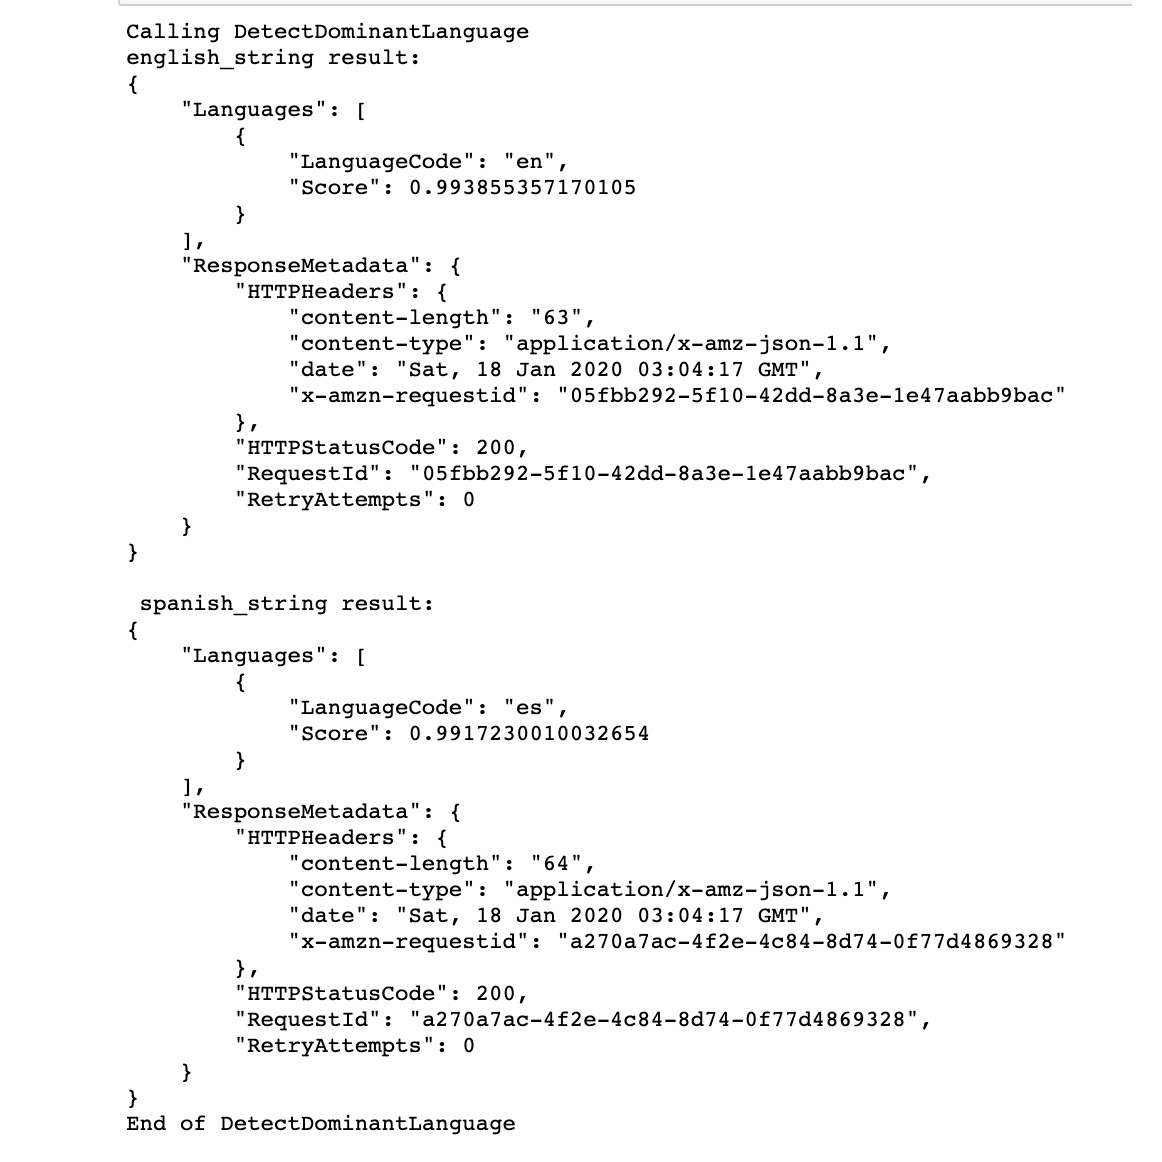
Figure 2.7: Detecting the dominant language output – English and Spanish
As expected, the english_text string is identified as English (with the en language code) with a ~0.99 confidence score.
Also as expected, the spanish_text string is identified as Spanish (with the es language code) with a ~0.99 confidence score.
Exercise 2.02: Detecting the Dominant Language in Multiple Documents by Using the CLI
In this exercise, you will learn how to use Comprehend's DetectDominantLanguage operation for multiple documents. The following steps describe how to detect the dominant language:
Note
The Pre checkup instructions and the source code for this exercise are available via GitHub in the repository at https://packt.live/2Z8Vbu4.
- Open a new Jupyter Notebook.
- On a fresh empty cell, import the AWS SDK for Python (boto3:https://boto3.amazonaws.com/v1/documentation/api/latest/index.html):
import boto3
- Then, import the JSON module to serialize the JSON (https://docs.python.org/3.6/library/json.html):
import json
- Instantiate a new Comprehend client:
comprehend = boto3.client(service_name='comprehend')
- Next, assign a list of English and Spanish strings to be analyzed by Comprehend:
english_string_list =
['Machine Learning is fascinating.',
'Studying Artificial Intelligence is my passion.']
spanish_string_list =
['El aprendizaje automático es fascinante.',
'Estudiar Inteligencia Artificial es mi pasión.']
- Lastly, we call Comprehend's batch_detect_dominant_language method with the english_string_list and spanish_string_list variables (https://docs.aws.amazon.com/comprehend/latest/dg/API_DetectDominantLanguage.html). Then, json.dumps() writes the JSON data to a Python string to the terminal:
print('Calling BatchDetectDominantLanguage')
print('english_string_list results:')
print(json.dumps(comprehend.batch_detect_dominant_language
(TextList=english_string_list),
sort_keys=True, indent=4))
print(' spanish_string_list results:')
print(json.dumps(comprehend.batch_detect_dominant_language
(TextList=spanish_string_list),
sort_keys=True, indent=4))
print('End of BatchDetectDominantLanguage ')
- Save the notebook.
- Press Shift + Enter to run the two notebook cells. Executing the cells will produce the following output (see the following partial screenshot—the output is too long to fit; you can see the full output in the notebook):
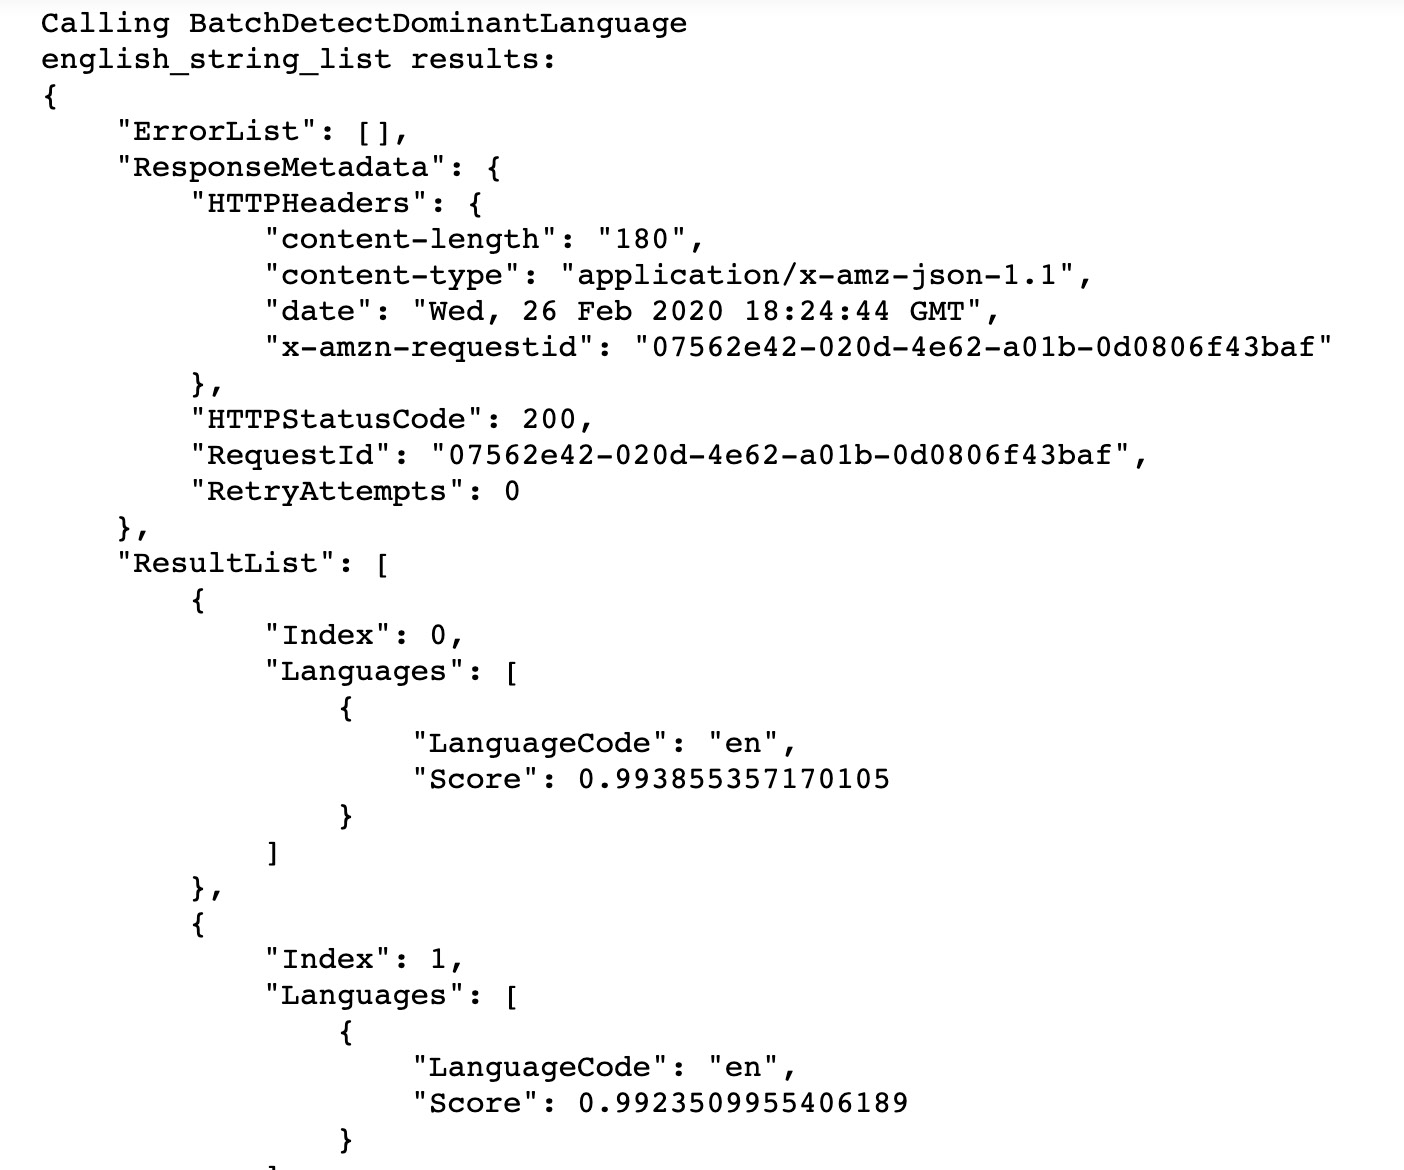
Figure 2.8: Detecting the dominant language (multiple documents) output—English
The important concepts to remember are that Comprehend has the ability to detect different languages and can take text input as a single string or in a batch format as a list of strings.
In this topic, we reviewed how Comprehend's DetectDominantLanguage method is structured, and how to pass in both strings and a list of strings. Next, we will extract entities, phrases, and sentiments from a set of documents.
Extracting Information from a Set of Documents
At a business level, knowing if and why a customer is angry or happy when they contact a virtual assistant is extremely important, to retain the customer. At an NLP level, this requires more information to be extracted and a more complex algorithm. The additional information to extract and quantify is entities, key phrases, emotional sentiment, and topics.
Detecting Named Entities—AWS SDK for Python (boto3)
An entity is a broader concept—it is something that has an identity of its own. An entity can be a person or a place, a company name or an organization; it can also be a number (say quantity, price, number of days) or a date, a title, a policy number, or a medical code. For example, in the text "Martin lives at 27 Broadway St.", Martin might be detected as a PERSON, while 27 Broadway St might be detected as a LOCATION.
Entities also have a score to indicate the confidence level that the entity type was detected correctly. The following table shows a complete list of entity types and descriptions:
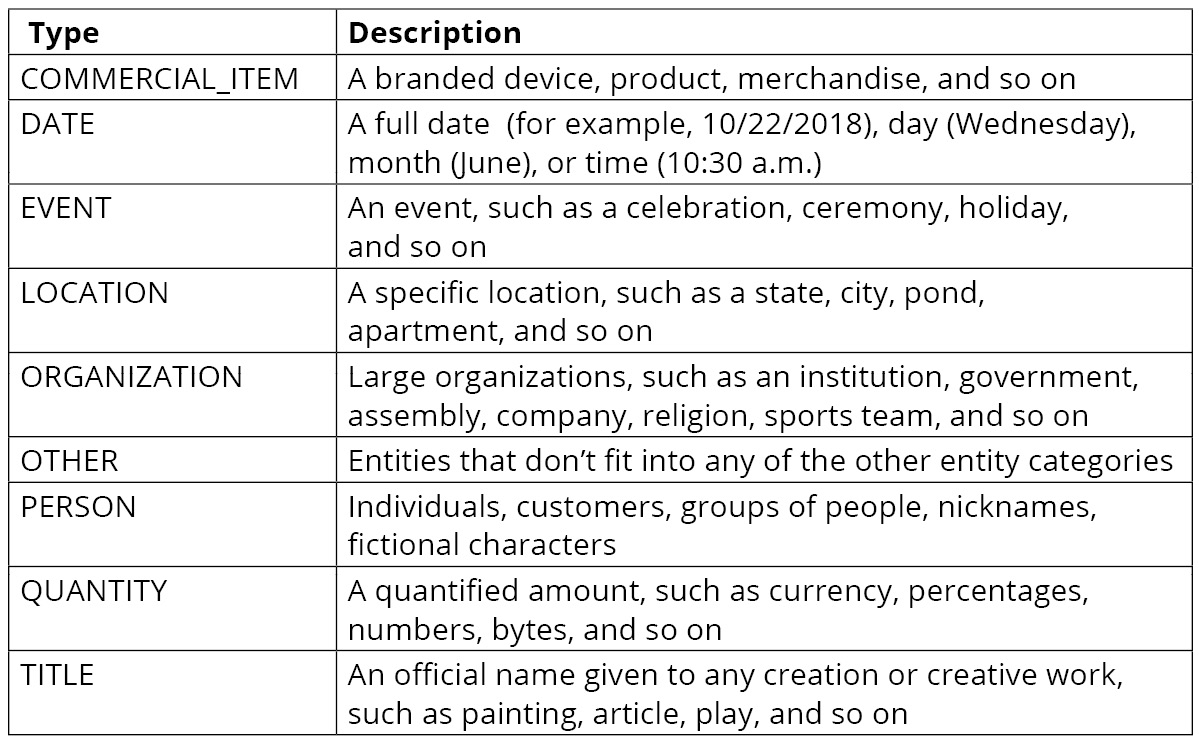
Figure 2.9: AWS Comprehend entity types and descriptions
There are three ways to invoke the detection of entities:
- DetectEntities will return the entities in a single document.
- BatchDetectEntities works on a set of documents and will return a list of the entities in each of the documents.
- While both the preceding APIs work in synchronous mode, that is, you send the content to the API and it will return the results, StartEntitiesDetectionJob works on a collection of jobs asynchronously. This API is well suited to large jobs that take more time.
DetectEntities – Input and Output
DetectEntities takes a LanguageCode and a string of text as an input and then provides the following information about each entity within the input text: BeginOffset, EndOffset, Score, Text, and Type. The following table shows a complete list of AWS Comprehend DetectEntities, types, and descriptions:
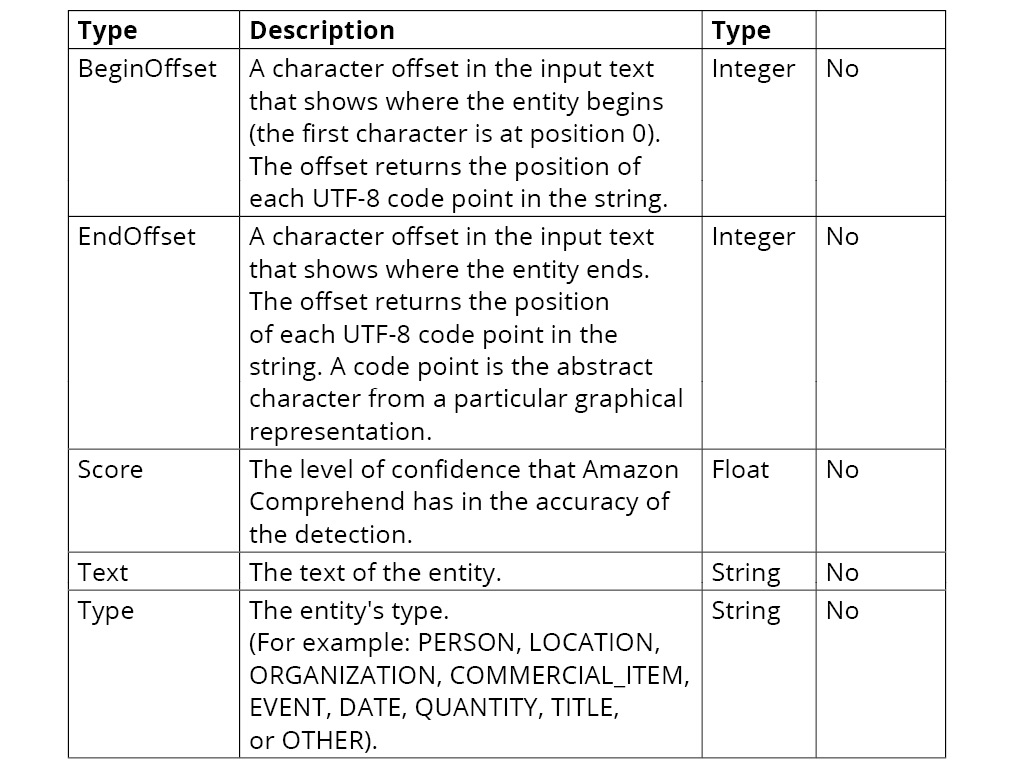
Figure 2.10: AWS Comprehend entity types and descriptions
Exercise 2.03: Determining the Named Entities in a Document (the DetectEntities method)
In this exercise, we will determine the named entities in a document. For this, we will use Amazon Comprehend's DetectEntities operation. The following are the steps for detecting named entities:
Note
The Pre checkup instructions and the source code for this exercise are available via GitHub in the repository at https://packt.live/2ADssUI.
- Open a new Jupyter Notebook.
- Import the AWS SDK for Python (boto3: https://boto3.amazonaws.com/v1/documentation/api/latest/index.html) by using the following command:
import boto3
- Now, import the JSON module to serialize JSON from https://docs.python.org/3.6/library/json.html by using the following command:
import json
- Now, instantiate a new Comprehend client:
comprehend = boto3.client(service_name='comprehend')
- Now, after instantiating a new Comprehend client, provide the English text to analyze:
english_string = "I study Machine Learning in "
"Seattle on Thursday."
print('Calling DetectEntities')
- Now, json.dumps() writes JSON data to a Python string:
print(json.dumps(comprehend.detect_entities
(Text = english_string, LanguageCode='en'),
sort_keys=True, indent=4))
print('End of DetectEntities ')
- Press Shift + Enter to run the two notebook cells. The output of the preceding code is shown in the following screenshot:
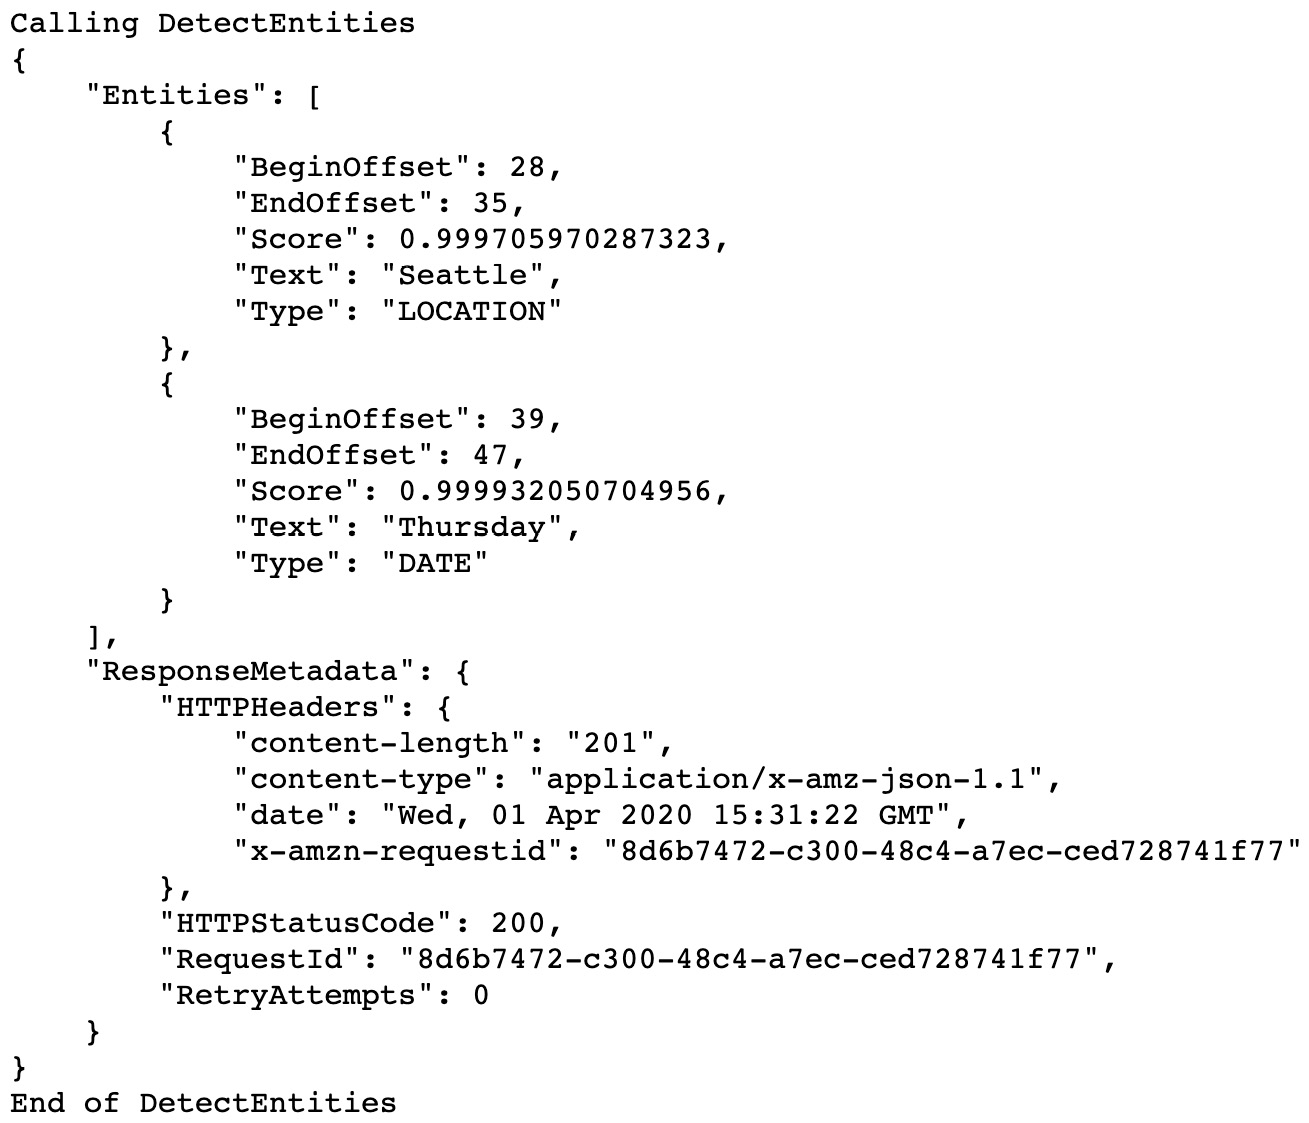
Figure 2.11: AWS Comprehend DetectEntities output
The confidence scores were both ~0.99, as the inputs were simple examples. As expected, Seattle was detected as a LOCATION, and Thursday was detected as a DATE:

Figure 2.12: AWS Comprehend BeginOffset and EndOffset review
Exercise 2.04: Detecting Entities in a Set of Documents (Text Files)
In this exercise, we will determine the named entities in multiple documents. For this, we will use Amazon Comprehend's DetectEntities operation. The following are the steps for detecting the named entities from a set of documents:
Note
The Pre checkup instructions and the source code for this exercise are available via GitHub in the repository at https://packt.live/31UCuMs.
- Open a new Jupyter Notebook.
- Import the AWS SDK for Python (boto3: https://boto3.amazonaws.com/v1/documentation/api/latest/index.html) by using the following command:
import boto3
- Now, import the JSON module to serialize JSON from https://docs.python.org/3.6/library/json.html by using the following command:
import json
- We also need to do some file operations to iterate through the documents. Import the glob module to find text files ending .txt from https://docs.python.org/3.6/library/glob.html by using the following command:
import glob
- We also need the os library. Import the os module from https://docs.python.org/3.6/library/os.html by using the following command:
import os
- Now, instantiate a new Comprehend client:
comprehend = boto3.client(service_name='comprehend')
Let's get a list of all the documents (assumes in Jupyter notebook you navigated to Chapter02/Exercise02.04/ directory and the opened the notebook Exercise2.04.ipynb):
data_dir = '../reviews__pos/*.txt'
# Works for Linux, OSX. Change to \ for windows
file_list = glob.glob(data_dir)
Note
The # symbol in the code snippet above denotes a code comment. Comments are added into code to help explain specific bits of logic. In this exercise, we are assuming the.txt files are stored in the review_pos directory. Depending on where you have downloaded and stored the .txt files on your system, the highlighted path must be modified in the code.
- Now, we can iterate through the documents and detect the entities in the documents. We will be calling detect_entities on each of the documents. As before, we will also use json.dumps() to write the JSON data to a Python string:
for file in file_list:
with open(file, 'r', encoding="utf-8") as f:
file_as_str = f.read()
# python string formatting to print the text file name
print('Calling detect_entities_from_documents.py on file: %s'
% file[-15:])
# json.dumps() writes JSON data to a Python string
print(json.dumps(comprehend.detect_entities
(Text = file_as_str, LanguageCode='en'),
sort_keys=True, indent=4))
print('End of detect_entities ')
- Press Shift + Enter to run the two notebook cells. The output of the preceding code is shown in the following screenshot. It is a long output—we are showing the output for one file. You will see the entities listed for all the files in the /reviews__pos/*.txt subdirectory:
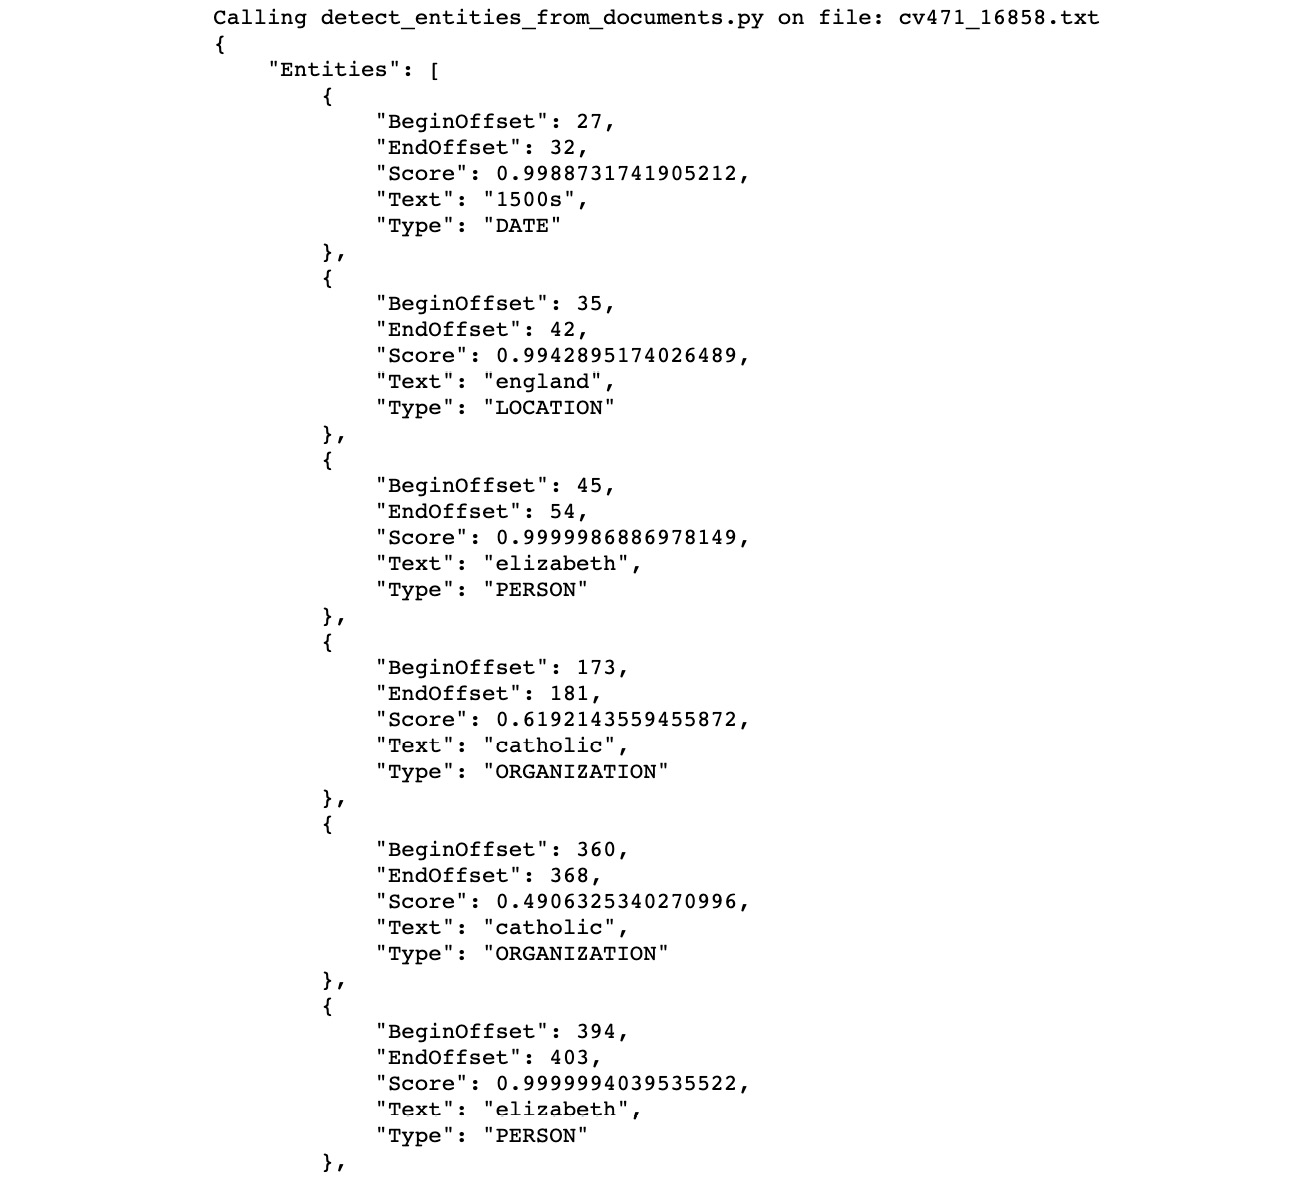
Figure 2.13: DetectEntities output
In this exercise, we extended entity detection to a set of documents, calling Amazon Comprehend's DetectEntities recursively.
Detecting Key Phrases
A key phrase for AWS is analogous to a noun phrase, which represents an actual thing. In English, when we put together different words that represent one concrete idea, we call it a noun phrase.
For example, A fast machine is a noun phrase because it consists of A, the article; fast, an adjective; and machine, which is a noun. AWS looks for appropriate word combinations and gives scores that indicate the confidence that a string is a noun phrase.
Exercise 2.05: Detecting Key Phrases
In this exercise, we will detect key phrases. To do so, we will use Amazon Comprehend's DetectKeyPhrase operation. The following are the steps for detecting key phrases:
Note
The Pre checkup instructions and the source code for this exercise are available via GitHub in the repository at https://packt.live/2Z75cI4.
- Import the AWS SDK for Python (boto3: http://boto3.readthedocs.io/en/latest/) by using the following command:
import boto3
- Now, import the JSON module to serialize the JSON from https://docs.python.org/3.6/library/json.html by using the following command:
import json
- Now, instantiate a new Comprehend client by using the following code:
comprehend = boto3.client(service_name='comprehend')
- Now, provide the English text to analyze using the following code:
english_string = 'robert redfords a river runs through '
'is not a film i watch often. it is a '
'masterpiece, one of the better films of '
'recent years. The acting and direction is '
'top-notch never sappy , always touching.'
print('Calling DetectKeyPhrases')
# json.dumps() writes JSON data to a Python string
print(json.dumps(comprehend.detect_key_phrases
(Text = english_string, LanguageCode='en'),
sort_keys=True, indent=4))
print('End of DetectKeyPhrases ')
- Run the code by executing the cells with Shift + Enter. You will see the following output:
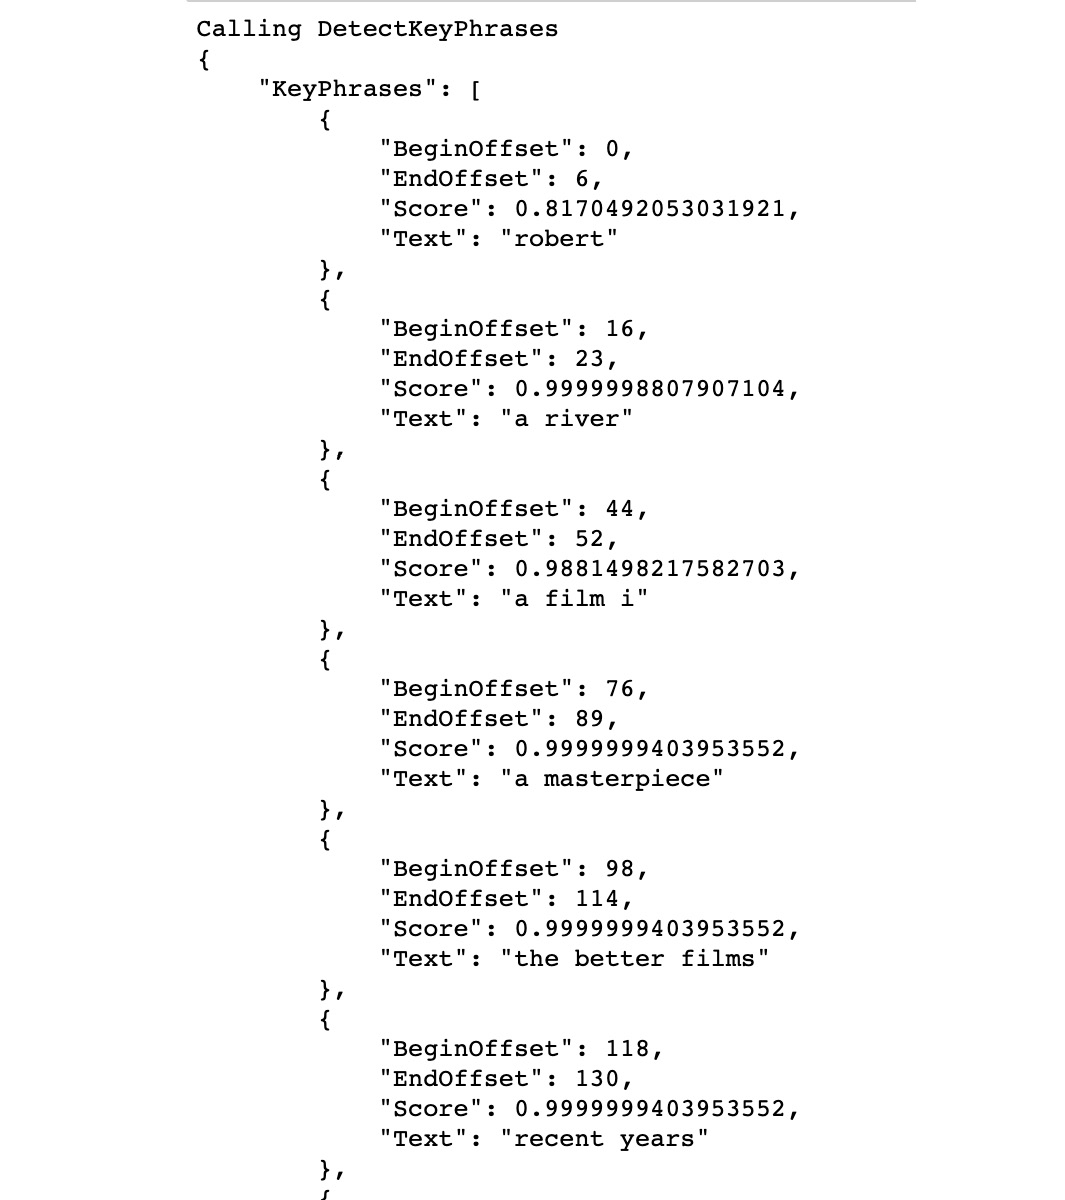
Figure 2.14: AWS Comprehend DetectKeyPhrase output
Detecting Sentiments
Amazon Comprehend has the capability to detect sentiments, usually used for social media posts, blog posts, reviews, emails, and other user-generated content. Amazon Comprehend can determine the four shades of sentiment polarity: positive, negative, neutral, and mixed. Mixed sentiment is interesting as it can differentiate between different aspects; for example, a user might like your website but not be thrilled about the price of a product.
Exercise 2.06: Conducting Sentiment Analysis
In this exercise, we will carry out sentiment analysis. To do so, we will use Amazon Comprehend's DetectSentiment operation. The following are the steps for detecting sentiment:
Note
The Pre checkup instructions and the source code for this exercise are available via GitHub in the repository at https://packt.live/3ebVNU1.
- Open a new Jupyter Notebook.
- Import the AWS SDK for Python (boto3) from http://boto3.readthedocs.io/en/latest/ by using the following command:
import boto3
- Now, import the JSON module to serialize JSON from https://docs.python.org/3.6/library/json.html by using the following command:
import json
- Now, instantiate a new Comprehend client, using the following code:
comprehend = boto3.client(service_name='comprehend')
- Then, provide a text string to analyze, using the following code:
english_string = 'Today is my birthday, I am so happy.'
print('Calling DetectSentiment')
# json.dumps() #writes JSON data to a Python string
print('english_string results:')
print(json.dumps(comprehend.detect_sentiment
(Text = english_string, LanguageCode='en'),
sort_keys=True, indent=4))
print('End of DetectSentiment ')
- Run the code by executing the cells with Shift + Enter. The output is as follows:
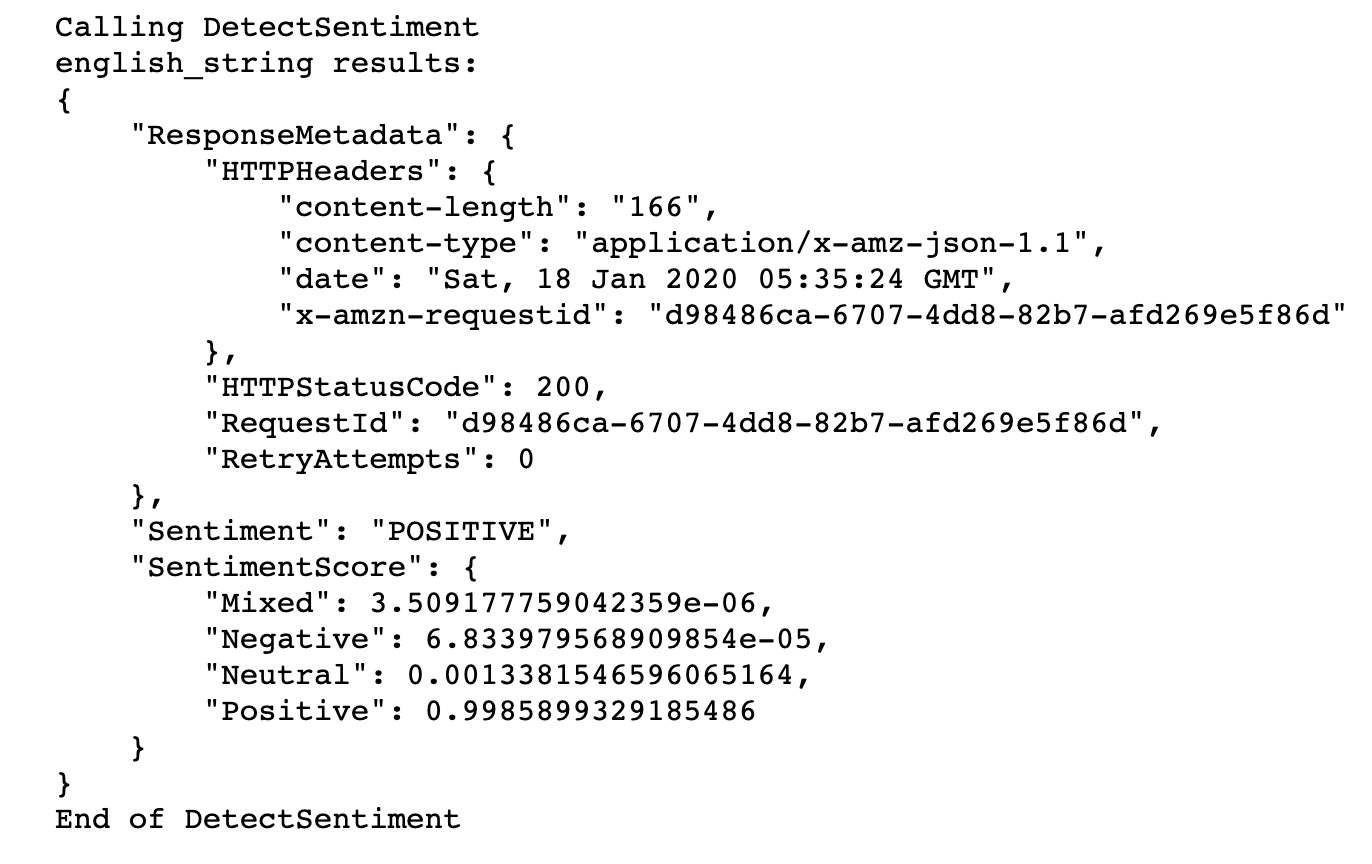
Figure 2.15: AWS Comprehend—DetectSentiment output
In this exercise, we saw how easy it is to perform sentiment analysis using AWS Comprehend. DetectSentiment correctly predicted the sentiment of the statement Today is my birthday, I am so happy as positive.
Setting Up a Lambda Function and Analyzing Imported Text Using Comprehend
We have used Amazon Comprehend to do various NLP tasks, such as detecting entities and key phrases and carrying out sentiment analysis.
Integrating Comprehend and AWS Lambda for responsive NLP
In this topic, we will be integrating AWS Lambda functions with Comprehend, which provides a more powerful, scalable infrastructure. You can use AWS Lambda to run your code in response to events, such as changes to data in an Amazon S3 bucket.
Executing code in response to events provides a real-world solution for developing scalable software architecture. Overall, this increases our data pipeline and provides the ability to handle more complex big data volumes and NLP operations.
What Is AWS Lambda?
AWS Lambda is a compute service that runs code without provisioning or managing servers. AWS Lambda executes code only when needed, and scales automatically. AWS Lambda runs your code on a high-availability compute infrastructure, which performs the administration of the compute service. More specifically, AWS Lambda performs the following: server and operating system maintenance, capacity provisioning and automatic scaling, code monitoring, and logging.
Overall, the goal of AWS Lambda is to make short, simple, modular code segments that you can tie together into a larger processing infrastructure.
What Does AWS Lambda Do?
Lambda allows users to run small segments of code (Java, Node, or Python) to complete a specific task. These specific tasks can be storing and then executing changes to your AWS setup, or responding to events in S3 (we will explore the latter later in this topic). Before Lambda, you would typically need a separate EC2 server to run your entire code; however, Lambda allows small segments of code to run without the need for EC2.
Lambda Function Anatomy
AWS Lambda provides two options for implementing Python code. First, you can upload a complete Python code file. Second, you can use the Lambda function editor entirely inline, which means that you can enter and modify the code directly, without having to upload any files to AWS. The code that you enter will be executed when the Lambda function is invoked. The second option will allow for easier testing, so we will use it.
Let's examine the structure of a Lambda function:
- When you create a function (for example, s3_trigger), AWS creates a folder named the same, with a Python file named Lambda_function.py within the folder. This file contains a stub for the Lambda_handler function, which is the entry point of our Lambda function. The entry point takes two parameters as arguments: The event argument and the context argument.
- The event argument provides the value of the payload, which is sent to the function from the calling process. It typically takes the form of a Python dict type, although it could also be one of list, str, int, float, or NoneType.
- The context argument is of the type LambdaContext and contains runtime information. You will be using this parameter for an exercise in a later section. The return value of the function can be any type that is JSON-serializable. This value gets returned to the calling application, after serializing.
We will incorporate Lambda, S3, and Amazon Comprehend, to automatically perform document analysis when a text document is uploaded to S3. The architecture of a Lambda function is as follows:
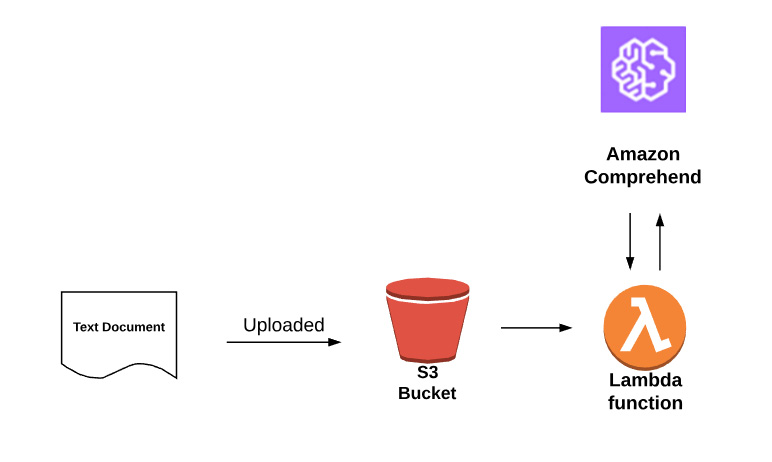
Figure 2.16: Architecture diagram
Exercise 2.07: Setting Up a Lambda Function for S3
In this exercise, we will integrate the following AWS services: S3, Lambda, and Amazon Comprehend. To perform this exercise, the architecture should be recollected. Upload a file (test_s3trigger_configured.txt) to S3 and view the results of Comprehend's analysis. The following are the steps for setting up a Lambda function:
Creating the S3 bucket
- You should have an AWS account and have completed the exercises and activities in Chapter 1, An Introduction to AWS.
- First, navigate to the Amazon S3 service, https://console.aws.amazon.com/s3/, and click Create bucket:

Figure 2.17: S3 Bucket creation for the Lambda trigger
For Bucket name, type aws-ml-s3-trigger, and then click Create:
Note
Bucket names in AWS have to be unique, otherwise you will get an error "Bucket name already exists". One easy way to get a unique name is to append the bucket name with today's date plus the time, for instance, YYYYMMDDHHMM. While writing this chapter, I created the bucket aws-ml-s3-trigger-202001181023 .
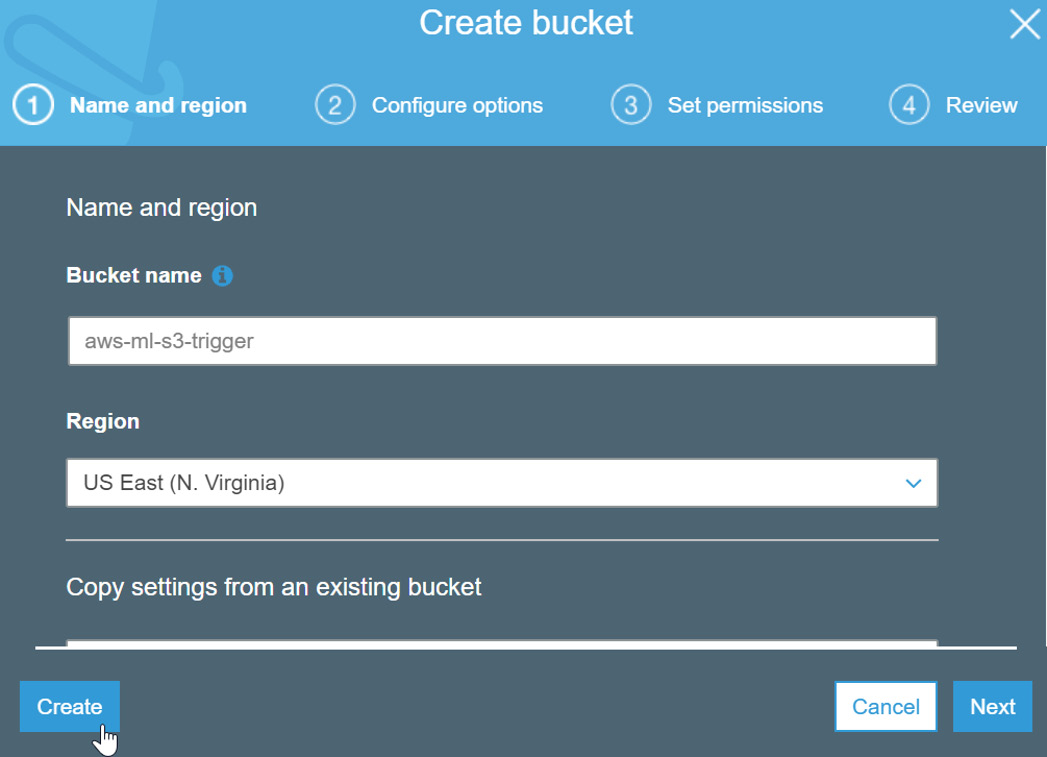
Figure 2.18: Creating an S3 bucket
- Your bucket will be created, and you will be redirected to the bucket list in the S3 buckets screen as shown:
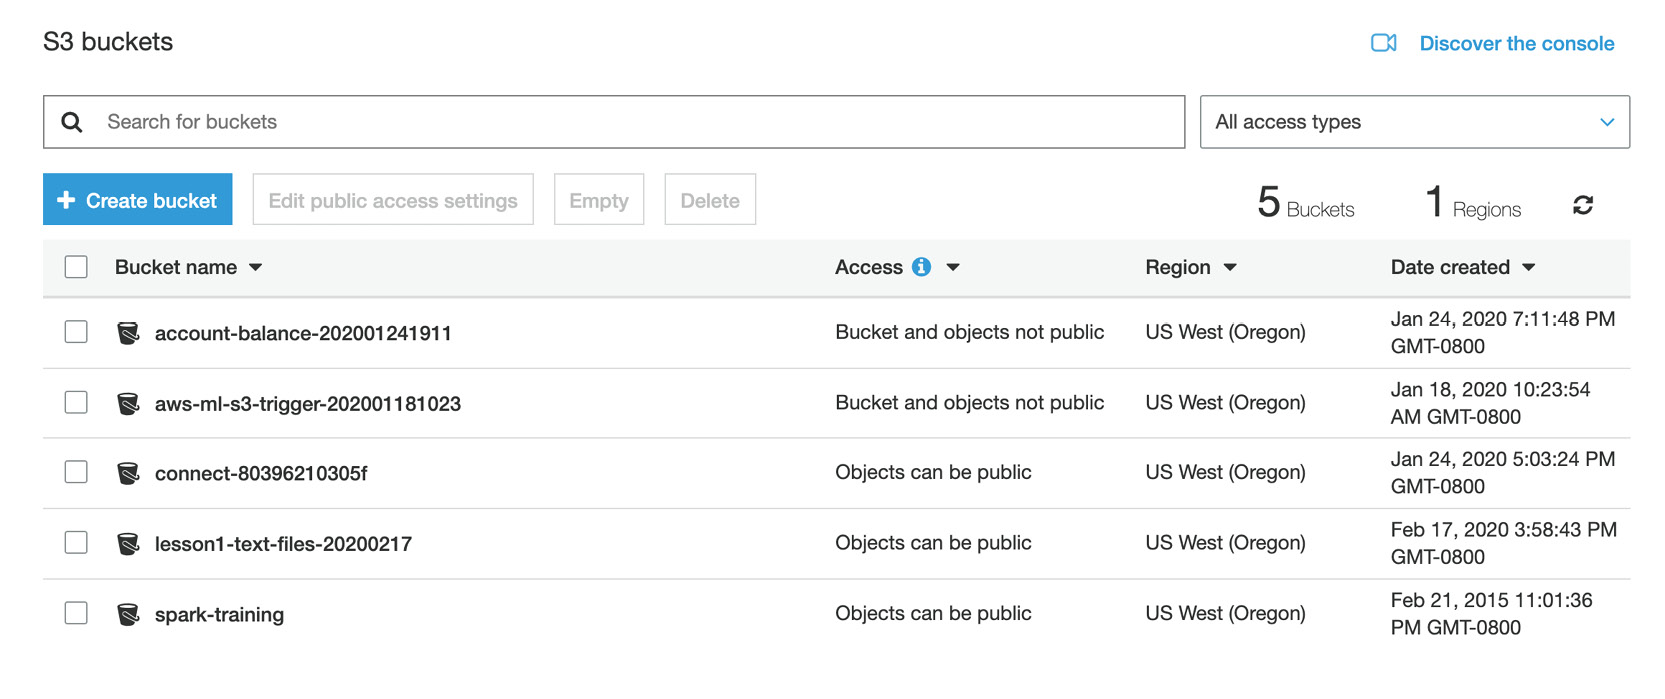
Figure 2.19: S3 Bucket list screen
- Next, navigate to Amazon Lambda, under Services, and click Lambda under Compute:
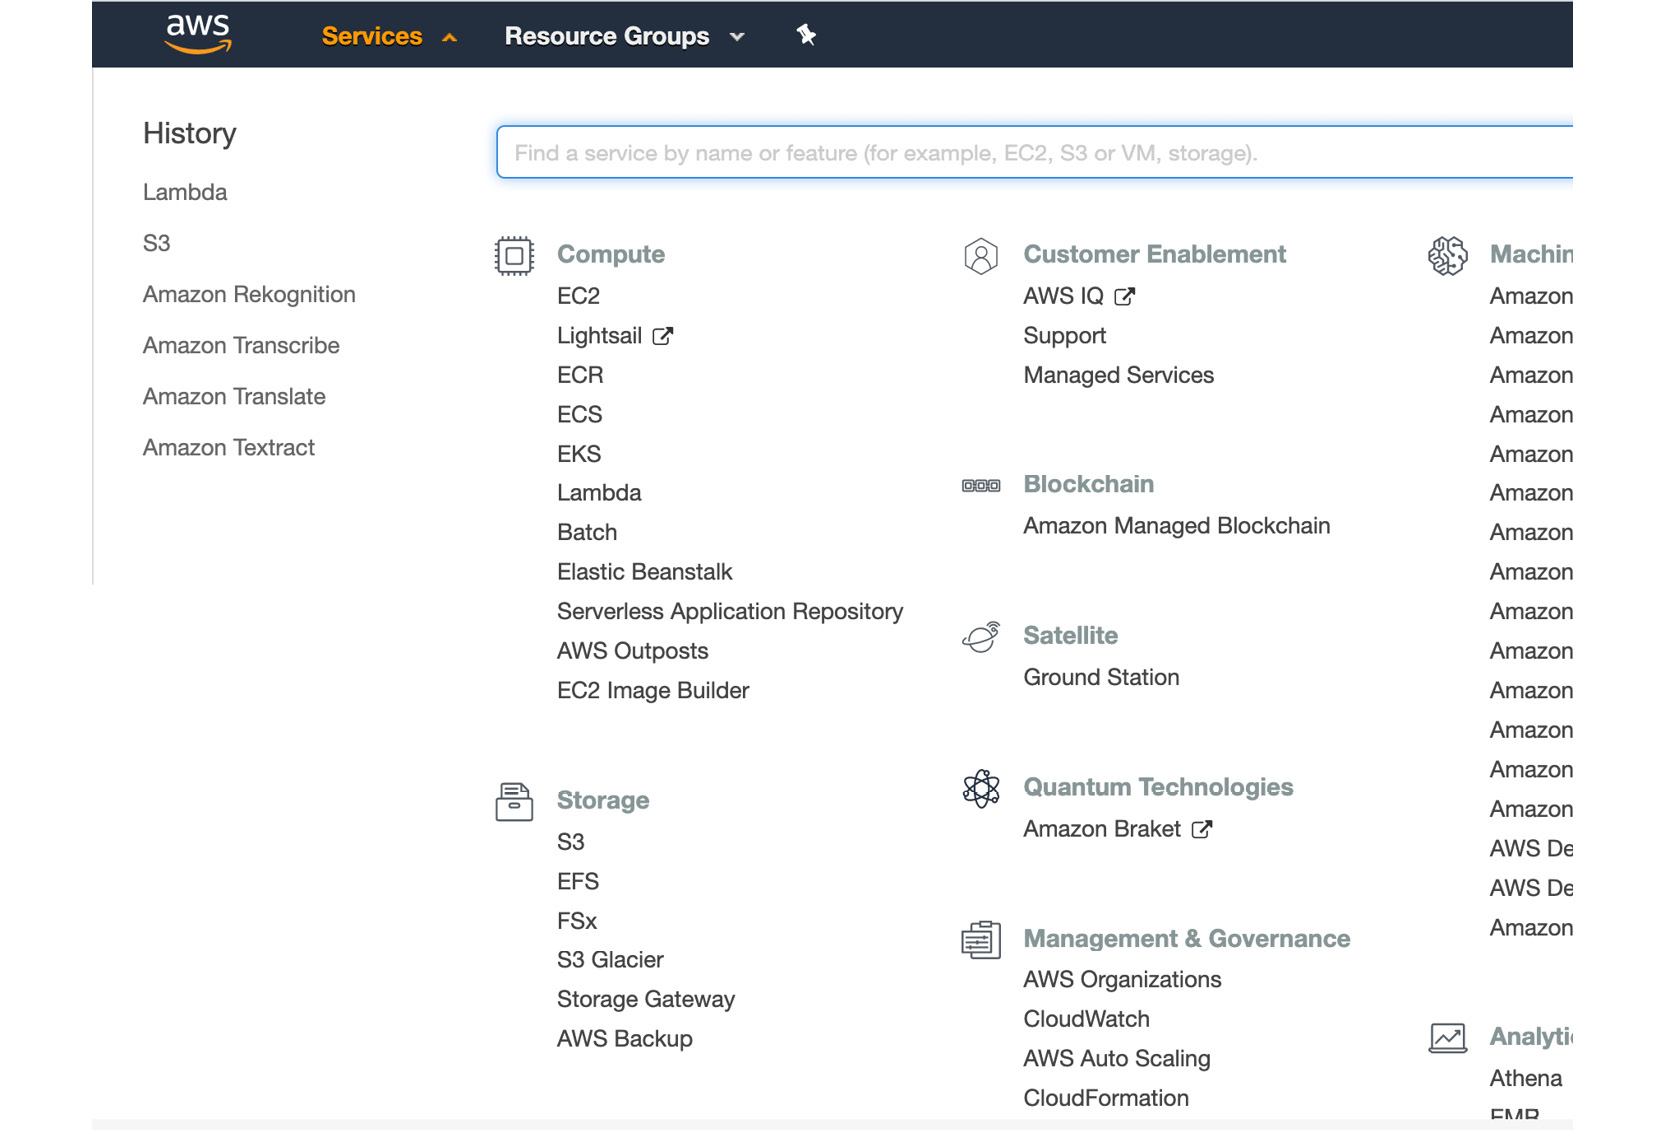
Figure 2.20: Services | Compute | Lambda
- You will see the Lambda console, as shown here:
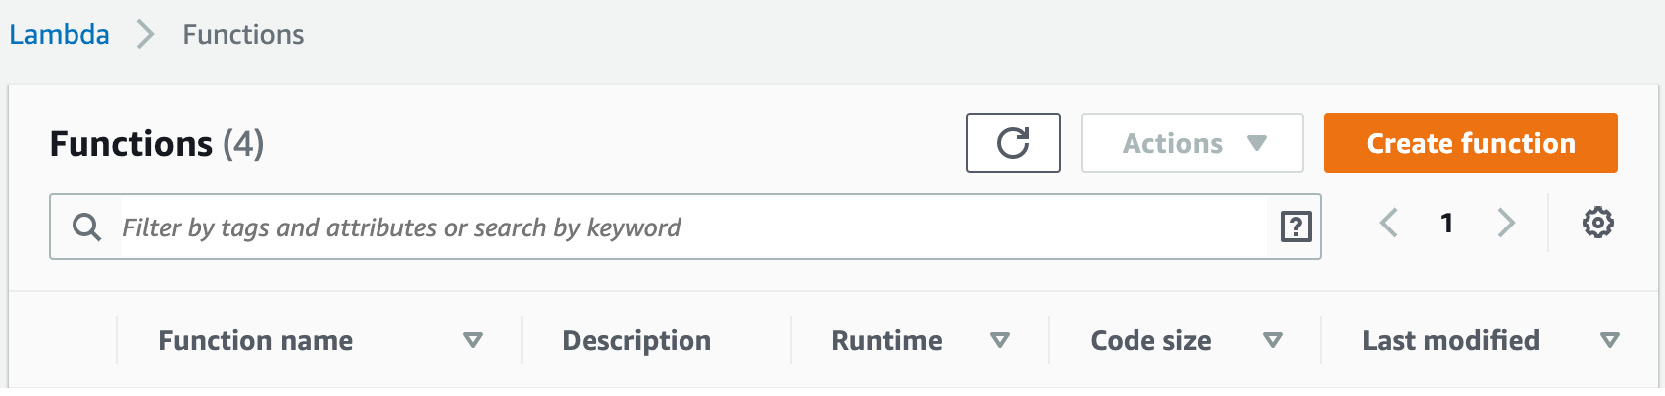
Figure 2.21: Lambda console
- In the Lambda console, click Create function:

Figure 2.22: AWS Lambda Create function button
- Choose Author from scratch from the options. For Name, type s3_trigger:
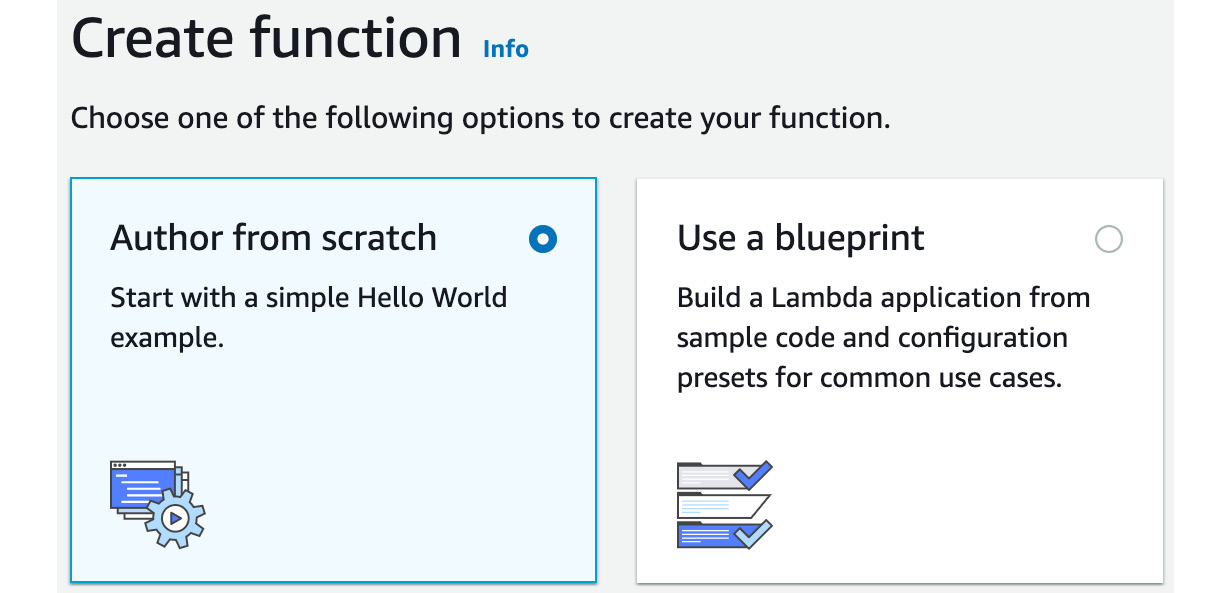
Figure 2.23: AWS Lambda—Creating a function with the Author from scratch option
- For the runtime options, choose Python 3.6 from the list:

Figure 2.24: AWS Lambda—Python 3.6 selection
- Click Choose or create an execution role and choose Create new role from AWS policy template(s) and enter the name s3TriggerRole in the Role name field:
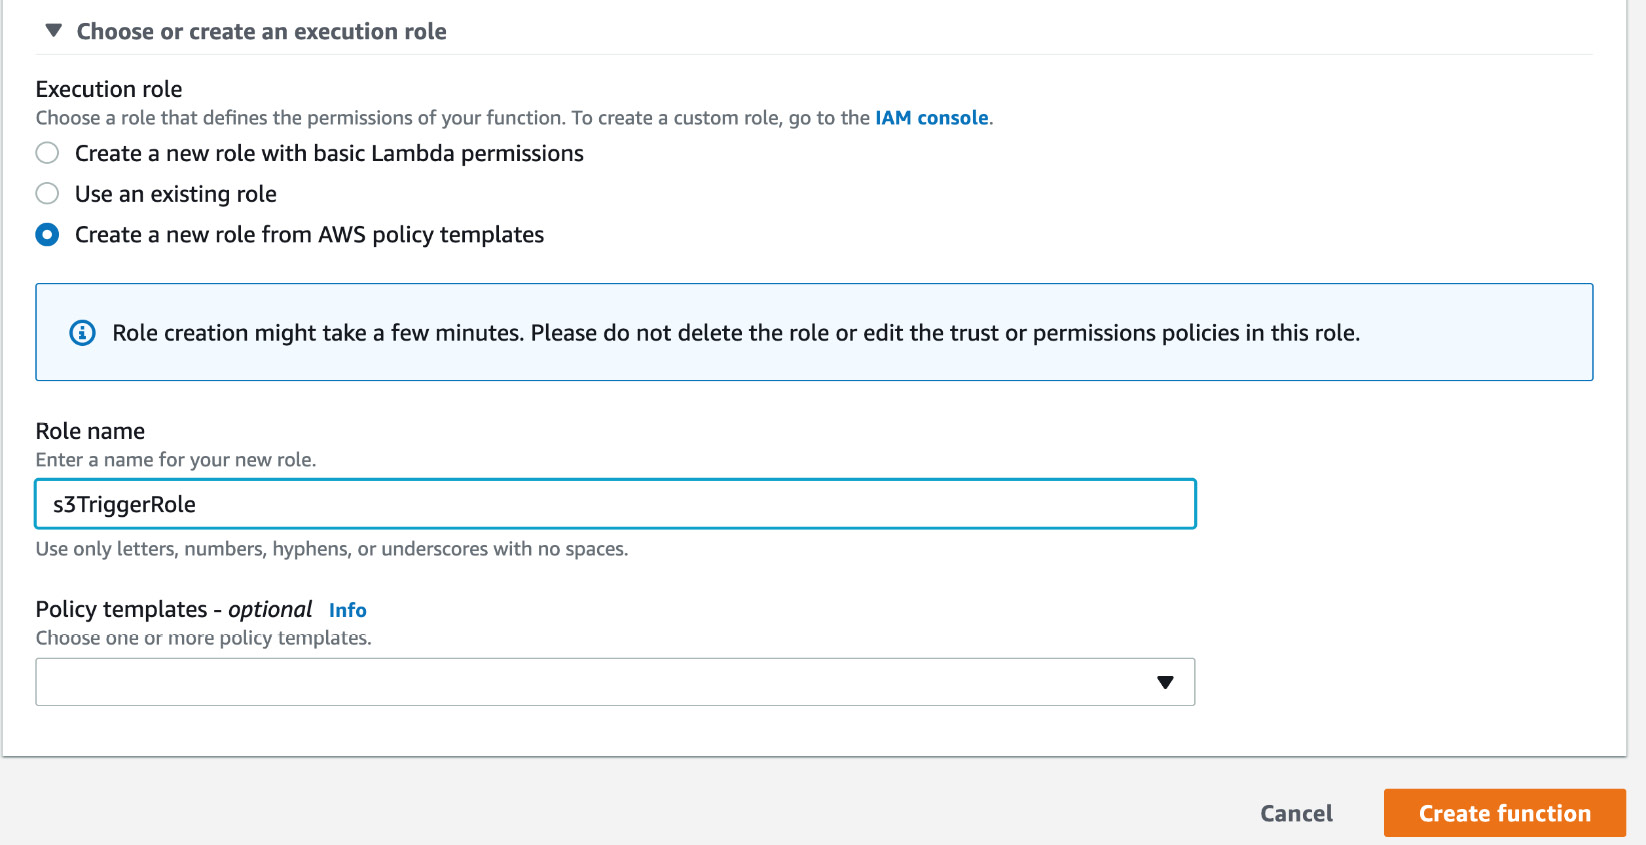
Figure 2.25: AWS Lambda Create Role template
- Click the dropdown in Policy templates and select Amazon S3 object read-only permissions. You will see AWS Lambda Policy template dropdown box, as shown here:
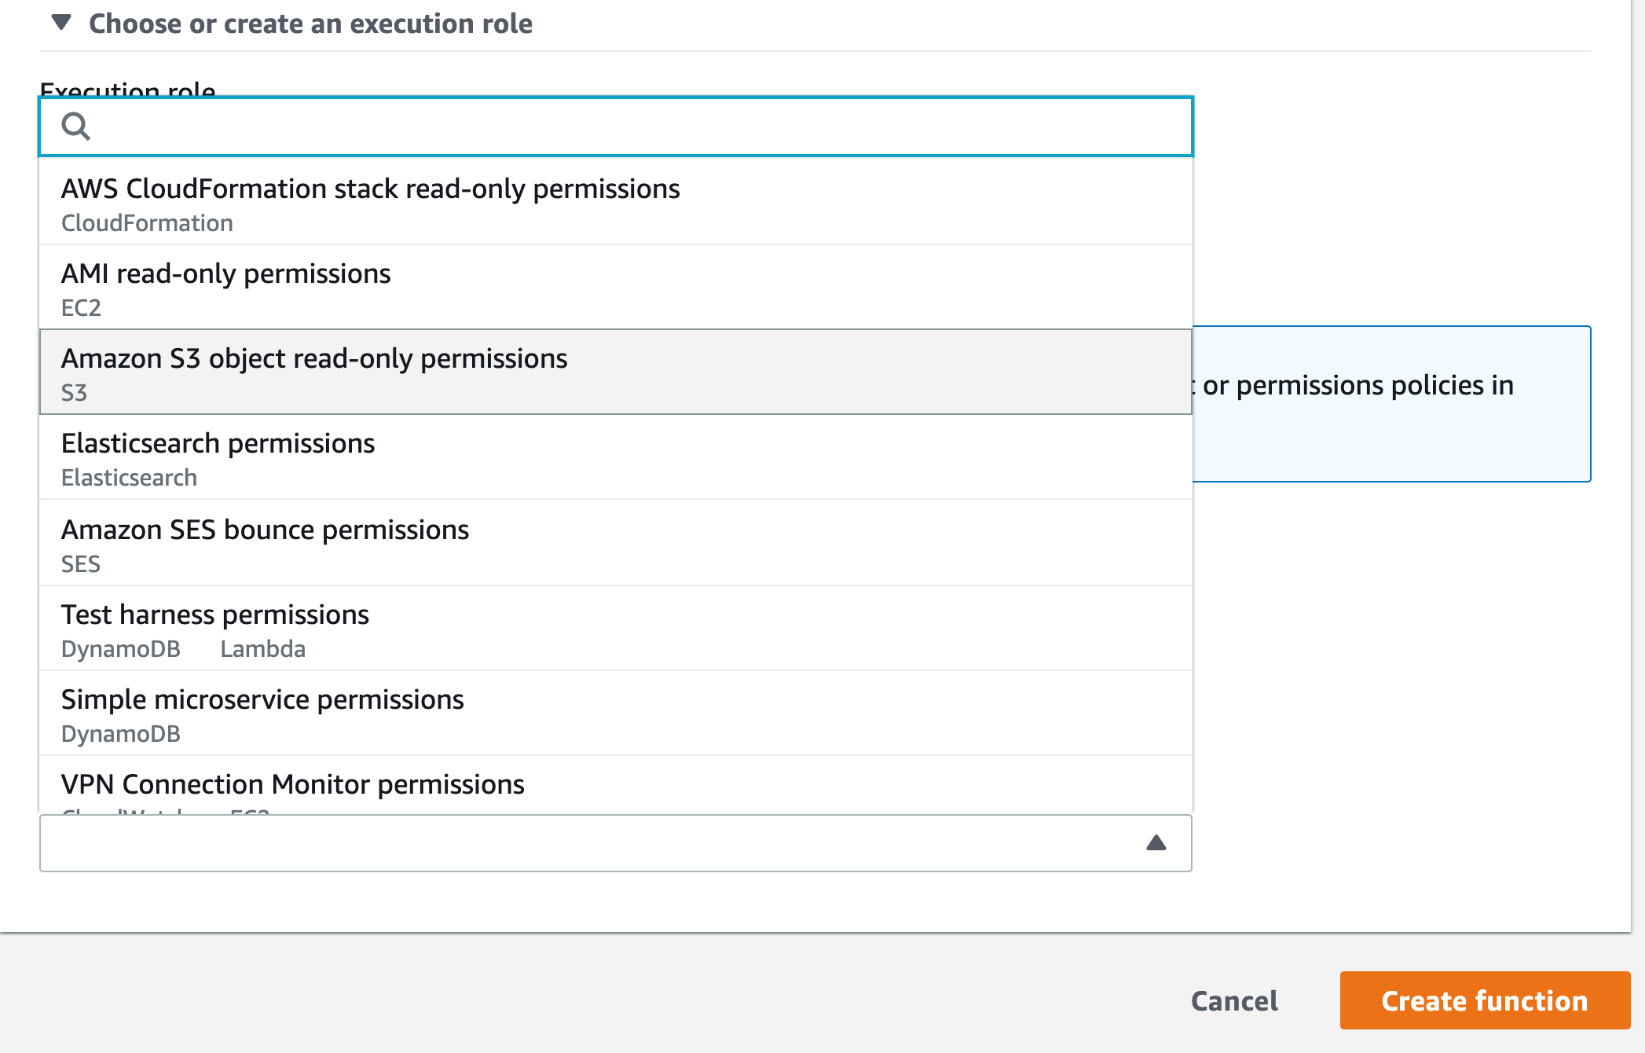
Figure 2.26: AWS Lambda Policy templates dropdown box
- Then, click the Create function button to create the Lambda function in AWS. The final AWS Lambda Create function screen looks as follows:
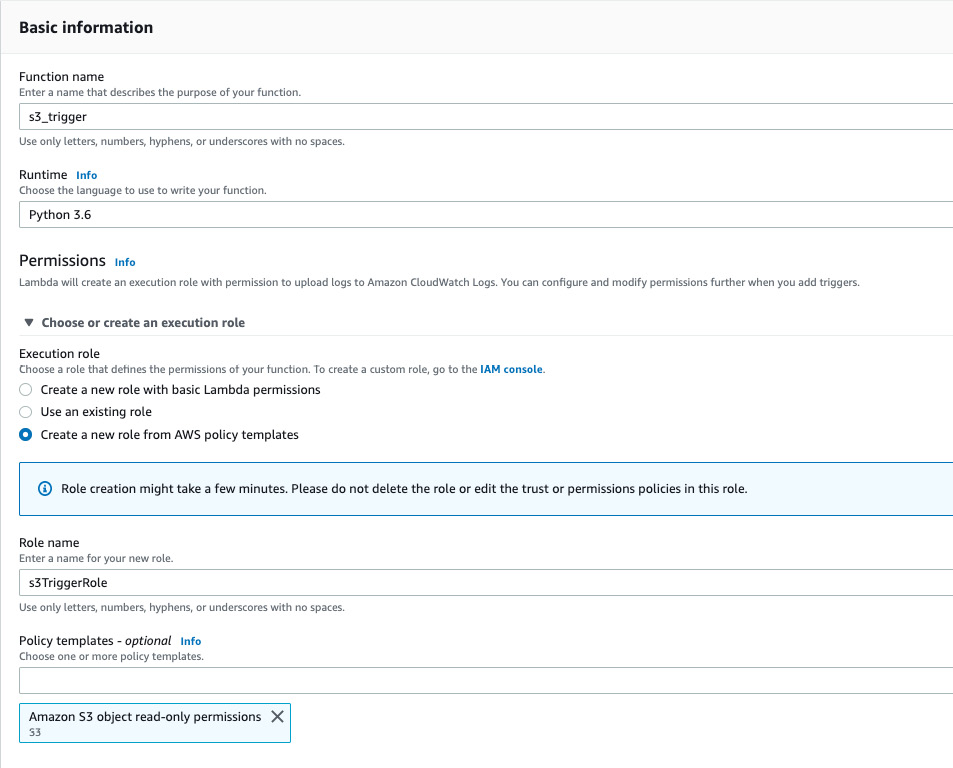
Figure 2.27: AWS Lambda—Create a function screen
- You will see the Lambda function designer. There is lot of information displayed. Let's focus on the essentials for this exercise:
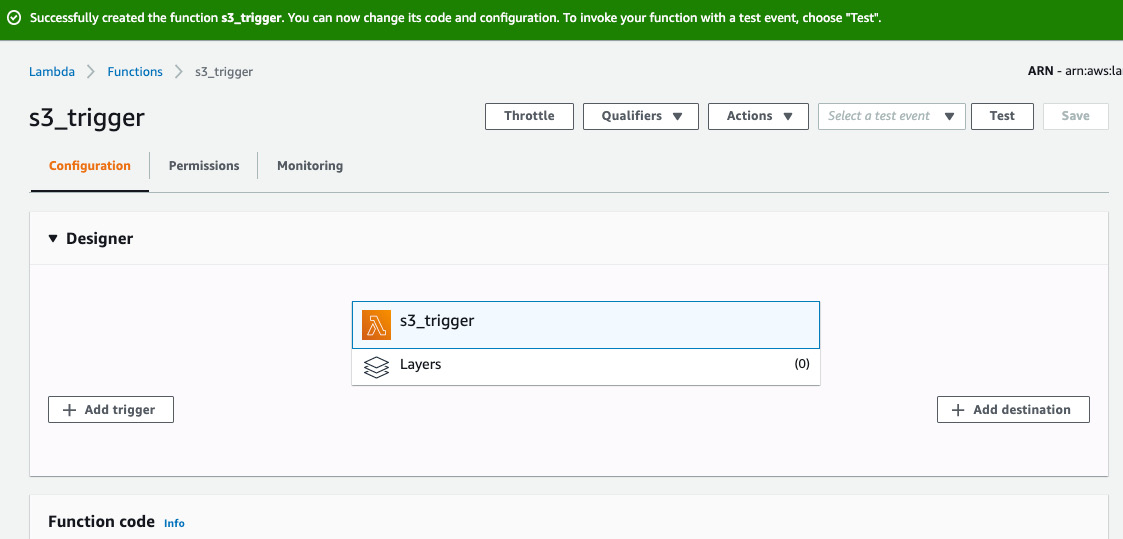
Figure 2.28: AWS Lambda—function designer
- Click Add trigger, and from the drop-down menu, select S3:
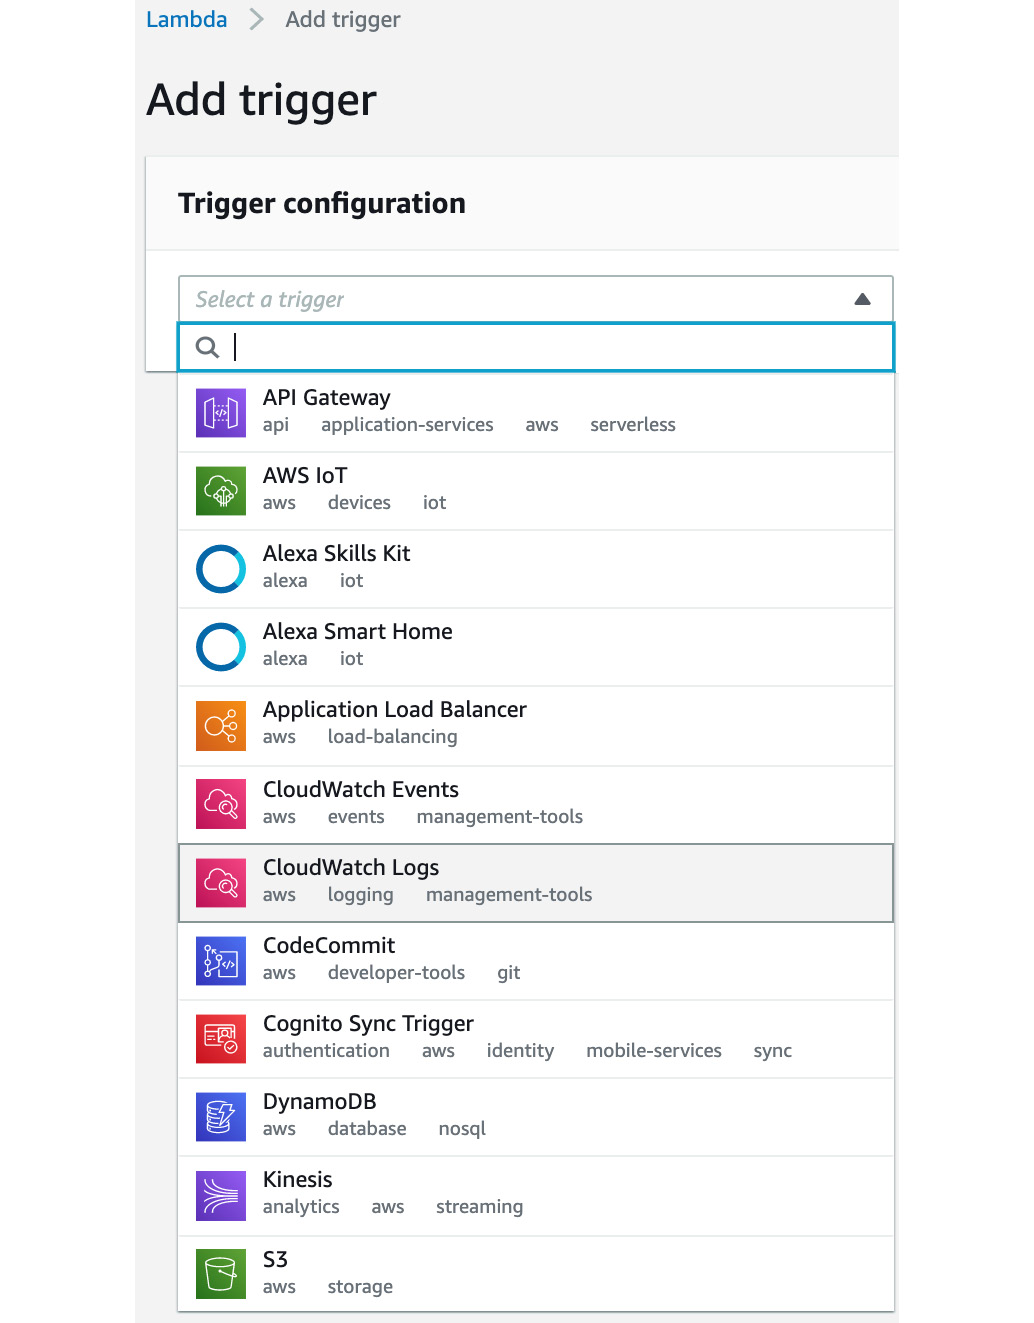
Figure 2.29: Trigger configuration drop-down menu
- Take a quick look at the options and select Add:
The bucket name should be the S3 trigger bucket you created (in my case, it was aws-ml-s3-trigger-202001181023); in the Event type section, All object create events must be selected in the dropdown and Enable Trigger should be checked, as shown here:
Note
You might get the error "An error occurred when creating the trigger: Configurations overlap. Configurations on the same bucket cannot share a common event type." This would happen if you created a function and deleted it. The easiest way is to delete the event via Services | Storage/S3 | Click the bucket | Properties | Events and deleting the Lambda event. Make sure you click the Save button after deleting the event.
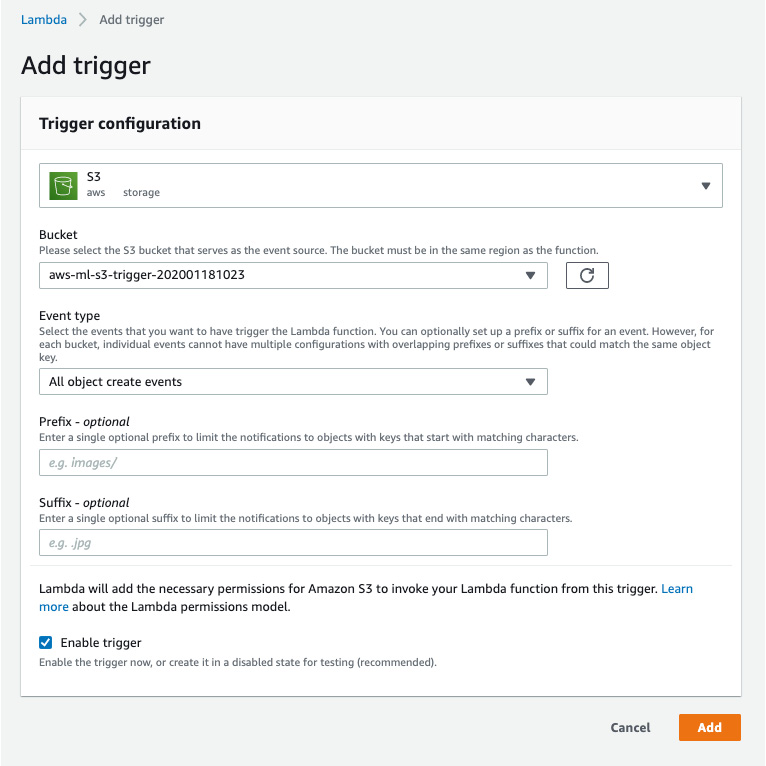
Figure 2.30: Amazon S3 Trigger configuration
You will see S3 on the Lambda Designer screen:
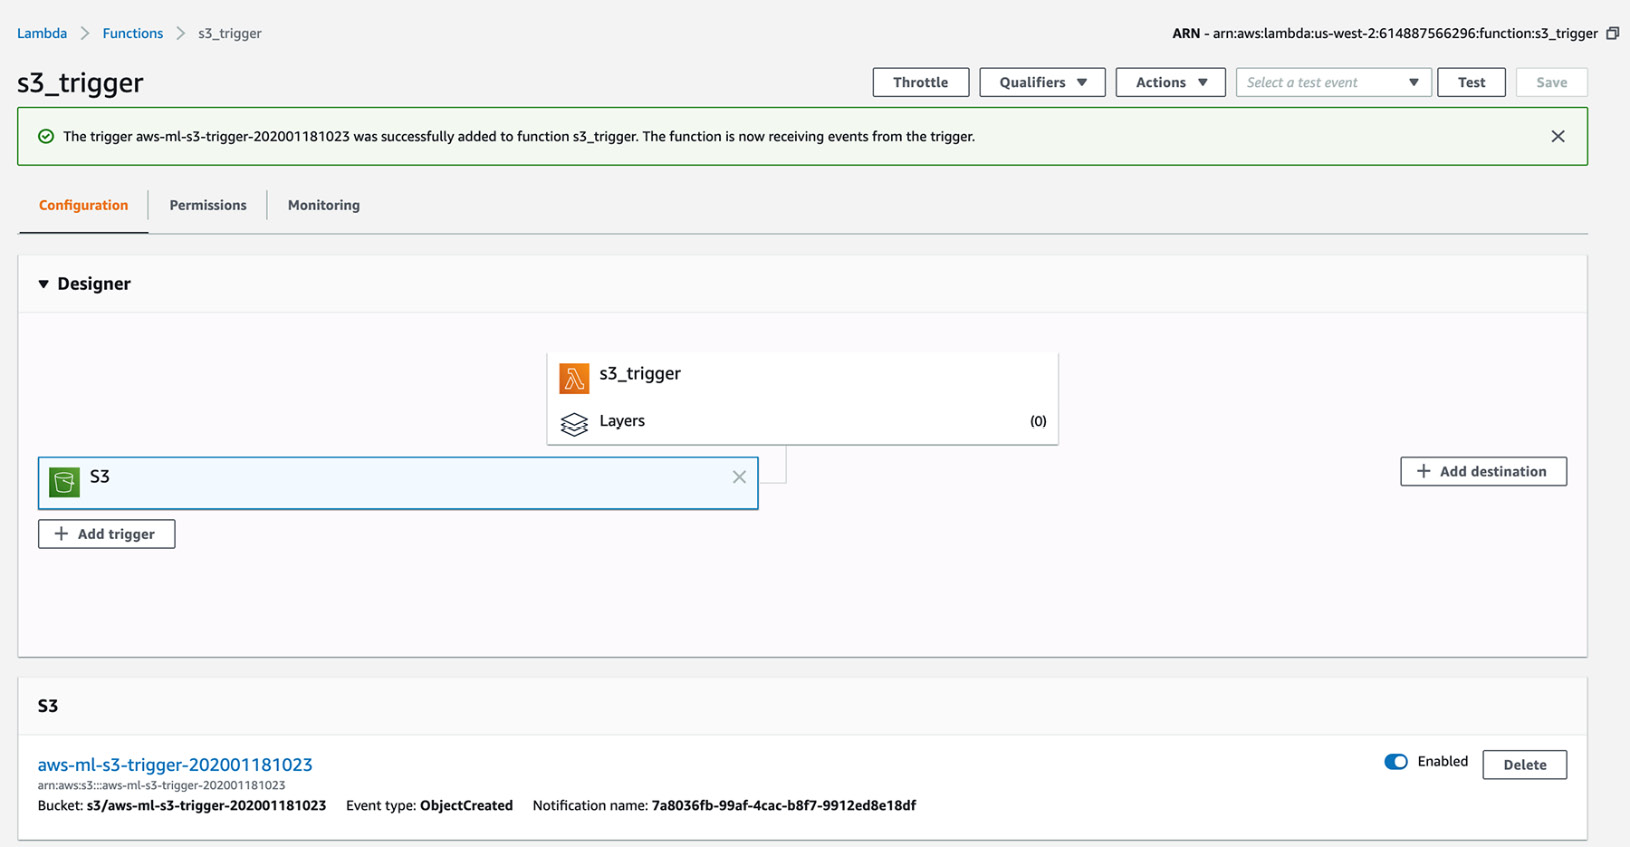
Figure 2.31: Lambda function designer with S3
- Again, choose Add trigger and choose CloudWatch/Events/EventBridge:
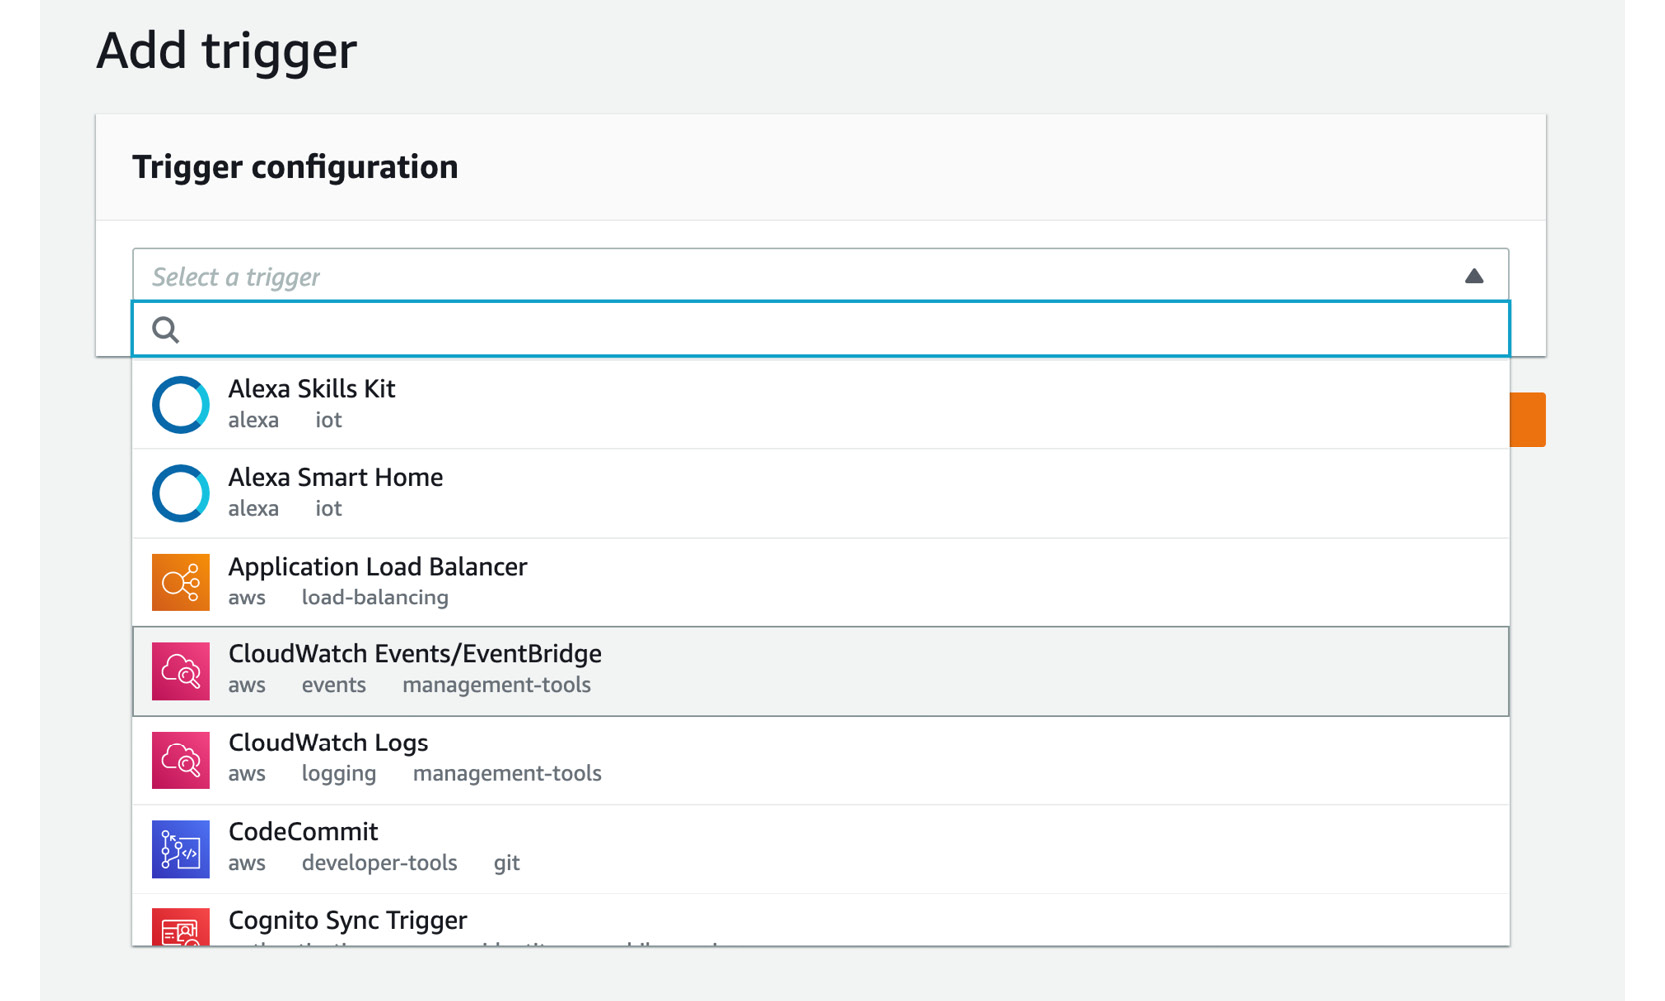
Figure 2.32: Adding the trigger configuration
- Then click the box next to Rule:
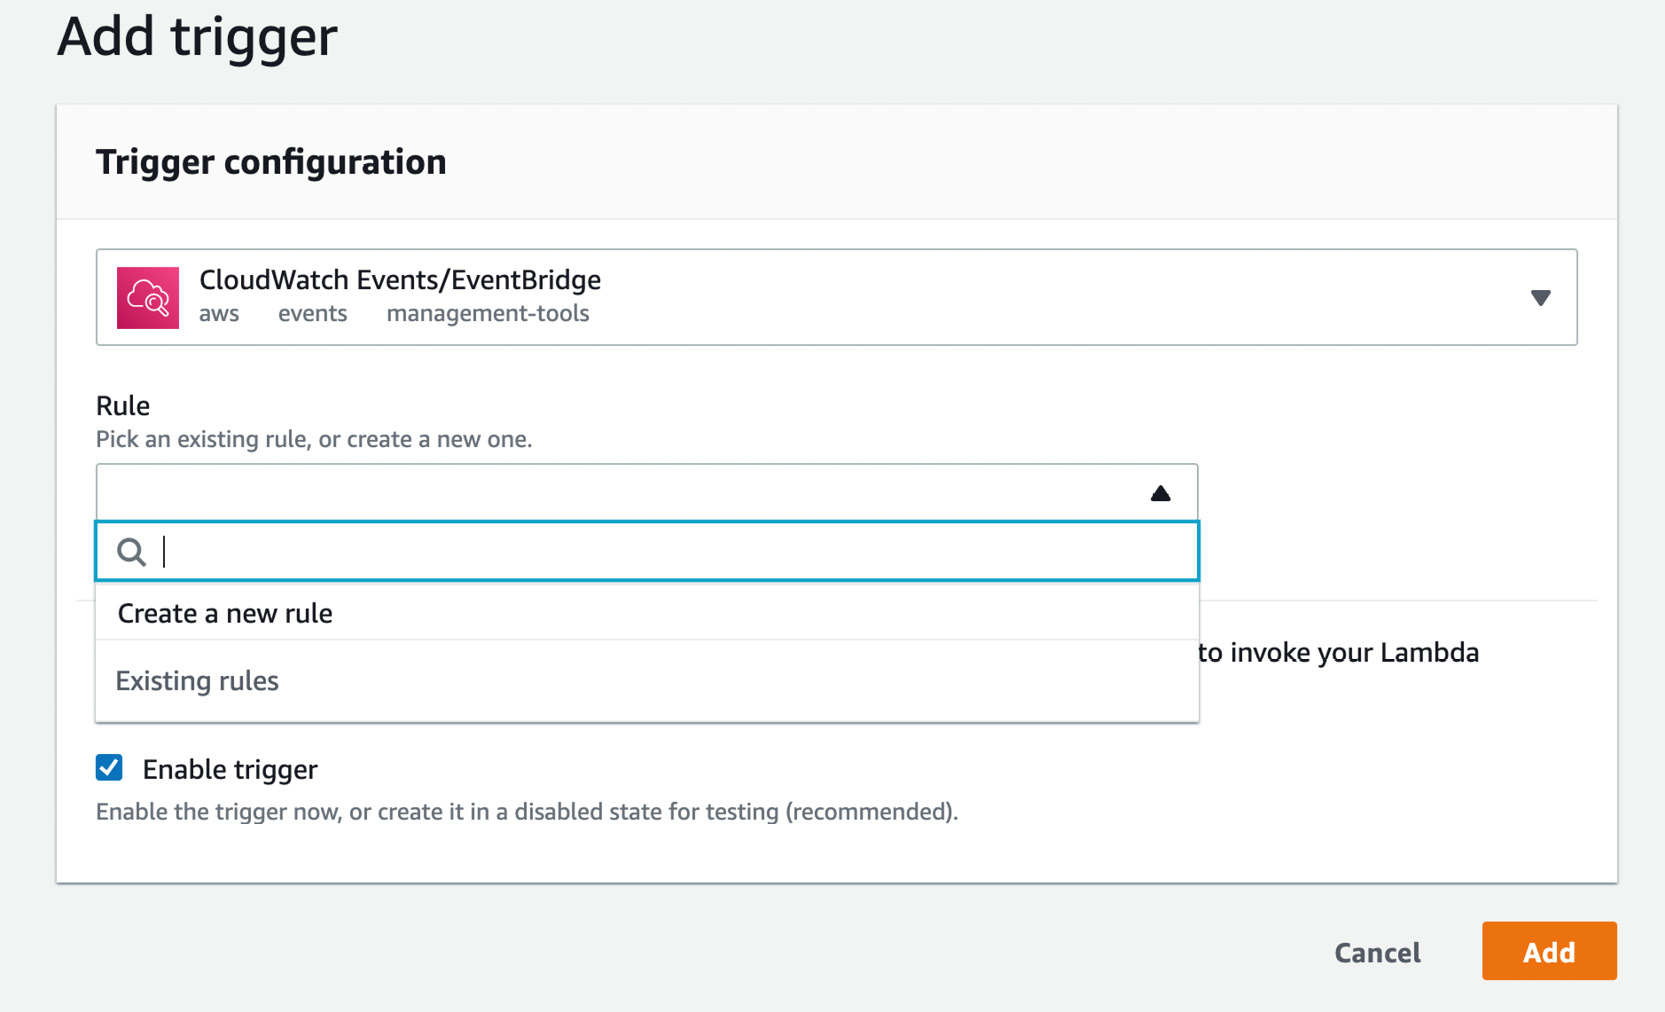
Figure 2.33: Add trigger – creating a new rule
- Select Create a new rule. The following screen will be displayed. Type s3_trigger_CWRule for the rule name.
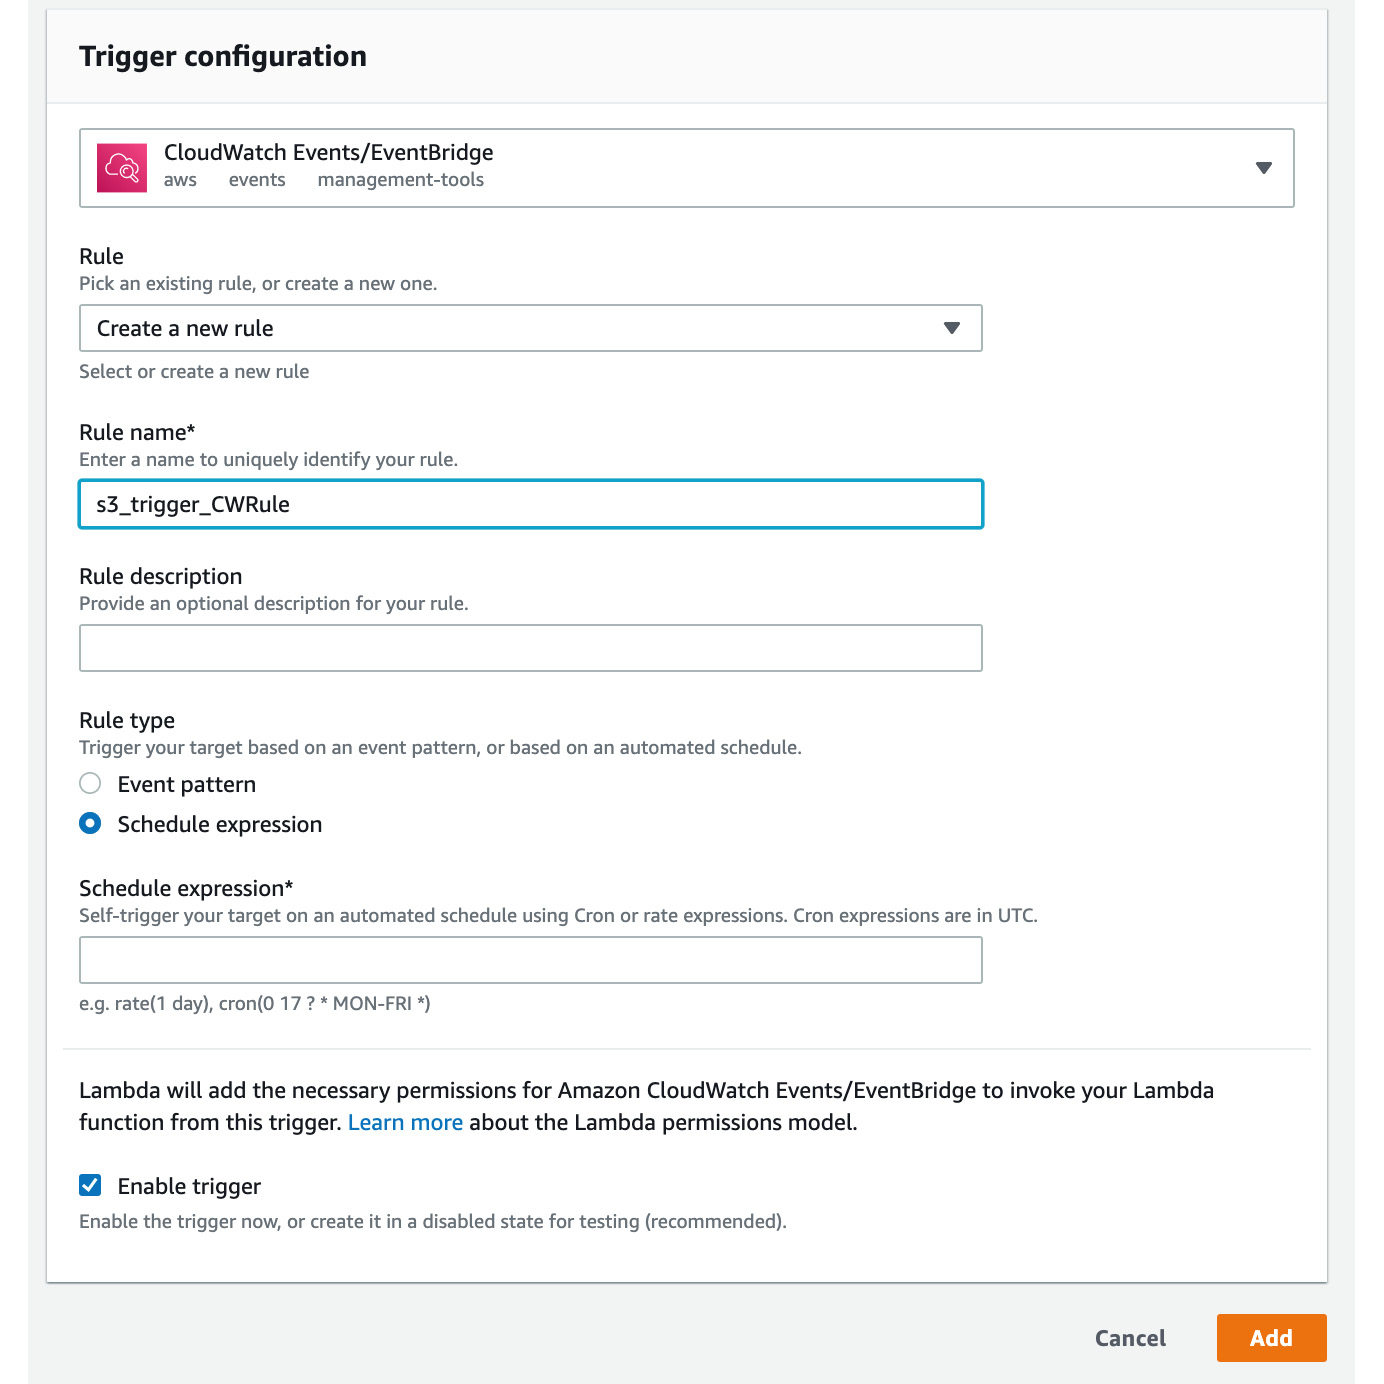
Figure 2.34: Add Trigger—New Rule Configuration
- Choose Event pattern in Rule type. Then select Simple Storage Service (S3) from the dropdown and All events and click Add:
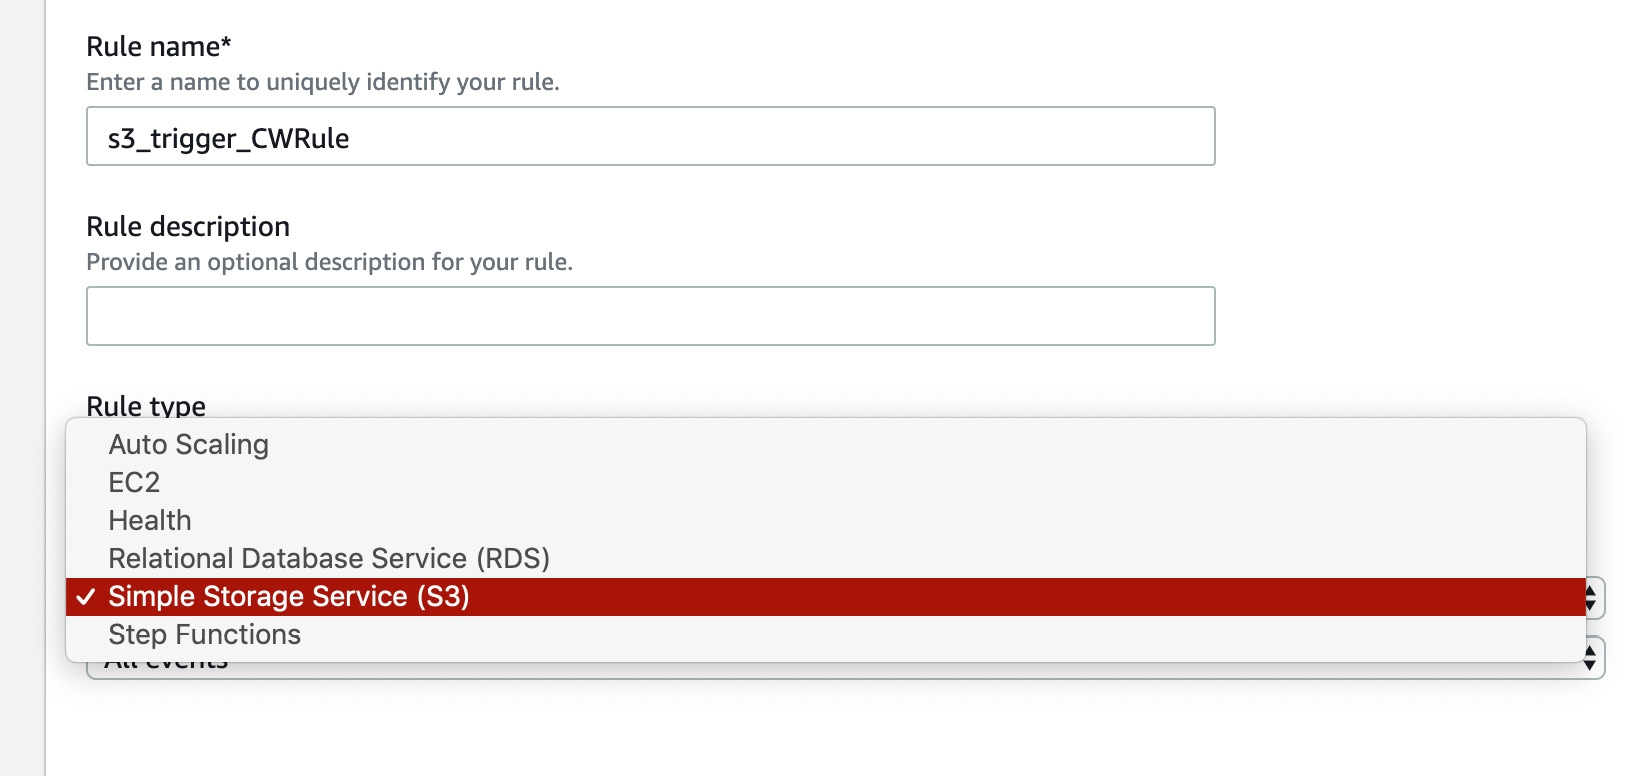
Figure 2.35: Adding an S3 rule type
- Let's explore the interface a bit more so that you can get comfortable navigating through different pages. Click Functions in the top-left corner:

Figure 2.36: Top navigation bar to navigate back to functions
- Click s3_trigger to go back to the function you are working on:
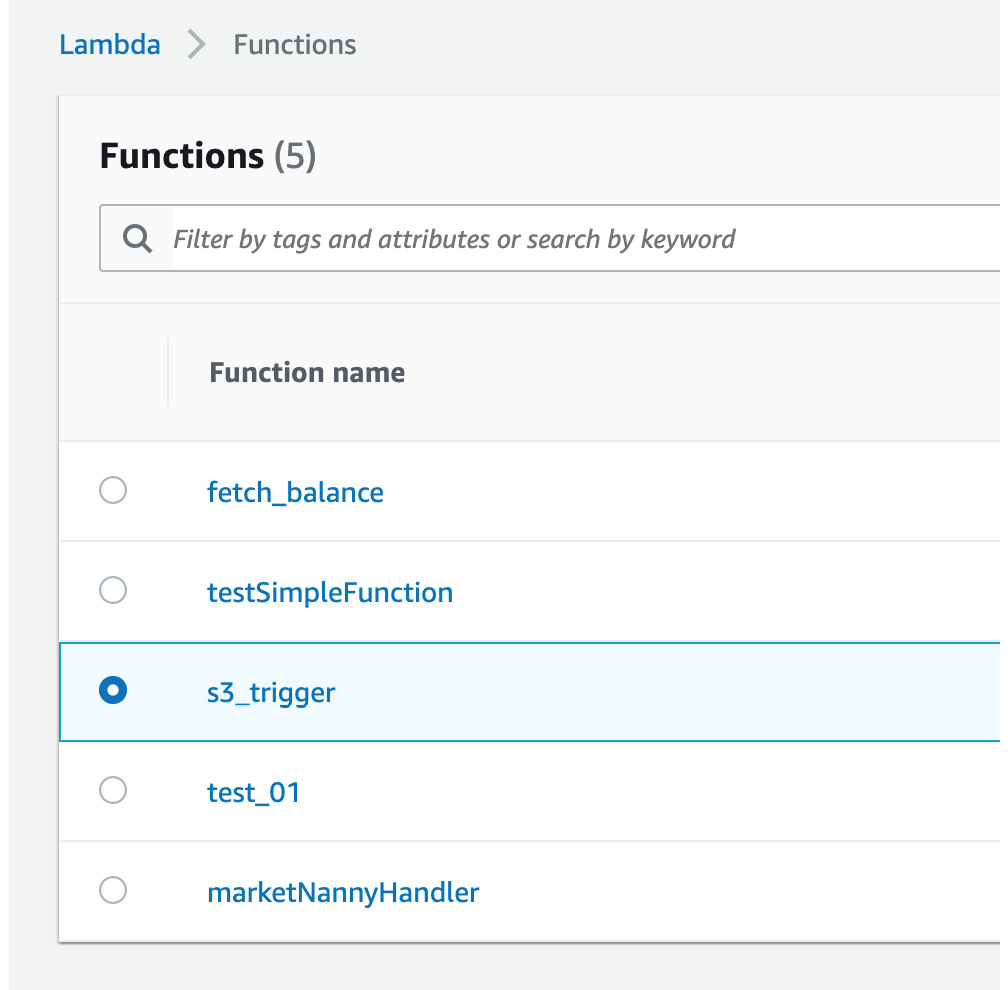
Figure 2.37: Selecting the lambda function to work on
- Next, scroll down the screen to the Function code section. The default code will be the same as, or similar to, the following:
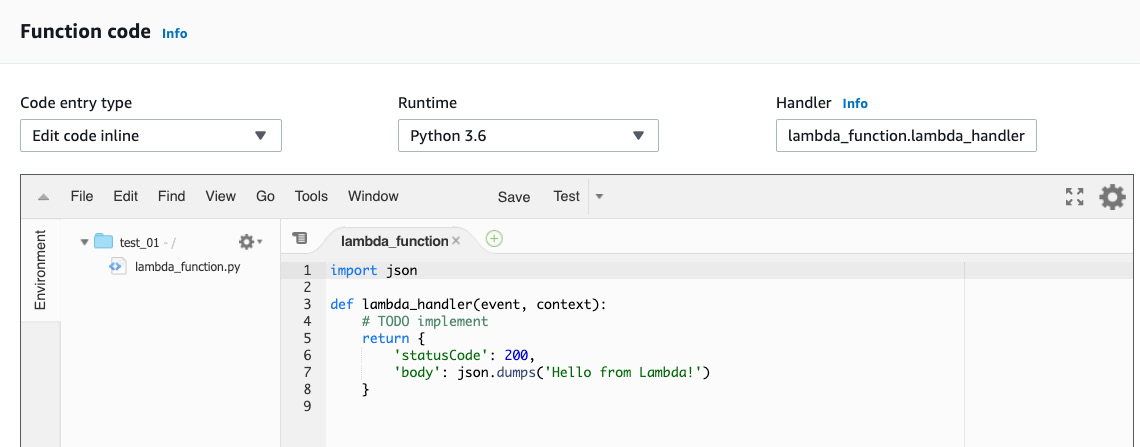
Figure 2.38: AWS Lambda—the default lambda_function screen
Here, we can enter and edit our code entirely within the lambda_function screen (as long as Code entry type is set to Edit code inline, which is the default value in the drop-down menu).
Note
For this step, you may either follow along and type in the code or obtain it from the source code folder at https://packt.live/2O6WsLW.
- First, we import the AWS SDK for Python (boto3: http://boto3.readthedocs.io/en/latest/):
import boto3
- Then, import the JSON module to serialize the JSON (https://docs.python.org/3.6/library/json.html):
import json
- Next, create a function that takes two parameters—event and context:
def Lambda_handler(event, context):
- Next, create the s3 client object:
s3 = boto3.client("s3")
- Add an if event to check whether an event occurs.
- Next, replace <input Bucket name> with the bucket you created (aws-ml-s3-trigger-202001181023, in are example):
bucket = "<input Bucket name>"
- Next, access the first index of the Records event to obtain the text file object:
text_file_obj = event["Records"][0]
- Next, assign the filename text to a variable and print the filename:
filename = str(text_file_obj['s3']['object']['key'])
print("filename: ", filename)
- Next, create the file object by getting the bucket and key:
file_obj = s3.get_object(Bucket = Bucket, Key = filename)
- Assign the text to the body_str_obj variable:
body_str_obj = str(file_obj['Body'].read())
- Create the comprehend variable:
comprehend = boto3.client(service_name="comprehend")
- The next three lines of code call the respective Comprehend functions to detect the sentiment, entities, and key phrases from the text document. Then, the output is printed to the console:
sentiment_response = comprehend.detect_sentiment
(Text = body_str_obj,
LanguageCode = "en")
print(«sentiment_response: », sentiment_response)
entity_response = comprehend.detect_entities
(Text = body_str_obj, LanguageCode = "en")
print(" entity_response: ", entity_response)
key_phases_response = comprehend.detect_key_phrases
(Text = body_str_obj,
LanguageCode = "en")
print(" key_phases_response: ", key_phases_response)
- The final statement returns the 'Hello from Lambda' string, like so:
return {
'statusCode' :200,
'body' : json.dumps('Hello from Lambda')
}
- Now, click the Save button:
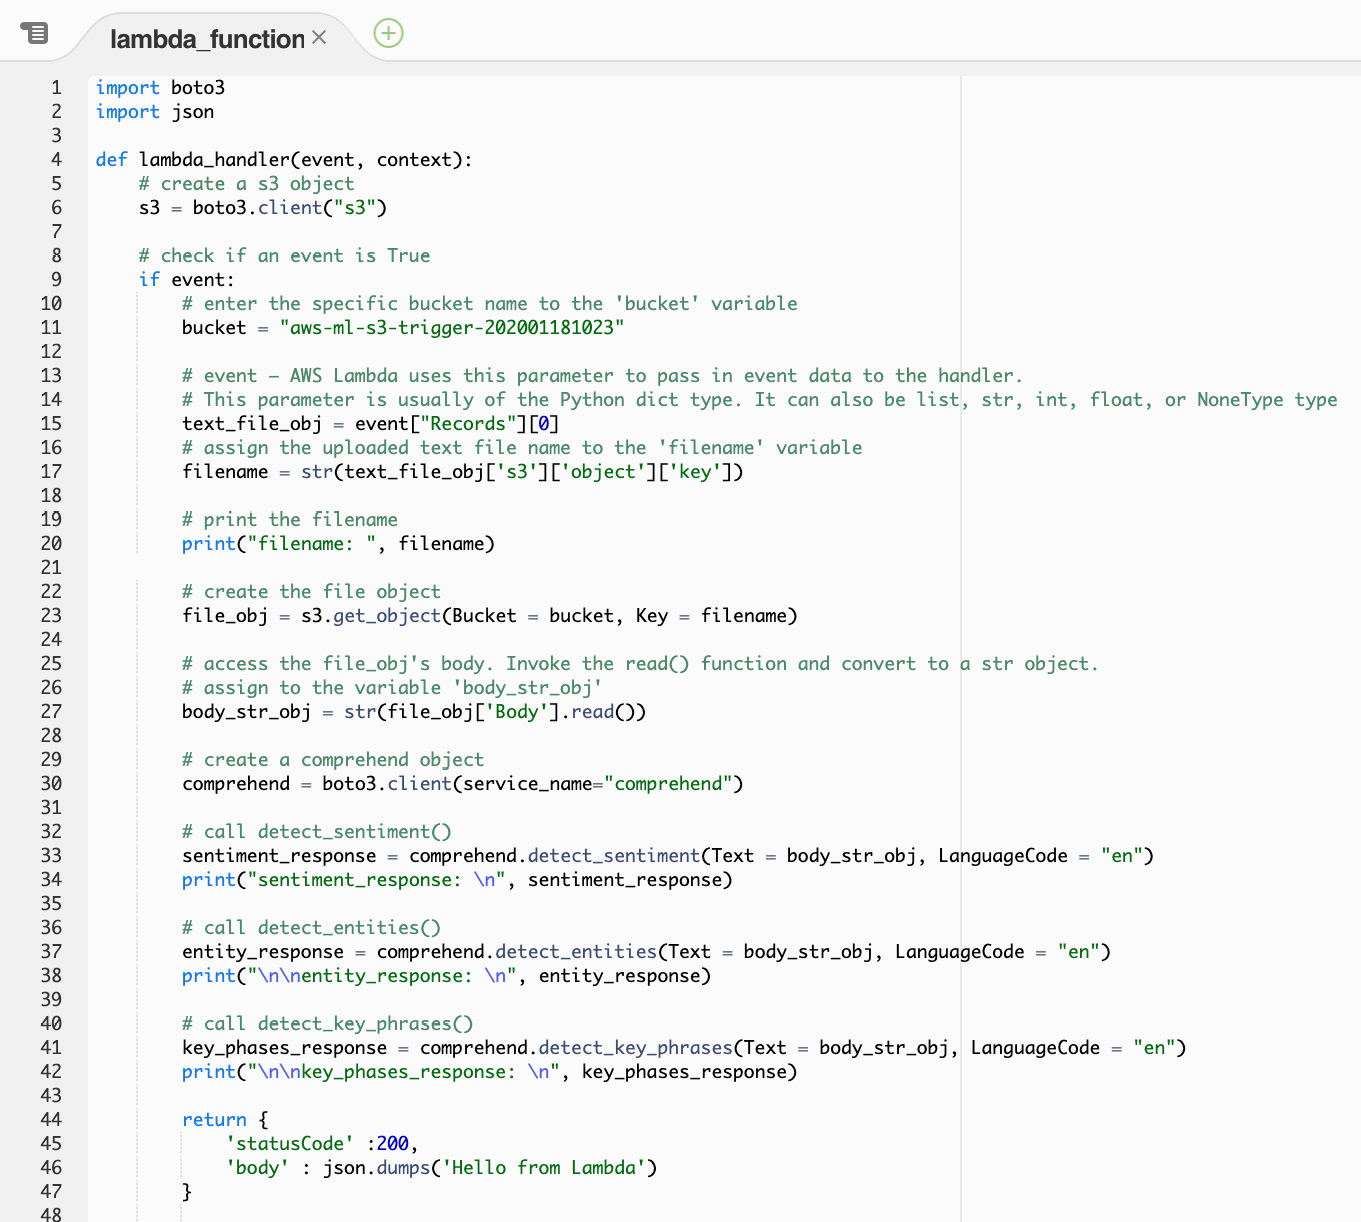
Figure 2.39: AWS Lambda – save screen
From this exercise, the s3_trigger function has access to S3, but not Amazon Comprehend. We need to attach a policy to the s3_trigger function to allow it to access Amazon Comprehend to execute the text analysis functions (detect_sentiment, detect_entities, and detect_key_phrases).
Exercise 2.08: Assigning Policies to S3_trigger to Access Comprehend
In this exercise, we will attach the policies to the S3_trigger function to allow it to access Comprehend. The steps for completion for assigning the policies are as follows:
- In the Amazon Management Console, click Services at the top left:
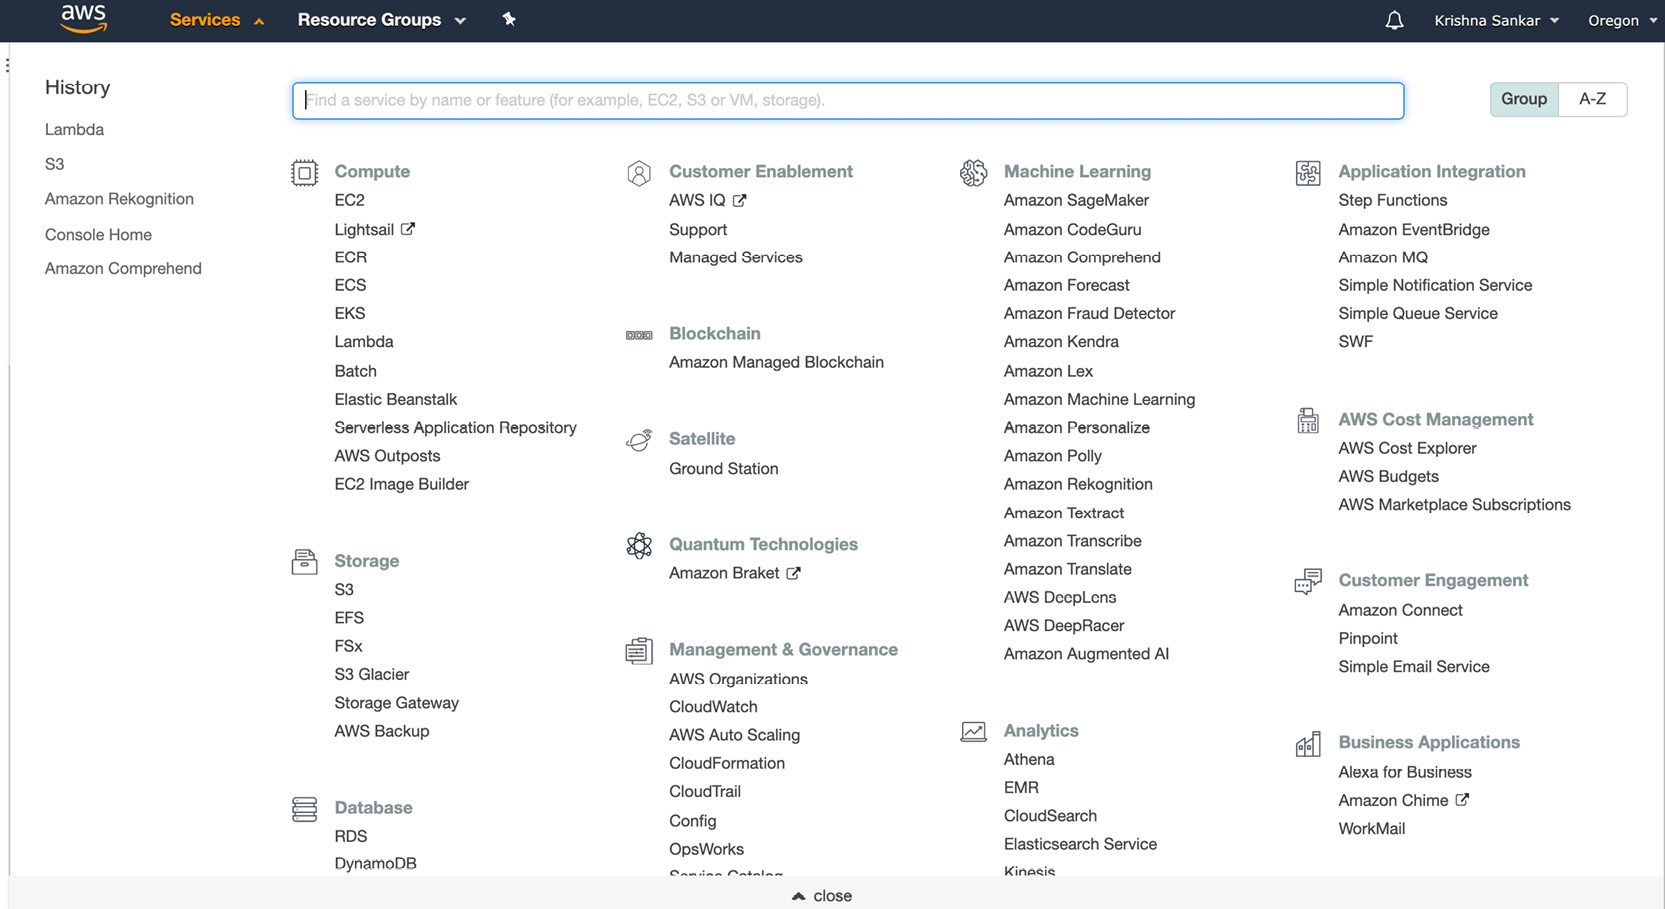
Figure 2.40: AWS Services from the AWS Management Console
- Navigate to the Identity and Access Management dashboard in the Security, Identity, & Compliance section. You can also type IAM and select it from the dropdown:
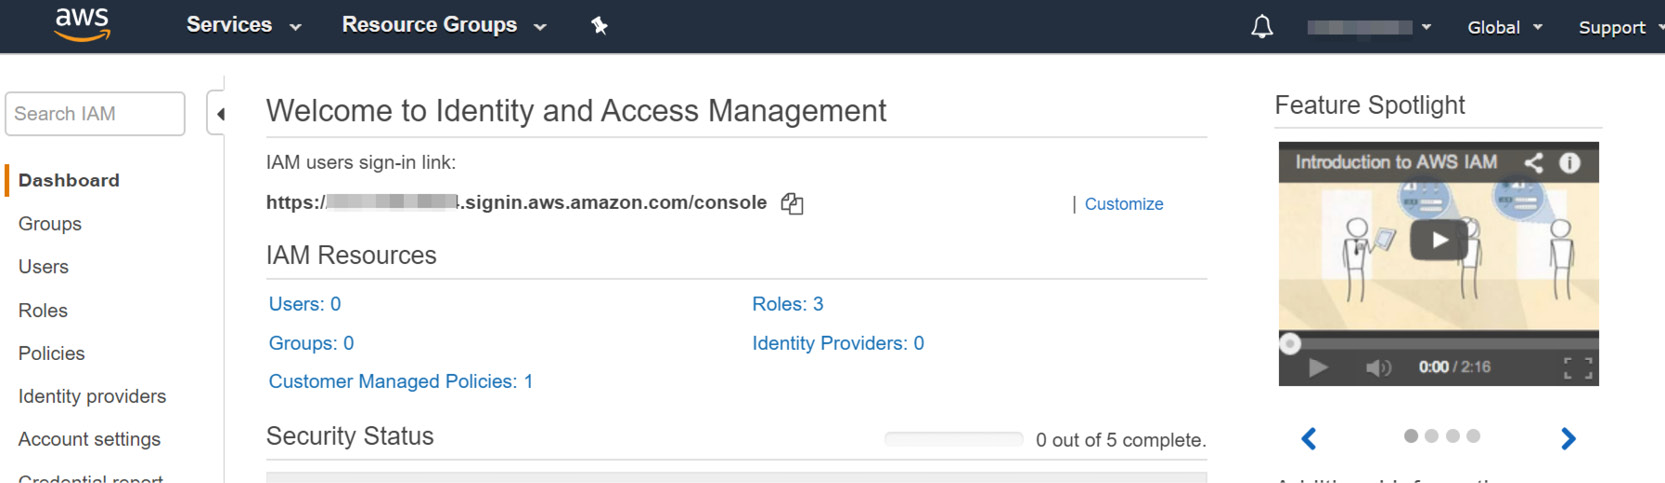
Figure 2.41: IAM dashboard
- Now, once you get to the IAM dashboard, click Roles:
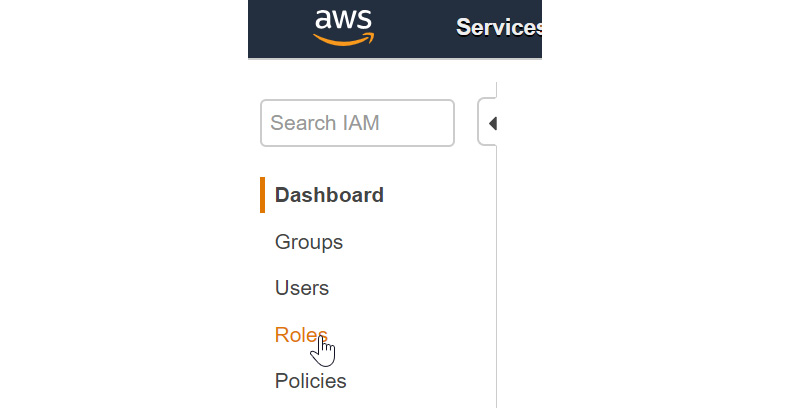
Figure 2.42: Left-hand side of the IAM dashboard
- Now, the screen will be populated with the role list. Click s3TriggerRole in the role list:
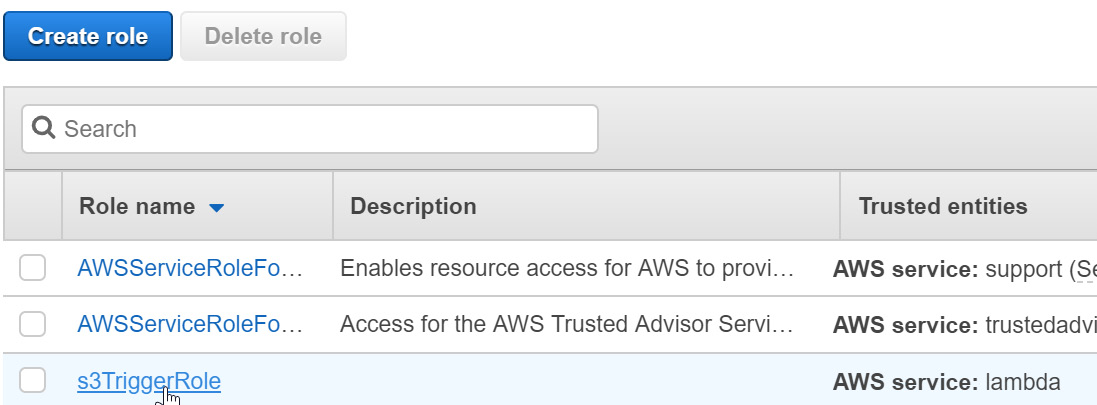
Figure 2.43: Role list—selecting s3TriggerRole
- The s3TriggerRole option will be enabled. Then, click Attach policies:
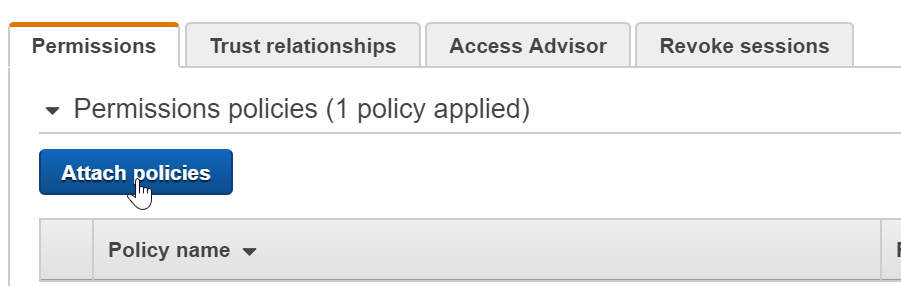
Figure 2.44: Permissions tab for s3TriggerRole
- Type Comprehend to filter the policies. Then, click the checkbox next to ComprehendFullAccess:
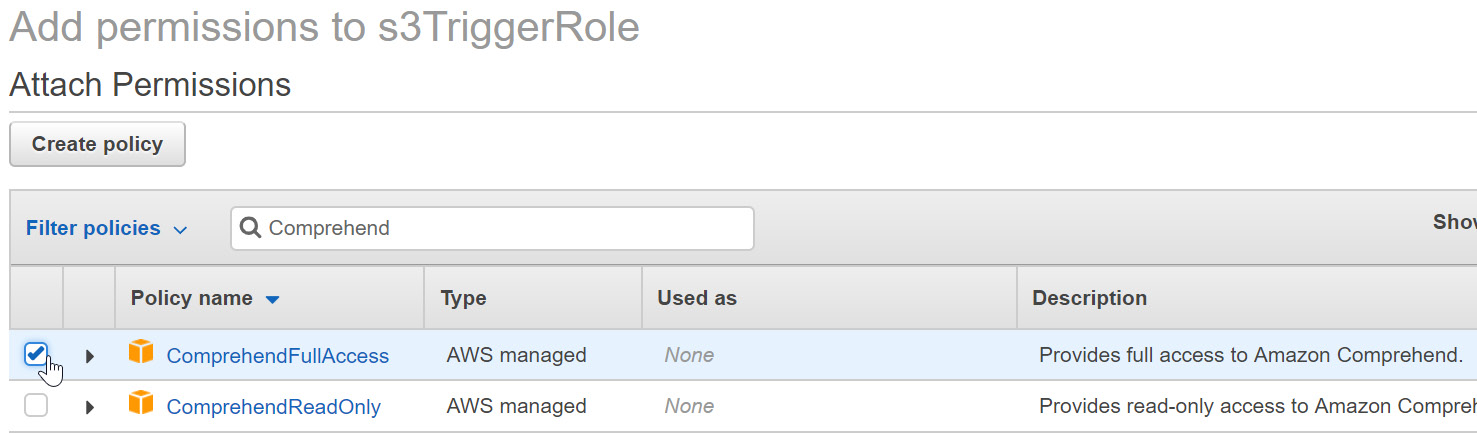
Figure 2.45: ComprehendFullAccess policy selection
- Once you have selected the checkbox, click Attach policy (located in the lower right-hand corner of the screen):
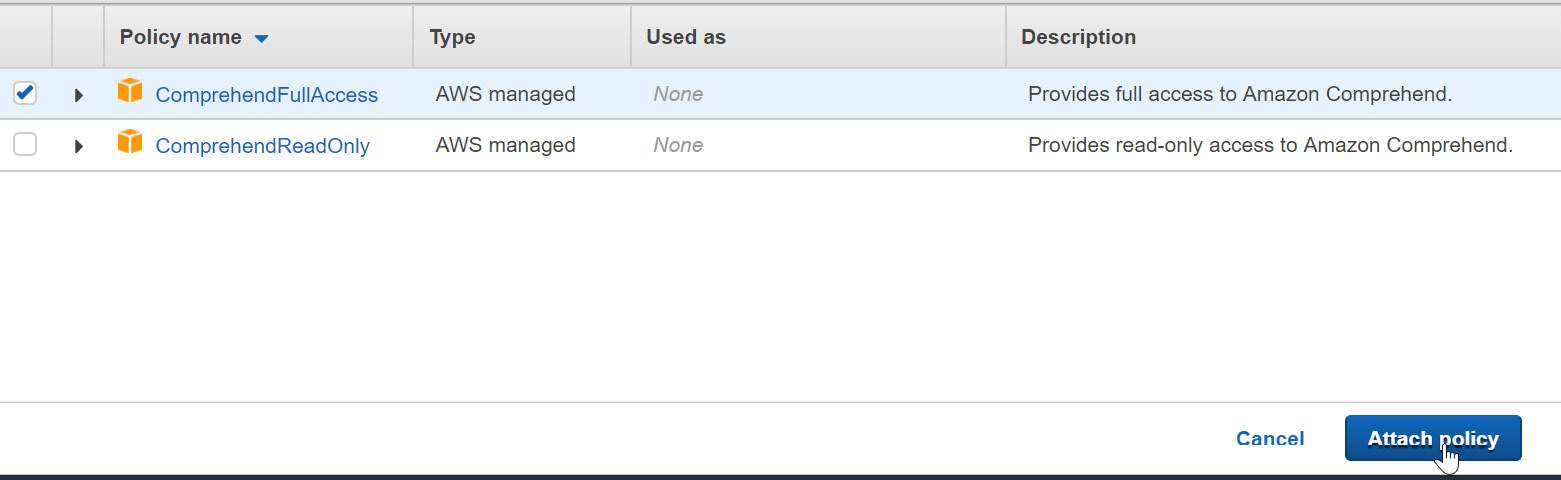
Figure 2.46: Attaching the selected policies
- You will be redirected to the s3TriggerRole screen, and you will receive the following message:
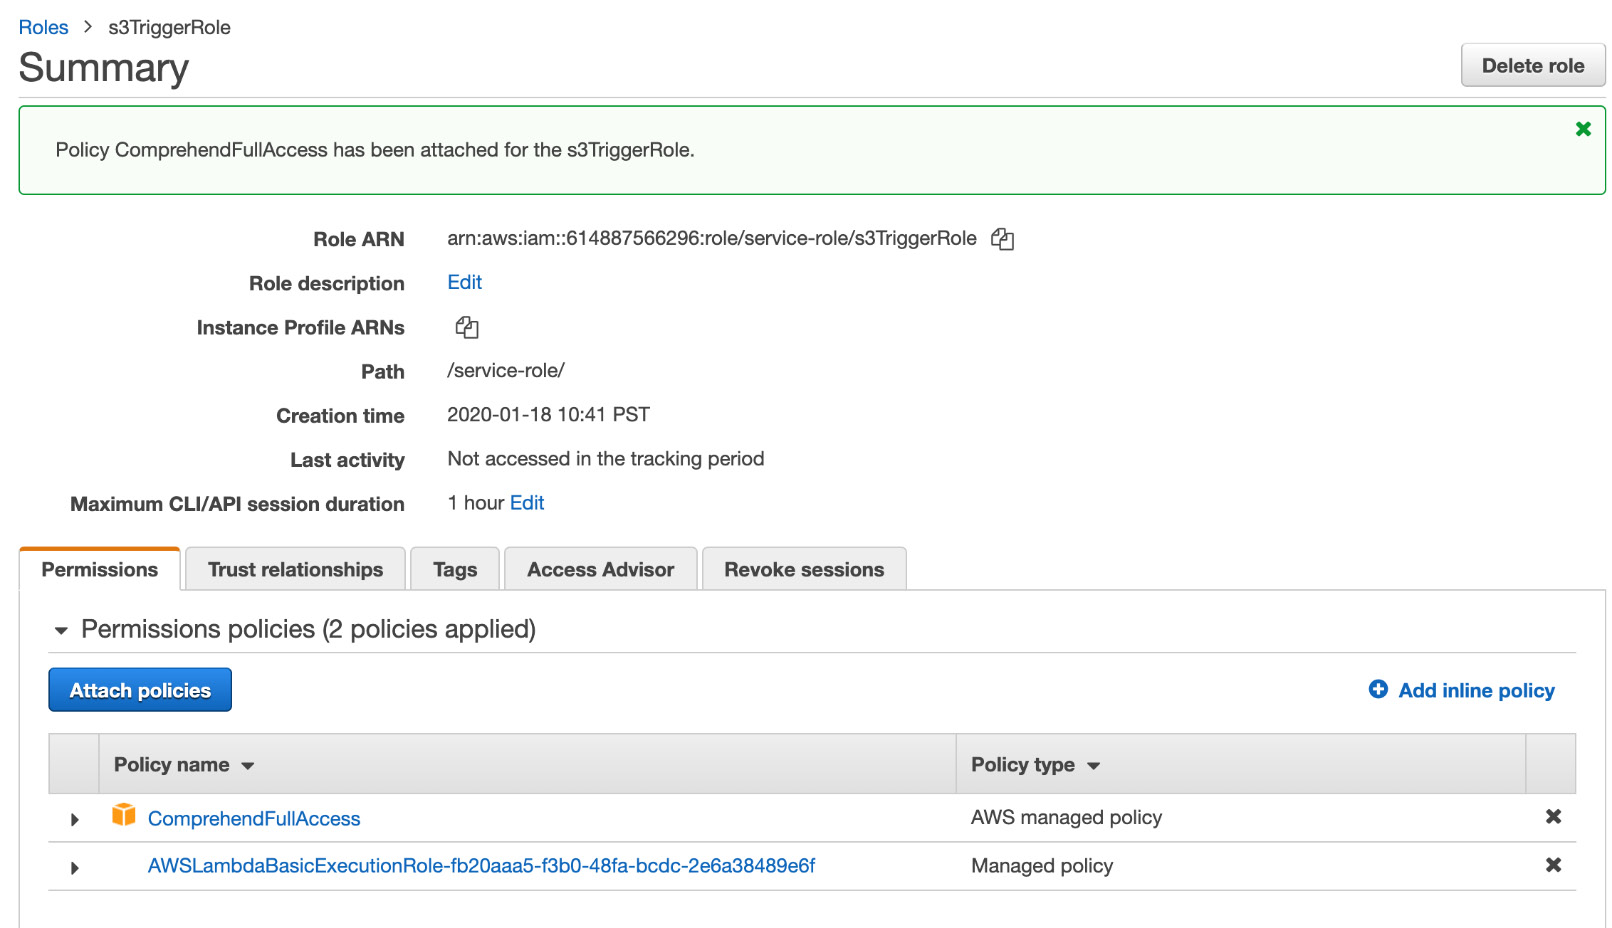
Figure 2.47: Successfully attached policies message
With that, we have successfully attached the policies to the S3_trigger function thus allowing it to access Comprehend.
Activity 2.01: Integrating Lambda with Amazon Comprehend to Perform Text Analysis
In this activity, we will integrate the Lambda functions with Comprehend to perform text analysis (detect_sentiment, detect_entities, and detect_key_phrases) when a document is uploaded to S3.
Suppose that you are creating a chatbot. You have identified a business topic and the corresponding text documents, with content that will allow the chatbot to make your business successful. Your next step is to integrate the Lambda functions with Comprehend, for sentiment, key phrases, and entities. To ensure that this happens correctly, you will need to have test_s3trigger_configured.txt.
Note
The test_s3trigger_configured.txt file can be found on GitHub at link https://packt.live/3gAxqku.
Before you execute s3_trigger, consider the output, based on the following aspects of the text: sentiment (positive, negative, or neutral), entities (quantity, person, place, and so on), and key phrases:
- First, navigate to the S3_trigger Lambda function.
- Add test_s3trigger_configured.txt to the S3 bucket, to verify the Lambda S3_trigger function.
- Now, upload the file into the bucket and monitor the file.
- Next, click View logs in CloudWatch by using the log stream.
- Now, expand the output in a text format.
The following will be the output:
Sentiment_response -> Classified as 60.0% likely to be positive
Sentiment_response:
{'Sentiment': 'POSITIVE',
'SentimentScore':{'Positive': 0.6005121469497681,
'Negative': 0.029164031147956848,
'Neutral': 0.3588017225265503,
'Mixed': 0.01152205839753151},
entity_response -> Classified as 70.5% likely to be a quantity
entity_response:
{Entities':[{'Score':0.7053232192993164,
'Type': 'QUANTITY','Text': '3 trigger',
'BeginOffset': 35, 'EndOffset': 44}],
key_phases_response -> Classified as 89.9% likely "a test file" and 98.5% likely "the s3 trigger" are the key phrases:
key_phases_response:
{'KeyPhrases': [{'Score': 0.8986637592315674,
'Text': 'a test file',
'BeginOffset': 8, 'EndOffset': 19},
{'Score': 0.9852105975151062,
'Text': 'the s3 trigger', 'BeginOffset': 30,
'EndOffset': 44}],
Note
The solution for this activity can be found on page 279.
Amazon Textract
Another interesting NLP Amazon service is Textract. Essentially, Textract can extract information from documents, usually business documents such as tax forms, legal documents, medical forms, bank forms, patent registrations, and so forth. It is an optical character recognition (OCR) solution for scanning structured documents, suitable for robotic process automation (RPA). Textract is a relatively new service—previewed in November 2018 and generally available in May 2019.
The advantage of Textract is that it understands documents and can extract tables and/or key-value pairs suitable for downstream processing. A lot of business processes, such as health insurance processing, tax preparation, loan application processing, monitoring and evaluation of existing loans, compliance evaluation, and engineering evaluations take in these documents, usually processing them manually to extract information and then start digital processes. Using Amazon Textract, the manual intake of various documents can be automated, resulting in a faster turnaround when approving loans, accelerated processing of health claims, or approving an engineering design quickly, thus achieving good business value.
Exercise 2.09: Extracting Tax Information Using Amazon Textract
In this exercise, you will take a page of a sample tax return document from documentcloud.org (https://www.documentcloud.org/documents/3462212-Sample-2016-Tax-Return.html) and see how much information Textract can extract:
Note
The sample document (page 1 of US Tax form 1040) is available at https://packt.live/2O5e1Mn.
- For this exercise, we will use the Textract interface directly. This is very useful to try out and to see how a document is amenable to OCR.
- First, go to the Textract dashboard by selecting Services | Machine Learning | Amazon Textract. There are lots of interesting details on that page. Take the time to read through the materials:
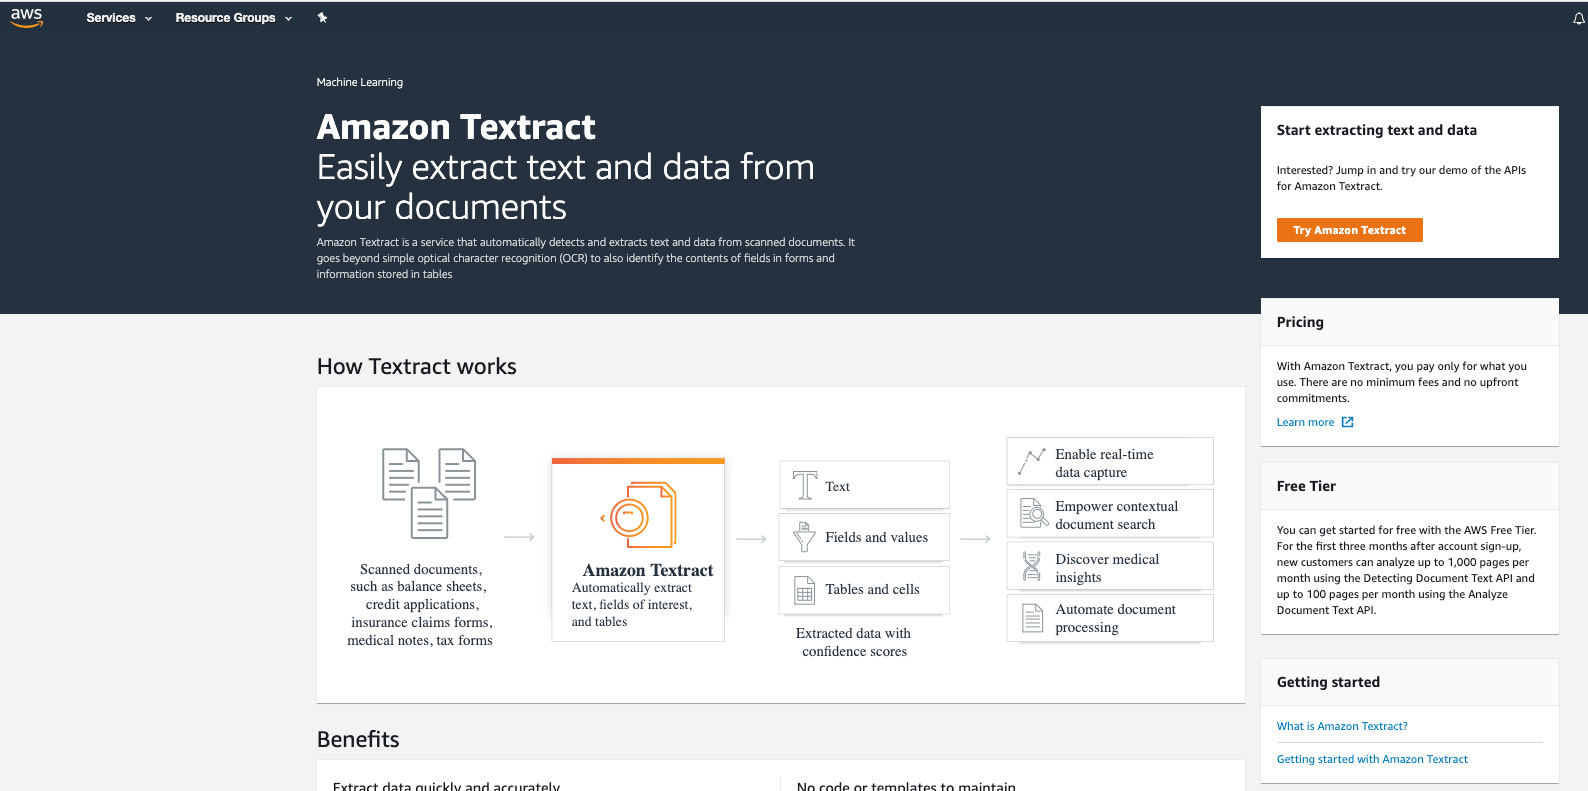
Figure 2.48: Amazon Textract dashboard
- Click Try Amazon Textract. A very simple utilitarian page appears:
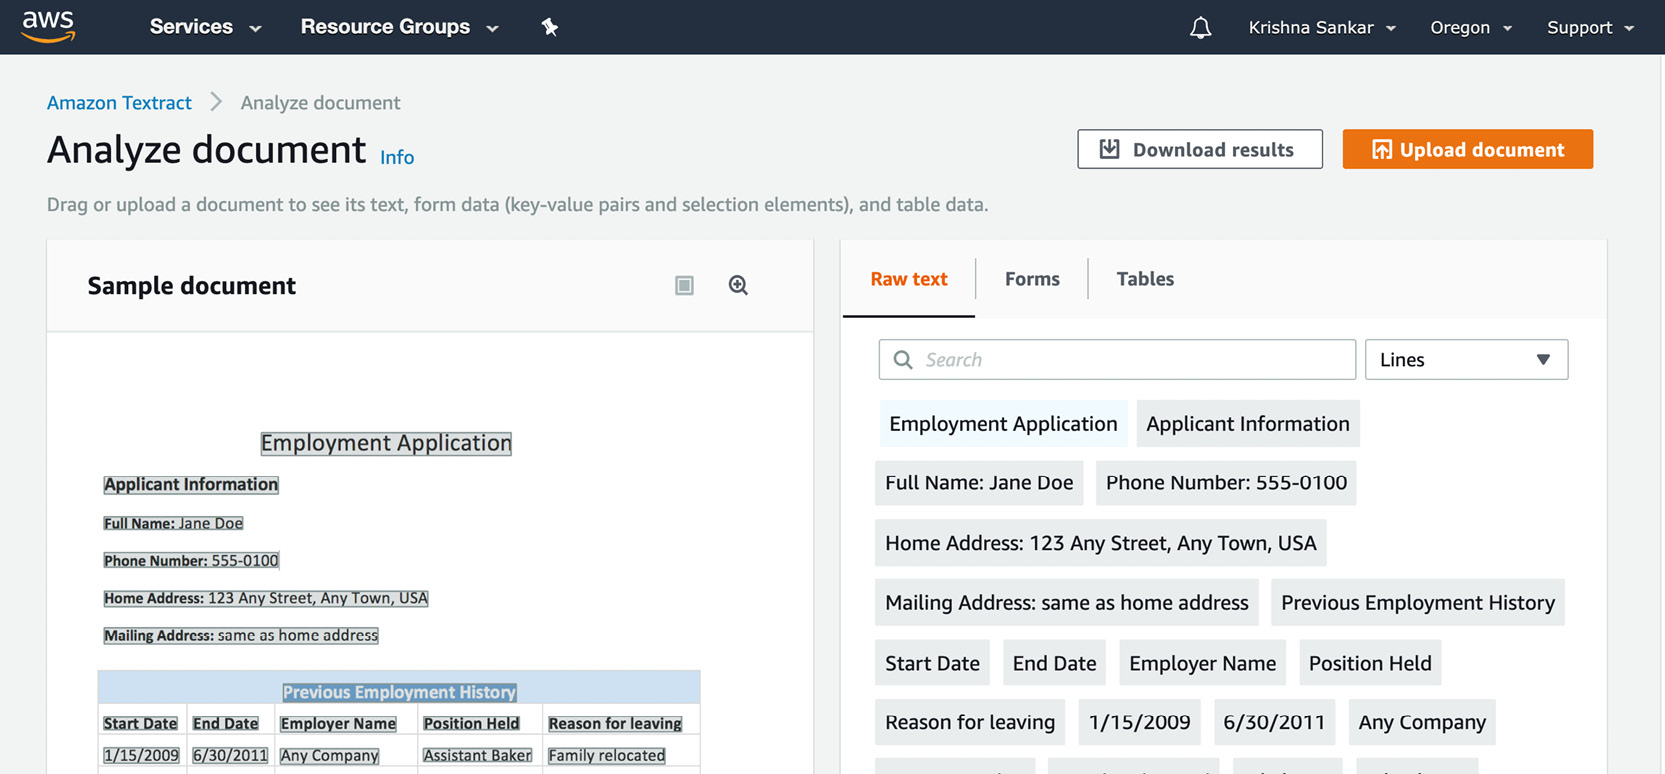
Figure 2.49: Amazon Textract Analyze document
- Click Upload document and upload the Sample-2016-Tax-Return.jpeg file. The service thinks for a minute and shows very informative tabs and the information it has extracted:
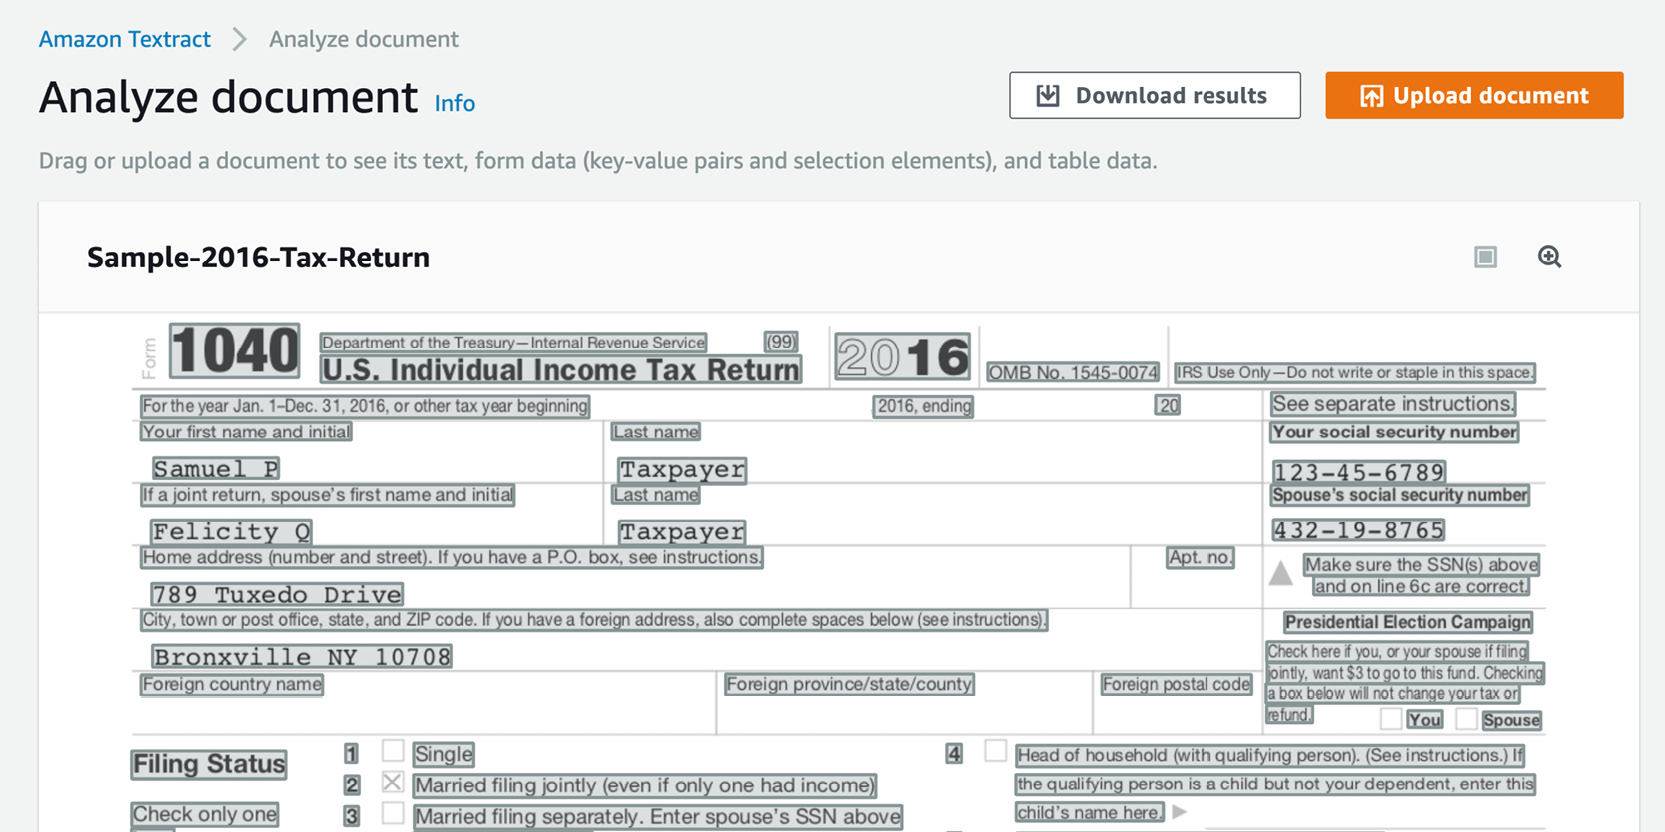
Figure 2.50: Amazon Textract Analyze document screen with the sample tax form
The raw text is interesting, but we are looking for more value for our automation pipeline.
- Click the Forms tab and you will see a very interesting page—it can get the value as well as the key. For example, line 7 is extracted as 7 Wages, salaries, tips, etc. Attach Form(s) W-2 7 and a value of 93,500. Now, a downstream loan processing application can get the value as well as the context and act on it.
You can click other fields on the image on the left-hand side and see the extracted entry on the right-hand side.
You can download the results as JSON, CSV, table, and text formats. As expected, keyvalues.csv has the line 7 we saw earlier as the key and 93,500 as the value:
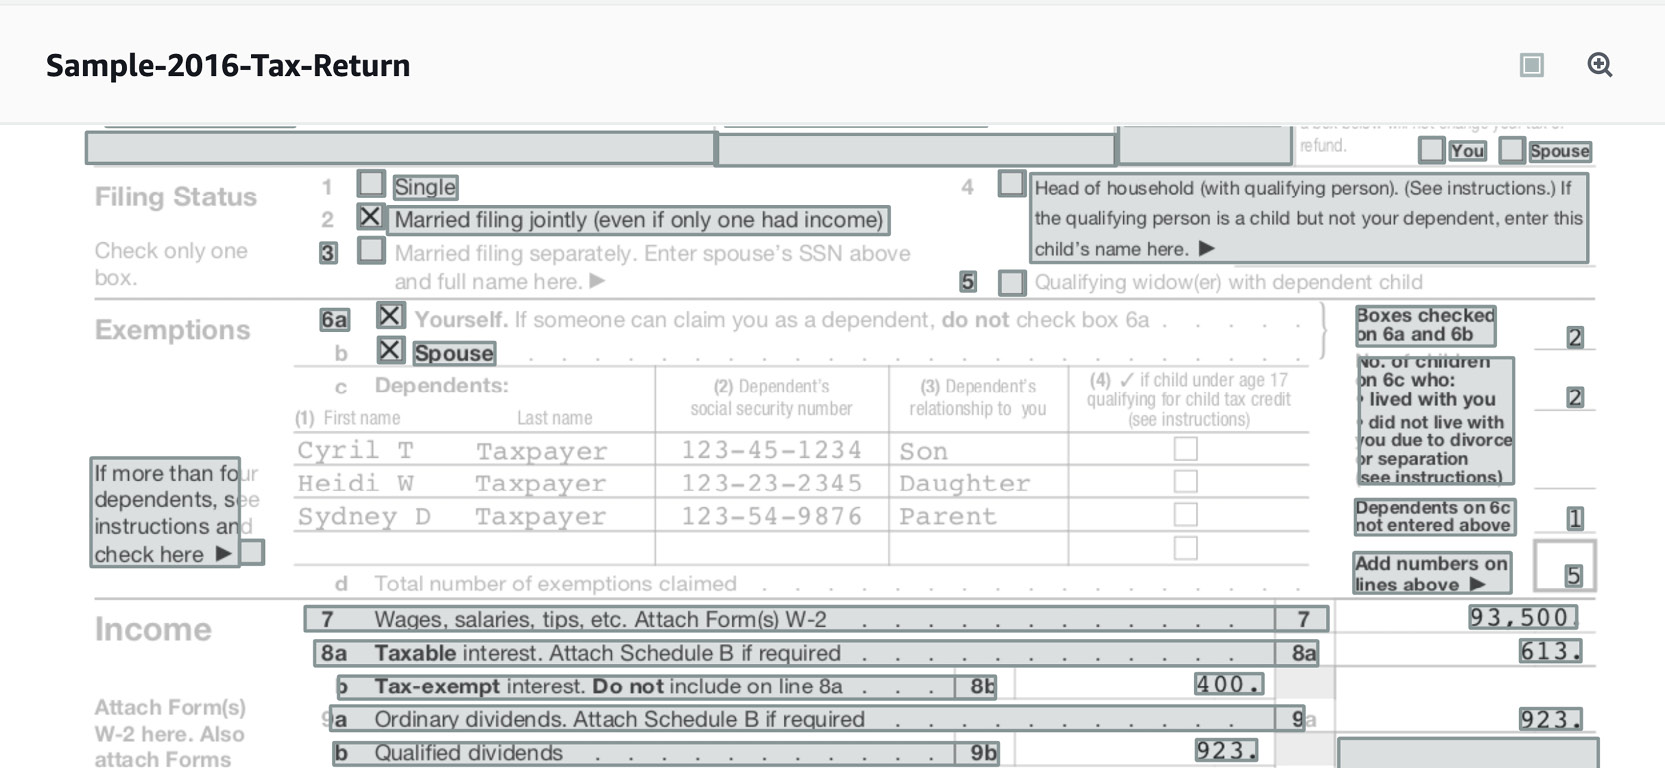
Figure 2.51: Amazon Textract Analyze document screen with the sample tax document form
- You can see the extracted fields in a table format (with the keys as the caption and the value in the grey box under the captions) as shown below:
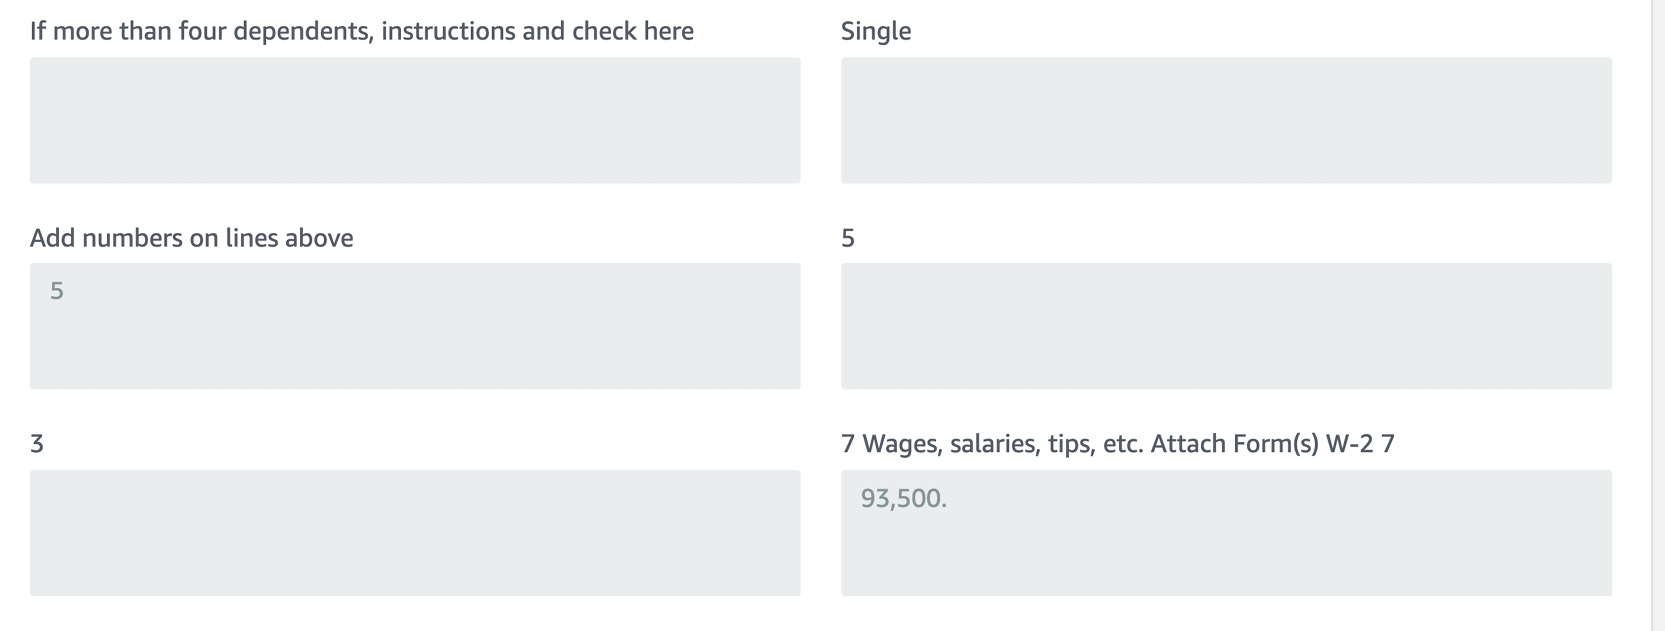
Figure 2.52: Amazon Textract Analyze document screen with the sample tax document Forms tab showing the key value
- The Tables tab is also interesting. Textract was able to extract two tables—the top and the bottom portion—but was not able to extract the middle one:
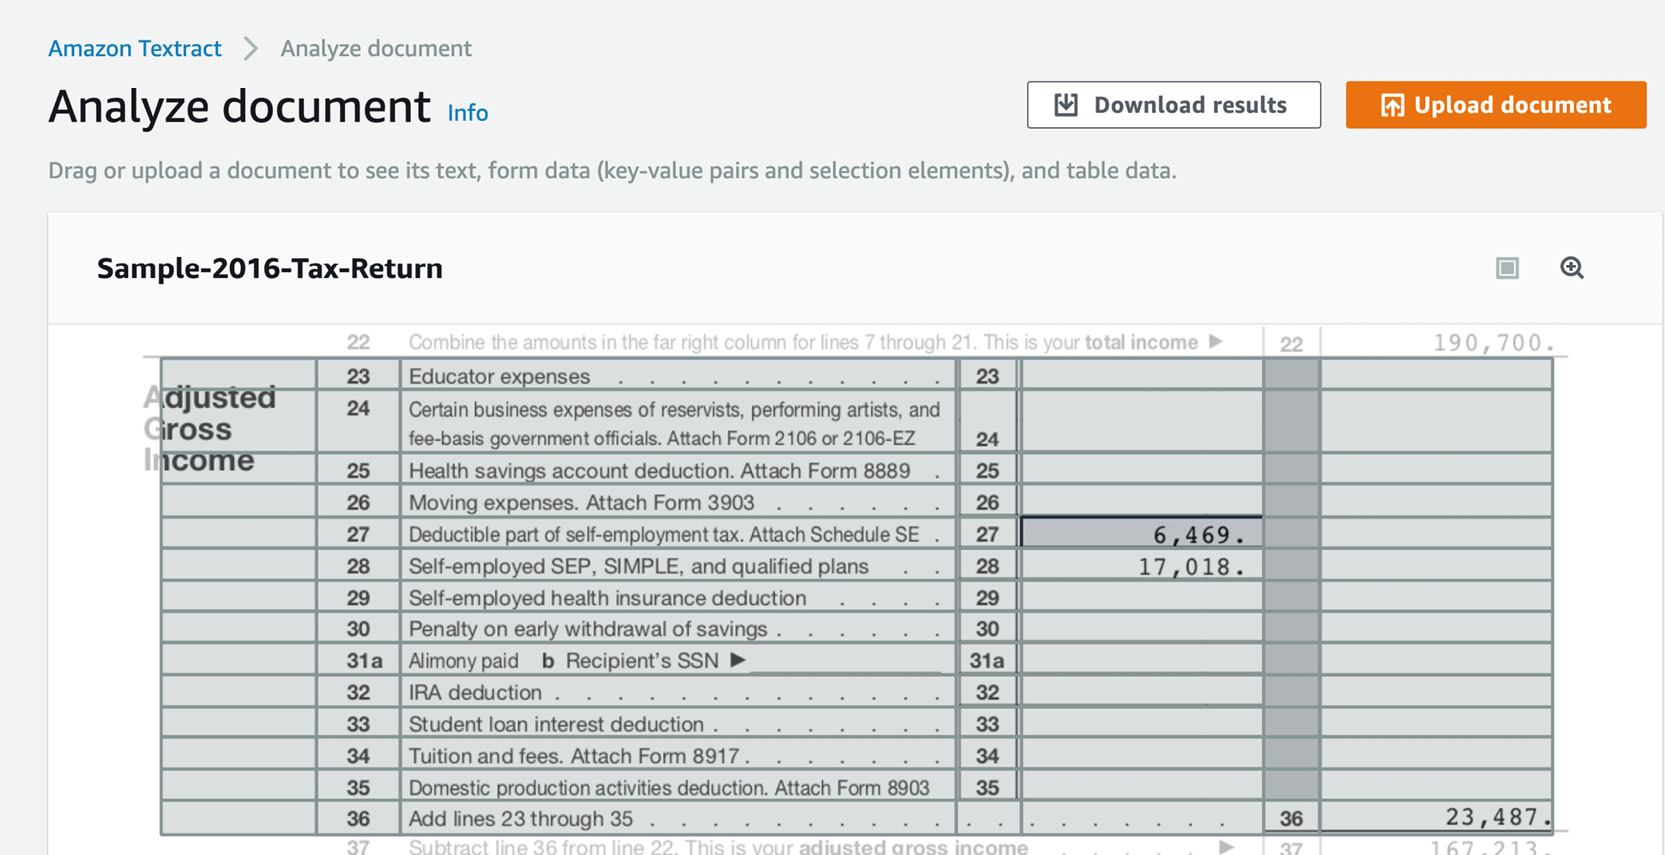
Figure 2.53: Amazon Textract Analyze document screen with the sample tax form showing Tables (form)
- You can see the extracted fields in a table format by clicking the Tables tab:
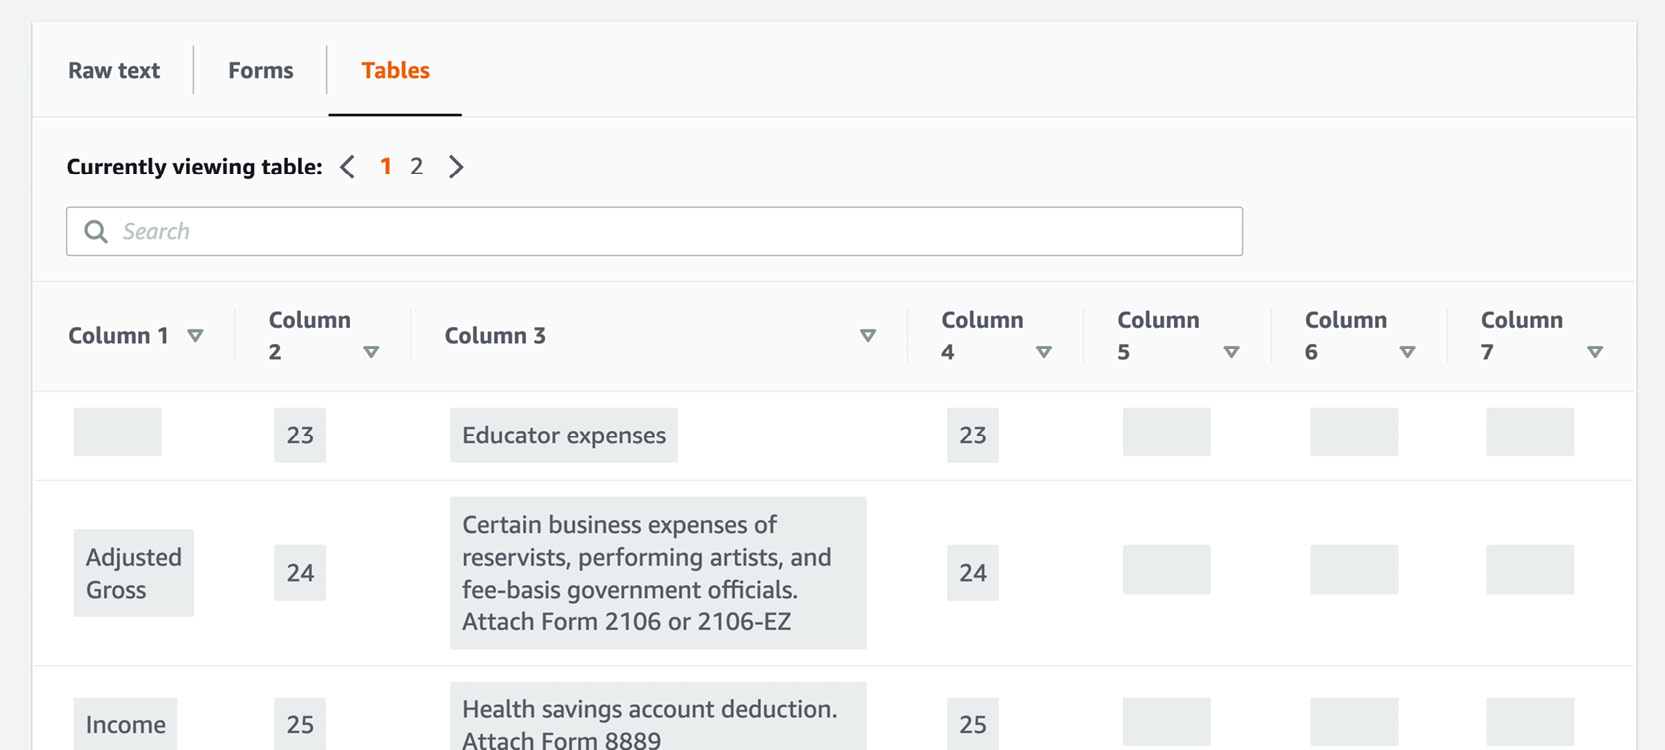
Figure 2.54: Amazon Textract Analyze document screen with the sample tax form showing Tables (extracted)
Now that you have a feel for what Textract can do, another useful exercise would be to develop a loan processing pipeline using Lambda. When page 1 of US Tax 1040 is dropped into an S3 bucket as a JPEG file, trigger a Lambda that takes the file and invokes Textract and stores the key-value file as a CSV in another bucket. If you feel adventurous, you can develop another Lambda downstream of Textract that gets triggered when the output file is created, and it can either alert a loan officer via SMS or a queue or even a mobile app alert.
Summary
In this chapter, we started with high-level concepts around Amazon AI services and serverless computing. On a conceptual level, you learned about serverless computing as well as the various AI services available on the AWS platform.
Overall, the culmination of these independent functions provides the foundation for building complex machine learning-based NLP applications (for example, Siri, Alexa, and so on). Knowing how and why the individual functions operate will allow you to build your own AWS-based NLP applications.
Then, we dived into the details of Amazon Comprehend—how Comprehend's DetectDominantLanguage method is structured, and how to pass in both strings and a list of strings. You learned how to extract entities, sentiments, key phrases, and topics, which provide the data for complex NLP. This allows Amazon Comprehend to become more efficient by automating text analysis upon a text document that's been uploaded to S3.
You also learned how to use Amazon Textract to extract structured information (tables and key-value pairs) out of scanned documents as a prelude to process automation.
In the next chapter, we will explore topic modeling and perform theme extraction.