
Chapter 6: Understanding Different Control Flows
To create robust automation workflows using UiPath Studio, you must understand how to control the project efficiently using control flows. UiPath provides a lot of control flow activities so that you can effectively drive the automation workflows of the project. Control flows provide the robot with more power so that it can make decisions while evaluating any business conditions as it's being executed. In this chapter, we will learn about these essential skills by covering important control flow activities using real-time examples.
In this chapter, we will cover the following topics:
- Overview of control flows
- What are sequences?
- What are flowcharts?
- Exploring decisions and types of decisions
- Exploring loops and types of loops
By the end of this chapter, you will be able to understand all the key concepts behind control flows and be able to implement these ideas in your robots.
Technical requirements
To work on control flows, you need to have UiPath Studio and UiPath Robot installed.
For this chapter, you will need a general idea of how to use Studio and Robot. Please refer to Chapter 2, UiPath Ecosystem, and Chapter 5, Learning about Variables and Arguments, to learn about the basics of UiPath Studio.
Overview of control flows
Control flows are activities that are used to convert the decision requirements into business workflows in UiPath. In an RPA project, control flows are sequentially executed on RPA code. This code may contain UiPath activities, control statements, and workflows. There are two key workflows in an RPA project, as follows:
- Sequence: Sequence workflows are easy to read, and they are executed from top to bottom or executed in a sequence of activities. They are mainly used in simple or linear business processes, which involve performing a sequence of automation executions once for the given input data.
- Flowchart: Flowchart business processes are used to address complex business requirements that involve many decision points and complex logic.
RPA workflows use control flow activities to drive the execution of statements. The most frequently used control activities are as follows:
- If: This activity is used to verify a condition and the outcome is either True or False. It's useful for making decisions based on the input value of the variables. This rule uses the If-Then-Else rule to evaluate any given input. For example, if you want to check a voter's eligibility by reading the value from the Age field, you need to evaluate the business condition if the given age is greater than or equal to 18 to find their eligibility status, as shown in the following screenshot:
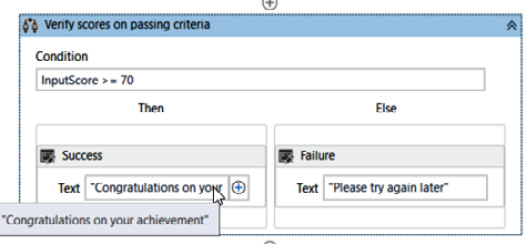
Figure 6.1 – Example of If-Then-Else
- Loops: These are used to verify a set of statements based on a conditional requirement or to execute statements multiple times until a certain condition is satisfied. The key loops are DoWhile, While, and For Each.
- Switch: This activity is used when there are more than two decision points and corresponding actions must be performed on each decision outcome.
In this section, we provided a high-level overview of control flows. We'll explore control flows in more detail in the upcoming sections.
What are sequences?
Sequences are easy to understand, and they are the simplest type of project. They are commonly used in processes that are linear and have step-by-step instructions to be performed one after the other in a single block of activity. The main use of sequences is reusability, in that they can be used in a single workflow or invoked from any other automation workflows by passing the arguments that we will discuss in Chapter 5, Learning about Variables and Arguments.
For example, you can create a sequence that takes information from a spreadsheet and enter it into a registration web page. Let's explore an example.
Example of a sequence
In this example, we will create a sequence that asks for first name, last name, and age and then displays the answer in a sentence:
- Create a New Blank Process from the New Project section in UiPath Studio and name it Sequence_Example, as shown in the following screenshot:
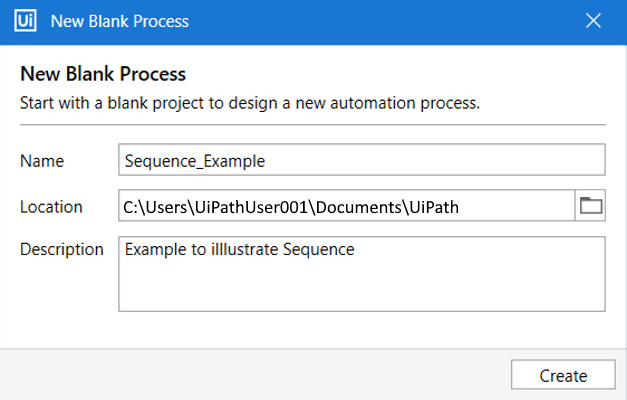
Figure 6.2 – Creating a New Blank Process
- Enter your preferred project Location to save the project.
- Enter details of the project in the Description field and click Create to create the Designer panel.
- Drag and drop the Sequence activity from the Activities panel into the Designer panel.
- Create three String variables called FirstName, LastName, and Age to store the information that's received from the user, as follows:

Figure 6.3 – Creating variables
- Drag three Input Dialog activities to the project's sequence, one after the other.
- Do the following to edit the properties of the Input Dialog so that it accepts and stores FirstName (these options are shown in the following screenshot):
- Set the Display Name property of the first Input Dialog to First Name.
- Set Dialog Title to "Enter First Name".
- Set Input Label to "What's your First Name?".
- Set Input Type to Text Box.
- Set Value entered to be stored in FirstName:
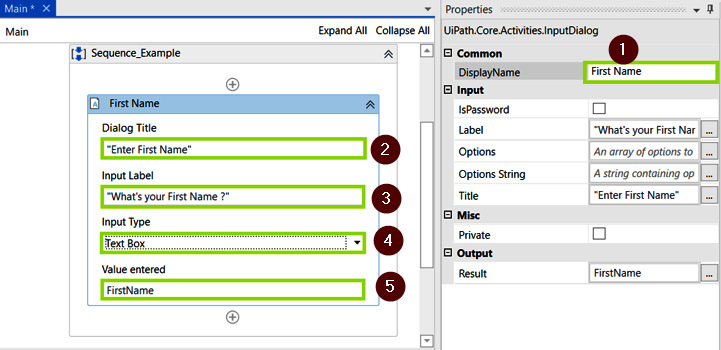
Figure 6.4 – Updating the Input Dialog properties – part 1
- Do the following to accept and store LastName (these options are shown in the following screenshot):
- Set the Display Name property of the second Input Dialog to Last Name.
- Set Dialog Title to "Enter Last Name".
- Set Input Label to "What's your Last Name?".
- Set Input Type to Text Box.
- Set Value entered to be stored in LastName:
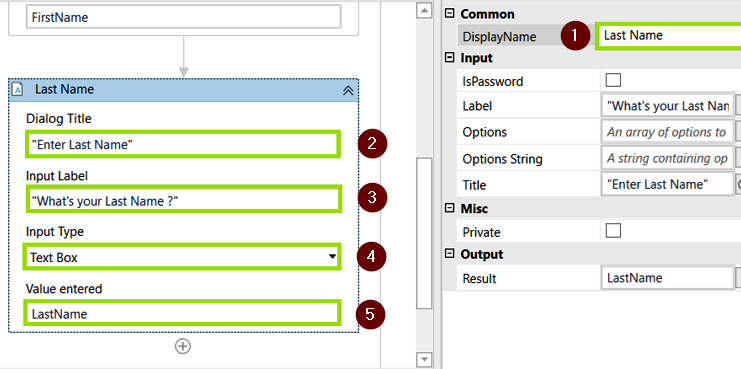
Figure 6.5 – Updating the Input Dialog properties – part 2
- Do the following to accept and store Age (these options are shown in the following screenshot):
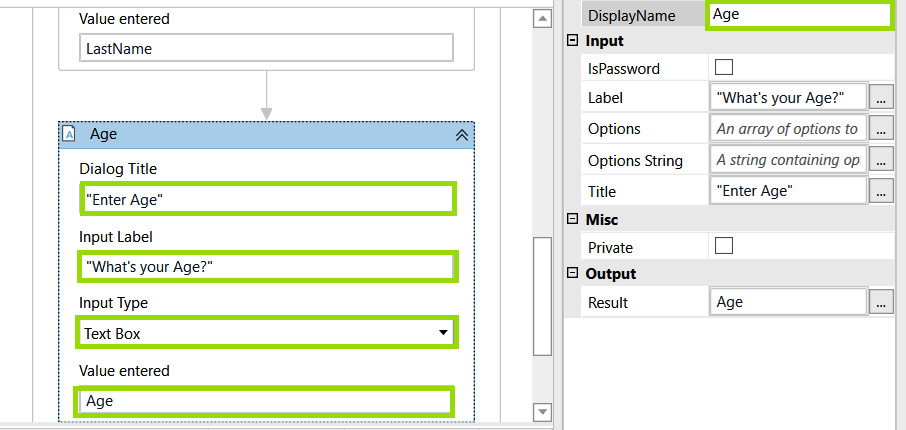
Figure 6.6 – Updating the Input Dialog properties – part 3
- Drag a Message Box activity to the sequence and change Text from the Properties section so that it includes "The Age of " + FirstName + " " + LastName + " is " + Age +".", as shown in the following screenshot:
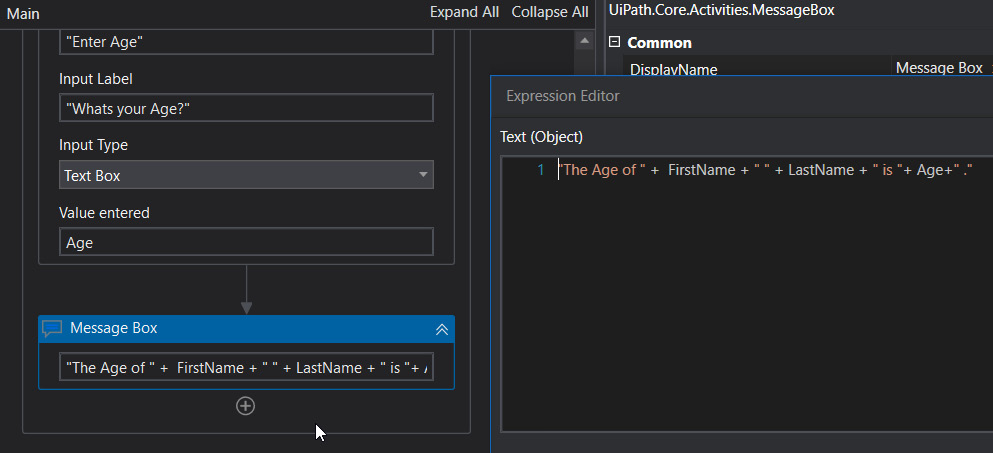
Figure 6.7 – A Message Box activity
The project outline sequence should look as follows:
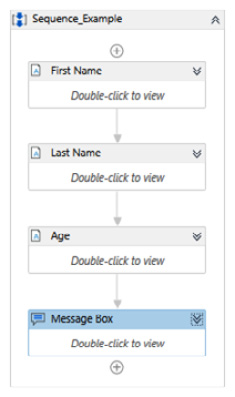
Figure 6.8 – Sequence outline
- Click the Run button from the Design tab and follow the prompts to enter your input to ensure the final output looks as follows:
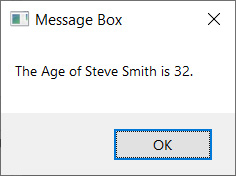
Figure 6.9 – Output Message Box
In this section, we learned how sequences can be used in automation. In the next section, we will explore other control flow options.
What are flowcharts?
Flowcharts are used in project settings where the business processes are complex and have multiple decision points. Flowcharts support multiple logical branching using various types of activities such as If/Else, loops, and switches.
For example, you can create a flowchart that takes input information, such as Year, from a user through an Input Text Box and verify whether it is a leap year. In this example, it can have two possible outcomes. One is leap year, while the other is not a leap year based on the input provided. Let's look at an example.
Example of a flowchart
In this section, we will create a flowchart example that identifies whether a given year is a leap year. Perform the following steps to build the automation using a flowchart:
- Create a New Blank Process from the New Project section in UiPath Studio and name it Flowchart_Example, as shown in the following screenshot:
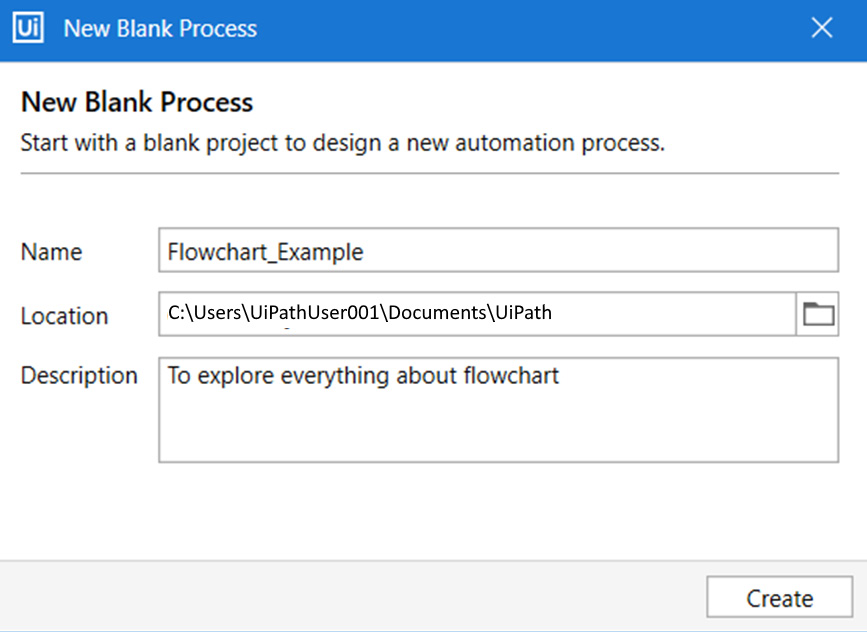
Figure 6.10 – Creating a New Blank Process
- Enter your preferred project Location to save the project.
- Enter details in the Description field and click Create to create the Designer panel.
- Click New > Flowchart from the Design tab and set Name to LeapYear, as shown in the following screenshot:
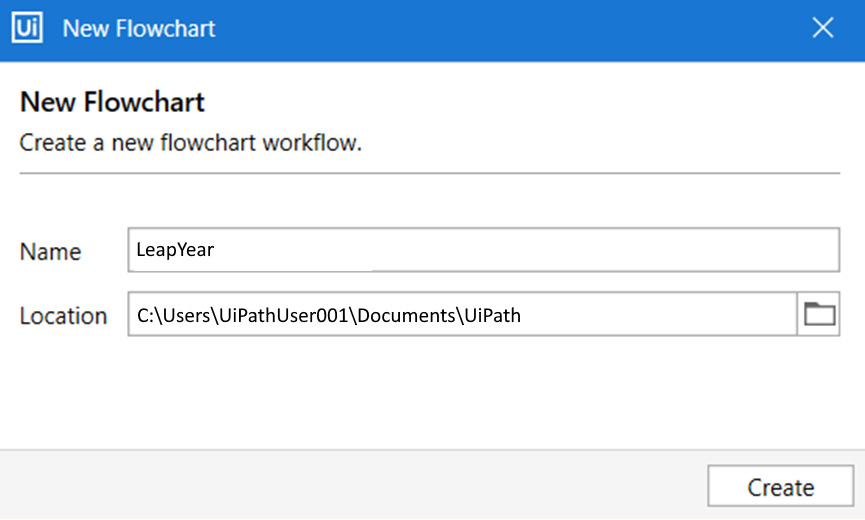
Figure 6.11 – New Flowchart
- Click Create to update the Designer view, as shown in the following screenshot:
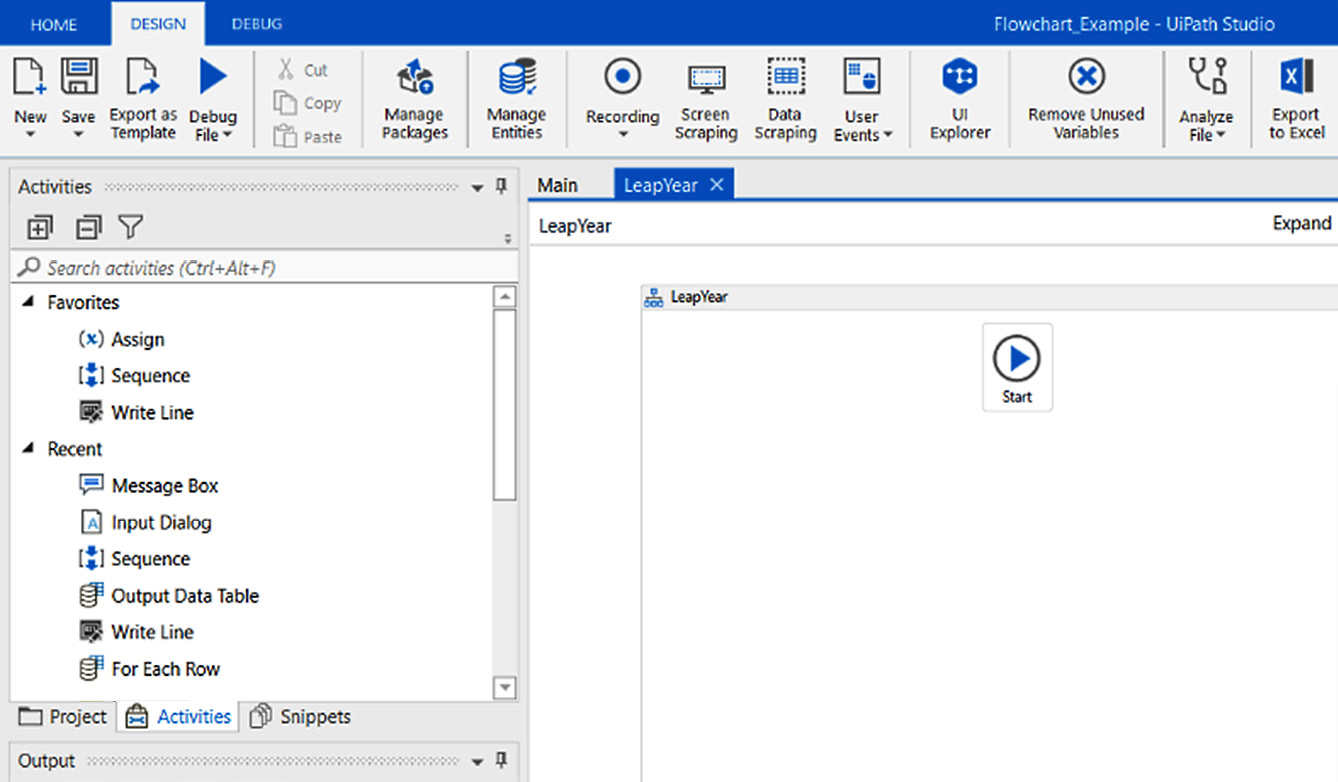
Figure 6.12 – The Flowchart Designer view
- Create a Name variable called inputYear and a Variable type called Int32 to store the information that's received from the user, as follows:

Figure 6.13 – Creating a variable
- Drag an Input Dialog activity onto the project flowchart, as follows:
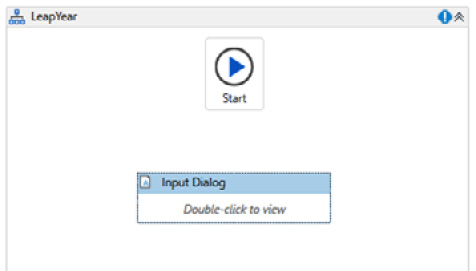
Figure 6.14 – Input Dialog
- Do the following to accept and store Input Year, as shown in the following screenshot:
- Set Dialog Title to "Input Year".
- Set Input Label to "What's the Input Year?".
- Set Input Type to Text Box.
- Set Value entered to be stored in inputYear:
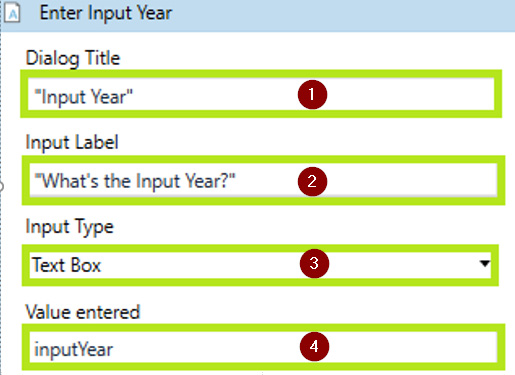
Figure 6.15 – Updating the Input Dialog properties
- Connect the Start node to your Input Dialog by dragging the pointer, as shown in the following screenshot:

Figure 6.16 – Connecting the Input Dialog
- Drag a Flow Decision activity and place it next to your Input Dialog.
- Click on Flow Decision and, in the Condition field, enter "inputYear mod 4 = 0" as a VB expression to verify whether the given input is a leap year. Otherwise, it is not a leap year, as shown in the following screenshot:
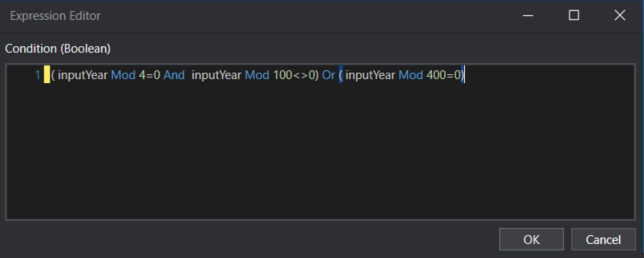
Figure 6.17– Updating the condition in the Condition (Boolean) panel
- Drag a Message box activity to the True side of the flow decision and add a message stating "The given year " + inputYear.ToString + " is a Leap Year" to the Text field of Properties, as shown here:
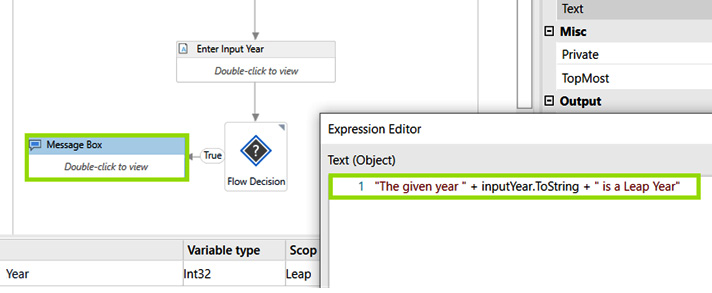
Figure 6.18 – True decision message box
- Drag a Message box activity to the False side of the flow decision and add a message stating "The given year " + inputYear.ToString + " is not a Leap Year" to the Text field of Properties, as shown here:
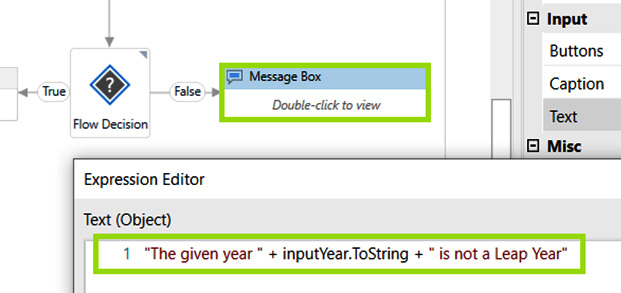
Figure 6.19 – False decision message box
The project's outline flowchart should look as follows:
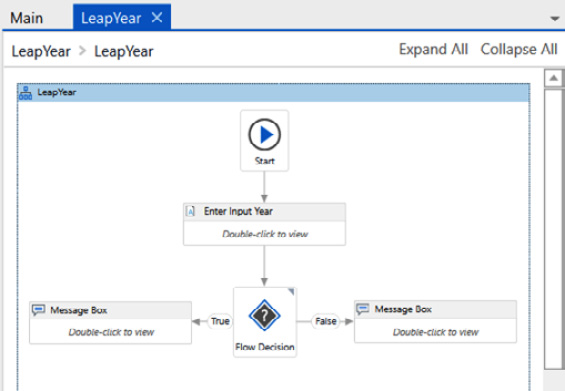
Figure 6.20 – Flowchart outline
- Click the Run button from the Design tab and follow the prompts to enter your input. The final output should look as follows for a leap year:
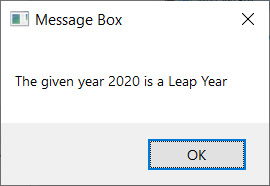
Figure 6.21 – Final true decision output message
- Click the Run button from the Design tab and follow the prompts to enter your input so that the final output looks as follows when it is not a leap year:
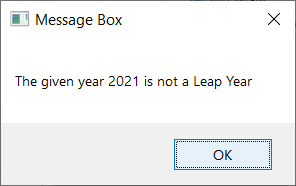
Figure 6.22 – Final false decision output message
So far, we have seen how sequences and flowcharts can be used in the Designer panel for automation using real-time examples. In the upcoming sections, we will learn how control flow activities can be used to enhance automation.
Exploring decisions and types of decisions
The decision activities allow you to control the execution of the data flow when a decision must be evaluated on a business scenario. Based on that, one of two actions must be performed. These two actions form the branches of the decision activity and are performed based on the outcome of the decision, which can be either True or False. In cases where multiple outcomes are expected, it is recommended that the Switch activity is used.
The If statement activity is used in a sequence, while a flow decision activity is used in a flowchart. For example, you can check for a specific value in some input text and act based on the outcome of the text. Let's look at this in more detail.
Example of an If activity
In this example, we will create a sequence that asks for an input number and then displays whether the given number is even or odd. Let's get started:
- Create a New Blank Process from the New Project section in UiPath Studio and name it Decision_Example, as shown in the following screenshot:
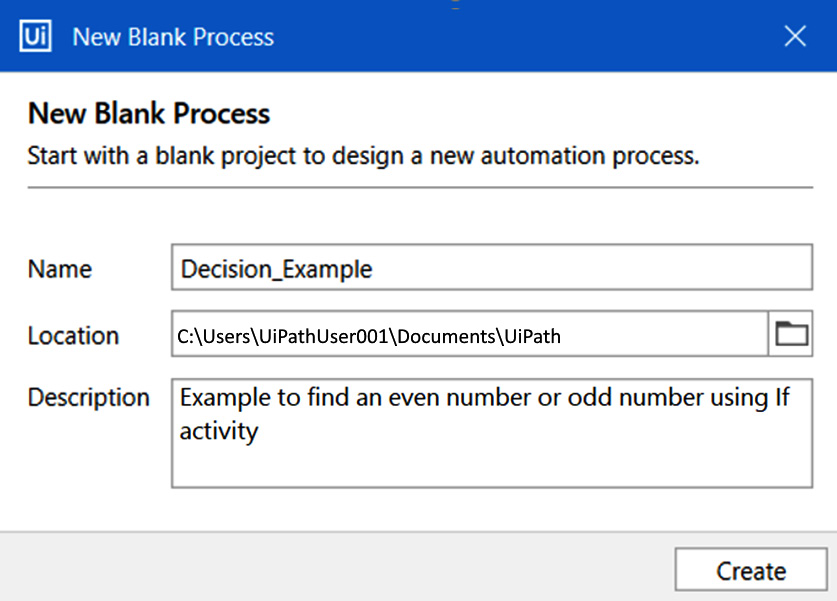
Figure 6.23 – Creating a New Blank Process
- Enter your preferred project Location to save the project.
- Enter some details in the Description field and click Create to create the Designer panel.
- Create an integer called InputNumber to store the information that's received from the user, as shown in the following screenshot:

Figure 6.24 – Creating a variable
- Drag an Input Dialog activity to the project's sequence.
- Do the following to accept and store InputNumber, as shown in the following screenshot:
- Set Dialog Title to "Input Number".
- Set Input Label to "Enter Input Number".
- Set Input Type to Text Box.
- Set Value entered to be stored in InputNumber:
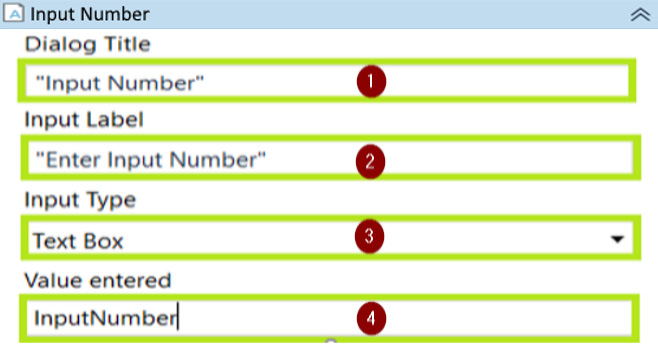
Figure 6.25 – Updating the Input Dialog properties
- Drag and drop the If activity from the Activities panel into the Designer panel, as shown in the following screenshot:
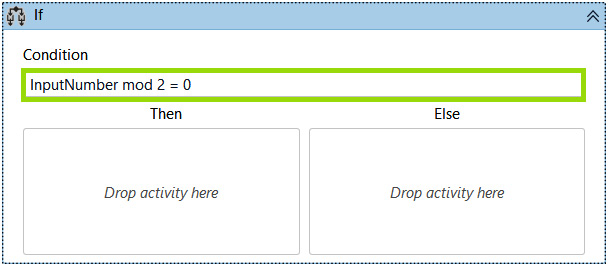
Figure 6.26 – Creating an If activity
- In the Condition field, write InputNumber mod 2 = 0, as shown in the following screenshot:
Figure 6.27 – Setting the If condition
- In the Then branch, drag a Message box activity and write "The given number is an even number".
- In the Else branch, drag a Message box activity and write "The given number is an Odd number".
The project's outline sequence should look as follows:
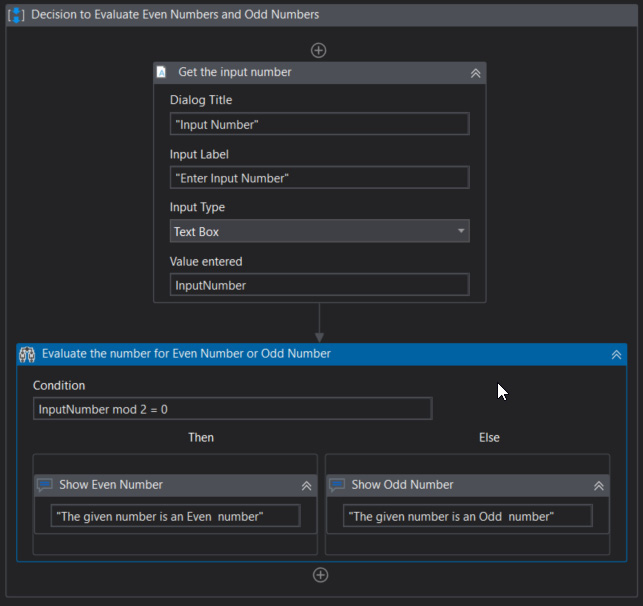
Figure 6.28 – Sequence outline
- Click the Run button from the Design tab and follow the prompts to enter your inputs so that the final output looks as follows for an even number:
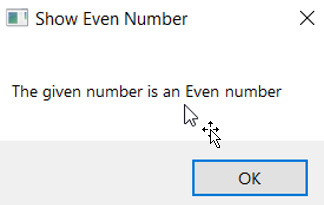
Figure 6.29 – Output message for an even number
- Click the Run button from the Design tab and follow the prompts to enter your inputs so that the final output looks as follows for an odd number:
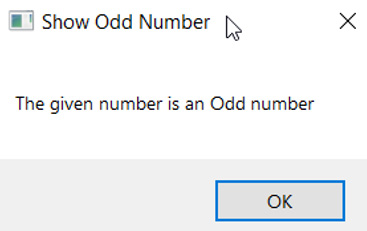
Figure 6.30 – Output message for an odd number
In this section, we have seen how If, Else, and Then can be used to evaluate a condition and perform actions based on the evaluation result. In the next section, we will learn how to automate repeated tasks using loops.
Exploring loops and types of loops
Loops are used to execute a given statement on repetitions based on a specific condition in an automation process. They are mainly used to automate repetitive automation tasks. The key loops in UiPath are Do While, While, and For Each. Let's explore these in turn.
Do While
The statements inside the Do While loop are executed first and then the execution is repeated until the specified condition is satisfied.
Example of a Do While loop
In this example, we will create a sequence that asks for an input number and then performs actions to output the value a set number of times. Let's get started:
- Create a New Blank Process from the New Project section in UiPath Studio and name it DoWhile_Example, as shown in the following screenshot:
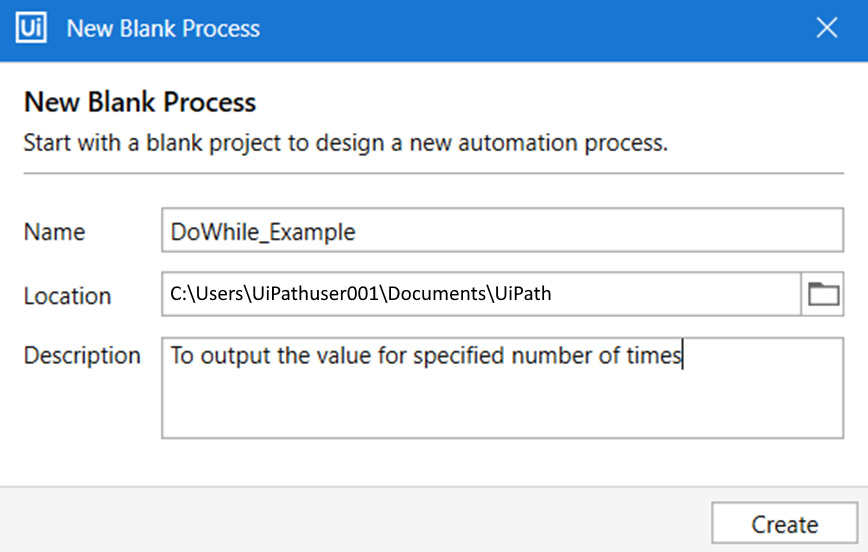
Figure 6.31 – Creating a New Blank Process
- Enter your preferred project Location to save the project.
- Enter some details in the Description field and click Create to create the Designer panel.
- Create an integer called Counter to get information from the user, as shown in the following screenshot:

Figure 6.32 – Creating a variable
- Drag an Input Dialog activity to the project's sequence.
- Do the following to accept and store InputNumber, as shown in the following screenshot:

Figure 6.33 – Updating the Input Dialog properties
- Drag and drop the Do While activity from the Activities panel into the Designer panel, as shown in the following screenshot:
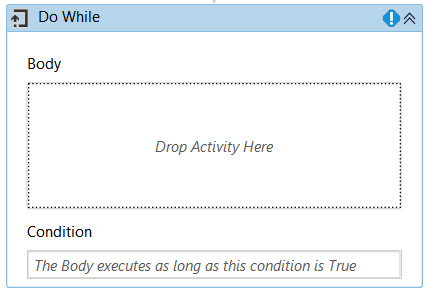
Figure 6.34 – Creating a Do While activity
- In the Condition field, write Counter < 10.
- In the Body branch, drag a Write Line activity and write Counter.ToString.
- Change the name of the Do While sequence to Do While_Count Numbers, and change the name of the Body sequence to Increment Counter by .1
- Drag an Assign activity inside the Increment Counter by 1 sequence and write Counter = Counter + 1.
- The project's outline sequence should look as follows:
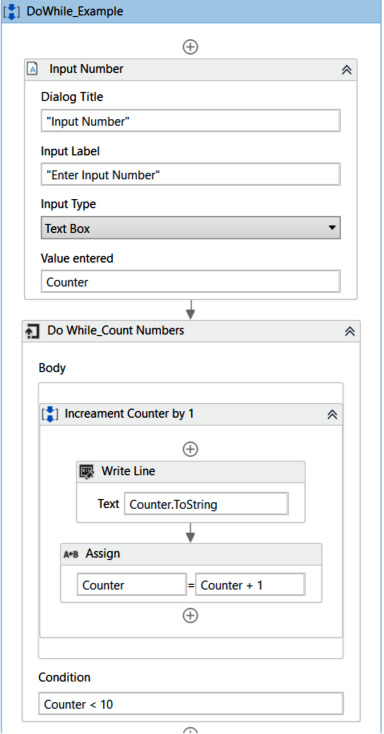
Figure 6.35 – Sequence outline
- Click the Run button from the Design tab and follow the prompts to enter 1 as input so that the final output looks as follows for a number that's less than 10:
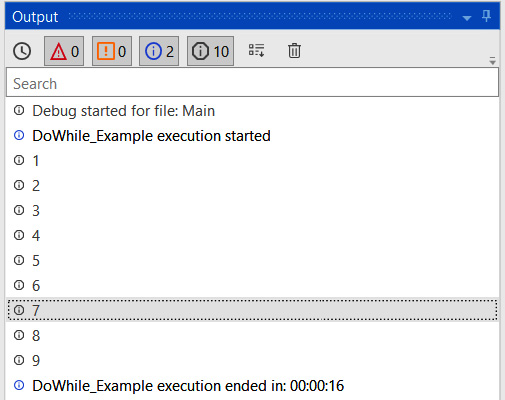
Figure 6.36 – Output window for an input that's less than 10
- Click the Run button from the Design tab and follow the prompts to enter 99 as your input so that the final output looks as follows for a number that's greater than 10. The number 99 will be displayed in the output because a Write Line activity has been used to display the number that is read as input through the Input Dialog activity and saved in the Counter variable.
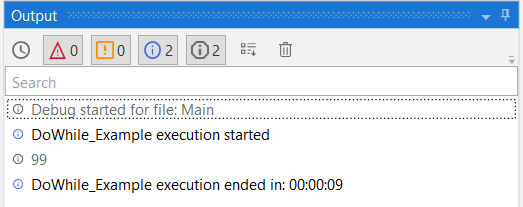
Figure 6.37 – Output window for an input that's greater than 10
While
The statements inside a While loop are executed if the specified condition is satisfied any number of times.
Example of a While loop
In the following example, we will create a sequence that asks for an input number and then performs actions to output the value, as long as the condition has been satisfied. Let's get started:
- Create a New Blank Process from the New Project section in UiPath Studio and name it While_Example, as shown in the following screenshot:

Figure 6.38 – Creating a New Blank Process
- Enter your preferred project Location to save the project.
- Enter some details in the Description field and click Create to create the Designer panel.
- Create a Counter integer to get information from the user, as shown in the following screenshot:

Figure 6.39 – Creating a variable
- Drag an Input Dialog activity to the project's sequence.
- Do the following to accept and store InputNumber, as shown in the following screenshot:
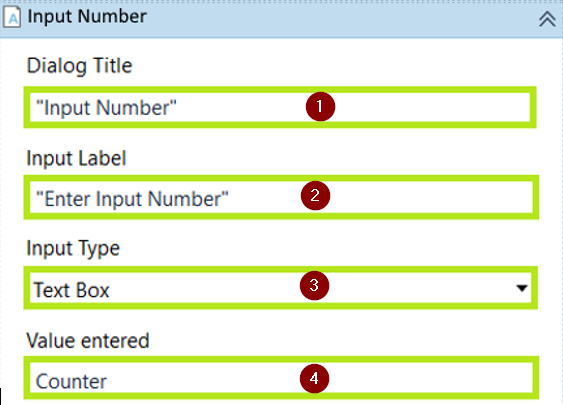
Figure 6.40 – Updating the Input Dialog properties
- Drag and drop the While activity from the Activities panel into the Designer panel, as shown in the following screenshot:
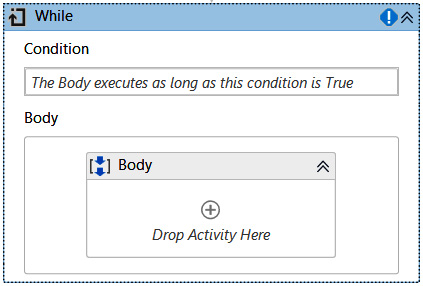
Figure 6.41 – Designer view of the While activity
- In the Condition field, write Counter < 10.
- In the Body branch, drag a Write Line activity and write Counter.ToString.
- Drag an Assign activity and write Counter = Counter + 1.
The project's outline sequence should look as follows:
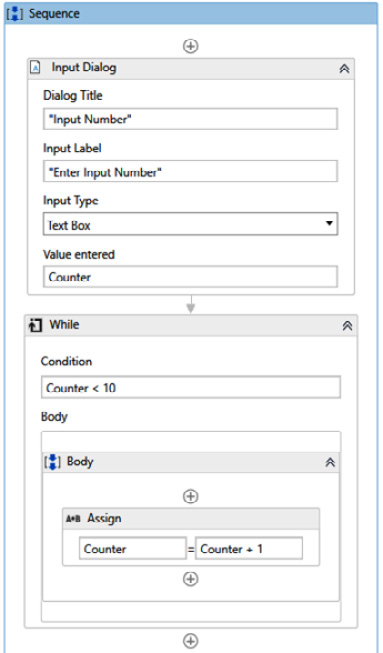
Figure 6.42 – Sequence outline
- Click the Run button from the Design tab and follow the prompts to enter 1 as your input so that the final output looks as follows for a number that's less than 10:
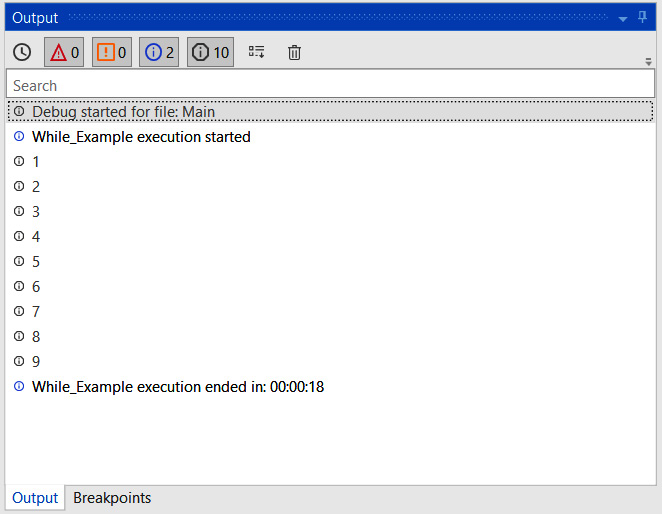
Figure 6.43 – Output window for an input that's less than 10
- Click the Run button from the Design tab and follow the prompts to enter 99 as your input so that the final output looks as follows for a number that's greater than 10, that is, 99:
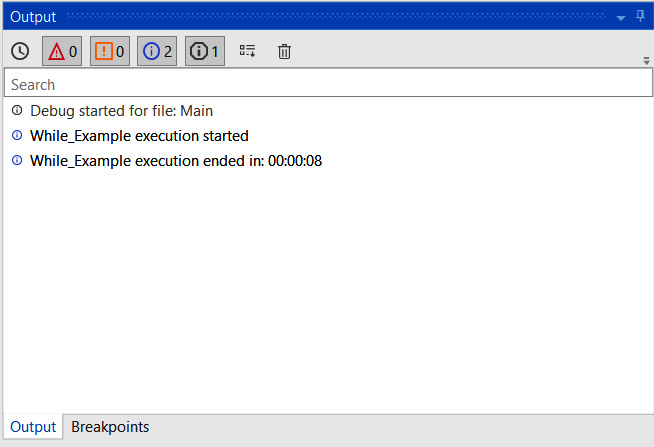
Figure 6.44 – Output window for an input that's greater than 10
In this section, we have explored the Do While activity, which is used in many programmatic situations to loop through inputs or values until a specific condition is satisfied. In the next section, we will learn about the For Each activity to see how we can process each and every available piece of input data.
For Each
The For Each activity helps you go through every item in your data collection defined in a list, array, or dictionary, as you learned in Chapter 7, Manipulating Data using UiPath. The statements inside the For Each activity are executed once for each item so that its operations are performed based on that item's information.
Example of a For Each activity
In this example, we will create a sequence that performs actions on a list of numbers. Let's get started:
- Create a New Blank Process from the New Project section in UiPath Studio and name it For_Each_Example, as shown in the following screenshot:
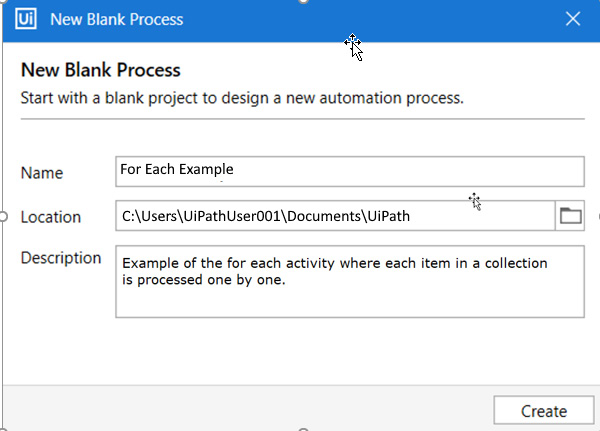
Figure 6.45 – Creating a New Blank Process
- Enter your preferred project Location to save the project.
- Enter some details in the Description field and click Create to create the Designer panel.
- Create a variable and name it Counters. Then, set Variable type to Array of [T] and select Int32 from the dropdown, as shown in the following screenshot:

Figure 6.46 – Creating a variable
- In the Default column of Variables, define the default list as {1,2,3,4,5,6,7,8,9,10}, as shown in the following screenshot:

Figure 6.47 – Setting the default values
- Drag and drop the For Each activity from the Activities panel into the Designer panel, as shown in the following screenshot:

Figure 6.48 – Creating a For Each activity
- Update the default value inside the For Each field to Counter and the in field to Counters, as shown in Figure 6.49. In the Body branch, drag a Write Line activity and write "The Current item in process is " + Counter.ToString. As the data type of each item of Numbers is Int32, we need to convert them into String format for the item to be displayed in the WriteLine activity.
The project's outline sequence should look as follows:
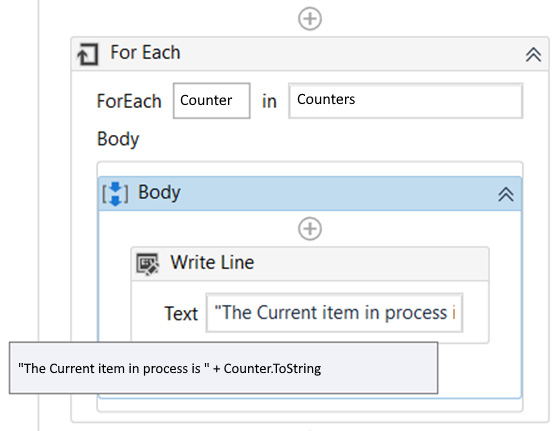
Figure 6.49 – Sequence outline
- Click the Run button from the Design tab and follow the prompts to enter your input so that the final output looks as follows:
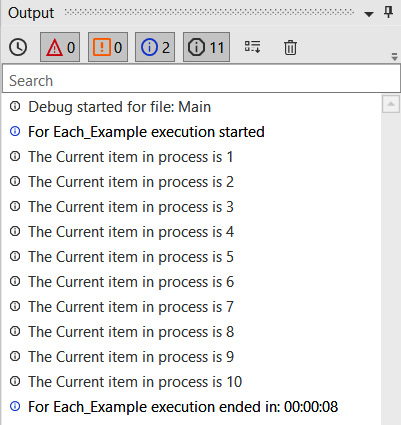
Figure 6.50 – Output window
In this section, we looked at the different types of loops that we can use to automate repeated tasks and enhance our automation effectively. These concepts can be applied to different situations, based on the automation requirements.
Summary
In this chapter, we learned about the different types of control flow concepts, control flow statements such as loops, switches, and If statements, and their implementations. We also learned how to apply these control flow concepts. The examples that were provided in this chapter will help you decide which activity to use when you encounter similar data handling situations while creating robots.
In the next chapter, you will learn how to manipulate different types of data using control flow activities.