
Chapter 12: Exploring UiPath Email Automation
Email is one of the most popular forms of digital communication and is widely used by individuals and organizations. When it comes to manual and repetitive tasks in our daily life, activities such as reading emails, performing business processes based on email inputs, and responding to emails consume most of our time. UiPath offers various email ways to read emails, filter emails, and respond to emails to help us automate repeated business processes.
As part of this chapter, you will become familiar with email automation, the different email automation types, and the different activities that support email automation. You will learn how to send and receive emails, respond to emails, attach and download document attachments, and use defined message templates for emails.
This chapter consists of the following sections:
- Exploring email activities
- Extracting email contents using Receive Messages
- Automating sending email messages
- Filtering and downloading attachments from an email
Technical requirements
This chapter requires you to have UiPath Studio and Robot installed, along with a good understanding of variables, data types, control flows, data manipulation, Excel and data tables, and selectors. You can refer to Chapters 5 to 10 to gather all the required knowledge.
Exploring email activities
Email activities packages are used to automate email-related tasks that are performed using protocols such as IMAP, POP3, and SMTP, which we will explore in the upcoming sections. To identify the different email activities available, you need to install the UiPath Mail Activities package in UiPath Studio. In this section, we will explore how to install the UiPath.Mail.Activities package and then investigate different email activities using step-by-step instructions.
Let's get started:
- Create a new project
Create a new email project by clicking on Process in the New Project section of the UiPath home page view. This will open the New Blank Process window. Fill in the details for Name (1) and Description (2), and click the Create button (3), as shown in Figure 12.1:

Figure 12.1 – Create new process
- Verify mail activities
The UiPath.Mail.Activities option is available by default in the Dependencies branch of the project while creating the process, as shown in Figure 12.2:

Figure 12.2 – Email activities dependencies
However, if it has been uninstalled or deleted by mistake, you may need to manually install the email dependencies from the packages.
- Install UiPath.Mail.Activities
Ensure that the UiPath.Mail.Activities option is not available in the Dependencies section, as shown in Figure 12.3. You can uninstall by clicking the dependency and clicking the Uninstall button if it is already present, as shown in the following screenshot:

Figure 12.3 – Email activities dependencies not available
Now, click Manage Packages in the Design tab and perform the following steps, as shown in Figure 12.4:
- Type UiPath.Mail.Activities in the Search textbox (1).
- Click on the Official (2) option on the left. This will populate the required package (3).
- Click on the package (3), and click Install (4).
- Click the Save button at the bottom of the screen to install the package:

Figure 12.4 – Installing email dependencies
- Verify the installed package
Expand the Dependencies section in Project to verify the UiPath.Mail.Activities installed dependency, as shown in Figure 12.5:

Figure 12.5 – Verifying installed dependencies
- Verify activities
Click the Activities (1) tab and type mail (2) in the Search field to verify the mail activities. You will see six different categories, Exchange, IBM Notes, IMAP, Outlook, POP3, and SMTP, along with Create HTML Content, Save Attachments, and Save Mail Message, as shown in (3) in Figure 12.6:

Figure 12.6 – Verifying installed activities
These activities are used for different automation purposes, which we will learn about in the upcoming sections. Please note that these activities will not be displayed without installing the UiPath.Mail.Activities package. Now let's look in to different Mail activities as follows:
- Exchange
Exchange refers to the Microsoft enterprise email solution and these activities can be used to perform various email operations such as sending emails, receiving emails, moving emails between folders, and deleting emails. The available activities are as shown in Figure 12.7:

Figure 12.7 – Exchange
- IBM Notes
The IBM Notes activities can be used to automate various email tasks in the IBM Notes client for sending emails, receiving emails, moving emails between folders, and deleting emails. The available activities are as shown in Figure 12.8:

Figure 12.8 – IBM Notes
- IMAP
The Internet Message Access Protocol (IMAP) is only used for receiving emails. There are also additional features to mark the email as Read and move emails within folders. The available activities are as shown in Figure 12.9:

Figure 12.9 – IMAP
- Outlook
Outlook activities are used to automate email tasks on already configured Outlook accounts. They can perform various automation tasks, including sending emails, receiving emails, moving emails between folders, and deleting emails. As a prerequisite, the Microsoft Outlook application should be installed on your machine for the activities to function correctly. The available activities are as shown in Figure 12.10:
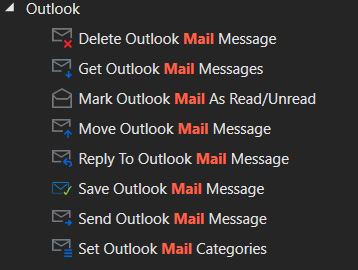
Figure 12.10 – Outlook
- POP3
The Post Office Protocol (POP3) is one of the oldest and less frequently used protocols and is only used for receiving emails. The available activity is as shown in Figure 12.11:

Figure 12.11 – POP3
- SMTP
The Simple Mail Transfer Protocol (SMTP) is one of the most basic protocols and is only used for sending emails. The available activity is shown in Figure 12.12:

Figure 12.12 – SMTP
In this section, we have explored how to install the UiPath.Mail.Activities package and have verified the installed dependency. We have also seen a high-level introduction of each activity and we will explore all the important email activities in upcoming sections.
Extracting email contents using Receive Messages
In this section, we will learn how to automate receiving emails, where the robot will read the contents of an email in a Google (Gmail) account. We will be using IMAP to achieve this goal. Assume the email address and password are already passed as an argument within the workflow and we consider only the first five unread email messages:
- Create a process
Create a new process named Email_Automation in UiPath Studio. To proceed with this development, you need to send a sample email to the Gmail account.
- Send email
Send one test email to the Google email that needs to be automated, as shown in Figure 12.13:
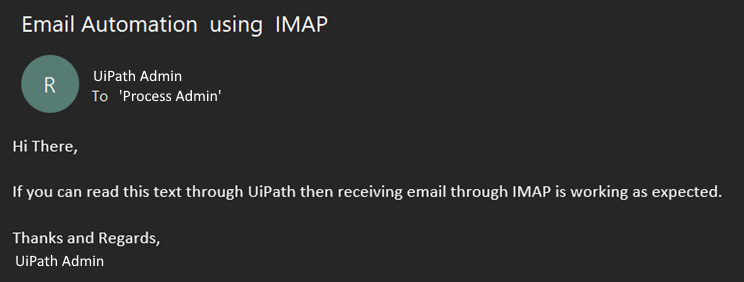
Figure 12.13 – Sample email
- Enable IMAP in Gmail settings
You need to enable IMAP in your Gmail settings, as shown in Figure 12.14. To perform this, first, log in to your Gmail account and click the Settings icon, then, click the See All Settings button. Click on Forwarding and POP/IMAP on the Settings screen, as shown in Figure 12.14:

Figure 12.14 – Settings screen
Click on Enable IMAP in the IMAP access section, as shown in Figure 12.15:

Figure 12.15 – Enabling IMAP
- Create an app password in Google
Next, you need to create an app password to use in UiPath Studio for accessing your Gmail to connect to IMAP. To perform this, create an app password by going to https://myaccount.google.com/apppasswords. Click the GENERATE button (shown in Figure 12.16) and copy the generated password that will be copied inside UiPath activities in the upcoming steps.
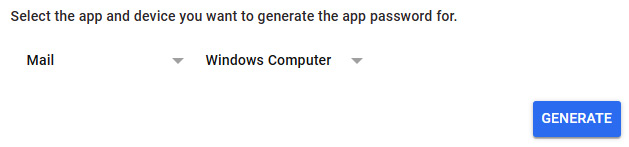
Figure 12.16 – Generating app password
- Create a workflow to receive email
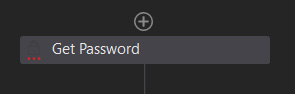
Figure 12.17 – Get Password activity
- Create the following variables to store the email ID, password, and actual emails. Enter the email address to be automated in the Default field, as shown in Figure 12.18:

Figure 12.18 – Variables for the process
- Click on the Get Password activity from Step I, enter the password copied in Step 4 of the previous section to the Password (1) field in Properties, and store the result in a variable named password (2), as shown in Figure 12.18:
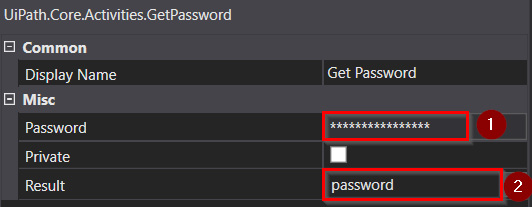
Figure 12.19 – Get Password properties
- Drag the Get IMAP Mail Messages activity to the workflow, as shown in Figure 12.19:
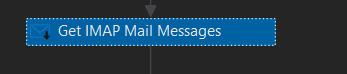
Figure 12.20 – Get IMAP Mail Messages activity
- Configure the IMAP settings properties for accessing emails from Gmail as shown in Figure 12.21 and the following steps:
i. In Mail Folder (1), enter "Inbox".
ii. In Port (2), enter 993.
iii. In Server (3), enter "imap.gmail.com".
iv. In Email (4), enter the email string variable, where you define the email address to be automated in the variables panel, as mentioned in Step II of 5. Create a workflow to receive email.
v. In Password (5), enter the password variable obtained from Step III of 5. Create a workflow to receive email.
vi. Check the OnlyUnreadMessages (6) checkbox.
vii. In Top (7), enter 5, to read only the top five unread emails.
viii. In Messages (8), enter the Emails List<MailMessage> variable to store all the emails.
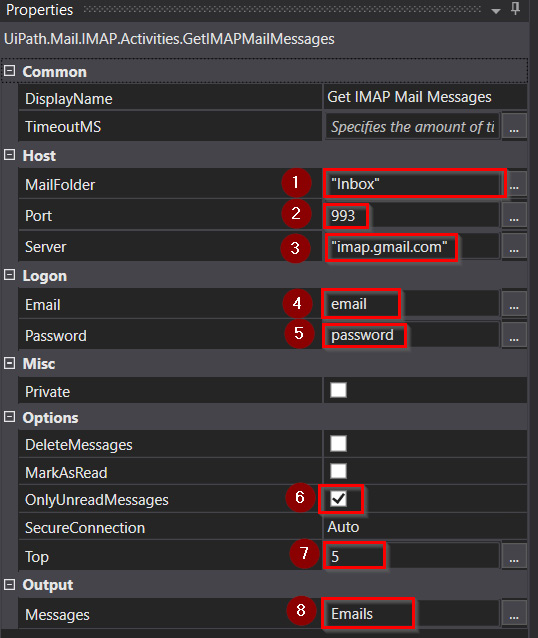
Figure 12.21 – Configuring IMAP settings properties
- Given that you have read through the top five emails described in the previous steps, now, you can use the mail variable (1) to loop through each of the emails (2) to find the expected email using a ForEach activity, as shown in Figure 12.22:

Figure 12.22 – For Each activity
- Configure the properties of the For Each activities to verify that TypeArgument is System.Net.Mail.MailMessage, as shown in Figure 12.23:
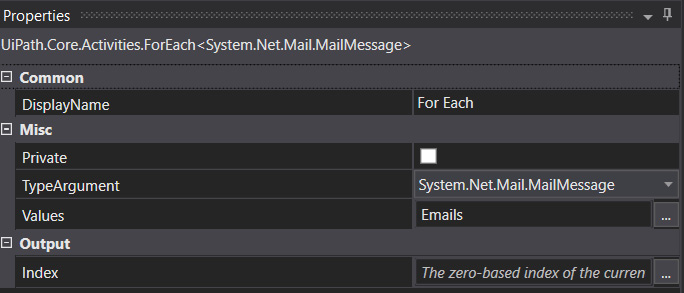
Figure 12.23 – For Each activity properties
- Perform the following steps to filter the emails containing the IMAP subject, as shown in Figure 12.25:
- Add an if activity.
- In Condition (1), enter mail.Subject.Contains("IMAP").
- Add an Assign activity in the Then section, and store the matched email to the emailBody (2) variable, as shown in Figure 12.24:

Figure 12.24 – Value of Assign activity
- Output the captured email using the Write Line activity (3).
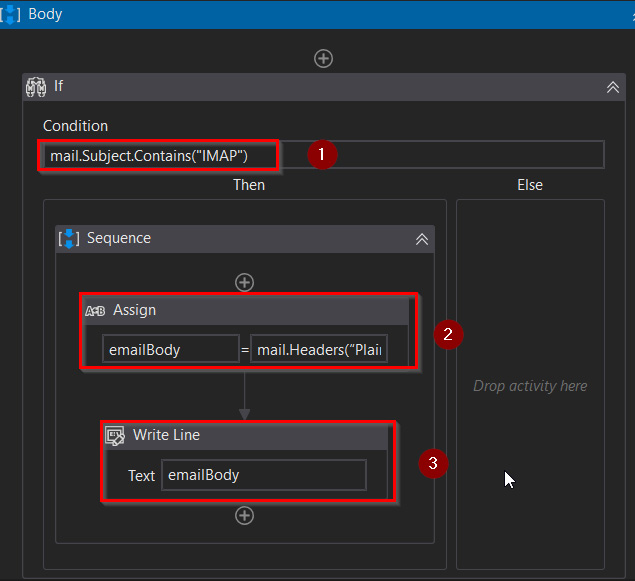
Figure 12.25 – If condition within For Each
- Run the project using the Run button, or Ctrl + F5, to verify the output in the Output panel is working as expected. Ensure the email you sent in Step 2 is displayed as the output, as shown in Figure 12.26:
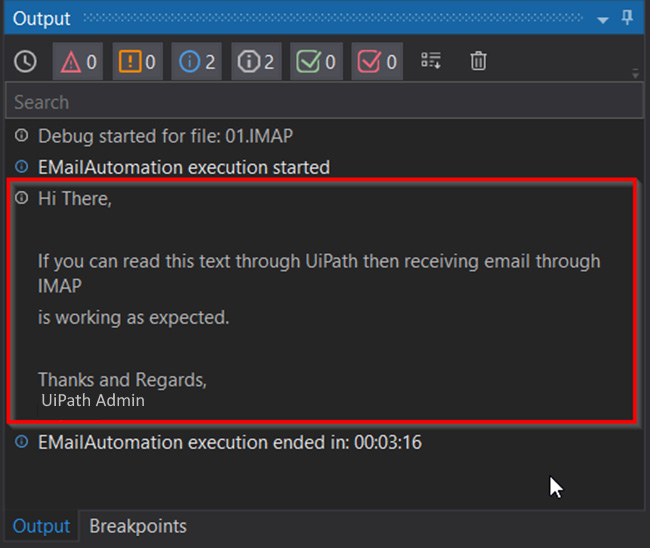
Figure 12.26 – Output panel
In this section, we learned about automating receiving emails from Gmail using IMAP within UiPath Studio. In addition, we saw how a password can be securely created using Gmail and passed to UiPath Studio. Finally, we explored many different activities, such as Get Password and Get IMAP Mail Messages, and learned how to implement them in automating emails. Now, let's see how to automate sending emails in the next section, where we will automatically send an email along with attachments using UiPath Studio.
Automating sending email messages
In this section, we will learn about automating sending emails, where the robot will read the contents of an email in a Gmail account. We will be using SMTP to achieve this goal. Assume the email address and password are already passed as an argument within the workflow, and we are only focusing on the first five unread email messages, like our example in the previous Extracting email contents using Receive Messages section on reading emails. All you need is a Gmail account to send an email with an attachment, and another email configured in Outlook to receive the emails sent by UiPath Robot.
The following provides step-by-step instructions to send an email from UiPath Studio:
- Create a process
Create a new SMTPEmailMessages process in UiPath Studio.
- Configure the Gmail password using Get Password
- Add a new activity, Get Password, to the workflow, as shown in Figure 12.27:

Figure 12.27 – Get Password
Configure the app password created in Step 4, Create an app password in Google of the previous section, as shown in Figure 12.28:

Figure 12.28 – Get Password properties
- Set the input folder with the input files to be processed
Keep the input files to be processed in the Input folder. We have two files, Invoice1.pdf and Invoice2.pdf, which need to be attached to emails, as shown in Figure 12.29:

Figure 12.29 – Input folder
- Define the input variable
Create an array of String variables for invoices to define the input files, as shown in Figure 12.30:

Figure 12.30 – Input files defined
- Process attachments
Add the For Each activity to the workflow, and use a variable invoice (1) to loop through each invoices (2) to send a separate email for each of the invoices, as shown in Figure 12.31:

Figure 12.31 – For Each invoice files
- Send the SMTP email activity
Assign the filename (1) and full file path using the variable filefullPath (2) of the file using two Assign activities. Next, add the Send SMPT Mail Message (3) activity, as shown in Figure 12.32:

Figure 12.32 – Send SMTP Mail Message within For Each
Ensure the correct variable is assigned to filename, as shown in Figure 12.33:

Figure 12.33 – Filename as a String
Ensure the correct variable is assigned to filefullPath so that the Robot can access the correct filenames, as shown in Figure 12.34:

Figure 12.34 – Assign the full path of the input file
- Configure the properties of the Send SMTP Mail Message activity
Configure the Attachments filename variable in the (Collection) field (1), update the Email section with the Subject and Body contents (2), update the Host details (such as Port and Server) to send the SMTP email (3), pass the email Logon details (such as Email and Password) (4), and finally, pass the Receiver details variable in the To field (5), which is the email ID of the receiver, as shown in Figure 12.35:

Figure 12.35 – Properties of Send SMTP Mail Message
Ensure the correct variable is assigned to Attachments so that the Robot can attach the correct document while sending emails, as shown in Figure 12.36:
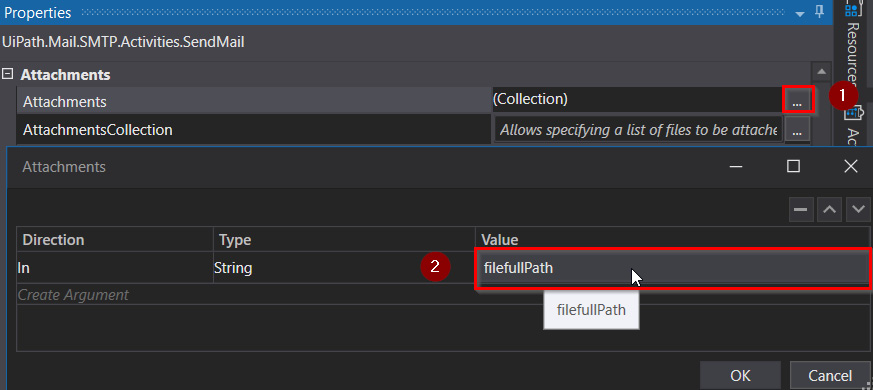
Figure 12.36 – Attachment of Send SMTP Mail Message
- Output verification
Run the project using the Run button or Ctrl + F5 to verify the output. Check the destination email to see if you received the two emails with attachments. Ensure the email you sent in Step 7 is displayed as the output in your email, as shown in Figure 12.37:

Figure 12.37 – Output verification in the destination email
In this section, we have automated sending emails using UiPath Robot and SMTP. We used a Gmail account to send an email with attached documents using the Attachments properties, and an Outlook account to receive the email. Finally, we executed the Robot to verify the output. In the next section, we will look at how to automatically process the attachments from an email.
Automating filter and download attachments from an email
In email automation, processing attachments is one of the most essential tasks. In UiPath Studio, we will use the Get Outlook Message activities to read the attachments and store them in a destination folder. We are going to use the attachment documents from the output emails generated in the previous section (Step 9 of Automating sending email messages) to process the attachments. For all Outlook activities, the Outlook application needs to be installed on the machine in which the automation is executed. Finally, we will learn about various filtering options, such as email address and subject line.
Use the following step-by-step instructions to download the attachments:
- Create a new project
Create a new process from the UiPath Studio backstage view.
- Get the Outlook mail message
In the Main file, drag the Get Outlook Mail Message activity from the Activities panel, as shown in Figure 12.38:

Figure 12.38 – Get Outlook Mail Message activity
- Configure the Get Outlook Mail Message properties
Click the Get Outlook Mail Message activity to view the Properties panel. In the Input section, enter the Outlook account email address in the Account field (1) and the corresponding MailFolder (2) from where you will be accessing the email. Now, it is time to filter the expected emails from the Options section using the Filter field (3), where you need to enter the sender's email address. Alternatively, you can use Subject, or any other email parameters, to filter the emails. Enable the OnlyUnreadEmails option (4) and enter the Top field as 10 (5) to read the top 10 unread emails. Finally, save all the read emails to the emails variable in the Output field (6), as shown in Figure 12.39:
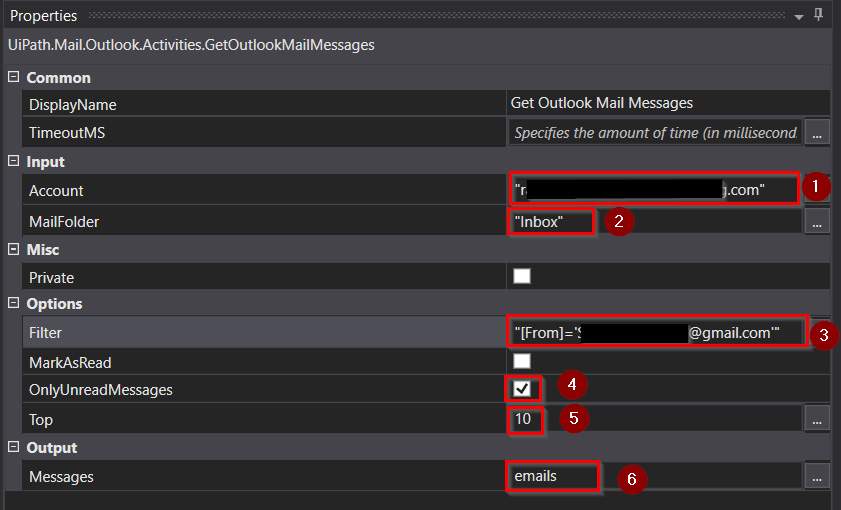
Figure 12.39 – Get Outlook Mail Message properties
- Extract and save the attachments using the Save Attachments activity
So far, we have read all the filtered emails and saved them into a variable called emails. Now, we will process each of the emails using a For Each activity (1) and check for the emails containing the subject line as Invoice# in the Condition field (2). Extract the invoice number from the subject line using the Split function (3) to create an output folder to save the attachments. Now, extract the attachments using the Save Attachments activity (4), as shown in Figure 12.40:

Figure 12.40 – Save Attachments properties
More information on creating an output folder to save the attachments is shown in Figure 12.41:
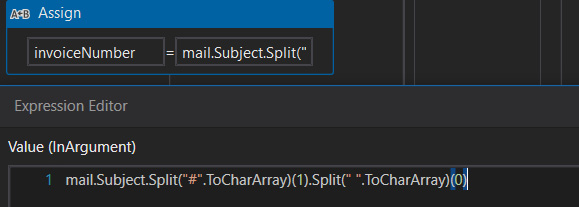
Figure 12.41 – Split function to create an output folder
- Output verification
Run the project using the Run button or Ctrl + F5 to verify the output. Check the destination folder to verify the attachments. Ensure the files you have sent from Gmail are displayed as the output in your project, as shown in Figure 12.42:
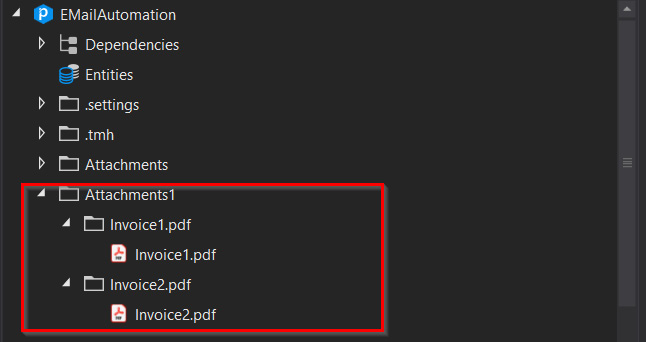
Figure 12.42 – Run project and output verification
In this section, we explored different features to process emails from the specified input email to read the subject, contents of the email, and download attachments. We also explored the properties of the Get Outlook Mail Message activity, where we learned the use of the fields, such as Account and Mail Folder. Finally, we used different options to filter the emails based on certain conditions, such as Only UnreadMessages from a list of emails, for example, the first 100 emails. These concepts can easily be applied to processing attachments in emails.
Summary
We explored everything about email automation in this chapter. We performed most of the email operations, such as sending emails, receiving emails, and downloading attachments automatically using UiPath Studio – operations that we frequently used to perform manually. In addition, we discussed various email protocols such as IMAP, SMTP, POP3, Exchange, and Outlook, and their usage. We also implemented practical examples to understand all the essential email automation concepts, from sending emails to receiving emails, filtering emails, and processing attachments.
In the next chapter, we will learn more about debugging. We will use UiPath Studio to easily troubleshoot, identify errors, and practice solving issues during any challenging situations while creating automation projects.