
Chapter 7: Manipulating Data Using UiPath
Today, every software application, business process, or human deals with data. Data is the most critical resource in every organization and it's available to us in many different forms. We need to modify, structure, format, or sort data to convert it into meaningful information in a business process.
This chapter focuses on introducing different methods of manipulating data based on various data types. Data used in a business process undergoes many transformational steps before it's ready for consumption at various stages of the process, hence it is crucial to understand how to perform such manipulations.
This chapter consists of the following sections:
- Explaining the concept of data manipulation
- Understanding string manipulation
- Understanding date and time manipulation
- Understanding list manipulation
- Understanding numeric calculations
- Understanding dictionary manipulation
- Understanding pattern-based data extraction using regular expressions (regexes)
Technical requirements
As a prerequisite, please have UiPath Studio and UiPath Robot installed and connected with Orchestrator. Furthermore, it is essential to understand the different data types, control flows, and UiPath Studio features before starting this chapter.
Explaining the concept of data manipulation
Data manipulation is a process that alters data through various operations to convert it into a usable format. It is a vital function for business operations and management as it provides many benefits, such as the following:
- Converts data into a more consistent format to improve reliability, readability, and organization
- Enables customization and generation of more meaningful data according to business requirements
- Removes unwanted data to ensure only the required information is processed
Data manipulation operations consist of four primary functions, as outlined here:
- Extracting data by specifying extraction conditions such as filtering, summarizing, and so on
- Adding new data
- Removing unwanted data
- Changing existing data by updating new values or converting unstructured data into a more meaningful and process-friendly format
There are many different methods of manipulating data, depending on the type of data. Let's now take a look at various data manipulation techniques.
Understanding string manipulation
Strings are one of the most commonly used data types in any automation solution. A string data type refers to a series of text values that we frequently use to extract, display, process, and send data between multiple applications for further processing. String operations help perform business scenarios such as sending out emails for users, extracting a portion of text from a larger text, and so on.
UiPath uses string manipulation methods in Visual Basic .NET (VB.NET) or C#, depending on the language you choose to use in UiPath Studio. In this chapter, we will use the methods in VB.NET. The following sections describe some of the commonly used string manipulation methods in UiPath.
Concat function
The Concat function enables the user to concatenate two or more string representations into one string representation. The Concat function is capable of concatenating up to four string objects at a time. The following code snippet shows the expression we use to concatenate strings:
String.Concat(StrVariable1, StrVariable2)
Let's take a look at a simple example of how to use this function. Proceed as follows:
- Open UiPath Studio and create a new project.
- Once the project is ready, double-click on the Main.xaml file on the Project panel to open it in the Designer panel.
- Click on the Activities panel, search for a Sequence activity, and drag it to the Designer panel.
- Select the Sequence activity you added, and click on the Variables panel.
- Create a new variable named DisplayText of type String.
- Drag and drop an Assign activity and assign the following value to the DisplayText variable: "Hello… My name is".
- Create another String variable named FirstName.
- Use another Assign activity below the previous and assign a FirstName variable with the value "John".
- Create a third String variable named LastName.
- Use a third Assign activity below the previous one and assign a LastName variable with the value "Doe".
- Now, search for a Message Box activity in the Activities panel and drag and drop it after the last Assign activity.
- Configure your Message Box activity with the following code:
String.Concat(DisplayText, FirstName, LastName)
Once you reach this point, your workflow should look similar to this:
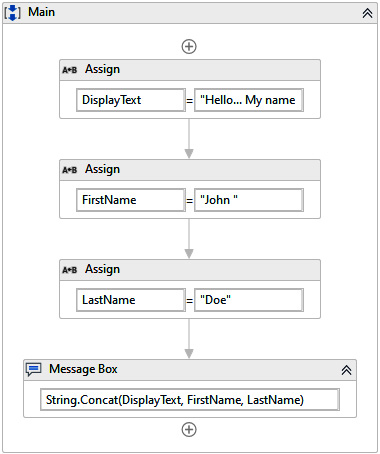
Figure 7.1 – String.Concat function example
Now we know how to combine two strings, let's look at how we can check whether a particular string exists in another string.
Contains function
The Contains function checks whether a specified substring exists in another string. The function returns a Boolean value depending on the result. The function returns True as the output when the substring exists in the main string and returns False if not. An important point to remember is that this function is case-sensitive; hence, it may return False as the output even when two strings match, but the casing of the letters is different. As we discussed in Chapter 5, Learning about Variables and Arguments, Boolean results enable the user to control the workflow execution. Since the Contains function returns a Boolean result, this function is mainly associated with a control flow activity. We can either use an If activity or Flow Decision activity depending on whether we are using a Sequence or a Flowchart container.
Let's look at the same workflow we designed and change it by adding this function to test its functionality, as follows:
- In the same workflow, drag and drop an If activity from the Activities panel and place it in between the last Assign activity and the Message Box activity.
- Configure the If activity using the following code for the Expression section:
String.Concat(DisplayText, FirstName, LastName).Contains("John")
The expression concatenates all the string variables and checks whether the "John" substring is available in it.
- Select the Message Box activity located below the If activity, and move it into the Then segment of the If activity.
- Drag and drop a Write Line activity from the Activities panel into the Else segment of the If activity.
- Configure the Write Line activity with the following string:
"The name you are looking for is not available"
Once you configure the Write Line activity, your workflow should look similar to this:

Figure 7.2 – String.Contains function example
The String.Contains function gives you True as the result if the searched string is available. If you want the function to return False when the string exists (simply by reverting the result), you can introduce the Not keyword into the expression. In the previously described example, the expression would look like this after introducing the Not keyword:
Not String.Concat(DisplayText, FirstName, LastName).Contains("John")
We can also look at another function that is similar to String.Concat. The String.Format function, however, provides the ability to change values at designated locations in a defined string. The next section explains this concept in detail.
Format function
The Format function is similar to the Concat function. However, the Format function can convert objects into strings and insert them into another string at specified locations. The Format function also allows the combining of any number of strings into one string variable. The Format function uses specific identifiers (IDs) to locate where to insert new text in the primary string. Such IDs are referred to as {0}, {1}, and {2}, in which the numeric values describe the order of merging text.
Let's take a look at how we can apply the Format function through a simple example, as follows:
- Let's continue to work on the same workflow we built previously. Drag and drop an Assign activity below the If activity.
- Create a new string variable named ConcatenatedText and specify it in the To segment of the Assign activity.
- Use the following code in the Value segment of the Assign activity to assign it a value. This function assigns the concatenated value to another string variable for us to further process the output:
String.Concat(DisplayText, FirstName, LastName)
- Drag and drop another Assign activity below the previous activity.
- Configure the To segment of the Assign activity by creating a new string variable named FormatString and assign it the following string:
"Good day… Let me introduce myself. {0} and I am {1} years old. I'm currently based in {2}"
- Use another Assign activity and place it below the previous activity.
- Create a new string variable named DisplayResult and configure the To segment of the Assign activity with the variable name.
- Configure the Value segment of the same Assign activity using the following code. The following code uses the String.Format function to fill in the text portions for {0}, {1}, and {2} indicators:
String.Format(FormatString, ConcatenatedText, "29", "Sri Lanka")
If you look at the function closely, the FormatString variable is the primary string that we need completed. The {0}, {1}, and {2} indicators are replaced by the values specified in the expression in the specified order.
- Add a Message Box activity and configure it by specifying the DisplayResult variable to show the output as a message.
Once you complete the configuration, your workflow should look similar to this:

Figure 7.3 – String.Format function example

Figure 7.4 – String.Format function output
The String.Format option can be helpful in scenarios where you have to replace dynamic parts of a string with values retrieved during execution. One good example is updating the body of a standard email message with the name of the person addressed. So, let's look at the Replace function.
Replace function
The Replace function enables the user to replace all occurrences of a specified substring in the primary string. Similar to the Contains function, this function is also case-sensitive. It uses the following expression to replace text:
VarName.Replace(<String to Replace>, <New Value>)
The Replace expression requires two parameters: the string to be replaced and the new text.
Let's apply this function to the same workflow and try replacing some values, as follows:
- Open the previously built workflow in UiPath Studio.
- Drag and drop an Assign activity after the last Message Box activity into the workflow.
- Configure the To segment of the Assign activity by creating a new string variable under the name CleansedValue.
- Configure the Value segment of the Assign activity by providing the following code:
DisplayResult.Replace("Hello…", "")
This code would look for the word "Hello…" in the string value in the DisplayResult variable and replace it with a blank string.
- Place a new Message Box activity below the last Assign activity and configure it to display the value in the CleansedValue variable. The final workflow should look similar to this:
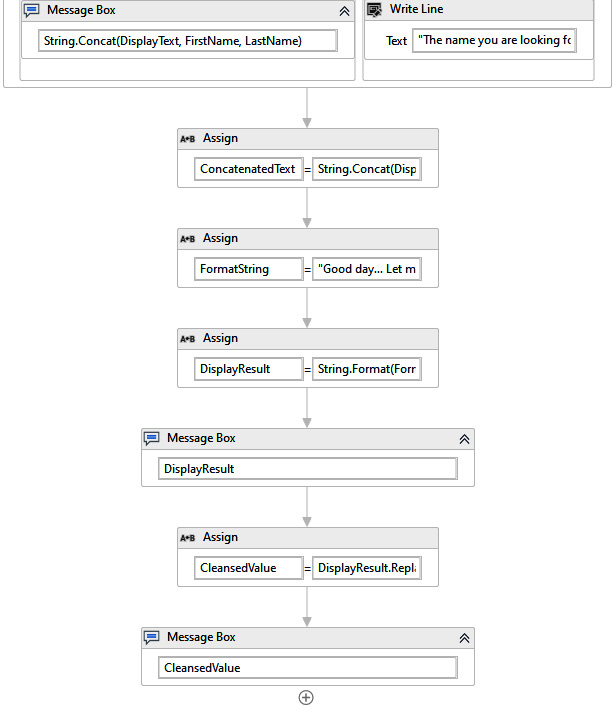
Figure 7.5 – String.Replace workflow example
- Execute the workflow and see the result of the last message that pops up. It should look similar to the following output:
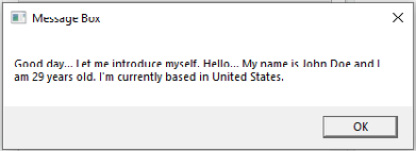
Figure 7.6 – String.Replace function output
So, the Replace function is beneficial when you want to remove special characters or any unwanted text from a string.
At this point, you are now familiar with several methods under string manipulation. Along with these methods, we sometimes need to search for a location of a string and get the position to perform certain actions. The following section describes the use of the IndexOf method to perform search operations.
IndexOf function
The IndexOf function returns the index of the first occurrence of a specified character in a string. An index in programming always starts at 0. Hence, in an actual string, the first letter is the zeroth letter, the second letter is the first letter, and so on. It is not just another method; it is one of many overload methods in VB.NET that perform several search mechanisms based on different input parameters we provide. In general, it uses the following expression to obtain the index of a specified character:
StrVariable.IndexOf("<search string>")
Let's get the index of the first occurrence of a letter in our previous output string, as follows:
- Open the same workflow file we worked on previously.
- Place a Message Box activity at the end of the workflow.
- Configure the new Message Box activity with the following code:
CleansedValue.IndexOf("d").ToString
This configuration would provide the index of the first occurrence of the letter "d" in the CleansedValue string. The index is next converted into a string using the .ToString method to print it as text in the Message Box activity.
- Run the program and see the output. The final Message Box activity should return "3" as the output. If you look closely in the CleansedValue variable string, the first occurrence of the letter "d" is in the word "Good". It is the fourth letter in the string; hence, in a zero-based string, the index of the letter is "3", which is similar to the output we got.
Apart from what we discussed, there are several overload methods that return the index of a string. We will not get into the detail of each and every method; however, we need to know the basics. Some overload methods are listed here:
- IndexOf(String, Int32, Int32, StringComparison): Provides the index of the first occurrence of a specified string in the current string. The parameters specify the starting search position in the current string, the number of characters in the current string to search, and the type of search to use for the specified string.
- IndexOf(String, Int32, StringComparison): Provides the index of the first occurrence of a specified string in the current string. The parameters specify the starting search position in the current string, along with the type of search to use for the string.
- IndexOf(Char, Int32, Int32): Provides the index for the first occurrence of a specified character. The parameters specify the starting search position and the number of characters to search in the current string.
- IndexOf(String, StringComparison): Provides the index of the first occurrence of a specified string in the current string. The parameters specify the type of search to use for the specified string.
- IndexOf(String, Int32, Int32): Provides the index of the first occurrence of a specified string. The parameters define the search position in the current string and the number of characters to search.
- IndexOf(Char): Provides the index of the first occurrence of a specified Unicode character in the current string.
As we tried one type out of the different overload methods, you can also try out some of the other types mentioned to get more practice on obtaining the index of a given string.
Let's now apply the knowledge gained on indexes and try out another method for string manipulation.
SubString function
There are scenarios where you need to extract only a particular portion of a string from a longer string to process it further. For example, from all the text in a Portable Document Format (PDF) file, you might want to extract only the invoice number to use it in another application. The SubString function comes in handy in such scenarios as it allows extraction of text by providing the starting index and the length of the substring. It uses the following expression to extract a portion of a text from a longer string:
StrVariable.SubString(<starting index>, <length of substring>)
Applying our knowledge of indexes, let's use the same working solution and try to extract the name of the person from the string variable, as follows:
- Let's open the same working solution we worked on previously.
- The CleansedValue string variable contains the name "John Doe". Let's count the starting index of the word "John" in the string. The word "John" starts from the 47th position.
- Now, we have to check how many characters we need to extract. The name "John Doe" includes eight characters, including the space in the middle. Hence, the length of the string we require for extraction is 8.
- Using the starting index and the length we calculated, let's configure the last Message Box activity to show the name. The following code example illustrates the configuration to apply in the Message Box activity:
CleansedValue.Substring(47, 8)
We can try to get the same output using the IndexOf function without hardcoding the positions. As we explored several IndexOf functions, let's explore a bit how we can combine these two functions together to get the same output.
- Start the program and see the output of the last Message Box activity. It should show the name "John Doe".
As a quick recap, this section focused on extracting the desired part of a string from a larger string by providing start and end index points. This function comes in very handy on many occasions where you want to extract certain parts of a string based on a specific string pattern. Apart from this function, we also have the ability to split a string into multiple elements and access each part separately. Let's now see how we can split a text and retrieve individual elements after splitting.
Split function
The Split function enables the user to split a long string based on a specific character. This functionality can be used when you need to work with comma-separated values (CSV) files or delimited string variables to split to access each component. Splitting a single string based on a delimiter converts the entire string into a string array representing each element by a zero-based index. It uses the following function to split string values. The arrays are of fixed size; hence, you cannot add or remove items from an array after creation:
StrVariable.Split("<split character>"c)
The letter c after the split character converts the character specified within double quotes to a character type.
Let's use our previous examples and split the values in a CleansedValue variable, as follows:
- Open the same working solution.
- After the last Message Box activity, place a new Assign activity.
- Configure the To segment of the Assign activity by creating a new string array-type variable. Press Ctrl + K and provide the variable name as SplitArray. Now, if you look at the Variables panel, the variable's data type is a string.
- Click on Variable Type in the Variables panel of the variable and click on the Array of [T] option to find more data types.
- From the Select Types pop-up screen, select the data type of the array as String and click OK.
- Now, you can see the data type of the SplitArray variable as String[] in the Variables panel.
- Configure the Value segment of the Assign activity with the following code to split the value in the CleansedValue variable by "<space>":
CleansedValue.Split(" "c)
The aforementioned configuration will split the entire sentence in the CleansedValue variable by a space delimiter. Each word will represent a specific element in the array based on its position in the string. For example, splitting the "Hello World" string with a space places the two words in the zeroth and first indexes in the array.
- Use another Message Box activity below the new Assign activity and configure it to retrieve the text in a specified index, as follows:
SplitArray(0).ToString
Once you reach this point, the workflow you built should look similar to this:

Figure 7.7 – String.Substring and String.Split functions' output
- Run the program and observe the output of the last Message Box activity. Since we split by space, the first word of the CleansedValue string is placed in the zeroth position. The output you get is the first word, which is Good. Try changing the index and run it a couple of times to observe the output. The following screenshot illustrates the output of the workflow we built:

Figure 7.8 – String.Split function output
This section focused on learning how to split a string by providing the split character. This function comes in handy when you want to extract specific text elements from a given string. Further, we also learned that the elements in the split array can be accessed through a zero-based index. Having said that, let's now look at how we can merge data in collection variables—such as arrays—into one string.
Join function
The Join function combines all the elements in a string array into one string by introducing a character as a separator between each element. For example, if the array consists of two elements such as "Hello" and "World", the separator introduced in the Join function is included in the output string to indicate which position it was split originally. Hence, in our example here, if we introduce "|" as the separator, the Join function returns "Hello|World" as the output. The expression used for the Join function is shown here:
String.Join("<separator>", <Collection Variable>)
Let's apply this function to our previous working solution to join the elements in the SplitArray variable, as follows:
- Open the previous working solution.
- Add a new Message Box activity at the end of the workflow.
- Configure the new Message Box activity with the following code to join the elements in the SplitArray variable:
String.Join(" ", SplitArray)
We specified the space as a separator to return the string to its original form.
- Run the program and observe the result of the last Message Box activity. It shows the string back in its original form.
String manipulation methods help us to understand which standard functions we can perform using text values. The concept of indexes we learned in this section of the chapter is common across all connection-type variables such as arrays, lists, data tables, and so on. All collection variables in VB.NET use the same concept using zero-based indexes when referring to individual elements. Each data type has its specific functions.
Similar to String functions, date-related functions are unique to the DateTime data type. Date-related calculations are quite common across any automation, hence it is essential to understand functions related to date values.
Understanding date and time manipulation
Date and time are two types of values that we come across almost all the time. Similarly, organizations deal with data that is of different dates, months, and years. .NET Framework offers many functionalities related to date values, enabling the user to calculate and manipulate dates easily. However, it is not required to know all the functionalities for the Associate exam. Hence, let's only look at some of the functionalities, which include the following:
- Date addition and subtraction
- Format conversion
- Extracting individual elements of a date
Let's explore some of the functionalities with the following scenario. We need to obtain a list of dates between 7 days before the current date and 7 days after the current date. Further, we also want to print the date, month, and the name of the date. The following steps provide a guide on generating the required output:
- Open UiPath Studio and create a new Empty process.
- Double-click on the Main.xaml file on the Projects panel to open the file in the Designer panel.
- Create three variables named CurrentDate, ProcessDate, and MaximumDate, and configure all three by changing their data type to System.DateTime.
- If DateTime is not listed in the dropdown under Variable Type, click on Browse for More, and search for the System.DateTime data type in the Browser for .Net Types popup.
- Drag and drop an Assign activity from the Activities panel into the workflow.
- Configure the To segment of the Assign activity by providing the first variable named CurrentDate.
- Configure the Value segment of the Assign activity by providing System.DateTime.Now to assign the current date and time to the variable.
- Drag and drop another Assign activity and use the CurrentDate.AddDays(-7) code to generate the date 7 days before the current date and assign it to the ProcessDate variable.
The specified code deducts 7 days from the date held in the CurrentDate variable to generate a new date.
- Similarly, use the following code in another Assign activity to assign the maximum date in the range to the MaximumDate variable:
CurrentDate.AddDays(7)
The specified code adds 7 days to the date specified in the CurrentDate variable to generate the maximum date we need to extract.
- Search for a While activity from the Activities panel and place it below the three Assign activities. We use a While loop to loop through the days between the days specified in the ProcessDate and MaximumDate variables. The condition of the While activity uses the following code:
ProcessDate<= MaximumDate
- Place a Write Line activity inside the While loop and configure it with the following code:
"Date: " + ProcessDate.ToString("dd-MMMM-yyyy") + " | Month: " + Microsoft.VisualBasic.DateAndTime.MonthName(ProcessDate.Month) + " | Day: " + ProcessDate.ToString("dddd")
The ProcessDate.ToString("dd-MMMM-yyyy") code segment converts the date to the specified format to output the date in string format. For example, the date is printed as 01-January-2021.
The Microsoft.VisualBasic.DateAndTime.MonthName(ProcessDate.Month) code segment generates the month name of the date value stored in the variable. For example, if the provided date is 01/12/2020, this code's output would be "December".
The ProcessDate.ToString("dddd") code segment converts the current day into the day's name, such as Sunday, Monday, and so on.
- Place a new Assign activity below the Write Line activity and increment the ProcessDate variable's date by 1 day. The following code provides sample code for the activity:
ProcessDate.AddDays(1)
Once you reach this point, you have completed creating a date manipulation workflow. The developed workflow should look similar to this:

Figure 7.9 – Date manipulation workflow example
- Run the automation and observe the output in the Output panel. Further, try simple configurations around the same workflow and understand which other functions are available to perform manipulations related to date values.
There are many functions related to a date. However, this section of the chapter covers only a few of the most commonly used functions. Based on the general idea obtained by going through the previously mentioned steps, you can easily use other functions to manipulate the data to retrieve the required output. On the other hand, the Lists data type offers the capability to hold a list of values of a specific data type, including strings, date-times, integers, and so on. The next section of the chapter focuses on some of the commonly used functions when working with list variables.
Understanding list manipulation
Lists are data types of a specific type that can contain multiple data values. All list data values have a fixed memory location, which is known as an index. Arrays are of fixed size and defined at the creation of a variable. However, lists allow us to add, modify, and remove items during runtime. Similar to arrays, lists provide specific methods to manipulate their data, such as the following:
- Adding items
- Removing items
- Looping through elements in the list and performing specific actions on each
- Sorting items in the list
- Searching for an item
- Clearing items in a list
UiPath offers a collection of activities to perform the aforementioned actions efficiently. The activities that UiPath offers are listed here:
- Add to Collection: Adds new items to a specified collection variable. It is the equivalent of the List.Add() function.
- Clear Collection: Deletes all data from a specified collection variable. This function comes in handy when working with list variables that hold data temporarily. This activity helps such scenarios by deleting everything in the list before loading it with the next batch.
- Remove from Collection: Removes a specified item from a collection variable. In addition to the removal operation, the activity also returns a Boolean result indicating whether the removal operation has been successful or not.
- Exists in Collection: The activity returns a Boolean result indicating whether a specified item exists in the collection or not. This activity provides an efficient mechanism to check the existence of items without looping through the list.
Let's now practice some simple list manipulation methods. The steps outlined next provide a guideline to perform the required actions.
Declaring list variables
In this section of the chapter, we will take a look at how to declare list variables through the Variables panel.
Open UiPath Studio and create a new Process activity, as follows:
- Open the Main.xaml file.
- Drag and drop a Sequence activity from the Activities panel into the Designer panel.
- Select the Sequence activity and click on the Variables panel.
- Create a new list variable named StudentsList with the type List<String>. The list data type will not show in the dropdown initially. Hence, click on the Browse for Types option in the dropdown, and look for System.Collections.Generic.List in the Browse and Select a .Net Type pop-up window.
- Select List<T> under System.Collections.Generic, select the data type from the dropdown as String, and click on the OK button to create a variable. The following screenshot shows the configuration in the Browse and Select a .Net Type pop-up window:
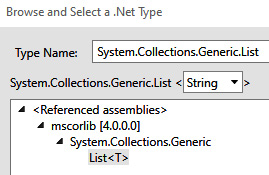
Figure 7.10 – List variable creation
- Configure the Default section in the Variables panel with the following code to initialize the variable with a few values:
New List(Of String) from {"John", "Daniel", "Keith"}
- Create another list variable of type string named EmployeeList following the same steps as before, and configure the Default section of the Variables panel with the following code:
New List(Of String) from {"Diana", "Lizi", "Peter", "Daniel"}
You are now familiar with the creation of list variables. Let's now focus on using variables in workflows.
Adding items to a list
In this section, we will look at the usage of the Add to Collection activity to add items to one of the lists we created earlier. Proceed as follows:
- Search for the Add To Collection activity in the Variables panel and drag it to the Sequence container we created earlier. Let's add a new item to the StudentList variable.
- Select the Add To Collection activity and modify the DisplayName property in the Properties panel with Add item to StudentList to rename it.
- Configure the Collection property of the activity by providing the StudentList variable. This property indicates to which collection variable you want to add data.
- Configure the Item property of the activity by providing a new name within double quotes, as follows:
"Andrew"
- You can now see in the following screenshot that UiPath Studio is showing an error message on the Collection property:

Figure 7.11 – Configuring Add To Collection activity data types
This error is thrown because the collection expects a string data type, but the activity is automatically configured to add object data types. You can see this configuration in the TypeArgument property of the activity.
- Configure the TypeArgument property of the activity by selecting the data type as String from the dropdown.
- Drag and drop another Add To Collection activity and configure it using the same steps to add a new name, "Jane", to the EmployeeList collection variable.
As we have built the workflow to add items to list variables, the next section of the chapter focuses on merging the two lists.
Merging list variables
Merging lists cannot be done directly—it requires converting the List type into an Enumerable type. To do this, proceed as follows:
- Place an Assign activity below the two Add To Collection activities.
- Configure the To segment of the Assign activity by creating a new list variable named CombinedPeopleList.
- Configure the Value segment of the Assign activity using the following code. The Enumerable.Concat method concatenates the list variables that are converted As Enumerable. All lists that require merging need conversion from a List type to an Enumerable type. The ToList() function converts the combined Enumerable list into a List data type for further processing:
Enumerable.Concat(StudentsList.AsEnumerable, EmployeeList.AsEnumerable).ToList
By now, we have one List variable that we can use for further processing. Further, if we look closely at the data values we have in both lists, we can see that the name "Daniel" is available in both lists. Once we merge the two lists into CombinedPeopleList, the new list now contains duplicate entries for "Daniel". The next section of the chapter focuses on how to remove duplicate entries.
Removing data in lists
Data removal from a list is made easy by the Remove From Collection activity. We can use this activity to remove the duplicate entry we have for "Daniel" by following these next guidelines:
- Search for the Remove From Collection activity from the Activities panel and place it below the Assign activity.
- Configure the Remove From Collection activity by configuring the Item property as "Daniel" and configuring the Collection property by providing the CombinedPeopleList variable. This activity removes the first occurrence of the name "Daniel" from the list.
The data is now ready for modification. The next section of the chapter focuses on how to convert data in a list to uppercase.
Modifying data in lists
Lists contain multiple data values that we can access using an index. Similarly, this functionality also enables the user to loop through data elements while performing different actions for each data element.
Let's take a look at how to loop through items and update each item in a list. In our scenario, we will update items in the list by converting them to uppercase letters. Proceed as follows:
- Search for a For Each activity from the Activities panel and place it below the Add To Collection activities.
- Change the TypeArgument property in the Properties panel of the For Each activity to String. This property indicates the data type of each element within the list. Hence, our list is a String list, so we have to change the property to String.
- Configure the Values property of the For Each activity by indicating the CombinedPeopleList list variable. It also updates the In segment of the For Each activity with the same configuration. The item variable specified in the ForEach segment of the loop is a particular variable that is only applicable within the For Each loop. The item variable holds the data element of the current iteration during execution.
- Search for an Assign activity from the Activities panel and place it inside the Body container of the For Each activity.
- Since we need to update the item in the list, let's place the item variable in the To segment of the Assign activity.
- Configure the Value segment of the Assign activity using the following code, which converts the value in the item variable to uppercase:
StrConv(item, VbStrConv.Uppercase)
- Create another list variable of type String through the Variables panel and name it ModifiedList.
- Change the Scope field of the ModifiedList variable to the outermost sequence.
- Change the default value of the ModifiedList variable to New List(Of String) to initialize the List variable as a string list.
- Place another Add To Collection activity below the Assign activity in the For Each loop.
- Configure the Collection property of the activity by specifying the newly created ModifiedList variable.
- Configure the Item property of the activity by providing the item variable. The Assign activity above the Add to Collection activity converts the value in the item variable to uppercase and overwrites its value. Hence, we are using the same variable to add the updated value to the new collection variable.
- Let's now print the results. Search for a Write Line activity and place it below the For Each loop.
- Configure the Write Line activity using the following code, which converts the final list into one string variable that we can print in the Output panel:
String.Join("|", ModifiedList)
Once you reach this point, the workflow you built should look similar to this:
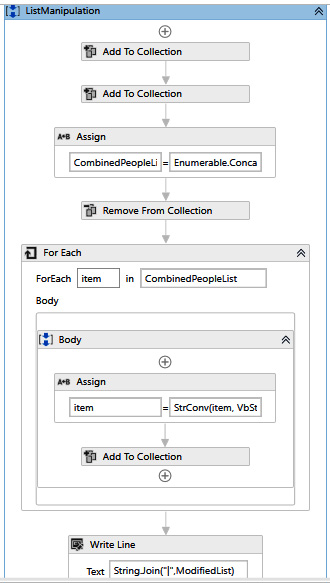
Figure 7.12 – List data manipulation workflow
Similarly, the final configuration of the variable you created in the Variables panel should look similar to this:
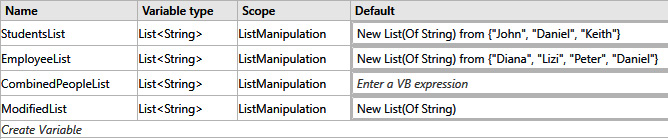
Figure 7.13 – List data manipulation variables in Variables panel
- Execute the program and observe the output in the Output panel. You should receive the following output:
JOHN|KEITH|ANDREW|DIANA|LIZI|PETER|DANIEL|JANE
The steps performed in this section give you a good understanding of how to manipulate data using List variables. Compared to arrays, the additional features List variables offer—such as adding or removing elements during runtime—make life easy when processing data elements. Lists are capable of holding any type of value, including numeric values. Numeric data has its unique functionalities such as summing up, division, multiplication, and so on. The next section of the chapter focuses on a few commonly used numeric calculations.
Understanding numeric calculations
Numeric data types come in handy while performing different simple-to-complex calculations. We can perform many calculations using numeric values, such as summing up, calculating averages, finding minimum and maximum values, and so on. Performing numeric calculations in UiPath is pretty easy. Let's try a straightforward example.
Create a List variable that holds the marks a student obtained during the last semester for all five subjects. Our task is to calculate the total and the average of the marks. Proceed as follows:
- Open UiPath Studio and create a new Blank Process activity.
- Double-click on the Main.xaml file to open the file in the Designer panel.
- Search for a Sequence activity and add it to the Designer panel.
- Create a new List variable of type String using the following code. The variable includes the results the student obtained for five subjects:
New List(Of String) From {"75", "34.4", "54", "34", "55"}
The scores on the list are of the String type. We cannot use the String data type to perform the calculations. As a result, we need to convert them to numeric data types while we perform the calculation.
- Create a new variable named TotalScore of type Int32.
- Create another variable named AverageScore of type Double.
- Drag and drop a For Each activity to allow us to loop through the items in the list.
- Configure the TypeArgument property of the loop with the String type.
- Drag and drop an Assign activity into the body of the For Each loop. We will be using the Assign activity to calculate the total of scores by adding up each item's value in the loop.
- Configure the To segment of the Assign activity by providing the variable name TotalScore.
- Configure the Value segment of the Assign activity with the following code. There are values with decimals in the list. Decimal values cannot be converted directly to Int32. Therefore, for our scenario, we will first convert the string to Double and round it off to the nearest integer before converting it to Int32:
TotalScore + Convert.ToInt32(Math.Round(Double.Parse(item)))
- Drag and drop a Write Line activity below the For Each activity and configure it to write the TotalScore variable value as a string in the Output panel.
- Place another Assign activity below the last activity and configure the Value segment with the following code, which uses the value in the TotalScore variable to generate the average score. We need the number of items in the list to calculate the average—the StudentMarks.Count code gives us the number of subjects the student completed:
TotalScore / StudentMarks.Count
- Configure the To segment of the Assign activity by specifying the AverageScore variable. The AverageScore variable will hold the average marks derived from the previous calculation.
- Place a Write Line activity below the For Each activity and configure it by converting the value in AverageScore to String to print the value in the Output panel. Once you reach this point, the workflow you have built should look similar to this:

Figure 7.14 – Numeric data manipulation workflow example
- Run the workflow and observe the results in the Output panel. You should see the total shows up as a whole number, whereas the average consists of decimal values.
There are many functions available in .NET Framework to perform numeric calculations. The example provided here is fundamental. It is intended to give you a high-level idea of performing some numeric manipulations such as rounding up values, calculating totals, and deriving averages. The knowledge you already gained through this chapter will give you the foundation to explore other functions in the Math library and the different other functions available for numeric calculations. Explore other methods and familiarize yourself with those functions as they will be useful when building automation solutions for your organization.
While numeric data types have their unique capabilities, Dictionary-type variables offer a unique way of managing data using the key-value pair concept. The next section of the chapter explains how to manipulate data using Dictionary variables.
Understanding dictionary manipulation
The Dictionary type has a key difference compared with List and Array types. While lists and arrays hold multiple data elements of the same data type, a dictionary can hold each data element along with a unique key. This combination is named key-value pairs. The user chooses the data type of the key and the value during variable creation.
The Dictionary type is mainly used for storing configuration details or other similar information. You may wonder why you should not use a List type to store and access configuration data. In real-world scenarios, each configuration data element has a descriptive name that describes what the configuration represents. For example, if the configuration file has data on Uniform Resource Locators (URLs), timeouts, and file paths, the file may look like this:
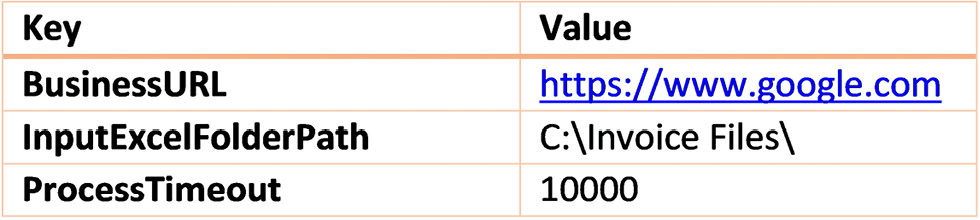
Figure 7.15 – Sample structure of a configuration file
Dictionary variables in similar scenarios make it easier for the user to understand which values are used within the workflow because of the descriptive key. This same concept is impossible with List or Array variables because values are accessed only by an index in lists and arrays.
UiPath Studio offers an environment to work with dictionaries with ease to perform actions such as initiation, addition, removal, extraction, and reassigning values. Let's work on a simple example to understand how to work with dictionaries.
Initialization of dictionaries
A dictionary is also a collection variable like lists and arrays. Therefore, the initialization procedure is similar to those data types. Initialization occurs when creating a variable through the Variables panel or within a workflow using an Assign activity.
Let's create a simple Dictionary variable that holds personal information such as a person's name, age, country, and birth date. Proceed as follows:
- Open UiPath Studio and create a new Empty process.
- Open the Main.xaml file in the Designer panel.
- Drag and drop a new Sequence activity to start building the workflow.
- Drag and drop an Assign activity from the Activities panel into the Sequence container.
- Open the Variables panel and click on the Create Variable option to create a new Dictionary variable by providing the name "PersonalData". The default data type of the variable is String.
- Click on the Variable Type field of the variable to access the dropdown and select Browse for Types. This action will open up the Browse and Select a .Net Type window.
- Search for the Dictionary type in the window and select the Dictionary<Tkey, TValue> item that resides under mscorlibSystem.Collections.Generic, as shown in the following screenshot:

Figure 7.16 – Creating a Dictionary-type variable
- Select the String data type for Key and String for Value from the two drop-down options that appear at the top, and click on the OK button. Once you create the variable, the Variables panel should show the data type of the variable as Dictionary<String, String>.
- Configure the To segment of the Assign activity by providing the new variable name to initialize it by providing the following code in the Value segment:
New Dictionary(Of String, String)
The code provided initializes the dictionary with a new Dictionary object of the specified type to make it ready for later use. Now, let's assign some values to the new Dictionary variable.
Adding new items to a dictionary
Since we now have a usable variable, let's add new values to the dictionary. This section will add new items such as the name, age, country, and date of birth of a person to the dictionary. Proceed as follows:
- Search for the Invoke Method activity from the Activities panel and place it below the Assign activity.
- Configure the TargetObject property of the Invoke Method activity by providing the name of the PersonalData dictionary variable.
- Configure the MethodName property of the Invoke Method activity by providing the method name as Add. The Add method is a method available in. NET Framework to add new items to a dictionary variable.
- Expand the Properties panel to view the properties of the Invoke Method activity.
- Click on the button next to the Collection property in the Properties panel to open the Parameters pop-up window to provide the new values for the key-value pair. The dictionary expects two input arguments for each item you add to the Dictionary variable.
- Click on the Create Argument option in the Parameters popup to create the first input argument. The first argument refers to the key of the new value. We plan to add a record that describes information on a person such as Name, Age, Country, and Birth Date. These IDs are keys that we should place in the dictionary.
- Configure the Direction value as In and the Type value as String since the dictionary expects a string as the key.
- Provide the first key value as Name.
- Create a new argument following the same method to provide a value for the new key you added. Specify the name of the person as John Doe in the second argument. The Name key would refer to the second argument that holds the value of the person.
The Parameters screen should look similar to this once you complete the aforementioned steps:

Figure 7.17 – Adding the first item to a Dictionary variable
- Click the OK button to close the Parameters screen.
- Add three more Invoke Method activities and configure them accordingly to add Age, Country, and Date of Birth values to the dictionary.
We now have data in the variable. Let's try to extract the data we inserted to use it in our workflow.
Extracting data from Dictionary variables
You are familiar with extracting data from lists and arrays. We used an index to access data elements in Array and List variables. Similarly, in Dictionary variables, we use the key to access data elements instead of the memory index. To do this, proceed as follows:
- Open the solution we previously worked on to create and assign data to a Dictionary variable.
- Place a Write Line activity below the last Invoke Method activity.
- Configure the Write Line activity with the following code to print the name of the person:
PersonalData("Name").ToString
- Run the program and observe the value printed on the Output panel.
- Configure the Write Line activity to show the rest of the values, and test it to understand better how to extract values from Dictionary variables.
Now that you have reached this point, you should be familiar with manipulating data in Dictionary variables. The steps provided in this section enable you to easily initialize, assign, and retrieve values from Dictionary variables to use in real-world use cases. The use of Dictionary variables is similar to List and Array variables. The only difference is that Dictionary variables' values are accessed through a unique key instead of the memory location.
Understanding pattern-based data extraction with regexes
We discussed extracting, converting, and performing several other manipulations on different data types during this chapter. Up to now, we discussed pretty straightforward situations where you had the exact value you need to manipulate. However, there are scenarios where you need to extract specific values based on a pattern from larger datasets, such as text paragraphs. We need to use unique functionalities such as regexes to extract only the value we need in such scenarios.
The importance of regexes is that it enables the user to match, locate, and extract values based on a specific pattern. For example, if you have a text paragraph that contains account numbers and email addresses, you can use regexes to extract only email addresses from the input string.
However, building regexes can be challenging. UiPath provides a regex builder to simplify the complexities around these expressions. Regexes are commonly used to parse text and for input validation, data scraping, and string manipulation. Hence, regexes are a part of string manipulation. However, we thought of addressing regexes separately as they are quite different from the other manipulation methods that we have covered.
UiPath provides three methods that use regexes along with RegEx Builder. Each method is a separate activity in UiPath that is associated with RegEx Builder. The three methods are listed here:
- Matches: Used to search for a specific pattern in an input string and returns all matching values as IEnumrable<Match>. You can access values in this type by using a For Each activity by setting the Type Argument field to System.Text.RegularExpressions.Match.
- IsMatch: Used to check whether a specific pattern exists in the input string. This function returns a Boolean value based on the result.
- Replace: We already discussed the String.Replace function. However, the String.Replace function expects us to give the exact string to replace. The Replace function provided with RegEx Builder enables the user to replace values that fall under a specific pattern mentioned by the regex with a new value.
Each activity includes a button that enables you to navigate to the RegEx Builder screen, allowing you to build the activity's regex. The RegEx Builder screen looks like this:

Figure 7.18 – RegEx Builder screen
The sections of the RegEx Builder screen are explained as follows:
- Test Text: A text editor where the user can test a specific text against an expression. The parts of matching text patterns in the test text will be highlighted, validating the expression.
- RegEx: Allows searching for a given text, number, character, or a combination of many.
- Value: Contains precisely the text, number, or character that needs to be retrieved.
- Quantifiers: A drop-down list that consists of types of results to be retrieved based on the user requirement. The drop-down list enables the user to extract the exact match or decide whether the expression can expect zero or more matching text values.
- Full Expression: Indicates the final expression built by adding one or more expression types.
Let's try some of these options with a simple example. We are given the following string:
"You have an amazing opportunity to connect with one of the celebrities to ask questions. Please reach out to [email protected] or [email protected] to reserve your seat today. For more information, reach out to 5992754159."
We need to use and extract all the email addresses available in the string. To do this, proceed as follows:
- Open UiPath Studio and create a new Blank Process activity.
- Open the Main.xaml file in the Designer panel to start building your workflow.
- Place a Sequence activity in the Designer panel.
- Create a new string variable named InputString to hold the input string given to us.
- Place an Assign activity within the Sequence container and assign the InputString variable The string given above in the block section.
- Search for the Matches activity from the Activities panel and drag and drop it below the Assign activity.
- Configure the Input property of the Matches activity by providing the InputString variable name. The Input property provides the string with the regex applied.
- Click on the Configure Regular Expression button on the Matches activity to open the RegEx Builder window.
- Copy the input string that we want to use and paste it in the Test Text section of RegEx Builder.
- Select the regex type as Email from the Expression Type dropdown. Once you select the type, you can see the prebuilt regex for emails that show up in the Full Expression section. Further, it will highlight the two email addresses we have in the Test Text section.
- Configure the Result property of the activity by creating a new variable named EmailList using the Ctrl + K variable creation shortcut.
- Search for a For Each activity and place it below the Matches activity.
- Configure the Type Argument field of the For Each activity by searching for System.Text.RegularExpressions.Match as the type of each item.
- Place a Write Line activity inside the loop and configure it with the item.ToString code to print the matching email address of the current iteration.
- Execute the workflow and monitor the Output panel for the extracted email addresses.
- Similarly, try doing the same steps to extract the phone number from the text.
The data we receive during any process may not always be perfect. As a result, extracting the expected data and transforming it to the format we need is always mandatory. We always work with data; therefore, knowing how to manipulate data using different methods comes in handy when building automation solutions. There are straightforward transformation methods, such as the methods we have for string, integer, and date-time formats. However, regexes come in handy when we work with unstructured data where extraction is not straightforward.
Summary
Manipulating data while building automation workflows is very important. Data manipulation enables you to read, filter, sort, extract, and perform calculations to derive meaningful data out of raw input data. Different variable types have their unique ways of manipulating data. Therefore, it is essential to understand which functionalities UiPath offers to perform various manipulations based on each data type. This chapter provided you with a good understanding of how to manipulate data in the most commonly used variable types such as strings, arrays, lists, and dictionaries.
The concepts learned in this chapter are very helpful in building complex workflow solutions with many manipulations. The following chapters use the basic knowledge gained in this chapter to perform complex actions such as interacting with Excel files, emails, user interfaces (UIs), and so on. As a result, it is essential to understand the concepts and methods described in this chapter. The next chapter covers one of the most critical topics in UI automation: selectors. The concepts you learned throughout this chapter will prove useful while performing UI automation.