
Chapter 15: Invoice Processing – Performer
In Henry's Food Mart, the finance and accounting department has selected the Invoice Processing process for automation. The Invoice Processing process reads through emails and downloads the invoices that have been received in an email attachment as a PDF. Then, it extracts customer information and invoice particulars from the invoices and enters them onto the Order Entry CRM web page.
You started building this process by following the Dispatcher-Performer model. In Chapter 14, Invoice Processing – Dispatcher, you learned how to build an automation that downloads the unread invoices from emails, extracts the customer details and invoice particulars from each invoice, and then uploads them to the Orchestrator queue named HenryFoodMartInvoice.
In this chapter, you will build the Performer model to enter the invoice data onto the Order Entry CRM web page.
The following is a list of what you will learn as part of this Invoice Processing – Performer project:
- Browser automation
- Working with different types of workflows
- Consuming Orchestrator queues
- Modifying selectors
- Logging in UiPath Studio
- Handling exceptions
- Deserializing JSON
- Working with DataTables
- Updating the queue status
Technical requirements
Let's understand the requirements that you will need for this project:
- UiPath Studio Community/Enterprise/Academic Alliance Edition version 20.10 and greater, which must be connected to the UiPath Orchestrator service.
- Access to the UiPath Orchestrator service
- The Order Entry CRM web page
- A Google Chrome browser
- Access to the internet
You can get the entire code for the invoice processing dispatcher from GitHub at https://github.com/PacktPublishing/UiPath-Associate-Certification-Guide/tree/main/Chapter15/Solution.
Project overview
In this chapter, you will be designing the performer model of the invoice processing process. Let's understand this process in detail. Here are the following steps that you should perform:
- Program a robot to start the Order Entry CRM web page.
- Program the robot to read transaction items from the queue named HenryFoodMartInvoice in the Orchestrator workflow.
- Program the robot to extract the following relevant fields from the transaction item that is read from the queue:
- Customer Details:
- Customer name
- Customer address
- Customer phone number
- Customer email ID
- Invoice Particulars:
- Invoice date
- Invoice number
- Order Information:
- Item quantity
- Item description
- Item unit price
- Line total amount
- Subtotal amount
- Shipping amount
- Total amount
- Customer Details:
- Program a robot to enter the following details on the Order Entry CRM web page:
- Customer details
- Invoice particulars
- Repeat Steps 2, 3, and 4 for the remaining queue items.
- Program the robot to successfully end the process if no new queue items are present in Orchestrator.
Let's understand the entire process with the help of a diagram:

Figure 15.1 – A high-level process diagram
Now that you have understood the process overview, let's start building the automation.
Setting up the project
Before you start building the process, first, let's set up all of the UiPath studio configurations correctly:
- Open up UiPath Studio and create a new process with the name of Invoice_Processing_Performer:

Figure 15.2 – Creating a new process
- Click on Manage Packages from the Designer ribbon bar and update the current project dependencies to the following versions:
- UiPath.Excel.Activities - v2.10.4
- UiPath.Mail.Activities – v1.10.5
- UiPath.System.Activities – v21.4.1
- UiPath.UIAutomation.Activities – v21.4.4:

Figure 15.3 – The updated dependencies
- Now that you have updated the dependencies to their correct versions, let's also install one more dependency, UiPath.WebAPI.Activities – v1.7.0:
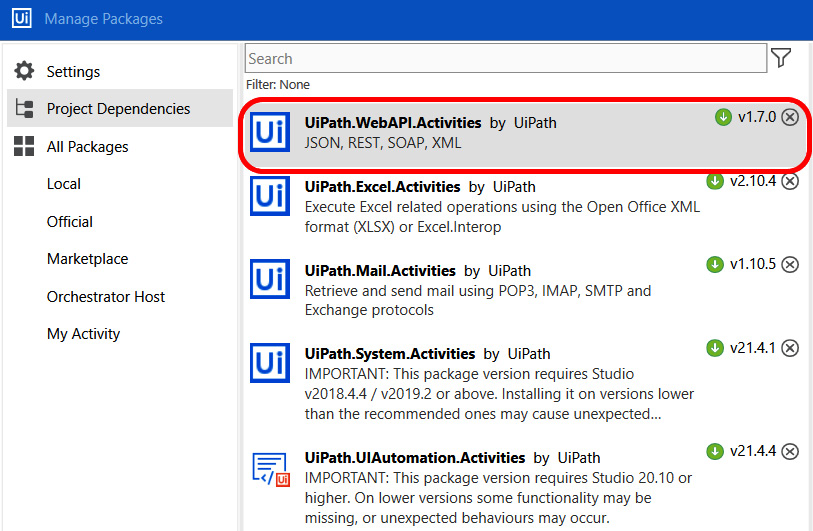
Figure 15.4 – The WebAPI dependencies added
Now that you have configured everything that is required, let's start building the process.
Starting the CRM
In this section, you will start the Order Entry CRM. Before you proceed with the building of the bot, download the Order Entry CRM from the Input File – Order Entry CRM folder from the GitHub repository at https://github.com/PacktPublishing/UiPath-Associate-Certification-Guide/tree/main/Chapter15/Input%20File%20-%20Order%20Entry%20CRM.
The Order Entry CRM has fields corresponding to the invoices, as shown in the following screenshot:
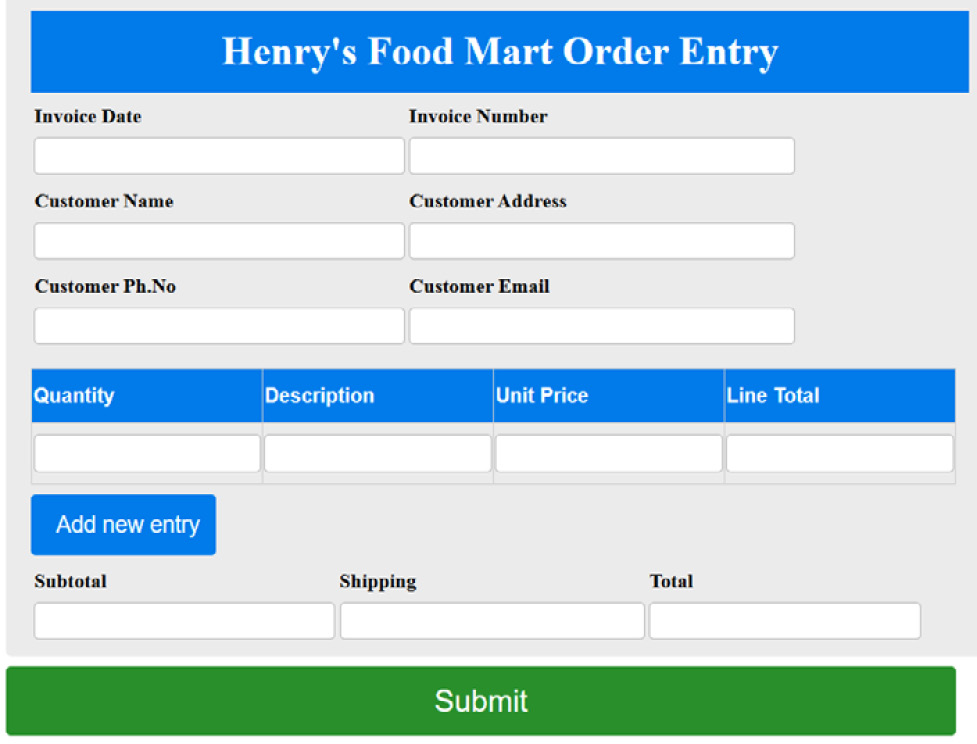
Figure 15.5 – Order Entry CRM
Create a folder with the name of CRM in the project directory, and move the Order Entry CRM page into this folder:
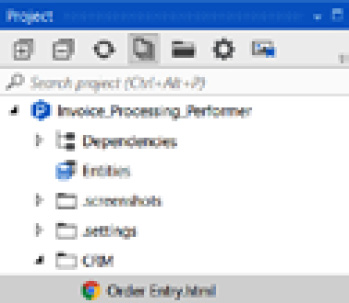
Figure 15.6 – Order Entry CRM moved into the CRM folder
Now that you have downloaded the CRM, let's start building the automation:
- In UiPath Studio, open the Main.xaml file.
- Drag and drop the Open Browser activity from the Activities panel into the Designer panel.
- Next, click on the Properties panel of the Open Browser activity and type in Environment.CurrentDirectory+"CRMOrder Entry.html" underneath Url.
- Choose Chrome as the BrowserType option:
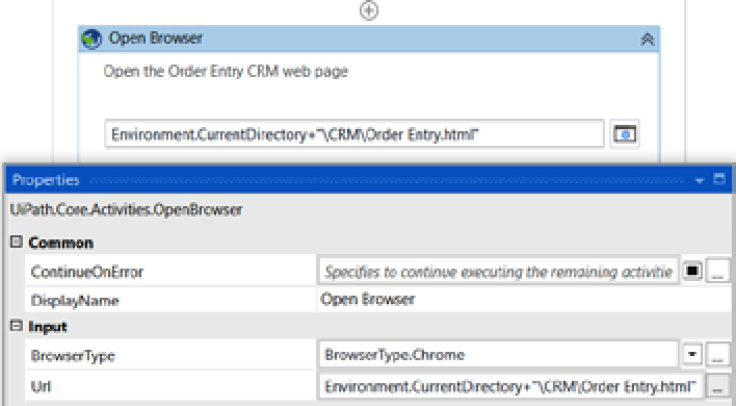
Figure 15.7 – The Open Browser activity
- Drag and drop the Maximize Window activity inside the Open Browser activity. This will ensure that the Order Entry CRM web page always opens up in a maximized window.
Excellent! Now that you have opened up the Order Entry CRM web page, let's start reading the data from the queue. Then, we will enter the records into the CRM.
Processing the queue
In this section, you will read transaction items from the queue and enter them into the Order Entry CRM web page.
Let's start by building the workflow:
- Create a new Flowchart workflow with the name of Read_From_Queue.
- Next, drag and drop a Sequence activity, rename it to Fetch transaction item, and set it as the start node:

Figure 15.8 – The Fetch transaction item sequence set as the start node
- Inside the Fetch transaction item sequence, drag and drop the Try Catch activity.
- Inside the Try block of the Try Catch activity, drag and drop the Get Transaction Item activity:
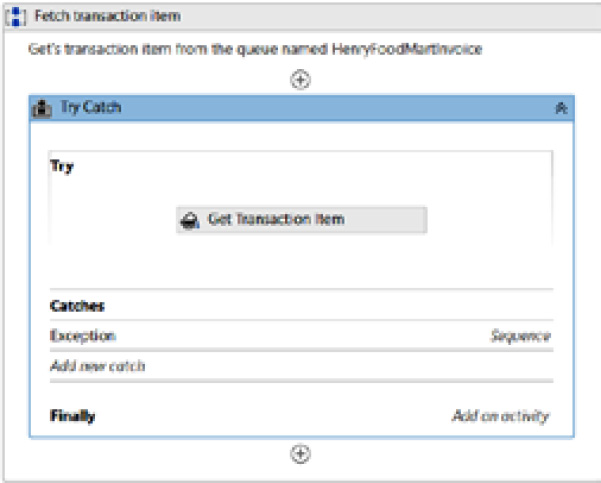
Figure 15.9 – The Get Transaction Item activity
- Click on the Properties panel of the Get Transaction Item activity and pass in the following properties:
- QueueName = "HenryFoodMartInvoice"
- Folder Path = "Packt"
In this case, the queue in Orchestrator is present in the folder named Packt. Therefore, to fetch the queue from the Packt folder, Packt has been passed in the Folder Path section.
- Add a new variable, called transactionItem, to the TransactionItem property under Output:
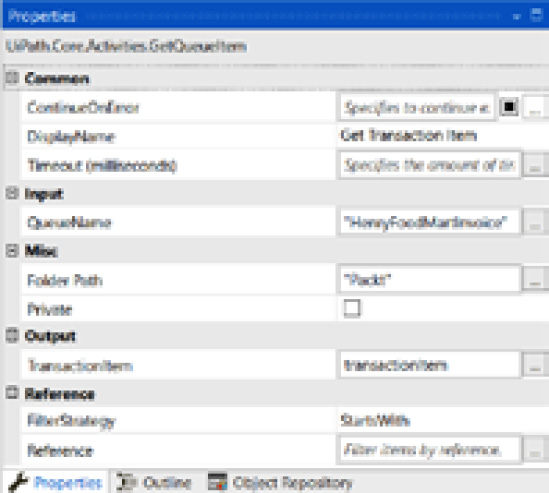
Figure 15.10 – The Properties panel
- Inside the Catches block of the Try Catch activity, catch an Exception value and add a Log Message activity. The Log Level property should be Error, and the Message section should be "No queue found at the mentioned folder path"+vbLf+exception.Message+vbLf+exception.Source.
- Navigate to the Read_From Queue flowchart workflow, and drag and drop the Flow Decision activity that connects to the Fetch transaction item sequence.
- Type in transactionItem IsNot Nothing underneath the Condition property of the Flow Decision activity:
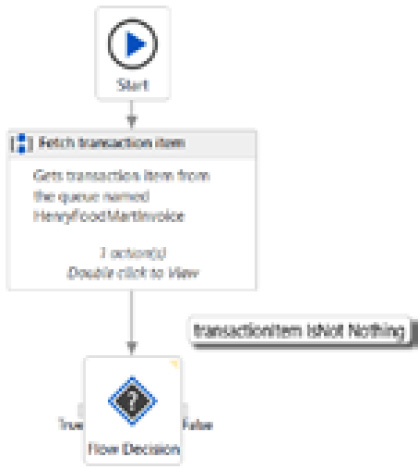
Figure 15.11 – The Flow Decision activity for checking a transaction item
This Boolean condition will give you two outcomes: either TRUE when transaction items are present in the queue or FALSE when there is no transaction item.
- Drag and drop a Log Message activity connecting the False branch. Set the Log Level property to Info, and type "No more transaction items present" into the Message section:
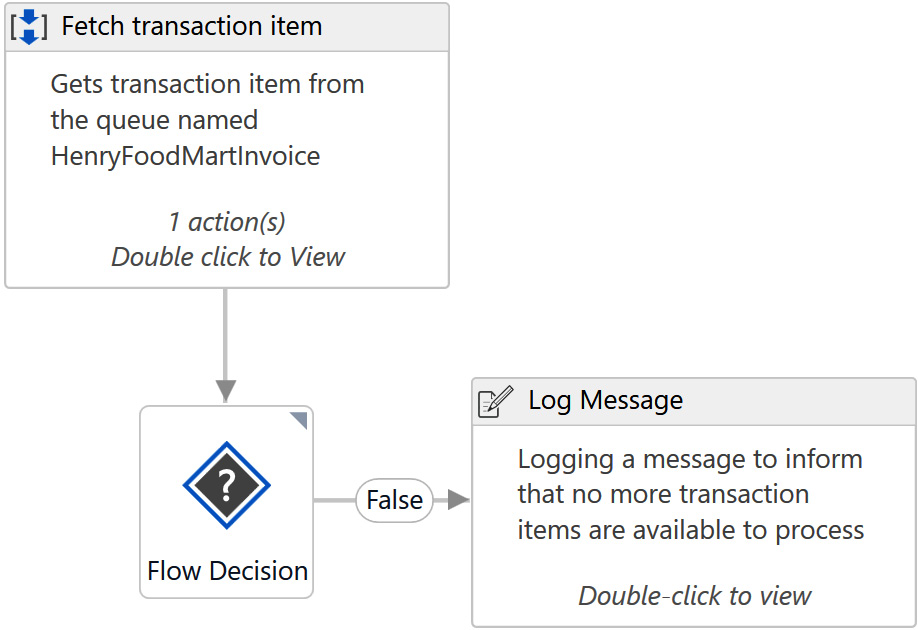
Figure 15.12 – Showing no new transaction items are present in the queue
If the Flow Decision activity condition is TRUE, you can go ahead and retrieve the Customer Details and Invoice Particular details from the transaction item. So, let's build the process in which to retrieve invoice details from the transaction item.
Retrieving data from the transaction item
In this section, you will extract the Customer Details and Invoice Particular details from the transaction item that has been read from the queue:
- Drag and drop a Sequence activity and connect it to the True branch of the Flow Decision activity. Then, rename the Sequence activity to Retrieve data from transaction:
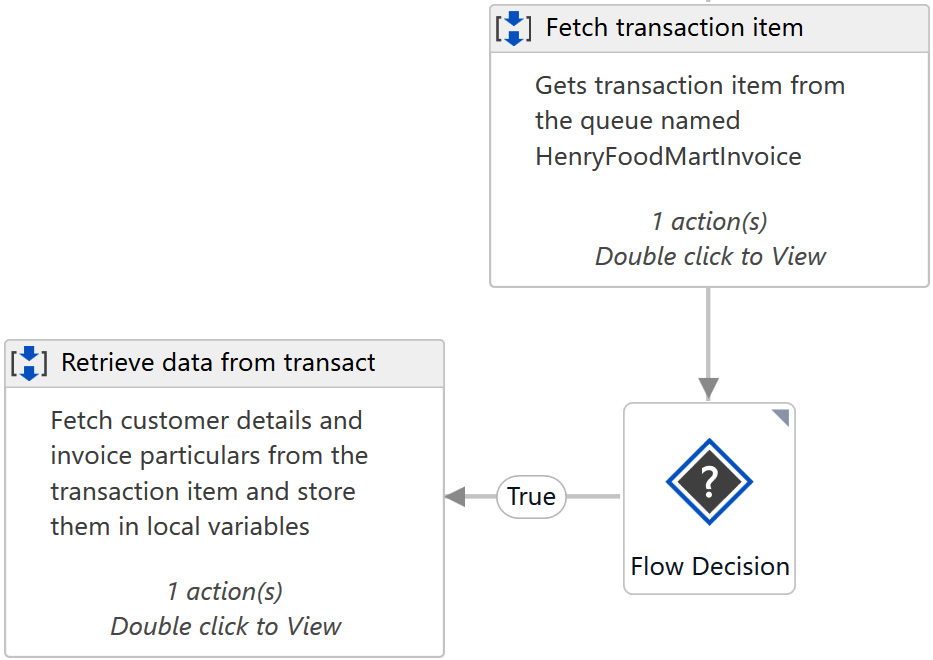
Figure 15.13 – Retrieving data from the transaction sequence
- Inside the Retrieve data from transaction sequence, drag and drop the Try Catch activity.
- Inside the Try block of the Try Catch activity, drag and drop a Sequence activity and rename it to Fetching Invoice Date.
- Add an Assign activity inside the Fetching Invoice Date sequence. Under the Property panel, type transactionItem.SpecificContent("invoiceDate").ToString into the Value section. Next, in the To section, create a new variable, named invoiceDate, of the String type:
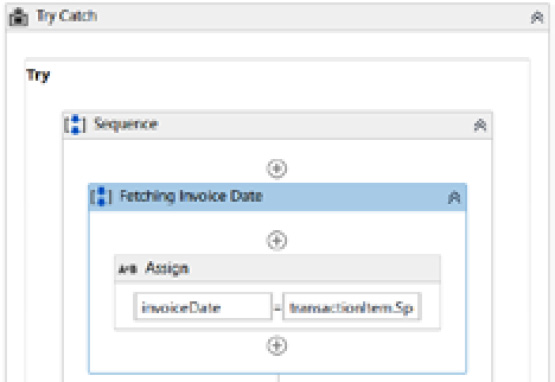
Figure 15.14 – Fetching Invoice Date
- Drag and drop a Sequence activity underneath the Fetching Invoice Date sequence and rename it to Fetching Invoice Number.
- Add an Assign activity inside the Fetching Invoice Number sequence. Under the Property panel, type transactionItem.SpecificContent("invoiceNumber").ToString into the Value section. Next, in the To section, create a new variable, named invoiceNumber, of the String type.
- Drag and drop a Sequence activity underneath the Fetching Invoice Number sequence and rename it to Fetching Customer Name.
- Add an Assign activity inside the Fetching Customer Name sequence. Under the Property panel, type transactionItem.SpecificContent("customerName").ToString into the Value section. Next, in the To section, create a new variable, named customerName, of the String type.
- Drag and drop a Sequence activity underneath the Fetching CustomerName sequence and rename it to Fetching CustomerAddress.
- Add an Assign activity inside the Fetching CustomerAddress sequence. Under the Property panel, type transactionItem.SpecificContent("customerAddress").ToString into the Value section. Next, in the To section, create a new variable, named customerAddress, of the String type.
- Drag and drop a Sequence activity underneath the Fetching CustomerAddress sequence and rename it to Fetching CustomerPhone Number.
- Add an Assign activity inside the Fetching CustomerPhone Number sequence. Under the Property panel, type transactionItem.SpecificContent("customerPhoneNo").ToString into the Value section. Next, in the To section, create a new variable, named customerPhoneNo, of the String type.
- Drag and drop a Sequence activity underneath the Fetching CustomerPhone Number sequence and rename it to Fetching CustomerEmail.
- Add an Assign activity inside the Fetching CustomerEmail sequence. Under the Property panel, type transactionItem.SpecificContent("customerEmail").ToString into the Value section. Next, in the To section, create a new variable, named customerEmail, of the String type.
- Drag and drop a Sequence activity underneath the Fetching CustomerEmail sequence and rename it to Fetching Invoice Particulars.
- Add an Assign activity inside the Fetching Invoice Particulars sequence. Under the Property panel, type transactionItem.SpecificContent("invoiceParticulars").ToString into the Value section. Next, in the To section, create a new variable, named invoiceParticulars, of the String type.
- Finally, in the Try block, add an Assign activity underneath the Fetching Invoice Particulars sequence. Then, under the Property panel, create a Boolean variable named flag in the To section, and type True into the Value section.
You will use this flag variable as a checker to verify whether an exception has occurred or not. If any exception is raised, then the flag variable will be initialized to False; otherwise, it will be initialized with True to continue forward.
- Inside the Catches block of the Try Catch activity, catch an Exception value and add a Log Message activity. The Log Level property should be Error, and the Message section should be "Transaction Item with the specified data not found "+vbLf+exception.Message+vbLf+exception.Source.
- Finally, in the Catches block, add an Assign activity underneath the Log Message activity. Then, under the Property panel, pass the flag Boolean variable into the To section and type False into the Value section.
- Navigate back to the Read_From_Queue flowchart, and drag and drop the Flow Decision activity that connects to the Retrieve data from transaction sequence.
- Pass in the flag variable underneath the Condition property of the Flow Decision activity. Doing this will ensure that if the outcome of the flag variable is True, you can proceed further with entering the details into the CRM. Else, if the outcome of the flag variable is False, that means there was an exception while retrieving data from the transaction item:

Figure 15.15 – The flow decision activity after fetching data from the transaction item
Now you have successfully retrieved the customer details and invoice particular details from the transaction item. Next, let's start entering the customer details and invoice particulars into the Order Entry CRM web page.
Entering the customer details
In this section, you will enter the customer name, address, phone number, and email in the Order Entry CRM web page:
- Create a new Sequence workflow with the name of Enter_Customer_Details.
- Create four In direction arguments and one Out direction arguments, as shown in the following screenshot:

Figure 15.16 – The Arguments panel
- Drag and drop the Try Catch activity inside the Enter_Customer_Details sequence.
- Inside the Try block of the Try Catch activity, drag and drop the Attach Browser activity and attach the already opened Order Entry CRM web page.
- Drag and drop the Type Into activity and indicate the Customer Name text field in the Order Entry CRM web page. Type in in_customerName.Trim underneath the Text property:

Figure 15.17 – Entering the customer name
- Underneath the customer name Type Into activity, drag and drop a new Type Into activity and indicate the Customer Address text field on the Order Entry CRM web page. Type in in_customerAddress.Trim under the Text property.
- Below the customer address Type Into activity, drag and drop a new Type Into activity and indicate the Customer Ph.No text field in the Order Entry CRM web page. Type in in_customerPhoneNo.Trim under the Text property.
- Below the customer phone number Type Into activity, drag and drop a new Type Into activity and indicate the Customer Email text field in the Order Entry CRM web page. Type in in_customerEmail.Trim under the Text property.
- Next, drag and drop an Assign activity. Pass the out_flag argument into the To section, and type True into the Value section.
- Inside the Catches block of the Try Catch activity, catch an Exception value and add a Log Message activity. The Log Level property should be Error, and the Message section should be "Error while entering Customer Details"+vbLf+exception.Message+vbLf+exception.Source.
- Below the Log Message activity, add an Assign activity. Pass the out_flag argument into the To section, and type False into the Value section.
- Navigate back to the Read_From_Queue flowchart. From the Project panel, drag and drop the Enter_Customer_Details.xaml workflow into the Designer panel and connect it to the True branch of the Flow Decision activity:
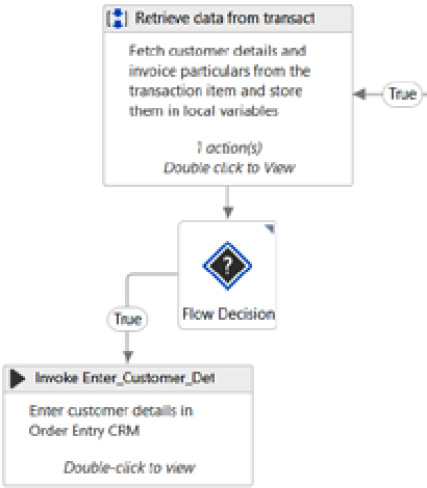
Figure 15.18 – Invoking the Enter_Customer_Details.xaml workflow
- Click on the Import Arguments button of the Invoke Enter_Customer_Details workflow activity to open the Invoked workflow's arguments window:

Figure 15.19 – Import Arguments
- Pass the flag, customerName, customerAddress, customerPhoneNo, and customerEmail variables into the Value section, as shown in the following screenshot:

Figure 15.20 – The Invoked workflow's arguments window
- Finally, drag and drop the Flow Decision activity that connects to the Invoke Enter_Customer_Details workflow activity.
- Pass the flag variable under the Condition property of the Flow Decision activity. Doing this will ensure that if the outcome of the flag variable is True, you can proceed further with entering the details of the invoice particulars in the CRM. Else, if the outcome of the flag variable is False, that means there was an exception while entering the customer details onto the Order Entry CRM web page:
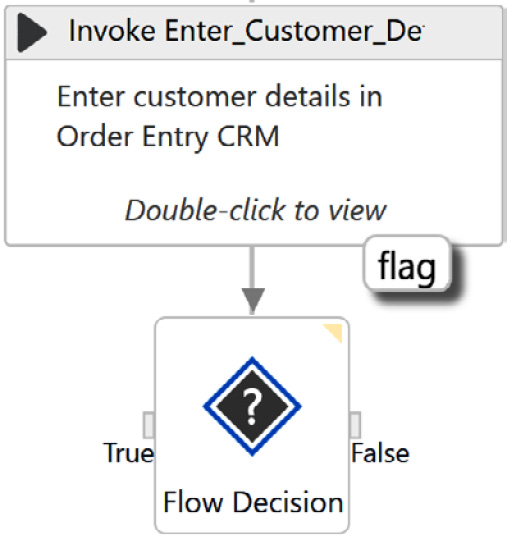
Figure 15.21 – The Flow Decision activity
Now that you have finished entering the customer details on the Order Entry CRM web page, let's move on enter the invoice particulars in the CRM.
Entering the invoice particulars
In this section, you will enter the details of the invoice particulars onto the Order Entry CRM web page. To do this, perform the following steps:
- Create a new Sequence workflow with the name of Enter_Invoice_Particulars.
- Create three In direction arguments and one Out direction argument, as shown in the following screenshot:

Figure 15.22 – The Arguments panel
- Drag and drop the Try Catch activity inside the Enter_Invoice_Particulars sequence.
- Inside the Try block of the Try Catch activity, drag and drop the Deserialize JSON activity and configure the properties as follows:
- Pass in in_invoiceParticulars under the JsonString field.
- Select the TypeArguments property as System.Data.DataTable.
- Create a new variable, named dt_invoiceParticulars, under the JsonObject field using Ctrl + K:

Figure 15.23 – Deserializing the JSON activity along with the Properties panel
Notice that the invoice particulars are in the form of the DataTable variable, and in Chapter 14, Invoice Processing – Dispatcher, you serialized the DataTable variable to JSON. In this case, the Deserialize JSON activity will deserialize the JSON output stored in the in_invoiceParticulars arguments into a new DataTable variable, named dt_invoiceParticulars.
- Drag and drop the Attach Browser activity and attach it to the already opened Order Entry CRM web page.
- Inside the Attach Browser activity scope, drag and drop the Type Into activity and indicate the Invoice Date text field in the Order Entry CRM web page. Type in in_invoiceDate.Trim underneath the Text property.
- Below the invoice date Type Into activity, drag and drop a new Type Into activity, and indicate the Invoice Number text field in the Order Entry CRM web page. Type in in_invoiceNumber.Trim underneath the Text property.
- Using the Variables panel, create three new variables named dtCount, tableRow, and rowCount, and choose the variable type as Int32 for all three variables.
- Below the invoice number Type Into activity, drag and drop the Multiple Assign activity and assign the following values to the dtCount, tableRow, and rowCount variables:
- dtCount = dt_invoiceParticulars.Rows.Count
- tableRow = 2
- rowCount = 1:

Figure 15.24 – The Multiple Assign activity
The dtCount variable determines the total number of rows present in the dt_invoiceParticulars DataTable variable.
The rowCount variable will determine the current row of the dt_invoiceParticulars DataTable variable in the loop. The rowCount variable is initialized with 1, and in every iteration, you will increase the values by 1.
The tableRow variable is used to enter the invoice particular onto the Order Entry CRM web page. The tableRow variable is initialized with 2, and in every iteration, you will increase the values by 1.
The following screenshot shows how the table row is marked on the Order Entry CRM web page:

Figure 15.25 – The table row on the Order Entry CRM web page
- Below the Multiple Assign activity, use the For Each Row activity and pass dt_invoiceParticulars into the DataTable property field.
- Inside the body of the For Each Row activity, drag and drop the Type Into activity and indicate the Quantity text field on the Order Entry CRM web page. Type in row(0).ToString.Trim under the Text property.
Let's look at the selector for this Type Into activity:

Figure 15.26 – The selector for the Type Into activity of the Quantity text field
If you look at the selector, it has a tableRow='2' attribute, which means it will type in the second row of the table for every iteration. However, you need to type in the new row for every new line item; hence, replace 2 with the tableRow variable.
The new selector should look as follows:
<webctrlparentid='dataTable' tag='INPUT'colName='Quantity'tableCol='1'tableRow='{{tableRow}}' />
Note
If the tableCol and tableRow attributes are not present in the selector, use the UI Explorer window and add them to the selector.
- Below the item quantity Type Into activity, drag and drop a new Type Into activity and indicate the Description text field on the Order Entry CRM web page. Then, type in row(1).ToString.Trim under the Text property.
Also, edit the selector here to include the tableRow variable. The new selector should look as follows:
<webctrlparentid='dataTable' tag='INPUT'colName='Description'tableCol='2'tableRow='{{tableRow}}' />
- Below the item description Type Into activity, drag and drop a new Type Into activity. Indicate the Unit Price text field on the Order Entry CRM web page. Then, type in row(2).ToString.Trim under the Text property.
Also, edit the selector here to include the tableRowvariable. The new selector should look as follows:
<webctrlparentid='dataTable' tag='INPUT'colName='Unit Price'tableCol='3'tableRow='{{tableRow}}' />
- Below the item unit price Type Into activity, drag and drop a new Type Into activity and indicate the Line Total text field on the Order Entry CRM web page. Then, type in row(3).ToString.Trim under the Text property.
Also, edit the selector here to include the tableRow variable. The new selector should look as follows:
<webctrlparentid='dataTable' tag='INPUT'colName='Line Total'tableCol='4'tableRow='{{tableRow}}' />
- Next, drag and drop the If activity and type in the condition as rowCount = (dtCount-3). This condition will allow you to enter all of the data that is present in the dt_invoiceParticulars variable, excluding the subtotal, shipping, and total values. The subtotal, shipping, and total values are present in the last three rows of the dt_invoiceParticulars variable.
- In the Then block of the If activity, add a Break activity. Once the bot reaches the subtotal field in the dt_invoiceParticulars variable, it will exit the For Each Row activity when it encounters the Break activity.
- In the Else block of the If activity, add the following two activities:
- The Click activity: Indicate the Add new entry button on the Order Entry CRM web page.
- The Multiple Assign activity: Increment the value of tableRow and rowCount variables by 1:

Figure 15.27 – The If activity
- Below the For Each Row activity, drag and drop the Type Into activity and indicate the SubTotal text field on the Order Entry CRM web page. Then, type in dt_invoiceParticulars.Rows(dtCount– 3)(3).ToString.Trim underneath the Text property.
- Below the subtotal Type Into activity, drag and drop a new Type Into activity and indicate the Shipping text field in the Order Entry CRM web page. Then, type in dt_invoiceParticulars.Rows(dtCount– 2)(3).ToString.Trim underneath the Text property.
- Below the shipping Type Into activity, drag and drop a new Type Into activity and indicate the Total text field on the Order Entry CRM web page. Then, type in dt_invoiceParticulars.Rows(dtCount– 1)(3).ToString.Trim.Split({"$"},StringSplitOptions.None)(1) underneath the Text property.
- Use a Click activity and indicate the Submit button. The bot will click on the Submit button, and all the values entered in the CRM will be saved.
- Below the Attach Browser activity, drag and drop the Assign activity. Pass out_flag into the To section, and type True into the Value section.
- Inside the Catches block of the Try Catch activity, catch an Exception variable and add a Log Message activity. The Log Level property should be Error, and the Message section should be "Error while entering Invoice Particular"+vbLf+exception.Message+vbLf+exception.Source.
- Below the Log Message activity, add an Assign activity. Pass the out_flag argument into the To section, and type False into the Value section.
- Navigate back to the Read_From_Queue flowchart. From the Project panel, drag and drop the Enter_Invoice_Particulars.xaml workflow into the Designer panel and connect it to the True branch of the Flow Decision activity:
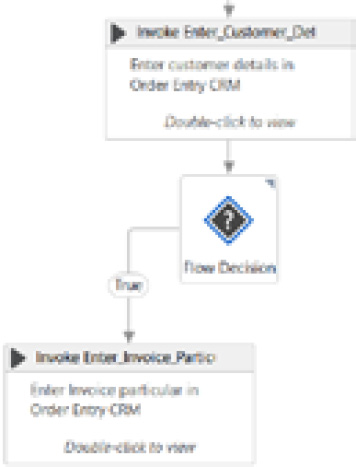
Figure 15.28 – Invoking the Enter_Invoice_Particulars.xaml workflow
- Click on the Import Arguments button of the Invoke Enter_Invoice_Particulars workflow activity to open the Invoked workflow's arguments window:

Figure 15.29 – Import Arguments
- Pass the flag, invoiceDate, invoiceNumber, and invoiceParticulars variables into the Value section, as shown in the following screenshot:
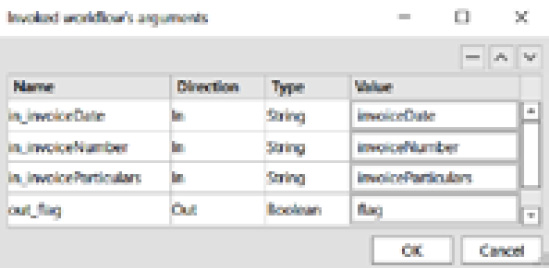
Figure 15.30 – The Invoked workflow's arguments window
- Finally, drag and drop the Flow Decision activity that connects to the Invoke Enter_Invoice_Particulars workflow activity.
- Pass the flag variable under the Condition property of the Flow Decision activity. Doing this will ensure that if the outcome of the flag variable is True, you can proceed further with the new transaction item. Else, if the outcome of the flag variable is False, that means there was an exception while entering the details of the invoice particulars onto the Order Entry CRM web page:
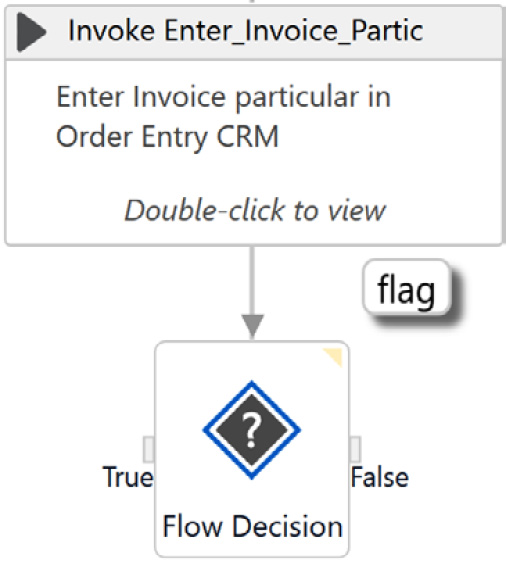
Figure 15.31 – The Flow Decision activity
Now you have completed entering invoice particulars details in the Order Entry CRM web page. In the next section, let's set the status of the transaction item depending upon the outcome of the flag variable in the Flow Decision activity.
Setting the transaction item status
In this section, for every transaction item read and processed, you will set the status to Successful or Failed:
- For the True branch of the Flow Decision activity from the Invoke Enter_Invoice_Particulars workflow activity, you will set the transaction item's Status to Successful.
- For the False branch of the remaining Flow Decision activity, you will set the transaction item's Status to Failed.
So, let's set the status of the transaction item:

Figure 15.32 – A successful transaction
- Edit the properties of the Set Transaction Status, as follows:
- Set Status to Successful.
- Pass the transactionItem variable into the TransactionItem text field.
- For this process, queues were created in the folder named Packt inside the Orchestrator workflow. Hence, you will type "Packt" into the Folder Path section:

Figure 15.33 – The Properties panel of the successful Set Transaction Status activity
- Connect the Set Transaction Status activity to the Fetch transaction item sequence. Doing this will allow the bot to go and fetch the next transaction item from the queue and process it.
- Drag and drop a new Set Transaction Status activity connecting the False branch, as shown in the following screenshot:

Figure 15.34 – A failed transaction
- Edit the properties of Set Transaction Status, as follows:
- Set Status to Failed.
- Pass the transactionItem variable into the TransactionItem text field.
- Type "Packt" into the Folder Path section.
- Set ErrorType to Application.
- Type "Failed while retrieving the transaction item or entering invoice data" into the Reason section:

Figure 15.35 – The Properties panel of the failed Set Transaction Status activity
Setting the transactionItem status to Failed will update the status in Orchestrator from In Progress to Retried. A new transaction item with a New status will be added to the queue for every Retried status.
Now that the status of transactionItem has been set to Failed, let's look at how you can fetch the next transaction item from the queue.
Closing and opening the CRM
Since the status of the transaction item has been set to fail, before fetching the next transaction from the queue, you will need to close the Order Entry CRM web page and open the CRM again:
- In the Read_From_Queue workflow, drag and drop a Sequence activity connecting to the Set Transaction Status(Failed) activity. Then, rename it to Close and Open the CRM.
- Inside the Close and Open the CRM sequence, drag and drop the Element Exists activity and indicate Henry's Food Mart Order Entry on the Order Entry CRM web page. In the Properties panel, create a new variable under Exists, named isCrmExists, using Ctrl + K.
The following screenshot shows Henry's Food Mart Order Entry being indicated by the Element Exists activity:

Figure 15.36 – The Element Exists activity on the CRM page
Before closing the CRM, you can check whether the CRM is open or has already been closed. The Element Exists activity will return a Boolean as the output:
- TRUE means the CRM is still open.
- FALSE means the CRM is not available.
TRUE means the robot will need to close the CRM and open the CRM again, and FALSE means the robot will only need to open the CRM again because it is already closed.
- To achieve the previously mentioned logic, you will use the If activity below the Element Exists activity. Pass isCrmExists into the Condition field.
- In the Then block of the If activity, drag and drop the Attach Browser activity, attach the already opened Order Entry CRM web page, and place the Close Tab activity inside the scope of the Attach Browser activity.
- Below the Attach Browser activity, drag and drop the Open Browser activity and type Environment.CurrentDirectory+"CRMOrder Entry.html" into the Url field. Then, place the Maximize Window activity inside the scope of the Open Browser activity.
- In the Else block of the If activity, drag and drop the Open Browser activity and type Environment.CurrentDirectory+"CRMOrder Entry.html" into the Url field. Then, place the Maximize Window activity inside the scope of the Open Browser activity:
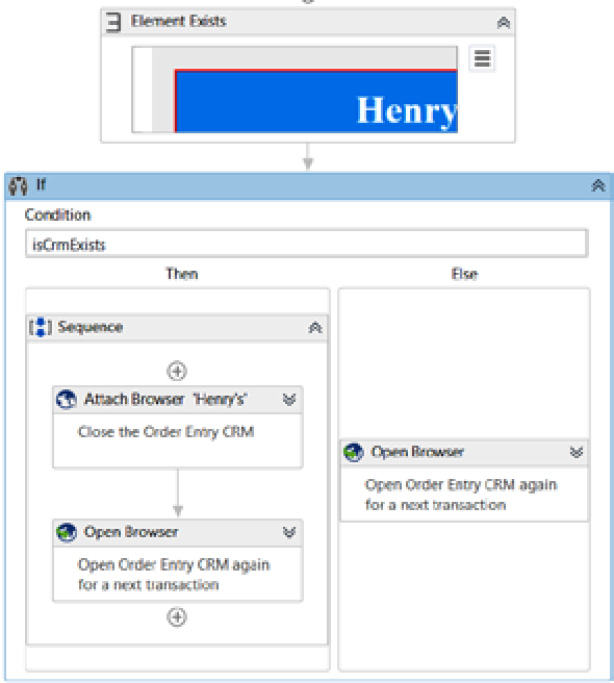
Figure 15.37 – The Close and Open the CRM sequence
- Navigate back to the Read_From_Queue workflow and connect the Close and Open the CRM sequence to the Fetch transaction item sequence.
If the transaction item fails, you have successfully built a piece of logic to close and open the CRM again. Next, it's time to assemble the Main.xaml file to run the process.
Assembling the Main.xaml file
It's time to run the process, but let's invoke the Read_From_Queue workflow inside the Main.xaml file before running the process:
- In the Main.xaml workflow, from the Project panel, drag and drop the Read_From_Queue workflow underneath the Maximize Window activity.
- Add a Close Tab activity below it:
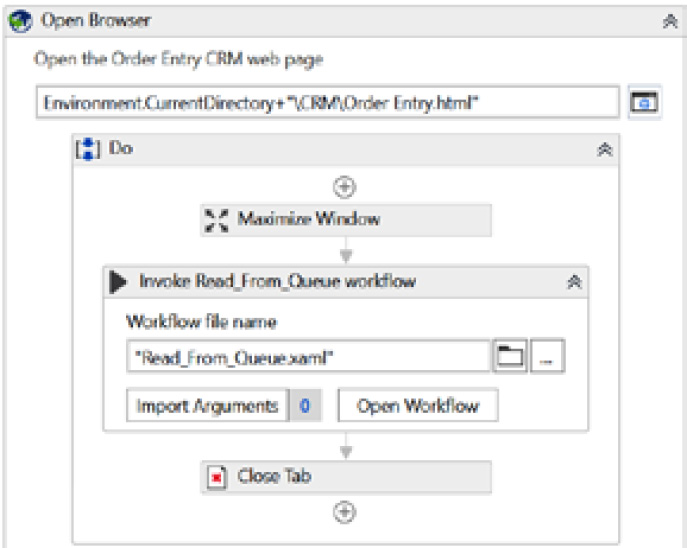
Figure 15.38 – The Main.xaml workflow
Now, let's run the entire process by clicking on the Run button from the Design ribbon bar. The process completes without any errors, and all the new transaction items from the queue have been processed and marked as successful:
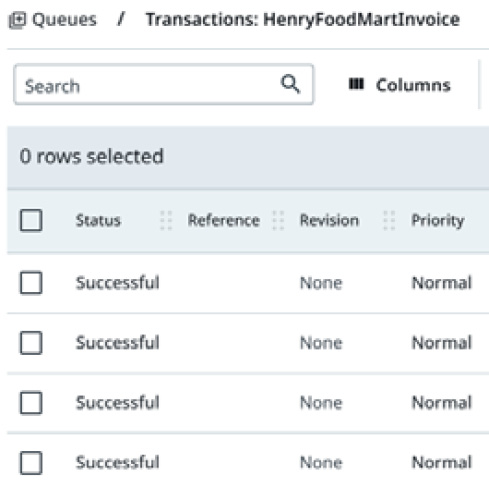
Figure 15.39 – A successful transaction item in the queue
Congratulations! You have successfully built the automation for the performer model of the invoice processing process. Now you can publish the code to Orchestrator to run the bot from the Orchestrator page or using the UiPath assistant.
Summary
In this chapter, you developed an automation process that fetches transaction items from a queue named HenryFoodMartInvoice. Later, you retrieved all of the specific data from the transaction item and stored it in a local variable. Once all the data was retrieved from the transaction item, you entered the customer details and invoice particulars on the Order Entry CRM web page.
Finally, you completed the dispatcher-performer model of the invoice processing process for Henry's Food Mart. In Chapter 14, Invoice Processing – Dispatcher, you downloaded the invoices from the mail and extracted the customer details and invoice particular details from the invoices, and uploaded them to the queue. In this chapter, you retrieved the customer details and invoice particular details from the queue and punched them into the Order Entry CRM.
In the next chapter, you will learn more about the UiPath RPA Associate Exam (UiRPA).