Chapter 4: Creating Documents in Pimcore
In the first three chapters, we provided an introduction to Pimcore and explained how to move around the admin interface. They were necessary steps because we now have the basics required to start learning how to use Pimcore for creating beautiful websites and solve all the digital innovation problems we introduced in the first chapter.
Now it is time to start facing some practical elements of Pimcore. We are going to introduce many topics throughout the coming chapters, with growing complexity, to master the entire Pimcore platform. In this chapter specifically, we will learn, step by step, how to create web pages using Pimcore.
In this chapter, we will cover the following topics:
- What is a document?
- Creating a document
- Creating a template
- Editing a document
- Inheriting documents
Learning about Pimcore documents will help you when it comes to building a simple website by defining your page format and designs.
Technical requirements
If you followed the instructions in Chapter 2, Setting Up Your Pimcore Development Environment, you should have a copy of the source code related to this book on your local machine.
So, all you need to do to run the demo connected with this chapter is clone the source code, navigate to the 4. Creating documents in Pimcore folder, and start a Docker environment.
You can find all the code files for this chapter on GitHub here: https://github.com/PacktPublishing/Modernizing-Enterprise-CMS-using-Pimcore/tree/main/4.%20Creating%20documentes%20in%20Pimcore.
To start the code on your PC, just navigate to folder 4. Creating documents in Pimcore and follow these instructions:
- Run Docker with the following command:
docker-compose up
- Then, to restore all the settings from on your local, type this:
docker-compose exec php bash restore.sh
- Navigate to http://localhost/admin and log in with your admin/pimcore credentials.
Now you are ready to play with the demo related to this chapter!
What is a document?
Generally speaking, everybody uses documents every day. We deal with document specifications for our boss or our customer, we write documents to keep track of the changes in our software… but what is a document in Pimcore? In the context of information science, we are not referring to a paper sheet, but to a digital asset that contains unstructured information; in our case, a web page is a document. Documents are organized into a document tree that creates a hierarchy between elements. This structure of documents will represent the structure of the website. This may seem complicated to read, but it is very easy to put into practice.
In the following example, we have a simple website composed of a tree web:

Figure 4.1: The document list
These are the pages we will create during this chapter and that will show all the document features.
We told you that a document could be any type of unstructured data container. Such containers can be very different, based on the kind of information found within them. To represent each document with the right amount of information, we need to classify documents using document types.
Pimcore offers many different document types that let you manage most of the use case you will face without any problems:
- Page: This is the typical web page. The path in the document tree defines the final URL.
- Snippet: As the word suggests, snippets are pieces of the document that can be embedded into pages for content reuse. We can also add snippets to snippets.
- Link: This is a raw web link that can be used inside a navigation tree.
- Email: This is a document that produces HTML content, such as pages, but also supports the sending of transactional emails, allowing you to define a sender and recipient.
- Newsletter: Very similar to email content but has some extra features to support usage as a newsletter (for instance, mass sending).
- Hardlink: Allows you to create internal links and alter the regular structure of the document.
- Folder: Like a folder on the filesystem of your PC, Pimcore folders contain multiple documents.
- PrintPage: Pages with some extra features for printing purposes, such as a Generate PDF button.
- PrintContainer: A container that organizes pages into a group to create a multi-page document that's ready for printing.
Not only does Pimcore come with document types out of the box, but you can also create your own.
In this first section of the chapter, we learned what documents in Pimcore are. This was useful for understanding what we are going to do next, as we will learn how to create a new document and implement a simple web page.
Creating a document
In this section, we will see how to create a document using Pimcore CMS. To do this, follow these steps:
- Navigate to the document tree and right-click to activate the context menu.
- Select Add page and then Blank (to create an empty page):
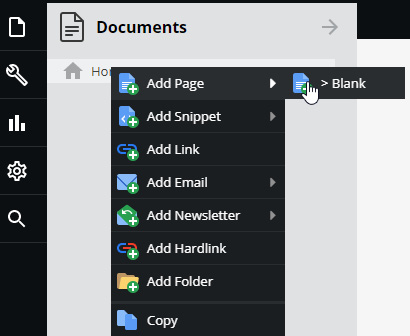
Figure 4.2: Adding a page in Pimcore
- A modal popup called Add page will appear, with three parameters for you to complete. The Title parameter is the title of the page, the Navigation parameter is the name that will be used in the navigation menu, and Key is a unique key that you choose for the document:

Figure 4.3: Entering data for the page that we are creating
- Click OK and you will see your Home page added to the menu tree:

Figure 4.4: The page added in the tree menu
- Click your newly created page, Home, and the page element will open the page in a new tab. The next figure shows the page editor:

Figure 4.5: The web page
This page tells us that we have created a web page, but the site is empty because we don't have a template. This message may seem a little bit frustrating because, after all those steps, you are still not able to enter content without creating an HTML template. This may seem quite odd if you are used to ready-to-use solutions such as WordPress, where anybody can add content without needing to write a single line of code. This is because of the Pimcore philosophy, where there isn't any superstructure between you and the tool.
In the next section, we will learn how to create a simple template. For now, we can be satisfied that we have learned how to create web pages using documents.
Creating a template
The purpose of this chapter is to give you the basics for rendering a document properly. This is only one small part of Pimcore's rendering capabilities, and we go deeper into this topic in Chapter 10, Creating Pimcore Bricks, to discover all the secrets of rendering custom data. For now, we will focus only on the information we need to create simple websites.
The Pimcore page design process
The first concepts to introduce are templates and layouts. The layout is a generic page prototype where you can leave some placeholders that will be filled by templates. For example,you can have a layout page with two columns and two placeholders, one per column. On each page, you will be able to fill the content inside each placeholder. Such placeholders are called Blocks in Twig syntax, and you can define how many blocks you want.
In the following figure, you can see how the web page design process works:
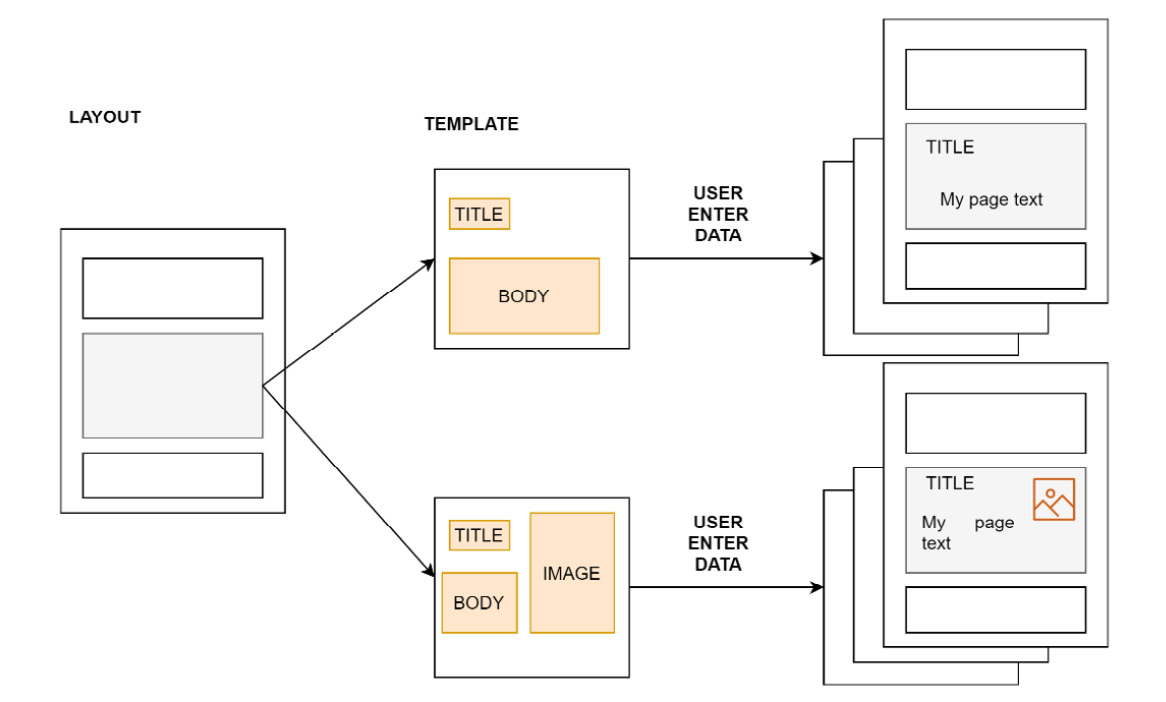
Figure 4.6: The template engine in action
Let's take a look at each stage:
- The first step is to define a Layout. This step must be done by a developer or someone that has mastered the HTML, CSS, and Twig templating languages. It is not complicated but requires you to access the source code and write down a file, and typically it cannot be done by the final user. At this stage, we will define the structure of the page; in the example, the number of rows/the common page parts are defined.
- Inside the layout, a space for the page implementation is left empty for the Template. Inside the template, the designer or the developer can add input that we filled by the user. In this manner, you can create the product page prototype and then the content manager can create many product pages.
- As the last step, the user will be able to enter data into the template placeholder. In this example, the user can enter a title, fill out the body text, and add images.
Note
Pimcore supports Twig or PHP templates. As stated in the official documentation, PHP templates are deprecated and will be retired with Pimcore X. That's why, even though many parts of the official Pimcore documentation show only PHP examples, we decided to base this book on the Twig template. We are aware that most PHP developers have been more comfortable with the plain PHP template, but it was hard to base a book on a deprecated feature.
In this section, we had an overview of Pimcore's templates; now it's time to learn how to create a template starting from scratch.
Implementing a simple layout
In this section, we will implement a simple layout that can be used to create web pages and build a website. As you will see, the process is easy and requires just a few steps to get a working template:
- Firstly, we need to tell the system to use Twig files instead of the PHP template. Navigate to /src/Controller and open DefaultController.php. You just need to add an annotation to the defaultAction method inside the controller using Template():
<?php
namespace AppController;
use PimcoreControllerFrontendController;
use SymfonyComponentHttpFoundationRequest;
use SensioBundleFrameworkExtraBundleConfigurationTemplate;
class DefaultController extends FrontendController
{
/**
* @Template()
*/
public function defaultAction(Request $request)
{
}
}
In the next steps, we will learn how the layout engine works and how you can create templates for your Pimcore websites. This is very simple, as we need just some knowledge of HTML, CSS, and PHP to create structured websites.
- At this point, we are ready to start creating a template. Navigate to /templates and create a file named layout.html.twig. The template engine behind Pimcore is Symfony, so most things that are valid for a generic Symphony project are also true for Pimcore. In the following example, we have a snippet of code that implements a Pimcore layout. You can copy this snippet into the layout.html.twig file or check the file provided in our demo:
<!DOCTYPE html>
<html lang="en">
<head>
<!-- head omitted -->
</head>
<body>
<!--Navigation bar omitted -->
{% block content %}
{% endblock %}
<hr>
<!--footer bar omitted -->
</body>
</html>
As you can see in the previous code, a Pimcore layout is just an HTML file (or a Twig template) where you add the following snippet to create a place where the user will put content:
{% block content %}
{% endblock %}
Inside the template, you want to add all the common parts of your websites, such as menus, footers, and the page structure. Of course, you can use multiple layouts across different pages, even for the same website (for instance, tree columns versus a two-column layout).
- The layout cannot be used by the final user, as it contains only the page structure definition. So, we will have to define a template. A template is another Twig file where you implement the blocks left empty in the layout. Navigate to /templates and create a folder named Default that contains a file named default.html.twig. Here, you have to extend the layout that we created in the previous step. To do so, add a simple template with a title, a subtitle, and a page body:
{% extends 'layout.html.Twig' %}
{% block content %}
<!-- Page Header -->
<header>
<div class=»container»>
<div class=»row»>
<div class=»col-lg-8 col-md-10 mx-auto»>
<div class=»site-heading»>
<h1> {{ pimcore_input(‹headline›, {‹width›: 540}) }}</h1>
<span class=»subheading»> {{ pimcore_ input(‹subheading›, {‹width›: 700}) }}</span>
</div>
</div>
</div>
</div>
</header>
{{ pimcore_wysiwyg(‹body›) }}
{% endblock %}
In this code block, we used simple HTML to define the page appearance and some Twig directives. The HTML page is composed of a header with an H1 title and a body. The highlighted parts are computed on the server side and will be rendered dynamically.
Let's take a moment to comment on each of them:
{% extends 'layout.html.twig' %}
This first statement links the template file to the parent layout. In this case, the template inherits the block from the layout.html.twig file.
The next statement indicates the beginning of the block of code that will fill the placeholder called content into the main layout file:
{% block content %}
- Then, mixed with HTML, we have some special directives that allow the user to put content inside the template. Our goal is to remove any dependency from the developer during the editing (in other words, the user must be able to enter data by themselves). This can be done easily by using Pimcore editables. We will spend a lot of time in Chapter 9, Configuring Entities and Rendering Data, going deeper into the details of editables, but for now, just think of them as data placeholders.
In our example, we need plain text values for the text and title fields, so we used a standard input box. This part of the template is very easy because, in practice, we just have to invoke a function as follows:
{{ pimcore_input('headline', {'width': 540}) }}
The first argument of the function is the name on the input, headline, in this case. Then we can have many parameters; in this case, we use a fixed width during the editing.
To add HTML text, we do the same, but using a What You See Is What You Get (WYSIWYG) interface. This is quite similar to the previous case, as you can see in the next code snippet:
{{ pimcore_wysiwyg('body') }}
Now we are able to edit documents! In the next section, we will learn how to put data inside a template and how to iterate this process to implement a real website.
Editing a document
In this section, we will learn how to create and edit a document. As we told you, a document can be any of your CMS web pages, so just from this simple lesson, you will be able to create any kind of website. The process of editing a document is very easy, and we will explore it by completing some simple steps:
- Open the admin panel and find Home, the page we created in the What is a document? section. By selecting it, you will open the web page in the main frame of the admin. As you can see in the next figure, we are going to edit the web page directly, and we will be using a mode called WYSIWYG, which is very useful because it makes the editor aware of what they are doing during the editing:

Figure 4.7: The web page editor
As you can see in the previous figure, we have some dotted areas, which are the placeholders that we added to the Twig template. These placeholders work like regular input boxes, so all you need to do is click on them and start entering text. In Pimcore, such items are called editables (as mentioned earlier).
- Click the larger placeholder and type the words Home Page; you will see the editor being filled in while you are typing the characters. In the next figure, you can see the final result of filling in the Title field:
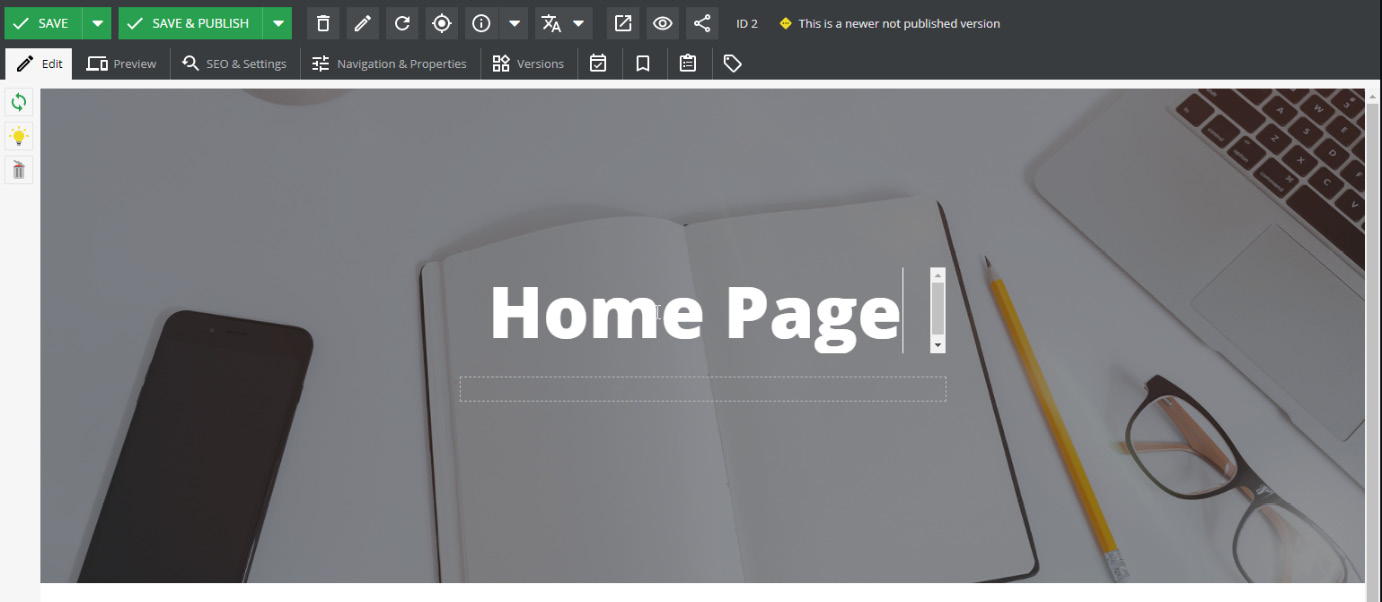
Figure 4.8: Writing the title
- Click the second placeholder (the one just below the title). As in the previous case, clicking the editor will unlock the ability for you to write any text. The difference is that the Title field is a single-line editable box, whereas this field is an HTML editor; you can select text and then apply styles as you would in any word processor. In the next figure, you can see this in action:
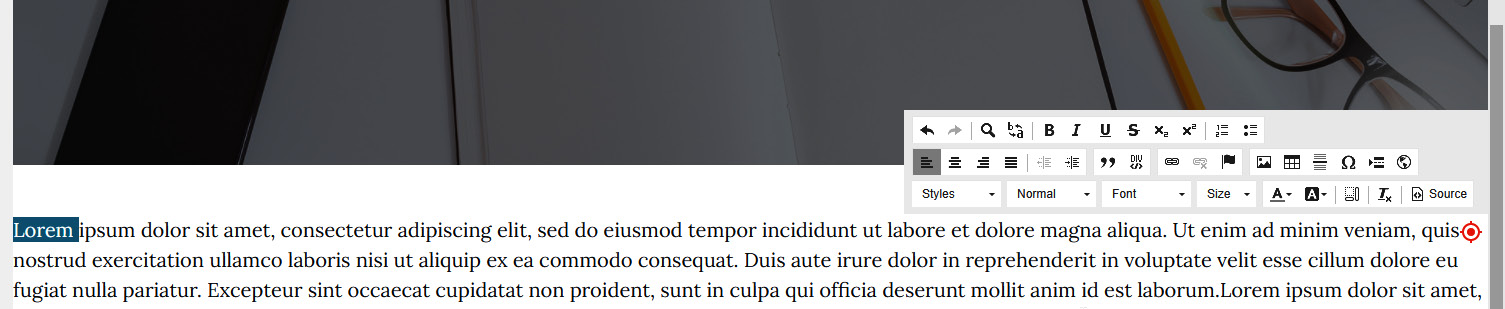
Figure 4.9: HTML editor in action
The previous figure shows the HTML text and the contextual menu that allows style settings for the text.
- Once we have filled the editable parts of the document, the web page is done. We can publish it using the Save and Publish button in the toolbar.
- Then, to view a preview of the page, just click the Preview button. In the next figure, we can see the preview tool in action. As you can see in the figure, we can choose the device to use for rendering the page (in this example, we are emulating a phone):
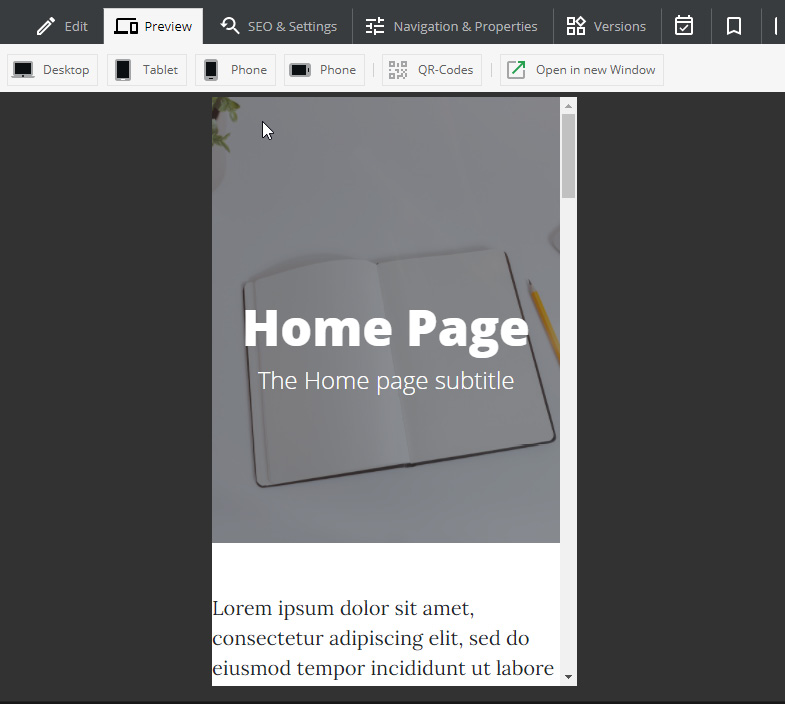
Figure 4.10: Document preview
- Finally, we have to take care of search engine settings. Click the SEO & Settings tab to enter the panel where we can edit these settings. Here we can add a title, a description, and any metatags we want:

Figure 4.11: SEO & Settings panel
On the same page, you can see a Google preview of your web page, so you can be aware of how it will look for the user searching for your web page. In the last editable component, you can define a custom URL for the page. This setting overrides the normal page structure, so it is an absolute URL.
- Finally, click the Version tab. You will see the history of a document, as shown in the following figure. Within the Version panel, you can access the history of the web pages and recover old versions in the case of errors:

Figure 4.12: Version panel
Editing documents enables us to create simple websites. This is easy by simply defining a template and then putting information into it. We have learned that we can create document instances by creating different templates, and the user can autonomously manage them using a web interface. Replicating what we have done so far is enough for building simple websites.
However, things can get a bit more complicated. For example, let's say you want to create a website catalog containing a set of products to sell. Using what we have learned so far, you can create a catalog by adding a document template for the product page; then, you can create a product page and fill in the data. Now, imagine that each product had a variety of variants; these (child) variants share a lot of information with the original (parent) product. Creating multiple pages for these variants using the process we just covered would be time-consuming. Plus, if you copied and pasted data that is similar across all the product variants and then one piece of information changed, you would have to update each page individually. This example shows us how replicating data by copying and pasting information can lead to a website that is hard to maintain.
In the next section, we will learn how to reuse the content of a document to avoid data replication using document inheritance.
Inheriting documents
Document inheritance is a feature that lets you create a pre-filled document where you can override just the section you need. Think of this feature as a "template in a template." This feature is activated by setting the Content Master Document property in the document settings. This feature applies to every document type, and it is very useful for repetitive content, such as newsletters or technical documentation.
In the following steps, we will see how to take advantage of inheritance for reusing content and organizing website content better. We will create a simple product catalog with a product (here, t-shirts) with multiple variants (one variant per color), and each variant will have its web page.
Follow these steps to do this:
- First of all, we have to create a template for a product page. So, let's create a file called product.html.twig inside /templates/Default. The process is very similar to the one followed in the Editing a document section, but this time we will have a more complex layout. In fact, we have to display product data, so we have to add more input. The next layout fragment displays the relevant part of the layout file:
<div class="breadcrumb-item">Category:{{ pimcore_input('category') }}</div>
<div ><h1>{{ pimcore_input('title', {'width': 540}) }}</h1></div>
<div class="product-price"><span>€{{ pimcore_input('price') }}</span><strike><span style='color:black'>€{{ pimcore_input('originalprice') }}<span></strike></div>
<div>Produced by: {{ pimcore_input('producer') }}</div>
<div>Made in: {{ pimcore_input('origin') }}</div>
Inside this code snippet, we have many inputs for adding all the product images (for example, category, title, discounted price, price, producer, and origin). We are now able of going into the Pimcore administrative interface and create a document item.
- Create a page in the tree menu. In our example, we will create a page for t-shirts with some variants, so the page title will be TShirt. In our case, we created this page inside a Products menu item that is the root of our catalog. Then, you have to iterate the process, creating a sub-page for each color variant (TShirt-Red, TShirt-Green, and TShirt-Yellow). The final result is shown in the next figure:
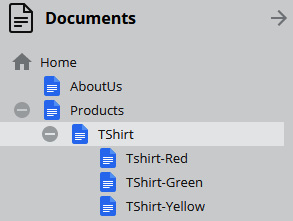
Figure 4.13: The menu with products
- Now double-click on the parent page, TShirt, and open the document.
- Now hit SEO & Settings. Click on the Template dropdown and select Default/default.html.twig:

Figure 4.14: Selecting the product template
- Repeat the previous step for all the child pages.
- Enter data for each field we added in the template. The result should be something similar to what you see in the following figure:

Figure 4.15: Editing the t-shirt product
Before editing a variant for the product that we created with these documents, we will assume that most of the information entered for this product will be the same for all the children. In fact, all products are just the same t-shirt, except for the color. Let's see in the next steps how to avoid data replication.
- Open the TShirt page and click on SEO & Settings. Then, drag and drop the TShirt page from the document tree to the Content-Master Document field:

Figure 4.16: Drag and drop the parent document
- After you click Apply, you will be prompted with the message: Are you sure? All content will be lost. When you confirm the operation, all the existing content on your page will be overridden from the inherited ones. Since the operation is completed, you now have all the editable components disabled. In the next figure, we can see how the page looks. As you can see, the placeholders are filled in automatically with the values from the parent page. You can see that the editable components are now disabled, and when you move the mouse over an editable area, a Click right to overwrite message appears:
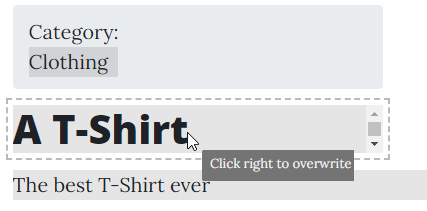
Figure 4.17: Overwriting an inherited property
- Right-click on the disabled editable; in this case, right-click A T-Shirt. This step unlocks the field and lets you change the default values for this page instance. In this case, we entered A Red T-Shirt:

Figure 4.18: After overwriting, the text is editable
In the previous figure, you can see that the product name was replaced. All the fields that are not inherited will reflect the changes from the parent document; so, if you change the price, this field will be updated in all the child pages. In that way, all common fields are entered once, and you replicate information only when you really need to.
- Now, replicate steps 6-8 for all the children of the T-shirt page tree.
In this section, we learned how to create a document by inheriting some data from a parent. This Pimcore feature lets us reuse information across a website. Using this inheritance feature, we avoided replicating common fields in the product hierarchy. This feature is another option for managing unstructured data in a more convenient way and avoiding data replication.
Summary
In this chapter, we learned how to create documents and how this feature enables us to create and manage very simple websites. The first thing we discovered, with respect to other CMS solutions, is that we don't have anything that's ready to use. Just to create the first web page, we needed to define some templates. This may seem like a waste of time, but it is in fact the opposite. Templates force you to work in a structured way from the beginning of the process. They force you to create editable web pages where the final user will be able to edit data without breaking the layout. This allows non-developers to master their content. It is what we called a detached approach in the first chapter.
If you have some experience in web development, you are probably wondering how far you can go with editables. Their flexibility can help you implement a huge amount of web pages, and you could theoretically go on and manage complex websites with them. The only limitation to this approach is that we are working with plain documents. Do you remember when we gave the definition of documents? We said that they are containers of unstructured information. That's the limitation. We can structure how information is distributed across the page, but this doesn't allow us to query or reuse data. We can create thousands of blogs or product pages with ease, but this is not enough. In fact, we will need to be more dynamic, by listing products on a category page or group blog articles by tag. You may want to implement these features using documents, but in spite of the power of Pimcore, in most cases, it will require a lot of effort, and you'll get a poor result. In fact, documents are good for rendering web pages but don't quite suit structured data or interactive content.
So, if you are wondering how to handle structured data, don't worry. In the next chapter, we will describe what data objects are and how to represent information in a structured way. This will be the basis for starting to manage data properly and render it without any duplication of content or source code.