
Chapter 9: Managing QuickSight Permissions and Usage
In this chapter, we will learn how to manage Amazon QuickSight operations and permissions. We will focus on the QuickSight permissions model and learn how to configure fine-grained permissions. We will also learn how to manage and organize QuickSight assets into folders, and how to set up threshold-based alerts and email reports.
We will cover the following topics in this chapter:
- Managing QuickSight permissions
- Managing QuickSight usage
Technical requirements
For this chapter, you will need access to the following:
- An AWS account and AWS Identity and Access Management (IAM) user, with elevated access
- The AWS Command Line Interface (CLI)
- An Amazon QuickSight account with Author and Reader users configured
- The environment created in Chapter 1, Introducing the AWS Analytics Ecosystem
- The dashboards created in Chapter 4, Developing Visuals and Dashboards
Managing QuickSight permissions
In this section, we will learn how to configure user permissions against Quicksight resources. First, let's introduce the fundamental topics we need to understand when setting up permissions:
- Principal: An AWS principal is the user (or group of users) or application that needs to access AWS resources.
- Action: Actions define the set of API operations that a principal is allowed or denied. For example, in QuickSight, the DeleteDataSet action deletes a dataset. To see a full list of QuickSight actions, refer to the AWS Documentation: https://docs.aws.amazon.com/service-authorization/latest/reference/list_amazonquicksight.html#amazonquicksight-actions-as-permissions.
- Resource: For most actions, we can narrow down the scope of a policy to a specific resource(s). Typically, a single resource has its own unique Amazon Resource Number (arn).
- Condition: AWS allows you to define access based on specific conditions. For example, a condition that gives access to an application from a specific IP address.
When granting AWS permissions, including QuickSight permissions, make sure you follow the least privilege security best practice. According to the principle of least privilege, you should only allow users to have access to the specific actions and resources they require.
Using user groups
As the number of users increases and their access patterns become more and more sophisticated, the complexity of configuring their permissions to resources also rises exponentially. In these circumstances, we can use user groups. User groups allow you to group users together and then apply permissions at the group level, rather than the individual level, which saves you time and effort. When a user joins a group, they automatically inherit the group permissions. Likewise, when a user leaves the group, then they lose access to the group's resources.
To better understand how to manage groups in Amazon QuickSight, we will use a simple hands-on example:
- First, let's create a group for the marketing department. Using a terminal with AWS CLI configured and with elevated access, type the following command, replacing the <account-id> value with the value from your environment:
$aws quicksight create-group --group-name "Marketing" --description "Group for the Marketing Department" --aws-account-id <account-id> --namespace default --region us-east-1
- Next, let's add our Reader user to this group. For this purpose, we will use the create-group-membership CLI command. Type the following, replacing the highlighted values with those from your environment:
$aws quicksight create-group-membership --member-name reader --group-name Marketing --aws-account-id <account-id> --namespace default --region us-east-1
- Next, we will use the QuickSight Console to share a new dashboard with the marketing group, rather than an individual user. Log into QuickSight as the Author user. Open the New York Taxi analysis and publish it as a brand-new dashboard. Give any name to your newly created dashboard.
- On the next screen, when sharing the dashboard, select the Marketing group and share your dashboard, as shown in the following screenshot:
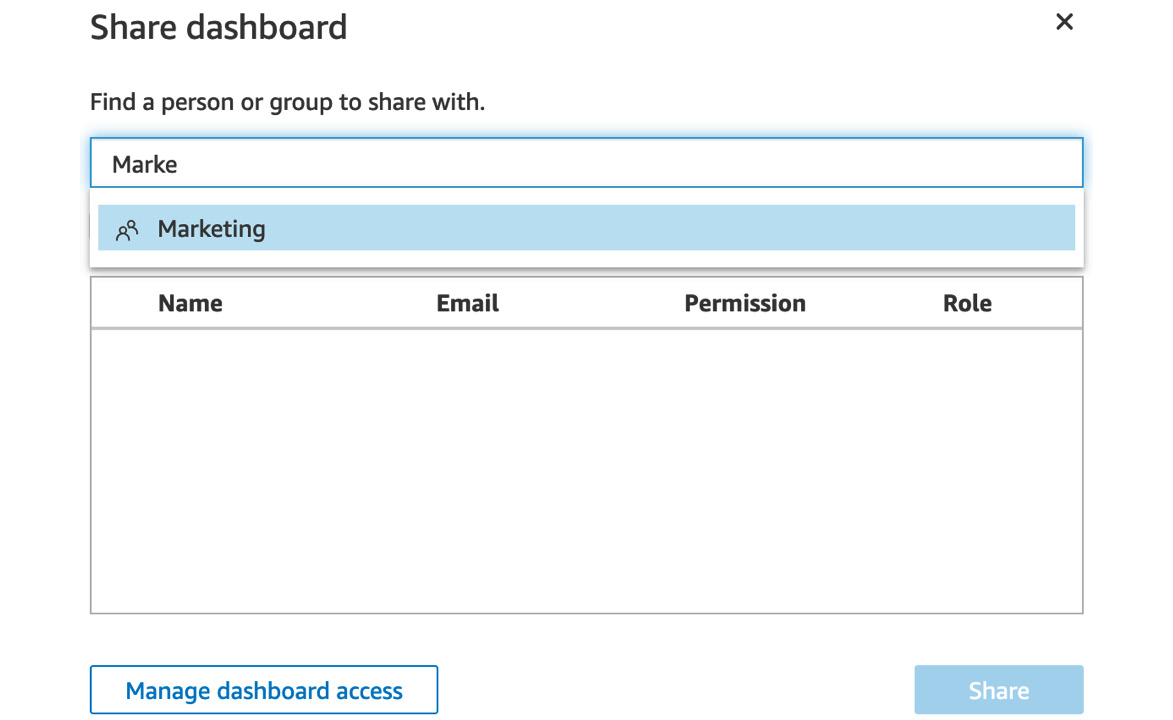
Figure 9.1 – Sharing a dashboard with a group
- To verify that your dashboard has been shared successfully, log out and log back in as the Reader user. Navigate to Dashboards, and notice the newly created dashboard:
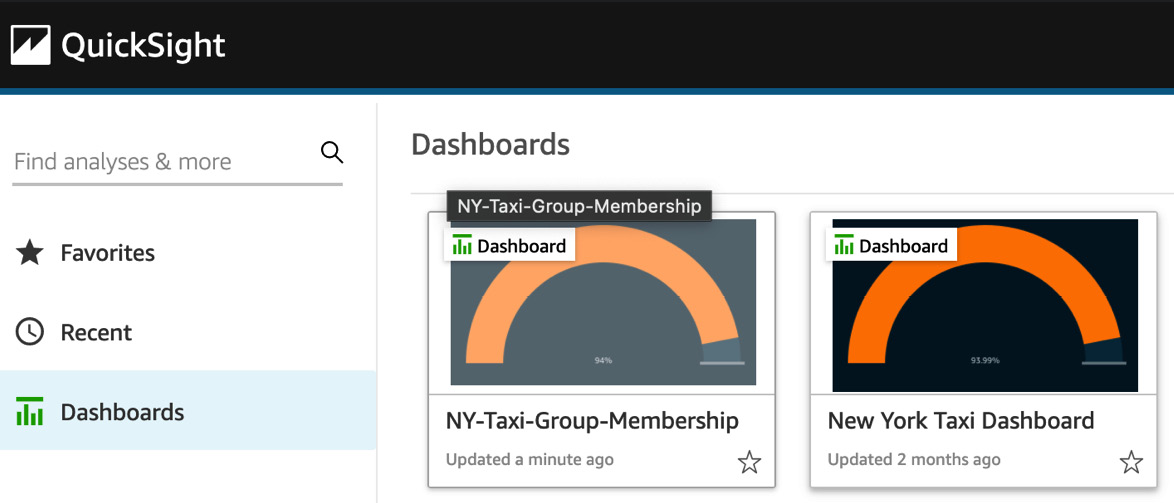
Figure 9.2 – Confirming dashboard group access
Note that we didn't need to give access directly to the Reader user for this dashboard. Instead, we added the Reader user into the Marketing group, and then we allowed all users from that group to have access to our published dashboard. In the future, if we had more users joining the Marketing group, they would automatically assume access to resources shared with that particular group, eliminating the need to define specific permissions at the individual user level.
Now that we have learned about user groups and how to use them to simplify our permissions, in the next section, we will talk about custom permissions.
Setting up custom permissions
In Chapter 2, Introduction to Amazon QuickSight, we learned the different user cohorts: Admin, Author, and Reader. The user cohort determines the level of access to features in the QuickSight console. Custom profiles allow you to override the default permissions with custom security profiles and define permissions that fit your organization's requirements.
Note
For custom permissions to work, you will need to be using IAM federated users.
To better understand custom permissions, we will use a simple hands-on example. By default, an Author user is able to configure a new data source. For our example, let's assume that to protect our Amazon SPICE space, we want to prevent authors from creating new data sources:
- First, log into the QuickSight Console as a QuickSight Admin user.
- Expand the QuickSight menu in the top-right corner of the screen and select Manage QuickSight.
- With the Manage users option selected, click on Manage permissions, as shown in the following screenshot:

Figure 9.3 – Accessing custom permissions
- On the next screen, tick the Creating or updating all data sources checkbox, as shown in the following screenshot:
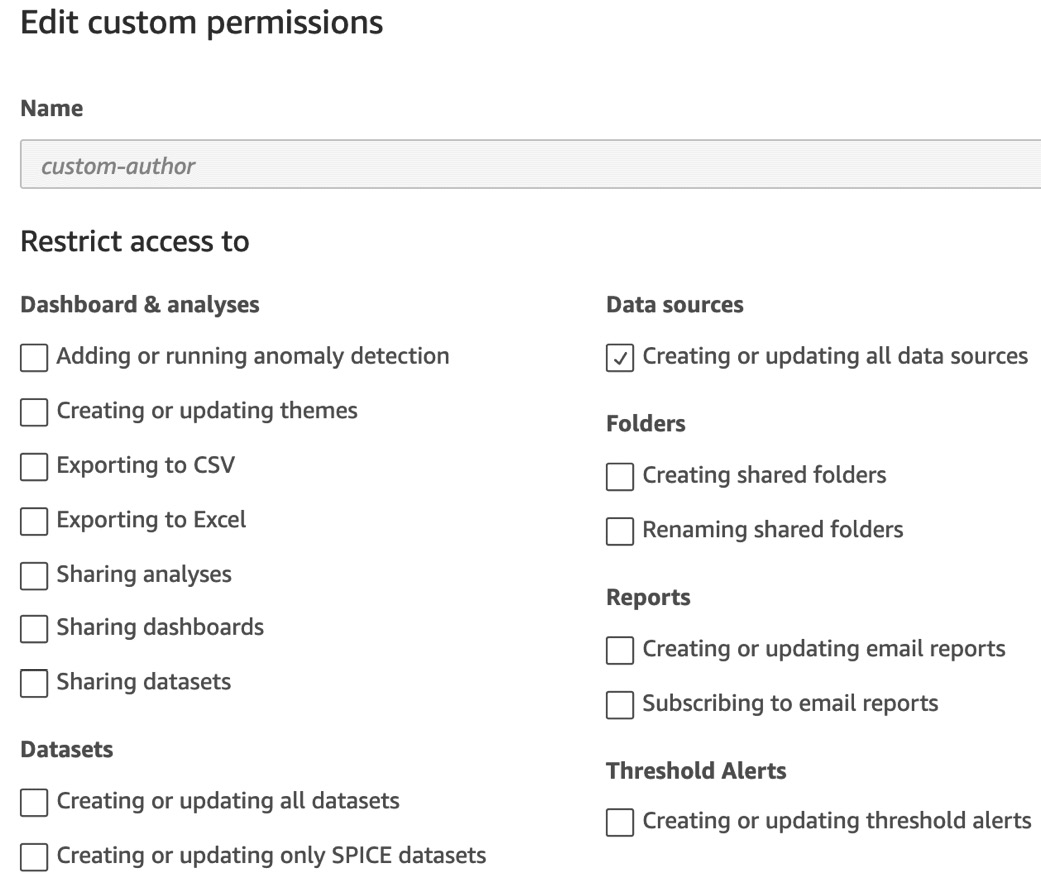
Figure 9.4 – Editing custom permissions
Note
When defining custom permissions using the QuickSight Console, you choose which actions you want to restrict access to. The rest of the actions will be permitted based on which cohort the user belongs to.
- Before we assign permissions, it is worth confirming that our Author user will be able to create a new dataset. Log into the QuickSight Console as the Author user and confirm that you can create a new dataset by selecting New dataset.
- Next, we will need to add a new Author user. Make sure you use the IAM credentials for this user by ticking the IAM checkbox when registering the user. For this example, we can call the user author-iam.
- After you register the new author-iam user, we will assign the new custom permissions profile to them. Using the AWS CLI and as the Quicksight Admin user, type the following command, replacing the highlighted values with those from your environment:
$aws quicksight update-user --user-name author-iam --role AUTHOR --custom-permissions-name custom-author --email <your-email> --aws-account-id <account-id> --namespace default --region us-east-1
- Now, we have attached our custom permissions to our newly created Author user. We can verify that the console access is as expected. Log out and log back into the QuickSight Console as the author-iam user.
- Next, select Datasets from the left-hand side menu, and then select Create a Dataset. Your screen should look like the following figure, giving you no options for creating a new dataset:
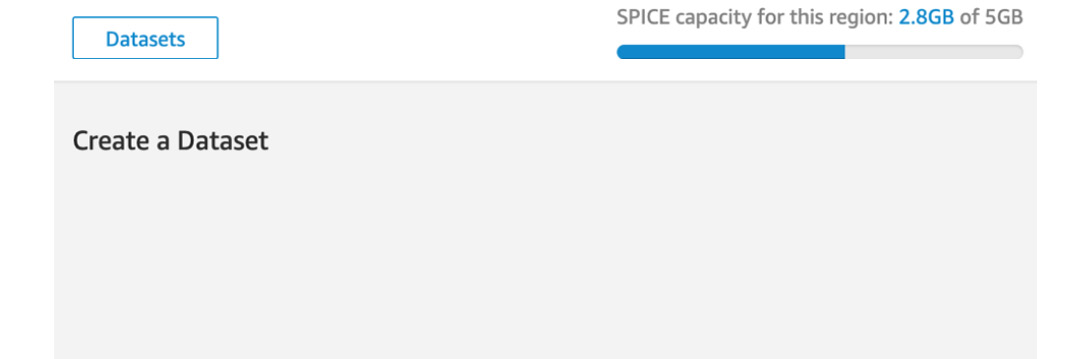
Figure 9.5 – Applying custom permissions
By applying custom permissions, we were able to override the default Author behavior and prevent our newly registered Author user from creating new data sources. You can configure multiple custom permissions profiles in your QuickSight account and allocate them to your users. A user cannot have more than one custom permissions profile.
- As a final step, we will deregister the author-iam user from QuickSight, since we no longer need them. To deregister the user, you can either use the QuickSight Admin Console or the AWS CLI by typing the following command and replacing the highlighted value with the values from your environment:
aws quicksight delete-user --user-name author-iam --aws-account-id <account-id> --namespace default --region us-east-1
Now that we have learned how to configure custom permissions, in the next section, we will learn how to integrate QuickSight with Amazon Lake Formation.
Integrating with Amazon Lake Formation
In this section, we will learn about the QuickSight integration with Amazon Lake Formation. Amazon Lake Formation provides an additional permission layer above the AWS Glue Data Catalog, allowing you to set up fine-grained permissions on top of your data lake on AWS. The integration with Lake Formation is useful for Amazon Athena datasets. Combined with QuickSight, Lake Formation will allow you to manage your data permissions from a single place, enforcing the permissions at the data lake layer by enhancing the existing QuickSight fine-grained permissions. To understand the value added by Lake Formation, we will first need to understand how to apply permissions for Athena datasets without Lake Formation.
Configuring Amazon Athena datasets permissions without Amazon Lake Formation
To better understand the value of Lake Formation, it is important to understand how to configure permissions for Athena datasets. We will use the demo data we configured in Chapter 1, Introducing the AWS Analytics Ecosystem. Specifically, we have configured the following AWS Glue database:
- Database: my-data-lake-db
- Table name: yellowtrips
- S3 location: s3://data-lake-xxxxxxxxx/yellowtrips/
In order to be able to create the Athena dataset, you will need QuickSight to do the following:
- Configure access to Amazon Athena.
- Configure access to the underlying S3 buckets.
In Chapter 2, Introduction to Amazon QuickSight, we learned how to give QuickSight access to Amazon S3 buckets. You can follow a similar process to give access to the Athena service.
To enable Athena access, we can use the following steps:
- First, log into the AWS Console as the QuickSight Admin user and select Manage QuickSight.
- Select Security & permissions.
- Select Add or remove from the QuickSight access to AWS services menu.
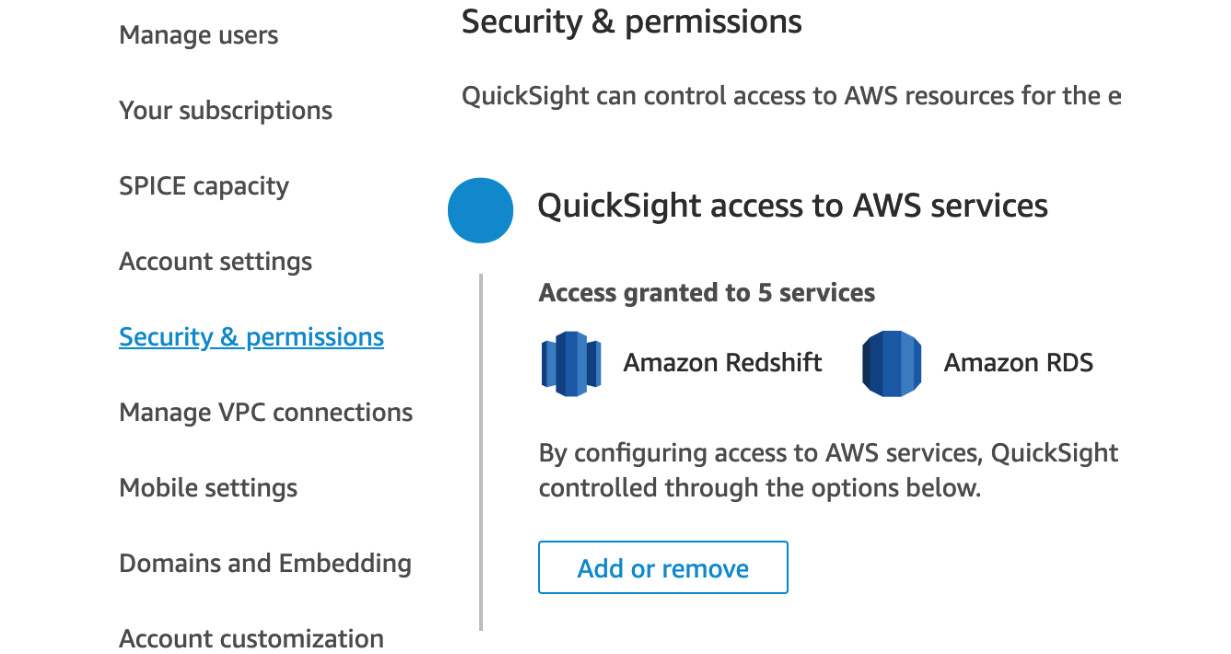
Figure 9.6 – Allowing QuickSight access to other AWS services
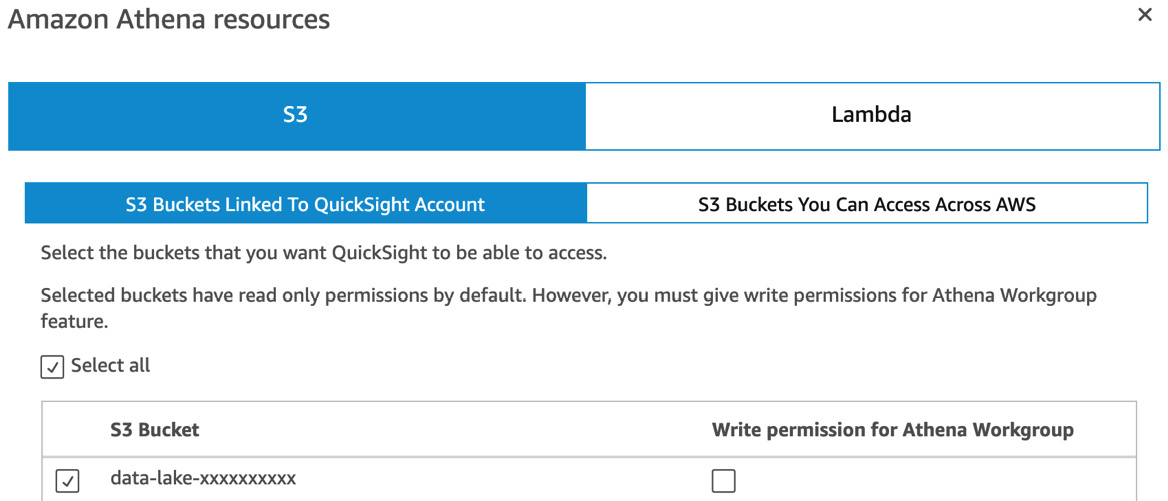
Figure 9.7 – Enabling Amazon Athena access
- Click Finish.
- To verify access, you can create a new Athena dataset (as we learned in Chapter 2, Introduction to Amazon QuickSight).
While this is straightforward to set up, it gives all users the same level of access to Athena and S3. It is very common for organizations to have different requirements when it comes to permissions to data for different users and groups. For that reason, QuickSight offers you the ability to define fine-grained access controls. This feature can be accessed via the Resource access for individual users and groups menu under the Security and Permissions settings. This will allow you to assign specific IAM policies to specific QuickSight users or groups, allowing you to define more detailed permissions to your Quicksight environment.
Now that we have learned how to create Athena datasets without Lake Formation, in the next section, we will understand how to configure datasets that are managed by Lake Formation.
Configuring Amazon Athena datasets with Amazon Lake Formation
Lake Formation provides an additional permission layer over your Athena datasets. Instead of granting permissions using IAM, you register your S3 storage in Lake Formation, and then you can use the Lake Formation Console or the Lake Formation API to grant or revoke permissions to the tables in your data catalog. Lake Formation supports column-based access policies, row-based filtering, and tag-based access controls, which allow you to define advanced and fine-grained access controls for your dataset.
Instead of defining IAM policies and defining assignments to your users or groups, you can use Lake Formation to manage your permissions centrally. In Lake Formation, you manage permissions with a grant/revoke syntax (which will be familiar to business intelligence (BI) developers), rather than defining JSON documents for IAM. When working with QuickSight principals, you will need to use the QuickSight user or group arn as the Lake Formation principal, as shown in the following figure:
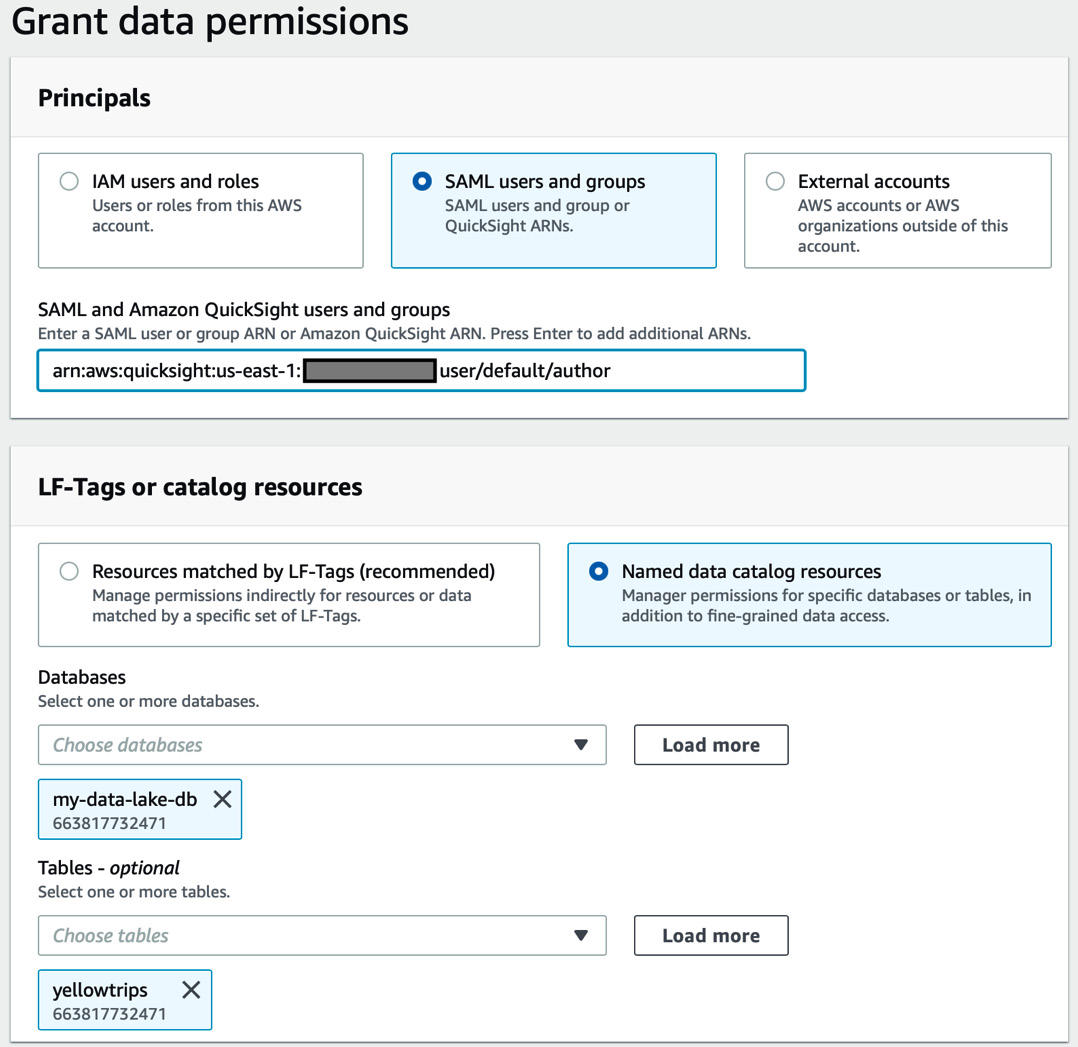
Figure 9.8 – Configuring QuickSight users with Amazon Lake Formation
Defining permissions in Lake Formation allows you to define complex, fine-grained permissions, without writing code or IAM policies. These data permissions are managed centrally within the AWS Console, and this allows you to easily change and verify the level of access each user has for specific datasets.
Now that we have learned how to configure custom permissions and talked briefly about the Lake Formation integration, in the next section, we will learn how to organize QuickSight assets using folders and set up alarms and email reports.
Managing QuickSight usage
In this section, we will focus on managing QuickSight assets. We will learn how to organize QuickSight assets using folders and how to set up alarms and reports.
Managing folders
You can use folders to easily organize, navigate, and discover QuickSight assets. QuickSight assets include the following:
- Datasets
- Analyses
- Dashboards
Folders can be either of the following:
- Personal folders: These can be used to organize your work for yourself.
- Shared folders: These can be used to simplify the sharing of QuickSight assets across multiple teams and BI developers.
Note
Only a QuickSight Admin user can create shared folders. Ownership of shared folders can be transferred to another user who belongs to the Author user cohort. Personal folder ownership always belongs to the user who created it.
To create folders, you can use either the QuickSight Console or QuickSight API. To better understand how to use folders, we will use a hands-on example using the New York Taxi sample dataset, analysis, and dashboard configured in Chapter 4, Developing Visuals and Dashboards.
Working with personal folders
In this section, we will work with personal folders and use them to group different assets together. For our example, let's assume that the Author user needs to organize all assets (datasets, analyses, and dashboards) of a specific project together. This will allow them to organize the QuickSight assets as they develop different projects.
To organize these assets, you can use QuickSight folders:
- First, log into the QuickSight console as the Author user.
- Then, click My folders, and then click + New in the top right-hand corner.
- Select a meaningful project name for your folder, for example, New York Taxi Project.
- Next, we will add the relevant assets. Locate each asset (dataset, analysis, and dashboard), click Add to folder, and select the newly created folder, as shown in the following screenshot:
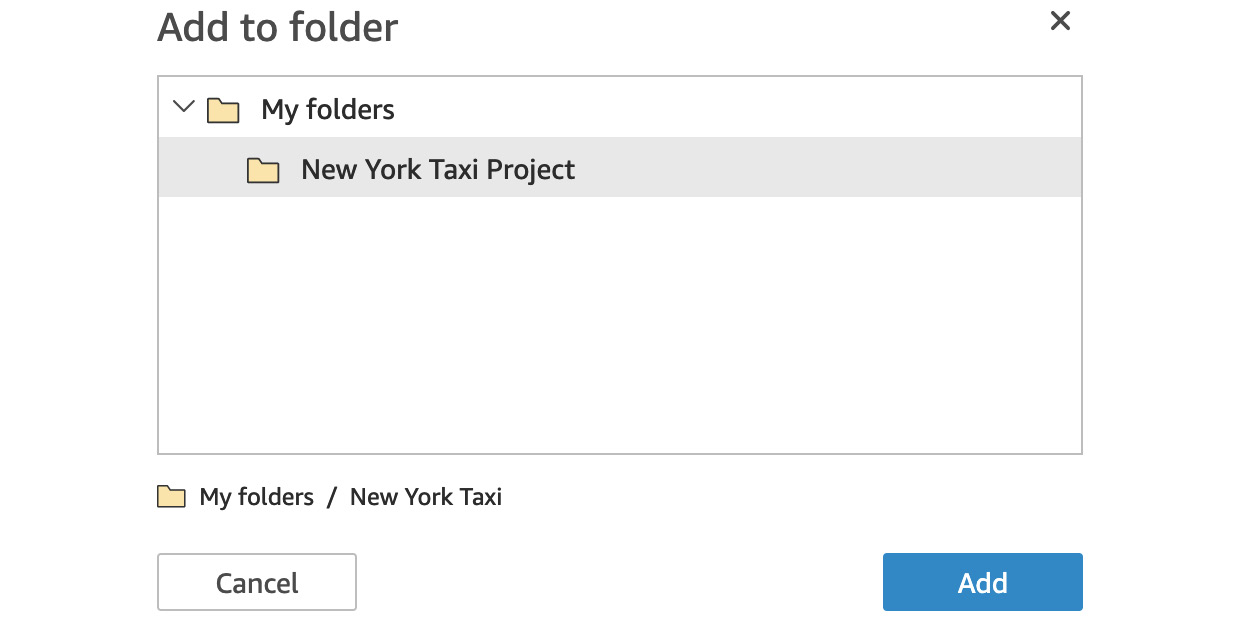
Figure 9.9 – Adding assets to folders
- After adding all the relevant assets, navigate back to My folders and open your New York Taxi Project folder, as shown in the following screenshot:
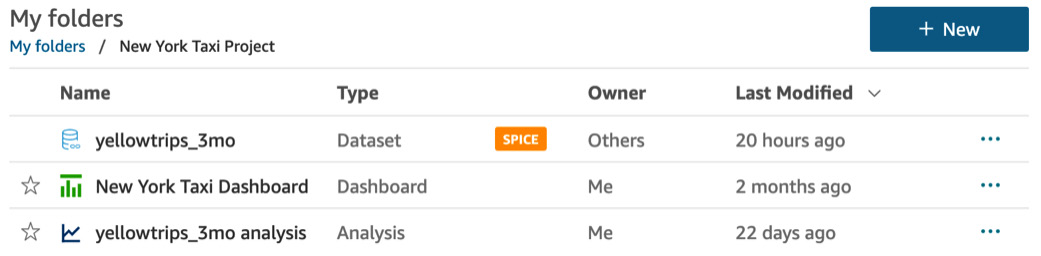
Figure 9.10 – Grouping different assets into folders
Note that now we have grouped together different assets relevant to a specific project, which saves you time when searching for relevant assets. The benefits of managing and organizing assets using folders are greater when you have a large number of projects and assets to work with.
Now that we have learned how to use personal folders, in the next section, we will look at shared folders.
Working with shared folders
Shared folders can be used to share assets between users or groups. Shared folders can be particularly useful when there are many BI developers working on a project. You can create shared folders for your users so they can easily find assets in a consistent way. As you onboard new users into your QuickSight environment, you can share folders with the new users, and your users will inherit the access to the underlying assets.
Note
Sharing a folder will give the underlying assets the same permissions as the shared folders. This will allow you to share multiple dashboards that belong to a folder with multiple users or groups, without having to configure specific rules for each asset.
To create a shared folder, we will use the following steps:
- Log in to the QuickSight Console (or use the CLI) as a QuickSight Admin user and select Shared folders, and then select + New.
- Give your shared folder a meaningful name, and select Create.
- Now we will share our folder with our Reader user. Before this step, to better understand the concept, we will remove the access to the dashboard for that user and then re-enable access by sharing the shared folder, which will contain the dashboard.
- In Chapter 4, Developing Visuals and Dashboards, we learned how to manage user access for QuickSight dashboards. To remove user access from a dashboard, log in as the Author user, open your New York Taxi dashboard, then select Share, then Manage Access, and then remove the Reader user.
- To add your New York Taxi dashboard into your newly created shared folder, simply select the dashboard and select Add to folder, as shown in the following screenshot. Select your shared folder, and then click Add:
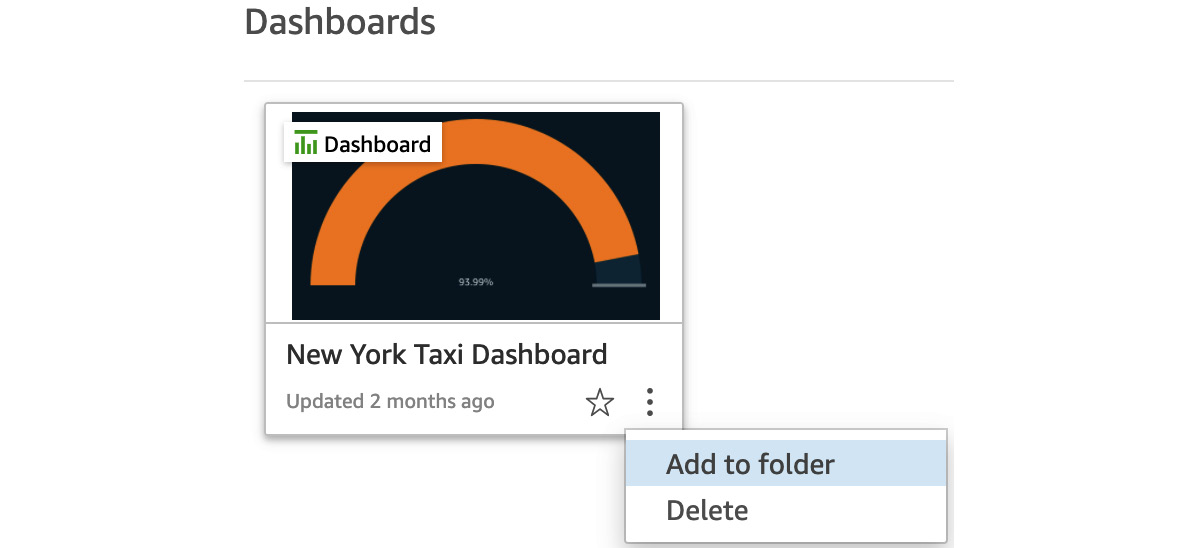
Figure 9.11 – Adding a dashboard to a shared folder
Note the message informing you that your asset will have the same sharing permissions to your shared folder:

Figure 9.12 – The sharing permissions message
- Next, we will share our folder with our Reader user. To share a folder, select the shared folder, and then select Share (as shown in the following screenshot), and add your Reader user:
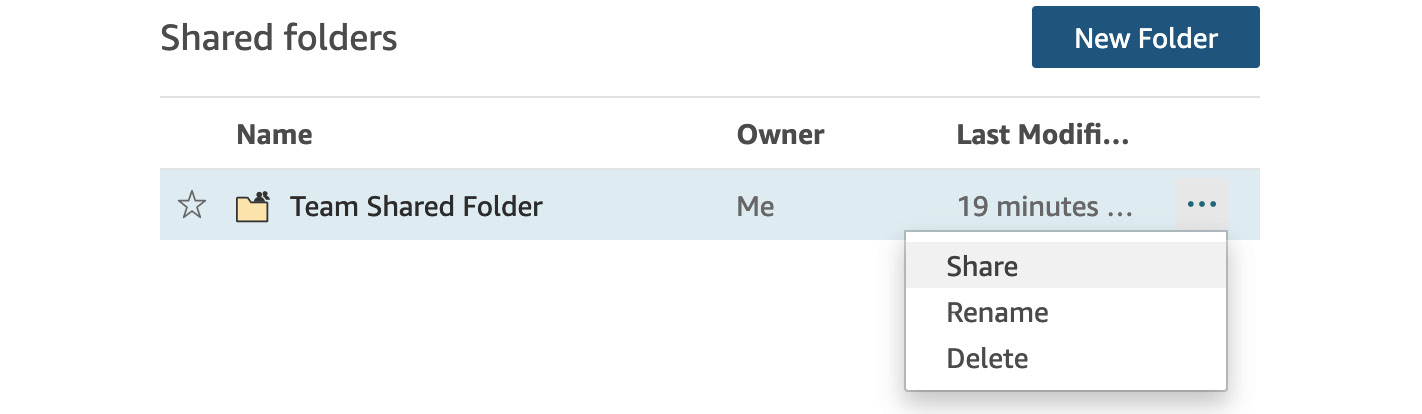
Figure 9.13 – Sharing a folder with other users
- As a final step, we can verify that the Reader user can open the dashboard shared with them via the shared folder. To verify, log into the QuickSight Console as the Reader user, open the shared folder, and then open your shared dashboard.
Managing folders effectively can help you organize and efficiently share QuickSight assets with your users or group of users. With effective folder management, your users will be able to easily navigate and find the assets they need to view or work with. Access management can also be simplified by grouping assets together in shared folders, and then providing access to the container folder, rather than on an individual asset level.
Note
You can transfer ownership of a shared folder to other QuickSight users who are in the Author or Admin user cohort. Readers cannot own shared folders and can only view them. Reader users can create personal folders only.
Now that we have learned how to work with shared folders, in the next section, we will learn how to create reports and alerts.
Creating reports and alerts
In this section, we will learn how to configure email reports and alerts. QuickSight allows you to configure email reports to update your business users on the latest state of the business.
Email reports are configured against a QuickSight dashboard. To better understand how to set up email reports, we will use the dashboard we created in Chapter 4, Developing Visuals and Dashboards. To set up an email report, follow these steps:
- First, log into Amazon QuickSight as the Author user.
- Next, open the New York Taxi dashboard.
- Click the Share button, and then select Email report, which opens the report configuration screen, as shown in the following figure:
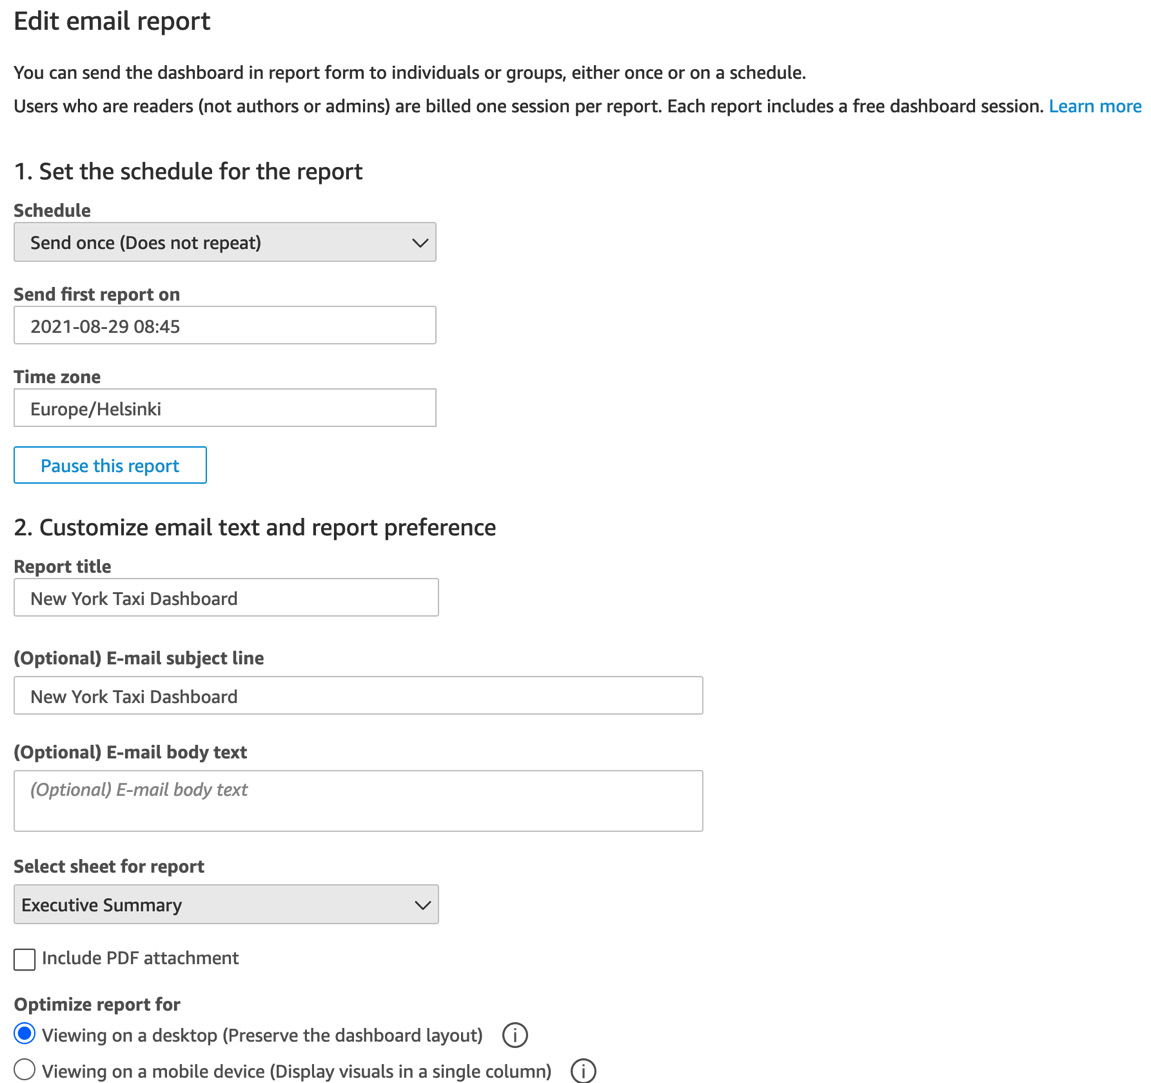
Figure 9.14 – Configuring email reports
- On the next screen, you can customize your report preferences:
- Schedule: You can set the repeat schedule of your report (send once, repeat once a day, once a week, or once a month) and configure the time when the first report will be sent.
- Customize email text and report preferences: You can customize your report text, including the email title, email text, and report title. You can also select whether the report layout is optimized for mobile screens or desktop screens.
- Recipients: Select the users (these can be either Author or Reader user roles) who will receive the report. You can also choose to email the report to all users with access to this dashboard. If you tick this checkbox, then when you add new users to the dashboard, they will automatically receive the email report.
- Click Save report to complete the email report configuration.
Now that we have configured the email report as the Author user, we will now focus on the Reader user and learn how to manage the report subscriptio:
- First, log out and log back in as the Reader user.
- Select Reports from the top-right corner menu, as shown in the following screenshot. Note that this option will be visible only when there are email reports configured for this dashboard:
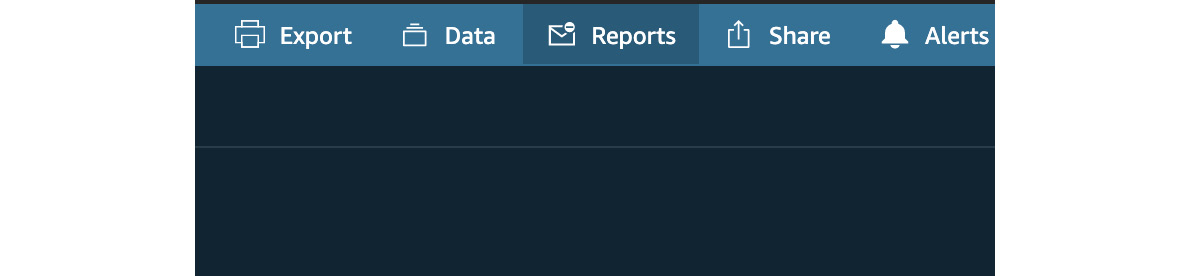
Figure 9.15 – Accessing the report subscription options
- In the next screen, you can change your report subscription preferences:
- Choose to subscribe (or unsubscribe) to the report.
- Choose a desktop/mobile-optimized layout.
These report preferences can be seen in the following screenshot:
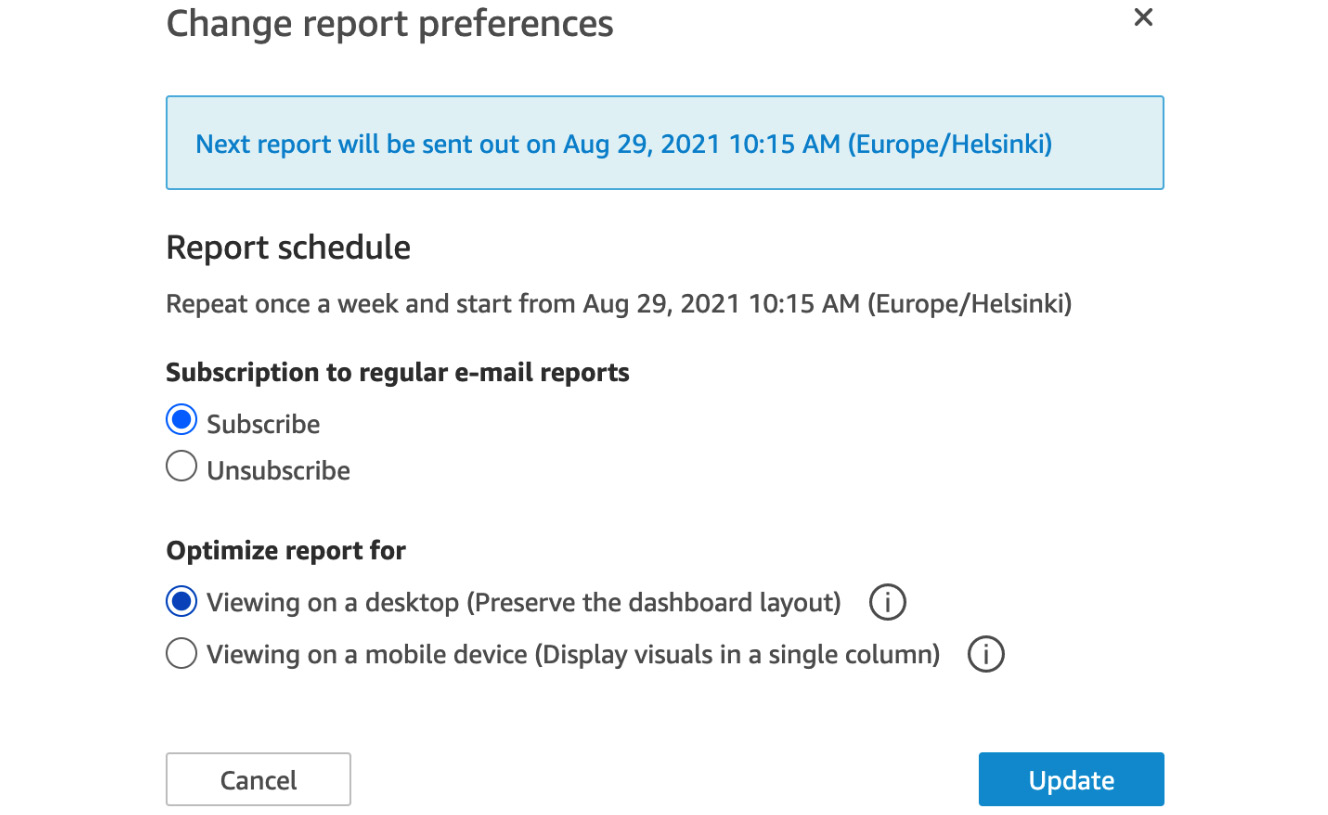
Figure 9.16 – Managing email report preferences
Now that we have learned how to set up email reports as Authors and how to manage subscriptions as Readers, in the next section, we will learn how to work with QuickSight alerts.
Working with QuickSight threshold-based alerts
QuickSight allows you to set up threshold-based alerts when certain changes occur in your data. Using threshold-based alerts, you can receive notifications when a specific metric changes above or below a certain threshold. For example, when a key performance indicator (KPI) falls below a target, you get notified so that action can be taken to get the KPI back on target.
Note
You can have multiple alerts based on different conditions for a specific KPI. Creating different types of alerts for the same metric allows you to implement a complex KPI-monitoring alert system.
In the next section, we will learn how to add threshold-based alerts.
Adding a threshold-based alert
To better understand how to configure threshold-based alerts, we will use the New York Taxi dashboard we developed in Chapter 4, Developing Visuals and Dashboards. We will use the gauge visual of this dashboard. At the time of writing, there are two visual types that can be configured with alerts:
- KPI visual
- Gauge visual
To configure threshold-based alerts, complete the following steps:
- First, log into the QuickSight Console (either as the Author or the Reader user) and open the New York Taxi dashboard.
Note
Threshold-based alerts can only be configured at a QuickSight dashboard, and not on a QuickSight analysis.
- Next, locate the gauge visual that shows the total number of passengers against a hypothetical target, and click on the visual. Notice the alert (bell) icon on the right-hand side:
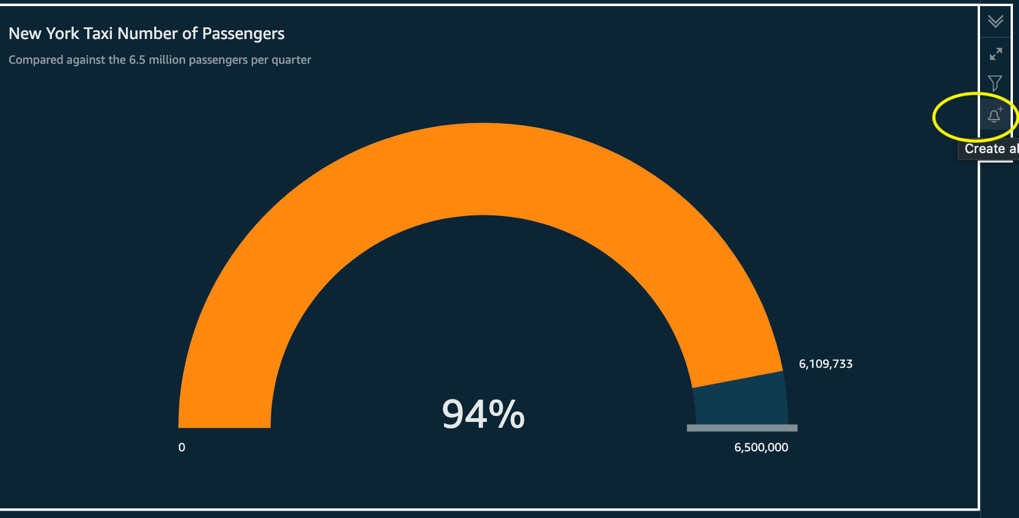
Figure 9.17 – Adding an alert for a gauge visual
- Click the alert (bell) icon to configure your alert. For this scenario, let's assume we want to add the first alert when our KPI is below the 95% mark of the target. Type the following values:
- Alert name: [Amber] New York Taxi Number of Passengers
- Alert value: Percent
- Condition: Is below
- Threshold: 95
- Notification preference: As frequently as possible
Alerts for SPICE datasets are evaluated every time the dataset is refreshed. According to the AWS documentation, for direct query datasets, alert rules are evaluated at a random time between 6:00 PM and 8:00 AM in the AWS Region that holds the dataset:
https://docs.aws.amazon.com/quicksight/latest/user/threshold-alerts.html
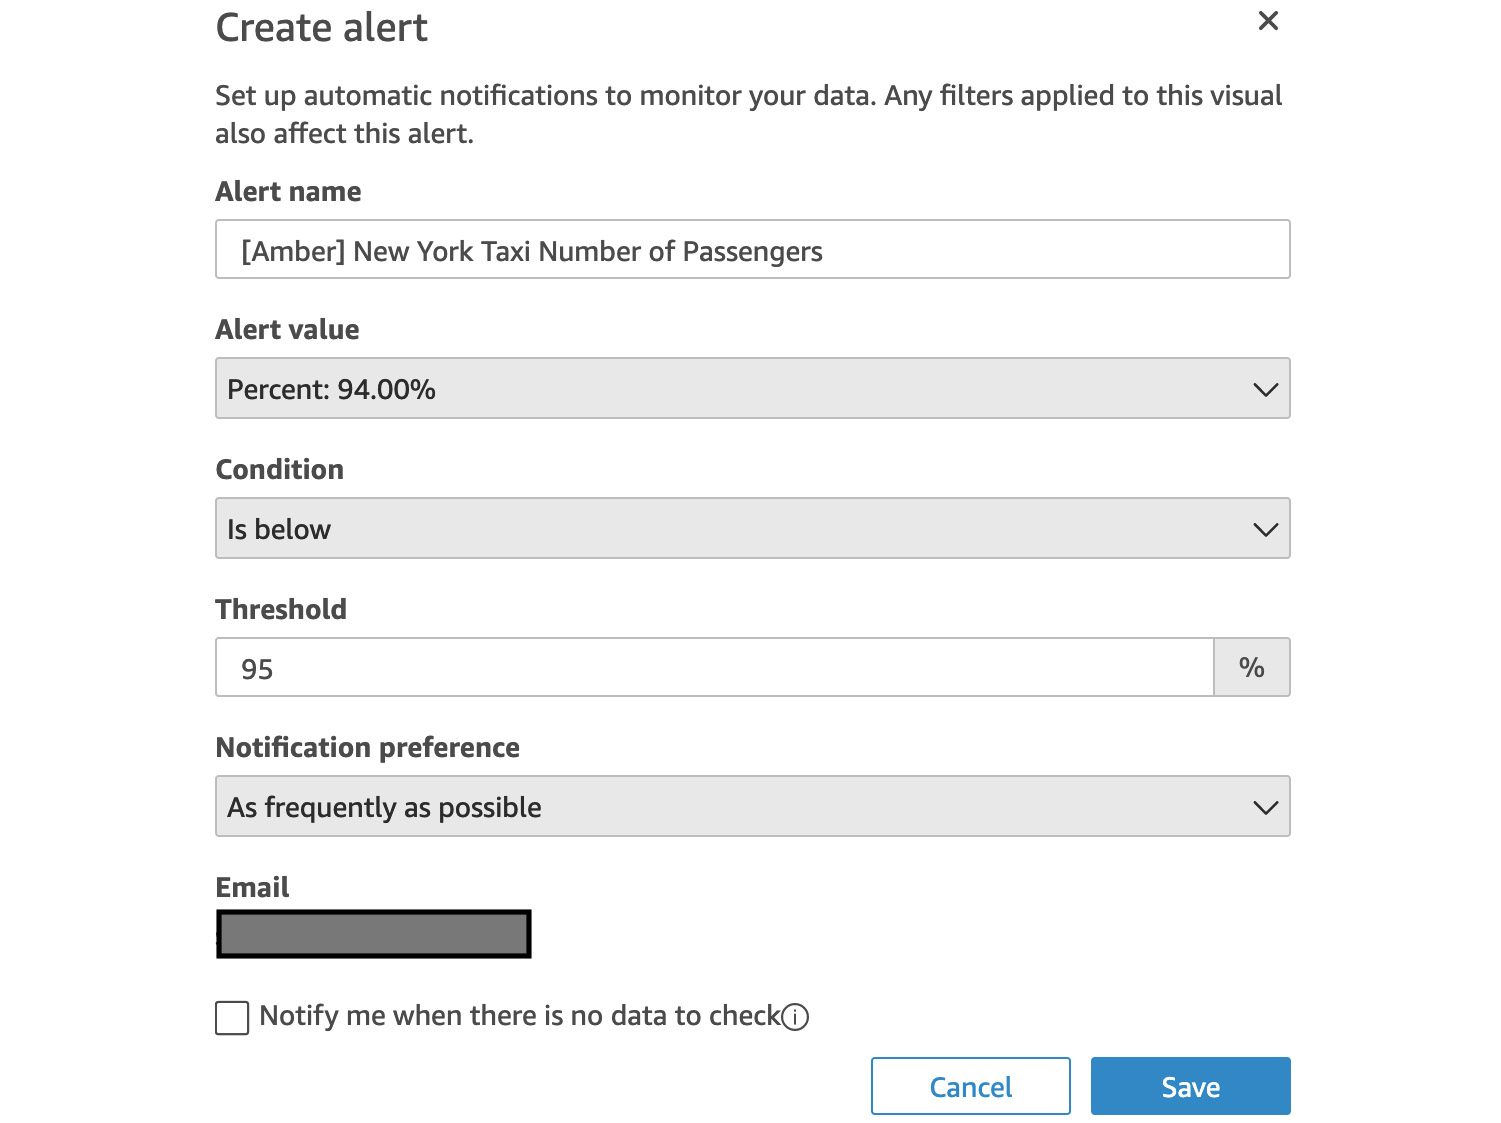
Figure 9.18 – Configuring alerts
- Click Save. Repeat the process to create a second alert. For the second alert, use the same configuration as the first one, replacing only the Amber word with Red in the alert name, and set the threshold to 90.
- The next time you refresh your dataset, you will see an example alert in your mailbox, as shown in the following screenshot:

Figure 9.19 – Receiving QuickSight alerts
Now that we have configured two alerts, in the next section, we will learn how to manage alerts.
Managing threshold-based alerts
In this section, we will learn how to manage threshold-based alerts:
- Stay logged into the QuickSight Console with the user you used in the previous section. Open the New York Taxi dashboard we used in the previous step to set up our alerts.
- Click the Alerts icon in the top-right corner of your QuickSight dashboard, as shown in the following screenshot:
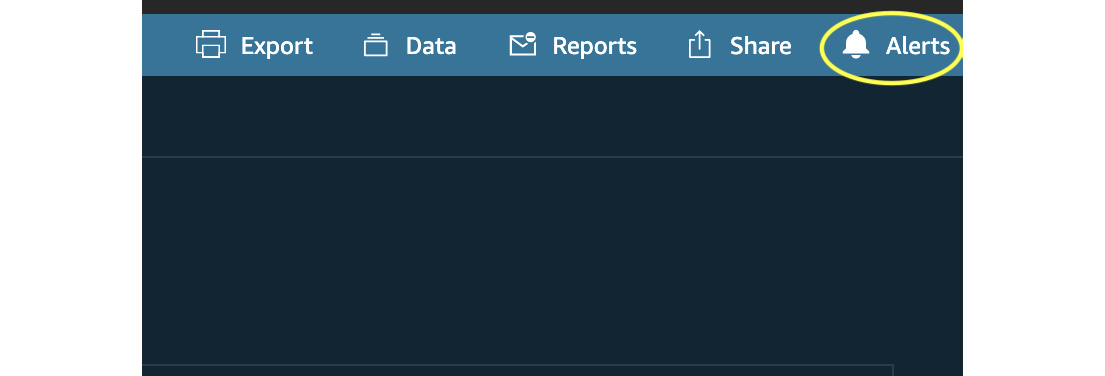
Figure 9.20 – Accessing the dashboard alerts management console
- This step will open the alerts management console, as shown in the following screenshot. From this screen, you can view all your dashboard alerts and the conditions that trigger them. You can enable/disable each alert separately by toggling the radio button next to each alert. Finally, you can expand the alert history and view when each alert has been triggered:
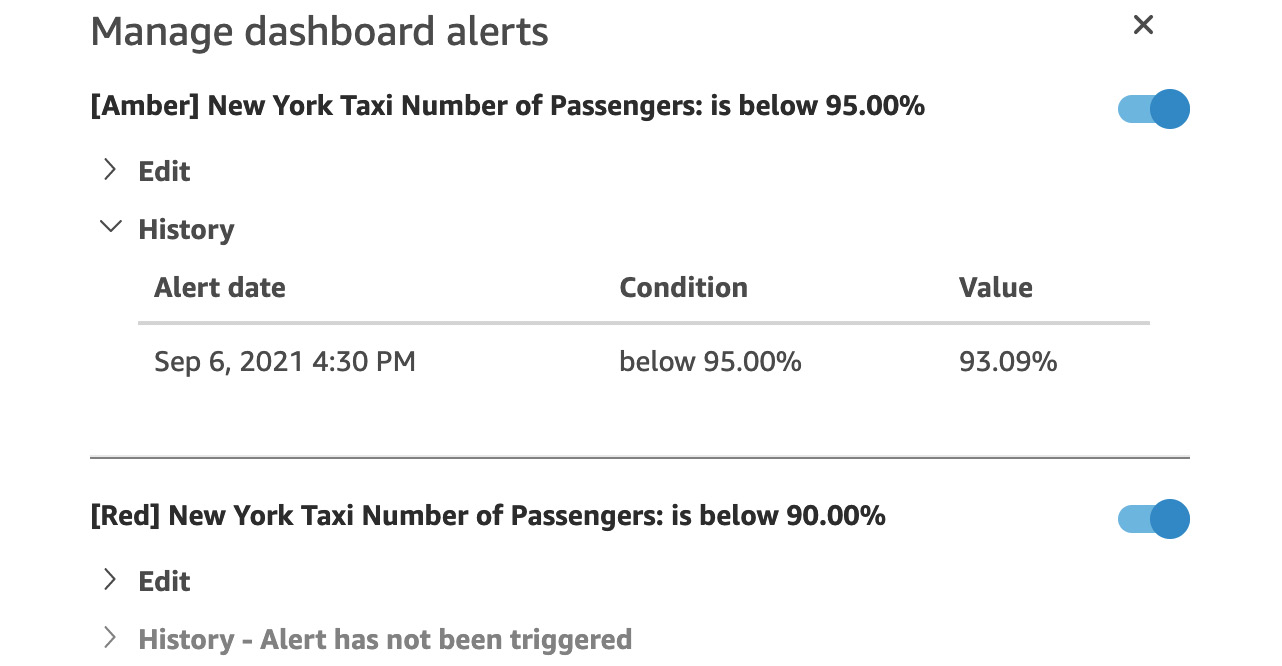
Figure 9.21 – Managing dashboard alerts
- Using the Edit dropdown, you can open each alert and change its name, condition, threshold, and notification preferences. You can also delete the alerts using this option.
By using email reports and threshold-based alerts, you ensure your business users are up to date with your latest dashboards. Your business users will receive email notifications either when new data is available or when certain thresholds are met.
Summary
Congratulations on completing this chapter.
In this chapter, we learned how to configure permissions for our Amazon QuickSight users and groups. We also learned how to define fine-grained permissions, and we discussed the benefits of integrating QuickSight with Amazon Lake Formation. Then, we focused on how best to organize QuickSight assets such as analyses, datasets, and dashboards by using folders, and how to share assets using shared folders. Finally, we learned how to configure automated email reports and how to configure threshold-based alerts.
Using the things you learned in this chapter, you will be able to define your permissions and make sure you manage them effectively, making use of groups and folders where possible.
In the next (and final) chapter, we will learn how to configure and architect multi-tenant QuickSight environments.
Questions
- What are the benefits of integrating Amazon Lake Formation with QuickSight?
- What QuickSight visuals support threshold-based alerts?
- How do we automate email reports?
- What are the differences between personal and shared folders in Amazon Quicksight, and when should we use them?
Further reading
- Amazon QuickSight User Guide:
https://docs.aws.amazon.com/quicksight/latest/user/amazon-quicksight-user.pdf