
Chapter 7: Extending the GitLab DevOps Platform with Comet
When you implement a data science project, you should consider that your model could age due to various factors, such as concept drift or data drift. For this reason, your project will probably need constant updates.
In the previous chapter, you learned the fundamental principles related to DevOps, which allow you to move the project from the test phase to the production phase. However, this is not enough to deal with constant updates efficiently. In fact, you may need to develop an automatic or semi-automatic procedure that allows you to pass from the build/test phase to the production phase easily without too many manual interventions.
In this chapter, you will review the basic concepts behind Continuous Integration and Continuous Delivery (CI/CD), two strategies that permit you to easily and automatically update your code and move from building/testing to production efficiently. You will also learn how you can implement CI/CD using GitLab, a very popular platform for software management. Then, you will configure GitLab to work with Comet. Finally, you will see a practical example that will help you get familiar with the described concepts.
The chapter is organized as follows:
- Introducing the concept of CI/CD
- Implementing the CI/CD workflow in GitLab
- Integrating Comet with GitLab
- Integrating Docker with the CI/CD workflow
Before moving on to the first step, let’s install the software needed to run the code implemented in this chapter.
Technical requirements
The examples described in this chapter use the following software/tools:
- Python
- Git client
Python
We will use Python 3.8. You can download it from the official website at https://www.python.org/downloads/ and choose version 3.8.
The examples described in this chapter use the following Python packages:
- comet_ml 3.23.0
- pandas 1.3.4
- scikit-learn 1.0
- requests 2.27.1
- Flask 2.1.1
We described the first two packages and how to install them in Chapter 1, An Overview of Comet. Please refer back to that for further details on installation.
Git client
A Git client is a command-line tool that allows you to communicate with a Source Control System (SCS). In this chapter, you will use the Git client to interact with GitLab. You can install it as follows:
For macOS users, open a terminal and run the following commands:
- Install the XCode Command Line Tools as follows:
xcode-select --install
- Then, install Homebrew as follows:
/bin/bash -c "$(curl -fsSL https://raw.githubusercontent.com/Homebrew/install/HEAD/install.sh)"
For more details, you can read the Homebrew official documentation, available at the following link: https://brew.sh/.
- Finally, install Git as follows:
brew install git
For Ubuntu Linux users, you can open a terminal and run the following commands:
sudo apt-add-repository ppa:git-core/ppa
sudo apt-get update
sudo apt-get install git
For Windows users, you can download it from the following link: https://git-scm.com/download/win. Once you have downloaded it, you can install it by following the guided procedure.
For all users, you can verify whether Git works by running the following command in a terminal:
git --version
For more details on how to install Git, you can read the Git official documentation, available at the following link: https://git-scm.com/book/en/v2/Getting-Started-Installing-Git.
Now that you have installed all of the software and tools needed to run the examples described in this chapter, we can move on to the first topic, which is introducing the concept of CI/CD.
Introducing the concept of CI/CD
DevOps best practices permit us to build a pipeline that connects the development phase with the operations phase through different steps. In the previous chapter, you learned how to deploy your Data Science project for the first time. You implemented all the steps manually by building a Docker image and then deploying it in Kubernetes. However, this described procedure does not scale if you perform daily updates to your software.
To automate the integration between the development and operation phases, we should introduce two new concepts, which are CI/CD and SCS.
This section is organized as follows:
- An overview of CI/CD
- The concept of an SCS
- The CI/CD workflow
Let’s start from the first point, which is an overview of CI/CD.
An overview of CI/CD
When using software in production, either a generic app or a machine learning prediction service, you (or other users) may find some bugs in the code or may want to add new features. For this reason, you should be able to define an automatic procedure that permits you to update your software continuously. In this case, you could use the CI/CD strategy.
CI involves the automation of the building and testing phases every time there is a change in the code. CD deploys the software built during the CI phase to a production-like environment. Usually, this phase requires a manual approval step to move the software to production. A more advanced mechanism involves Continuous Deployment, which transforms the manual approval step into an automatic process.
To perform CI/CD, you need an SCS that keeps track of all software changes and makes the communication between the Development and Operation phases possible, as shown in the following figure:
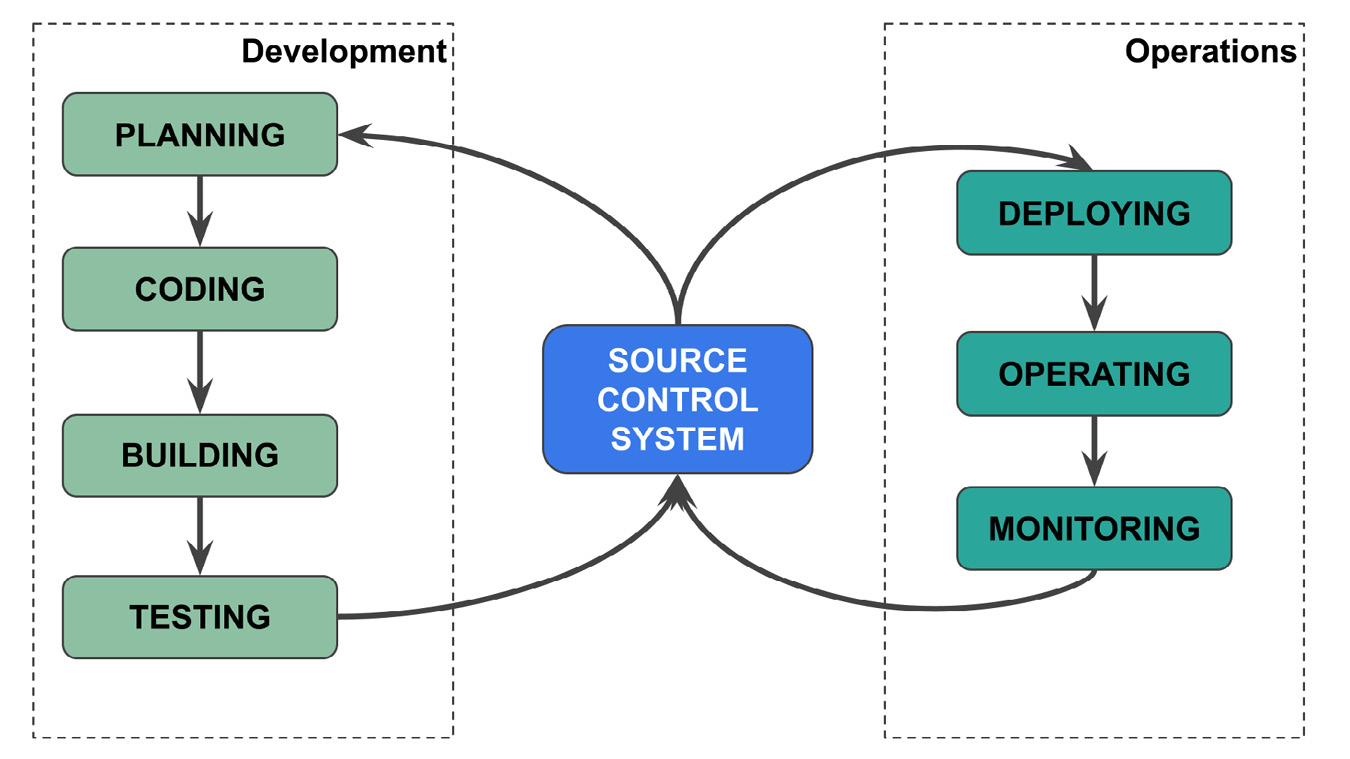
Figure 7.1 – The role of an SCS in DevOps
The preceding figure shows the DevOps life cycle, which was already described in Chapter 6, Integrating Comet into DevOps, where the releasing step has been substituted by the SCS. In practice, the SCS is a repository that stores the software and keeps track of its updates. The development team stores the software in an SCS and updates it regularly. The operations team downloads the software from the SCS, and when they approve it, the software moves to production. Thanks to the presence of the SCS, the CI/CD procedure is automatic.
Now that you are familiar with the concept of CI/CD, we can investigate the concept of an SCS in more detail and how it works.
The concept of an SCS
An SCS, also known as a Version Control System (VCS), enables you to store your code, keep track of the code history, merge code changes, and return to the previous code version if needed. In addition, an SCS permits you to share your code with your team and work on your code locally until it is ready. Since SCS is a centralized source for your code, you can use it to easily build the DevOps life cycle.
The following figure shows the basic architecture of an SCS:
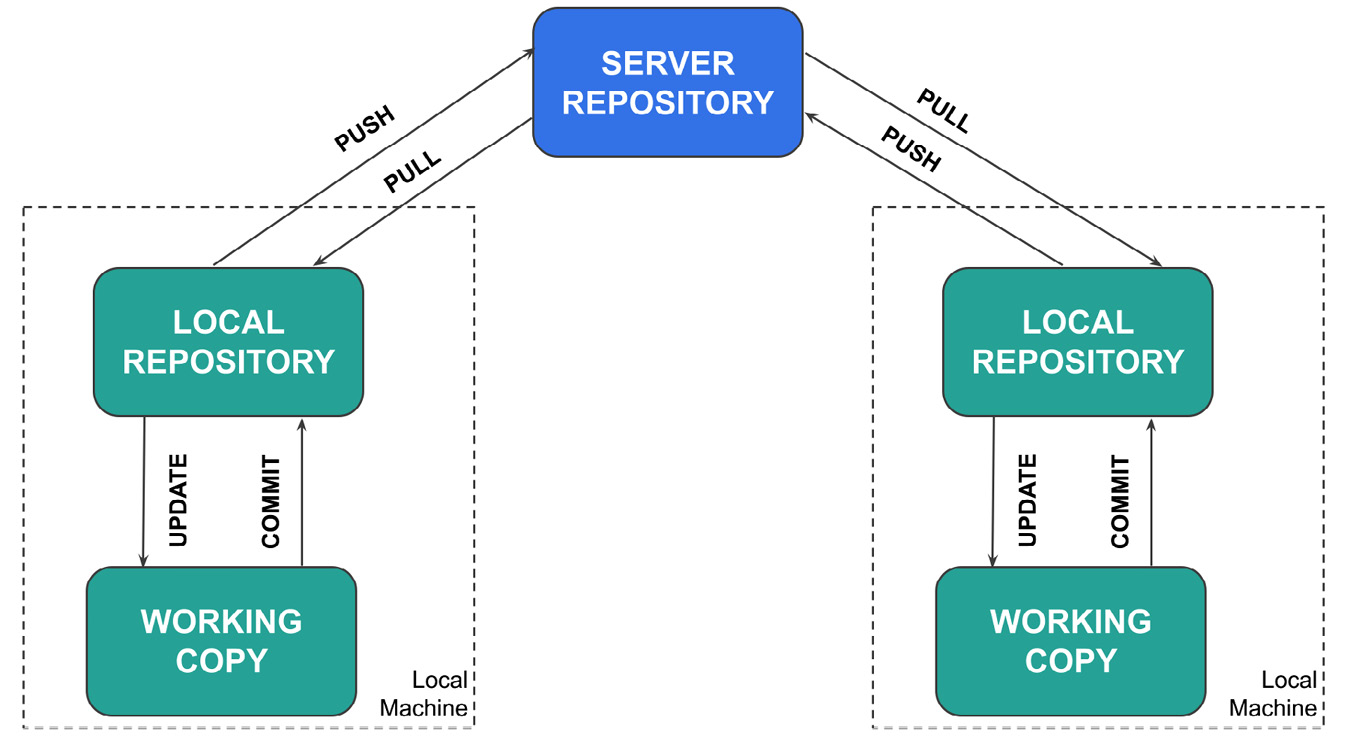
Figure 7.2 – The basic architecture of an SCS
An SCS is composed of a central server repository, which stores the code, and keeps track of all its history, as follows:
- The first time you want to download the code, you need to clone it in your local machine where a local repository is built.
- Then, you can work on your local working copy, which practically corresponds to a directory in your local filesystem. All of the changes you make to your code in your working copy do not affect either your local repository or the server repository.
- To register your local changes to the local repository, you should run the COMMIT command.
- To register the changes of your local repository to the server repository, you should run the PUSH command.
Before making any change to your code, you should always update your code from the server repository through the PULL command and from your local repository through the UPDATE command.
The described mechanism works well when multiple developers are working together because each developer works on their local machine, and when the code is ready, they save the changes to the server repository. Through an SCS, you can push your commits to other developers as well as pull their commits to your local repository.
Typically, when you want to propose some changes to your code, you do not push them to the main repository. Instead, you create a new branch that contains your changes. A branch is a version of the repository diverging from the main project because it contains some proposals for changes. Using a branch permits you to work on your code independently from its stable version available in the main repository. The operation of combining a branch with the main repository is called merging.
Now that you have learned the main concepts behind an SCS, we can move on to the next point, which is the CI/CD workflow.
The CI/CD workflow
The following figure shows the typical CI/CD workflow:
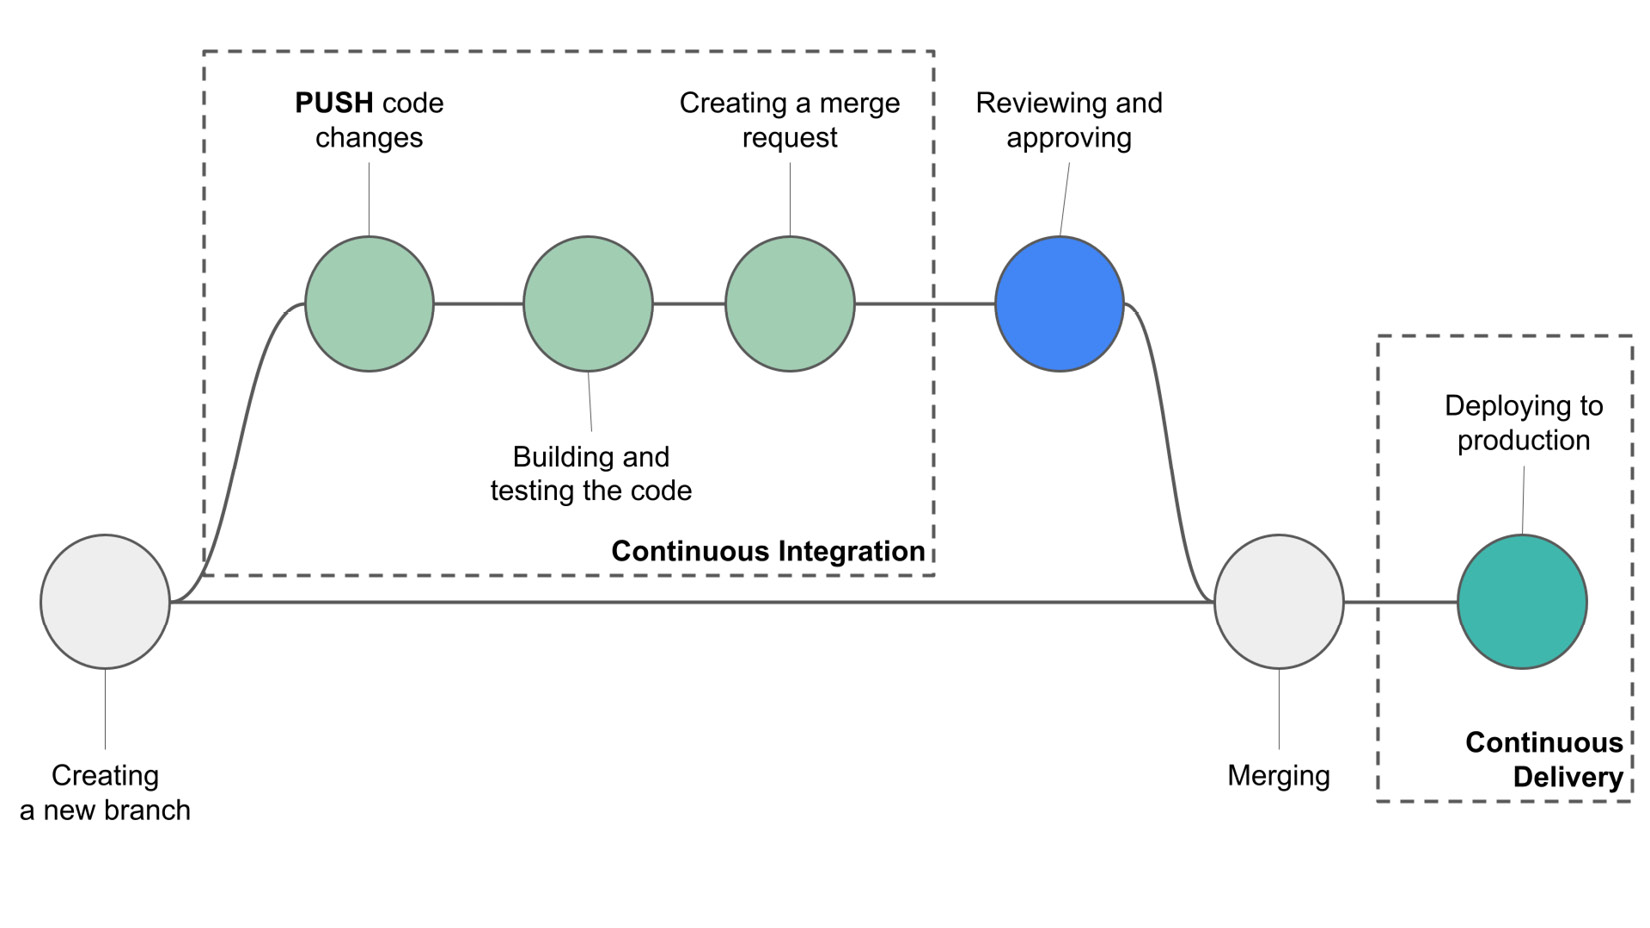
Figure 7.3 – A typical CI/CD workflow
Let’s suppose that you want to make some changes to your code that is already hosted on an SCS. You should do the following:
- Create a new branch for your code.
- Next, push the new code to the server repository.
- The CI strategy automatically builds and tests your code.
- If your code passes the tests, you can create a merge request. Otherwise, you need to perform other changes to your code and create a new push, which triggers automatic building and testing.
- Once your code has passed all of the tests, you need to manually approve it (in the case of CD) or an automatic procedure approves it (in the case of Continuous Deployment).
- Upon approval, the branch is merged into the main repository.
- Eventually, the new code is moved to production.
Many platforms implement the CI/CD workflow. In the next section, we will review GitLab, one of the most popular platforms in the industry.
Implementing the CI/CD workflow in GitLab
GitLab is an SCS that permits you to store your code through a versioning system. In addition, it provides you with all of the tools to implement a CI/CD workflow. The GitLab platform is available at the following link: https://gitlab.com/. You can get started with GitLab by creating an account at the following link: https://gitlab.com/users/sign_up.
The section is organized as follows:
- Creating/modifying a GitLab project
- Exploring the GitLab internal structure
- Exploring GitLab concepts for CI/CD
- Building the CI/CD pipeline
- Creating a release
Let’s start with the first point, which is creating/modifying a GitLab project.
Creating/modifying a GitLab project
Basic operations on a GitLab project include the following steps:
- Creating a new project
- Adding a new branch to the project
- Creating a merging request
Let’s investigate each step separately, starting from the first one: creating a new project.
Creating a new project
You can create a new project in GitLab as follows:
- Log in to the GitLab platform.
- From the main dashboard, click on the New Project button located in the top-right corner of the page.
- Select Create blank project, fill out the form, and then click on the Create Project button.
- Now your project is on the GitLab platform. You can download it on your local machine by selecting Repository on the left menu, and then you can click on the Clone button. A popup window opens. You can copy the address defined by the Clone with HTTPS label as shown in the following figure:
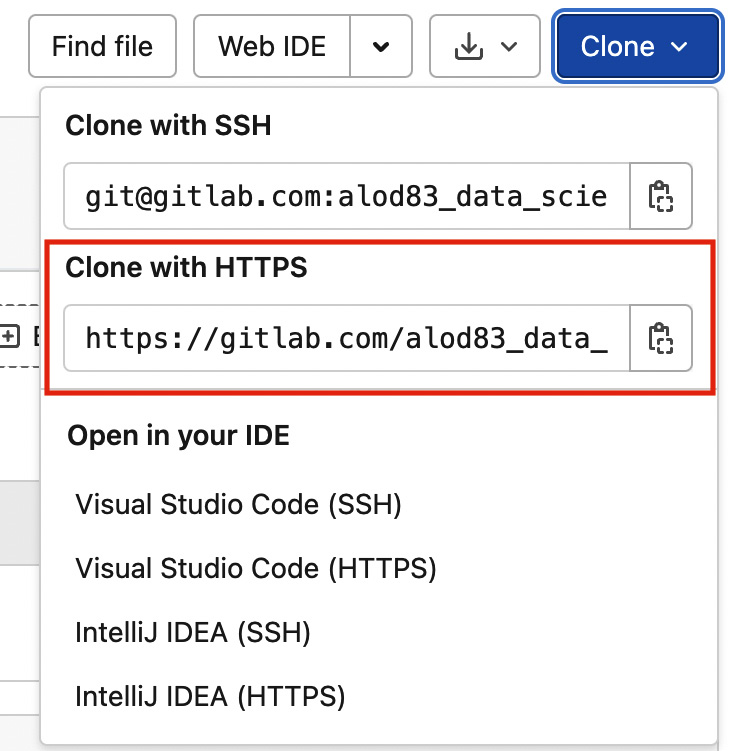
Figure 7.4 – The address to copy to clone a GitLab project in your local file system
The address starts with https://gitlab.com/ and contains the path to your project group.
- Open a terminal and run the following command:
git clone <PASTE_HERE_YOUR_COPIED_ADDRESS>
- The terminal will ask you for your credentials. You can enter them. Once the procedure is completed, a new directory will appear in your filesystem. The name of the directory is the project name in GitLab.
At this point, you have a working copy of your GitLab empty project in your local filesystem. You can start editing it.
- For example, you can add to the repository a simple file, named helloWorld.py, which simply prints the 'Hello World!' string, as shown in the following piece of code:
if __name__ == "__main__":
print('Hello World!')
- You can add the script to the GitLab working copy as follows:
git add helloWorld.py
We use the add command to add a new file to the working copy.
- You can add the script to the local GitLab repository as follows:
git commit –m "my message"
- Finally, you can save changes to the remote server as follows:
git push origin main
The keyword main indicates that you are saving the changes to the main branch. The git command might prompt you to set the upstream, which is the default remote branch for the current local branch. You can set the upstream branch directly through the –u option as follows:
git push –u origin main
So far, you have worked with the main branch. However, when you want to add new features to a stable project, it is better to work on a separate branch. So, let’s see how to create a new branch.
Adding a new branch
Let’s suppose that now you want to change the original text printed by the script as follows:
if __name__ == "__main__":
print('Hi!')Now you want to save the changes to a new branch of the repository. You can proceed as follows:
- First, create a new branch, named new_branch, as follows:
git checkout -b new_branch
You can use the checkout keyword to create a new branch as well as the –b option to set the branch name.
- Then, add the script to the branch as follows:
git add helloWorld.py
- Commit the changes to the local repository as follows:
git commit -m "modified greeting string"
- Finally, push the changes to the new branch as follows:
git push origin new_branch
If you access the GitLab dashboard, you can see that the system has created a new branch as shown in the following figure:
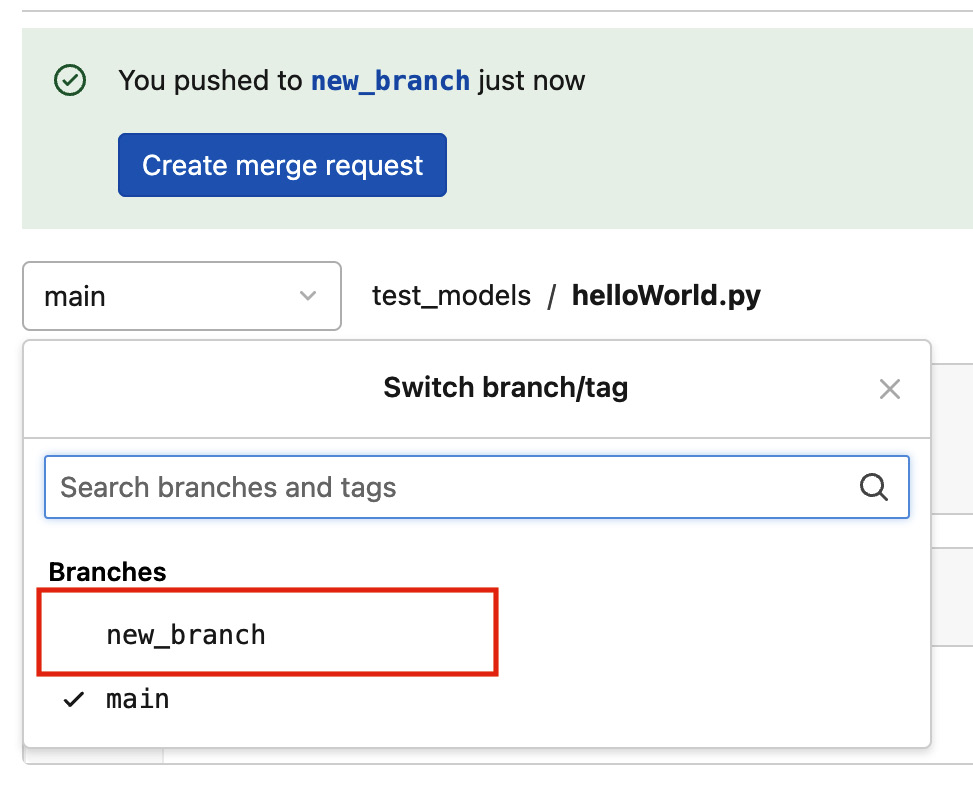
Figure 7.5 – The new branch created in GitLab after the git push command
The created branch remains pending until you create a merge request. Let’s investigate how to perform it.
Creating a merge request
Figure 7.5 shows that the GitLab platform proposes to create a merge request of the branch (the green rectangle at the top of the figure, with the blue button). The following are the steps to creating a merge request:
- If you click on the Create merge request button, the GitLab dashboard asks you to fill out some fields for the merge request, such as an associated message.
- Then, you can click again on the button Create merge request.
- The repository’s maintainer will receive a notification, specifying that there is a merge request.
- The maintainer (you, in this case) can approve the merge request simply by clicking on the merge button, as shown in the following figure:
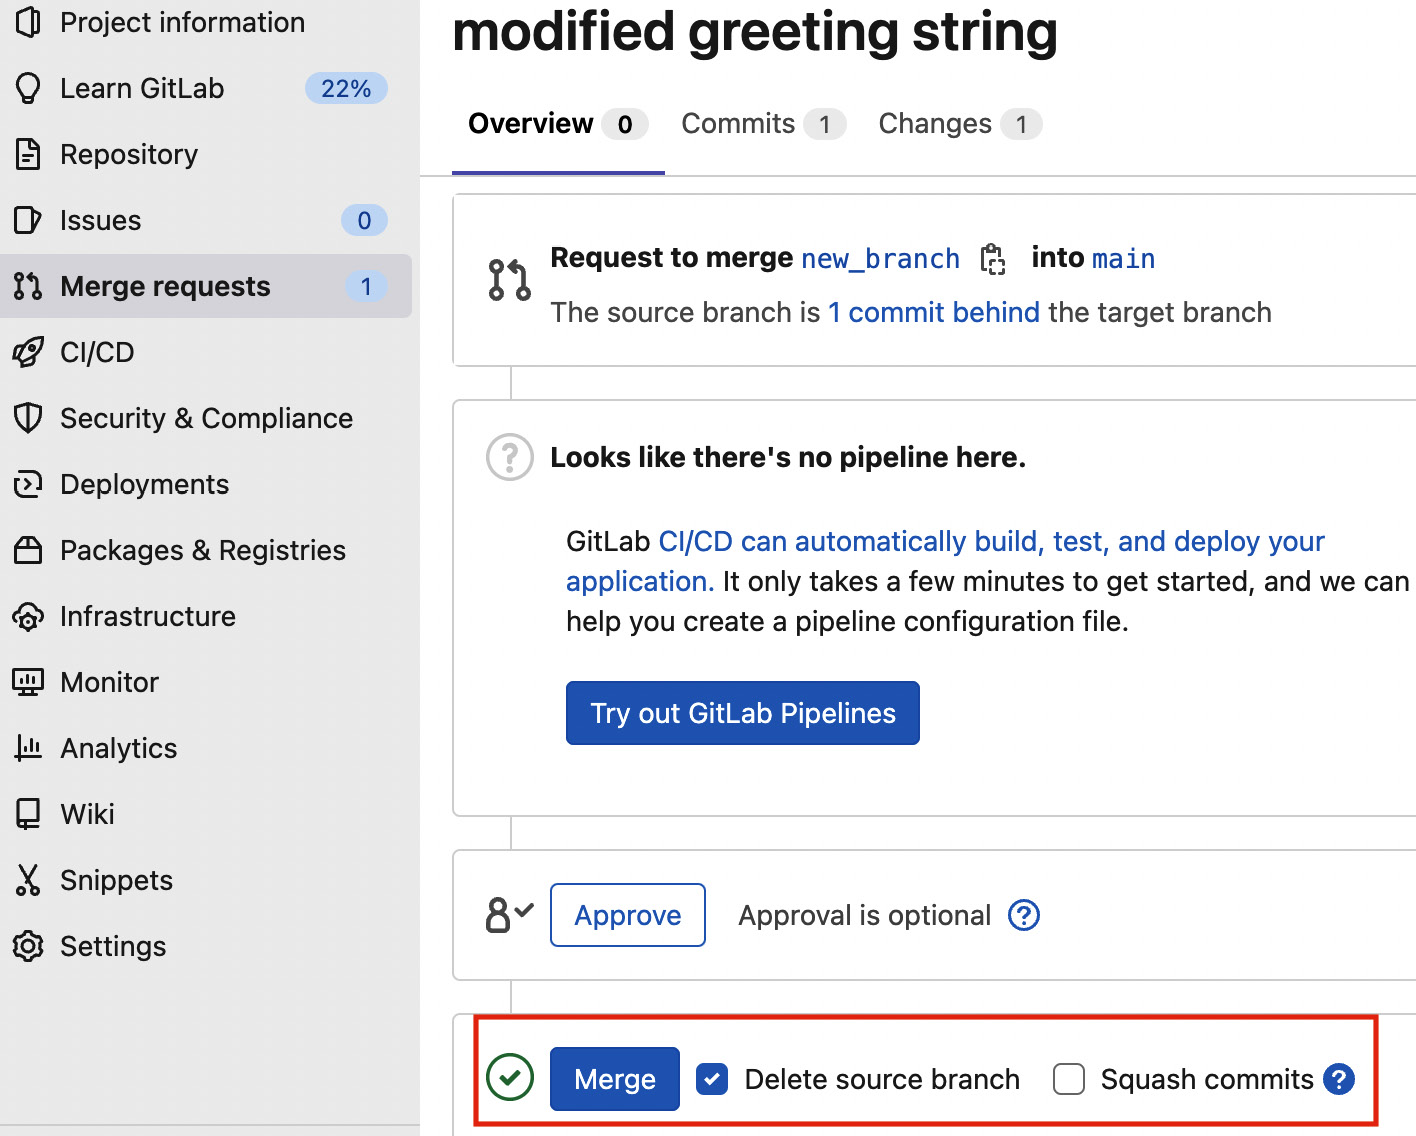
Figure 7.6 – Approving a merge request
Once the merge request is approved, all of the changes you performed in the branch are moved to the main branch.
Now that you have learned the basic concepts of creating and modifying a project in GitLab, we can move on to the next step, which is exploring GitLab's internal structure.
Exploring GitLab's internal structure
To store the content of a project, GitLab uses the following three main concepts:
- Blob
- Tree
- Commit
Let’s investigate each concept separately.
Blob
A blob (short for Binary Large Object) represents the content of a file, without its metadata or the file name. In practice, a blob of a file is the associated SHA1 hash of that file. Different files with the same content have the same blob. GitLab stores all of the blobs in a local directory called .git/objects within the GitLab project. Whenever you add a new file to the repository through the git add command, a new blob object is added to the .git/objects directory, provided that the same content is not already available in the .git/objects directory.
Tree
Blobs are organized in trees, which represent directories. Every time you run a git commit command, GitLab creates a new tree in the .git/objects directory. The tree objects contain the following:
- The blob identifiers contained in the tree
- The paths of the files
- The metadata associated with all the files in that directory
The following piece of code shows an example of tree content:
100644 blob ce013625030ba8dba906f756967f9e9ca394464a
file1.txt
100644 blob e69de29bb2d1d6434b8b29ae775ad8c2e48c5391
file2.txt
The preceding tree contains two blobs named file1.txt and file2.txt.
Commit
When you run the git commit command, GitLab also adds a commit object in the .git/objects directory. The commit object points to the tree object, as shown in the following piece of code:
tree dca98923d43cd634f4359f8a1f897bf585100cfe
author Author Name <author's computer name> 1656927878 +0200
committer Author Name <author's computer name> 1656927878 +0200
My commit message
You can see the reference to the tree, the author who performed the commit, and the commit message (My commit message in the example).
If you access the .git/objects directory, you can check the type of the object as follows:
- First, take the name of the directory containing the object you want to check (such as 7f).
- Next, append to the directory’s name the first two characters of the object you want to check. For example, if the object name is dca98923d43cd634f4359f8a1f897bf585100cfe, you take dc and append it to 7f. As a resulting string, you have 7fdc.
- From the .git/objects directory, run the following command to see the type of the object:
git cat-file –t 7fdc
You can output either blob, tree, or commit file types.
- Alternatively, you can view the content of the object by running the following command:
git cat-file –p 7fdc
For the preceding command, you use the –p argument.
Now that you have learned the GitLab internal structure, we can move on to the next point, which is exploring GitLab concepts for CI/CD.
Exploring GitLab concepts for CI/CD
GitLab defines the following concepts, which implement the CI/CD workflow:
- Job: The smallest unit that you can run in a GitLab CI/CD workflow. For example, a job can be a compilation, building, or running task.
- Stage: A logical representation that defines when to run jobs.
- Pipeline: A collection of jobs organized in different stages.
- Runner: An agent that runs jobs.
To configure the CI/CD workflow in GitLab, you should add .gitlab-ci.yml to your project. The presence of a .gitlab-ci.yml file in your repository automatically triggers a GitLab runner that executes the scripts defined in the jobs.
To define the stages of your CI/CD workflow, you can use the stages keyword in the .gitlab-ci.yml file, as shown in the following piece of code:
stages:
- build
- test
- deploy
In the preceding example, we defined three stages: build, test, and deploy. These stages are executed in sequential order, starting from the first stage to the last one.
To define a job, you can use a generic name, followed by the stage to which the job belongs, and the scripts to run, as shown in the following example:
my-job:
stage: build
script:
- echo "Hello World!"
In the preceding example, we defined a job named my-job that belongs to the build stage and simply prints to screen the sentence "Hello World!".
By default, a GitLab runner runs all of the jobs in the same stage concurrently. This process is also called a basic pipeline. However, you can customize the order of jobs, regardless of the stage they belong to, by using the needs keyword within the job definition. For example, if you want to specify that job2 must be run after job1, you can write the following code:
job1:
stage: build
script:
- echo "Hello World from Job1!"
job2:
needs:
- job1
stage: build
script:
- echo "Hello World from Job2!"
We use the needs keyword for job2 to specify its dependence on job1.
Now that you have learned the basic GitLab concepts for CI/CD, we can implement a practical example.
Building the CI/CD pipeline
Let’s suppose that now you want to implement a CI/CD workflow that is triggered every time you push a change to a branch of your repository. The idea is to implement the CI/CD workflow illustrated in Figure 7.3.
As a use case, we can extend the example described in the Creating/modifying a GitLab project section by adding a new script to the test_models repository. The script simply builds a linear regression model on the well-known diabetes dataset and calculates the mean squared error metric.
To configure the CI/CD workflow for this project, you should perform the following steps:
- Writing the main script
- Configuring a runner
- Configuring the .gitlab-ci.yml file
- Creating a merge request
Let’s start with the first step, which is writing the main script.
Writing the main script
The script named linear_regression.py loads the well-known diabetes dataset provided by the scikit-learn library, trains it with a training set, and then calculates the Mean Squared Error (MSE) metric.
The following piece of code shows the code that implements the preceding steps:
from sklearn.datasets import load_diabetes
from sklearn.model_selection import train_test_split
from sklearn.linear_model import LinearRegression
from sklearn.metrics import mean_squared_error
diabetes = load_diabetes()
X = diabetes.data
y = diabetes.target
X_train, X_test, y_train, y_test = train_test_split(X, y, test_size=0.20, random_state=42)
model = LinearRegression()
model.fit(X_train,y_train)
y_pred = model.predict(X_test)
mse = mean_squared_error(y_test,y_pred)
print(f"MSE: {mse}")The script simply prints the MSE value. Since the script uses the scikit-learn library, we also include a requirements.txt file in the project repository. This file simply contains the scikit-learn library name.
Now you can perform the following steps:
- Add the files to the GitLab repository as explained in the preceding section:
git add linear_regression.py
git add requirements.txt
- Then, you can commit changes to your local repository first and then to the GitLab remote server as follows:
git commit –m "added linear regression "
git push origin main
Once the push operation terminates, you should be able to see the files on your GitLab dashboard.
Now that you have written the main script, we can implement the CI/CD workflow by following the next step, which is configuring a runner.
Configuring a runner
First, we need to set up a runner, which is a process that executes jobs. In this example, we will use the shared runners provided by GitLab. However, you can implement your own custom runner as described in the GitLab official documentation, available at the following link: https://docs.gitlab.com/runner/.
To configure a runner, you can proceed as follows:
- On the GitLab dashboard, access your project by selecting Menu | Projects | Your Projects. Then, select your project name, which is test_models in our case.
- In the left menu, select Settings and then CI/CD. In the Runners section, click on the Expand button.
- Make sure that the slider under Enable shared runners for this project is active. If not, enable it. The following figure shows where you should click to enable runners:
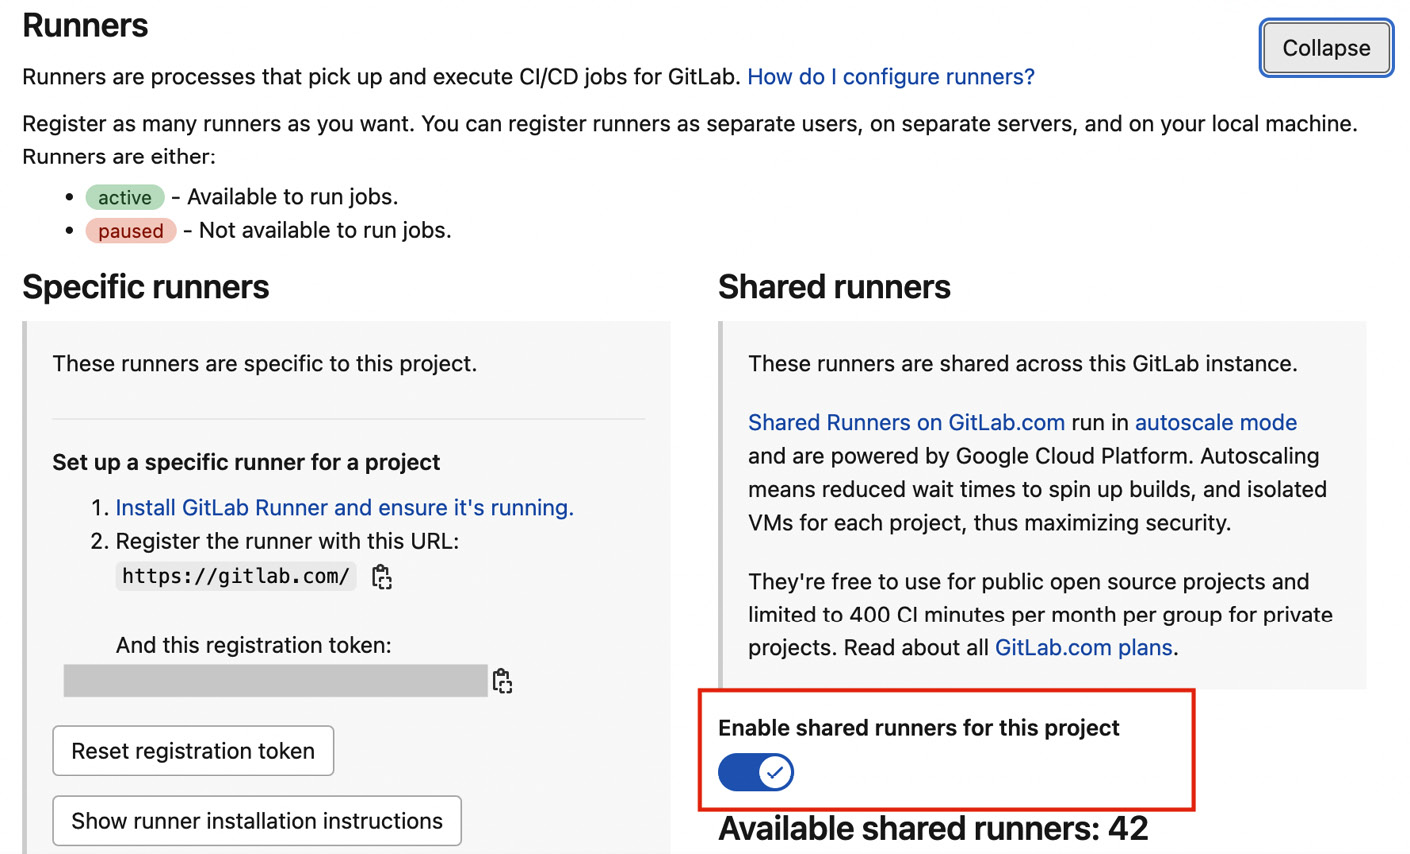
Figure 7.7 – How to enable GitLab runners
Now that you have configured the runners, you can configure the .gitlab-ci.yml file.
Configuring the .gitlab-ci.yml file
We need to configure .gitlab-ci.yml as follows:
- In the left menu, select CI/CD and then Editor. An Editor opens with a basic template of the .gitlab-ci.yml file. You can modify the basic template through the following steps.
- First, you can import the basic Docker image as follows:
image: python:3.8
Since our script is written in Python, we only need to import the Python interpreter.
- Next, you can define just one stage as follows:
stages:
- run
- To make the installed packages also accessible during the subsequent run stages, we cache them. First, we define a caching working directory as follows:
variables:
PIP_CACHE_DIR: "$CI_PROJECT_DIR/.cache/pip"
$CI_PROJECT_DIR contains the current directory of the project.
- To cache the installed packages, you should install them in a virtual environment and cache them as well:
cache:
paths:
- .cache/pip
- venv/
The cache keyword specifies the list of files that should be cached. The paths keyword determines which files to add to the cache.
- Now you define a special job, named before_script, that specifies all of the operations that should be run before each script. In our case, we create and activate a virtual environment as well as install the required packages as follows:
before_script:
- pip install virtualenv
- virtualenv venv
- source venv/bin/activate
- pip install -r requirements.txt
- Next, you can define the run job as follows:
run-job:
stage: run
script:
- python linear-regression.py
Simply, the job runs the linear-regression.py script.
- Finally, you can click on the Commit changes button. This operation will trigger the CI/CD pipeline, as defined in your .gitlab-ci.yml file.
If everything is okay, you should see an output similar to that shown in the following figure:
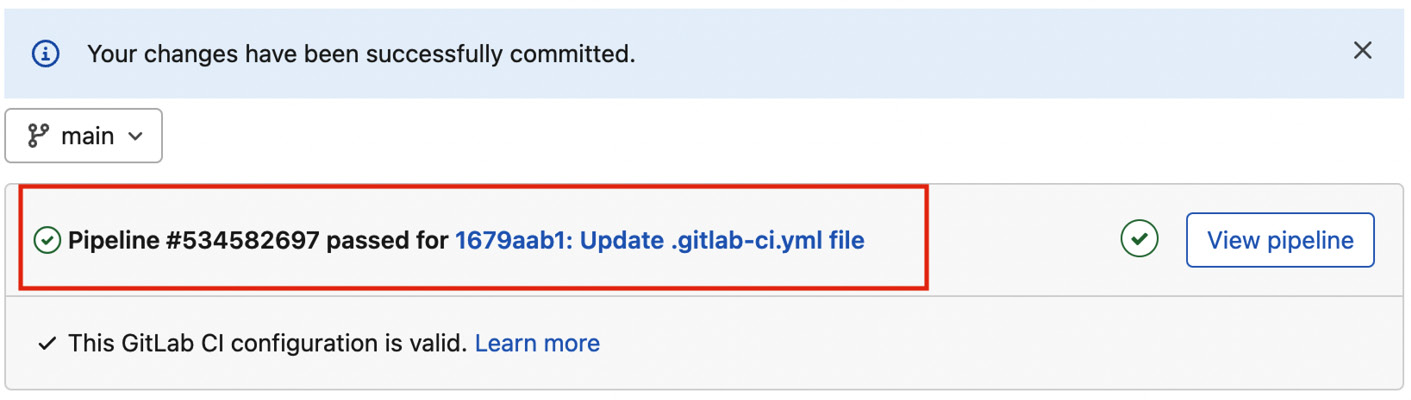
Figure 7.8 – The output of a successful pipeline
If you click on the View pipeline button, you can view all of the details related to the built pipeline, as shown in the following figure:
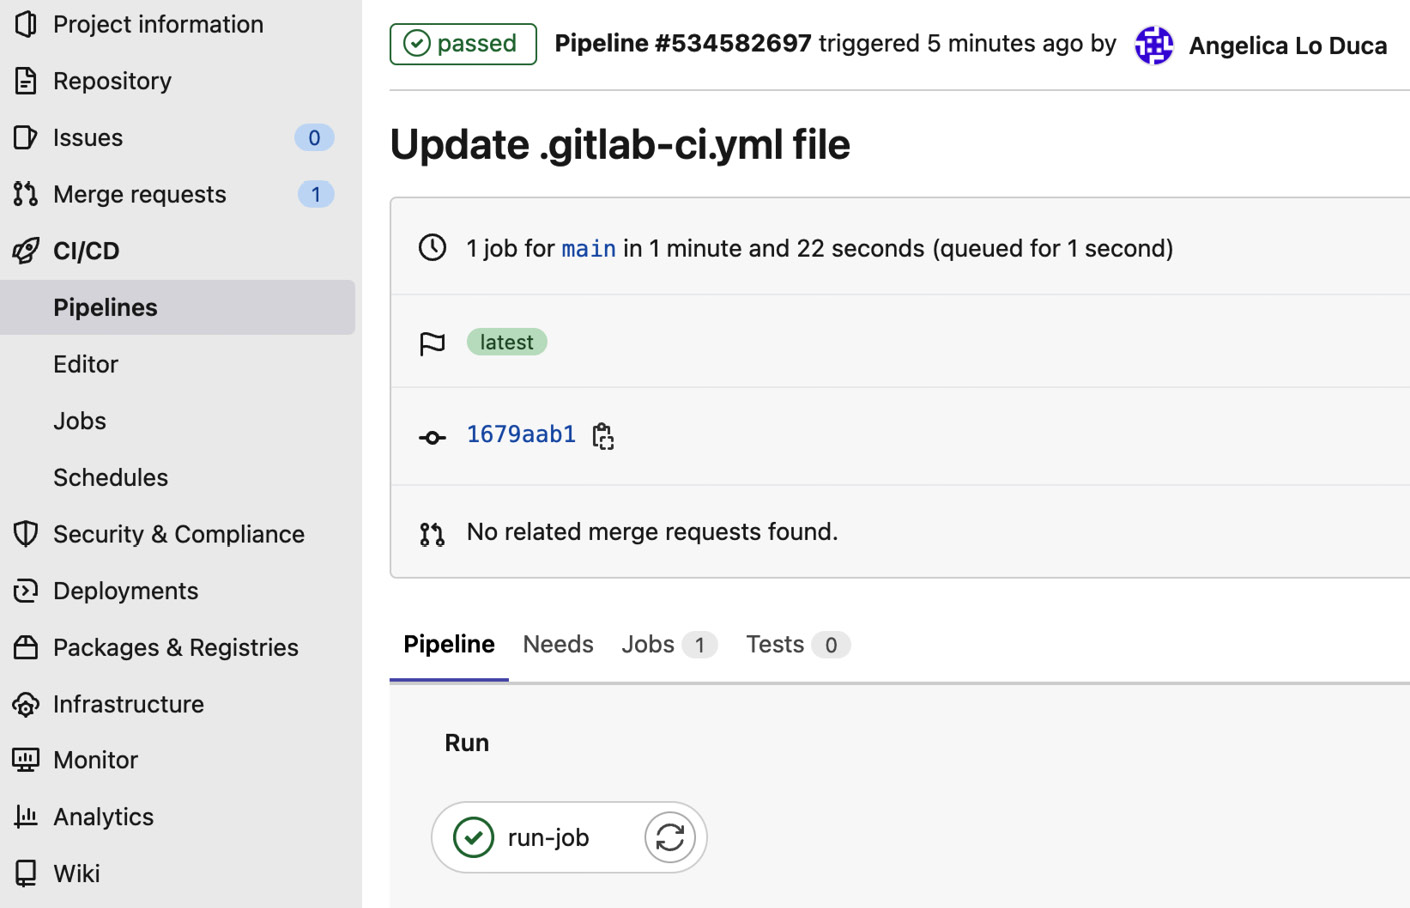
Figure 7.9 – Details related to a successful pipeline
At the bottom part of the screen, you can see the jobs contained in the pipeline. In our case, there is just one job named run-job. You can click on the run-job button to see the output of the console, as shown in the following figure:
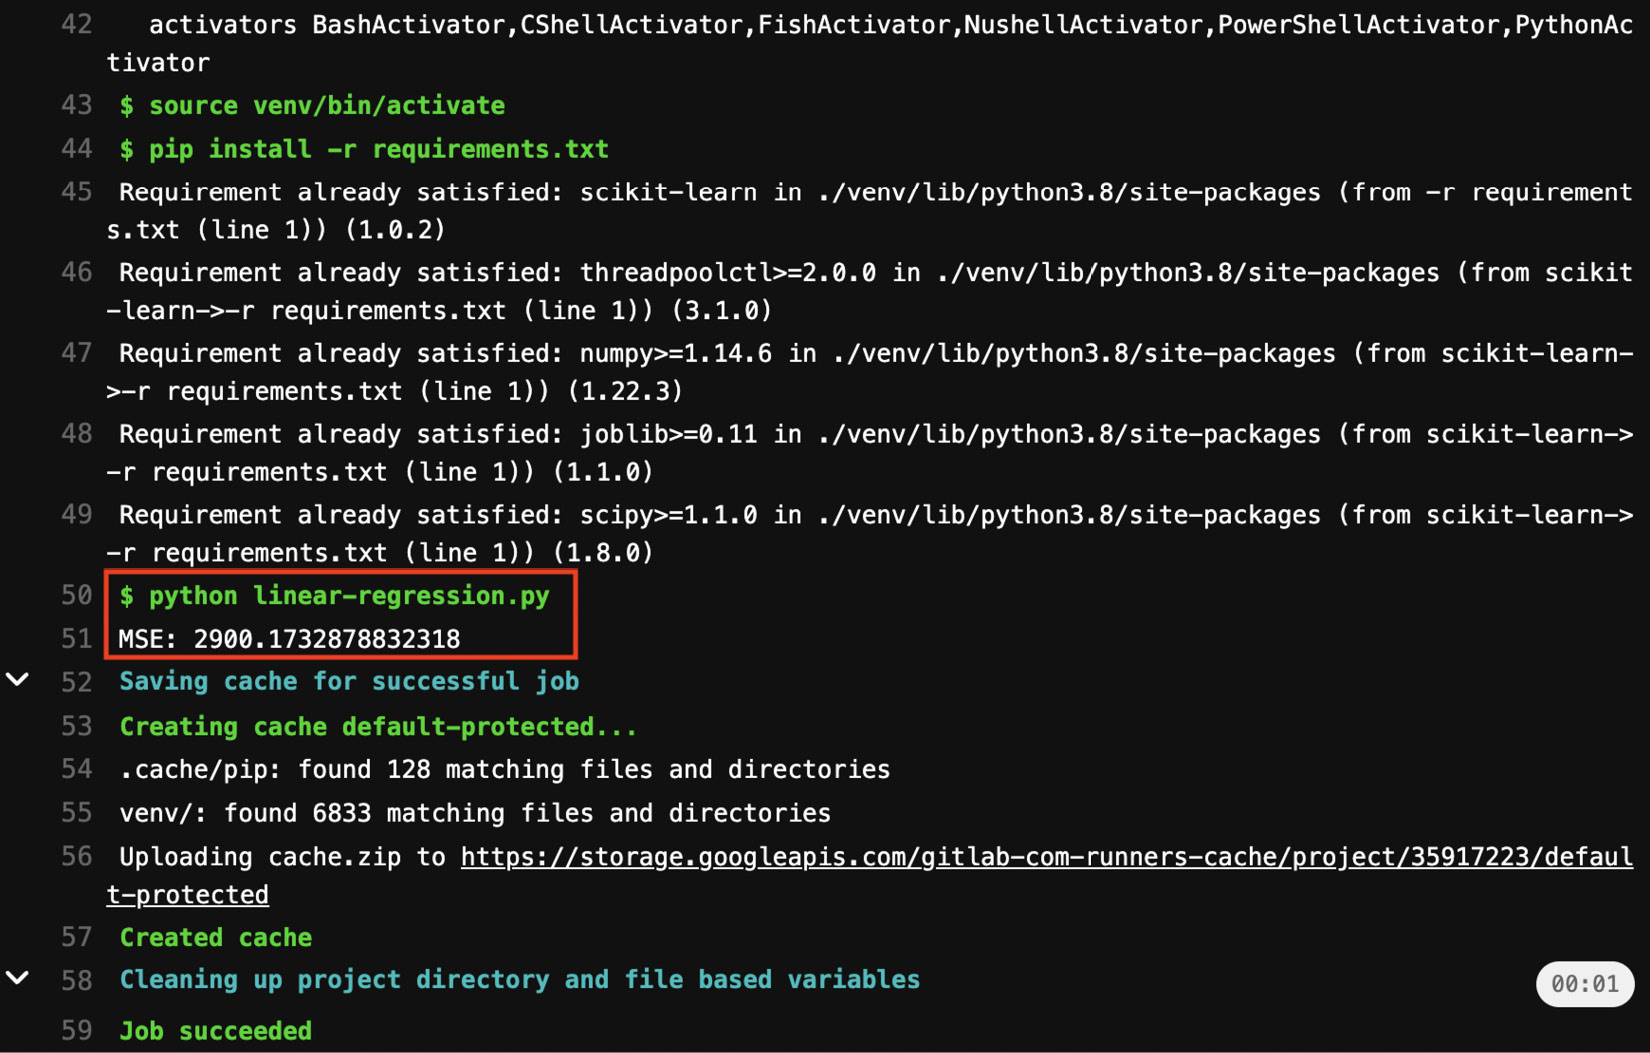
Figure 7.10 – The output of run-job
You can clearly see the output of the python linear-regression.py command, which shows the calculated Root Mean Squared Error (RMSE).
Note
It is possible that your pipeline fails. In fact, the first time you run a CI/CD pipeline in GitLab, you need to validate your account by providing a valid credit card. Once you fill in the required information, you should be able to run the CI/CD pipeline.
Now that you have learned how to configure the .gitlab-ci.yml file, we can move on to the next step, which is creating a merge request.
Creating a merge request
The objective of this step involves modifying the linear-regression.py script, saving the changes to a new branch, and creating a merge request.
- First, we modify linear-regression.py by simply printing a new metric, which is the RMSE. We can write the following code:
from math import sqrt
# train the model and calculate MSE
rmse = sqrt(mse)
print(f"RMSE: {rmse}")
- Next, we create a new branch named test as follows:
git checkout -b test
- We commit changes to our local repository and the remote GitLab repository as follows:
git commit –m "modified linear regression"
git push origin test
You can see that we have pushed changes to the test branch.
- If you access the GitLab dashboard, you can see that a new branch has been created. A new message appears, asking you to create a merge request, as shown in the following figure:

Figure 7.11 – The message appearing after pushing to a new branch
You can click on the Create merge request button to trigger a merge request. This operation triggers the CI/CD pipeline.
- In the Merge requests menu, you can see the merge request we just created, as shown in the following figure:
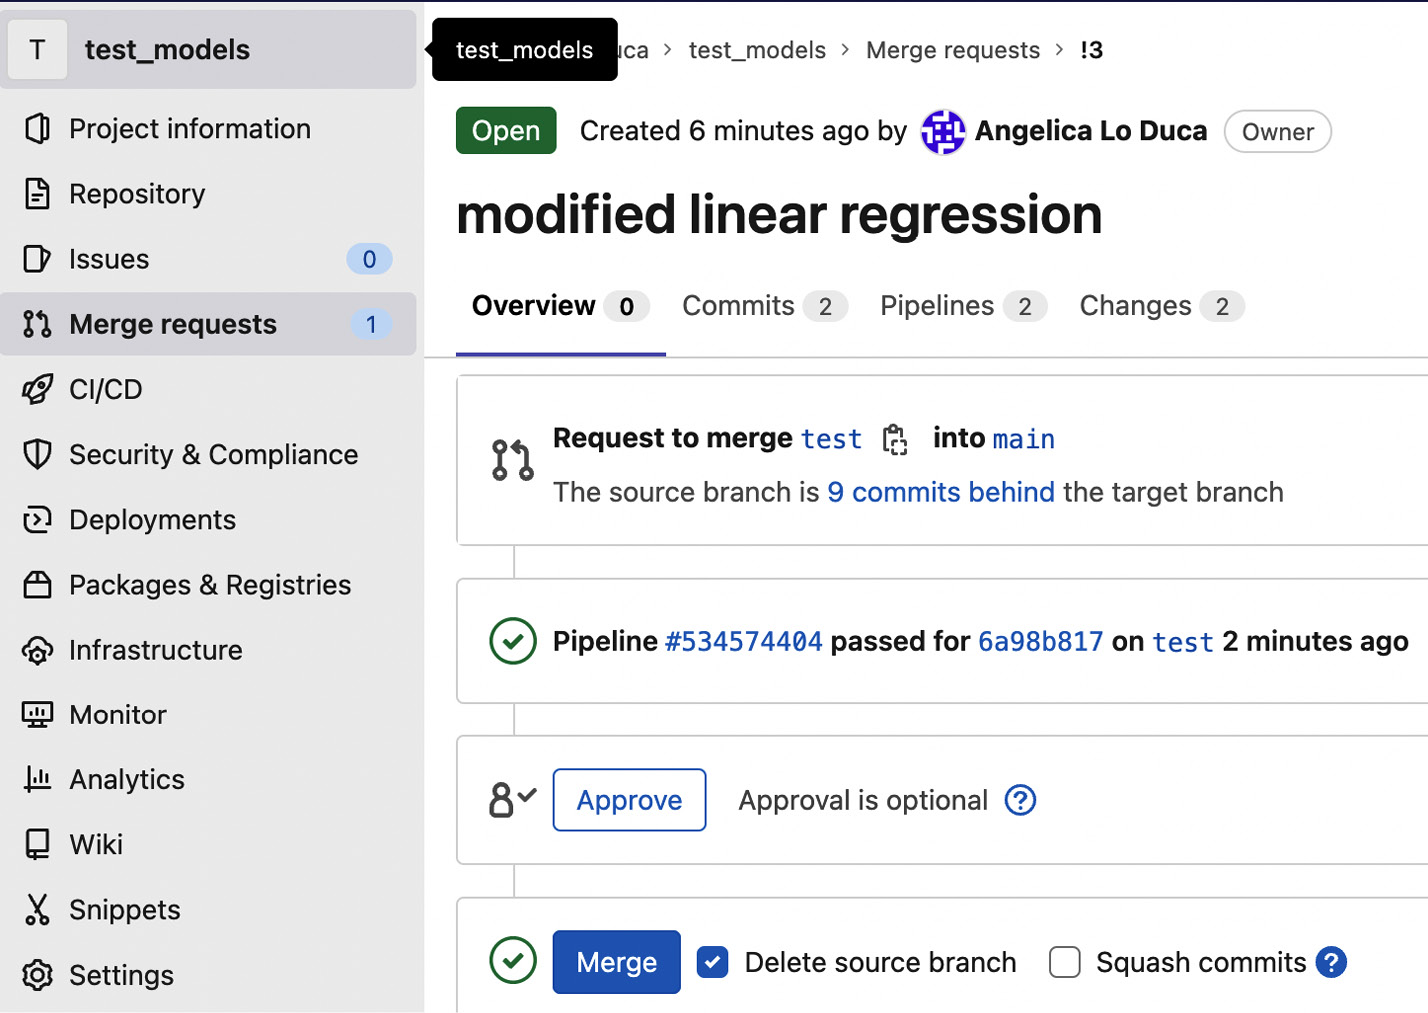
Figure 7.12 – An overview of the merge request
You can see details on the pipeline, and you can decide to approve and merge the test branch with the main branch.
Now that you have learned how to build the CI/CD pipeline, we can move to the last step, which is creating a release.
Creating a release
When your project is ready to be published and downloaded by other people, you can create a release. A release is a snapshot of your project, which also includes the installation packages and the release notes. To create a release, your project must have at least one tag, which can be, for example, the version of your project.
A release includes four zipped versions of your code, including four different formats: .zip, .tar.gz, .tar.bz2, and .tar. The release also includes a JSON file, which lists the release content, as shown in the following example:
{"release":{"id": 5269390,
"name": "Test Models V1",
"project":{"id": 35917223,
"name": "test_models",
"created_at": "2022-05-05T16:33:04.210Z",
"description": ""
},
"tag_name": "v1",
"created_at": "2022-07-04T19:45:04.219Z",
"milestones": [],
"description": "The first release of test models"
}
}
The JSON file includes metadata related to the name of the release, the release date, a description, and so on.
GitLab provides different ways to create a release. In this section, we will describe the following two ways to create a release:
- Using the GitLab dashboard: To create a new release, you can click on the left tab of your dashboard and select Deployments | Releases. Then, you can add a new tag, such as v1, and follow the guided procedure.
- Using the .gitlab-ci.yml file: You can add a new stage, called release, to your configuration file, as shown in the following piece of code:
release_job:
stage: release
image: registry.gitlab.com/gitlab-org/release-cli:latest
rules:
- if: $CI_COMMIT_TAG
release:
tag_name: '$CI_COMMIT_TAG'
In this example, you build a release only if the commit operation includes a tag. You should also make sure that your release job has access to the release-cli, so you should add it to the PATH or use the image provided by the GitLab registry, as shown in the preceding example.
To add a tag to your commit operation, you can proceed as follows:
- From the command line, you can add a tag before committing your code by using the tag keyword as follows:
git tag my_tag
- Then, you can save your tag to the remote repository as follows:
git push origin my_tag
- You add your tag name at the end of the git push command.
For more details on the other ways to create a release, you can refer to the GitLab official documentation, available at the following link: https://docs.gitlab.com/ee/user/project/releases/.
Now that you have learned the basic concepts behind GitLab, we can investigate how to integrate Comet with GitLab.
Integrating Comet with GitLab
Thanks to a collaboration between Comet and GitLab, Comet experiments are fully integrated with GitLab. You can integrate Comet and GitLab in two ways as follows:
- Running Comet in the CI/CD workflow
- Using Webhooks
Let’s investigate the two ways separately, starting with the first one.
Running Comet in the CI/CD workflow
The following figure shows how Comet can be integrated with the CI/CD pipeline:
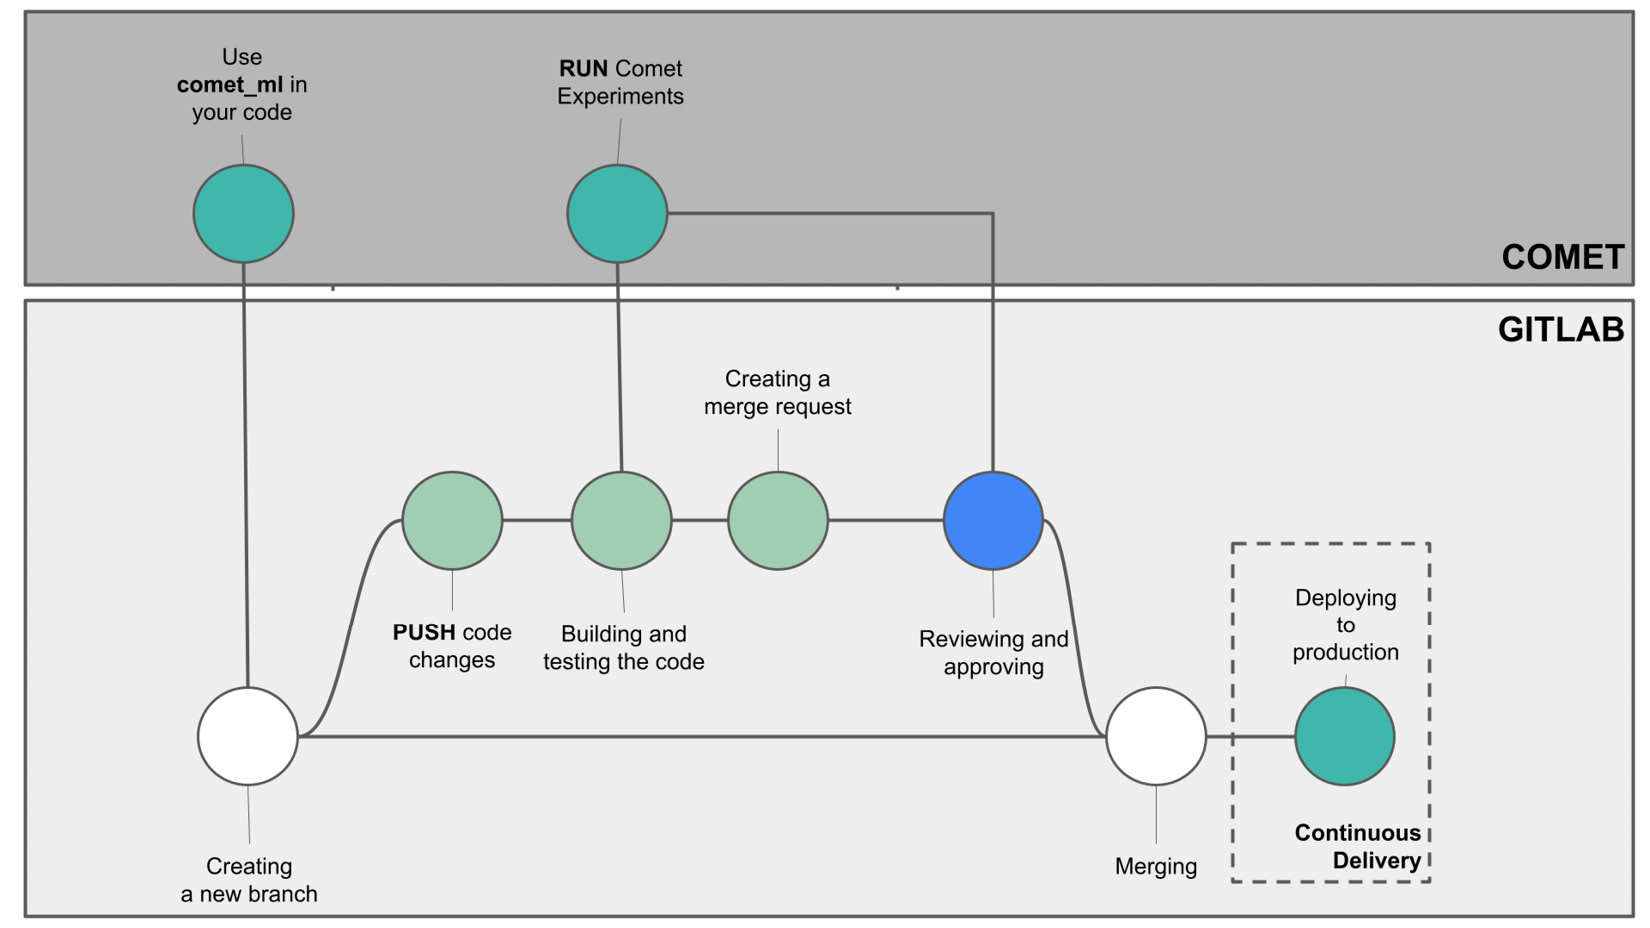
Figure 7.13 – Integration of Comet in the CI/CD workflow
Let’s suppose that you have changed your code to support Comet experiments. If your code is written in Python, then you have imported the comet_ml library and used it to track your experiments. You can start the CI/CD workflow by creating a new branch for your project. As usual, you push code changes, and you build and run the code. This process also triggers a connection with the Comet platform. Then, the CI/CD workflow continues as described in the preceding section. When you review and approve the code, you should also consider the output of the Comet experiments to make sure that the proposed changes improve the model.
To make the integration between Comet and GitLab work, you should configure the Comet secrets in the GitLab project. You can proceed as follows:
- In GitLab, select your project. Then, from the left menu, select Settings | CI/CD | Variables | Expand.
- Add the following two protected variables: COMET_API_KEY, which stores your Comet API key, and COMET_WORKSPACE, which stores your Comet workspace, as shown in the following figure:
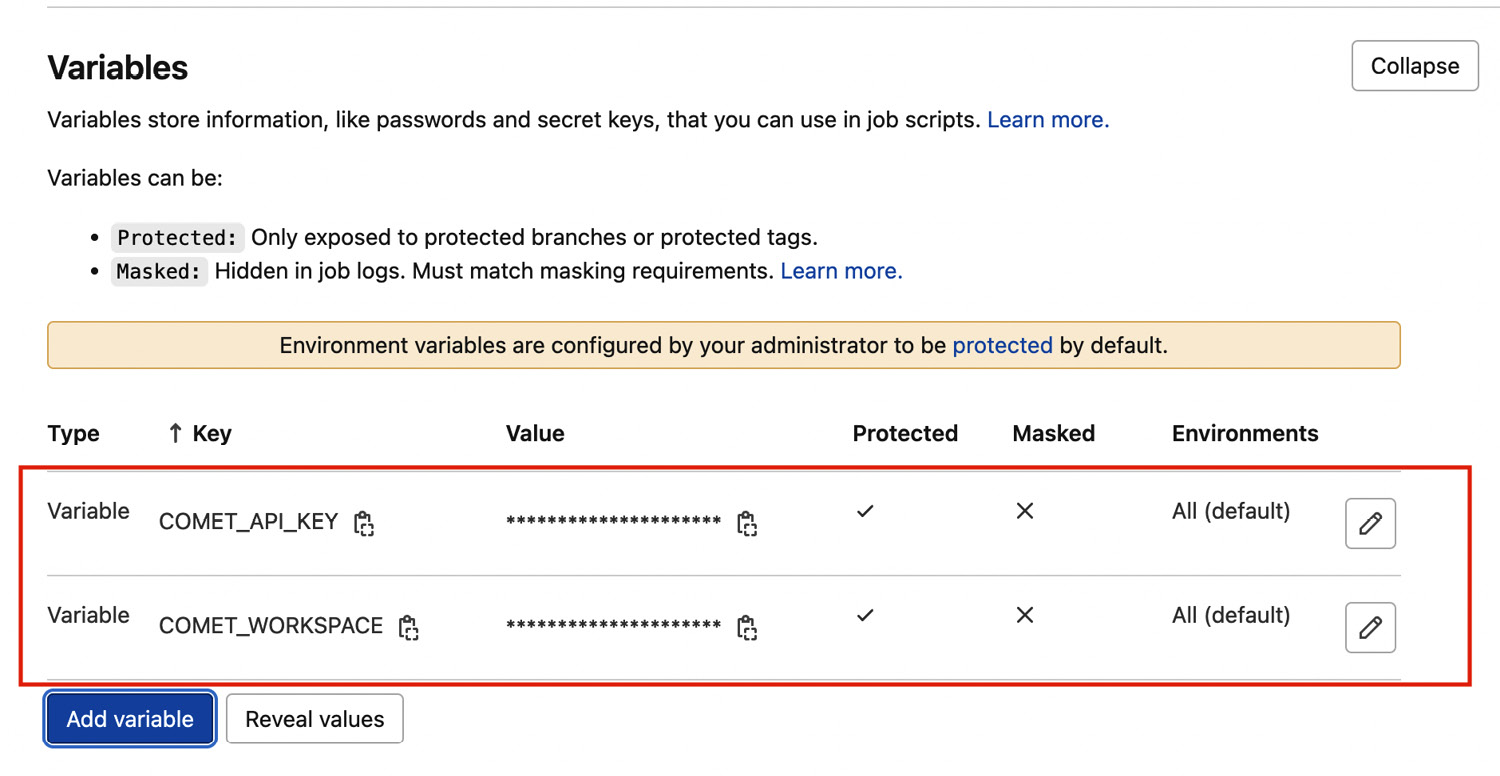
Figure 7.14 – The configured variables in GitLab
We have configured both variables as protected. This means that only protected branches can access them. By default, the main branch is protected. You can set a branch as protected in the Protected Branches menu, which is available by following this path from the project menu: Settings →Repository →Protected Branches →Expand. When you want to protect a branch, you should select who can modify the branch. For example, you can choose the maintainers, as shown in the following figure:

Figure 7.15 – How to protect a branch in GitLab
Now that you have learned how to run Comet in a CI/CD pipeline, we can move on to the next step, which is using webhooks.
Using webhooks
A webhook is an automated message sent from an application to notify someone that something happened. A webhook contains a payload, that is a message, and is sent to a unique URL. You can configure Comet to work with webhooks to notify an external application that there was a change in a registered model.
The following figure shows a possible integration of Comet webhooks with the CI/CD workflow:
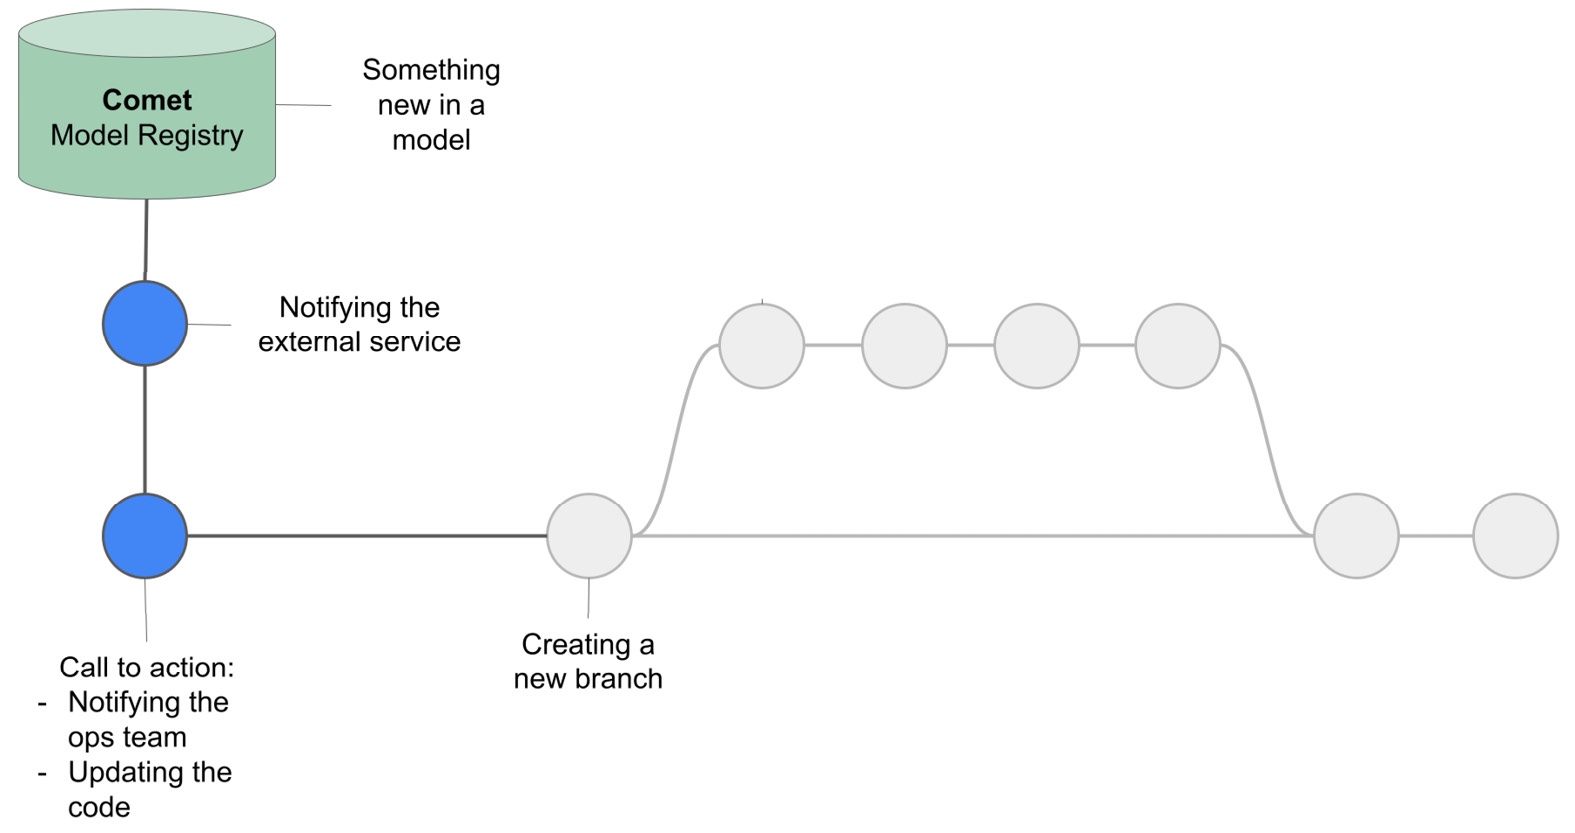
Figure 7.16 – A possible integration of Comet webhooks with the CI/CD pipeline
Let’s suppose that you have configured a webhook that notifies an external service whenever a change occurs in a model registered in the Comet Model Registry. When the external service receives a notification, it could notify the operations team to update the code, or it could trigger an automatic downloading of the new version of the model from Comet. In both cases, the produced action should update the code stored in the GitLab repository. Thus, you should create a new branch and follow the usual CI/CD workflow described in the preceding section.
Comet webhooks are part of the Comet REST APIs that you learned in Chapter 6, Integrating Comet into DevOps.
To configure a webhook in Comet, proceed as follows:
- Generate a POST request to the following endpoint:
https://www.comet.ml/api/rest/v2/webhooks/config
- The POST request should contain the following payload:
payload = { "workspaceName": <YOUR_COMET_WORKSPACE>,
"modelName": <YOUR MODEL NAME>,
"webhookUrls": [{ "url": <URL to the external service>,
"header": { "Authorization": <secret token>,
"Other": "other_info"
}
}]
}
You should define the workspace name and the model name in the Comet Registry that you want to notify. Under the webhooksUrls keyword, you can specify as many external services as you want. For each service, you should specify the secret token used to access it.
- In Python, you use the requests package to send the webhook configuration to the Comet REST API service as follows:
import requests
headers = {'Content-Type':'application/json',
"Authorization": f"{<YOUR_COMET_API_KEY>}"
}
response = requests.post(url, headers=headers, json=payload)
Once you have configured the Comet webhook, every time there is a change in the stage of your model, a notification will be sent to your external service.
Now that you have learned how to integrate Comet with GitLab, let’s move on to a practical example that shows how to integrate Docker with the CI/CD workflow.
Integrating Docker with the CI/CD workflow
Let’s see how to integrate Docker with the GitLab CI/CD workflow through a practical example. As a use case, let’s use the example implemented in Chapter 6, Integrating Comet into DevOps, in the Implementing Docker section. The example built an application that tested four different classification models (random forest, decision tree, Gaussian Naive Bayes, and k-nearest neighbors), which classified diamonds cut into two categories (Gold and Silver) based on some input parameters. In addition, the application logged all of the models in Comet.
You can download the full code of the example from the GitHub repository of the book available at the following link: https://github.com/PacktPublishing/Comet-for-Data-Science/tree/main/07.
In that example, we built a Docker image with the code and we ran it. In this section, the idea is to wrap that example in a CI/CD workflow and run it in GitLab. In other words, the idea is to build and run the Docker image automatically within the CI/CD workflow, without writing all the commands manually. To do so, proceed with the following steps:
- First, we log in to the GitLab platform and we create a new project as described in the preceding section.
- Then, we clone the project in our local filesystem, and we copy all of the files implemented in Chapter 6, Integrating Comet into DevOps, in the Implementing Docker section, in the created directory.
- We add all of the files to the GitLab repository through the following command:
git add <file_name>
The copied files include the following:
- Dockefile
- compare-models.py
- requirements.txt
- source/diamonds.csv
- We save changes to our local repository through the commit command and to the remote server through the push command as follows:
git commit –m "initial import"
git push origin main
- Now you should be able to see the files on your GitLab dashboard.
- The next step involves creating the environment variables related to Comet. We add the following environment variables, through the GitLab dashboard, as described in the preceding section:
- COMET_API_KEY
- COMET_PROJECT
- COMET_WORKSPACE
- Now you are ready to create a new .gitlab-ci.yml file. You can follow the procedure described in the preceding section to open the file editor. Once you have opened the editor, you are ready to configure it. We will configure the CI/CD workflow to work with Docker images as follows:
image: docker:latest
services:
- docker:dind
- Then, we build two stages, build and run as follows:
stages:
- build
- run
During the build stage, we will build the Docker image, and during the run stage, we will wrap it in a container, and we will run the code in the container.
- We then define some auxiliary variables that will be used in the next steps as follows:
variables:
CONTAINER_TEST_IMAGE: $CI_REGISTRY_IMAGE:$CI_COMMIT_REF_SLUG
CONTAINER_RELEASE_IMAGE: $CI_REGISTRY_IMAGE:latest
CONTAINER_TEST_IMAGE contains the name of the produced image during the build stage. We build it from some system variables available in GitLab. For more details on these system variables, you can check the GitLab official documentation available at the following link: https://docs.gitlab.com/ee/ci/variables/predefined_variables.html.
- To make the run job use the image built during the build stage, we need to save the image in a registry. GitLab provides a registry to store images. So, before every job, we log in to the GitLab registry as follows:
before_script:
- docker login -u $CI_REGISTRY_USER -p $CI_REGISTRY_PASSWORD $CI_REGISTRY
We use the docker login command described in Chapter 6, Integrating Comet into DevOps but the difference is that now we log in to the GitLab registry. We use the username and the password provided by the GitLab variables.
- We define the build job as follows:
job-build:
stage: build
script:
- docker build --pull -t $CONTAINER_TEST_IMAGE .
- docker push $CONTAINER_TEST_IMAGE
Simply, the job builds the Docker image and saves it to the GitLab registry.
- Now we define the run job as follows:
job-run:
stage: run
script:
- docker pull $CONTAINER_TEST_IMAGE
- docker run --rm -e COMET_API_KEY -e COMET_PROJECT -e COMET_WORKSPACE $CONTAINER_TEST_IMAGE
The job pulls the image from the registry and runs it in a container. As for the run command defined in Chapter 6, Integrating Comet into DevOps, we pass each environment variable separately.
- We can save the .gitlab-ci.yml file by clicking on the button Commit changes. Now the pipeline is triggered. Let’s wait for the results.
If everything works as expected, you should be able to see your results in Comet. In addition, you can access the produced image by selecting your project, then Packages & Registries | Container Registry, as shown in the following figure:
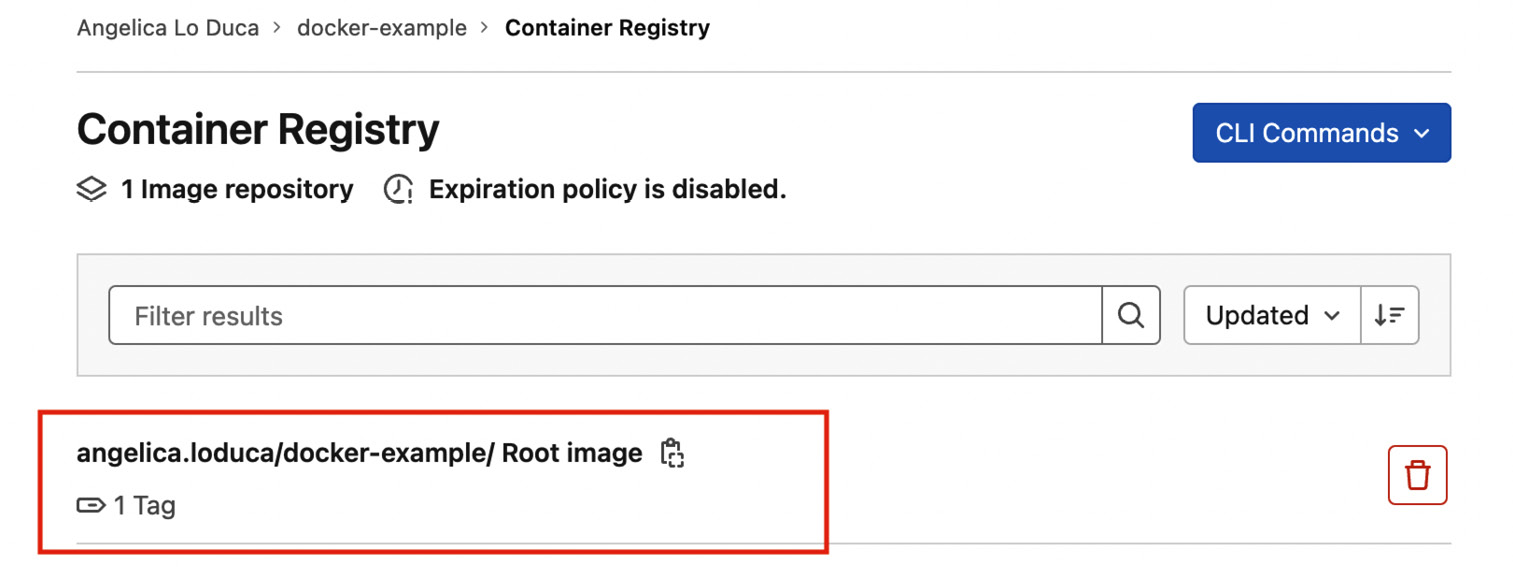
Figure 7.17 – The Container Registry in GitLab with the saved image
Now that the CI/CD pipeline is configured, every time you make a change in your code and you push it to GitLab, your code is automatically deployed as a Docker container.
Summary
You have just learned how to build and run a CI/CD workflow in GitLab!
Throughout this chapter, you have reviewed some advanced concepts related to DevOps, with a focus on the CI/CD workflow. You have also learned some basic concepts related to the GitLab platform and how to use them to implement the CI/CD workflow. Then, you have learned how to integrate Comet with GitLab. Finally, you have implemented a practical example that wraps the Docker building and running processes in the CI/CD pipeline. The CI/CD workflow is very important when deploying an application because it permits you to make the software releasing process easy, quick, and automatic.
In the next chapter, we will review some basic concepts related to machine learning in general, and how to use Comet to build and run a complete machine learning example.
Further reading
- Evertse, J. (2019). Mastering GitLab 12: Implement DevOps Culture and Repository Management Solutions. Packt Publishing.
- O’Grady, A. (2018). GitLab Quick Start Guide: Migrate to GitLab for All Your Repository Management Solutions. Packt Publishing Ltd.
- Umali, R. (2015). Learn Git in a Month of Lunches. Simon and Schuster.