
Chapter 5: Securing and Testing Your Backend
This chapter explains how to secure and test your Spring Boot backend. Securing your backend is a crucial part of code development. In the testing part of this chapter, we will create some unit tests in relation to our backend—these will make your backend code easier to maintain. We will use the database application that we created in the previous chapter as a starting point.
In this chapter, we will cover the following topics:
- Understanding Spring Security
- Securing your backend with a JSON Web Token (JWT)
- Testing in Spring Boot
- Creating unit tests
Technical requirements
The Spring Boot application that we created in the previous chapters is required.
The following GitHub link will also be required: https://github.com/PacktPublishing/Full-Stack-Development-with-Spring-Boot-and-React/tree/main/Chapter05.
Check out the following video to see the Code in Action: https://bit.ly/3Gv9wVD
Understanding Spring Security
Spring Security (https://spring.io/projects/spring-security) provides security services for Java-based web applications. The Spring Security project was started in 2003 and was previously named Acegi Security System for Spring.
By default, Spring Security enables the following features:
- An AuthenticationManager bean with an in-memory single user. The username is user, and the password is printed to the console output.
- Ignored paths for common static resource locations, such as /css and /images. HyperText Transfer Protocol (HTTP) basic security for all other endpoints.
- Security events published to Spring's ApplicationEventPublisher interface.
- Common low-level features are on by default (HTTP Strict Transport Security (HSTS), cross-site scripting (XSS), cross-site request forgery (CSRF), and so forth).
- Default autogenerated login page.
You can include Spring Security in your application by adding the following dependencies to the pom.xml file. The first dependency is for the application and the second is for testing:
<dependency>
<groupId>org.springframework.boot</groupId>
<artifactId>spring-boot-starter-security</artifactId>
</dependency>
<dependency>
<groupId>org.springframework.security</groupId>
<artifactId>spring-security-test</artifactId>
<scope>test</scope>
</dependency>
When you start your application, you can see from the console that Spring Security has created an in-memory user with a username of user. The user's password can be seen in the console output, as illustrated here:
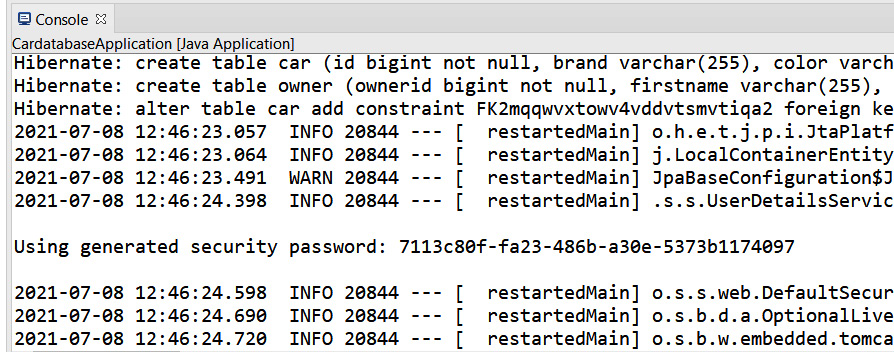
Figure 5.1 – Spring Security enabled
If there is no password in the console, try to restart your project by pressing the red Terminate button in the console and rerun your project.
Now, if you make a GET request to your application programming interface (API) root endpoint, you will see that it is now secured. Open your web browser and navigate to http://localhost:8080/api. Now, you will see that you are redirected to the Spring Security default login page, as illustrated in the following screenshot:

Figure 5.2 – Secured REpresentational State Transfer (REST) API
To be able to make a successful GET request, we have to authenticate. Type user into the Username field and copy the generated password from the console to the Password field. With authentication, we can see that the response contains our API resources, as illustrated in the following screenshot:

Figure 5.3 – Basic authentication
To configure how Spring Security behaves, we have to add a new configuration class that extends WebSecurityConfigurerAdapter. Create a new class called SecurityConfig in your application root package (com.packt.cardatabase). The following source code shows the structure of the security configuration class. The @Configuration and @EnableWebSecurity annotations switch off the default web security configuration, and we can define our own configuration in this class. Inside the configure(HttpSecurity http) method, we can define which endpoints in our application are secure and which are not. We don't actually need this method yet because we can use the default settings where all the endpoints are secured:
package com.packt.cardatabase;
import org.springframework.context.annotation.
Configuration;
import org.springframework.security.config.annotation.
web.builders.HttpSecurity;
import org.springframework.security.config.
annotation.web.configuration.EnableWebSecurity;
import org.springframework.security.config.annotation.
web.configuration.WebSecurityConfigurerAdapter;
@Configuration
@EnableWebSecurity
public class SecurityConfig extends
WebSecurityConfigurerAdapter {
@Override
protected void configure(HttpSecurity http) throws
Exception {
}
}
We can also add in-memory users to our application by adding the userDetailsService() method to our SecurityConfig class. The following source code of the method will create an in-memory user with a username of user and a password of password:
// SecurityConfig.java
@Bean
@Override
public UserDetailsService userDetailsService() {
UserDetails user =
User.withDefaultPasswordEncoder()
.username("user")
.password("password")
.roles("USER")
.build();
return new InMemoryUserDetailsManager(user);
}
The use of in-memory users is fine in the development phase, but the real application should save users in the database.
Important Note
The withDefaultPasswordEncoder() method should only be used for demonstration purposes and it is not safe for production.
To save users to the database, you have to create a user entity class and repository. Passwords shouldn't be saved to the database in plaintext format. Spring Security provides multiple hashing algorithms, such as bcrypt, that you can use to hash passwords. The following steps show you how to implement this:
- Create a new class called User in the com.packt.cardatabase.domain package. Activate the domain package and right-click it. Select New | Class from the menu and name the new class User. After that, your project structure should look like this:
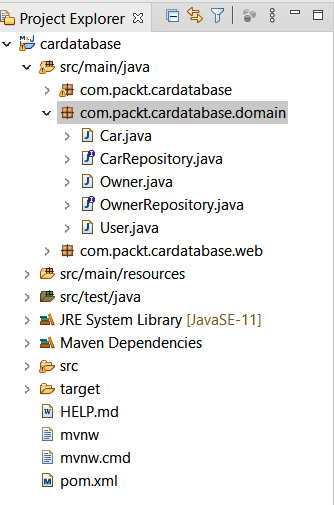
Figure 5.4 – Project structure
- Annotate the User class with the @Entity annotation. Add the identifier (ID), username, password, and role class fields. Finally, add the constructors, getters, and setters. We will set all the fields to be nullable, and specify that the username must be unique by using the @Column annotation. Refer to the following User.java source code of the fields and constructors:
package com.packt.cardatabase.domain;
import javax.persistence.Column;
import javax.persistence.Entity;
import javax.persistence.GeneratedValue;
import javax.persistence.GenerationType;
import javax.persistence.Id;
@Entity
public class User {
@Id
@GeneratedValue(strategy=GenerationType.IDENTITY)
@Column(nullable=false, updatable=false)
private Long id;
@Column(nullable=false, unique=true)
private String username;
@Column(nullable=false)
private String password;
@Column(nullable=false)
private String role;
public User() {}
public User(String username, String password,
String role) {
super();
this.username = username;
this.password = password;
this.role = role;
}
Here is the rest of the User.java source code with the getters and setters:
public Long getId() {
return id;
}
public void setId(Long id) {
this.id = id;
}
public String getUsername() {
return username;
}
public void setUsername(String username) {
this.username = username;
}
public String getPassword() {
return password;
}
public void setPassword(String password) {
this.password = password;
}
public String getRole() {
return role;
}
public void setRole(String role) {
this.role = role;
}
}
- Create a new class called UserRepository in the domain package. Activate the domain package and right-click it. Select New | Class from the menu and name the new class UserRepository.
- The source code of the repository class is similar to what we made in the previous chapter, but there is one query method, findByUsername, that we need for the steps that follow. That is used to find user from the database in the authentication process. The method returns Optional to avoid a null exception. Refer to the following UserRepository source code:
package com.packt.cardatabase.domain;
import java.util.Optional;
import org.springframework.data.repository.
CrudRepository;
public interface UserRepository extends CrudRepository
<User, Long> {
Optional<User> findByUsername(String username);
}
- Next, we will create a class that implements the UserDetailsService interface that's provided by Spring Security. Spring Security uses this for user authentication and authorization. Create a new service package in the root package. Activate the root package and right-click it. Select New | Package from the menu and name the new package service, as illustrated in the following screenshot:
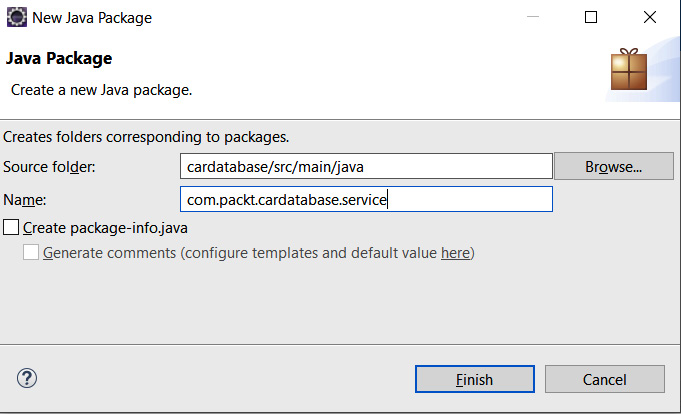
Figure 5.5 – The service package
- Create a new class called UserDetailsServiceImpl in the service package we just created. Now, your project structure should look like this:
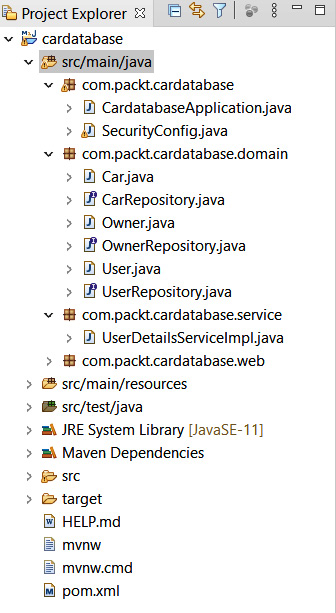
Figure 5.6 – Project structure
- We have to inject the UserRepository class into the UserDetailsServiceImpl class because that is needed to fetch the user from the database when Spring Security handles authentication. The findByUsername method that we implemented earlier returns Optional, therefore we can use the isPresent() method to check if user exists. If user doesn't exist, we throw a UsernameNotFoundException exception. The loadByUsername method returns the UserDetails object, which is required for authentication. We are using the Spring Security UserBuilder class to build the user for the authentication. Here is the source code of UserDetailsServiceImpl.java:
package com.packt.cardatabase.service;
import java.util.Optional;
import org.springframework.beans.factory.annotation.
Autowired;
import org.springframework.security.core.userdetails.
User.UserBuilder;
import org.springframework.security.core.userdetails.
UserDetails;
import org.springframework.security.core.userdetails.
UserDetailsService;
import org.springframework.security.core.userdetails.
UsernameNotFoundException;
import org.springframework.stereotype.Service;
import com.packt.cardatabase.domain.User;
import com.packt.cardatabase.domain.UserRepository;
@Service
public class UserDetailsServiceImpl implements
UserDetailsService {
@Autowired
private UserRepository repository;
@Override
public UserDetails loadUserByUsername(String
username)
throws UsernameNotFoundException {
Optional<User> user =
repository.findByUsername(username);
UserBuilder builder = null;
if (user.isPresent()) {
User currentUser = user.get();
builder =
org.springframework.security.core.userdetails.
User.withUsername(username);
builder.password(currentUser.getPassword());
builder.roles(currentUser.getRole());
} else {
throw new UsernameNotFoundException("User not
found.");
}
return builder.build();
}
}
- In our security configuration class, we have to define that Spring Security should use users from the database instead of in-memory users. Delete the userDetailsService() method from the SecurityConfig class to disable in-memory users. Add a new configureGlobal method to enable users from the database. We should never save the password as plain text to the database. Therefore, we will define a password hashing algorithm in the configureGlobal method. In this example, we are using the bcrypt algorithm. This can be easily implemented with the Spring Security BCryptPasswordEncoder class that encodes a hashed password in the authentication process. Here is the SecurityConfig.java source code. Now, the password must be hashed using BCrypt before it's saved to the database:
package com.packt.cardatabase;
import org.springframework.beans.factory.annotation.
Autowired;
import org.springframework.context.annotation.
Configuration;
import org.springframework.security.config.annotation.
authentication.builders.AuthenticationManagerBuilder;
import org.springframework.security.config.annotation.
web.configuration.EnableWebSecurity;
import org.springframework.security.config.annotation
.web.configuration.WebSecurityConfigurerAdapter;
import org.springframework.security.crypto.bcrypt.
BCryptPasswordEncoder;
import com.packt.cardatabase.service.
UserDetailsServiceImpl;
@Configuration
@EnableWebSecurity
public class SecurityConfig extends
WebSecurityConfigurerAdapter {
@Autowired
private UserDetailsServiceImpl userDetailsService;
@Autowired
public void configureGlobal
(AuthenticationManagerBuilder auth)
throws Exception {
auth.userDetailsService(userDetailsService)
.passwordEncoder(new BCryptPasswordEncoder());
}
}
- Finally, we can save a couple of test users to the database using the CommandLineRunner interface. Open the CardatabaseApplication.java file and add the following code at the beginning of the class to inject UserRepository into the main class:
@Autowired
private UserRepository urepository;
- Let's save two users to the database with bcrypt hashed passwords. In the following code snippet, we save two users with bcrypt hashed passwords. You can find bcrypt calculators or generators from the internet if you type plain text password and get hashed password, and you should use these here:
@Override
public void run(String... args) throws Exception {
// Add owner objects and save to db
Owner owner1 = new Owner("John", "Johnson");
Owner owner2 = new Owner("Mary", "Robinson");
orepository.saveAll(Arrays.asList(owner1,
owner2));
// Add car object and link to owners and save to
db
Car car1 = new Car("Ford", "Mustang", "Red",
"ADF-1121", 2021, 59000, owner1);
Car car2 = new Car("Nissan", "Leaf", "White",
"SSJ-3002", 2019, 29000, owner2);
Car car3 = new Car("Toyota", "Prius", "Silver",
"KKO-0212", 2020, 39000, owner2);
repository.saveAll(Arrays.asList(car1, car2,
car3));
for (Car car : repository.findAll()) {
logger.info(car.getBrand() + " " +
car.getModel());
}
// Username: user, password: user
urepository.save(new User("user",
"$2a$10$NVM0n8ElaRgg7zWO1CxUdei7vWoPg91Lz2aYavh9.f9q0e4bRadue","USER"));
// Username: admin, password: admin
urepository.save(new User("admin", "$2a$10$8cjz47bjbR4Mn8GMg9IZx.vyjhLXR/SKKMSZ9.mP9vpMu0ssKi8GW", "ADMIN"));
}
Important Note
BCrypt is a strong hashing function that was designed by Niels Provos and David Mazières. Here is an example of a BCrypt hash that is generated from the admin string:
$2a$10$8cjz47bjbR4Mn8GMg9IZx.vyjhLXR/SKKMSZ9.mP9vpMu0ssKi8GW
$2a represents the algorithm version and $10 represents the strength of the algorithm. The default strength of Spring Security's BcryptPasswordEncoder class is 10. BCrypt generates a random salt in hashing, therefore the hashed result is always different.
After running your application, you will see that there is now a user table in the database and that two user records are saved with hashed passwords, as illustrated in the following screenshot:
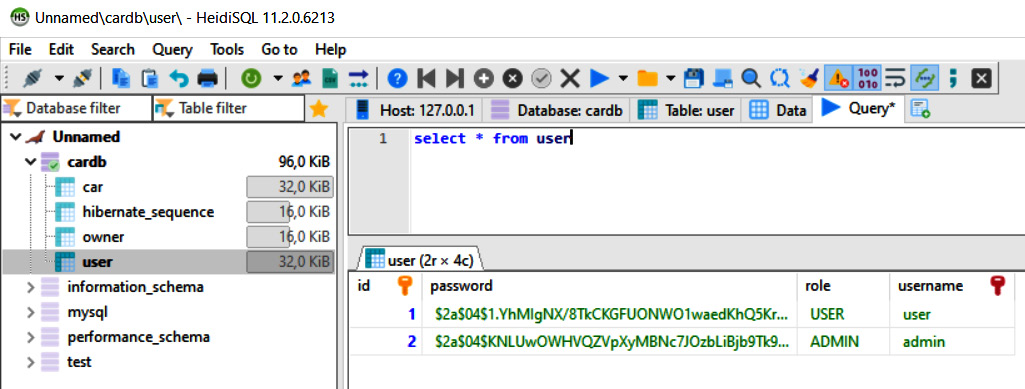
Figure 5.7 – Users
- Now, you will get a 401 Unauthorized error if you try to send a GET request to the http://localhost:8080/api path without authentication. You should authenticate to be able to send a successful request. The difference, when compared with the previous example, is that we are using the users from the database to authenticate.
You can see a GET request to the /api endpoint using the admin user in the following screenshot. We can also use Postman and basic authentication:

Figure 5.8 – GET request authentication
- Now, you can see that we get users by calling the /users endpoint in our RESTful web service, and that is something we want to avoid. As mentioned earlier, Spring Data REST generates a RESTful web service from all public repositories by default. We can use the exported flag of the @RepositoryRestResource annotation and set it to false, and then the following repository is not exposed as a REST resource:
package com.packt.cardatabase.domain;
import org.springframework.data.repository.
CrudRepository;
import org.springframework.data.rest.core.annotation.
RepositoryRestResource;
@RepositoryRestResource(exported = false)
public interface UserRepository extends CrudRepository
<User, Long> {
}
Now, if you make a GET request to the /users endpoint, you will see that /users endpoint is not visible anymore, as shown in the following screenshot:

Figure 5.9 – GET request
Next, we will start to implement authentication using a JWT.
Securing your backend using a JWT
In the previous section, we covered how to use basic authentication with a RESTful web service. This method cannot be used when we develop our own frontend with React, so we are going to use JWT authentication instead. A JWT is a compact way to implement authentication in modern web applications. A JWT is really small in size and can therefore be sent in the Uniform Resource Locator (URL), in the POST parameter, or inside the header. It also contains all the necessary information pertaining to the user.
A JWT contains three different parts, separated by dots: xxxxx.yyyyy.zzzzz. These parts are broken up as follows:
- The first part (xxxxx) is the header that defines the type of the token and the hashing algorithm.
- The second part (yyyyy) is the payload that, typically, in the case of authentication, contains user information.
- The third part (zzzzz) is the signature that is used to verify that the token hasn't been changed along the way.

Figure 5.10 – JWT
The following diagram shows a simplified representation of the JWT authentication process:

Figure 5.11 – JWT authentication process
After successful authentication, the requests sent by the client should always contain the JWT that was received in the authentication.
We will use the Java jjwt library (https://github.com/jwtk/jjwt), which is the JWT library for Java and Android. Therefore, we have to add the following dependency to the pom.xml file. The jjwt library is used for creating and parsing JWTs:
<dependency>
<groupId>io.jsonwebtoken</groupId>
<artifactId>jjwt-api</artifactId>
<version>0.11.2</version>
</dependency>
<dependency>
<groupId>io.jsonwebtoken</groupId>
<artifactId>jjwt-impl</artifactId>
<version>0.11.2</version>
<scope>runtime</scope>
</dependency>
<dependency>
<groupId>io.jsonwebtoken</groupId>
<artifactId>jjwt-jackson</artifactId>
<version>0.11.2</version>
<scope>runtime</scope>
</dependency>
The following steps demonstrate how to enable JWT authentication in our backend. We will start with the login functionality:
- First, we will create a class that generates and verifies a signed JWT. Create a new class called JwtService in the com.packt.cardatabase.service package. At the beginning of the class, we will define a few constants: EXPIRATIONTIME defines the expiration time of the token in milliseconds (ms), PREFIX defines the prefix of the token, and the Bearer schema is typically used. A secret key is created using the jjwt library's secretKeyFor method, and this can be used for the demonstration. In a production environment, you should read your secret key from the application configuration. The getToken method generates and returns the token. The getAuthUser method gets the token from the response Authorization header. Then, we use the parserBuilder method provided by the jjwt library to create a JwtParserBuilder instance. The setSigningKey method is used to specify a secret key for the token verification.
Finally, we use the getSubject method to get the username. The whole JwtService source code can be seen here:
package com.packt.cardatabase.service;
import io.jsonwebtoken.Jwts;
import io.jsonwebtoken.SignatureAlgorithm;
import io.jsonwebtoken.security.Keys;
import java.security.Key;
import org.springframework.http.HttpHeaders;
import org.springframework.stereotype.Component;
import javax.servlet.http.HttpServletRequest;
import java.util.Date;
@Component
public class JwtService {
static final long EXPIRATIONTIME = 86400000; // 1
day in ms
static final String PREFIX = "Bearer";
// Generate secret key. Only for the demonstration
// You should read it from the application
configuration
static final Key key = Keys.secretKeyFor
(SignatureAlgorithm.HS256);
// Generate signed JWT token
public String getToken(String username) {
String token = Jwts.builder()
.setSubject(username)
.setExpiration(new Date(System.currentTimeMillis()
+ EXPIRATIONTIME))
.signWith(key)
.compact();
return token;
}
// Get a token from request Authorization header,
// verify a token and get username
public String getAuthUser(HttpServletRequest
request) {
String token = request.getHeader
(HttpHeaders.AUTHORIZATION);
if (token != null) {
String user = Jwts.parserBuilder()
.setSigningKey(key)
.build()
.parseClaimsJws(token.replace(PREFIX, ""))
.getBody()
.getSubject();
if (user != null)
return user;
}
return null;
}
}
- Next, we will add a new simple Plain Old Java Object (POJO) class to keep credentials for authentication. Create a new class called AccountCredentials in the com.packt.cardatabase.domain package. The class has two fields: username and password. Here is the source code of the class. This class doesn't have the @Entity annotation because we don't have to save credentials to the database:
package com.packt.cardatabase.domain;
public class AccountCredentials {
private String username;
private String password;
public String getUsername() {
return username;
}
public void setUsername(String username) {
this.username = username;
}
public String getPassword() {
return password;
}
public void setPassword(String password) {
this.password = password;
}
}
- Now, we will implement the controller class for login. Login is done by calling the /login endpoint using the POST method and sending the username and password inside the request body. Create a class called LoginController inside the com.packt.cardatabase.web package. We have to inject a JwtService instance into the controller class because that is used to generate a signed JWT in the case of a successful login. The code is illustrated in the following snippet:
package com.packt.cardatabase.web;
import org.springframework.beans.factory.annotation
.Autowired;
import org.springframework.http.HttpHeaders;
import org.springframework.http.MediaType;
import org.springframework.http.ResponseEntity;
import org.springframework.security.authentication.
AuthenticationManager;
import org.springframework.security.authentication.
UsernamePasswordAuthenticationToken;
import org.springframework.security.core.
Authentication;
import org.springframework.web.bind.annotation.
RequestBody;
import org.springframework.web.bind.annotation.
RequestMapping;
import org.springframework.web.bind.annotation.
RequestMethod;
import org.springframework.web.bind.annotation.
RestController;
import com.packt.cardatabase.domain.
AccountCredentials;
import com.packt.cardatabase.service.JwtService;
@RestController
public class LoginController {
@Autowired
private JwtService jwtService;
@Autowired
AuthenticationManager authenticationManager;
@RequestMapping(value="/login", method=RequestMethod
.POST)
public ResponseEntity<?> getToken(@RequestBody
AccountCredentials credentials) {
// Generate token and send it in the response
Authorization
// header
}
}
- Next, we will implement the getToken method that handles the login functionality, as follows:
// LoginController.java
@RequestMapping(value="/login", method=RequestMethod
.POST)
public ResponseEntity<?> getToken(@RequestBody
AccountCredentials credentials) {
UsernamePasswordAuthenticationToken creds =
new UsernamePasswordAuthenticationToken(
credentials.getUsername(),
credentials.getPassword());
Authentication auth =
authenticationManager.authenticate(creds);
// Generate token
String jwts = jwtService.getToken(auth.getName());
// Build response with the generated token
return ResponseEntity.ok()
.header(HttpHeaders.AUTHORIZATION, "Bearer " + jwts)
.header(HttpHeaders.ACCESS_CONTROL_EXPOSE_HEADERS,
"Authorization")
.build();
}
- We have also injected AuthenticationManager into the LoginController class, therefore we have to add the following code to the SecurityConfig class:
package com.packt.cardatabase;
import org.springframework.beans.factory.annotation
.Autowired;
import org.springframework.context.annotation.Bean;
import org.springframework.context.annotation.
Configuration;
import org.springframework.security.authentication.
AuthenticationManager;
import org.springframework.security.config.annotation.
authentication.builders.AuthenticationManagerBuilder;
import org.springframework.security.config.annotation.
web.configuration.EnableWebSecurity;
import org.springframework.security.config.annotation.
web.configuration.WebSecurityConfigurerAdapter;
import org.springframework.security.crypto.bcrypt.
BCryptPasswordEncoder;
import com.packt.cardatabase.service.
UserDetailsServiceImpl;
@Configuration
@EnableWebSecurity
public class SecurityConfig extends WebSecurityConfigurerAdapter {
@Autowired
private UserDetailsServiceImpl userDetailsService;
@Autowired
public void configureGlobal
(AuthenticationManagerBuilder auth)
throws Exception {
auth.userDetailsService(userDetailsService)
.passwordEncoder(new BcryptPassword
Encoder());
}
@Bean
public AuthenticationManager
getAuthenticationManager() throws
Exception {
return authenticationManager();
}
}
- In this phase, we have to configure Spring Security functionality. Spring Security's configure method defines which paths are secured and which are not secured. Add the following configure method to the SecurityConfig class. There,we define that the POST method request to the /login endpoint is allowed without authentication and that requests to all other endpoints require authentication. We will also define that Spring Security will never create a session, and therefore we can also disable csrf:
// SecurityConfig.java
@Override
protected void configure(HttpSecurity http) throws
Exception {
http.csrf().disable()
.sessionManagement()
.sessionCreationPolicy(SessionCreationPolicy.
STATELESS).and()
.authorizeRequests()
// POST request to /login endpoint is not secured
.antMatchers(HttpMethod.POST, "/login").
permitAll()
// All other requests are secured
.anyRequest().authenticated();
}
- Finally, we are ready to test our login functionality. Open Postman and make a POST request to the http://localhost:8080/login URL. Define a valid user inside the request body—for example, {"username":"user", "password":"user"}—and set the Content-Type header to application/json. Now, you should see an Authorization header in the response that contains the signed JWT, like the one shown in the following screenshot:
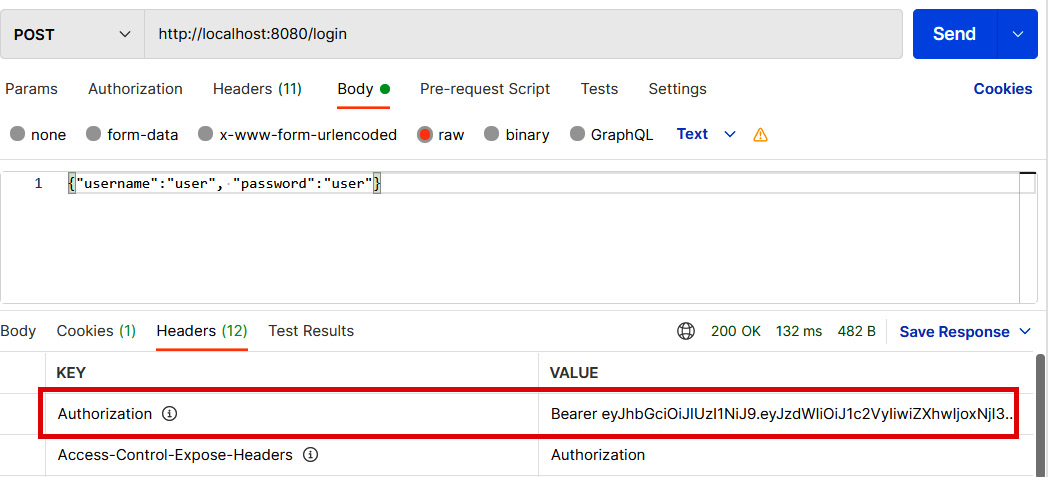
Figure 5.12 – Login request
You can also test login using the wrong password, and see that the response doesn't contain the Authorization header.
We have now finalized the login step, and we will move on to handing authentication in the rest of the incoming requests. In the authentication process, we are using filters that allow us to perform some operations before a request goes to the controller or before a response is sent to a client. The following steps demonstrate the rest of the authentication process:
- We will use a filter class to authenticate all other incoming requests. Create a new class called AuthenticationFilter in the root package. The AuthenticationFilter class extends Spring Security's OncePerRequestFilter interface that provides a doFilterInternal method where we implement our authentication. We have to inject a JwtService instance into the filter class because that is needed to verify a token from the request. The code is illustrated in the following snippet:
// Imports
@Component
public class AuthenticationFilter extends
OncePerRequestFilter {
@Autowired
private JwtService jwtService;
@Override
protected void doFilterInternal(HttpServletRequest
request,
HttpServletResponse response,
FilterChain filterChain)
throws ServletException,
java.io.IOException {
// Get token from the Authorization header
String jws = request.getHeader
(HttpHeaders.AUTHORIZATION);
if (jws != null) {
// Verify token and get user
String user = jwtService.getAuthUser(request);
// Authenticate
Authentication authentication =
new UsernamePasswordAuthenticationToken(user,
null,
java.util.Collections.emptyList());
SecurityContextHolder.getContext()
.setAuthentication(authentication);
}
filterChain.doFilter(request, response);
}
}
- Next, we have to add our filter class to the Spring Security configuration. Open the SecurityConfig class and inject the AuthenticationFilter class that we just implemented, as follows:
@Autowired
private AuthenticationFilter authenticationFilter;
- Then, modify the configure method in the SecurityConfig class and add the following lines of code:
@Override
protected void configure(HttpSecurity http) throws Exception {
http.csrf().disable()
.sessionManagement()
.sessionCreationPolicy(SessionCreationPolicy.STATELESS).and()
.authorizeRequests()
.antMatchers(HttpMethod.POST, "/login").permitAll()
.anyRequest().authenticated().and()
.addFilterBefore(authenticationFilter,
UsernamePasswordAuthenticationFilter.class);
}
Now, we are ready to test the whole workflow. After we run the application, we can first log in by calling the /login endpoint with the POST method and, in the case of a successful login, we will receive a JWT in the Authorization header. Remember to add a valid user inside the body and set the Content-Type header to application/json. The following screenshot illustrates the process:
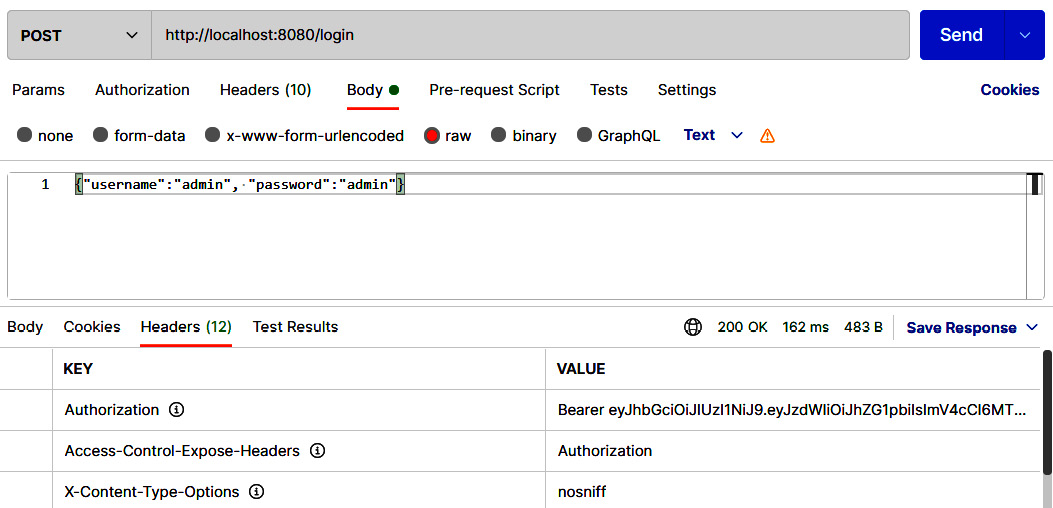
Figure 5.13 – Login request
- Following a successful login, we can call the other RESTful service endpoints by sending the JWT that was received from the login in the Authorization header. Copy the token from the login response (without the Bearer prefix) and add the Authorization header with the token in the VALUE column. Refer to the example in the following screenshot:
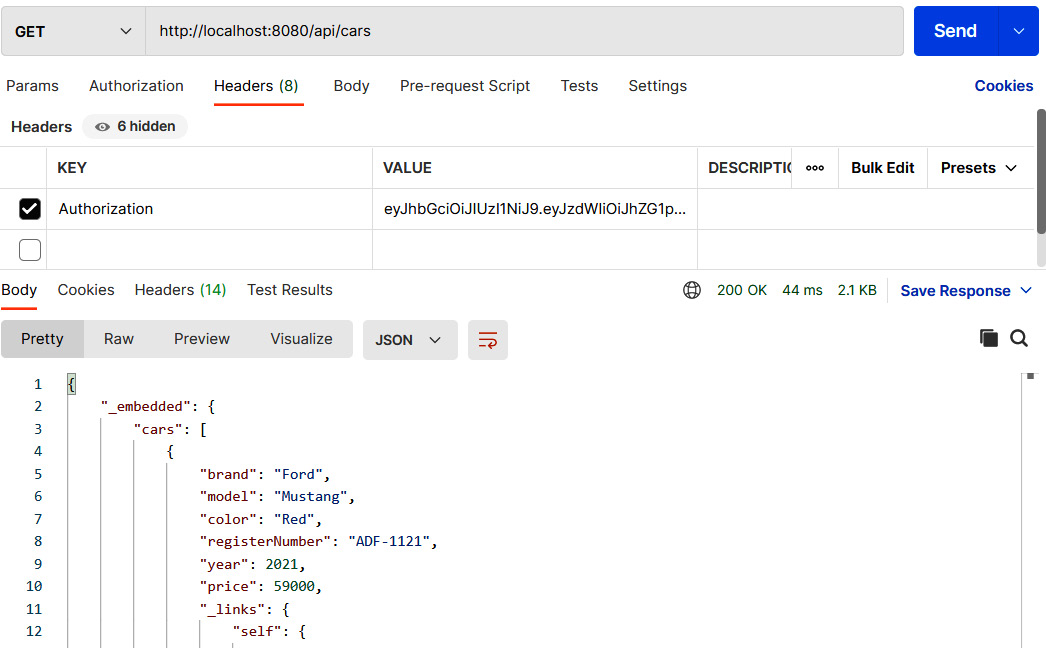
Figure 5.14 – Authenticated GET request
- We should also handle exceptions in the authentication. Now, if you try to log in using the wrong password, you get a 403 Forbidden status without any further clarification. Spring Security provides an AuthenticationEntryPoint interface that can be used to handle exceptions. Create a new class named AuthEntryPoint in the root package that implements AuthenticationEntryPoint. We implement the commence method that gets an exception as a parameter. In the case of an exception, we set the response status to 401 Unauthorized and write an exception message to the response body. The code is illustrated in the following snippet:
package com.packt.cardatabase;
import java.io.IOException;
import java.io.PrintWriter;
import javax.servlet.ServletException;
import javax.servlet.http.HttpServletRequest;
import javax.servlet.http.HttpServletResponse;
import org.springframework.http.MediaType;
import org.springframework.security.core.
AuthenticationException;
import org.springframework.security.web.
AuthenticationEntryPoint;
import org.springframework.stereotype.Component;
@Component
public class AuthEntryPoint implements
AuthenticationEntryPoint {
@Override
public void commence(
HttpServletRequest request,
HttpServletResponse response,
AuthenticationException authException) throws
IOException, ServletException {
response.setStatus
(HttpServletResponse.SC_UNAUTHORIZED);
response.setContentType
(MediaType.APPLICATION_JSON_VALUE);
PrintWriter writer = response.getWriter();
writer.println("Error: " + authException.
getMessage());
}
}
- Then, we have to configure Spring Security for the exception handling. Inject our AuthEntryPoint class into the SecurityConfig class, as follows:
// SecurityConfig.java
@Autowired
private AuthEntryPoint exceptionHandler;
Then, modify the configure method, as follows:
// SecurityConfig.java
@Override
protected void configure(HttpSecurity http) throws
Exception {
http.csrf().disable()
.sessionManagement()
.sessionCreationPolicy
(SessionCreationPolicy.STATELESS).and()
.authorizeRequests()
.antMatchers(HttpMethod.POST, "/login").permitAll()
.anyRequest().authenticated().and()
.exceptionHandling()
.authenticationEntryPoint(exceptionHandler).and()
.addFilterBefore(authenticationFilter,
UsernamePasswordAuthenticationFilter.class);
}
- Now, if you send a login POST request with the wrong credentials, you will get a 401 Unauthorized status in the response and an error message in the body, as shown in the following screenshot:
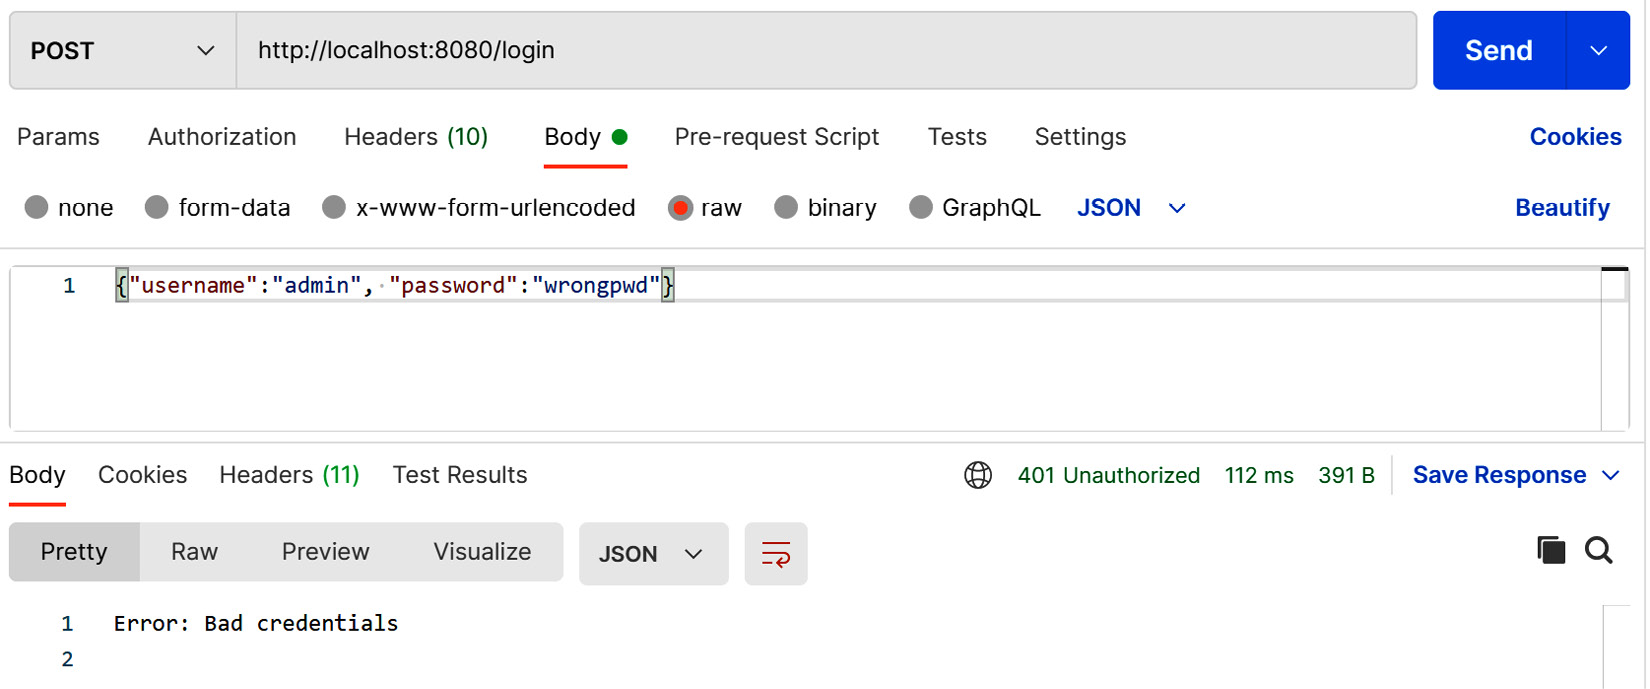
Figure 5.15 – Bad credentials
We will also add a cross-origin resource sharing (CORS) filter to our security configuration class. This is needed for the frontend, which is sending requests from the other origin. The CORS filter intercepts requests, and if these are identified as cross-origin, it adds proper headers to the request. For that, we will use Spring Security's CorsConfigurationSource interface. In this example, we will allow all origins' HTTP methods and headers. You can define a list of permissible origins, methods, and headers here if you require a more finely graded definition.
- Add the following imports and methods to your SecurityConfig class to enable the CORS filter:
// SecurityConfig.java
// Add the following imports
import java.util.Arrays;
import org.springframework.web.cors.CorsConfiguration;
import org.springframework.web.cors.
CorsConfigurationSource;
import org.springframework.web.cors.
UrlBasedCorsConfigurationSource;
// Add Global CORS filter inside the class
@Bean
CorsConfigurationSource corsConfigurationSource() {
UrlBasedCorsConfigurationSource source =
new UrlBasedCorsConfigurationSource();
CorsConfiguration config = new CorsConfiguration();
config.setAllowedOrigins(Arrays.asList("*"));
config.setAllowedMethods(Arrays.asList("*"));
config.setAllowedHeaders(Arrays.asList("*"));
config.setAllowCredentials(false);
config.applyPermitDefaultValues();
source.registerCorsConfiguration("/**", config);
return source;
}
- If you want to explicitly define the origins, you can set this in the following way:
// localhost:3000 is allowed
config.setAllowedOrigins(Arrays.asList
("http://localhost:3000"));
We also have to add the cors() function to the configure method, as shown in the following code snippet:
// SecurityConfig.java
@Override
protected void configure(HttpSecurity http) throws
Exception {
http.csrf().disable().cors().and()
.sessionManagement()
.sessionCreationPolicy(SessionCreationPolicy.
STATELESS).and()
.authorizeRequests()
.antMatchers(HttpMethod.POST, "/login").permitAll()
.anyRequest().authenticated().and()
.exceptionHandling()
.authenticationEntryPoint(exceptionHandler).and()
.addFilterBefore(authenticationFilter,
UsernamePasswordAuthenticationFilter.class);
}
Now, all the functionalities that are required have been implemented in our backend. Next, we will continue with backend unit testing.
Testing in Spring Boot
The Spring Boot test starter package is added to the pom.xml file by Spring Initializr when we create our project. This is added automatically without any selection in the Spring Initializr page. The code can be seen in the following snippet:
<dependency>
<groupId>org.springframework.boot</groupId>
<artifactId>spring-boot-starter-test</artifactId>
<scope>test</scope>
</dependency>
The Spring Boot test starter provides lots of handy libraries for testing, such as JUnit, Mockito, and AssertJ. In this book, we are using the JUnit 5 version (JUnit Jupiter). If you take a look, your project structure already has its own package created for test classes, as we can see in the following screenshot:

Figure 5.16 – Test classes
By default, Spring Boot uses an in-memory database for testing. We are now using MariaDB, but H2 can also be used for testing if we add the following dependency to the pom.xml file. The scope defines that the H2 database will only be used for running tests; otherwise, the application will use the MariaDB database:
<dependency>
<groupId>com.h2database</groupId>
<artifactId>h2</artifactId>
<scope>test</scope>
</dependency>
If you also want to use the default database for testing, you can use the @AutoConfigureTestDatabase annotation.
Creating unit tests
For unit testing, we are using JUnit, which is a popular Java-based unit testing library. The following source code shows an example skeleton of the Spring Boot test class. The @SpringBootTest annotation specifies that the class is a regular test class that runs Spring Boot-based tests. The @Test annotation before the method specifies to JUnit that the method can be run as a test case:
@SpringBootTest
public class MyTestsClass {
@Test
public void testMethod() {
// Test case code
}
}
First, we will create our first test case that will test the major functionality of our application before we create any formal test cases. Proceed as follows:
- Open the CardatabaseApplicationTest test class that has already been made for your application. There is one test method called contextLoads here, and this is where we will add the test. The following test checks that the instance of the controller was created and injected successfully:
package com.packt.cardatabase;
import static org.assertj.core.api.Assertions.assertThat;
import org.junit.jupiter.api.Test;
import org.springframework.beans.factory.annotation.
Autowired;
import org.springframework.boot.test.context.
SpringBootTest;
import com.packt.cardatabase.web.CarController;
@SpringBootTest
class CardatabaseApplicationTests {
@Autowired
private CarController controller;
@Test
void contextLoads() {
assertThat(controller).isNotNull();
}
}
- To run tests in Eclipse, activate the test class in Project Explorer and right-click. Select Run As | JUnit test from the menu. You should now see the JUnit tab in the lower part of the Eclipse workbench. The test results are shown in this tab and the test case has been passed, as illustrated in the following screenshot:

Figure 5.17 – JUnit test run
You can use @DisplayName annotation to give a more descriptive name to your test case. The name defined in the @DisplayName annotation is shown in the JUnit test runner. The code is illustrated in the following snippet:
@Test
@DisplayName("First example test case")
void contextLoads() {
assertThat(controller).isNotNull();
}
- Next, we will create unit tests for our owner repository to test create, read, update, and delete (CRUD) operations. Create a new class called OwnerRepositoryTest in the root test package. Instead of the @SpringBootTest annotation, @DataJpaTest can be used if the test is focused on Java Persistence API (JPA) components. When using this annotation, the H2 Hibernate database and Spring Data are configured automatically for testing. Structured Query Language (SQL) logging is also turned on. The code is illustrated in the following snippet:
package com.packt.cardatabase;
import static org.assertj.core.api.Assertions.assertThat;
import org.junit.jupiter.api.Test;
import org.springframework.beans.factory.annotation.
Autowired;
import org.springframework.boot.test.autoconfigure.
orm.jpa.DataJpaTest;
import com.packt.cardatabase.domain.Owner;
import com.packt.cardatabase.domain.OwnerRepository;
@DataJpaTest
public class OwnerRepositoryTest {
@Autowired
private OwnerRepository repository;
}
- We will add our first test case to test the addition of a new owner to the database. A new owner object is created and saved to the database with the save method. Then, we check that the owner can be found. Add the following query to your OwnerRepository.java file. We will use this query in our test case:
Optional<Owner> findByFirstname(String firstName);
- The following source code shows the test case method. Add the following method code to your OwnerRepositoryTest class:
@Test
void saveOwner() {
repository.save(new Owner("Lucy", "Smith"));
assertThat(repository.findByFirstname
("Lucy").isPresent())
.isTrue();
}
- The second test case will test the deletion of owner from the database. A new owner object is created and saved to the database. Then, all owners are deleted from the database, and finally, the count() method should return zero. The following source code shows the test case method. Add the following method code to your OwnerRepositoryTest class:
@Test
void deleteOwners() {
repository.save(new Owner("Lisa", "Morrison"));
repository.deleteAll();
assertThat(repository.count()).isEqualTo(0);
}
- Run the test cases and check the Eclipse JUnit tab to find out whether the tests passed. The following screenshot shows that they have indeed passed:

Figure 5.18 – Repository test cases
- Next, we will demonstrate how to test your RESTful web service JWT authentication functionality. To test the controllers or any endpoint that is exposed, we can use a MockMvc object. By using the MockMvc object, the server is not started, but the tests are performed in the layer where Spring handles HTTP requests, and therefore it mocks the real situation. MockMvc provides the perform method to send these requests. To test authentication, we have to add credentials to the request body. Finally, we check that the response status is OK. The code is illustrated in the following snippet:
package com.packt.cardatabase;
import static org.springframework.test.web.servlet.
request.MockMvcRequestBuilders.post;
import static org.springframework.test.web.
servlet.result.MockMvcResultHandlers.print;
import static org.springframework.test.web.
servlet.result.MockMvcResultMatchers.status;
import org.junit.jupiter.api.Test;
import org.springframework.beans.factory.annotation.
Autowired;
import org.springframework.boot.test.autoconfigure.
web.servlet.AutoConfigureMockMvc;
import org.springframework.boot.test.context.
SpringBootTest;
import org.springframework.http.HttpHeaders;
import org.springframework.test.web.servlet.MockMvc;
@SpringBootTest
@AutoConfigureMockMvc
public class CarRestTest {
@Autowired
private MockMvc mockMvc;
@Test
public void testAuthentication() throws Exception {
// Testing authentication with correct credentials
this.mockMvc.
perform(post("/login").
content("{"username":"admin","password":
"admin"}").
header(HttpHeaders.CONTENT_TYPE,
"application/json")).
andDo(print()).andExpect(status().isOk());
}
}
Now, when we run the authentication tests, we will see that the test passed, as the following screenshot confirms:

Figure 5.19 – Login test
At this point, we have covered the basics of testing in the Spring Boot application, and you have gained the knowledge that's required to implement more test cases for your application.
Summary
In this chapter, we focused on securing and testing the Spring Boot backend. First, securing was done with Spring Security. The frontend will be developed with React in upcoming chapters; therefore, we implemented JWT authentication, which is a lightweight authentication method suitable for our needs.
We also covered the basics of testing a Spring Boot application. We used JUnit for unit testing and implemented test cases for JPA and RESTful web service authentication.
In the next chapter, we will set up the environment and tools related to frontend development.
Questions
- What is Spring Security?
- How can you secure your backend with Spring Boot?
- What is a JWT?
- How can you secure your backend with a JWT?
- How can you create unit tests with Spring Boot?
- How can you run and check the results of unit tests?
Further reading
Packt has other great resources available for you to learn about Spring Security and testing. These are listed here:
- Spring Security – Third Edition. Mick Knutson, Robert Winch, and Peter Mularien. (https://www.packtpub.com/application-development/spring-security-third-edition)
- Mastering Software Testing with JUnit 5. Boni García. (https://www.packtpub.com/web-development/mastering-software-testing-junit-5)