
Chapter 2: Understanding Dependency Injection
In this chapter, we will learn what Dependency Injection (DI) is and how we can use it with the Spring Boot framework. The Spring Boot framework provides DI; therefore, it is good to understand the basics. DI reduces component dependencies and makes your code easier to test and maintain.
In this chapter, we will look into the following:
- Introducing DI
- Using DI with Spring Boot
Technical requirements
Java SDK version 8 or higher is necessary to use Eclipse IDE. In this book, we are using Windows, but all the tools are available for Linux and macOS as well.
All of the code for this chapter can be found at the following GitHub link: https://github.com/PacktPublishing/Full-Stack-Development-with-Spring-Boot-and-React/tree/main/Chapter02.
Introducing DI
DI is a software development technique where we can create objects that depend on other objects. DI helps with interaction between classes but at the same time keeps the classes independent.
There are three types of classes in DI:
- A service is a class that can be used (this is the dependency).
- The client is a class that uses the dependency.
- The injector passes the dependency (the service) to the dependent class (the client).
The three types of classes in DI are shown in the following diagram:
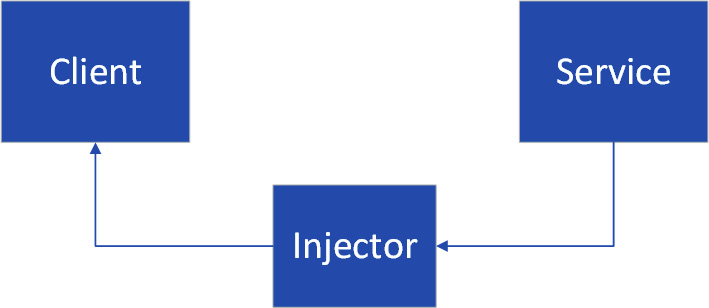
Figure 2.1 – DI
DI makes classes loosely coupled. This means that the creation of client dependencies is separated from the client's behavior, which makes unit testing easier.
Let's take a look at a simplified example of DI using Java code. In the following code, we don't have DI, because the client Car class is creating an object of the service class:
public class Car {
private Owner owner;
public Car() {
owner = new Owner();
}
}
In the following code, the service object is not directly created in the client class. It is passed as a parameter in the class constructor:
public class Car {
private Owner owner;
public Car(Owner owner) {
this.owner = owner;
}
}
The service class can also be an abstract class; we can then use any implementation of that in our client class and use mocks when testing.
There are different types of DI; let's take a look at two of them here:
- Constructor injection: Dependencies are passed to a client class constructor. An example of the constructor injection was already shown in the preceding Car example code.
- Setter injection: Dependencies are provided through setters. The following example code shows an example of the setter injection:
public class Car {
private Owner owner;
public void setOwner(Owner owner) {
this.owner = owner;
}
}
Here, the dependency is now passed in the setter as an argument.
The DI reduces dependencies in your code and makes your code more reusable. It also improves the testability of your code. Now, we have learned the basics of DI; next, we will look at how DI is used in Spring Boot.
Using DI in Spring Boot
Spring Boot scans your application classes and registers classes with certain annotations (@Service, @Repository, and @Controller) as Spring beans. These beans can then be injected using an @Autowired annotation:
public class Car {
@Autowired
private Owner owner;
...
}
A fairly common situation is where we need database access for some operations, and, in Spring Boot, we use repository classes for that. In this situation, we can inject the repository class and start to use its methods:
public class Car {
@Autowired
private CarRepository carRepository;
// Fetch all cars from db carRepositoty.findAll();
...
}
Java (javax.annotation) also provides an @Resource annotation that can be used to inject resources. You can define the name or type of the injected bean when using the @Resource annotation. For example, the following code shows some use cases. Imagine that we have a resource defined as follows:
@Configuration
public class ConfigFileResource
@Bean(name="configFile")
public File configFile() {
File configFile = new File("configFile.xml");
return configFile;
}
}
We can then inject the bean by using an @Resource annotation:
// By bean name
@Resource(name="configFile")
private ConfigFile cFile
OR
// Without name
@Resource
private ConfigFile cFile
We have now gone through the basics of DI in Spring Boot. We will put this into practice in the following chapters.
Summary
In this chapter, we learned what DI is. We also learned how to use DI in the Spring Boot framework, which we are using in our backend.
In the next chapter, we will look at how we can use the Java Persistent API (JPA) with Spring Boot and how to set up a MariaDB database. We will also learn about the creation of CRUD repositories and the one-to-many connection between database tables.
Questions
- What is DI?
- How does the @Autowired annotation work in Spring Boot?
- How do you inject resources in Spring Boot?
Further reading
Packt has other great resources for learning about Spring Boot:
- Learning Spring Boot 2.0 (Second Edition) by Greg L. Turnquist (https://www.packtpub.com/product/learning-spring-boot-2-0-second-edition/9781786463784)
- Spring 5.0 Projects by Nilang Patel (https://www.packtpub.com/product/spring-5-0-projects/9781788390415)