
Chapter 7: Getting Started with React
This chapter describes the basics of React programming. We will cover the skills that are required to create basic functionalities for the React frontend. In JavaScript, we use the ECMAScript 2015 (ES6) syntax because it provides many features that make coding cleaner.
In this chapter, we will look at the following topics:
- How to create React components
- Useful ES6 features
- JavaScript XML (JSX) and styling
- Properties (props) and state
- Stateless components
- Conditional rendering
- React hooks
- Custom hooks
- The Context application programming interface (API)
- Handling lists with React
- Handling events with React
- Handling forms with React
Technical requirements
In this book, we will be using the Windows operating system (OS), but all of the tools can be used with Linux and macOS as well. For our work with React hooks, React version 16.8 or higher will be required.
You can find more resources at the GitHub link at https://github.com/PacktPublishing/Full-Stack-Development-with-Spring-Boot-and-React/tree/main/Chapter07.
How to create React components
According to Meta Platforms, Inc., React is a JavaScript library for user interfaces (UIs). Since version 15, React has been developed under the Massachusetts Institute of Technology (MIT) license. React is component-based, and the components are independent and reusable. The components are the basic building blocks of React. When you start to develop a UI with React, it is good to start by creating mock interfaces. That way, it will be easy to identify what kinds of components you have to create and how they interact.
From the following screenshot of the mock UI, we can see how the UI can be split into components. In this case, there will be an application root component, a search bar component, a table component, and a table row component:
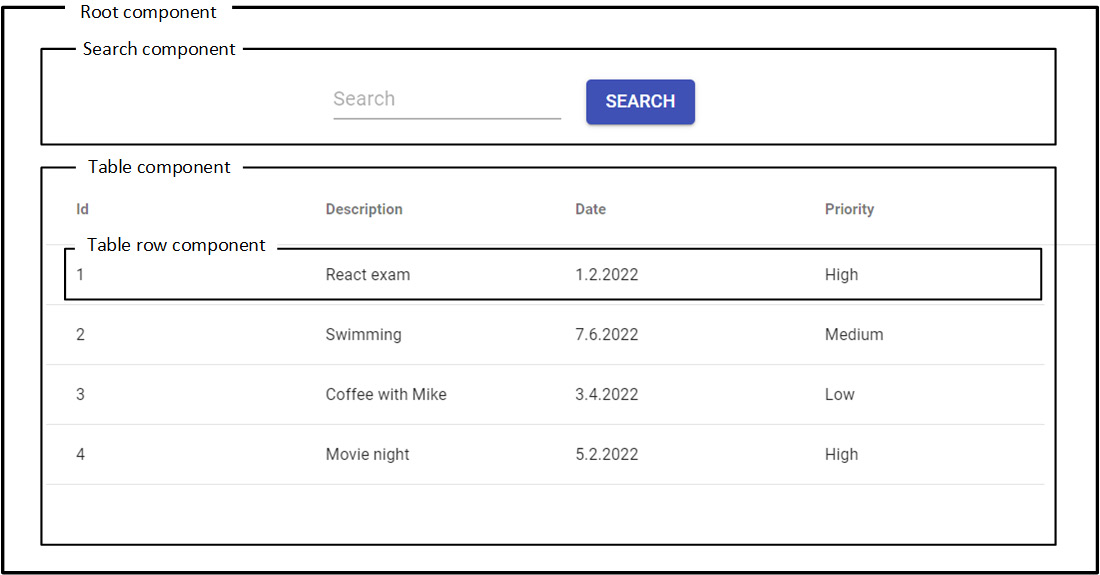
Figure 7.1 – React components
The components can then be arranged in a tree hierarchy, as shown in the following screenshot. The root component has two child components: the search component and the table component. The table component has one child component: the table row component. The important thing to understand with React is that the data flow is going from a parent component to a child component. We will learn later how data can be passed from a parent component to a child component using props:
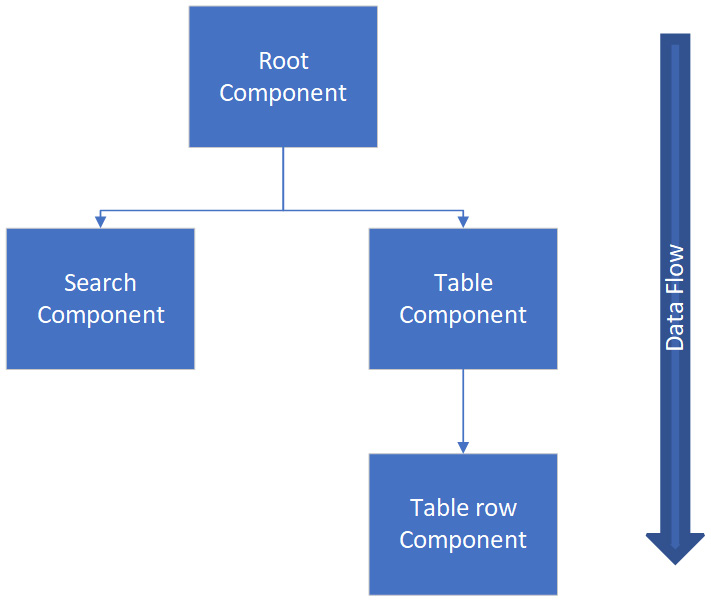
Figure 7.2 – Component tree
React uses the virtual Document Object Model (VDOM) for selective re-rendering of the UI, which makes it more cost-effective. The VDOM is a lightweight copy of the DOM, and manipulation of the VDOM is much faster than it is with the real DOM. After the VDOM is updated, React compares it to a snapshot that was taken from the VDOM before updates were run. After the comparison, React will know which parts have been changed, and only these parts will be updated to the real DOM.
A React component can be defined by using a JavaScript function or the ES6 JavaScript class. We will go more deeply into ES6 in the next section. Here is some simple component source code that renders the Hello World text. This first code block uses the JavaScript function:
// Using JavaScript function
function App() {
return <h1>Hello World</h1>;
}
The mandatory return statement in the React function component defines what the component looks like.
The following code uses the ES6 class to create a component:
// Using ES6 class
class App extends React.Component {
render() {
return <h1>Hello World</h1>;
}
}
The component that was implemented using the class contains the required render() method that shows and updates the rendered output of the component. If you compare the App function and class components, you can see that the render() method is not needed in the function component. Before React version 16.8, you had to use class components to be able to use states. Now, you can use hooks to create states also with function components. We will learn about state and hooks later in this chapter.
In this book, we are creating components using functions. You have to write less code when using function components, but you can still also use class components as well.
Important Note
The name of the React component should start with a capital letter. It is also recommended to use the PascalCase naming convention whereby each word starts with a capital letter.
Let's make changes to our component's return statement and add a new <h2> element to it, as follows:
function App() {
return (
<h1>Hello World</h1>
<h2>This is my first React component</h2>
);
}
When you run the app, you get an Adjacent JSX elements must be wrapped in an enclosing tag error, as indicated in the following screenshot:
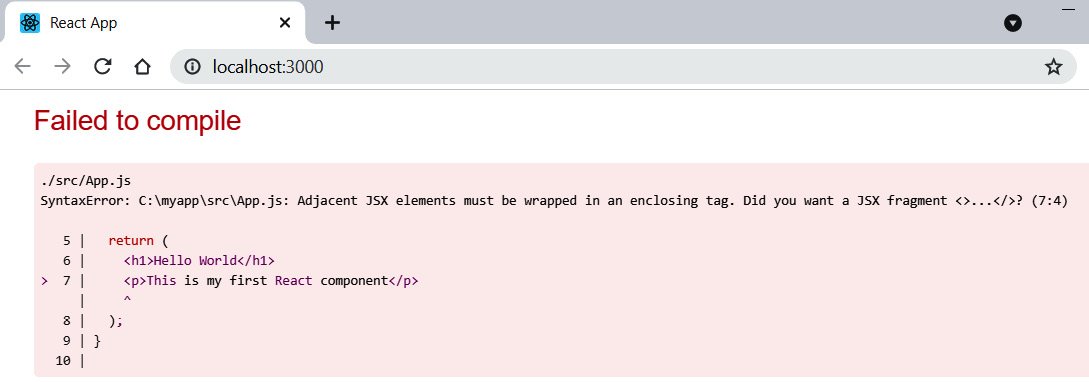
Figure 7.3 – Adjacent JSX elements error
If your component returns multiple elements, you have to wrap these inside one parent element. To fix this error, we have to wrap the header elements in one element, such as div, as illustrated in the following code snippet:
// Wrap elements inside the div
function App() {
return (
<div>
<h1>Hello World</h1>
<h2>This is my first React component</h2>
</div>
);
}
Since React version 16.2, we can also use fragments, as shown in the following code snippet:
// Using fragments
function App() {
return (
<React.Fragment>
<h1>Hello World</h1>
<h2>This is my first React component</h2>
<React.Fragment/>
);
}
There is also shorter syntax for fragments, which look like empty JSX tags. This is shown in the following code snippet:
// Using fragments short syntax
function App() {
return (
<>
<h1>Hello World</h1>
<h2>This is my first React component</h2>
</>
);
}
Let's look more carefully at the first React app we created in Chapter 6, Setting Up the Environment and Tools – Frontend, using create-react-app. The source code of the index.js file in the root folder looks like this:
import React from 'react';
import ReactDOM from 'react-dom'
import './index.css';
import App from './App';
import reportWebVitals from './reportWebVitals';
ReactDOM.render(
<React.StrictMode>
<App />
</React.StrictMode>,
document.getElementById('root')
);
reportWebVitals();
At the beginning of the file, there are import statements that load components and assets to our file. For example, the second line imports the react-dom package from the node_modules folder, and the fourth line imports the App component (the App.js file in the src folder). The third line imports the index.css style sheet that is in the same folder as the index.js file. The react-dom package provides DOM-specific methods for us. To render the React component to the DOM, we can use the render method from the react-dom package. React.StrictMode is used to find potential problems in your React app and these are printed in the browser console.
The new root API was introduced in React version 18. Here, we first create a root using the createRoot method. The root calls the render method to render an element to the root. The old root API still works, but you get a warning in the console. In this book, we are using React 18 and the new root API, as indicated in the following code snippet:
// New Root API, React 18
import * as ReactDOMClient from 'react-dom/client';
import App from './App';
const container = document.getElementById('root');
// Create a root.
const root = ReactDOMClient.createRoot(container);
// Render an element to the root.
root.render(<App />);
The container in the root API is <div id="root"></div> element, which can be found in the index.html file inside the public folder. Look at the following index.html file:
<!DOCTYPE html>
<html lang="en">
<head>
<meta charset="utf-8" />
<link rel="icon" href="%PUBLIC_URL%/favicon.ico" />
<meta name="viewport" content="width=device-width,
initial-scale=1" />
<meta name="theme-color" content="#000000" />
<meta
name="description"
content="Web site created using create-react-app"
/>
<link rel="apple-touch-icon" href="%PUBLIC_URL%
/logo192.png" />
<link rel="manifest" href="%PUBLIC_URL%/
manifest.json" />
<title>React App</title>
</head>
<body>
<noscript>You need to enable JavaScript to run this
app.</noscript>
<div id="root"></div>
</body>
</html>
The following source code shows the App.js component from our first React app. You can see that import also applies to assets, such as images and style sheets. At the end of the source code, there is an export statement that exports the component, and it can be made available to other components by using import. There can only be one default export statement per file, but there can be multiple named export statements:
import logo from './logo.svg';
import './App.css';
function App() {
return (
<div className="App">
<header className="App-header">
<img src={logo} className="App-logo" alt="logo" />
<p>
Edit <code>src/App.js</code> and save to reload.
</p>
<a
className="App-link"
href="https://reactjs.org"
target="_blank"
rel="noopener noreferrer"
>
Learn React
</a>
</header>
</div>
);
}
export default App;
The following example shows how to import default and named exports:
import React from 'react' // Import default value
import { name } from … // Import named value
The exports look like this:
export default React // Default export
export { name } // Named export
Now that we have covered the basics of React components, let's take a look at the basic features of ES6.
Useful ES6 features
ES6 was released in 2015, and it introduced a lot of new features. ECMAScript is a standardized scripting language, and JavaScript is one implementation of it. In this section, we will go through the most important features released in ES6 that we will be using in the following sections.
Constants and variables
Constants, or immutable variables, can be defined by using a const keyword, as shown in the following code snippet. When using the const keyword, the variable content cannot be reassigned:
const PI = 3.14159;
Now, you will get an error if you try to reassign the PI value, as indicated in the following screenshot:
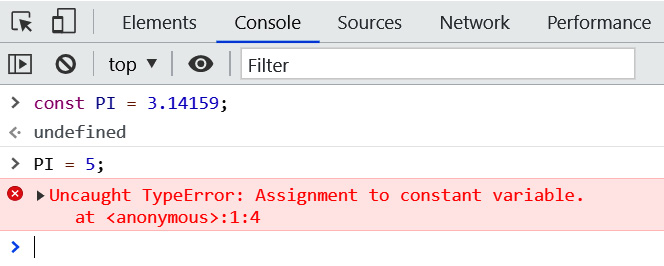
Figure 7.4 – Assignment to constant variable
The scope of const is block-scoped. This means that the const variable can only be used inside the block in which it is defined. In practice, the block is the area between curly brackets {}. The following sample code shows how the scope works:
let count = 10;
if (count > 5) {
const total = count * 2;
console.log(total); // Prints 20 to console
}
console.log(total); // Error, outside the scope
The second console.log statement gives an error because we are trying to use the total variable outside the scope.
The following example demonstrates what happens when const is an object or array:
const myObj = {foo: 3};
myObj.foo = 5; // This is ok
When const is an object or array, the content can be changed.
The let keyword allows you to declare mutable block-scoped variables, therefore the let variable can be used inside the block in which they are declared (note that it can also be used inside sub-blocks).
Arrow functions
The traditional way of defining a function in JavaScript is by using a function keyword. The following function gets one argument and returns the argument value multiplied by 2:
function(x) {
return x * 2;
}
But when we use the ES6 arrow function, the function looks like this:
x => x * 2
As we can see, by using the arrow function, we have made the declaration of the same function more compact. The function is a so-called anonymous function, and we can't call it. Anonymous functions are often used as an argument for other functions. In JavaScript, functions are first-class citizens and you can store functions in variables, as illustrated here:
const calc = x => x * 2
Now, you can use the variable name to call the function, like this:
calc(5); // returns 10
When you have more than one argument, you have to wrap the arguments in parentheses and separate the arguments with a comma to use the arrow function effectively. For example, the following function gets two parameters and returns the sum of the parameters:
const calcSum = (x, y) => x + y
// function call
calcSum(2, 3); // returns 5
If the function body is an expression, then you don't need to use the return keyword. The expression is always implicitly returned from the function. When you have multiple lines in the function body, you have to use curly brackets and a return statement, as follows:
const calcSum = (x, y) => {
console.log('Calculating sum');
return x + y;
}
If the function doesn't have any arguments, then you should use empty parentheses, like so:
const sayHello = () => "Hello"
We are going to use lots of arrow functions later in our frontend implementation.
Template literals
Template literals can be used to concatenate strings. The traditional way to concatenate strings is to use the + operator, as follows:
let person = {firstName: 'John', lastName: 'Johnson'};
let greeting = "Hello " + ${person.firstName} + " " +
${person.lastName};
With the template literals, the syntax looks like this. You have to use backticks (' ') instead of single or double quotes:
let person = {firstName: 'John', lastName: 'Johnson'};
let greeting = 'Hello ${person.firstName}
${person.lastName}';
Next, we will learn how to create classes using JavaScript ES6 syntax.
Classes and inheritance
Class definition in ES6 is similar to other object-oriented (OO) languages, such as Java or C#. The keyword for defining classes is class. A class can have fields, constructors, and class methods. The following sample code shows the ES6 class:
class Person {
constructor(firstName, lastName) {
this.firstName = firstName;
this.lastName = lastName;
}
}
Inheritance is performed with an extends keyword. The following sample code shows an Employee class that inherits a Person class. This means that it inherits all fields from the parent class and can have its own fields that are specific to Employee. In the constructor, we first call the parent class constructor by using the super keyword. That call is required by the rest of the code, and you will get an error if it is missing:
class Employee extends Person {
constructor(firstName, lastName, title, salary) {
super(firstName, lastName);
this.title = title;
this.salary = salary;
}
}
Although ES6 is already quite old, it is still only partially supported by modern web browsers. Babel is a JavaScript compiler that is used to compile ES6 to an older version that is compatible with all browsers. You can test the compiler on the Babel website (https://babeljs.io). The following screenshot shows the arrow function compiling back to the older JavaScript syntax:

Figure 7.5 – Babel
Now that we have learned about the basics of ES6, let's take a look at what JSX and styling are all about.
JSX and styling
JSX is the syntax extension for JavaScript. It is not mandatory to use JSX with React, but there are some benefits that make development easier. JSX, for example, prevents injection attacks because all values are escaped in the JSX before they are rendered. The most useful feature is that you can embed JavaScript expressions in the JSX by wrapping it with curly brackets; this technique will be used a lot in the following chapters.
In the following example, we can access the component props when using JSX. Component props are covered in the next section:
function App() {
return <h1>Hello World {props.user}</h1>;
}
You can also pass a JavaScript expression as props, as shown in the following code snippet:
<Hello count={2+2} />
JSX is compiled into regular JavaScript by Babel.
You can use both internal and external styling with React JSX elements. Here are two examples of inline styling. This first one defines the style inside the div element:
<div style={{ height: 20, width: 200 }}>
Hello
</div>
This second example creates a style object first, which is then used in the div element, The object name should use the camelCase naming convention:
const divStyle = { color: 'red', height: 30 };
const MyComponent = () => (
<div style={divStyle}>Hello</div>
);
As shown in the previous section, you can import a style sheet to a React component. To reference classes from an external Cascading Style Sheets (CSS) file, you should use a className attribute, as shown in the following code snippet:
import './App.js';
...
<div className="App-header"> This is my app</div>
In the next section, we will learn about React props and state.
Props and state
Props and state are the input data for rendering the component. The component is re-rendered when the props or the state change.
Props
Props are inputs to components, and they are a mechanism to pass data from the parent component to its child component. Props are JavaScript objects, therefore they can contain multiple key-value pairs.
Props are immutable, so a component cannot change its props. Props are received from the parent component. A component can access props through the props object that is passed to the function component as a parameter. For example, let's take a look at the following component:
function Hello() {
return <h1>Hello John</h1>;
}
The component is just rendering a static message, and it is not reusable. Instead of using a hardcoded name, we can pass a name to the Hello component by using props, like this:
function Hello(props) {
return <h1>Hello {props.user}</h1>;
}
The parent component can send props to the Hello component in the following way:
<Hello user="John" />
Now, when the Hello component is rendered, it shows the Hello John text.
You can also pass multiple props to a component, as shown here:
<Hello firstName="John" lastName="Johnson" />
Now, you can access both props in the component using the props object, as follows:
function Hello(props) {
return <h1>Hello {props.firstName} {props.lastName}</h1>;
}
Now, the component output is Hello John Johnson.
State
The state value can be updated inside a component. The state is created using the useState hook function. It takes one argument, which is the initial value of the state, and returns an array of two elements. The first element is the name of a state, and the second element is a function that is used to update the state value. The syntax of the useState function is shown in the following code snippet:
const [state, setState] = React.useState(intialValue);
The next code example creates a state variable called name, and the initial value is Jim:
const [name, setName] = React.useState('Jim');
You can also import the useState function from React, like so:
import React, { useState } from 'react';
Then, you don't need to type the React keyword, as indicated here:
const [name, setName] = useState('Jim');
The value of the state can now be updated by using the setName function, as illustrated in the following code snippet. That is the only way to modify the state value:
// Update name state value
setName('John');
You should never update the state value directly using the = operator. If you update state directly, React won't re-render the UI and you will also get an error because you cannot re-assign the const variable, as indicated here:
// Don't do this, UI won't re-render
name = 'John';
If you have multiple states, you can call the useState function multiple times, as shown in the following code snippet:
// Create two states: firstName and lastName
const [firstName, setFirstName] = useState('John');
const [lastName, setLastName] = useState('Johnson');
Now, you can update states using the setFirstName and setLastName functions, as shown in the following code snippet:
// Update state values
setFirstName('Jim');
setLastName('Palmer');
You can also define state using an object, as follows:
const [name, setName] = useState({
firstName: 'John',
lastName: 'Johnson'
});
Now, you can update both the firstName and lastName state object parameters using the setName function, as follows:
setName({ firstName: 'Jim', lastName: 'Palmer' })
If you want to do a partial update of the object, you can use the spread operator. In the following example, we use the object spread syntax (...) that was introduced in ES2018. It clones the name state object and updates the firstName value to be Jim:
setName({ ...name, firstName: 'Jim' })
A state can be accessed by using the state name, as shown in the next example. The scope of the state is the component, so it cannot be used outside the component in which it is defined:
// Renders Hello John
import React, { useState } from 'react';
function MyComponent() {
const [firstName, setFirstName] = useState('John');
return <div>Hello {firstName}</div>;
}
We have now learned the basics of state and props but will learn more about states later in this chapter.
Stateless components
The React stateless component is just a pure JavaScript function that takes props as an argument and returns a React element. Here's an example of a stateless component:
function HeaderText(props) {
return (
<h1>
{props.text}
</h1>
)
}
export default HeaderText;
Our HeaderText example component is also called a pure component. A component is said to be pure if its return value is consistently the same given the same input values. React provides React.memo(), which optimizes the performance of pure functional components. In the following code snippet, we wrap our component using memo():
import React, { memo } from 'react';
function HeaderText(props) {
return (
<h1>
{props.text}
</h1>
)
}
export default memo(HeaderText);
Now, the component is rendered and memoized. In the next render, React renders a memoized result if the props are not changed. The React.memo() phrase also has a second argument, arePropsEqual(), which you can use to customize rendering conditions, but we will not cover that here. The one benefit of the functional components is unit testing, which is straightforward because its return value is always the same for the same input values.
Conditional rendering
You can use a conditional statement to render different UIs if a condition is true or false. This feature can be used, for example, to show or hide some elements, handle authentication, and so on.
In the following example, we will check if props.isLoggedin is true. If so, we will render the <Logout /> component; otherwise, we render the <Login /> component. This is now implemented using two separate return statements:
function MyComponent(props) {
const isLoggedin = props.isLoggedin;
if (isLoggedin) {
return (
<Logout />
)
}
return (
<Login />
)
}
You can also implement this by using condition ? true : false logical operators, and then you need only one return statement, as illustrated here:
function MyComponent(props) {
const isLoggedin = props.isLoggedin;
return (
<div>
{ isLoggedin ? <Logout /> : <Login /> }
</div>
);
}
React hooks
There are certain important rules for using hooks in React. You should always call hooks at the top level in your React function component. You shouldn't call hooks inside loops, conditional statements, or nested functions.
useState
We are already familiar with the useState hooks function that was used to declare states. Let's create one more example of using the useState hook. We will create a counter example that contains a button, and when it is pressed, the counter is increased by 1, as illustrated in the following screenshot:
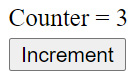
Figure 7.6 – Counter component
First, we create a Counter component and declare a state called count with the initial value 0. The value of the counter state can be updated using the setCount function. The code is illustrated in the following snippet:
import React, { useState } from 'react';
function Counter() {
// count state with initial value 0
const [count, setCount] = useState(0);
return <div></div>;
};
export default Counter;
Next, we render a button element that increments the state by 1. We use the onClick event attribute to call the setCount function, and the new value is the current value plus 1. We will also render the counter state value. The code is illustrated in the following snippet:
import React, { useState } from 'react';
function Counter() {
const [count, setCount] = useState(0);
return (
<div>
<p>Counter = {count}</p>
<button onClick={() => setCount(count + 1) }>
Increment
</button>
</div>
);
};
export default Counter;
Now, our Counter component is ready, and the counter is incremented by 1 each time the button is pressed. When the state is updated, React re-renders the component, and we can see the new count value.
Important Note
In React, events are named using camelCase—for example, onClick.
State updates are asynchronous therefore you have to be careful when a new state value depends on the current state value. To be sure that the latest value is used, you can pass a function to the update function. You can see an example of this here:
setCount(prevCount => prevCount + 1)
Now, the previous value is passed to the function, and the updated value is returned and saved to the count state. There is also a hook function called useReducer that is recommended to use when you have a complex state, but we won't cover that in this book.
React also uses batching in state updates to reduce re-renders. Before React version 18, batching only worked in states updated during browser events—for example, a button click. The following example demonstrates the idea of batch updates:
import React, { useState } from 'react';
function App() {
const [count, setCount] = useState(0);
const [count2, setCount2] = useState(0);
const increment = () => {
setCount(count + 1); // No re-rendering yet
setCount2(count2 + 1);
// Component re-renders after all state updates
}
return (
<div>
<p>Counters: {count} {count2}</p>
<button onClick={increment}>Increment</button>
</div>
);
};
export default App;
From React version 18 onward, all state updates will be batched. If you don't want to use batch updates in some cases, you can use the react-dom library flushSync API to avoid batching. For example, you might have a case where you want to update some state before updating the next one. Here's the code you'll need to do this:
import { flushSync } from "react-dom";
…
const increment = () => {
flushSync( () => {
setCount(count + 1); // No batch update
}
}
Note—this must be checked when React 18 is released.
useEffect
The useEffect hook function can be used to perform side-effects in the React function component. The side-effect can be, for example, a fetch request. The useEffect hook takes two arguments, as shown here:
useEffect(callback, [dependencies])
The callback function contains side-effect logic, and dependencies is an optional array of dependencies.
The following code snippet shows the previous counter example, but we have added the useEffect hook. Now, when the button is pressed, the count state value increases, and the component is re-rendered. After each render, the useEffect callback function is invoked and we can see Hello from useEffect in the console, as illustrated in the following code snippet:
import React, { useState, useEffect } from 'react';
function Counter() {
const [count, setCount] = useState(0);
// Called after every render
useEffect(() => {
console.log('Hello from useEffect')
});
return (
<div>
<p>{count}</p>
<button onClick={() => setCount(count + 1)}>Increment
</button>
</div>
);
};
export default Counter;
In the following screenshot, we can see what the console now looks like, and we can see that the useEffect callback is invoked after each render. The first log row is printed after the initial render, and the rest are printed after the button is pressed two times and the component is re-rendered due to state updates:
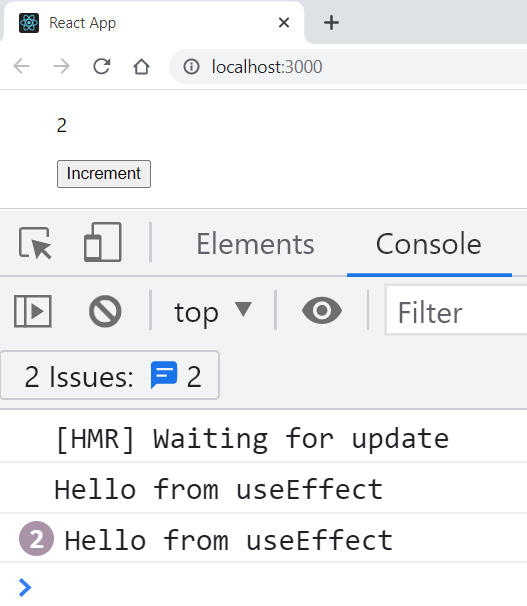
Figure 7.7 – useEffect
The useEffect hook has a second optional argument that you can use to prevent it from running in every render. In the following code snippet, we define that if the count state value is changed (meaning that the previous and current values differ), the useEffect callback function will be invoked. We can also define multiple states in the second argument. If any of these state values are changed, the useEffect hook will be invoked:
// Runs when count value is changed and component is
re-rendered
useEffect(() => {
console.log('Counter value is now ' + count);
}, [count]);
If you pass an empty array as second argument, the useEffect callback function runs only after the first render, as shown in the following code snippet:
// Runs only after the first render
useEffect(() => {
console.log('Hello from useEffect')
}, []);
Now, you can see that Hello from useEffect is printed only once after the initial render and if you press the button, the text is not printed:
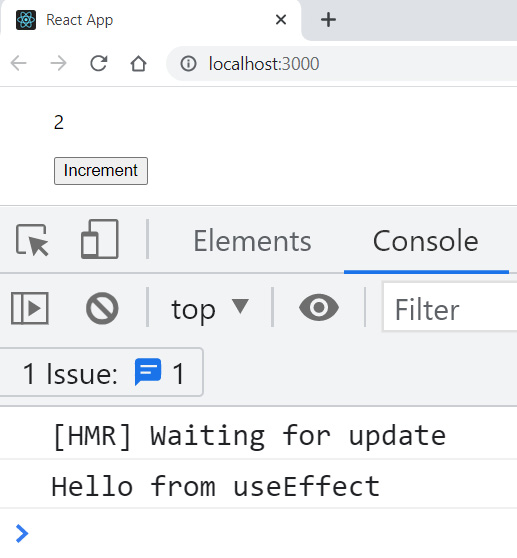
Figure 7.8 – useEffect with an empty array
The useEffect function can also return a function that will run before every effect, as shown in the following code snippet. With this mechanism, you can clean up each effect from the previous render before running the effect next time:
useEffect(() => {
console.log('Hello from useEffect');
return () => {
console.log('Clean up function');
}
}, [count]);
Now, if you run a counter app with these changes, you can see what happens in the console, as shown in the following screenshot:
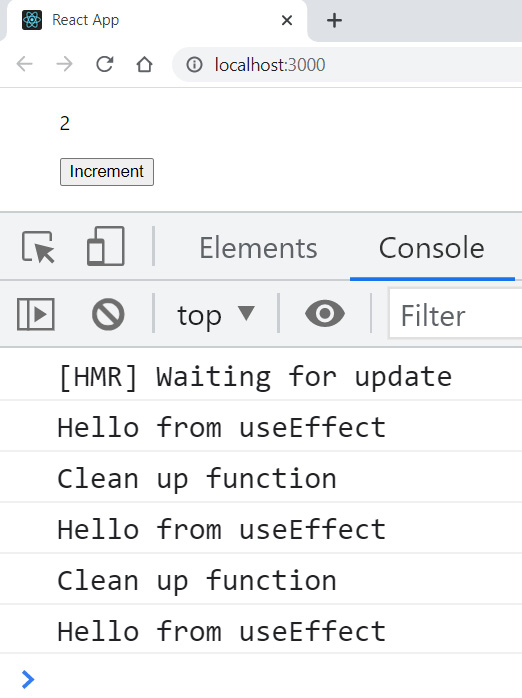
Figure 7.9 – Cleanup function
useRef
The useRef hook returns a mutable ref object and it can be used, for example, to access DOM nodes. You can see it in action here:
const ref = useRef(initialValue)
The returned ref object has a current property that is initialized with the passed argument (initialValue). In the next example, we create a ref object called inputRef and initialize it to null. Then, we use the JSX element's ref property and pass our ref object to it. Now, it contains our input element, and we can use the current property to execute the input element's focus function:
import React, { useRef } from 'react';
import './App.css';
function App() {
const inputRef = useRef(null);
return (
<div>
<input ref={inputRef} />
<button onClick={() => inputRef.current.focus()}>
Focus input
</button>
</div>
);
}
export default App;
There are other useful hook functions, and we will cover some of these later in this book. In this section, we have learned the basics about React hooks, and we will use them in practice when we start to implement our frontend.
Custom hooks
You can also build your own hooks in React. Hooks' names should start with the use- word, and they are JavaScript functions. Custom hooks can also call other hooks. With custom hooks, you can reduce your component code complexity.
Let's go through a simple example of creating a custom hook. We will create a useTitle hook that can be used to update a document title. We will define it in its own file called useTitle.js. First, we define a function, and it gets one argument named title. The code is illustrated in the following snippet:
// useTitle.js
function useTitle(title) {
}
Next, we will use a useEffect hook to update the document title each time the title argument is changed, as follows:
import { useEffect } from 'react';
function useTitle(title) {
useEffect(() => {
document.title = title;
}, [title]);
}
export default useTitle;
Now, we can start to use our custom hook. Let's use it in our counter example and print the current counter value into the document title. First, we have to import the useTitle hook into our Counter component, like this:
import useTitle from './useTitle';
function Counter() {
return (
<div>
</div>
);
};
export default Counter;
Then, we will use the useTitle hook to print the count state value into the document title. We can call our hook function in the top level of the Counter component function, and every time the component is rendered, the useTitle hook function is called and we can see the current count value in the document title. The code is illustrated in the following snippet:
import React, { useState } from 'react';
import useTitle from './useTitle';
function App() {
const [count, setCount] = useState(0);
useTitle('You clicked ${count} times');
return (
<div>
<p>Counter = {count}</p>
<button onClick={ () => setCount(count + 1) }>
Increment
</button>
</div>
);
};
export default App;
Now, if you click the button, the count state value is shown also in the document title using our custom hook, as illustrated in the following screenshot:
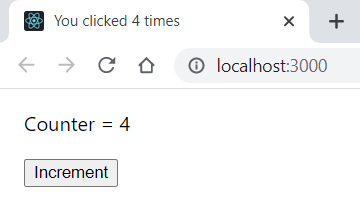
Figure 7.10 – Custom hook
You now have basic knowledge of React hooks and how you can create your own custom hooks.
The Context API
Passing data using props can be cumbersome if your component tree is deep and complex. You have to pass data through all components down the component tree. The Context API solves this problem, and it is recommended to use for global data that you might need in multiple components through your component tree—for example, a theme or authenticated user.
Context is created using the createContext method and it takes an argument that defines the default value. You can create your own file for the context, and the code looks like this:
import React from 'react';
const AuthContext = React.createContext('');
export default AuthContext;
Next, we will use a context provider component that makes our context available for other components. The context provider component has a value prop that will be passed to consuming components. In the following example, we have wrapped <MyComponent /> using the context provider component, therefore the userName value is available in our component tree under <MyComponent />:
import React from 'react';
import AuthContext from './AuthContext';
import MyComponent from './MyComponent';
function App() {
// User is authenticated and we get the username
const userName = 'john';
return (
<AuthContext.Provider value={userName}>
<MyComponent />
</AuthContext.Provider>
);
};
export default App;
Now, we can access the provided value in any component in the component tree by using the useContext() hook, as follows:
import React from 'react';
import AuthContext from './AuthContext';
function MyComponent() {
const authContext = React.useContext(AuthContext);
return(
<div>
Welcome {authContext}
</div>
);
}
export default MyComponent;
The component now renders Welcome john text.
Handling lists with React
For list handling, we will learn about a new JavaScript map()method, which is useful when you have to manipulate a list. The map() method creates a new array containing the results of calling a function to each element in the original array. In the following example, each array element is multiplied by 2:
const arr = [1, 2, 3, 4];
const resArr = arr.map(x => x * 2); // resArr = [2, 4, 6, 8]
The map() method also has index as a second argument, which is useful when handling lists in React. List items in React need a unique key that is used to detect rows that have been updated, added, or deleted.
The following example code demonstrates a component that transforms an array of integers to an array of list items and renders these inside the ul element:
import React from 'react';
function MyList() {
const data = [1, 2, 3, 4, 5];
return (
<div>
<ul>
{
data.map((number, index) =>
<li key={index}>Listitem {number}</li>)
}
</ul>
</div>
);
};
export default MyList;
The following screenshot shows what the component looks like when it is rendered:
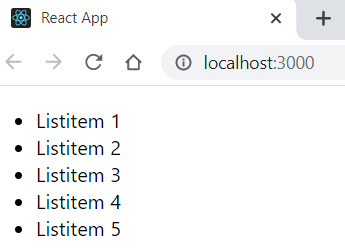
Figure 7.11 – React list component
If the data is an array of objects, it would be nicer to present it in table format. We do this in roughly the same way as we did with the list, but now we just map the array to table rows (tr elements) and render these inside the table element, as shown in the following component code:
import React from 'react';
function MyTable() {
const data = [
{brand: 'Ford', model: 'Mustang'},
{brand: 'VW', model: 'Beetle'},
{brand: 'Tesla', model: 'Model S'}];
return (
<div>
<table>
<tbody>
{
data.map((item, index) =>
<tr key={index}>
<td>{item.brand}</td><td>{item.model}</td>
</tr>)
}
</tbody>
</table>
</div>
);
};
export default MyTable;
The following screenshot shows what the component looks like when it is rendered. Now, you should see the data in the HyperText Markup Language (HTML) table:
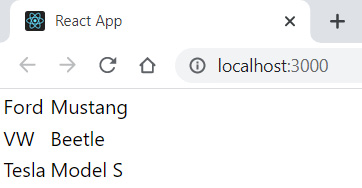
Figure 7.12 – React table
Now, we have learned how to handle list data using the map() method and how to render it using, for example, an HTML table element.
Handling events with React
Event handling in React is similar to handling DOM element events. The difference compared to HTML event handling is that event naming uses camelCase in React. The following sample component code adds an event listener to a button and shows an alert message when the button is pressed:
import React from 'react';
function MyComponent() {
// This is called when the button is pressed
const buttonPressed = () => {
alert('Button pressed');
}
return (
<div>
<button onClick={buttonPressed}>Press Me</button>
</div>
);
};
export default MyComponent;
In React, you cannot return false from the event handler to prevent the default behavior. Instead, you should call the preventDefault() method. In the following example, we are using a form element, and we want to prevent form submission:
import React from 'react';
function MyForm() {
// This is called when the form is submitted
const handleSubmit = (event) => {
event.preventDefault(); // Prevents default behavior
alert('Form submit');
}
return (
<form onSubmit={handleSubmit}>
<input type="submit" value="Submit" />
</form>
);
};
export default MyForm;
Now, when you press the Submit button, you can see the alert and the form will not be submitted.
Handling forms with React
Form handling is a little bit different with React. An HTML form will navigate to the next page when it is submitted. Oftentimes, we want to invoke a JavaScript function that has access to form data after submission and avoid navigating to the next page. We already covered how to avoid submission in the previous section using preventDefault().
Let's first create a minimalistic form with one input field and a Submit button. In order to get the value of the input field, we use the onChange event handler. We use the useState hook to create a state variable called text. When the value of the input field is changed, the new value will be saved to the state. This is also called a controlled component because form data is handled by React.
The setText(event.target.value) statement gets the value from the input field and saves it to the state. Finally, we will show the typed value when a user presses the Submit button. Here is the source code for our first form:
import React, { useState } from 'react';
function MyList() {
const [text, setText] = useState('');
// Save input element value to state when it has been
changed
const inputChanged = (event) => {
setText(event.target.value);
}
const handleSubmit = (event) => {
alert('You typed: ${text}');
event.preventDefault();
}
return (
<form onSubmit={handleSubmit}>
<input type="text" onChange={inputChanged}
value={text}/>
<input type="submit" value="Press me"/>
</form>
);
};
export default MyList;
Here is a screenshot of our form component after the Submit button has been pressed:
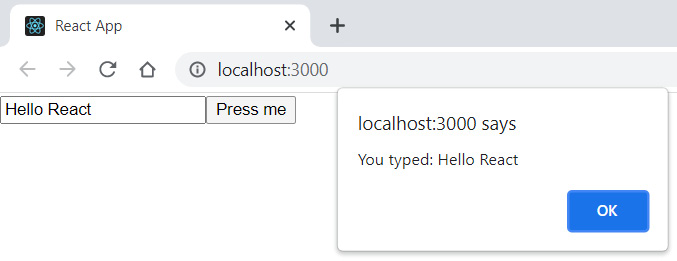
Figure 7.13 – Form component
You can also write an inline onChange handler function using the JSX, as shown in the following example:
return (
<form onSubmit={handleSubmit}>
<input
type="text"
onChange={event => setText(event.target.value)}
value={text}/>
<input type="submit" value="Press me"/>
</form>
);
Now is a good time to look at the React developer tools, which are useful for debugging React apps. If we open the React developer tools with our React form app and type something into the input field, we can see how the value of the state changes, and we can inspect the current value of both the props and the state.
The following screenshot shows how the state changes when we type something into the input field:
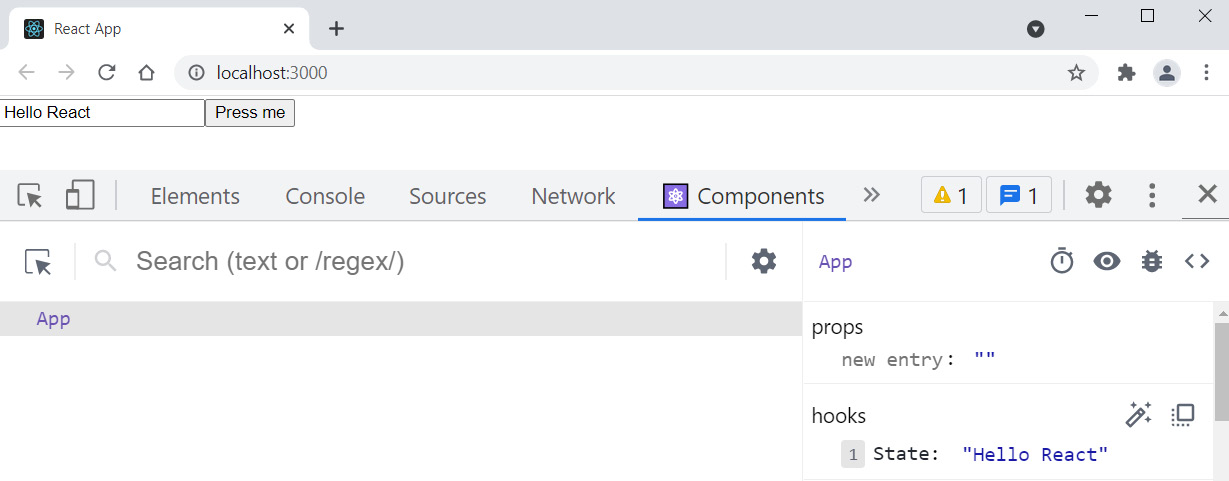
Figure 7.14 – React developer tools
Typically, we have more than one input field in the form. Let's look at how we can handle that using an object state. First, we introduce a state called user using the useState hook, as shown in the following code snippet. The user state is an object with three attributes: firstName, lastName, and email:
const [user, setUser] = useState({
firstName: '',
lastName: '',
email: ''
});
One way to handle multiple input fields is to add as many change handlers as we have input fields, but this creates a lot of boilerplate code, which we want to avoid. Therefore, we add name attributes to our input fields. We can utilize these in the change handler to identify which input field triggers the change handler. The name attribute value of the input element must be the same as the name of the state object property in which we want to save the value, and the value attribute should be object.property—for example, in the first name input element. The code is illustrated here:
<input type="text" name="lastName" onChange={inputChanged} value={user.lastName}/>
The input change handler now looks like this. If the input field that triggers the handler is the first name field, then event.target.name is firstName, and the typed value will be saved to the state object's firstName field. Here, we also use the object spread notation that was introduced in the React hooks section. In this way, we can handle all input fields with the one change handler:
const inputChanged = (event) => {
setUser({...user, [event.target.name]:
event.target.value});
}
Here is the full source code of the component:
import React, { useState } from 'react';
function MyForm() {
const [user, setUser] = useState({
firstName: '',
lastName: '',
email: ''
});
// Save input box value to state when it has been changed
const inputChanged = (event) => {
setUser({...user, [event.target.name]:
event.target.value});
}
const handleSubmit = (event) => {
alert('Hello ${user.firstName} ${user.lastName}');
event.preventDefault();
}
return (
<form onSubmit={handleSubmit}>
<label>First name </label>
<input type="text" name="firstName" onChange=
{inputChanged}
value={user.firstName}/><br/>
<label>Last name </label>
<input type="text" name="lastName" onChange=
{inputChanged}
value={user.lastName}/><br/>
<label>Email </label>
<input type="email" name="email" onChange=
{inputChanged}
value={user.email}/><br/>
<input type="submit" value="Press me"/>
</form>
);
};
export default MyForm;
Here is a screenshot of our form component after the Submit button has been pressed:
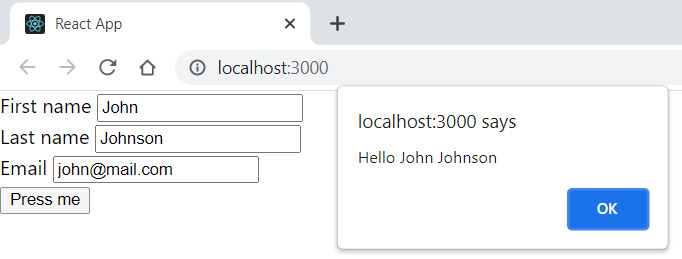
Figure 7.15 – React form component
The previous example can be also implemented using separate states instead of one state and object. The following code snippet demonstrates that. Now, we have three states, and in the input element's onChange event handler, we call the correct update function to save values into the states. In this case, we don't need the name input element's name attribute:
import React, { useState } from 'react';
function MyForm() {
const [firstName, setFirstName] = useState('');
const [lastName, setLastName] = useState('');
const [email, setEmail] = useState('');
const handleSubmit = (event) => {
alert('Hello ${firstName} ${lastName}');
event.preventDefault();
}
return (
<form onSubmit={handleSubmit}>
<label>First name </label>
<input
onChange={e => setFirstName(e.target.value)}
value={firstName}/><br/>
<label>Last name </label>
<input
onChange={e => setLastName(e.target.value)}
value={lastName}/><br/>
<label>Email </label>
<input
onChange={e => setEmail(e.target.value)}
value={email}/><br/>
<input type="submit" value="Press me"/>
</form>
);
};
export default MyForm;
We now know how to handle forms with React, and we will use these skills later when we implement our frontend.
Summary
In this chapter, we started to learn about React, which we will be using to build our frontend. Before starting to develop with React, we covered the basics, such as the React component, JSX, props, the state, and hooks. In our frontend development, we used ES6, which makes our code cleaner. We then went through the features we need for further development. We also learned how to handle forms and events with React.
In the next chapter, we will focus on networking with React. We will also be using the GitHub REpresentational State Transfer (REST) API to learn how to consume a RESTful web service with React.
Questions
- What is a React component?
- What are state and props?
- How does data flow in a React app?
- What is the difference between stateless and stateful components?
- What is JSX?
- What are component life cycle methods?
- How should we handle events in React?
- How should we handle forms in React?
Further reading
Packt has the following great resources for learning about React:
- React - The Complete Guide, by Academind GmbH: https://www.packtpub.com/product/react-the-complete-guide-includes-hooks-react-router-and-redux-2021-updated-second-edition-video/9781801812603
- React 17 Design Patterns and Best Practices - Third Edition, by Carlos Santana Roldán: https://www.packtpub.com/product/react-17-design-patterns-and-best-practices-third-edition/9781800560444