
Chapter 8: Consuming the REST API with React
This chapter explains networking with React. That is really important skill which we need in most of the React apps. We will learn about promises, which make asynchronous code cleaner and more readable. For networking, we will use the fetch and axios libraries. As an example, we will use the GitHub REST API to demonstrate how to consume RESTful web services with React.
In this chapter, we will cover the following topics:
- Using promises
- Using the fetch API
- Using the axios library
- Practical examples
- Handling responses from the REST API
Technical requirements
In this book, we are using the Windows operating system, but all the tools are available for Linux and macOS via Node.js.
The following GitHub link will also be required: https://github.com/PacktPublishing/Full-Stack-Development-with-Spring-Boot-and-React/tree/main/Chapter08.
Using promises
The traditional way to handle an asynchronous operation is to use callback functions for the success or failure of the operation. One of these callback functions is called (success or failure), depending on the result of the call. The following example shows the idea of using a callback function:
function doAsyncCall(success, failure) {
// Do some API call
if (SUCCEED)
success(resp);
else
failure(err);
}
success(response) {
// Do something with response
}
failure(error) {
// Handle error
}
doAsyncCall(success, failure);
A promise is an object that represents the result of an asynchronous operation. The use of promises simplifies the code when you're executing asynchronous calls. Promises are non-blocking.
A promise can be in one of three states:
- Pending: Initial state
- Fulfilled: Successful operation
- Rejected: Failed operation
With promises, we can execute asynchronous calls if the API we are using supports promises. In the following example, the asynchronous call is made and when the response is returned, the callback function inside the then method is executed and takes response as an argument:
doAsyncCall()
.then(response => // Do something with the response)
The then method returns a promise. You can chain many instances of then together, which means that you can run multiple asynchronous operations one after another:
doAsyncCall()
.then(response => // Get some data from the response)
.then(data => // Do something with the data
You can also add error handling to promises by using catch():
doAsyncCall()
.then(response => // Get some data from the response)
.then(data => // Do something with data)
.catch(error => console.error(error))
There is a more modern way to handle asynchronous calls that involves async/await, which was introduced in ECMAScript 2017. At the time of writing, it is not as widely supported by browsers as promises are. async/await is based on promises. To use async/await, you must define an async function that can contain await expressions. The following is an example of an asynchronous call containing async/await. As you can see, you can write the code in a similar way to synchronous code:
doAsyncCall = async () => {
const response = await fetch('http://someapi.com');
const data = await response.json();
// Do something with the data
}
For error handling, you can use try…catch with async/await, as shown in the following example:
doAsyncCall = async () => {
try {
const response = await fetch('http://someapi.com');
const data = await response.json();
// Do something with the data
}
catch(err) {
console.error(err);
}
}
Now, we can start to learn about the fetch API, which we can use to make requests in our React apps.
Using the fetch API
With the fetch API, you can make web requests. The idea of the fetch API is similar to the traditional XMLHttpRequest, but the fetch API also supports promises, which makes it more straightforward to use. You don't have to install any libraries if you are using fetch.
The fetch API provides a fetch() method that has one mandatory argument: the path of the resource you are calling. In the case of a web request, it will be the URL of the service. For a simple GET method call, which returns a JSON response, the syntax is as follows. The fetch() method returns a promise that contains the response. You can use the json() method to parse the JSON body from the response:
fetch('http://someapi.com')
.then(response => response.json())
.then(data => console.log(data));
.catch(error => console.error(error))
To use another HTTP method, such as POST, you must define it in the second argument of the fetch() method. The second argument is an object where you can define multiple request settings. The following source code makes the request using the POST method:
fetch('http://someapi.com', {method: 'POST'})
.then(response => response.json())
.then(data => console.log(data))
.catch(error => console.error(error));
You can also add headers inside the second argument. The following fetch() call contains the 'Content-Type':'application/json' header:
fetch('http://someapi.com',
{
method: 'POST',
headers: {'Content-Type':'application/json'}
}
.then(response => response.json())
.then(data => console.log(data))
.catch(error => console.error(error));
If you have to send JSON-encoded data inside the request body, the syntax is to do so is as follows:
fetch('http://someapi.com',
{
method: 'POST',
headers: {'Content-Type':'application/json'},
body: JSON.stringify(data)
}
.then(response => response.json())
.then(data => console.log(data))
.catch(error => console.error(error));
The fetch API is not the only way to execute requests in the React app. There are other libraries that you can use as well. In the next section, we will learn how to use one such popular library: axios.
Using the axios library
You can also use other libraries for network calls. One very popular library is axios (https://github.com/axios/axios), which you can install in your React app with npm:
npm install axios
You must add the following import command to your React component before using it:
import axios from 'axios';
The axios library has some benefits, such as automatic transformation for JSON data. The following code shows an example call being made with axios:
axios.get('http://someapi.com')
.then(response => console.log(response))
.catch(error => console.log(error));
The axios library has its own call methods for the different HTTP methods. For example, if you want to make a POST request and send an object in the body, axios provides the axios.post method:
axios.post('http://someapi.com', { newObject })
.then(response => console.log(response))
.catch(error => console.log(error));
Now, we are ready to look at practical examples involving networking with React.
Working on practical examples
In this chapter we will go through two examples of using some open REST APIs in your React app.
OpenWeatherMap API
First, we will make a React app that shows the current weather in London. This weather data will be fetched from OpenWeatherMap (https://openweathermap.org/). You need to register with OpenWeatherMap to get an API key. We will use a free account as that is sufficient for our needs. Once you have registered, navigate to your account information to find the API keys tab. There, you'll see the API key that you need for your React weather app:
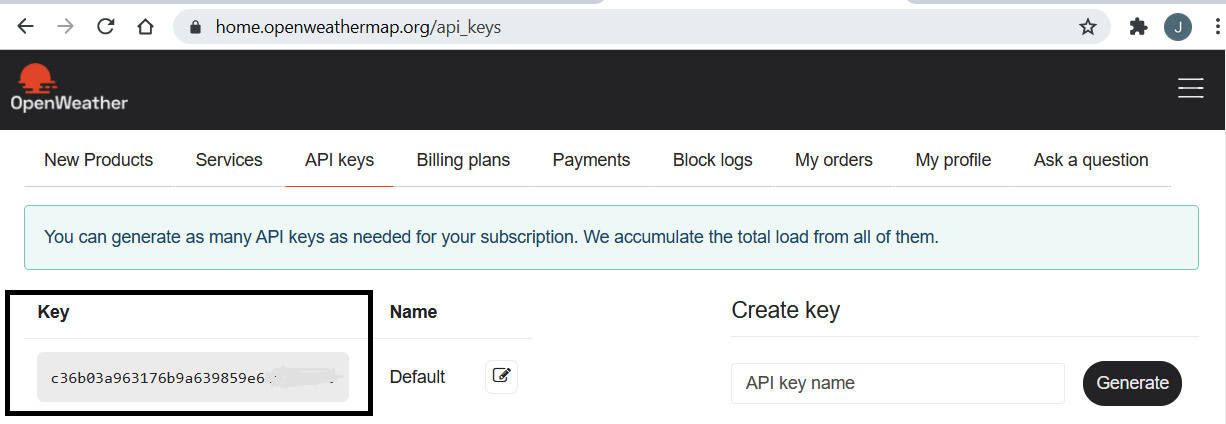
Figure 8.1 – The OpenWeatherMap API key
Let's create a new React app with create-react-app:
- Open a terminal in Windows or Terminal in macOS/Linux, and type the following command:
npx create-react-app weatherapp
- Navigate to the weatherApp folder:
cd weatherapp
- Start your app with the following command:
npm start
- Open your project folder with VS Code and open the App.js file in the editor view. Remove all the code inside the <div className="App"></div> divider. Now, your source code should look as follows:
import './App.css';
function App() {
return (
<div className="App">
</div>
);
}
export default App;
- First, we must add the states that are needed for the response data. We will show the temperature, description, and weather icon in our app. So, we must define three state values. We will also add one Boolean state to indicate the status of fetch loading:
import React, { useState } from 'react';
import './App.css';
function App() {
const [temp, setTemp] = useState('');
const [desc, setDesc] = useState('');
const [icon, setIcon] = useState('');
const [isReady, setReady] = useState(false);
return (
<div className="App">
</div>
);
}
export default App;
When you are using a REST API, you should inspect the response to be able to get values from the JSON data. In the following example, you can see the address that returns the current weather for London. If you copy the address in a browser, you can view see the JSON response data: api.openweathermap.org/data/2.5/weather?q=London&units=Metric&APIkey=YOUR_KEY.
From the response, you can see that temp can be accessed using main.temp. Then, you can see that description and icon are inside the weather array, which has only one element, and that we can access it using weather[0].description and weather[0].icon:
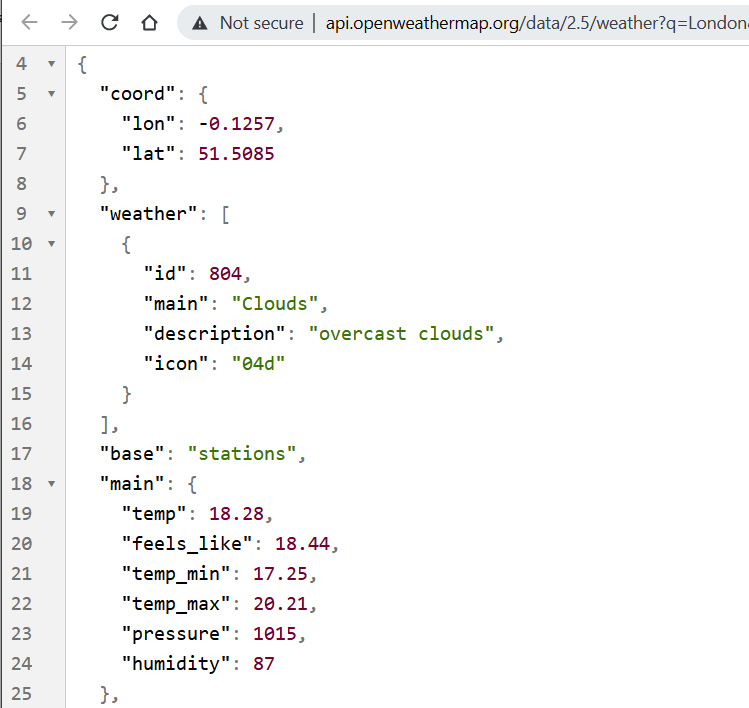
Figure 8.2 – Get weather by city
The REST API call is executed using fetch in the useEffect hook function, using an empty array as the second argument. Therefore, the fetch is done once, after the first render. After a successful response, we save the weather data to the state and change the isReady state to true. Once the state values have been changed, the component will be re-rendered. We will implement the return statement in the next step.
- The following is the source code for the useEffect hook function, It will execute the fetch function once after the first render::
React.useEffect(() => { fetch('http://api.openweathermap.org/data/2.5/
weather?q=London&
APPID=YOUR_KEY&units=metric')
.then(result => result.json())
.then(jsonresult => {
setTemp(jsonresult.main.temp);
setDesc(jsonresult.weather[0].main);
setIcon(jsonresult.weather[0].icon);
setReady(true);
})
.catch(err => console.error(err))
}, [])
- Once you have added the useEffect function, the request is executed after the first render. We can check that everything has been done correctly using the React developer tool. Open your app in a browser and open your React developer tool's Component tab. Now, you can see that the states have been updated with the values from the response:
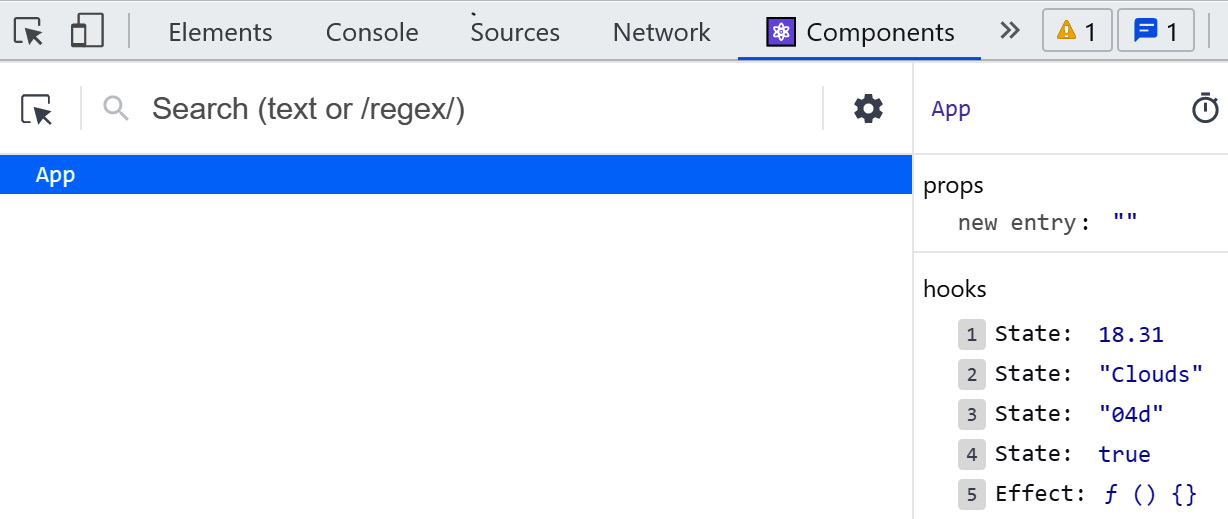
Figure 8.3 – Weather component
You can also check that the request status is 200 OK from the Network tab. Finally, we implement the return statement to show the weather values. We are using conditional rendering here; otherwise, we will get an error because we don't have image code in the first render call and the image upload won't succeed.
- To show the weather icon, we must add http://openweathermap.org/img/wn/ before the icon code, and @2x.png after the icon code. Then, we can set the concatenated image URL to the img element's src attribute. temperature and description are shown in the paragraph element. The °C HTML entity shows the Celsius degree symbol:
if (isReady) {
return (
<div className="App">
<p>Temperature: {temp} °C</p>
<p>Description: {desc}</p>
<img src={'http://openweathermap.org/img/wn/
${icon}@2x.png'}
alt="Weather icon" />
</div>
);
}
else {
return <div>Loading...</div>
}
- Now, your app should be ready. When you open it in a browser, it should look as follows:
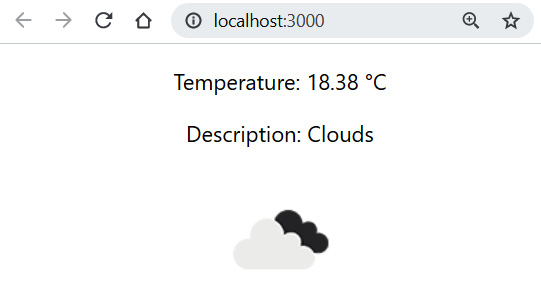
Figure 8.4 – WeatherApp
The source code for the entire App.js file is as follows:
import React, { useState } from 'react';
import './App.css';
function App() {
const [temp, setTemp] = useState('');
const [desc, setDesc] = useState('');
const [icon, setIcon] = useState('');
const [isReady, setReady] = useState(false);
React.useEffect(() => {
fetch('http://api.openweathermap.org/data
/2.5/weather?q=London&APPID=c36b03a96
3176b9a639859e6cf279299&units=metric')
.then(result => result.json())
.then(jsonresult => {
setTemp(jsonresult.main.temp);
setDesc(jsonresult.weather[0].main);
setIcon(jsonresult.weather[0].icon);
setReady(true);
})
.catch(err => console.error(err))
}, [])
if (isReady) {
return (
<div className="App">
<p>Temperature: {temp} °C</p>
<p>Description: {desc}</p>
<img src={'http://openweathermap.
org/img/wn/${icon}@2x.png'}
alt="Weather icon" />
</div>
);
}
else {
return <div>Loading...</div>
}
}
export default App;
In this second example, we are going to use the GitHub API to fetch repositories according to a keyword. Following the same steps as in the previous example, create a new React app called restgithub:
- Start the app and open the project folder with VS Code.
- Remove the extra code inside the <div className="App"></div> divider from the App.js file. Your App.js code should look as follows:
import './App.css';
function App() {
return (
<div className="App">
</div>
);
}
export default App;
The URL of the GitHub REST API is as follows:
https://api.github.com/search/repositories?q={KEYWORD}.
Let's inspect the JSON response by typing the URL into a browser and using the react keyword. From the response, we can see that repositories are returned as a JSON array called items. From the individual repositories, we will show the full_name and html_url values. We will present the data in the table and use the map() function to transform the values into table rows, as shown in the previous chapter:

Figure 8.5 – GitHub REST API
We are going to make the REST API call with the keyword from the user input. Therefore, we can't make the REST API call in the useEffect() hook function because, in that phase, the user input isn't available. One way to implement this is to create an input field and button.
The user types the keyword into the input field and the REST API call is made when the button is pressed. We need two states – one for the user input and one for the data from the JSON response. The type of the data state is an array because repositories are returned as JSON arrays in the response:
import React, { useState } from 'react';
import './App.css';
function App() {
const [keyword, setKeyword] = useState('');
const [data, setData] = useState([]);
return (
<div className="App">
</div>
);
}
export default App;
- Next, we must implement the input field and the button in the return statement. We also have to add a change listener to our input field to be able to save the input value to a state called keyword. The button has a click listener that invokes the function that will make the REST API call with the given keyword:
const fetchData = () => {
// REST API call
}
return (
<div className="App">
<input
value={keyword}
onChange={e => setKeyword(e.target.value)} />
<button onClick={fetchData}>Fetch</button>
</div>
);
In the fetchData function, we concatenate the url and keyword states by using template literals. Then, we save the items array from the response to the data state. The following is the source code for the fetchData function:
const fetchData = () => {
fetch('https://api.github.com/search/repositories?q=${keyword}')
.then(response => response.json())
.then(data => setData(data))
.catch(err => console.error(err))
}
- In the return statement, we use the map function to transform the data state into table rows. The url property of a repository will be the href value of the <a> element:
return (
<div className="App">
<input value={keyword}
onChange={e => setKeyword(e.target.value)} />
<button onClick={fetchData}>Fetch</button>
<table>
<tbody>
{
data.map(repo =>
<tr>
<td>{repo.full_name}</td>
<td>
<a href={repo.html_url}>
{repo.html_url}</a>
</td>
</tr>
)
}
</tbody>
</table>
</div>
);
The following screenshot shows the final app upon using the React keyword in the REST API call:
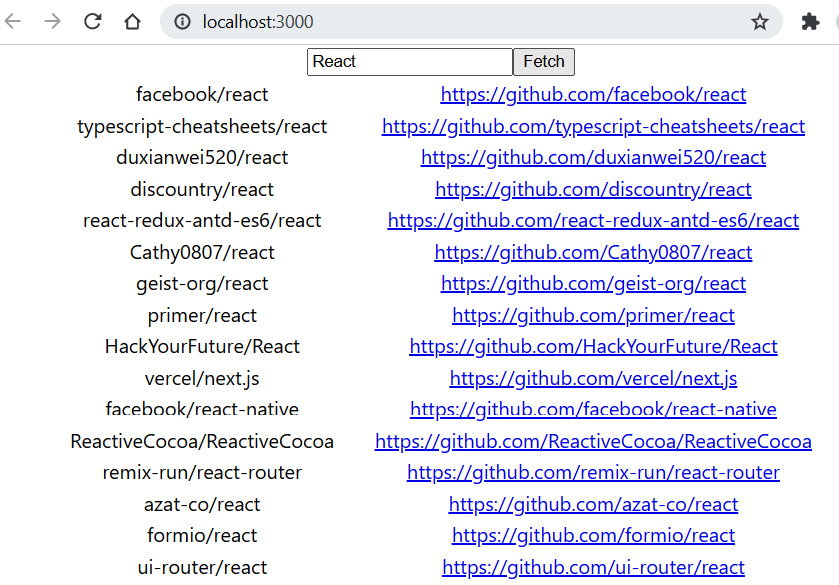
Figure 8.6 – GitHub REST API
The source code for the App.js file looks as follows:
import React, { useState } from 'react';
import './App.css';
function App() {
const [keyword, setKeyword] = useState('');
const [data, setData] = useState([]);
const fetchData = () => {
fetch('https://api.github.com/search/repositories?q=${
keyword}')
.then(response => response.json())
.then(data => setData(data.items))
.catch(err => console.error(err))
}
return (
<div className="App">
<input value={keyword}
onChange={e => setKeyword(e.target.value)} />
<button onClick={fetchData}>Fetch</button>
<table>
<tbody>
{
data.map(repo =>
<tr key={repo.id}>
<td>{repo.full_name}</td>
<td>
<a href={repo.html_url}>
{repo.html_url}</a>
</td>
</tr>
)
}
</tbody>
</table>
</div>
);
}
export default App;
Now that we have learned about networking with React, we can utilize these skills in the frontend implementation.
Summary
In this chapter, we focused on networking with React. We started with promises, which make asynchronous network calls easier to implement. This is a cleaner way to handle calls, and it's much better than using traditional callback functions.
In this book, we are using the fetch API for networking. Therefore, we went through the basics of using fetch. We implemented two practical React apps using the fetch API to call REST APIs and we presented the response data in the browser.
In the next chapter, we will look at some useful React components that we are going to use in our frontend.
Questions
Answer the following questions to test your knowledge of this chapter:
- What is a promise?
- What is fetch?
- How should you call the REST API from the React app?
- How should you handle the response of the REST API call?
Further reading
Packt has other great resources available for learning about React. These are as follows:
- React 17 Design Patterns and Best Practices – Third Edition, by Carlos Santana Roldán (https://www.packtpub.com/product/react-17-design-patterns-and-best-practices-third-edition/9781800560444)
- Full-Stack React Projects – Second Edition, by Shama Hoque (https://www.packtpub.com/product/full-stack-react-projects-second-edition/9781839215414)