
Chapter 3: Using JPA to Create and Access a Database
This chapter covers how to use Java Persistent API (JPA) with Spring Boot and how to define a database by using entity classes. In the first phase, we will be using the H2 in-memory database for development and demonstration purposes. H2 is an in-memory SQL database that is good for fast development or demonstration purposes. In the second phase, we will move from H2 to use MariaDB. This chapter also describes the creation of CRUD repositories and a one-to-many connection between database tables.
In this chapter, we will cover the following topics:
- Basics of ORM, JPA, and Hibernate
- Creating the entity classes
- Creating CRUD repositories
- Adding relationships between tables
- Setting up the MariaDB database
Technical requirements
Java SDK version 8 or higher is necessary to use Spring Boot (http://www.oracle.com/technetwork/java/javase/downloads/index.html). The Spring Boot application we created in previous chapters is required.
A MariaDB installation is necessary to create the database application (https://downloads.mariadb.org/).
The code for this chapter can be found at the following GitHub link: https://github.com/PacktPublishing/Full-Stack-Development-with-Spring-Boot-and-React/tree/main/Chapter03.
Check out the following video to see the Code in Action: https://bit.ly/3lVCuVe
Basics of ORM, JPA, and Hibernate
Object Relational Mapping (ORM) is a technique that allows you to fetch from and manipulate a database by using an object-oriented programming paradigm. ORM is really good for programmers because it relies on object-oriented concepts rather than database structures. It also makes development much faster and reduces the amount of source code. ORM is mostly independent of databases, and developers don't have to worry about vendor-specific SQL statements.
Java Persistent API (JPA) provides object-relational mapping for Java developers. The JPA entity is a Java class that presents the structure of a database table. The fields of an entity class present the columns of the database tables.
Hibernate is the most popular Java-based JPA implementation and is used in Spring Boot by default. Hibernate is a mature product and is widely used in large-scale applications.
Next, we will start to implement our first entity class using the H2 database.
Creating the entity classes
An entity class is a simple Java class that is annotated with JPA's @Entity annotation. Entity classes use the standard JavaBean naming convention and have proper getter and setter methods. The class fields have private visibility.
JPA creates a database table called by the name of the class when the application is initialized. If you want to use some other name for the database table, you can use the @Table annotation in your entity class.
At the beginning of this chapter, we will use the H2 database (https://www.h2database.com/), which is embedded in our in-memory database. To be able to use JPA and the H2 database, we have to add the following dependencies to the pom.xml file:
<dependency>
<groupId>org.springframework.boot</groupId>
<artifactId>spring-boot-starter-data-jpa</artifactId>
</dependency>
<dependency>
<groupId>com.h2database</groupId>
<artifactId>h2</artifactId>
<scope>runtime</scope>
</dependency>
Let's look at the following steps to create entity classes:
- To create an entity class in Spring Boot, we must create a package for entities. The package should be created under the root package. To start this, activate the root package in Eclipse's Project Explorer and right-click to make a context menu appear.
- From this menu, select New | Package. The following screenshot shows how to create a package for entity classes:

Figure 3.1 – New package

Figure 3.2 – New Java Package
- Next, we will create our entity class. Activate a new com.packt.cardatabase.domain package, right-click it, and select New | Class from the menu.
- Because we are going to create a car database, the name of the entity class will be Car. Type Car in the Name field and then press the Finish button, as shown in the following screenshot:
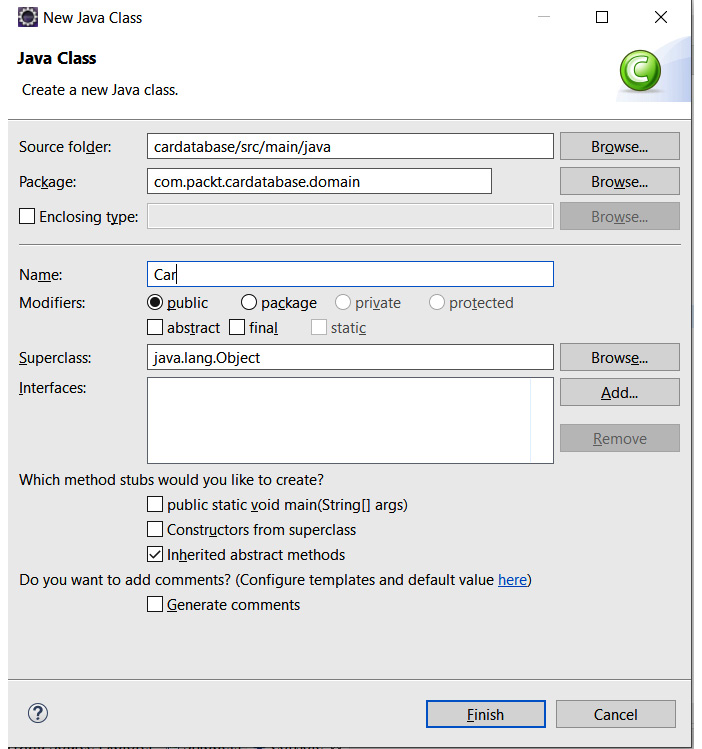
Figure 3.3 – New Java Class
- Open the Car class file in the editor by double-clicking it in the project explorer. First, we must annotate the class with the @Entity annotation. The @Entity annotation is imported from the javax.persistence package:
package com.packt.cardatabase.domain;
import javax.persistence.Entity;
@Entity
public class Car {
}
Tip
You can use the Ctrl + Shift + O shortcut in Eclipse IDE to import missing packages automatically.
Important Note
This book is based on Spring Boot 2 and the upcoming Spring Boot 3 is using Jakarta EE instead of Java EE. Therefore, you need to replace all javax imports with jakarta if you are using Spring Boot 3.
For example, javax.persistence.Entity is replaced with jakarta.persistence.Entity
- Next, we must add some fields to our class. The entity class fields are mapped to database table columns. The entity class must also contain a unique ID that is used as a primary key in the database:
package com.packt.cardatabase.domain;
import javax.persistence.Entity;
import javax.persistence.GeneratedValue;
import javax.persistence.GenerationType;
import javax.persistence.Id;
@Entity
public class Car {
@Id
@GeneratedValue(strategy=GenerationType.AUTO)
private long id;
private String brand, model, color,
registerNumber;
private int year, price;
}
Tip
You can use the Ctrl + Shift + O shortcut in the Eclipse IDE to import missing packages automatically.
The primary key is defined by using the @Id annotation. The @GeneratedValue annotation defines that the ID is automatically generated by the database. We can also define our key generation strategy; the AUTO type means that the JPA provider selects the best strategy for a particular database and that it is also the default generation type. As well as this, you can create a composite primary key by annotating multiple attributes with the @Id annotation.
The database columns are named according to class field naming conventions by default. If you want to use some other naming convention, you can use the @Column annotation. With the @Column annotation, you can define the column's length and whether the column is nullable. The following code shows an example of using the @Column annotation. With this definition, the column's name in the database is explanation, the length of the column is 512, and it is not nullable:
@Column(name="explanation", nullable=false, length=512)
private String description
- Finally, we must add getters, setters, and constructors with attributes to the entity class. We don't need an ID field in our constructor due to automatic ID generation. The source code of the Car entity class constructors is as follows:
Tip
Eclipse provides the automatic addition of getters, setters, and constructors. Activate your cursor inside the class and right-click. From the menu, select Source | Generate Getters and Setters... or Source | Generate Constructor using fields....
package com.packt.cardatabase.domain;
import javax.persistence.Entity;
import javax.persistence.GeneratedValue;
import javax.persistence.GenerationType;
import javax.persistence.Id;
@Entity
public class Car {
@Id
@GeneratedValue(strategy=GenerationType.AUTO)
private long id;
private String brand, model, color,
registerNumber;
private int year, price;
public Car() {}
public Car(String brand, String model, String
color,
String registerNumber, int year, int
price) {
super();
this.brand = brand;
this.model = model;
this.color = color;
this.registerNumber = registerNumber;
this.year = year;
this.price = price;
}
The following is the source code for the Car entity class's getters and setters:
public long getId() {
return id;
}
public void setId(long id) {
this.id = id;
}
public String getBrand() {
return brand;
}
public void setBrand(String brand) {
this.brand = brand;
}
public String getModel() {
return model;
}
public void setModel(String model) {
this.model = model;
}
// Rest of the setters and getters. See the whole source code from GitHub
- We also have to add new properties to the application.properties file. This allows us to log the SQL statements to the console. Since Spring Boot version 2.3.0, we also have to define the data source URL. Open the application.properties file and add the following two lines to the file:
spring.datasource.url=jdbc:h2:mem:testdb
spring.jpa.show-sql=true
Important Note
When you are editing the application.properties file, you have to make sure that there are no extra spaces at the end of the lines. Otherwise, the settings won't work. This might happen often when you copy/paste settings.
- Now, the car table is created in the database when we run the application. At this point, we can see the table creation statements in the console when running the application:

Figure 3.4 – Car table SQL statements
Important Note
If spring.datasource.url is not defined in the application.properties file, Spring Boot creates a random data source URL that can be seen in the console when you run the application; for example, H2 console available at '/h2-console'. Database available at 'jdbc:h2:mem:b92ad05e-8af4-4c33-b22d-ccbf9ffe491e'.
- The H2 database provides a web-based console that can be used to explore a database and execute SQL statements. To enable the console, we have to add the following lines to the application.properties file. The first setting enables the H2 console, while the second defines the path of the H2 console:
spring.h2.console.enabled=true
spring.h2.console.path=/h2-console
- You can access the H2 console by navigating to localhost:8080/h2-console using your web browser. Use jdbc:h2:mem:testdb as JDBC URL and leave the Password field empty in the Login window. Press the Connect button to log into the console, as shown in the following screenshot:
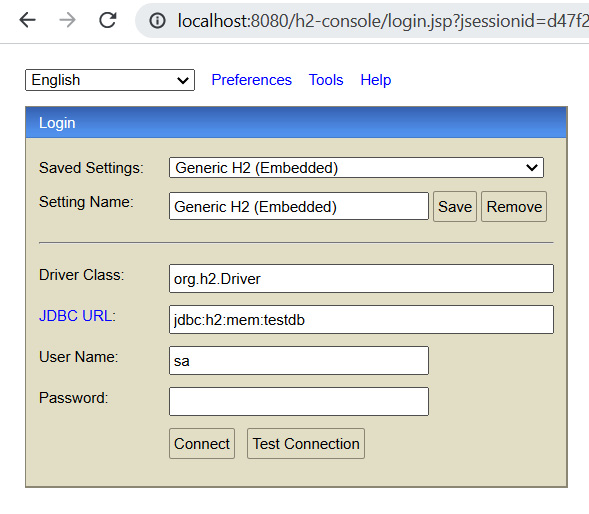
Figure 3.5 – H2 console login
Tip
You can also change the H2 database username and password by using the following settings in the application.properties file: spring.datasource.username and spring.datasource.password.
Now, you can see our CAR table in the database. You may notice that the register number has an underscore between the words. The reason for the underscore is the camel case naming of the attribute (registerNumber):
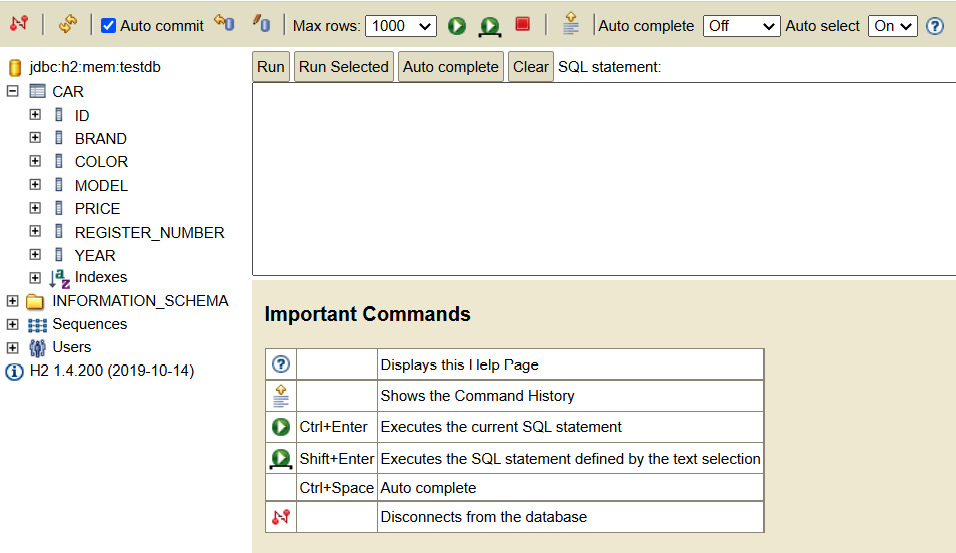
Figure 3.6 – H2 console
With that, we have created our first entity class and learned how JPA generates a database table from the entity class. Next, we will create a repository class that provides CRUD operations.
Creating CRUD repositories
The Spring Boot Data JPA provides a CrudRepository interface for Create, Read, Update, and Delete (CRUD) operations. It provides CRUD functionalities to our entity class.
Let's create our repository in the domain package, as follows:
- Create a new class called CarRepository in the com.packt.cardatabase.domain package and modify the file according to the following code snippet:
package com.packt.cardatabase.domain;
import org.springframework.data.repository
.CrudRepository;
public interface CarRepository extends CrudRepository<Car, Long> {
}
CarRepository now extends the Spring Boot JPA CrudRepository interface. The <Car, Long> type arguments define that this is the repository for the Car entity class and that the type of the ID field is Long.
The CrudRepository interface provides multiple CRUD methods that we can now start to use. The following table lists the most commonly used methods:
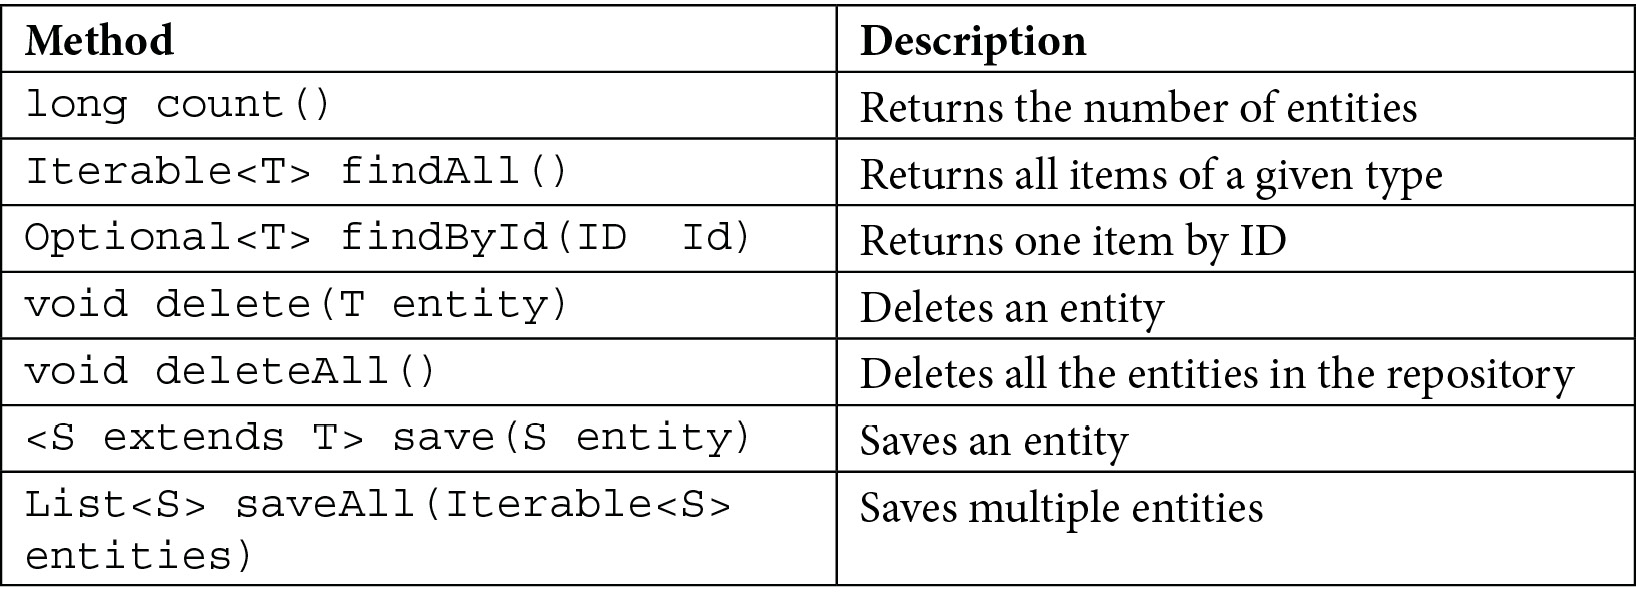
Figure 3.7 – CRUD methods
If the method returns only one item, Optional<T> is returned instead of T. The Optional class was introduced in Java 8 SE and is a type of single-value container that either contains a value or doesn't. If there is value, the isPresent() method returns true; otherwise, it returns false. If there is a value, you can get it by using the get() method. By using Optional, we can prevent null pointer exceptions.
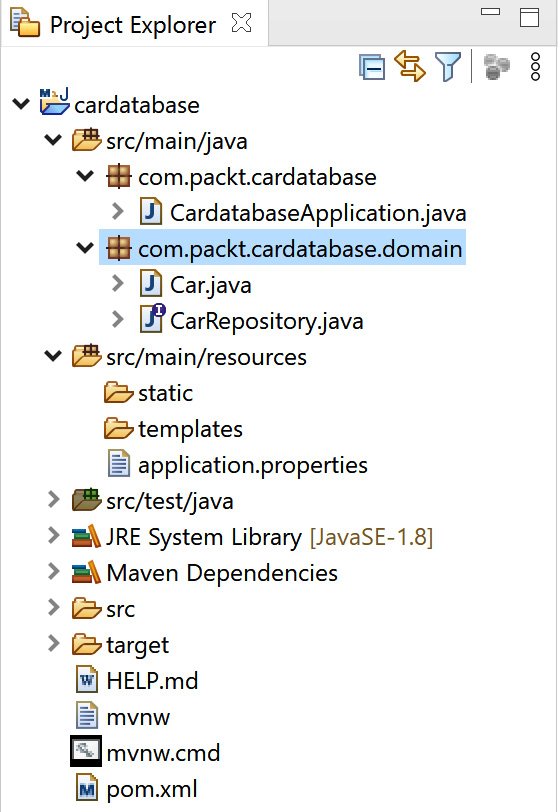
Figure 3.8 – Project structure
- Now, we are ready to add some demonstration data to our H2 database. For that, we will use the Spring Boot CommandLineRunner interface. The CommandLineRunner interface allows us to execute additional code before the application has fully started. Therefore, it is a good point to add demo data to your database. Your Spring Boot application's main class implements the CommandLineRunner interface. Therefore, we should implement the run method, as shown in the following CardatabaseApplication.java code:
package com.packt.cardatabase;
import org.springframework.boot.CommandLineRunner;
import org.springframework.boot.SpringApplication;
import org.springframework.boot.autoconfigure.
SpringBootApplication;
@SpringBootApplication
public class CardatabaseApplication implements CommandLineRunner {
public static void main(String[] args) {
SpringApplication.run
(CardatabaseApplication.class, args);
}
@Override
public void run(String... args) throws Exception {
// Place your code here
}
}
- Next, we have to inject our car repository into the main class to be able to save new car objects to the database. An @Autowired annotation is used to enable dependency injection. This allows us to pass dependencies into an object. We will also add a logger to our main class:
package com.packt.cardatabase;
import org.slf4j.Logger;
import org.slf4j.LoggerFactory;
import org.springframework.beans.factory.annotation
.Autowired;
import org.springframework.boot.CommandLineRunner;
import org.springframework.boot.SpringApplication;
import org.springframework.boot.autoconfigure.
SpringBootApplication;
import com.packt.cardatabase.domain.Car;
import com.packt.cardatabase.domain.CarRepository;
@SpringBootApplication
public class CardatabaseApplication implements CommandLineRunner {
private static final Logger logger =
LoggerFactory.getLogger(CardatabaseAp
plication.class);
@Autowired
private CarRepository repository;
public static void main(String[] args) {
SpringApplication.run
(CardatabaseApplication.class, args);
}
@Override
public void run(String... args) throws Exception {
// Place your code here
}
}
- Once we have injected the repository class, we can use the CRUD methods it provides in the run method. The following sample code shows how to insert a few cars into the database using the save method. We will also use the repository's findAll() method to fetch all the cars from the database and print them to the console using the logger:
// CardataseApplication.java run method
@Override
public void run(String... args) throws Exception {
repository.save(new Car(“Ford", “Mustang", “Red",
“ADF-1121", 2021, 59000));
repository.save(new Car(“Nissan", “Leaf", “White",
“SSJ-3002", 2019, 29000));
repository.save(new Car(“Toyota", “Prius",
“Silver",
“KKO-0212", 2020, 39000));
// Fetch all cars and log to console
for (Car car : repository.findAll()) {
logger.info(car.getBrand() + “ “ + car
.getModel());
}
}
The insert statements and cars we logged can be seen in the Eclipse console once the application has been executed:
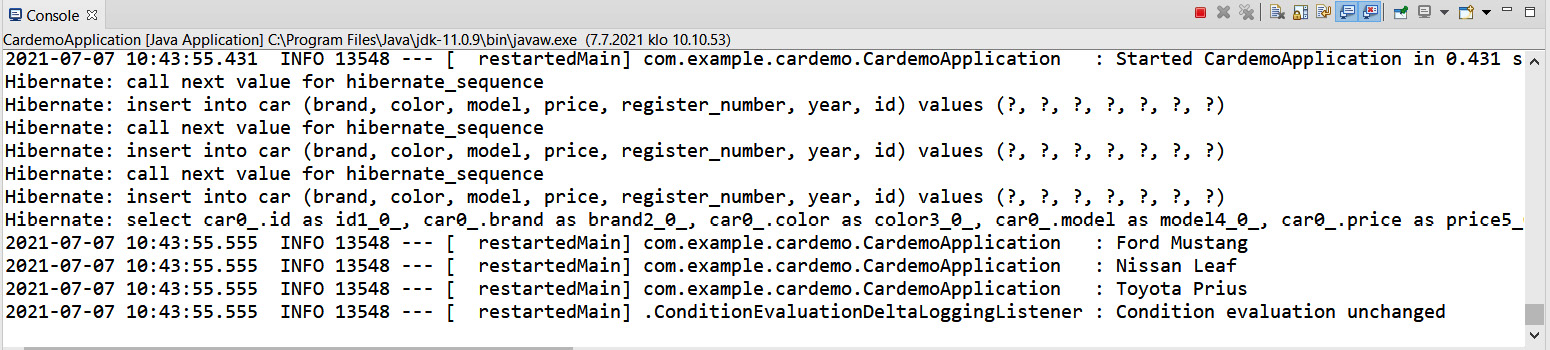
Figure 3.9 – Insert statements
You can now use the H2 console to fetch cars from the database, as shown in the following screenshot:
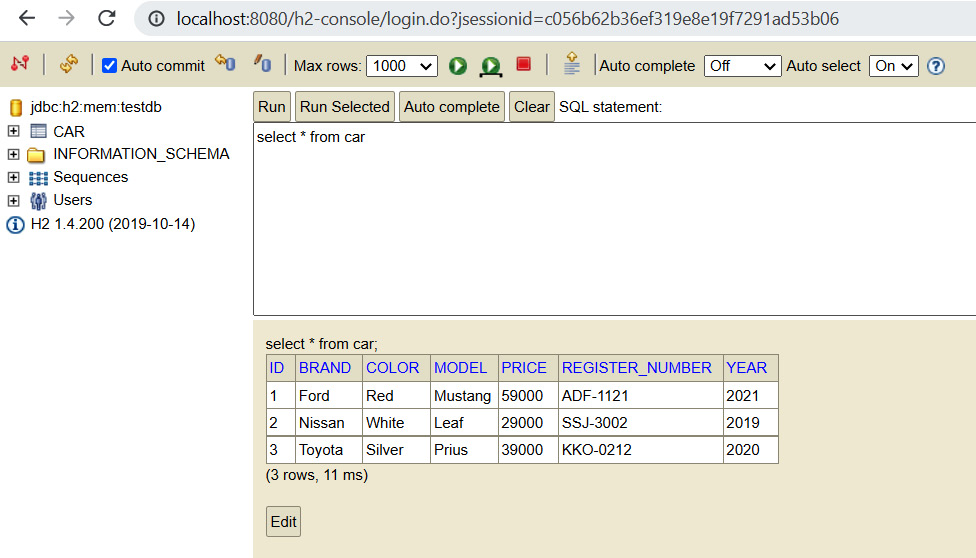
Figure 3.10 – H2 console – Select cars
- You can define your queries in the Spring Data repositories. The query must start with a prefix; for example, findBy. After the prefix, you must define the entity class fields that are used in the query. The following is some sample code for three simple queries:
package com.packt.cardatabase.domain;
import java.util.List;
import org.springframework.data.repository.
CrudRepository;
public interface CarRepository extends CrudRepository
<Car, Long> {
// Fetch cars by brand
List<Car> findByBrand(String brand);
// Fetch cars by color
List<Car> findByColor(String color);
// Fetch cars by year
List<Car> findByYear(int year);
}
There can be multiple fields after the By keyword, concatenated with the And and or keywords:
package com.packt.cardatabase.domain;
import java.util.List;
import org.springframework.data.repository.
CrudRepository;
public interface CarRepository extends CrudRepository
<Car, Long> {
// Fetch cars by brand and model
List<Car> findByBrandAndModel(String brand, String
model);
// Fetch cars by brand or color
List<Car> findByBrandOrColor(String brand, String
color);
}
Queries can be sorted by using the OrderBy keyword in the query method:
package com.packt.cardatabase.domain;
import java.util.List;
import org.springframework.data.repository.
CrudRepository;
public interface CarRepository extends CrudRepository
<Car, Long> {
// Fetch cars by brand and sort by year
List<Car> findByBrandOrderByYearAsc(String brand);
}
- You can also create queries by using SQL statements via the @Query annotation. The following example shows the usage of a SQL query in CrudRepository:
package com.packt.cardatabase.domain;
import java.util.List;
import org.springframework.data.jpa.repository.Query;
import org.springframework.data.repository.
CrudRepository;
public interface CarRepository extends CrudRepository
<Car, Long> {
// Fetch cars by brand using SQL
@Query(“select c from Car c where c.brand = ?1")
List<Car> findByBrand(String brand);
}
With the @Query annotation, you can use more advanced expressions, such as like. The following example shows the usage of the like query in CrudRepository:
package com.packt.cardatabase.domain;
import java.util.List;
import org.springframework.data.jpa.repository.Query;
import org.springframework.data.repository.CrudRepository;
public interface CarRepository extends CrudRepository
<Car, Long> {
// Fetch cars by brand using SQL
@Query(“select c from Car c where c.brand like
%?1")
List<Car> findByBrandEndsWith(String brand);
}
Spring Data JPA also provides PagingAndSortingRepository, which extends CrudRepository. This offers methods to fetch entities using pagination and sorting. This is a good option if you are dealing with larger amounts of data because you don't have to return everything from a large result set. You can also sort your data into some meaningful order. PagingAndSortingRepository can be created in a similar way to how we created CrudRepository:
package com.packt.cardatabase.domain;
import org.springframework.data.repository.
PagingAndSortingRepository;
public interface CarRepository extends
PagingAndSortingRepository <Car, Long> {
}
In this case, you now have the two new additional methods that the repository provides:

Figure 3.11 – PagingAndSortingRepository methods
At this point, we have completed our first database table and we are ready to add relationships between the database tables.
Adding relationships between tables
Next, we create a new table called owner that has a one-to-many relationship with the car table. In this case, a one-to-many relationship means that the owner can own multiple cars, but a car can only have one owner. The following Unified Modeling Language (UML) diagram shows the relationship between the tables:

Figure 3.12 – OneToMany relationship
The following are the steps to create a new table:
- First, we must create the Owner entity and repository in the com.packt.cardatabase.domain package. The Owner entity and repository are created in a similar way to the Car class.
The following is the source code of the Owner entity class:
// Owner.java
package com.packt.cardatabase.domain;
import javax.persistence.Entity;
import javax.persistence.GeneratedValue;
import javax.persistence.GenerationType;
import javax.persistence.Id;
@Entity
public class Owner {
@Id
@GeneratedValue(strategy=GenerationType.AUTO)
private long ownerid;
private String firstname, lastname;
public Owner() {}
public Owner(String firstname, String lastname) {
super();
this.firstname = firstname;
this.lastname = lastname;
}
public long getOwnerid() {
return ownerid;
}
public void setOwnerid(long ownerid) {
this.ownerid = ownerid;
}
public String getFirstname() {
return firstname;
}
public void setFirstname(String firstname) {
this.firstname = firstname;
}
public String getLastname() {
return lastname;
}
public void setLastname(String lastname) {
this.lastname = lastname;
}
}
The following is the source code for OwnerRepository:
// OwnerRepository.java
package com.packt.cardatabase.domain;
import org.springframework.data.repository.
CrudRepository;
public interface OwnerRepository extends
CrudRepository<Owner, Long> {
}
- Now is a good time to check that everything is working. Run the project and check that both database tables have been created and that there are no errors in the console. The following screenshot shows the console messages when the tables are created:

Figure 3.13 – The car and owner tables
Now, our domain package contains two entity classes and repositories:

Figure 3.14 – Project Explorer
- The one-to-many relationship can be added by using the @ManyToOne and @OneToMany annotations. In the car entity class, which contains a foreign key, you must define the relationship with the @ManyToOne annotation. You should also add the getter and setter for the owner field. It is recommended that you use FetchType.LAZY for all associations. For the toMany relationships, that is the default value, but for the toOne relationships, you should define it. FetchType defines the strategy for fetching data from the database. The value can be either EAGER or LAZY. In our case, the lazy strategy means that when the owner is fetched from the database, all the cars associated with the owner will be fetched when needed. Eager means that the cars will be fetched immediately by the owner. The following source code shows how to define a one-to-many relationship in the Car class:
// Car.java
@ManyToOne(fetch=FetchType.LAZY)
@JoinColumn(name="owner")
private Owner owner;
//Getter and setter
public Owner getOwner() {
return owner;
}
public void setOwner(Owner owner) {
this.owner = owner;
}
- In the owner entity site, the relationship is defined with the @OneToMany annotation. The type of field is List<Car> because the owner may have multiple cars. Now, you can add the getter and setter for this, as follows:
// Owner.java
@OneToMany(cascade=CascadeType.ALL, mappedBy="owner")
private List<Car> cars;
public List<Car> getCars() {
return cars;
}
public void setCars(List<Car> cars) {
this.cars = cars;
}
The @OneToMany annotation has two attributes that we are using. The cascade attribute defines how cascading affects the entities in the case of deletions or updates. The ALL attribute setting means that all operations are cascaded. For example, if the owner is deleted, the cars that are linked to that owner are deleted as well. The mappedBy="owner" attribute setting tells us that the Car class has the owner field, which is the foreign key for this relationship.
When you run the project, by looking in the console, you will see that the relationship has been created:

Figure 3.15 – Console
- Now, we can add some owners to the database with CommandLineRunner. Let's also modify the Car entity class constructor and add an owner object there:
// Car.java constructor
public Car(String brand, String model, String color,
String registerNumber, int year, int price, Owner
owner) {
super();
this.brand = brand;
this.model = model;
this.color = color;
this.registerNumber = registerNumber;
this.year = year;
this.price = price;
this.owner = owner;
}
- First, we will create two owner objects and save these to the database using the repository's saveAll method, which we can use to save multiple entities at once. To save the owners, we have to inject OwnerRepository into the main class. Then, we must connect the owners to the cars by using the Car constructor. First, let's modify the CardatabaseApplication class by adding the following imports:
// CardatabaseApplication.java
import com.packt.cardatabase.domain.Owner;
import com.packt.cardatabase.domain.OwnerRepository;
Now, let's inject OwnerRepository into the CardatabaseApplication class:
@Autowired
private OwnerRepository orepository;
At this point, we must modify the run method to save owners and link owners and cars:
@Override
public void run(String... args) throws Exception {
// Add owner objects and save these to db
Owner owner1 = new Owner(“John" , “Johnson");
Owner owner2 = new Owner(“Mary" , “Robinson");
orepository.saveAll(Arrays.asList(owner1,
owner2));
// Add car object and link to owners and save
these to db
Car car1 = new Car(“Ford", “Mustang", “Red",
“ADF-1121", 2021, 59000, owner1);
Car car2 = new Car(“Nissan", “Leaf", “White",
“SSJ-3002", 2019, 29000, owner2);
Car car3 = new Car(“Toyota", “Prius", “Silver",
“KKO-0212", 2020, 39000, owner2);
repository.saveAll(Arrays.asList(car1, car2,
car3));
for (Car car : repository.findAll()) {
logger.info(car.getBrand() + “ “ +
car.getModel());
}
}
Now, if you run the application and fetch cars from the database, you will see that the owners are now linked to the cars:

Figure 3.16 – OneToMany relationship
If you want to create a many-to-many relationship instead, which means, in practice, that an owner can have multiple cars and a car can have multiple owners, you should use the @ManyToMany annotation. In our example application, we will use a one-to-many relationship. The code that you have completed here will be needed in the next chapter.
Next, you will learn how to change the relationship to many-to-many. In a many-to-many relationship, it is recommended that you use Set instead of List with Hibernate:
- In the Car entity class's many-to-many relationship, define the getters and setters in the following way:
// Car.java
@ManyToMany(mappedBy="cars")
private Set<Owner> owners = new HashSet<Owner>();
public Set<Owner> getOwners() {
return owners;
}
public void setOwners(Set<Owner> owners) {
this.owners = owners;
}
- In the Owner entity class, the many-to-many relationship is defined as follows:
// Owner.java
@ManyToMany(cascade=CascadeType.PERSIST)
@JoinTable(name="car_owner",
joinColumns = { @JoinColumn(name="ownerid") },
inverseJoinColumns = { @JoinColumn(name="id") })
private Set<Car> cars = new HashSet<Car>();
public Set<Car> getCars() {
return cars;
}
public void setCars(Set<Car> cars) {
this.cars = cars;
}
- Now, if you run the application, there will be a new join table called car_owner that is created between the car and owner tables. The join table is a special kind of table that manages the many-to-many relationship between two tables. The join table is defined by using the @JoinTable annotation. With this annotation, we can set the name of the join table and join columns. The following screenshot shows the database structure when using a many-to-many relationship:
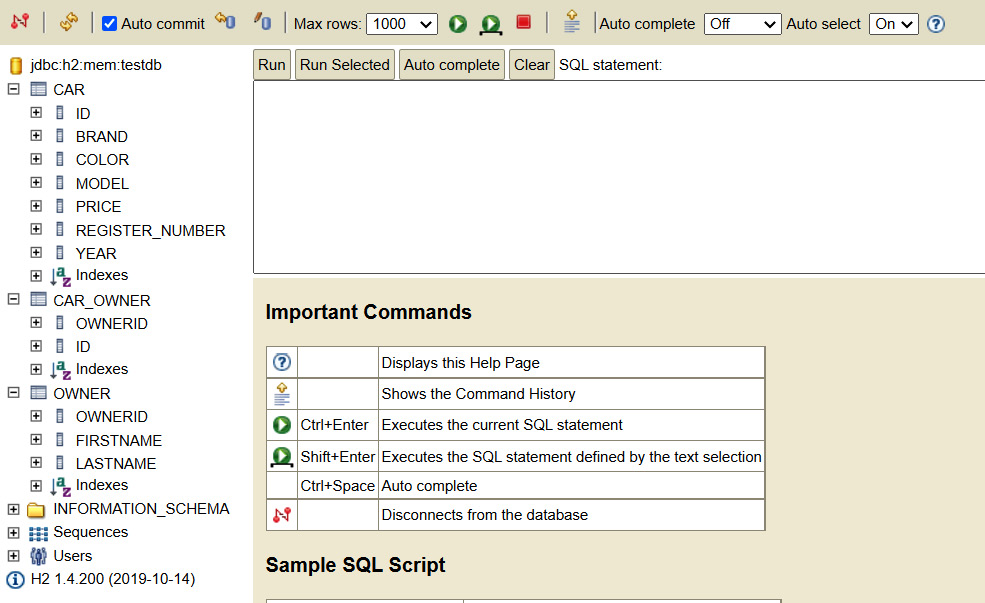
Figure 3.17 – Many-to-many relationship
Now, the database UML diagram looks as follows:
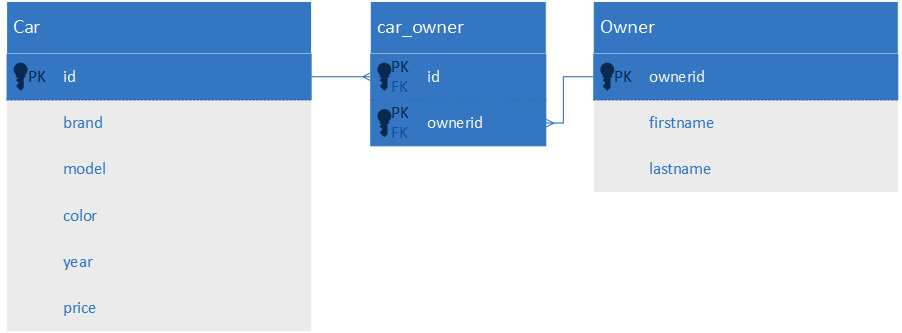
Figure 3.18 – ManyToMany relationship
Now that we have used an in-memory H2 database, we are going to use a MariaDB database instead.
Setting up a MariaDB database
Now, we will switch our database from H2 to MariaDB. The database tables are still created automatically by JPA. However, before we run our application, we have to create a database for it. In this section, we will be using the one-to-many relationship from the previous section.
The database can be created by using HeidiSQL. Open HeidiSQL and follow these steps:
- Right-click inside the database list.
- Then, select Create new | Database:

Figure 3.19 – Create new – Database
- Let's name our database cardb. After clicking OK, you should see the new cardb database in the database list:

Figure 3.20 – The cardb database
- In Spring Boot, add a MariaDB Java client dependency to the pom.xml file and remove the H2 dependency since we don't need it anymore:
<dependency>
<groupId>org.mariadb.jdbc</groupId>
<artifactId>mariadb-java-client</artifactId>
</dependency>
- In the application.properties file, you must define the database connection. First, you must define the database's URL, username, password (defined in Chapter 1,
Setting Up the Environment and Tools – Backend), and database driver class:
spring.datasource.url=jdbc:mariadb://localhost:3306/cardb
spring.datasource.username=root
spring.datasource.password=YOUR_PASSWORD
spring.datasource.driver-class-name=org.mariadb.jdbc.Driver
- The spring.jpa.generate-ddl setting defines whether JPA should initialize the database (true/false). The spring.jpa.hibernate.ddl-auto setting defines the behavior of the database initialization. The possible values are none, validate, update, create, and create-drop. The default value depends on your database. If you are using an embedded database such as H2, the default value is create-drop, otherwise, the default value is none. create-drop means that the database is created when an application starts and it is dropped when the application is stopped. The create value only creates the database when the application is started. The update value creates the database and updates the schema if it has changed:
spring.datasource.url=jdbc:mariadb:
//localhost:3306/cardb
spring.datasource.username=root
spring.datasource.password=YOUR_PASSWORD
spring.datasource.driver-class-name=
org.mariadb.jdbc.Driver
spring.jpa.generate-ddl=true
spring.jpa.hibernate.ddl-auto=create-drop
- Check that the MariaDB database server is running and run your Spring Boot application. After running the application, you should see the tables in MariaDB. You might have to refresh the database tree in HeidiSQL first by pressing the F5 key. The following screenshot shows the HeidiSQL user interface once the database has been created. You can also run SQL queries in HeidiSQL, as shown in the following screenshot:
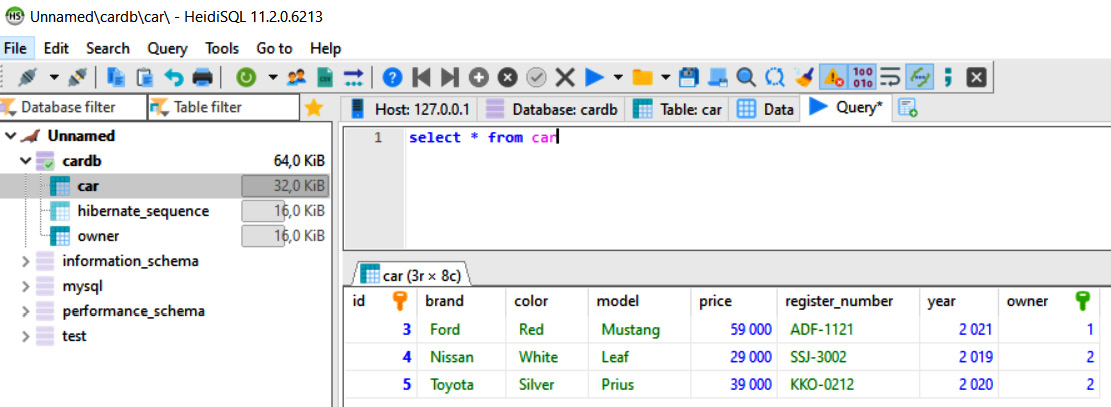
Figure 3.21 – MariaDB cardb
Now, your application is ready to use with MariaDB.
Summary
In this chapter, we used JPA to create our Spring Boot application database. First, we created entity classes, which are mapped to database tables. Then, we created CrudRepository for our entity class, which provides CRUD operations for the entity. After that, we managed to add some demo data to our database by using CommandLineRunner. We also created one-to-many relationships between two entities. At the beginning of this chapter, we used the H2 in-memory database, while at the end, we switched the database to MariaDB.
In the next chapter, we will create a RESTful web service for our backend. We will also look at testing the RESTful web service with the curl command-line tool, and also by using Postman GUI.
Questions
Answer the following questions to test your knowledge of this chapter:
- What are ORM, JPA, and Hibernate?
- How can you create an entity class?
- How can you create CrudRepository?
- What does CrudRepository provide for your application?
- How can you create a one-to-many relationship between tables?
- How can you add demo data to a database with Spring Boot?
- How can you access the H2 console?
- How can you connect your Spring Boot application to MariaDB?
Further reading
Packt has other great resources for Spring Boot:
- Learning Spring Boot 2.0 – Second Edition by Greg L. Turnquist (https://www.packtpub.com/application-development/learning-spring-boot-20-second-edition).
- Master Hibernate and JPA with Spring Boot in 100 steps (https://www.packtpub.com/product/master-hibernate-and-jpa-with-spring-boot-in-100-steps-video/9781788995320).