
Chapter 4: Creating a RESTful Web Service with Spring Boot
In this chapter, we will first create a RESTful web service using the controller class. After that, we will demonstrate how to use Spring Data REST to create a RESTful web service that also provides all CRUD functionalities automatically. After you have created a RESTful API for your application, you can implement the frontend using a JavaScript library such as React. We will be using the database application that we created in the previous chapter as a starting point.
Web services are applications that communicate over the internet using the HTTP protocol. There are many different types of web service architectures, but the principal idea across all designs is the same. In this book, we are creating a RESTful web service from what is nowadays a really popular design.
In this chapter, we will cover the following topics:
- Basics of a RESTful web service
- Creating a RESTful web service with Spring Boot
- Using Spring Data REST
Technical requirements
The Spring Boot application created in the previous chapters is required. Postman, cURL, or another suitable tool for transferring data using various HTTP methods is also necessary.
The following GitHub link will also be required: https://github.com/PacktPublishing/Full-Stack-Development-with-Spring-Boot-and-React/tree/main/Chapter04.
Check out the following video to see the Code in Action: https://bit.ly/3PP2SOn
Basics of REST
Representational State Transfer (REST) is an architectural style for creating web services. REST is not a standard, but it defines a set of constraints defined by Roy Fielding. The six constraints are as follows:
- Stateless: The server doesn't hold any information about the client state.
- Client: The client and server act independently. The server does not send any information without a request from the client.
- Cacheable: Many clients often request the same resources; therefore, it is useful to cache responses in order to improve performance.
- Uniform interface: Requests from different clients look the same. Clients may include, for example, a browser, a Java application, and a mobile application.
- Layered system: REST allows us to use a layered system architecture.
- Code on demand: This is an optional constraint.
The uniform interface is an important constraint, and it means that every REST architecture should have the following elements:
- Identification of resources: There are resources with their unique identifiers, for example, URIs in web-based REST services. REST resources should expose easily understood directory structure URIs. Therefore, a good resource naming strategy is very important.
- Resource manipulation through representation: When making a request to a resource, the server responds with a representation of the resource. Typically, the format of the representation is JSON or XML.
- Self-descriptive messages: Messages should have sufficient information that the server knows how to process them.
- Hypermedia as the Engine of Application State (HATEOAS): Responses can contain links to other areas of service.
The RESTful web service that we are going to develop in the following topics follows the REST architectural principles above.
Creating a RESTful web service
In Spring Boot, all HTTP requests are handled by controller classes. To be able to create a RESTful web service, first, we have to create a controller class. We will create our own Java package for our controller:
- Activate the root package in the Eclipse Project Explorer and right-click. Select New | Package from the menu. We will name our new package com.packt.cardatabase.web:

Figure 4.1 – New Java package
- Next, we will create a new controller class in a new web package. Activate the com.packt.cardatabase.web package in the Eclipse Project Explorer. Right-click and select New | Class from the menu; we will name our class CarController:

Figure 4.2 – New Java class
- Now, your project structure should look like the following screenshot:

Figure 4.3 – Project structure
Important Note
If you create classes in the wrong package accidentally, you can drag and drop the files between packages in the Eclipse Project Explorer. Sometimes, the Eclipse Project Explorer view might not be rendered correctly when you make some changes. Refreshing Project Explorer helps (activate Project Explorer and press F5).
- Open your controller class in the editor window and add the @RestController annotation before the class definition. Refer to the following source code. The @RestController annotation identifies that this class will be the controller for the RESTful web service:
package com.packt.cardatabase.web;
import org.springframework.web.bind.annotation.
RestController;
@RestController
public class CarController {
}
- Next, we add a new method inside our controller class. The method is annotated with the @RequestMapping annotation, which defines the endpoint that the method is mapped to. In the following code snippet, you can see the sample source code. In this example, when a user navigates to the /cars endpoint, the getCars() method is executed:
package com.packt.cardatabase.web;
import org.springframework.web.bind.annotation.
RequestMapping;
import org.springframework.web.bind.annotation.
RestController;
@RestController
public class CarController {
@RequestMapping("/cars")
public Iterable<Car> getCars() {
// Fetch and return cars
}
}
The getCars() method returns all the car objects, which are then marshaled to JSON objects by the Jackson library (https://github.com/FasterXML/jackson).
By default, @RequestMapping handles all the HTTP method (GET, PUT, POST, and so on) requests. You can define which method is accepted using the following @RequestMapping(value="/cars", method=GET) parameter. Now, this method handles only GET requests from the /cars endpoint. You can also use the @GetMapping annotation instead and then only the GET requests are mapped to the getCars() method. There are other annotations for the different HTTP methods, such as @GetMapping, @PostMapping, @DeleteMapping, and so on.
- To be able to return cars from the database, we have to inject CarRepository into the controller. Then, we can use the findAll() method that the repository provides to fetch all cars. Due to the @RestController annotation, the data is now serialized to JSON format in the response. The following source code shows the controller code:
package com.packt.cardatabase.web;
import org.springframework.beans.factory.annotation.
Autowired;
import org.springframework.web.bind.annotation.
RequestMapping;
import org.springframework.web.bind.annotation.
RestController;
import com.packt.cardatabase.domain.Car;
import com.packt.cardatabase.domain.CarRepository;
@RestController
public class CarController {
@Autowired
private CarRepository repository;
@RequestMapping("/cars")
public Iterable<Car> getCars() {
return repository.findAll();
}
}
- Now, we are ready to run our application and navigate to localhost:8080/cars. We can see that there is something wrong, and the application seems to be in an infinite loop. This happens on account of our one-to-many relationship between the car and owner tables. So, what happens in practice? First, the car is serialized, and it contains an owner who is then serialized, and that, in turn, contains cars that are then serialized and so on. To avoid this, we can use different solutions. One way is to use the @JsonIgnore annotation to the cars field in the Owner class, which ignores the cars field in the serialization process. We will also use the @JsonIgnoreProperties annotation to ignore fields that are generated by Hibernate:
// Owner.java
import com.fasterxml.jackson.annotation.JsonIgnore;
import com.fasterxml.jackson.annotation.JsonIgnoreProperties;
@Entity
@JsonIgnoreProperties({"hibernateLazyInitializer",
"handler"})
public class Owner {
@Id
@GeneratedValue(strategy=GenerationType.AUTO)
private long ownerid;
private String firstname, lastname;
public Owner() {}
public Owner(String firstname, String lastname) {
super();
this.firstname = firstname;
this.lastname = lastname;
}
@JsonIgnore
@OneToMany(cascade=CascadeType.ALL, mappedBy=
"owner")
private List<Car> cars;
- Now, when you run the application and navigate to localhost:8080/cars, everything should go as expected and you will get all the cars from the database in JSON format, as shown in the following screenshot:

Figure 4.4 – GET request to http://localhost:8080/cars
Important Note
Your output might differ from the screenshot due to using a different browser. In this book, we are using the Chrome browser and the JSON Viewer extension, which makes JSON output more readable. JSON Viewer can be downloaded from the Chrome Web Store for free.
We have written our first RESTful web service, which returns all the cars. Spring Boot provides a much more powerful way of creating RESTful web services and we go through this in the next topic.
Using Spring Data REST
Spring Data REST (https://spring.io/projects/spring-data-rest) is part of the Spring Data project. It offers an easy and fast way to implement RESTful web services with Spring. To start using Spring Data REST, you have to add the following dependency to the pom.xml file:
<dependency>
<groupId>org.springframework.boot</groupId>
<artifactId>spring-boot-starter-data-rest</artifactId>
</dependency>
By default, Spring Data REST finds all public repositories from the application and creates RESTful web services for your entities automatically. In our case, we have two repositories: CarRepository and OwnerRepository, therefore Spring Data REST creates RESTful web services automatically for those repositories.
You can define the endpoint of service in your application.properties file as follows:
spring.data.rest.basePath=/api
Now, you can access the RESTful web service from the localhost:8080/api endpoint. By calling the root endpoint of the service, it returns the resources that are available. Spring Data REST returns JSON data in the Hypertext Application Language (HAL) format. The HAL format provides a set of conventions for expressing hyperlinks in JSON and it makes your RESTful web service easier to use for frontend developers:
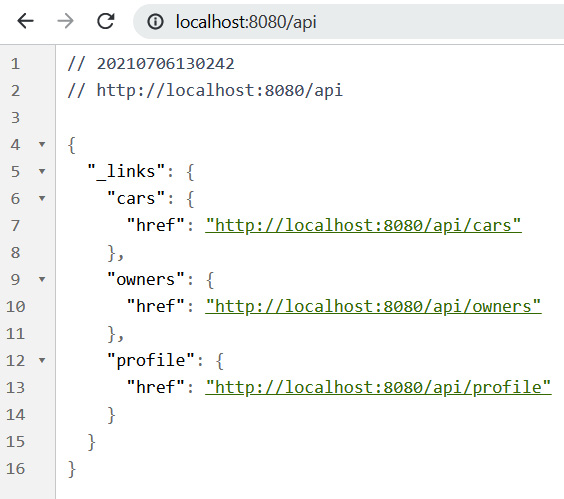
Figure 4.5 – Spring Boot Data REST resources
We can see that there are links to the car and owner entity services. The Spring Data REST service path name is derived from the entity class name. The name will then be pluralized and uncapitalized. For example, the entity Car service path name will be cars. The profile link is generated by Spring Data REST and contains application-specific metadata. If you want to use different path naming, you can use the @RepositoryRestResouce annotation in your repository class as shown in the next example:
package com.packt.cardatabase.domain;
import org.springframework.data.repository.CrudRepository;
import org.springframework.data.rest.core.annotation.
RepositoryRestResource;
@RepositoryRestResource(path="vehicles")
public interface CarRepository extends CrudRepository<Car,
Long> {
}
Now, if you call the endpoint localhost:8080/api, you can see that endpoint is changed from /cars to /vehicles.
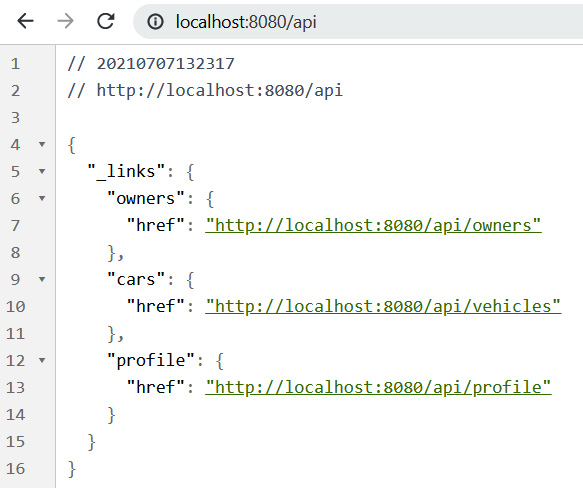
Figure 4.6 – Spring Boot Data REST resources
You can remove the different naming and we will continue with the default endpoint name, /cars.
Now, we'll start to examine different services more carefully. There are multiple tools available for testing and consuming RESTful web services. In this book, we are using the Postman (https://www.postman.com/downloads/) desktop app, but you can use tools that you are familiar with, such as cURL. Postman can be acquired as a desktop application or as a browser plugin. cURL is also available for Windows 10 by using Windows Ubuntu Bash.
If you make a request to the /cars endpoint, http://localhost:8080/api/cars, using the GET method (note, you can use a web browser for GET requests), you will get a list of all the cars, as shown in the following screenshot:

Figure 4.7 – Fetch cars
In the JSON response, you can see that there is an array of cars, and each car contains car-specific data. All the cars also have the _links attribute, which is a collection of links, and with these links, you can access the car itself or get the owner of the car. To access one specific car, the path will be http://localhost:8080/api/cars/{id}.
The GET request to http://localhost:8080/api/cars/3/owner returns the owner of the car with id 3. The response now contains owner data, a link to the owner, and links to other cars of the owner:

Figure 4.8 – Car owner
The Spring Data REST service provides all CRUD operations. The following table shows which HTTP methods you can use for different CRUD operations:

Figure 4.9 – Spring Data REST operations
Next, we will look at how to delete a car from the database by using our RESTful web service. In a delete operation, you have to use the DELETE method and the link to the car that will be deleted (http://localhost:8080/api/cars/{id}).
The following screenshot shows how you can delete one car with id 3 by using the Postman desktop app (note, you have to check some car id from your database and use that instead). In Postman, you have to select the correct HTTP method from the drop-down list, enter the request URL, and then click the Send button:
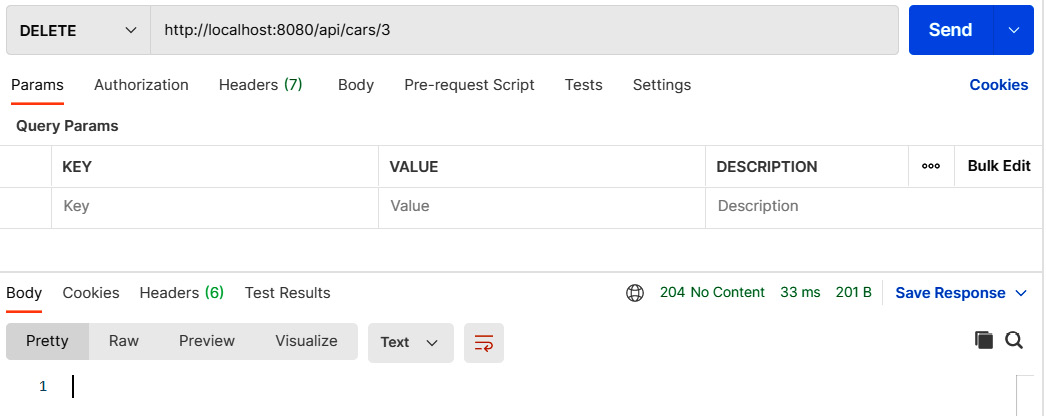
Figure 4.10 – DELETE request to delete car
If everything went correctly, you will see the response status 204 No Content in Postman. After the successful delete request, you will also see that there are now two cars left in the database if you make a GET request to the http://localhost:8080/api/cars/ endpoint. If you got the 404 Not Found status in the response, check that you are using a car ID that exists in the database.
When we want to add a new car to the database, we have to use the POST method, and the request URL is http://localhost:8080/api/cars. The header must contain the Content-Type field with the value application/json, and the new car object will be embedded in the request body in JSON format. Here is one car example:
{
"brand":"Toyota",
"model":"Corolla",
"color":"silver",
"registerNumber":"BBA-3122",
"year":2021,
"price":32000
}
If you click the Body tab and select raw in Postman, you can type a new car JSON string to the Body tab as shown in the following screenshot:
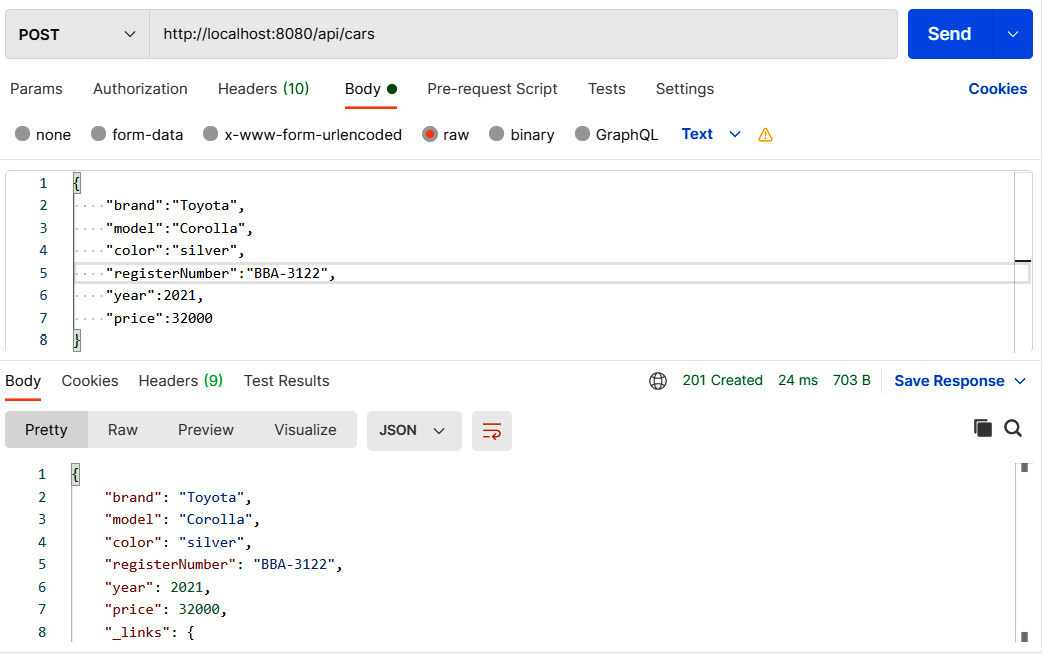
Figure 4.11 – POST request to add a new car
You also have to set a header by clicking the Headers tab in Postman, as shown in the following screenshot:
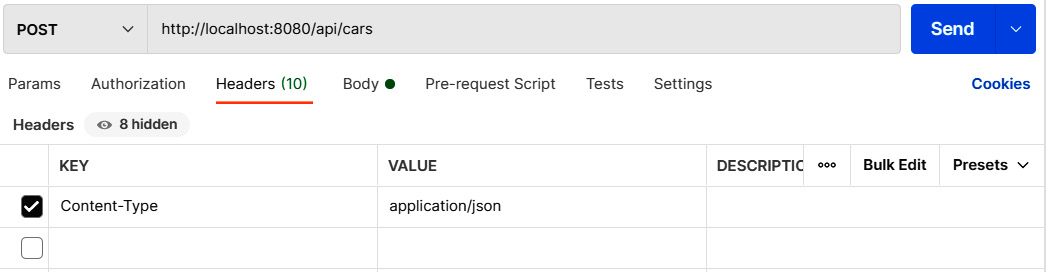
Figure 4.12 – POST request headers
The response will send a newly created car object back and the status of the response will be 201 Created if everything went correctly. Now, if you again make a GET request to the http://localhost:8080/api/cars path, you will see that the new car exists in the database:

Figure 4.13 – New car added
To update entities, we can use the PATCH method and the link to the car that we want to update (http://localhost:8080/api/cars/{id}). The header must contain the Content-Type field with the value application/json, and the car object with edited data will be given inside the request body. If you are using PATCH, you have to send only fields that are updated. If you are using PUT, you have to include all fields in the request body.
Let's edit the car that we created in the previous example, and we will change the color to white. The Postman request is shown in the following screenshot (note, we set the header as in the POST example and use the car id in the URL):
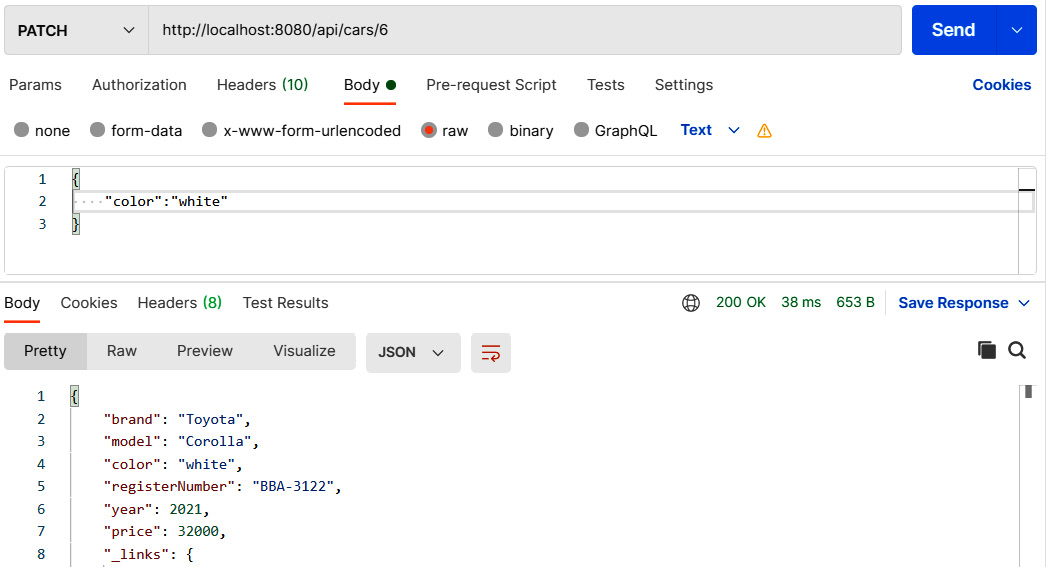
Figure 4.14 – PATCH request to update existing car
If update succeeded, the response status is 200 OK. If you now fetch the updated car by using the GET request, you will see that the color is updated.

Figure 4.15 – Updated car
Next, we will add an owner to the new car that we just created. We can use the PUT method and the http://localhost:8080/api/cars/{id}/owner path. In this example, the ID of the new car is 6, therefore the link is http://localhost:8080/api/cars/6/owner. The content of the body is now linked to an owner, for example, http://localhost:8080/api/owners/1.
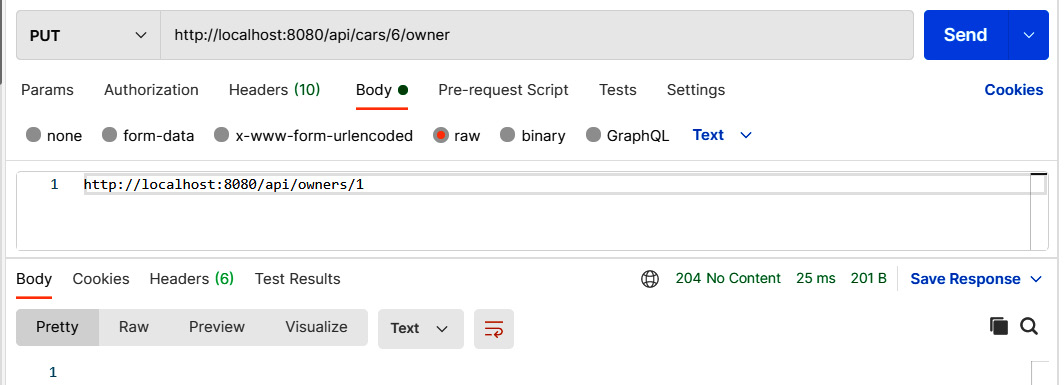
Figure 4.16 – PUT request to update owner
The Content-Type value of the headers should be text/uri-list in this case.
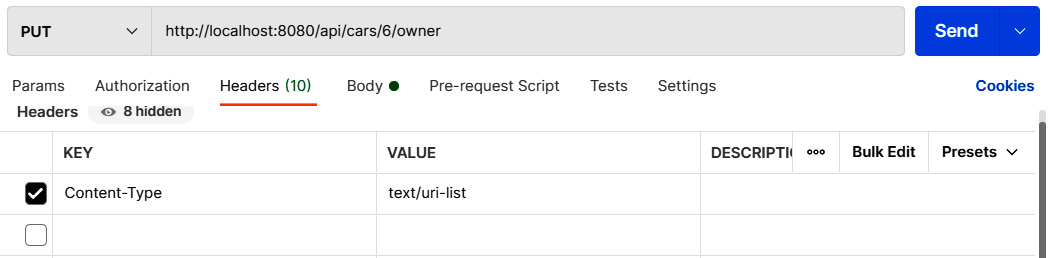
Figure 4.17 – PUT request headers
Finally, you can make a GET request for the car's owner and you should see that now the owner is linked to the car as shown in the following screenshot:
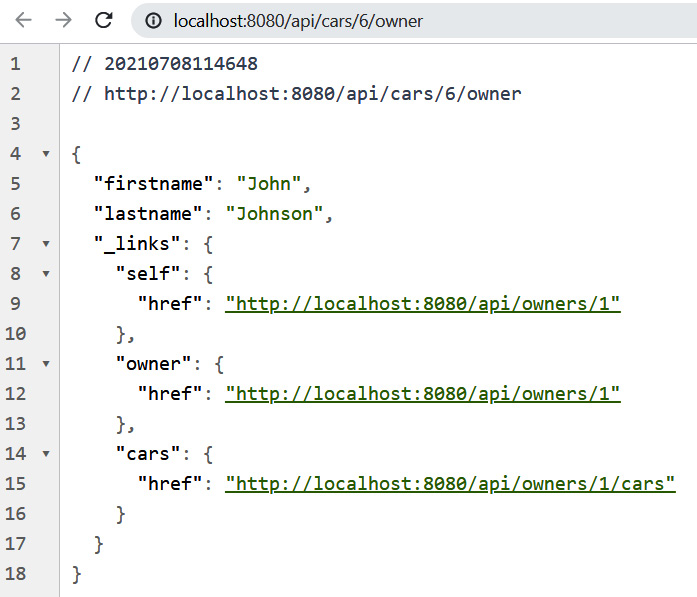
Figure 4.18 – Car owner
In the previous chapter, we created queries to our repository. These queries can also be included in our service. To include queries, you have to add the @RepositoryRestResource annotation to the repository class. Query parameters are annotated with the @Param annotation. The following source code shows CarRepository with these annotations:
package com.packt.cardatabase.domain;
import java.util.List;
import org.springframework.data.repository.CrudRepository;
import org.springframework.data.repository.query.Param;
import org.springframework.data.rest.core.annotation.
RepositoryRestResource;
@RepositoryRestResource
public interface CarRepository extends CrudRepository<Car,
Long> {
// Fetch cars by brand
List<Car> findByBrand(@Param("brand") String brand);
// Fetch cars by color
List<Car> findByColor(@Param("color") String color);
}
Now, when you make a GET request to the http://localhost:8080/api/cars path, you can see that there is a new endpoint called /search. Calling the http://localhost:8080/api/cars/search path returns the following response:
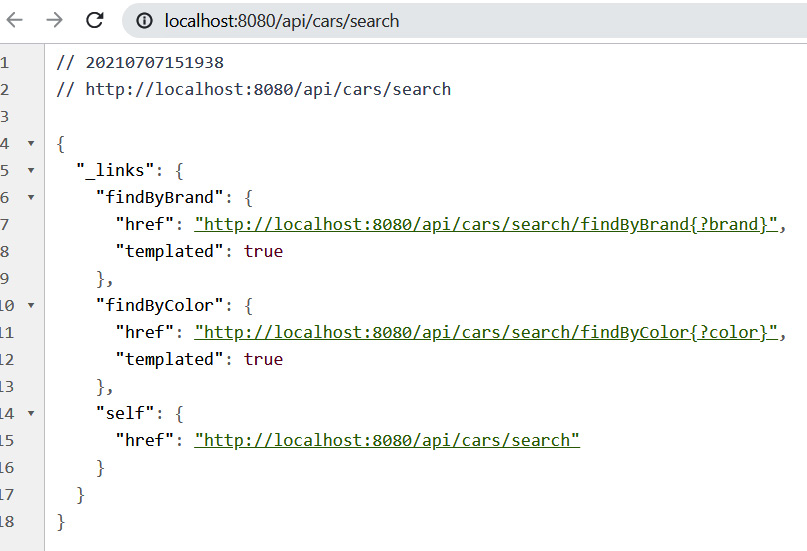
Figure 4.19 – REST queries
From the response, you can see that both queries are now available in our service. The following URL demonstrates how to fetch cars by brand: http://localhost:8080/api/cars/search/findByBrand?brand=Ford.
The following screenshot is the output of the preceding URL:
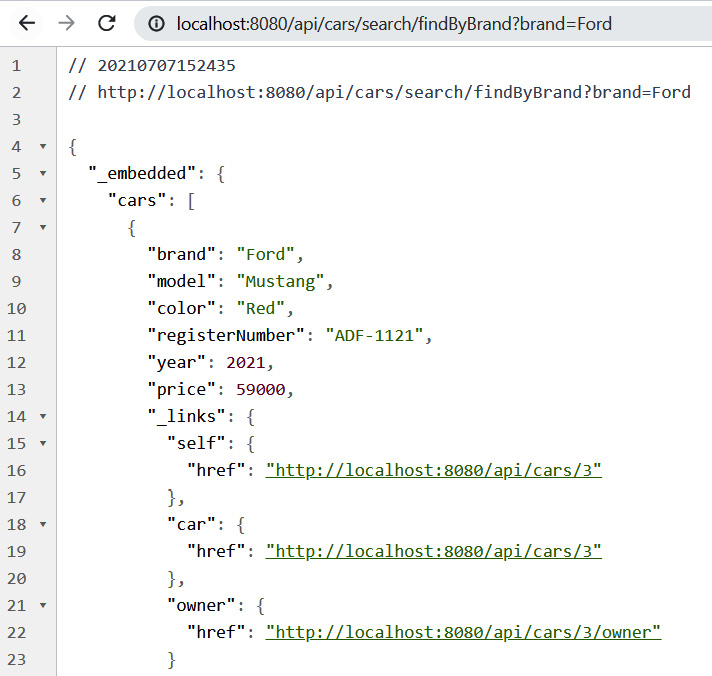
Figure 4.20 – REST query response
We have now created the RESTful API to our backend, and we will consume that later with our React frontend.
Summary
In this chapter, we created a RESTful web service with Spring Boot. First, we created a controller and one method that returns all cars in JSON format. Next, we used Spring Data REST to get a fully functional web service with all CRUD functionalities. We covered different types of requests that are needed to use CRUD functionalities of the service that we created. Finally, we also included our queries to RESTful web service.
In the next chapter, we will secure our backend using Spring Security.
Questions
- What is REST?
- How can you create a RESTful web service with Spring Boot?
- How can you fetch items using our RESTful web service?
- How can you delete items using our RESTful web service?
- How can you add items using our RESTful web service?
- How can you update items using our RESTful web service?
- How can you use queries with our RESTful web service?
Further reading
Packt has other great resources available for learning about Spring Boot RESTful web services:
- Learning Spring Boot 2.0 – Second Edition, by Greg L. Turnquist (https://www.packtpub.com/application-development/learning-spring-boot-20-second-edition)
- Building a RESTful Web Service with Spring, by Ludovic Dewailly (https://www.packtpub.com/web-development/building-restful-web-service-spring)
- Modern API Development with Spring and Spring Boot, by Sourabh Sharma (https://www.packtpub.com/product/modern-api-development-with-spring-and-spring-boot)