
6
Building the Frontend of the Application
In the previous chapter, you learned how to build a simple yet complete FastAPI backend – an API for car management with the complete set of CRUD operations and some filtering and pagination. Now, we will create an equally simple frontend with our knowledge of React, JSX, and a couple of Hooks. In this chapter, we will be creating a very bare-bones React frontend for our API. I will start by creating the React app using the create-react-app tool and then set up Tailwind CSS for styling. After that, I will give a very brief introduction to an essential React package, React Router, and I will define the virtual pages that our app will need. Finally, we are going to add the basic functionality and interactivity needed in order to be able to perform CRUD operations on our MongoDB instance, using the FastAPI backend that we created. This application is not going to be very realistic – there will be no security implemented and we will rely only on the backend validation rules from FastAPI. The idea is to showcase the flow of data between MongoDB and the React web page through FastAPI.
In this chapter, we will cover the following topics:
- Sketching the application pages and components
- Setting up Tailwind CSS and React Router 6
- Scaffolding the needed components
- Creating the virtual pages and their functionalities
By the end of the chapter, you will be able to implement simple but essential CRUD operations and you will be able to apply the same logic to any type of data that you might need. Limiting ourselves to just two essential React Hooks is not really an important factor here – you will see that we can achieve the desired functionality and later extend this approach as new requirements are imposed.
Technical requirements
The technical requirements for this chapter are the same as the ones described in Chapter 4, Setting Up a React Workflow: you will need Node.js (version 14 or later) in order to be able to develop your React application. Along with Node.js, you should have Visual Studio Code, which is probably one of the best tools when working with such a broad range of technologies (MongoDB, Python, React, JavaScript, shell).
Besides these installed tools, you should keep FastAPI running in a separate shell in order to be able to connect it to our frontend.
Creating our Frontend with React
With our backend ready and eager to respond to requests, we can now prepare our React environment. First, I want to give you a brief overview of what we are going to build.
With the help of our friend, create-react-app, we will create an app called frontend in our project folder. Then, we will set up Tailwind CSS, our UI library of choice in the same way that we did in the previous chapter, so I will not waste your time repeating the same steps.
I will then give a very brief introduction to React Router, a package that allows us to monitor the URL of our frontend and display different pages accordingly. Finally, I am going to tackle the pages needed for the application that roughly correspond to the path operations: a page for inserting a new car, one for listing and querying them, and one for modifying the price of the car or deleting it. I will make use of the basics that we saw in Chapter 4, Setting Up a React Workflow: create-react-app, Tailwind, some Hooks, and some very simple components. After that, we will be adding basic CRUD functionality to our frontend.
Setting up React and Tailwind
We have already been through this, but just keep in mind that you should be at the root of our project (Ch5) and type the following:
npx create-react-app frontend
After this process has been completed, follow the procedure from Chapter 4, Setting Up a React Workflow, and install and set up Tailwind CSS. The procedure is exactly the same and we should end up with the same starter React project with Tailwind CSS enabled. As denoted in Chapter 4, Setting Up a React Workflow, you can examine the generated page and test it with some simple classes, such as bg-red-500. If everything is working, the page should turn red, and you are ready to continue.
Installing and setting up React Router 6
Now, we need to start thinking about all of the possible pages that our application should have, and this is maybe a moment to take out a notebook or a piece of paper and start doing some drawings. This is a trivial application, so let’s just say that we want these basic “pages” (I put quotes because they’re not really pages – they are routes within the same page):
- A home page, at the route /.
- A cars page for displaying all cars or according to some filter: /cars.
- A new car page, with a form for inserting new cars: /cars/new.
- A single car page, for viewing a single car by ID: /cars/:id – this page will also be responsible for updating prices and deleting cars, as I want to keep things as simple as possible.
Let’s start setting up the router: first, we have to install it. Follow these steps:
- Stop the process if it is still running and type the following:
npm install react-router-dom@6
Now, I do not know if you have already worked with the router, but it used to be installed in the App.jsx component and we enabled routing from there, application-wide. The latest version, 6, instructs us to use the index and, since I really do not want to enter into the intricacies of this powerful React package, I will just show you how to set up a few basic routes and leave you to the excellent documentation online. React Router has evolved a lot since the last versions and version 6 has seen numerous improvements and changes, as well as the ability to handle nested routes differently than in the previous versions. The basic ideas, however, remain the same: the router passes properties (for example, the location) to the components it renders. In the following chapter, we will gradually introduce a couple of other features of the router, but for now, this will suffice.
React Router basically provides us with a set of components and Hooks that allow us to implement declarative routing.
- In the src/index.js file, the document into which React injects all of its magic, import after React on ReactDOM the following packages:
import {BrowserRouter,Routes,Route,
} from "react-router-dom";
- Now comes the tedious part: we should create empty components for each route in our router, so remember the React Visual Studio Code plugin shortcut (hint: rafce) and create a folder inside your source directory. Inside this folder, which I named /pages, I will scaffold the following components: Car, NewCar, and Cars; they all have the same plain structure. This, for instance, is what the Cars component looks like:
const Cars = () => {
return (
<div>Cars</div>
)
}
export default Cars
- Now that we have our components/pages laid out, we can import them all into the index.js file and hook the router up. Edit the src/index.js file:
import React from 'react';
import ReactDOM from 'react-dom/client';
import {
BrowserRouter,
Routes,
Route,
} from "react-router-dom";
import Car from './pages/Car';
import Cars from './pages/Cars';
import NewCar from './pages/NewCar';
import './index.css';
import App from './App';
const root = ReactDOM.createRoot(document.getElementById('root'));
root.render(
<React.StrictMode>
<BrowserRouter>
<Routes>
<Route path="/" element={<App />} />
<Route path="cars" element={<Cars />} />
<Route path="cars/new" element={<NewCar />} />
<Route path="cars/:id" element={<Car />} />
<Route path="about" element={<About />} />
</Routes>
</BrowserRouter>
</React.StrictMode>
);
This is a bit long, I know, but I prefer to show you the whole file so that you can see what is going on. Essentially, every path (/car, /cars, and so on) is wrapped inside a Route component, and they all have an element or component (that we kept in the /pages folder) that will render when their number (route) is called. React Router 6 enables nested routing so that all of our car-related CRUD routes can be laid down in a more elegant way, but I just want to go with the simplest solution for now. If you start the server with npm start and try out a couple of routes manually (navigating to http://localhost:3000/cars, for instance), you should see our boring white components responding to the routes.
Notice that, with this setup of the React Router, App.jsx has lost some significance: it is just a page like all of the others, as the router contents get loaded directly into the index.js file, effectively bypassing the App component – we could have loaded the router into the App.js file instead.
With our virtual pages ready to be coded, we can proceed and create a basic structure for our app – the reusable components and the layout.
Layout and components
Single-page React-based applications may have numerous virtual pages, but the chance is that they will share some, if not the vast majority of, elements: a header with navigation, a footer, and maybe even more. Since we are planning our application and we have correctly identified the header and the footer as reusable components that will be shared across all pages, we need a way to ensure that we do not have to import them into every page. Enter the layout component. It is simply a React component that will wrap the content provided via props and include all the shared components across the app. Without further ado, let’s make a folder called components in the src folder and create generic components called Header.jsx and Footer.jsx. Finally, let’s create a component called Layout.jsx and edit it a bit:
import Header from "./Header";
import Footer from "./Footer";
const Layout = ({children}) => {
  return (
    <div className="flex flex-col h-screen bg-orange-400">
        <Header />
        <div className="flex-1">{children}</div>
        <Footer/>
    </div>
  )
}
export default Layout
Now, in order to be able to use our beautiful orange layout (I am kidding, it’s ugly but it’s visible), we have to wrap our pages (App, Car, Cars, and so on) like the App.js file, for instance:
import Layout from "./components/Layout";
function App() {
  return (
    <Layout>
      <div>
        This is the App
      </div>
    </Layout>
  );
}
export default App;
If you inspect the root page, which displays the App component, you will see that I have made the page a flexbox display, with the content able to grow and fill the page, while the header and footer take up only their own height. Believe it or not, achieving this layout just a decade ago required some fiddling. I will not get into the Tailwind CSS classes, but they are made to be intuitive: flex means display:flex, flex-col translates to flex-direction:column, h-screen means height:100vh, and so on.
More manual labor ahead: you should wrap all the remaining pages in the layout component, so let’s do it… Done? Great! On to some more interesting things.
Let’s just create some navigation in our Header.jsx component first:
import {NavLink} from "react-router-dom";
const Header = () => {
  return (
    <nav className="flex justify-between relative items-center
         font-mono h-16">
       <Link to="/" className="pl-8 text-xl font-bold">Cars
           FARM</Link>
       <div className="pr-8 font-semibold">
           <NavLink className={({ isActive }) =>
              isActive ? "active-link" : "p-4"
            } to="/">Home</NavLink>
           <NavLink className={({ isActive }) =>
              isActive ? "active-link" : "p-4"
            } to="/cars">Cars</NavLink>
           <NavLink className={({ isActive }) =>
              isActive ? "active-link" : "p-4"
            } to="/new">New Car</NavLink>
       </div>
    </nav>
  )
}
export default Header
I strongly encourage you to get acquainted with the Tailwind way of doing things – it looks kind of weird at the beginning, but after a while, you just catch yourself styling apps and web pages through classes incredibly quickly. In the preceding code, Tailwind does everything for us: we have a single nav element and the classes applied make it a flex container, set the direction to row (the default), justify the items between, center them vertically, and apply a height of 4 rem (h-16), while the font-mono class sets the display font to be Monospace. For the links, I used React Router’s components NavLink and Link, which provide navigation to our app. The difference is that NavLink is aware of the current page and is thus able to provide a different class according to the isActive flag.
Finally, the .active-link class is not something provided by Tailwind: I made it up. I then went to my index.css file and edited it in order to apply existing Tailwind classes to my custom active-link class (the text is white, the background is yellowish, and it has some padding and shadow):
@tailwind base;
@tailwind components;
@tailwind utilities;
@layer utilities{
    .active-link{
    @apply bg-yellow-500 p-4 shadow-md text-white
    }
 }
The @apply directive is a handy way to apply multiple Tailwind classes (and respective styles) to an element without polluting the HTML/JSX markup too much.
After having scaffolded our components, we can now add a bit of style, using our Tailwind CSS utility framework. I will not put the code here, but you can find it in the repository and, since Tailwind is really just CSS classes, you should be able to see exactly what each class does.
Creating the pages functionalities
It is finally time for our beautiful React frontend to meet our speedy FastAPI! I am now going to connect our React shell with the API in order to enable the CRUD functionality that is our main (and for now, only) task. I want to begin with the /cars page, which should display all the cars and maybe provide some filters – a dropdown with the most frequent car brands, for example. We will later see how we can leverage MongoDB’s distinct method in order to populate such a field.
We will need a simple card component, and in order to keep things really simple, I will just use image placeholders instead of real pictures of cars. Let’s put our humble knowledge of React Hooks to good use and create a new Cars.jsx component (or page):
import Layout from "../components/Layout"
import Card from "../components/Card"
import {useState, useEffect} from 'react'
const Cars = () => {
    const [cars, setCars] = useState([])
    const [brand, setBrand] = useState('')
    const [isPending, setIsPending] = useState(true)
    useEffect(()=>{
        fetch(`http://localhost:8000/cars?brand=${brand}`)
           .then(response=>response.json())
           .then(json=>setCars(json))
           setIsPending(false)
      },[brand])
This is a chunk of code that shouldn’t present any concern, so let’s take a look at it from top to bottom. First, we import our components – the Layout and the Card component, which will be used to display the individual cars. After that, we import our two Hooks – useState and useEffect. The Cars function uses three state variables: cars, for the array of cars to be displayed (initially an empty array), brand (initially we set it to an empty string), and a flag – isPending. This flag will be set to true while the frontend is fetching the JSON response from our API and will be reverted to false when the data is loaded.
The useEffect function, as we saw in the previous chapter, takes two arguments – a function that will be executed for external effects and an array of dependencies. In our case, the function to be executed is very simple: a simple fetch request to our API, using a single query parameter – the string, initially set to an empty string, thus returning all the cars. We could have added the price range selectors, and I suggest that you try adding them yourself, maybe with two numeric text inputs. The array dependency is simple in this case – we want to run the fetch only when the brand state changes, so that it goes into the array. If you were to implement other filters, this is the place to put them. Notice that I have used the old-school JavaScript promise syntax with then(). We cannot use async/await functions in useEffect, although we can declare them and then call them when needed. Since we are performing a very simple fetch request, this will do the job. Now, what do we do with the selector for the car brands?
The following arrow function is the handler of the brand selector:
    const handleChangeBrand = (event) => {
        setCars([])
        setBrand(event.target.value)
        setIsPending(true)
    }
Again, I have kept the code very simple: this function will be passed as the handler of the brand select input and, when triggered, it will carry out a couple of operations: first, we set the cars array to be empty, then we set the brand to the value of the selected option, and finally, we set the pending flag to true.
Let’s take a look at the return statement of the components, the JSX. I have removed all the numerous Tailwind classes in order to make the file more readable:
return (
    <Layout>
        <h2>Cars - {brand?brand:"all brands"}</h2>
        <div>
        <label htmlFor="cars">Choose a brand: </label>
            <select name="cars" id="cars"
              onChange={handleChangeBrand}>
                <option value="">All cars</option>
                <option value="Fiat">Fiat</option>
                … more options here
            </select>
        </div>
        <div>
            {isPending && <div>
                <h2>Loading cars, brand:{brand}...</h2>
            </div>}
            <div>
                {cars && cars.map(
                    (el)=>{
                        return (<Card key={el._id} car =
                          {el} />)
                    }
                    )}
                </div>
            </div>
    </Layout>
)
The JSX that eventually outputs our /cars page begins with an h2 element that displays the brand of the selected cars if selected. Immediately after that, we are greeted with our brand selector that has our previously defined onChange handler attached. Finally, we have a loading div that is usually represented by a spinner image and that will be visible only while the API is being read – chances are you will not be able to see it on your local machine.
The cars are displayed in standard React cars&&cars.map() fashion: if the cars array is populated, then map over the array and put each car into a card. I will not display the code for the card since it is practically identical to the code from Chapter 4, Setting Up a React Workflow.
The following screenshot shows what our single-page app (SPA) should look like – it is very simple, with a header containing the navigation, the main body, and a simple dark footer.

Figure 6.1 – The Cars FARM application displaying cars
The page will not win any awards, but it does what it was supposed to do – it displays cars from our FastAPI service, and it even has some filtering capabilities!
Let’s tackle the creation part of CRUD, the page that we assigned the /new route in the React Router setting. I want to point out that in a real-world setting, you probably wouldn’t want to create the following page the same way that I did. I want, however, to display some basic React features and how the communication with the FastAPI server can be as transparent as possible. Let’s break the code down – first, we are going to need a form input component. Again, in a real setting, you will probably want to use something like Formik or the React Form Hook, but I just want to show how React enables us to deal with the data flow in a much easier way compared to vanilla JavaScript or older solutions such as jQuery.
The form helper component will really have a simple task: it just needs to display a form element, set its type (numeric or text in our case), the label, name, and an onChange event handler:
const FormInput = (props) => {
    const { label, placeholder, type, onChange, name } = props
    return (
      <div>
          <label>{label}</label>
          <input
              placeholder={placeholder}
              type={type}
              name={name}
              onChange={onChange}
               />
      </div>
    )
  }
  export default FormInput
I have omitted the Tailwind classes again in order to preserve some space. The input field takes a total of five props and the component structure is very simple.
Now, on to the NewCar.js component. First, I want to import our Hooks, the Layout component and the FormInput component:
import {useState} from 'react'
import {useNavigate} from "react-router-dom"
import Layout from "../components/Layout"
import FormInput from '../components/FormInput';
After the usual imports, we have a newcomer – useNavigate from the React Router – which is simply a function that will allow me to programmatically navigate to another React page. Alongside our Layout component that wraps every single page, I imported the FormInput component. The logic here is simple – we abstracted the form input because we want to be able to reuse it, so we can fit all the inputs into an array. Bear in mind that here we are playing with only five car features, while most car sales sites have at least 30 or even 50!
At the beginning of the NewCar arrow function component, I want to initialize an empty car object and then gradually populate it with the form. I defined an object at the beginning – the emptyCar, which is basically a car object with all of its features set to empty or null. This object will be used to initialize our state variable, which I called newCar – the car that, if everything goes according to plan, will have the honor of being inserted in our MongoDB:
const NewCar = () => {
    const emptyCar = {
        "brand":"",
        "make":"",
        "year":null,
        "cm3":null,
        "price":null
    }
    const inputs = [
        {
            id:"brand",
            name:"brand",
            type:"text",
            placeholder:"Brand",
            label:"Brand"
        },
        {
            id:"make",
            name:"make",
            type:"text",
            placeholder:"Make",
            label:"Make"
        },
        {
            id:"year",
            name:"year",
            type:"number",
            placeholder:"Year",
            label:"Year"
        },
        {
            id:"price",
            name:"price",
            type:"number",
            placeholder:"Price",
            label:"Price"
        },
        {
            id:"cm3",
            name:"cm3",
            type:"number",
            placeholder:"Cm3",
            label:"Cm3"
        },
        {
            id:"km",
            name:"km",
            type:"number",
            placeholder:"km",
            label:"km"
        },
    ]
Next, I defined an array of inputs that correspond to the features of our car, which, in turn, is defined in our pydantic model. The name is important, so it has to be lowercase since these will be the keys to our JSON objects! Returning to real-life car sales sites, you would probably want to put the inputs in a separate file if the number is too big, or resort to an external library.
The next part is about making use of the state variables:
const [newCar, setNewCar] = useState(emptyCar)
const [error, setError] = useState([])
const navigate = useNavigate();
As I mentioned earlier, we have one crucial state – the newCar object. I initialize it with the emptyCar object, setting all the properties to empty strings and nulls. I have added another state variable called error and set it to an empty array – here, I will put all the errors that come directly from our backend. I will not implement client-side validation because I want to show the bare-bones communication between FastAPI and its pydantic responses and React. In a real-world environment, you would use some client-side validation and not even try to send incomplete or invalid data to the server! The last line just instantiates the navigation for React Router. Here, we move on to the event handlers:
const handleSubmit = (e)=>{
   e.preventDefault()
   addCar(newCar)
}
const onChange = (e) => {
   setNewCar({...newCar, [e.target.name]: e.target.value})
}
const handleReset = (e) => {
   setNewCar(emptyCar)
}
handleSubmit simply prevents the default submitting of the form, a React classic, and then uses the spread operator (three dots) to update the initially “empty” newCar object with the property that is passed to the handler. This is why it was important to set the names of the inputs correctly, as the field brand, for instance, in the handler function becomes {“brand”:”Ford”} and part of the newCar object. Since I passed this same handler (onChange) to every input in my inputs array, that simply means that every time you change the value of any input, the newCar state object will be updated.
The handleReset simply resets the form (no preventDefault here because we want that to happen) and resets our newCar to the initial (empty) values. Let's now see the main function of the component, the addCar:
const addCar = async (newCar)=>{
   const response = await fetch("http://localhost:8000/cars/",{
    method:"POST",
    headers:{
        'Content-Type':'application/json'
    },
    body:JSON.stringify(newCar)
    })
    const data = await response.json()

    if(!response.ok) {
        let errArray = data.detail.map(el=>{
             return `${el.loc[1]} -${el.msg}`
        })
        setError(errArray)
        } else {
        setError([])
           navigate('/cars')
        }
    }
There is a lot going on here – first, I try to send a fetch request to our API using the appropriate method (POST), header (content-type set to application/json), and the body as a JSON object. I repeat: you would not want to do it this way without proper validation! This is for demonstration purposes because I find it useful to see the data flow through both the backend and the frontend.
The FastAPI backend will send some response, and that response might be valid or not. If the response is OK, which is just a concise way of telling us that the status code of the response is in the 200-299 range (so, 200 OK or 201 CREATED – the good stuff), we set the error to an empty array and navigate, with the help of React Router, happily to a new location – in my case, /cars. If, however, the response is not OK, I gladly take the FastAPI error messages (because there are several – for every field, for every invalid or required but missing value) and map them into the errors array. I did a bit of parsing, but you can figure it out easily if you analyze any error response from FastAPI’s POST requests: the errors are under the details key, and they have a location (in this case, it is always the body and the field) and a message. I constructed this array on purpose because I wanted to display it on the page, but it is not something that you would do like this: you would want to mark the form fields containing errors with the color red or something similar and display the messages beside the corresponding fields.
Let’s see the output of the component now:
return (
    <Layout>
        <div>
            <h1>Insert a New Car</h1>
        </div>
        <div>New car status:{JSON.stringify(newCar)}</div>
        {error && <ul>
        {error && error.map(
            (el, index)=>(<li key={index}>{el}</li>)
                 )
              }
         </ul>}
         <div>
             <form onSubmit={handleSubmit}>
                 {inputs.map((input) => (
                        <FormInput
                            key={input.id}
                            name={input.name}
                            {...input}
                            value={newCar[input.name]}
                            onChange={onChange}
                            required />
                    ))}

                <button type="submit"
                  onClick={handleSubmit}>Insert</button>
      <button type="reset"
        onClick={handleReset}>Reset</button>
            </form>
            </div>
        </Layout>
  )
}
Again, I have removed the Tailwind classes and started the file with just a simple title. After the title, I displayed the newCar object in its stringified version so that we can monitor its state and how it reacts to updates. After the newCar object, I display the errors array – you must submit the form with some errors in order to see them.
Finally, there is a form – the only interesting part is probably the mapping over the inputs array and the destructuring of values passed to its elements. This is what the page should look like:
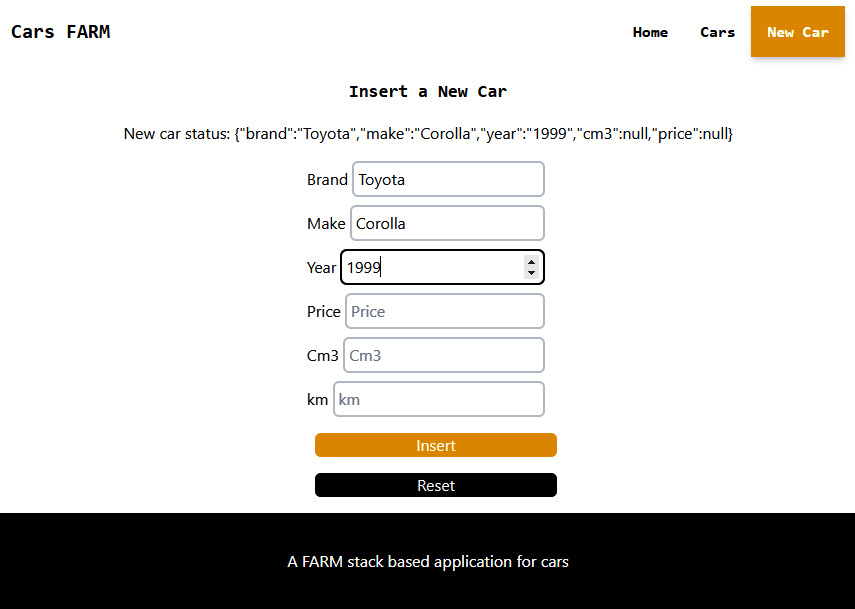
Figure 6.2 – The Insert a New Car page
Try to play around with the form and customize it using some prettier Tailwind class combinations.
Creating the car details and the update/delete page
The bulk of the work is done – we are able to create new cars and list them. I will now create the details page, a page component that will be used to display just one vehicle. It will not be particularly content-rich, since we have only five fields in our model and they easily fit inside the card. Imagine, however, that we had dozens of fields representing car features: color, type of engine, overall state, insurance, and maybe the location. Well, all of those fields would be displayed on the details page. Since I want to keep this very simple, I am going to add the update and delete actions to this page – without creating a dedicated React route for an edit-car page.
This /car/:id page will thus serve three purposes: it will display the car details, covering the get/:id route, but will also host two simple buttons – one for updating the price of the car (although we could add and edit any of the fields) and one for permanently deleting the car. For simplicity’s sake, I will not create a pop-up or modal window that you would typically want to have when destroying resources. The purpose of the chapter is only to create a CRUD application, and this is precisely what we’re doing here. Let’s crack open the src/pages/Car.jsx file and have a look at it. The imports are the following:
import {useState, useEffect} from 'react'
import {useParams, useNavigate} from "react-router-dom"
import Layout from '../components/Layout'
import FormInput from '../components/FormInput'
By now, you have already become a React connoisseur, so you know that we are using useEffect and useState to fetch the individual car data and manage its state, while the React Router imports are for catching the id of the car and for navigating away programmatically. Finally, you have already seen the Layout component and the FormInput component as I have used them in the /new route. Let’s take a look at the first part of the functional component:
const Car = () => {
    const {id} = useParams()
    const navigate = useNavigate()
    const [car, setCar] = useState(null)
    const [price, setPrice] = useState(null)
    const [error, setError] = useState([])
    const [isPending, setIsPending] = useState(true)
    …
Apart from using the useParams() to capture the ID of the specific car and instantiating the navigation using the useNavigate hook, I set up no less than four state variables: the car (we are going to get it by using the ID), the price – the only editable property of the car, and the two helper states that we have already seen – the error (which is really an array of errors) and the isPending flag, for making sure that we have finished fetching. Let’s see the rest of the components:
(continued)
const onChange = (event)=>{
    setPrice(event.target.value)
    }
const getCar =  async() => {
    const res = await fetch('http://localhost:8000/cars/'+id )
    if (!res.ok){
        setError("Error fetching car")
        } else {
        const data = await res.json()
        setCar(data)
        setPrice(data.price)
        }
        setIsPending(false)
    }
The onChange handler is just for setting the new price of the car when we need to adjust it, while the bulk is contained in the getCar function. The dynamic is identical to what we have already done to get all of the cars: I make a fetch request using the ID of the desired car that the router was kind enough to provide me with and then I check the response – if it is OK (in the 200-299 range), I set the car state variable to the obtained car data, and populate the price variable – the variable that is the value of the input field – to the current price. In case of errors, I populate the error with a message. At the end, I remove the isPending flag.
Now we’ll move on to the delete and update handlers, which will make HTTP requests to our DELETE and PATCH FastAPI endpoints:
const handleDelete = async () => {
const response = await fetch(`http://localhost:8000/cars/${id}`,{
    method:"DELETE",
    headers:{
        'Content-Type':'application/json'
    }
    })
    if(!response.ok) {
        const data  = await response.json()
        let errArray = data.detail.map(el=>{
                return `${el.loc[1]} -${el.msg}`
            })
        setError(errArray)
        } else {
        setError([])
        navigate("/cars")
        }
    }
By this point, all of this code should be second nature to you, although I admit that it is not very elegant: I simply issue a DELETE request to the /cars/id endpoint and check for any errors. Since it is a DELETE request, remember that we do not actually expect anything in the response, so there is really no point in trying to get it or parse it – I just want the HTTP status code. If the response code is OK, I use navigate() to go to the desired page, using the power of React Router. Updating the car is very similar:
const updatePrice = async () => {
        const response = await fetch(`http://localhost:8000/cars/${id}`,{
            method:"PATCH",
            headers:{
                'Content-Type':'application/json'
                },
            body: JSON.stringify({price})
                    })

    const data = await response.json()
    if(!response.ok) {
        let errArray = data.detail.map(el=>{
            return `${el.loc[1]} -${el.msg}`
            })
        setError(errArray)
    } else {
        setError([])
        getCar()
        }
  }
The interesting part of this chunk of code is that we send a PATCH request, knowing that our smart FastAPI backend will know to only update the provided field – the price. After the usual error checking routine, if everything is OK, then we make a new call to the getCar function – that way, the UI (our page) gets updated with the new data – the new price. The useEffect call is as follows:
useEffect(()=>{
   getCar()
},[])
The component’s JSX is full of Tailwind classes, and, in this case, I want to leave them so you can get a feel for what they achieve.
The first part of the return statement is used to check whether the isPending state variable is equal to true and then to display a div with a notification. This should probably contain a spinner or something more intuitive, but a red background will do for now. If there are errors in the error array, they will be iterated over and displayed in an unordered list with minimal styling:
return (
      <Layout>
        {isPending && <div className="bg-red-500 w-full
          text-white h-10 text-lg">
            <h2>Loading car...</h2>
        </div>}
        {error && <ul className="flex flex-col mx-auto
          text-center">
            { error && error.map(
                (el, index)=>(
                    <li key={index} className="my-2 p-1
                      border-2 border-red-700 max-w-md mx-
                        auto">{el}</li>
                    )
                )
            }
        </ul>}
The part that follows directly in the same function outputs the selected car data: the brand and make, there is an image placeholder, and there is a div for displaying the Price, Year, and Km variables:
{car&&<div>
    <div className="flex flex-col justify-between min-h-full
        items-center">
    <div className="font-bold text-xl text-gray-600 my-3">
         {car.brand} {car.make}
    </div>
    <div className="max-w-xl">
        <img alt="A car!" src="https://via.placeholder.com
             /960x550.png?text=IMAGINE+A+CAR!" />
    </div>
    <div className="flex flex-col items-center font-normal
        text-lg">
        <div>Price: <span className="font-semibold text-
            orange-600 text-xl">{car.price}</span></div>
            <div>Year: {car.year}</div>
            <div>Km: {car.km}</div>
         </div>
Finally, I just added a simple form input for updating the price and a couple of buttons – the first will update the price of the car to the value of the input and the second one will trigger a DELETE request:
<div className="flex flex-row">
    <FormInput label='change price'
        placeholder={price}
        type="number"
        value={price}
        onChange={onChange}
        required />
<button
    onClick={updatePrice}
    className="bg-yellow-500 text-white p-2 rounded-md m-3
        transition-opacity hover:opacity-80">
    Edit price
</button>
<button
    onClick={handleDelete}
    className="bg-red-700 text-white p-2 rounded-md m-3
        transition-opacity hover:opacity-80">
    Delete Car
</button>
</div>
<p>Warning: deleting is permanent!</p>
    </div>
         </div>}
    </Layout>
   )
}
export default Car
Instead of describing what the JSX does, I believe that it is easier to take a look at the screenshot of the generated page:

Figure 6.3 – The single car page with update and delete buttons
Apart from the Layout component that “includes” the menu and the footer, I just display the car data, along with the input for updating the price and two buttons, connected to our handlers for updating and deleting.
The application that you just created is pretty ugly, although Tailwind manages to hold it together. A person running this app locally on their laptop can insert new cars as they are arriving to be sold, can delete them, and can update their price. That is a very crude CRUD application (pun intended!) but it meets our initial goal and I hope that it sheds some light on the mechanism of connecting MongoDB, FastAPI, and React.
Once you get the hang of making HTTP requests to the backend and using Hooks to map the response data to UI elements, you will have web developer superpowers and almost unlimited flexibility at your fingertips. Meeting new requirements and implementing new features with the FARM stack is, I firmly believe, much easier than with other framework stacks.
The application that we have built together in this chapter is far from being production-ready – even for an intranet app locally run on an old laptop that is supposed to just get the job done. But hey! You made a full-stack application:
- You have defined some pydantic models and defined rules for data validation, ensuring data integrity and validity.
- You have created a MongoDB Atlas online database (for free!) and connected it in an efficient manner to your FastAPI backend using a modern async Python driver (Motor).
- You have crafted several endpoints for your application. You are able to create, read, list, update, and delete entities – in this case, cars, but this approach is very easy to generalize and apply to practically any type of data that can fit in your MongoDB database (and that’s a lot!).
- You have created a React application using the CRA tool and made use of the latest features, React Router 6 and Hooks, in order to scaffold your components and pages and make sure that the data from FastAPI flows precisely the way you want it to.
The application that we have built is not going to be deployed to an online server or service, since it doesn’t really meet any basic requirements, but we will tackle that in the next chapter. I want to make our app a bit more realistic and add users to it. And with users flying around, that means that we will have to talk about authentication and authorization.
Summary
We have managed to create a very rudimentary React single-page application and we connected it to our FastAPI backend. Our app is able to display cars, edit their price, and delete cars from MongoDB, so we can safely say that we have achieved the initial goal – we have CRUD functionality.
This application is not only a kind of proof-of-concept, but it is also completely unusable for any kind of work: our API is not protected in any way and anyone with the URL of our endpoint can begin issuing requests, inserting fake cars, or editing and deleting existing ones! We could, of course, run MongoDB on our own local computer, but that would kind of defy the purpose of this book.
In the next chapter, we will introduce the basic ideas and concepts of authentication and authorization and we will explore ways in which we can make our FARM stack apps secure and usable.