
8
Server-Side Rendering and Image Processing with FastAPI and Next.js
We have covered a lot of ground in our FARM-stack exploration so far, but when it comes to building real, modern web applications, there are so many aspects and topics that just listing all of them would take dozens of pages.
In this chapter, I will try to focus on a couple of key topics and essential web development requirements that you are bound to run into, namely: making fast, SEO-performant, server-side, or statically generated pages, and image handling. Where possible, I will try to give concrete and deliberately simplified examples, while outlining different solutions and strategies and emphasizing the strengths specific to the MongoDB, FastAPI, and React frameworks.
In this chapter, we’ll cover, or at least touch on, the following topics:
- Creating a FastAPI endpoint that can accept and process files, namely, images
- Introduction to the Next.js framework and server-side rendering
- Manipulating and uploading images to an external service
- Authentication with Next.js and API routes using FastAPI JWTs
- Deployment of FastAPI on Heroku and Next.js on Vercel
By the end of this chapter, you will have the basic knowledge required to tackle numerous web-related challenges and will know how to search for solutions autonomously, while leveraging the power and flexibility of Next.js and FastAPI.
Technical requirements
To complete this chapter’s code, the requirements are the same as for the previous chapters – you need a working Python environment (version >3.6) and a Node.js installation with npm.
You can download the complete project on GitHub here: https://github.com/PacktPublishing/Full-Stack-FastAPI-React-and-MongoDB/tree/main/chapter8.
Introduction to our Sample App
In the previous chapters, we were able to dive into the basic components of our FARM stack, but web development is much more than a basic sum of its components. Full-stack web development often consists of a constant back and forth between the frontend and the backend, and their seamless communication is the key to any functional and efficient web app. In this chapter, we are going to build something a bit more realistic, while remaining on topic – a car selling application – but adhering to a slightly more complex specification. As in the previous chapters, I do not plan to propose optimized or clever solutions, but rather simple, illustrative code whose main purpose is to highlight the topic at hand. Roughly speaking, the specification is the following:
- The app should accommodate external users who do not need to be logged in to see the cars and internal users – admins and salespersons, who are able to perform CRUD operations on the car adverts
- The car listings should be rendered on the server-side (for page loading speed and SEO)
- The car entities should contain an image – in a real app, we would want an array of images, at least 5 or 10 of them, but in our case, one will do
- The images should be hosted on a cloud provider and allow for on-the-fly transformations and optimization
- We want to enable the authenticated user to remain logged in even when the browser is closed or the page is refreshed, for a predetermined period of time
- Finally, we want to explore at least a couple of possible deployment options and discuss the differences
This sounds like a lot of ground to cover, so we won’t discuss the code that we have already created in the previous chapters. Rather, I will point out the new or different parts, and try to keep the features of the new technologies covered at a minimum, while providing you with useful links and books for diving deeper. We will begin with the backend.
Managing images and files in the backend
Files, especially images, are essential to modern web applications. Apart from the usual story of an image being worth a thousand words, images have multiple functions – aesthetic (incorporated in your site branding and color schemes and conveying certain emotions), informative (in our case, the user wants to see whether the car they are considering is worth buying!), and so on. The evolution of the process of serving images has evolved with the web itself; serving optimized and fast-loading images of the right dimensions and resolution has become an essential task in web development and there are many solutions, at various levels, that help us achieve good results.
First, the images have to be stored somewhere and have to be accessible by the app. While you could be storing images on your web server and serving them pretty quickly (they are, after all, static assets), the tendency is to host them on a third-party provider and make use of their content delivery networks (CDNs). Images often make up for more than half of the total page payload, and specialized image hosting providers help us reduce that load, serving tailored images for every device, size, and network connection speed. While there are many competitors on the market, I will not delve into their differences and comparative advantages – it is a type of research that you will have to do yourself, taking into account your project. For my web development needs, Cloudinary – one of the market leaders – has been nothing short of excellent. It is a mature company that specializes in serving content (images, videos, and also PDFs) and optimizing it for all devices while providing image transformations on the fly, and much more. They offer a generous free tier that will allow you to get to know the platform and familiarize yourself with their APIs, available both in Python and JavaScript. Let’s create an account on Cloudinary now!
Creating a Cloudinary account
Head over to the Cloudinary website and click on the Create Account page. Once there, on https://cloudinary.com/users/register/free, you should fill in the required data: your name, email address, and a secure password. It is paramount that you choose the Digital Asset Management account, as that will enable you to serve your images and videos (digital assets) through Cloudinary. While Cloudinary is a feature-rich ecosystem in its own right, we will not spend time exploring it; we will just create and use the bare minimum that will allow us to store our car images and briefly touch on some transformations later.

Figure 8.1 – Cloudinary account variables
After you have created your account, head over to the Dashboard page and take notice of the three variables that are displayed (or hidden) on the page – we will use them when creating our image-posting endpoint in FastAPI, in a similar way as the MongoDB variables. You can reveal them by clicking, and then you can copy them into a handy .txt file.
Creating a new MongoDB database and collections
For this application, we will create a new MongoDB database and collections. Head over to the MongoDB site or fire up Compass and create a new database called nextCars with two collections inside: users and cars. Since we have covered the creation of databases and collections in Chapter 2, Setting Up the Document Store with MongoDB, I will not go over the process again, to save some time and space. The connection string for the database will need to be updated to match the new database name (DB_NAME=nextCars).
Updating the FastAPI REST API
The REST API for this application is going to be mostly unaltered, and I believe that is one of the strengths of this stack – the modularity and interchangeability of the components. We will be able to reuse our entire model and our routes (and routers), while just adding the features that regard the addition of the image. Since we have decided to store our images on Cloudinary, all we have to do is provide a URL for the picture to the car model. This URL will be generated by Cloudinary upon upload, and it will enable us to generate different image sizes, according to our needs. In a more realistic scenario, you might want to create a MongoDB array field for storing a set of images (URLs), or you could pull the image out altogether into a new Pydantic and MongoDB model and then reference it – something that would probably be the most recommended practice. Since my primary concern here is to showcase the storing and serving of images through FastAPI, and not modeling, we will stick to the single picture field inside the Cars model. In the models.py file, we will update the following:
models.py
class CarBase(MongoBaseModel):
    brand: str = Field(..., min_length=3)
    make: str = Field(..., min_length=1)
    year: int = Field(..., gt=1975, lt=2023)
    price: int = Field(...)
    km: int = Field(...)
    cm3: int = Field(..., gt=600, lt=8000)
    picture: Optional[str] = None
class CarDB(CarBase):
    owner: str = Field(...)
class CarUpdate(MongoBaseModel):
    price: Optional[int] = None
We have just added a picture field to the Car model and set it to be an optional string that defaults to a None value. This will simplify things down the line if we want to import our cars dataset and do not provide an image right away. The CarDB model just extends our CarBase model with the user ID, while the CarUpdate model remains the same – only updating the price is possible.
The rest of the models.py file is unchanged, and I will not repeat it here. The users.py router and our main.py file are also unaltered.
On a side note, I should say that in order to get the code for this book to work, I had to modify our main.py file – the part where we implement the CORS middleware. Even though FastAPI implements the underlying Starlette’s framework middleware, at the point of writing this, it seems that it is necessary to import directly Starlette’s middleware. To cut things short, our main.py file looks like this now:
from decouple import config
from fastapi import FastAPI
from starlette.middleware import Middleware
from starlette.middleware.cors import CORSMiddleware
middleware = [
    Middleware(
        CORSMiddleware,
        allow_origins=["*"],
        allow_credentials=True,
        allow_methods=["*"],
        allow_headers=["*"],
    )
]
from motor.motor_asyncio import AsyncIOMotorClient
from routers.cars import router as cars_router
from routers.users import router as users_router
DB_URL = config("DB_URL", cast=str)
DB_NAME = config("DB_NAME", cast=str)
origins = ["*"]
app = FastAPI(middleware=middleware)
As you can see, the middleware is imported directly from Starlette and defined directly upon the app instantiation. FastAPI is still a relatively new and young framework, and it is very possible that this hack will not be necessary in the future, but I do feel the need to save you some debugging and research time.
The rest of the main.py file is the same as before; we include the routers and define the events for startup and shutdown:
app.include_router(cars_router, prefix="/cars", tags=["cars"])
app.include_router(users_router, prefix="/users", tags=["users"])
@app.on_event("startup")
async def startup_db_client():
    app.mongodb_client = AsyncIOMotorClient(DB_URL)
    app.mongodb = app.mongodb_client[DB_NAME]
@app.on_event("shutdown")
async def shutdown_db_client():
    app.mongodb_client.close()
Let’s open our .env file and set up Cloudinary. Notice that you can use Cloudinary even without providing the credentials (API and secret keys), but in order to do so, you must explicitly set that in your Cloudinary settings page, under the Uploads tab – Enable unsigned uploading:

Figure 8.2 – Cloudinary settings page
In this case, I do want to set up a Cloudinary client and provide it with our secret keys. In the virtual environment, install the Cloudinary Python client with the following:
pip install cloudinary
Once installed, we will go to our Cloudinary management page and copy the API key and the SECRET key into our .env file, after the MongoDB credentials:
DB_URL=mongodb+srv://farmbook:[email protected]/?retryWrites=true&w=majority
DB_NAME=nextCars
CLOUD_NAME=<your cloud name>
API_KEY=<your api key>
API_SECRET=<your api secret>
This way, we will be able to access this environment data with Python-Decouple. Since we will be using the Cloudinary API only in the /cars router, we can open the /routers/cars.py file and update it. Let’s go over the entire /routers/cars.py file:
from typing import List, Optional
from fastapi import (
    APIRouter,
    Request,
    Body,
    UploadFile,
    File,
    status,
    HTTPException,
    Depends,
    Form,
)
from fastapi.encoders import jsonable_encoder
from fastapi.responses import JSONResponse
from fastapi.responses import StreamingResponse
from decouple import config
import cloudinary
import cloudinary.uploader
When dealing with file uploads, we cannot use JSON – we must accept the file through form data and we cannot mix the two (an HTTP limitation), so we imported Form, File, and UploadFile from FastAPI. The process of handling Form data is explored in Chapter 3, Getting Started with FastAPI, so now we have a chance to try it out; that is basically the main idea of the whole book – trying things out, even if they are not necessary, so in case you might need them, you know where to start.
The last two imports are Cloudinary’s client and uploader utilities that enable our app to communicate with the online image service. Let’s continue with /routers/cars.py:
from models import CarBase, CarDB, CarUpdate
from authentication import AuthHandler
CLOUD_NAME = config("CLOUD_NAME", cast=str)
API_KEY = config("API_KEY", cast=str)
API_SECRET = config("API_SECRET", cast=str)
cloudinary.config(
    cloud_name=CLOUD_NAME,
    api_key=API_KEY,
    api_secret=API_SECRET,
)
router = APIRouter()
auth_handler = AuthHandler()
We are importing our Pydantic car models and our authentication handler, which hasn’t changed. After that, we need to import the Cloudinary keys and configure the library. After this is all set, we proceed to instantiate the FastAPI router responsible for cars and the authentication.
While the routes for listing all cars, getting one car by ID, deleting, and updating remain the same (so I will not list them again here), the route that is completely different is the one for creating a new car, the POST route:
@router.post("/", response_description="Add new car with picture")
async def create_car_form(
    request: Request,
    brand: str = Form("brand"),
    make: str = Form("make"),
    year: int = Form("year"),
    cm3: int = Form("cm3"),
    price: int = Form("price"),
    km: int = Form("km"),
    picture: UploadFile = File(...),
    userId=Depends(auth_handler.auth_wrapper),
):
    result = cloudinary.uploader.upload(
        picture.file,
        folder="FARM",
        crop="scale",
        width=800,
    )
    url = result.get("url")
    car = CarDB(
        brand=brand,
        price=price,
        cm3=cm3,
        km=km,
        make=make,
        year=year,
        picture=url,
        owner=userId,
    )
    car = jsonable_encoder(car)
    new_car = await request.app.mongodb["cars"].insert_one(car)
    created_car = await request.app.mongodb["cars"].find_one(
        {"_id": new_car.inserted_id}
    )
    return JSONResponse(status_code=status.HTTP_201_CREATED, content=created_car)
You can notice several differences from our previous route: we no longer accept JSON, but Form data, so the values (brand, make, cm3, and so on) are taken from the Form data parameters and not from parsing JSON data. We also have File and FileUpload for handling the image file, which we called picture. The file is immediately handed to Cloudinary and we get a response back upon a successful upload. Notice that here we should perform some error checking in case the upload doesn’t go as planned! The uploader, if everything goes well, returns us a result and, at this point, all we care about is the URL of the image – this URL allows us not only to access the image but also to identify it and apply transformations to it!
I passed different parameters to the Cloudinary uploader along with the file: FARM is the folder where I want the picture uploaded (it is trivial to create custom folders inside the Assets page in Cloudinary); I set the picture width to 800, which means 800 px maximum, and the resizing method to scale. A complete list of parameters you can pass on upload is available on the Cloudinary website and it includes various transformations that are way beyond the scope of this book.
We then use the said URL and the user ID to construct a Car instance to be saved to our MongoDB database. This upload can take some time, so it would be a good candidate for treating with some loading spinners or other activity indicators on the frontend. Finally, we return the created car with the status 201 Created.
You can now spin the server up with the following:
uvicorn main:app --reload
Now, try to log in.
First, we need to test the /register route and create some users. You can use HTTPie to send a POST request and register a user, as we did previously:
venv) λ http POST "http://localhost:8000/users/register" email="[email protected]" password="marko" username="marko" role="ADMIN"
I have a couple of dummy users created, so I can use HTTPIE to login and get the JWT for authentication:
(venv) λ http POST "http://localhost:8000/users/login" email="[email protected]" password="marko"
As usual, we get a JSON web token as well as the logged-in user data:
{
"token": "eyJ0eXAiOiJKV1QiLCJhbGciOiJIUzI1NiJ9.eyJleHAiOjE2NTcwNDY3ODgsImlhdCI6MTY1NzAyNTE4OCwic3ViIjoiNjJiZjU5MWM3N2M3OWUxYTkwMmUwNTZhIn0.Wf7ps6IPypzDHJxrOFHJhnHw9pJkRf5QWJui-uae3x4",
"user": {
"email": "[email protected]",
"role": "ADMIN",
"username": "marko"
}
}
If we now include this JWT in our Insomnia client as a bearer token and post to the /cars endpoint some car data along with a car image it should look like as shown in the following image:

Figure 8.3 – Insomnia REST client performing a POST request
There are a couple of things to keep in mind when testing – the request type has to be set to Multipart and the Picture field has to be specified as a file. Also, do not forget to add a valid token in the Bearer tab; otherwise, you will get a Not Authenticated error.
The upload could take a while, depending on your connection’s upload speed, but once you get a response, it will contain a picture URL. If you click it, it will display your image, reduced to a width of 800 pixels, and hosted securely on Cloudinary!
Integrating Python Pillow for image processing
Before moving to the frontend, where we will spend most of our time in this chapter, I want to add just a little bit of code to this particular POST endpoint. While Cloudinary enables us to perform numerous image (and video!) transformations, there might be a situation in which you want or have to perform some operations yourself. One of the main advantages and selling points of the FARM stack is the availability of Python’s rich and vast module ecosystem that encompasses different fields. As it happens, Python has a very powerful and mature imaging library, formerly known as PIL and now Pillow, which enables us to perform most filtering, resizing, cropping, watermarking, and so on, while also being able to treat images as matrices of pixels and apply complex algorithms.
In this example, I just want to show how easy it is to plug in some Pillow functionality. Let’s install Pillow by stopping our FastAPI server and typing the following:
pip install Pillow
After that, we will add a couple of imports to the /routers/cars.py file:
from PIL import Image, ImageOps
Then, update the POST endpoint:
@router.post("/", response_description="Add new car with picture")
async def create_car_form(
    request: Request,
    brand: str = Form("brand"),
    make: str = Form("make"),
    year: int = Form("year"),
    cm3: int = Form("cm3"),
    price: int = Form("price"),
    km: int = Form("km"),
    picture: UploadFile = File(...),
    userId=Depends(auth_handler.auth_wrapper),
):
    original_image = Image.open(picture.file)
    poster_image = ImageOps.posterize(original_image, 2)
    out_image = BytesIO()
    poster_image.save(out_image, "JPEG")
    out_image.seek(0)
    result = cloudinary.uploader.upload(
        out_image,
        folder="FARM",
        crop="scale",
        width=800,
    )
The preceding code takes on the uploaded file using the Image.open method of the Pillow module, applies a simple transformation (posterizes the image), and finally, returns it as a JPEG to Cloudinary. If you try the exact same POST request with the Ford Fiesta image (courtesy of Vincent Guzman from Unsplash) from the previous try, you will get a transformed image. I assume you won’t opt for such extreme image operations, but it is good to know how to tackle image transformation and storage with these two powerful tools. You could watermark images for an advert site, create duo-tone images that fit your branding colors, add borders or rounded corners, and pretty much anything that you can imagine.
In this section, we were able to integrate a real image-processing pipeline into our FastAPI REST API and you could use some variations of it for various image-related tasks: product galleries, systematic image processing, applying filters, and so on.
In the following section, we will begin working with Next.js – a powerful and feature-rich React-based web framework.
Introduction to Next.js and our frontend project
In this section, we will introduce Next.js, the React web framework, and we will begin creating a project throughout the chapter. We will develop a Next.js-powered website for selling used cars, similar to what we did in the previous chapters. The backend will be powered by our FastAPI REST API, while the frontend will use various features provided by Next.js. I will gradually build up the app, adding features in a simple and, hopefully, straightforward way. The end goal of the chapter is not to make an optimized or production-ready app, but rather to illustrate the possibilities and features of the tools that we’re going to use.
Let’s speak about Next.js, one of the hottest frontend frameworks in the last couple of years. Next.js offers numerous features that cater to the modern web, and this introduction is meant only to give you an idea of what can be accomplished with it. The first problem that Next.js solves is the fact that React runs on the client-side, meaning that the pages are displayed only after being downloaded, ran in the browser, and rendered on the client. This has several drawbacks, especially with larger and more complex applications – it negatively affects Search Engine Optimization and the initial loading might take a while.
Several frameworks where not only React-based, and companies have tried to create a way of pre-rendering the resulting HTML and providing at the same time the JavaScript-based interactivity of a React (or Svelte, or Vue.js) application. Vercel’s Next.js is arguably the most feature-rich and most complete out of several similar solutions (Vue.js’s Nuxt.js, the relatively new SvelteKit, and so on). One young framework that looks very promising and flexible is Astro.js.
For working with Next.js, the only real requirement is that you are familiar with React since it is mostly React that we will be writing. However, Next.js provides several game-changing features that might make you switch to it for the vast majority of your projects. Let’s list some of the most interesting and significant:
- File-based routing: A folder/file structure that maps directly to URLs, coupled with the Next router (with hooks!) for programmatic navigation
- Server-side rendering: The pages can be rendered on the server as well as on the client, or both, as well as statically prerendered
- Static site generation: Pages can be entirely static and Next.js can be used as part of a JAMStack site
- Image optimization: Like another React-based framework, Gatsby.js, Next.js provides us with an extremely useful Image component that greatly facilitates the tedious image resizing and optimizations, and the process of generating image source sets of the same image for different viewports
- Numerous other goodies: Incremental static generation (basically, the process of regenerating the site by creating only the pages that should be updated), TypeScript support, and the pluggable Node.js underlying server that can also make use of Express.js or Fastify.js (two blazingly fast Node.js frameworks)
- Configuration tools and “abstract” documents for unified layouts, plugins, and much more
I believe that this is the right place to inform you that Packt has published probably the best book ever written on Next.js – Real World Next.js by Michele Riva (https://www.packtpub.com/product/real-world-next-js/9781801073493) and if you wish to dive into the framework (and you should, by all means!), feel free to grab it.
Scaffolding the application
Let’s begin building our Next.js-powered car sales application. Similar to create-react-app, Next.js provides us with a command-line tool for scaffolding a new Next app. The only requirement for this process is having Node.js, npm, and npx installed on our machine.
Enter the /Chapter8 folder, open a new terminal window (I am still using Cmder), and issue the following command:
npx create-next-app next-cars
This command will take some time to run, and it will create a project structure, install numerous dependencies, and give you a sample page. If everything went how it should, your terminal will instruct you to change the directory to the newly created folder (next-cars, in our case) and start the development server with the following:
npm run dev
If you visit the page at localhost:3000 (the default Next.js port), you will be greeted by the default Next.js page. Let’s quickly run over the project structure – open the next-cars folder with your favorite code editor (I strongly recommend Visual Studio Code featuring the ES7 React snippets plugin!).
The /pages folder is where the magic happens. To put it as simply as possible, if you create a page, which is really a React component, name it index.js, and put it in the /pages/cars/mazda folder, it will render this page/component at the /cars/mazda URL. If you create another component in the same /mazda folder and name it 3.js, it will render a component for the /cars/mazda/3 URL, and so on. Another feature that is important to emphasize immediately is the fact that you can name a page [slug].js, with the use of square brackets. Square brackets are used to capture url parameters, so a file located at the location of /cars/[slug].js will render the component for every request matching the URL /cars/anything, while passing the parameter slug (equal to "anything" in this case) as a prop to the component..
Styling with Tailwind CSS
Let’s install Tailwind CSS since I want to keep the styling work to an absolute minimum and, as we did before with React, the process is practically identical. Stop the Next.js development server and type the following command:
npm install -D tailwindcss postcss autoprefixer
npx tailwindcss init -p
The second command will initialize a tailwind.config.js file, so open it and replace the content with this:
module.exports = {
  content: [
    "./pages/**/*.{js,ts,jsx,tsx}",
    "./components/**/*.{js,ts,jsx,tsx}",
  ],
  theme: {
  },
  plugins: [
  ],
}
Finally, delete Home.module.style in the /styles folder and replace the global styles with the following Tailwind directives:
@tailwind base;
@tailwind components;
@tailwind utilities;
I usually like to immediately test the home page. Open the /pages/index.js file, the one that will map to the root URL (/), and create a generic React component by using the _rafce shortcut:
const index = () => {
  return (
    <div className="bg-orange-500 text-white p-5">
      FARM Cars
    </div>
  )
}
export default index
Restart the server and you should see a simple page with one div element, an orange background with white text; that means Tailwind is installed. Just in case, keep in mind that Tailwind maintains excellent documentation, so head over to the guides at https://tailwindcss.com/docs/guides/nextjs in case anything changes in the future versions.
Customizing the _app.js component
When building our React app, we used a custom layout component to wrap the pages and achieve a consistent look across the application. Next.js, among other useful things, provides us with a special component called App that lives in the /pages/_app.js file. This component is used for initializing pages and provides different capabilities, such as the said layout consistency (header, footer, and page content), but can also be used for keeping track of the state while navigating the app, injecting additional data, and so on. For now, we will use it just to create a page skeleton. Let’s create a folder called /components in the root folder (the same level as /pages) and create two generic components (Header.jsx and Footer.jsx) with just the text header and footer, respectively.
Then, let’s alter the _app.js component:
import '../styles/globals.css'
import Header from '../components/Header'
import Footer from '../components/Footer'
function MyApp({ Component, pageProps }) {
  return (
    <div className="flex flex-col justify-between items-stretch
        min-h-screen">
      <Header />
      <div className="flex-1">
        <Component {...pageProps} />
      </div>
      <Footer />
    </div>
  )
}
export default MyApp
All the content of our pages will be rendered into the highlighted component, while we added a wrapping div, set it to a flex column display using Tailwind, and made the header and footer stick to the top and bottom.
Next.js provides us with a very nifty Link component that optimizes the navigation within the application with features such as page preloading, dynamic routes variable handling, and more.
This basic setup provided us with some useful features – we have a layout component, and we didn’t have to make one from scratch or manually wrap components.
Setting up the environment variables
Next.js allows us to make use of environment variables and it does so in a very simple and elegant way, following a few conventions. Why do we need environment variables? Well, in our case, we do not want to hardcode the URL of our API everywhere in the code – we are working with a local API (on localhost:8000) during development, then we will eventually deploy our Python API on Heroku or some other server, and we will have another address. Finally, when we deploy our Next.js application, we will want to provide the URL of our production server as an environment variable to Vercel or Netlify, depending on our deployment solution.
Next.js will read the .env.local file, located in the root of our project, and load its variables into the current environment. These variables will not be available to the client unless they start with NEXT_PUBLIC_. In our case, we just want to save our API_URL that will be served by FastAPI. So, let’s put that in the file, bearing in mind that it should be available to the clientside:
NEXT_PUBLIC_API_URL=http://127.0.0.1:8000
If we wanted to add other environment variables, they would have to be stacked below this one. It is important not to add the trailing slash at the end of the URL when dealing with Heroku or the requests will crash.
Scaffolding the required pages
Our strategy now will be the following:
- We will create all the pages needed for our application: the car list and the individual car pages (server-side rendered), the register and login pages, and the create new car page. For brevity’s sake, we will skip the pages for updating and deleting cars, but you are more than welcome to implement them yourself as a useful exercise.
- After all the pages and the navigation have been scaffolded, we will create a more robust authentication mechanism, using Next.js API routes, httpOnly cookies, and the React Context API. The users will be able to log in and log out, and only admins and salespersons will be able to create new cars (a similar logic would be implemented for updating and deleting cars). We will not implement a registration page and that would also be a great exercise for you – it shouldn’t be harder than coding the login route, depending on whether you opt to automatically log the newly created users in or not.
We have just wrapped the whole application inside a div and added the footer component at the end. If you take a look at the app now, on http://localhost:3000 with the Next.js server running, you should be able to see the text footer after the FARM Cars title from index.js, our only page for now. I will apply the exact same process for building the header component, which will contain just a menu bar. Let’s now update a Header.jsx component in the /components folder:
const Header = () => {
  return <div
      className="text-orange-600 p-2 font-bold">
      Header</div>;
};
export default Header;
I have just added a minimal amount of Tailwind style just so we can see where the header is. Now, we will include it in the _app.js file, as we did with the footer:
import '../styles/globals.css'
import Header from '../components/Header'
import Footer from '../components/Footer'
function MyApp({ Component, pageProps }) {
  return (
    <div>
      <Header />
      <Component {...pageProps} />
      <Footer />
  </div>
  )
}
export default MyApp
Finally, we can make the header and footer stick to the top and bottom of the page, respectively, by applying Tailwind classes; we will make the whole app a flex container, and we will set the minimum height to screen height while allowing the App component to take up as much space as needed:
import '../styles/globals.css'
import Header from '../components/Header'
import Footer from '../components/Footer'
function MyApp({ Component, pageProps }) {
  return (
    <div className="min-h-screen flex flex-col">
      <Header />
      <div className="flex-1"><Component {...pageProps} />
      </div>
      <Footer />
  </div>
  )
}
export default MyApp
Having the layout in place, now we can create a simple navigation menu in the header with the help of the Next.js Link component. Let’s reiterate: we need the following links – home (/), cars (/cars), login (/account/login), and register (/account/register) – for now. Later on, we will display some links conditionally depending on the user – whether a user is logged in or not, whether they’re an admin or salesperson, and so on.
Creating the header navigation
Let’s create this navigation, using the Link component and the Tailwind classes:
import Link from "next/link"
const Header = () => {
  return (
    <div className=" text-orange-600 p-2 font-bold flex flex-
        row justify-between items-center">
      <div>
        <Link href="/">
          <a>FARM Cars</a>
        </Link>
      </div>
      <ul className="flex flex-row space-x-4 ">
        <li>
          <Link href="/cars">
            <a>Cars</a>
          </Link>
        </li>
        <li>
          <Link href="/about">
            <a>About</a>
          </Link>
        </li>
        <li>
          <Link href="/account/register">
            <a>Register</a>
          </Link>
        </li>
        <li>
          <Link href="/account/login">
            <a>Login</a>
          </Link>
        </li>
      </ul>
    </div>
  );
};
export default Header;
These links are downright ugly, and they all point to non-existing locations, but while we won’t delve into aesthetic enhancements, we will create all the pages now and just scaffold them with the help of the ES7+ React/Redux/React-Native snippets Visual Studio Code extension we installed earlier. I will not list all the code here, but just go over the following files: in the /pages directory, create a /cars folder, and inside index.js, add the following:
const cars = () => {
  return (
    <div>Cars page</div>
  )
}
export default cars
I will repeat this exact process and create an /accounts folder in the /pages folder and inside it, I will create the Login and Register pages.
Authentication with API routes and httpOnly cookies in Next.js
We should be able to navigate using our navigation in the header. It is now time to introduce an important feature of Next.js – the API routes. Put simply, Next.js allows us to write API endpoints by using a special folder called /api located inside the /pages directory. Inside this /api folder, we can make use of the folder and file-based Next.js router, so an API route that lives in a /api/user.js file will be available at the http://localhost:3000/api/user endpoint, and so on. Note that these files are not React components, but simple Node.js request/response functions.
While the API routes are powerful Node-based mechanisms that allow you to write your backend entirely without ever leaving Next.js, they can have different uses in different cases and scenarios. For instance, we can use these API routes as a proxy for our FastAPI backend, thus hiding it completely from the frontend in case we want to perform some client-side data fetching. Coupled with the concept of middleware – essentially, functions that intercept the request and response cycle – we can use them for securing the entire application or just parts of it and do so in a granular way. While you can (and by all means should) inspect the API routes documentation on the Next.js website, let’s see how it can help us with our task of authenticating and authorizing users.
In the previous chapter, we have seen how JWT-based authentication works, and, since we were using React, we opted for a rather extreme solution – we didn’t save the JWT anywhere, so any page refresh or browser closing resulted in a logout, since the JWT was stored only in the Context API. We could have used the browser’s local storage but there are many reasons to believe that these solutions are too insecure and risky. Since Next.js API routes run on the same server as our frontend, we can use a more elegant and secure method and persist the state of the logged user throughout the application. We will use httpOnly cookies, which are available only through HTTP and are inaccessible to JavaScript. Since both the frontend and the “backend” (in this case, Next.js’ API routes, not our real backend) will run on the same server (in development: localhost:3000 by default), we can set cookies easily. After we get the cookie, we will use it to store the JWT token and provide it to any subsequent request. Our FastAPI /me route will be used to read the JWT and tell us whether the user exists or not, whether it’s a regular user or an admin, and so on, and then we will model the page’s behavior accordingly.
Having laid out our main strategy, let’s move on and tackle the first task: we want to create a Next.js API route, call it login, and enable it to just POST the credentials data (in FastAPI, we opted for a combination of email and password) to our real backend (Python) and, if the request should be successful, send a cookie with the JWT.
Before we begin refreshing our Node.js knowledge (it is really the bare minimum – just request and response), we need to stop the Next.js server and install the cookie package in order to be able to set cookies (note that this package isn’t particularly tied to Next.js itself):
npm i cookie
In the /pages/api folder, create a file called login.js (the naming is important!) and start writing some Node.js code:
import cookie from 'cookie'
export default async (req, res)=>{
    if (req.method==='POST'){
        const {email, password} = req.body
        const result = await fetch
          ('http://127.0.0.1:8000/users/login', {
            method:'POST',
            headers:{'Content-Type':'application/json'},
            body:JSON.stringify({email, password})
        })
        const data = await result.json()
        if (result.ok){
            const jwt = data.token
            res.status(200).setHeader('Set-Cookie',
              cookie.serialize(
                'jwt',jwt,
                {
                    path:'/',
                    httpOnly: true,
                    sameSite:'strict',
                    maxAge:30

                }
            )).json({
                'username':data['user']['username'],
                'email':data['user']['email'],
                'role':data['user']['role'],
                'jwt':jwt
            })
        } else {
            data['error'] = data['detail']
            res.status(401)
            res.json(data)
            return
        }
    } else {
        res.setHeader('Allow',['POST'])
        res.status(405).json({message:`Method ${req.method}
          not allowed`})
        return
    }
}
The code is pretty straightforward; there are just a couple of checks that make it a bit longer, but they are important. Let’s see how it works: first, it is a typical Node.js async request/response function – we first check whether the method is right as we do not want to proceed with anything that is not a POST request. After having read the body of the request (the email and password pair), we pass them to a fetch request to our FastAPI server, making sure to set the content type to JSON and the method to POST. After we get the response from FastAPI, we check whether it’s OK and proceed to set a cookie through the header. The options passed to the cookie serializer are the following: path set to /, which means that the cookie will be sent throughout the entire application, all the URLs, httpOnly is true since this was the whole point, so to speak, sameSite is set to strict, and maxAge is the duration of the validity of the cookie in seconds – here, I opted for a very short amount of time, just 30 seconds, so we can test things out, but ideally it should match the duration of the JWT itself and be around 60*60*24*7 minutes or about a week for this type of website.
Test the following endpoint with HTTP:
(venv) λ http POST http://localhost:3000/api/login email="[email protected]" password="marko"
You should get a response similar to this one:
HTTP/1.1 200 OK
Set-Cookie: jwt=eyJ0eXAiOiJKV1QiLCJhbGciOiJIUzI1NiJ9.eyJleHAiOjE2NTcxNDUxOTYsImlhdCI6MTY1NzEyMzU5Niwic3ViIjoiNjJiZjU5MWM3N2M3OWUxYTkwMmUwNTZhIn0.JKn-QcQ3DVaUZA_tAzQaDZnylFPY40qQDtWdFSOYdVA; Max-Age=30; Path=/; HttpOnly; SameSite=Strict
Vary: Accept-Encoding
{
"email": "[email protected]",
"role": "ADMIN",
"username": "marko"
}
All the data seems to be there – the set cookie and the data that we passed along with the cookie. We can now head over to the /pages/login.jsx page – a “proper” page – and create our login component. It is going to be very simple – just a form connected to the previously created /api/login API route. Once the correct credentials are provided, the cookie will be set. Later, we will discuss how we are going to use this cookie, but for now, let’s just set it from our frontend. Let’s now update our Login.jsx page in the /pages folder and enable the user to actually log in, using our login API route. Open the Login.jsx page and edit it:
import { useState } from "react";
const login = () => {
  const [email, setEmail] = useState("");
  const [password, setPassword] = useState("");
  const handleSubmit = async (e) => {
    e.preventDefault();
    const res = await fetch('api/login', {
      method: "POST",
      headers: { "Content-Type": "application/json" },
      body: JSON.stringify({ email, password }),
    });
    const data = await res.json();
   };
We aren’t doing anything special here: I am using just a couple of state variables in order to have two controlled inputs in our form, preventing the form from submitting by default and sending the email/password combination to our API route through a POST request to the Next.js API route. The rest of the functional component is mainly used for rendering the form:
return (
    <div className="flex flex-col justify-center items-center
        h-full">
      <h2 className=" text-orange-500 font-bold text-
          lg">Login</h2>
{error && (
        <div className="border-2 text-red-700 font-bold p-5">
          {error.detail}
        </div>
      )}
      <div>
        <form className=" max-w-md flex flex-col justify-center
            items-center"
          onSubmit={handleSubmit}>
          <label className="block">
            <span className="text-gray-700">Email</span>
            <input
              type="email"
              className="mt-1 block w-full"
              placeholder="your email"
              required
              onChange={(e) => setEmail(e.target.value)}
              value={email}
            />
          </label>
          <label className="block">
            <span className="text-gray-700">Password</span>
            <input type="password" required
              className="mt-1 block w-full"
              onChange={(e) => setPassword(e.target.value)}
              value={password}
            />
          </label>
          <button className=" bg-orange-500 text-white p-2 m-3
              w-full rounded-lg">Log in</button>
        </form>
      </div>
    </div>
  );
};
export default login;
If we test this page and submit our credentials, we will get an HTTP-only cookie and ideally, we should redirect the user to the home page. We are also displaying the error from FastAPI in case the email and password do not match, but this is all less important now. We have the cookie, and it will persist through page refreshes and the app being closed! While we’re at it, let’s implement a rather rudimentary but effective way of destroying the cookie – we will create an API route called logout.js in the API folder:
import cookie from 'cookie'
export default async (req, res)=>{
    res.status(200).setHeader('Set-Cookie', cookie.serialize(
        'jwt','',
        {
            path:'/',
            httpOnly: true,
            sameSite:'strict',
            maxAge:-1
        }
    )
    ).end()
}
This rather silly route doesn’t take any parameters and doesn’t return anything useful. Rather, it sets the token to a blank value and makes it expire instantly (maxAge:-1).
We are now able to obtain and destroy cookies that are HTTP only, therefore, not accessible through JavaScript, and we made sure that our FastAPI routes in the backend are secured.
Now, we face two different but highly related problems: we want to be able to keep track of this logged-in status and the type of user throughout the entire application, and we want to be able to filter out some pages completely, depending on the role of the authenticated user. I want to point out again that all this code is by no means meant for any kind of production site and that we cannot hope to be able to replicate the robustness, security, and ease of use of branded solutions such as Auth0, Amazon Cognito, Firebase, and the like. It is just a, hopefully, useful introduction to what is possible with Next.js and really any REST API that is secured via JWT, since we are not doing anything Python-specific at this point.
React Context API and custom hook
In order to make our app at least a bit more pleasant to work with, we will create (again) a Context for authentication, and it will not differ very much from what we did with plain React. Create a folder called /context in the root of our project and create an AuthContext.js file inside:
import { createContext, useState } from "react";
const AuthContext = createContext({})
export const AuthProvider = ({children}) => {
    const [user, setUser] = useState(null)
    const [authError, setAuthError] = useState(null)
    const [loading, setLoading] = useState(false)
    return <AuthContext.Provider value={{user, setUser,
        authError, setAuthError, loading, setLoading}}>
        {children}
    </AuthContext.Provider>
}
export default AuthContext
This mechanism was already dissected in Chapter 7, Authentication and Authorization, so I will not repeat the explanations. As with the React project, we will create a custom hook in order to make the context easier to work with. Create a folder called /hooks in the root of the project, and create the useAuth.js file:
import { useContext } from "react";
import AuthContext from "../context/AuthContext";
const useAuth = () => {
    return useContext(AuthContext)
}
export default useAuth;
The hook enables us to plug into the context quickly anywhere we might need it. In Next.js, the most logical place to put the context is the _app.js component, since it encompasses the entire app. Open _app.js and edit it:
import '../styles/globals.css'
import Header from '../components/Header'
import Footer from '../components/Footer'
import {AuthProvider} from '../context/AuthContext'
function MyApp({ Component, pageProps }) {
  return (
    <AuthProvider>
      <div className="min-h-screen flex flex-col container
        p-5">
        <Header />
        <div className="flex-1 "><Component {...pageProps}
         /></div>
        <Footer />
      </div>
    </AuthProvider>
  )
}
export default MyApp
Updating the Login.jsx component
Now our whole application is “aware” of the context and we provided just a couple of state variables and their setters: user, setUser for the user, the same for the error, and a pair of setLoading and loading for the loading stage since we’re going to try to get the user from the /me route from the cookie’s JWT. Now we can modify the Login.jsx page to accommodate the context. The rendered part is not altered, only the function:
import { useState } from "react";
import { useRouter } from "next/router";
import useAuth from "../../hooks/useAuth";
const login = () => {
  const [email, setEmail] = useState("[email protected]");
  const [password, setPassword] = useState("marko");
  const [error, setError] = useState(null);
  const { setUser } = useAuth();
  const router = useRouter();
  const handleSubmit = async (e) => {
    e.preventDefault();
    const res = await fetch("/api/login", {
      method: "POST",
      headers: { "Content-Type": "application/json" },
      body: JSON.stringify({ email, password }),
    });
    if (res.ok) {
      const user = await res.json();
      setUser(user);
      router.push("/");
    } else {
      const errData = await res.json();
      console.log(errData);
      setError(errData);
    }
  };
In this new version, the Login function does a bit more – after obtaining (hopefully!) the user data, it sets the context to the logged-in user and redirects us to the home page, making use of the Next Router, a simple hook that enables programmatic navigation.
While we’re at it, let’s create a Logout.jsx component for logging the user out. The procedure is the same – destroy the cookie by making it expire immediately, set the context to a null user, and redirect to the home page:
import { useRouter } from "next/router";
import { useEffect } from "react";
import useAuth from "../../hooks/useAuth";
const logout = () => {
  const { user, setUser } = useAuth();
  const removeCookie = async () => {
    const res = await fetch("http://127.0.0.1:3000/api/logout", {
      method: "POST",
      headers: { "Content-Type": "application/json" },
    });
  };
  const router = useRouter();
  useEffect(() => {
    removeCookie();
    setUser(null);
    router.push("/");
  }, []);
  return <></>;
};
export default logout;
Now it is time to update our Header.jsx file and make our navigation user-aware; if the user is logged in, we want to display their username and maybe enable some menu items that would otherwise be unavailable. But more importantly, we want to check whether the cookie containing a (valid) JWT is present and if so, load the user automatically by using the useEffect hook. Open up Header.jsx and begin editing it:
components/Header.jsx
import Link from "next/link";
import useAuth from "../hooks/useAuth";
import { useEffect } from "react";
const Header = () => {
  const { user, setUser, authError, setAuthError, setLoading, loading } = useAuth();
  useEffect(() => {
    setLoading(true);
    (async () => {
      const userData = await fetch("/api/user");
      try {
        const user = await userData.json();
        setUser(user);
      } catch (error) {
        setUser(null);
      }
    })();
    setLoading(false);
  }, []);
After importing our useAuth custom hook, we get access to all of our context data and we can conditionally show or hide menu items. If there is no user logged in, we want to show the register and login menu items, otherwise, the logout button and maybe some information on the current user. We also take this opportunity to insert a useEffect hook, a function that will fire off and try to verify our cookie. If a cookie is found and a valid user is retrieved, we set the setUser function to that user and it will be available throughout the app; if not, we set the user to be null. In between, I threw some isLoading states in case we want to inform the user that we are trying to retrieve the data from the API. The rest of the component is similar to what was previously written, except for some user-checking logic:
  return (
    <div className=" text-orange-600 py-2 font-bold flex flex-
        row justify-between items-center">
      <div>
        {loading ? <span>Loading...</span> : ""}
        <Link href="/">
          <a>
            FARM Cars
            {user ? (
              <span>
                {user.username} ({user.role})
              </span>
            ) : (
              ""
            )}
          </a>
        </Link>
      </div>
      <ul className="flex flex-row space-x-4 ">
        <li>
          <Link href="/cars">
            <a>Cars</a>
          </Link>
        </li>
        {user && user.role === "ADMIN" ? (
          <li>
            <Link href="/cars/add">
              <a>Add Car</a>
            </Link>
          </li>
        ) : (
          ""
        )}
        {!user ? (
          <>
            <li>
              <Link href="/account/register">
                <a>Register</a>
              </Link>
            </li>
            <li>
              <Link href="/account/login">
                <a>Login</a>
              </Link>
            </li>
          </>
        ) : (
          <>
            <li>
              <Link href="/account/logout">
                <a>Log out {user.username}</a>
              </Link>
            </li>
          </>
        )}
      </ul>
    </div>
  );
};
export default Header;
Next.js middleware
The menu now works as expected and the New Car item will not be visible in the menu. However, the page still exists, and it can be reached even if we are not logged in; you can try to navigate to the page, and it will load. You shouldn’t be able to insert new car ads because, without the cookie, you will not have a valid JWT to provide to the FastAPI server, but we do not want to give access to the page anyway. Yes, I know that the page doesn’t contain any form or means to input data; the point is that the page shouldn’t be available to anonymous users. While we could use our context API and verify the absence or presence of users and act accordingly, we could also use higher-order components, as we did with React Router. Instead, I want to showcase another very cool and useful feature of Next.js – the middleware.
Next.js middleware is essentially a set of user-defined functions that allows us to tap into the request-response cycle of Next.js and perform various operations, such as performing checks, setting and reading cookies, redirecting and modifying responses, and so on. While the features are documented on the Next.js website (https://nextjs.org/docs/advanced-features/middleware), you might be familiar with a similar concept if you have ever used Django or Express. Bear in mind that even FastAPI has a very similar feature of the same name! Let’s follow the instructions from the documentation. As with other “special” files such as _document.js and _app.js, middleware lives in a file called middleware.js at the same level as our /pages folder. I will just make a half-functional example here. I want to check for the mere existence of a cookie named jwt. If this cookie is present, users can proceed to the /cars/add page; otherwise, they will be redirected to the login page when trying to reach the said page:
import { NextResponse } from "next/server";
export function middleware(req){
    const url = req.url
    const cookie = req.cookies.get('jwt')
    if(url.includes('/cars/add') && (cookie===undefined)){
        return NextResponse.redirect('http://localhost:3000/
            account/login')
    }
    return NextResponse.next()
}
We imported just the NextResponse class from the “next/server” but feel free to explore other middleware goodies. After the import, we export a single function called middleware (again, the name is important) that takes in the request object and the response, which we won’t use, so it is omitted. We then take the URL of the request (which will match every request on the site because middleware runs on every request) and try to find a cookie named jwt. Finally, there goes our condition – if the URL includes /cars/add and there is no cookie called jwt (matches undefined), we redirect to /account/login. Otherwise, we call the next() page.
Now, if you are not logged in and try to go to the /cars/add page, you should immediately get redirected to the /account/login page. Middleware in Next.js is still a pretty new feature, but it is very powerful and can be used for many advanced use cases. Notice that here we are redirecting to our development localhost address, so this code should be refactored and the Next.js server address should be included in the .env.local site!
Implementing authentication flows by ourselves is a good learning experience and we should probably leave it at that. I want to point out again that there are numerous excellent authentication solutions both for the React/Next.js world and for FastAPI. Still, if you are new to the React Context API and to the world of hooks, implementing even a rudimentary authentication solution similar to the one presented in this chapter can help you grasp the majority of the moving parts involved in a full-stack project (in our case, a FARM stack project) and help you even in other similar technologies (Vue.js, Svelte, Node.js, Django REST framework, and so on).
Creating the page for inserting new cars
To complete our Next.js app, we are going to add just a couple of pages – the ones that actually have something to do with our initial purpose: building a car sales app. First, we need to create a page for adding cars, and this page is already “protected” by our Next.js middleware – only logged-in users can access the page and we know that only logged-in users can POST to our FastAPI backend. For this page, we are going to install two new Node.js packages: Axios (for structuring our API calls) and cookies-next, for reading our cookie from Next.js, extracting the JWT, and supplying it to the API call for creating a new car via a POST request. Stop the Next.js server and install the packages:
npm i axios cookies-next
Now we have everything in place, and we can begin creating our add.jsx page in the /cars folder:
import { useState } from "react";
import axios from "axios";
import { useRouter } from "next/router";
import { getCookie } from "cookies-next";
export const getServerSideProps = ({ req, res }) => {
  const jwt = getCookie("jwt", { req, res });
  return { props: { jwt } };
};
We are using useState for making our form inputs controlled, axios for the API call, the Next Router for navigating away from the page when we are done, and the getCookie function from the cookies-next package because we want to read the server-side cookies. In order to be able to use data from the server-side directly, Next.js provides us with a custom function called getServerSideProps that will be the centerpiece of our server-side page generation process.
getServerSideProps is one of the most important custom functions in the Next.js universe, as it enables us to get data from the server, pass it to the page as props, and then pre-render the page at request time. Normally, we use it to get data about the entity or group of entities that we want to display on a page, but in this case, we use it a little differently; we read the value of our JWT from the cookie that we obtained when logging in and we pass it to the page through props.
Next, we set up a bunch of stateful values for our form, but this should really be handled by a form library, as we did previously in the chapter on React:
const add = ({ jwt }) => {
  const [brand, setBrand] = useState("");
  const [make, setMake] = useState("");
  const [year, setYear] = useState("");
  const [cm3, setCm3] = useState("");
  const [price, setPrice] = useState("");
  const [km, setKm] = useState("");
  const [picture, setPicture] = useState(null);
  const [loading, setLoading] = useState(false);
  const router = useRouter();
Besides the form fields, we set up a loading state and instantiate the Next router – the React hook we already used for programmatic navigation when the request is completed. Now, we get to the important part of the component:
  const handleSubmit = async (e) => {
    e.preventDefault();
    const formData = new FormData();
    formData.append("brand", brand);
    formData.append("make", make);
    formData.append("year", year);
    formData.append("km", km);
    formData.append("cm3", cm3);
    formData.append("price", price);
    formData.append("picture", picture);
    setLoading(true);
The handleSubmit function will fire up when the user tries to submit the form, so first, we prevent the default form submit action and then we create a new FormData instance, appending all the values obtained from the states. Next, we try to make our API call, in this case using Axios instead of Fetch (which we have used until now):
    try {
      const response = await axios({
        method: "POST",
        url: "http://localhost:8000/cars/",
        data: formData,
        headers: {
          "Content-Type": "multipart/form-data",
          Authorization: `bearer ${jwt}`,
        },
      });
    } catch (error) {
      console.log(error);
    }
    setLoading(false);
    router.push("/cars");
  };
The important part is that now (since we have an image, thus, a file, to send), we must use multipart/form-data – that is why we made our Python FastAPI REST server accept form data instead of JSON. We also set the authorization using the JWT coming from the cookie. The function ends up redirecting us to the /cars page. In a realistic app, a friendly message for the user would be nice. Finally, we get to construct the form:
  {!loading ? (
      <form
          className=" max-w-md flex flex-col justify-center
              items-center"
          onSubmit={handleSubmit}
        >
          <label className="block">
            <span className="text-gray-700">Brand</span>
            <input
              name="brand"
              id="brand"
              type="text"
              className="mt-1 block w-full"
              placeholder="car brand"
              required
              onChange={(e) => setBrand(e.target.value)}
              value={brand}
            />
          </label>
I will omit the remaining fields (for the make, year, cm3, price, and km) for brevity, since they are identical – except the numeric ones are, well, set to number inputs. The picture field, however, is the following:
<label className="block">
   <span className="text-gray-700">Picture</span>
     <input name="picture" id="picture" type="file"
       className="mt-1 block w-full"
       onChange={(e) =>setPicture(e.target.files[0])}
       required />
</label>
<button className="bg-orange-500 text-white p-2 m-3 w-full
    rounded-lg ">Submit</button>
</form>
      ) : (
        <></>
      )}
      {loading && (
<div className=" bg-orange-600 w-full min-h-full text-white
    flex flex-col justify-center items-center">
<p className=" text-xl">Inserting new car</p>
</div>
     )}
    </div>
  );
};
export default add;
The file field provides an array of files by default, so we take the one with the index equal to zero (the first one) and we send it to the useState function. All the fields are required in the HTML, although additional validation would be necessary. Finally, we use the loading variable to display an ugly loading div while the file is being uploaded (for large pictures, it can take some time, depending on your connection!).
If you test the /cars/add page, you should be able to insert some car pictures (or really any pictures) and some data, and the images should be resized (by Cloudinary) and posterized by Python Pillow! Let’s create the most important pages now – the list of all cars and the individual car pages. I will not spend any time making them pretty, so be warned.
Creating the car list page
I have already mentioned that Next.js allows us to use three distinct page rendering methods: pure client-side rendering with React, server-side rendering, where pages are prerendered on the server and then sent to the browser (similar to Django and other old-school frameworks), or completely statically generated (SSG). For the car list page, we will use server-side generation, while the individual pages will be statically generated.
We will make use of the getServerSideProps function to get the cars from our API and then use them to construct our page – the function we’ve already used in order to get the cookie. We could have opted for a different strategy, but this is the most common approach in our type of scenario – we have a semi-dynamic website, so to speak: data should change and be updated, but not very often, so users will not miss important last-minute notifications. Let’s open the /cars/index.jsx page:
import Card from "../../components/Card"
export const getServerSideProps = async () => {
  const res = await      fetch(`${process.env.NEXT_PUBLIC_API_URL}/cars/`);
  const cars = await res.json();
  return {
    props: {
      cars,
      revalidate: 10,
    },
  };
};
After importing a still non-existing Card component that will be used for displaying the cars, we implemented a very simple async getServerSideProps function; it just makes a call to the API (we do not need any cookies or a JWT since this endpoint is not protected!), returns the resulting array of cars as JSON, and sets the revalidate to 10 seconds. This is the amount of time after which a page will be regenerated. The cars variable in props will be passed to our component:
const Cars = ({ cars }) => {
   return (
    <div>
      <h1>Cars</h1>
<div className="grid lg:grid-cols-4 grid-cols-3 gap-3">
        {cars.map((car) => {
         const {_id, brand, make, picture, year, km, cm3,
           price} = car
          return (
            <Card
                key={_id}
                brand={brand}
                id={_id}
                make={make}
                url={picture}
                year={year}
                km={km}
                cm3={cm3}
                price={price}
                />
          );
        })}
      </div>    </div>
  );
};
export default Cars;
The rest of the component is trivial; we pass all the individual car props to the Card component and we lay them in a grid. For the Card component, I wanted to plug in another way of using Cloudinary: the npm package called cloudinary-build-url. The package works together with Next.js and helps us create transformations, apply filters, or resize images on a component or page level. Stop the server and install the package:
npm i cloudinary-build-url
Card.jsx lives in the /components folder and is rather simple, with a little twist:
import Image from 'next/image'
import Link from 'next/link'
import { buildUrl } from 'cloudinary-build-url'
const transformedUrl = (id)=> buildUrl(id, {
    cloud: {
      cloudName: '<my cloud name>',
    },
    transformations: {
      effect: {
        name: 'grayscale'
      },
      effect: {
        name: 'tint',
        value: '60:blue:white',

      }
    }});
Our images are getting completely mauled by the various filters and transformations, but I wanted to showcase the different stages at which you can apply image transformations – at the upload stage, before the upload stage with Python and Pillow, and even when we are already in Next.js. buildUrl is straightforward: you need to create a function that will take in the ID or URL of your image, provide the cloud name, and list the transformations that you wish to apply. In a real-world scenario, one of these image stages should be more than enough:
const Card = ({brand, make, year, url, km, price, cm3, id}) => {
  return (
    <Link href={"cars/" + id}>
        <div className="max-w-sm rounded overflow-hidden
         shadow-lg cursor-pointer hover:scale-105
           transition-transform duration-200">
        <div className="w-full"><Image src=
          {transformedUrl(url)} alt={brand} height={300}
            width={600} /></div>
        <div className="px-6 py-4">
            <div className="font-bold text-xl mb-2">{brand}
              {make}</div>
            <p className="text-orange-600 font-bold">Price:
              {price} EUR</p>
            <p className="text-gray-700 text-base">
            A detailed car description from the Cars FARM
             crew.
            </p>
        </div>
  <div className="px-6 pt-4 pb-2">
    <span className="inline-block bg-gray-200 rounded-full
      px-2 py-1 text-sm font-semibold text-gray-700 mr-2
        mb-2">made in {year}</span>
    <span className="inline-block bg-gray-200 rounded-full
      px-2 py-1 text-sm font-semibold text-gray-700 mr-2
        mb-2">Cm3:{cm3}</span>
    <span className="inline-block bg-gray-200 rounded-full
      px-2 py-1 text-sm font-semibold text-gray-700 mr-2
        mb-2">Km:{km}</span>
  </div>
</div>
</Link>
  )
}
export default Card
The rest of the component is really just a bunch of Tailwind classes. If we try this, however, we will get a pretty descriptive error, stating that we haven’t whitelisted the Cloudinary domain in the Next.js settings and thus our images cannot be displayed. Head over to the next.config.js file in the root of our project and edit it quickly:
module.exports = {
  images: {
    domains: ['res.cloudinary.com'],
  },
}
This way, we are able to show images from the Cloudinary domain and if we should add other media sources, we would have to list them in this file.
Creating statically generated pages for individual cars
Our final part of this application will be to create individual pages for the cars. Since we will fetch our cars by their unique IDs generated by MongoDB and then converted to a plain string, we will make use of Next.js’s dynamic routes. Similar to React Router, Next.js offers a simple and effective way of creating pages based on a URL query. All we need is a special name for the page, enclosed in brackets, with the name of the parameter that we want to use for querying. In plain words, if we name a page/component [slug].jsx in a /articles folder, we will be able to reference the slug value in a URL in the form /articles/first in our code as a variable slug equal to “first.” Please do not take my contorted explanation for granted and head over to the Next.js routing tutorial, https://nextjs.org/docs/routing/introduction; it is thorough and simple.
Let’s create a new page in our /pages/cars folder, name it [id].jsx, and start editing it:
import Image from "next/image";
export const getStaticPaths = async () => {
  const res = await fetch(`${process.env.NEXT_PUBLIC_API_URL}/
      cars`);
  const cars = await res.json();
  const paths = cars.map((car) => ({
    params: { id: car._id },
  }));
  return { paths, fallback: "blocking" };
};
export const getStaticProps = async ({ params: { id } }) => {
  const res = await fetch(`${process.env.NEXT_PUBLIC_API_URL}/
      cars/${id}`);
  const car = await res.json();
  return {
    props: { car },
    revalidate: 10,
  };
};
After importing the Next Image component for rendering the picture, we have a Next.js function, getStaticPaths, which makes an API request and has to return all our unique identifiers that will be used for constructing the single car pages. Since we opted for the ID as the unique identifier, we are making a fetch request to get all the cars and then mapping through the array of cars in order to get just the IDs. In other cases, you might use unique article slugs based on the title and some combination of date or author. It is important, however, to keep this array filled with unique values that will enable us to get to the respective pages to be generated on the server side. This function returns a variable called paths enclosed in an object and additional options. The Next.js documentation recommends using getStaticPaths when statically pre-rendering pages that use dynamic routes – data coming from CMSs, databases, filesystems, and so on – so it perfectly fits our needs. We want the individual car pages to be statically rendered, indexed by crawling engines, and fast.
getStaticProps is the function that must be used with getStaticPaths and is responsible for generating the individual pages, based on the paths provided by the previous function. In our case, it takes the IDs as parameters, performs fetch requests in order to get the necessary data, and passes it to the page under props. From there on, we are creating a normal React, albeit static, page with the incoming car props:
const CarById = ({ car }) => {
  return (
    <div className="flex flex-col justify-center items-center
        min-h-full">
      <h1 className="text-xl font-bold text-gray-700">
        {car.brand} - {car.make}
      </h1>
      <div className=" bg-white p-5 shadow-md rounded-lg">
        <img src={car.picture} width={700} height={400} />
      </div>
      <div className=" text-gray-500 m-5">{`This fine car was
          manufactured in ${car.year}, it made just ${car.km}
              km and it sports a ${car.cm3} cm3 engine.`}</div>
      <div className="text-gray-500 font-bold">Price: {car.
          price} eur</div>
    </div>
  );
};
export default CarById;
Again, just an ugly page for the car, but prerendered on the server for all the cars in the database (or in the query).
There are numerous other features and even bare minimum requirements that our app is lacking, but we have no space to implement them all. We would probably want a Registration page in case users should register, and we lack basic interactions – messaging, comments, inquiries, or similar. That is not the point here, however; the sole purpose of the section was to give you a taste of the powerful FastAPI/MongoDB/Next.js combination. With server-side rendering, our applications can be blazingly fast, but only if we use the tools at our disposal correctly!
It is worth mentioning that the page completely lacks any meta information, but the documentation on using the Head component (https://nextjs.org/docs/api-reference/next/head) is extensive and straightforward.
Deployment to Heroku and Vercel
To conclude this chapter and have a well-rounded, albeit incomplete, project, we will now deploy our backend (FastAPI) to Heroku and our frontend to Vercel, a Platform-as-a-Service and hosting company that is, incidentally, the creator of Next.js.
You should already have a Heroku account if you followed the workflow described in Chapter 3, Getting Started with FastAPI so we will now proceed and create an account on Vercel. You can and should log in with your GitHub account since your deploys will be automatic from your repository once you set up the project. The process of deploying FastAPI to Heroku has already been discussed in Chapter 5, Building the Backend for Our Application – we just need to pass additional environment variables from our /backend/.env file, the new MongoDB database name, and Cloudinary data.
A personal note
Heroku seems to dislike when the requirements.txt file contains the packages’ version numbers – I guess it needs to figure the dependency tree by itself, so if you want to save yourself some time, try to remove the version numbers.
We will now turn our attention to Vercel. After creating an account by logging in with GitHub, you should already have added a repository within your /next-cars folder. If not, do it now, stop the Next.js server, and add the code:
git add .
Then, create a commit:
git commit -m "deployment to Vercel"
After you create the repository on GitHub and add the origin, you can push the changes to your main branch:
git push origin main
Now, heading over to Vercel, click the blue Deploy button and head over to https://vercel.com/new. Here, we can choose our next-cars repository and import it. The next step is to insert our environment variables; in my case, the API address on Heroku was https://calm-cove-22493.herokuapp.com (without the trailing slash!), so I used it for NEXT_PUBLIC_API_URL.
After hitting the Deploy button, the process will begin and you will be able to monitor it throughout the stages – preparation, generations of pages, and so on. Vercel is very verbose, so in case of some problems, you should be able to debug it and fix the issues.
After a, hopefully, successful deployment, Vercel will throw some confetti around and guide you to test the website on a custom URL. The application for this chapter is deployed on https://next-cars-two.vercel.app/.
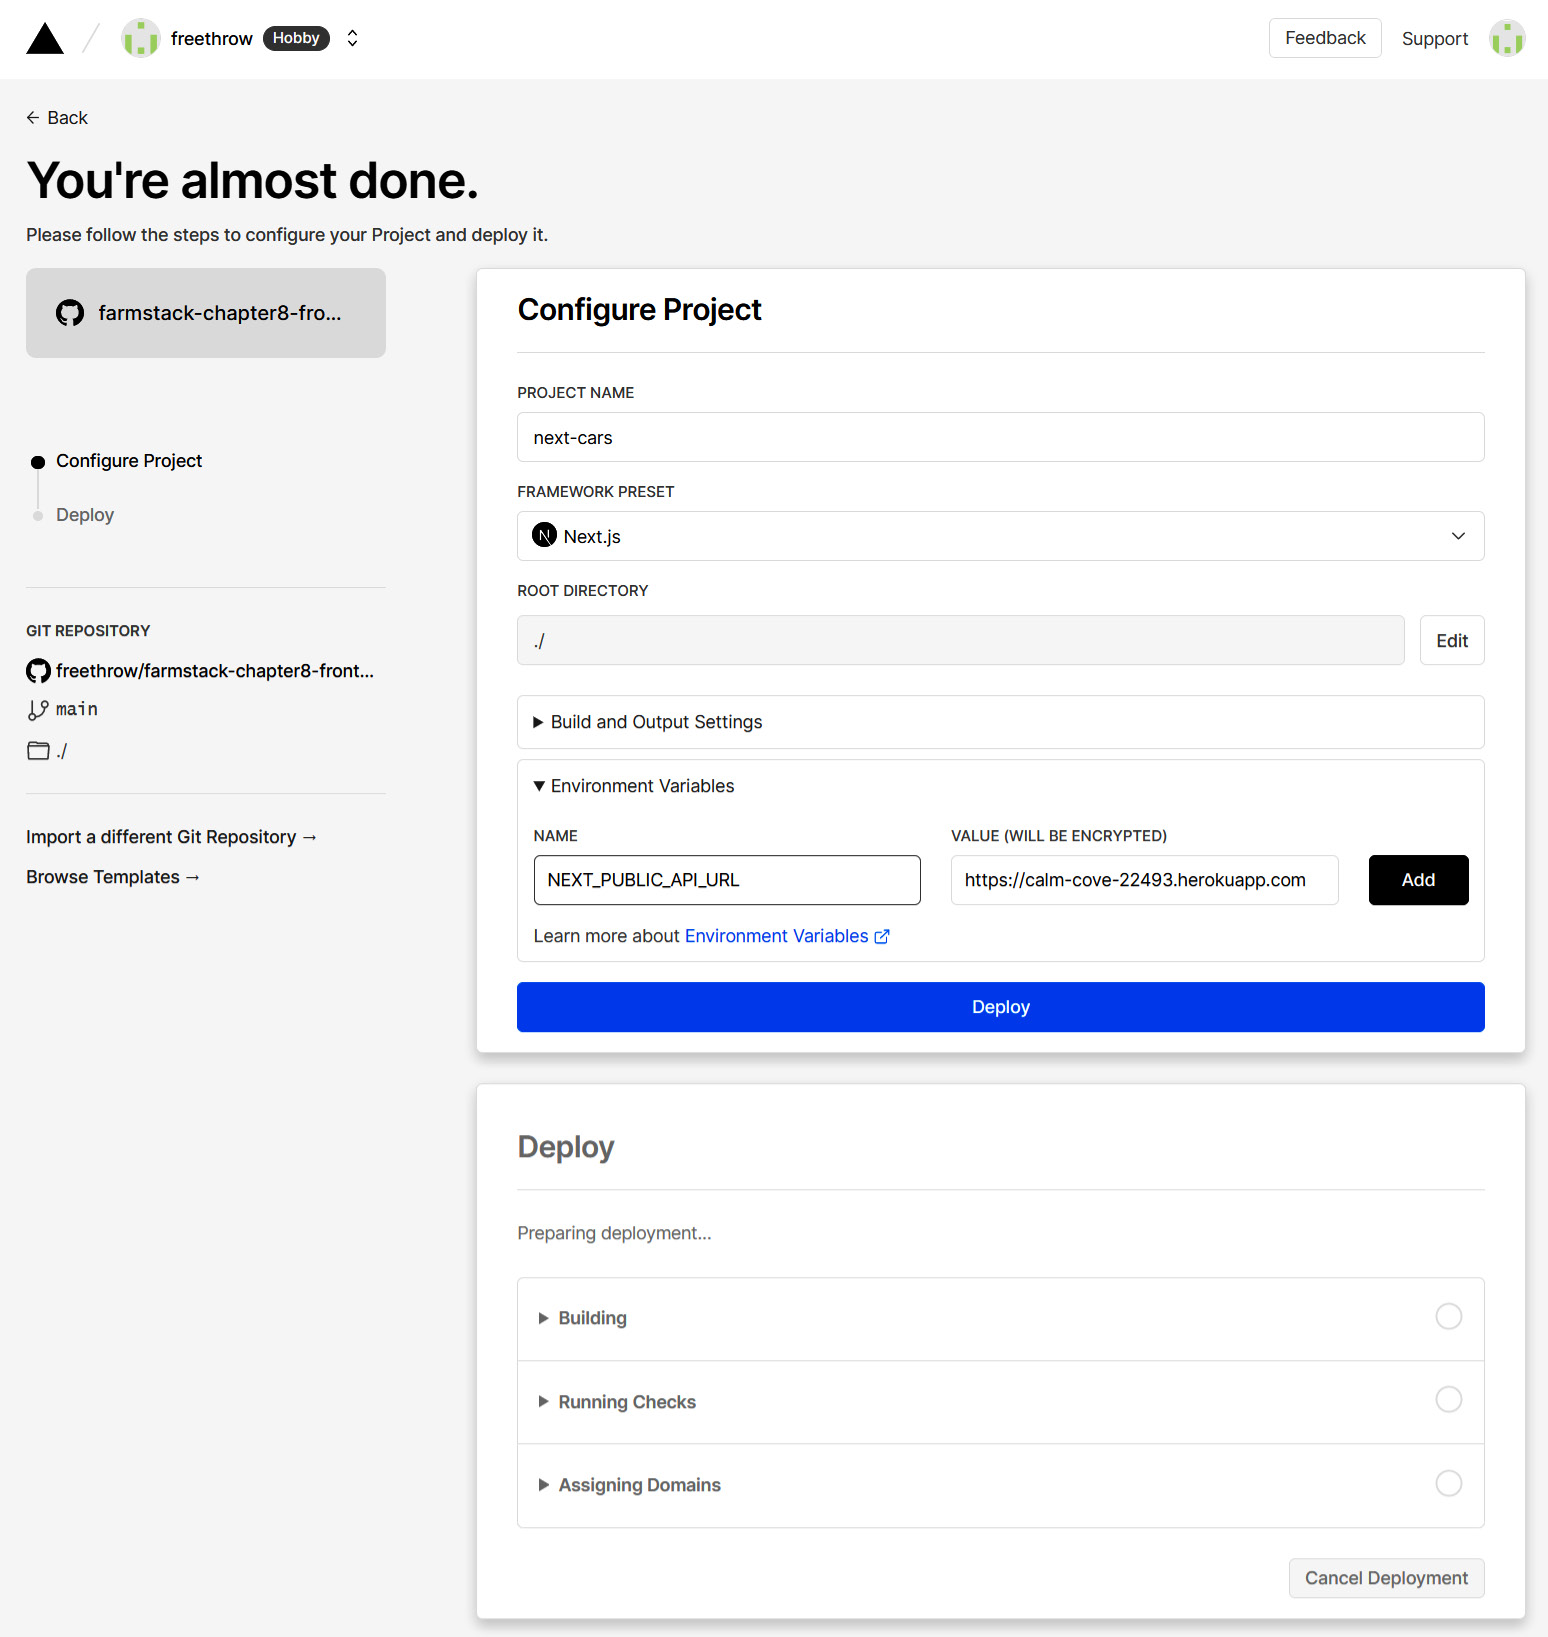
Figure 8.4 – The Vercel project configuration page and the Deploy button
The Vercel deployment page (Figure 8.4) is very informative and dynamic. It allows us to set environment variables and customize the deployment settings (we won’t do it here, though) and it informs us of the deployment status as it goes through various stages. Errors, should they arise, are displayed in the tabs below the Deploy title and allow for a quick and informative log-checking.
The deployment of Next.js on Netlify is very similar, with the environment variables setting process and the automatic deploys from GitHub, but we will examine this process with React.js in the forthcoming chapter.
Summary
In this chapter, you were introduced to Next.js – an incredibly feature-rich and powerful React-based framework, suitable for building all kinds of websites and apps. We covered server-side generation (SSG) and server-side rendering (SSR), as well as a more robust authentication system, using httpOnly cookies and API routes. You have learned the very basics of Next.js development and are now familiarized with the most interesting features and differences from plain React development. You have learned different ways of integrating images (or media files in general) into a complex pipeline, based on Cloudinary and Python Pillow and the powerful Next Image component. Finally, you were able to deploy your Next.js app on Vercel, a premier deployment solution, and put the GitHub repository into a continuous delivery and deployment pipeline. We’ve covered a lot of ground!
In the next chapter, we are going to go back to plain React and explore some topics that really set our FastAPI background apart from other REST API solutions, such as a (super-simple) regression system, some dashboard/data visualization, report generation, and serving them through an API.