
4
Setting Up a React Workflow
This title might be a bit awkward, but really, I am going to go over a bit of React since it is a vast topic that deserves a separate book, and there are plenty of very good ones on the market. I listed the reasons for choosing React in the first place, back when we were analyzing our stack in Chapter 1, Web Development and the FARM Stack, so we will not go over it again. Instead, I will try to make a concise and short introduction to React, while pinpointing what I feel are the most important topics and features that you should be aware of in order to be proficient as soon as possible.
In this chapter, we’re going to create a very simple React app, or better – the frontend of an app – through which we will showcase the main features and the most salient concepts that will make working with React worth your while. We will begin with the prerequisites and tools (such as Node.js, some Visual Studio Code extensions, and more). We will also learn how to use the standard command-line tool Create React App for quick-starting new applications, and then I will go over the concept of components and the role of JSX – the essence of React.
We will design a simple application in terms of components, and we will see how decoupling helps us write modular and maintainable code. We will briefly glance over two of the most important hooks and see how they solve some web development problems that are as ancient as the web itself. Finally, we will deploy our shell app and briefly discuss the deployment possibilities.
In this chapter, we will cover the following main topics:
- The basic ideas behind React
- Creating React apps and the resulting starter files
- Styling with Tailwind CSS
- Functional components and JSX – the language of React
- Managing state with the useState hook and communicating with APIs using the useEffect hook
- Exploring React Router and other goodies
By the end of the chapter, you will have created a minimal, yet fully functional React web app, and you will become part of an army of frontend developers who value simple tools to be able to achieve complex functionalities, without being confined within a strict framework.
Technical requirements
Starting a React project involves less setup, although the structure of the project will be more complicated than the Python one, as you will soon be able to see. Creating a React-based application used to involve several steps, such as setting up a build system, a transpiler, creating a directory structure, and more. Fortunately for us, a script, which is conveniently called Create-React-App, is there to do all the heavy lifting for us! The only requirement is to have a working and updated Node.js installation on your local machine.
If you do not have Node.js on your machine, head over to https://nodejs.org/en/download/, grab the version for your operating system, and then follow the instructions. I am currently using version 14, but feel free to use a newer version. When installing, check all the boxes – you want npm (Node.js’ package manager) and optional additional command-line tools if you are on a Windows machine.
Since you already have Visual Studio Code installed (haven’t you?), this is a good moment to install a great React extension called ES7+ React/Redux/React-Native snippets – it will allow you to speed up the creation of components – the building blocks of a React app. Finally, if you are developing and testing your apps in Google Chrome, there is a neat extension called React Developer Tools that will enable you to debug your react apps quicker and spot potential problems easier.
Let’s Create (a) React App
As I mentioned earlier, create-react-app takes away much of the heavy work when starting a project, and we will be using it throughout this book. However, bear in mind that there are other ways to set up React; for instance, you can include it through a CDN just like plain old jQuery if you want to go old-school!
Let’s create a simple app that we will be building upon in this introduction. Grab a folder, mine is called chapter4, cd into it, and from your Terminal of choice type in the following:
npx create-react-app cars
Now watch the magic happen before your eyes! Npx is a tool that is included with the latest versions of npm, and it allows us to run executable scripts without the need to install them on your machine. Please allow the process to finish. This can take a while and the output might be cryptic, but eventually, we will have a properly initiated React project ready to be developed.
The Terminal will inform you that you can run several commands, but at this point, we will follow the suggestion and change the directory into the newly created cars directory (because that is what we called our project when we ran create-react-app) and run the following command:
npm start
You will be greeted by a gray screen with a slowly rotating blue React logo. Success! However, behind this dead-simple page, there is tons of code, and we can examine this generated code by looking inside the cars folder that the good create-react-app robot (I always imagined it as a robot) built for us.
The is a node_modules directory that, like in all Node.js projects, contains all the project dependencies, and there are lots of them! You will not need to touch this folder except in extreme debugging operations, so let’s move on to the next one. In the Public folder, there are a couple of generic files that we will soon remove, such as the PNG logos and the favicon.ico file, but there is also an extremely important HTML file – the index.html. This bare-bones file contains a div, with the id of the root and this div is the place where React will put our whole application.
Moving on to the src directory, this is where we will be doing all of our work. The App.js file that represents our entire application – all the components, menus, headers and footers, lists, and controls – will be hosted on this file, which, in turn, will be rendered in our single div with the id of the root in the HTML file. This monstrous complexity is necessary for the flexibility and capabilities that React will be able to provide us while developing, in just a few more steps.
Since I will not delve much into the styling of our React apps in this book, I want to get it out of the way as quickly as possible and in the easiest way possible in my opinion. React enables us to style applications in a myriad of ways – you can use classic CSS style sheets or SASS, you can opt for JavaScript-style objects, and there are very modern and weird but efficient solutions such as Styled Components. Additionally, all of the major visual frameworks have a React version – Material UI, Bootstrap, and Semantic UI – you name it. I will be using Tailwind CSS, which has an atypical approach that I like, and I feel that it doesn’t get in the way too much. I found Tailwind CSS excellent for defining basic, simple styles that make the page look simple and clean, while it is perfectly good for achieving pixel-perfect designs from Figma or Adobe XD files if needed.
Tailwind CSS and Installation
Essentially, Tailwind CSS is a utility-first framework that translates CSS into a bunch of classes that can be used directly in the markup and enable us to achieve complex designs. Just by adding classes to our HTML elements, we will be able to create completely styled documents. Check it out on their excellent website at https://tailwindcss.com/ and get acquainted with it, as we will be using it for all our React-styling needs.
To install the Tailwind CSS framework in our cars project, we will follow the procedure from https://tailwindcss.com/docs/guides/create-react-app. Follow these steps:
- First, we need to install the packages using npm. Stop your server with Ctrl + C and run the following:
npm install -D tailwindcss postcss autoprefixer
The preceding command installs Tailwind and two other dependencies as development dependencies.
- Next, we will automatically create the necessary config files with the following command:
npx tailwindcss init -p
- Now, we need to tell Tailwind where to look for files. Open the tailwind.config.js file and make sure it contains the following:
module.exports = {
content: [
"./src/**/*.{js,jsx,ts,tsx}",
],
theme: {
extend: {},
},
plugins: [],
}
- Finally, edit the index.css file in your src folder, delete everything – the styles that powered our rotating logo page – and just leave the following:
@tailwind base;
@tailwind components;
@tailwind utilities;
- This is kind of embarrassing, but important. As it turns out, as of 2022, you need to run the following:
npm install postcss@latest
This is in order to update the postcss package to its latest version and make Tailwind work as expected. Do not forget to run npm start again – it will start our development server, which reloads every time we save our changes!
- Finally, edit the App.js file – clear everything and just leave the following:
function App() {
return (
<div className="App">
<h1 className="bg-slate-500 text-white text-
center">This is a Tailwind styled site!</h1>
</div>
);
}
export default App;
Don’t worry about the weird className stuff – this is JSX, React’s language for creating HTML – but take a look at the classes (they are classes, despite the naming). The first one tells Tailwind to apply a background of slate-500 (it’s a color) and the text-white and text-center classes are pretty self-explanatory. You will notice that Visual Studio Code does some nice autocompletion stuff as soon as you type in the first quote. Phew! We have a basic React + Tailwind setup. Now let’s move on and see whether it was worth it. If you want to practice Tailwind CSS a bit, try creating a full-height page with some creepy dashed borders! Next, we will tackle the most fundamental parts of React: JSX. This is the language that React uses to create the HTML and the components – the building blocks that will eventually compose our application.
JSX and the Components – the building blocks
We might safely say that JSX is the glue that holds the whole React concept together. The smallest building blocks of a React page or app are so-called React elements. A simple element might be as follows:
const title = <h1>The Car Sales App</h1>
This is an interesting concept – it looks like an H1 HTML element, but it also definitely looks like JavaScript, too. And you would be right – JSX enables us to create React elements that can be inserted into React’s virtual DOM tree that is different from the actual HTML. React takes care of the tedious job of updating the DOM to match the virtual DOM and compiles the JSX elements (through something called Babel) into actual HTML elements. Why JSX, you wonder? Well, first, it is a full-fledged programming language – JavaScript in all its glory and power. React elements are immutable – once we create them, we cannot change them, and as the React site states, they are like single frames in a movie. However, they can be replaced with new elements.
It is important to note that every React component, including our App file, which is currently the only component that we have, must return one and only one element – a div or a fragment (essentially, an empty tag, <>) and all the React elements enclosed in it. Let’s try and write some simple elements and modify our App.js file to look like this:
function App() {
  let data = ["Fiat", "Peugeot","Ford","Renault","Citroen"]
  return (
    <div className="App max-w-3xl mx-auto h-full">
     <h1 className="bg-slate-500 text-white text-center
       ">This is a Tailwind styled site!</h1>
      <div>
        {data.map(
          (el)=>{
            return <div>Cars listed as <span className=
              "font-bold">{el.toUpperCase()}</span></div>
          }
        )}
      </div>
    </div>
  );
}
export default App;
Our simple page should look like the following:

Figure 4.1 – Our nearly blank Tailwind CSS – the React page
Let’s take a look at what we just did, or better yet, what JSX was able to provide us. First, we have declared some data – a simple list of car brands in an array. For now, we will pretend that we got this data from an external API. After all, it’s all JavaScript. Then, in the return statement, we were able to map over this array using the JavaScript map function – we called the elements of the el array. Finally, we return these elements – in this case, they are strings, and we wrap them in template literals (another ES6 feature) and, just to be fancy, transform them to uppercase. The whole function returns exactly one div element. Since class is a reserved name in JavaScript, React uses the className keyword, and we can see that we used it quite a bit since Tailwind is very verbose.
Finally, let’s add a little something to our App.js file, so React doesn’t complain in the console. Change the return statement by adding a key property:
return <div key={el}>Cars listed as <span className="font-bold">{el.toUpperCase()}</span></div>The key is a unique identifier that React needs anytime it creates arrays of DOM elements, so it knows which one to replace, keep, or remove. This is a rather simplistic example, but it shows the basics of the power of React’s handwriting – JSX. The important thing to remember is that we have to return exactly one element – be it a div element, a title, or a React fragment.
To sum it up, and for those of you who might be coming from a different UI framework or library (such as Vue.js, Svelte, or Angular), React does not have a proper templating language with a dedicated syntax for looping over arrays of objects or if-else constructs. Instead, you can rely on the full power of JavaScript and use the standard language features such as map for iterating through arrays, filter for filtering data, ternary operators for if-else constructs, template literals for string interpolations, and more. Coming from classical templating languages such as Jinja2 and Handlebars, I must admit it can take some time to adjust. But after a while, it becomes very natural, and you don’t really have to think much about rules and what can and cannot be done (almost anything can!).
Now we will speak about arguably React’s most important feature – components.
Components
The whole idea or paradigm of modern web development (we’re talking 2020s modern) is built around the concept of breaking complex UIs into smaller, more manageable units – components. In React since its beginning, components could be created by extending a JavaScript component class, using the render method, and defining functions. With the introduction of hooks, which are special functions that allow us to interact with the state and life cycle of the components directly, React development became much more flexible and concise – at least in my humble opinion. But let’s talk about components.
Components are reusable pieces of the UI, and we can think of them as functions returning JSX – pieces or units of UI. One of the first stages of planning the development of a react site is the identification of areas, that is, pieces that could be abstracted into components and reused in some way or, at the very least, abstracted into separate units.
Let’s try to create a minimal component for displaying the header on a page. The component should have an easy task: just to display the header, in our case, the title of the page, and maybe some simple navigation links.
Functional components in React.js are defined as files with .jsx or .js extensions, and like our App.js file (which is also a component – the root component), they must return a single JSX element. The filenames should be capitalized. This is a great moment in which to use our previously installed React extension for Visual Studio Code as it provides useful snippets for creating standard components. Follow these steps:
- Let’s create a folder called components in our src folder along with a new file called Header.js in it.
- Now, open the newly created file and type in rafce. The editor should suggest something cryptically to you, called reactArrowFunctionExportComponent.
- Select it and you will see your file filled with a typical ES6 arrow function component exported:
const Header = () => {
return (
<div>Header</div>
)
}
export default Header
This file defines a single JSX topmost element – called Header – and exports it at the bottom.
- Let’s make some edits to this file, making use of our Tailwind CSS framework classes: we will make a div element on the left-hand side containing the title and a couple of links on the right-hand side. At this point, we will not worry about responsiveness or fancy coloring. I just want to create some contrast so that we can see what we have made:
const Header = () => {
return (
<div className="flex flex-row bg-orange-600 text-
white align-middle justify-center p-5">
<h1>Cars Sales App</h1>
</div>
)
}
export default Header
- After these edits, which we will explain in a bit and which are purely Tailwind-related, go ahead and import the first component to our App.js file. Imports are handled in terms of the relative path – just remember that the dot denotes the current directory of the file (src, in our case), while /components is the folder in which we are keeping our components. The App.js file should now look like this:
import Header from "./components/Header";
function App() {
let data = [
{brand:"Fiat", color:"green", model:"500L",
price:7000, "year":2020,"id":1},
{brand:"Peugeot", color:"red", model:"5008",
price:8000, "year":2018,"id":2},
{brand:"Volkswagen", color:"white", model:"Golf
7", price:8500, "year":2019,"id":3},
{brand:"Fiat", color:"green", model:"Tipo",
price:10000, "year":2019,"id":4},
{brand:"Kia", color:"black", model:"Ceed",
price:6000, "year":2010,"id":5},
{brand:"Volkswagen", color:"white", model:"Golf
7", price:8500, "year":2019,"id":15},
{brand:"Fiat", color:"gray", model:"Ritmo",
price:300, "year":1990,"id":21}
]
return (
<div className="App max-w-3xl mx-auto h-full">
<Header/>
<div>
{data.map(
(el)=>{
return (
<div key={el.id}>
<span className="font-bold">
{el.brand.toUpperCase()}</span>
</div>
)
}
)}
</div>
</div>
);
}
export default App;
If you reload our app… I’m just kidding, React should be doing that job for you if you haven’t stopped the npm run start process. You will see that our simple web page now has a simple header component. It is an H1 element and has some basic formatting – it is orange and centered. We imported the component as a self-closing tag.
So, you just made your first, very simple, React functional component. In this way, we can break down the functionality of our entire website: we can add a footer, maybe some navigation, and more. In fact, the process of breaking an app down into components and deciding what should constitute a single component is so important that the React documentation has an excellent page dedicated to the process: https://reactjs.org/docs/thinking-in-react.html.
In the following diagram, you can see a simple example of breaking an application user interface into separate components. Each rectangle represents an independent component that is imported into the main app component. Some might be repeated several times, while others – such as the header and the footer – might be present with only one instance:

Figure 4.2 – Breaking an app into components
Crafting components like this is nice and quick, but it can become boring if the output is… fixed, so to speak. Fortunately, React components are functions, and functions can take arguments, and usually, they are able to do something useful with those arguments. Let’s say that we want to create a component that will replace our rather ugly-looking list of car brands and display the information in a more eye-pleasing and informative way. We can then pass the data for each car in our data array (an object) and have it formatted the way we want.
Let’s redo our procedure for building components. Follow these steps:
- Create a new file in the components folder, name it Card.js, and type rafce in order to get the VSC extension to fire. You will then see something like this:
const Card = () => {
return (
<div>Card</div>
)
}
export default Card
- Now, let us import the Card component into our App.js file in the same way as we did with the Header:
import Header from "./components/Header";
import Card from "./components/Card";
function App() {
let data = [
]
return (
<div className="App max-w-3xl mx-auto h-full">
<Header/>
<div>
{data.map(
(el)=>{
return (
<Card key={el.id} car = {el} />
)
}
)}
</div>
</div>
);
}
export default App;
Now, instead of returning the divs when mapping through our data – we are returning our Card component and passing it the key (that is, the ID of the car object; note that it just has to be unique or React will yell at us!). Additionally, we are passing it something that we called car and set to the element – the car object.
If you take a look at our page, you will not be impressed – it’s just a bunch of Tailwind-bland Card texts. However, we did achieve something – we passed data through props (short for properties) to each Card. We just have to “accept” it in the component.
- Let’s call this function argument props and log it to the console. In the Card.js file, modify the first two lines:
const Card = (props) => {
console.log(props)
return (
<div>Card</div>
)
}
export default Card
The app will not change, but if you take a look at the console output in Google Chrome, you will see that we are getting back all of the car objects inside our Card components.
- Now we can go on and populate the Card with the data:
const Card = (props) => {
return (
<div>
{props.car.brand}
{props.car.model}
{props.car.year}
{props.car.price}
{props.car.color}
</div>
)
}
export default Card
We’ve got something that will not win any design awards but will get all of our data back into the component.
- Now you can get creative: dive into some Tailwind CSS documentation and come up with a card style that you like. I am going to make something really simple, and I am going to get rid of this props.car repetition by using some JavaScript ES6 destructuring:
const Card = ({car}) => {
let {brand, price, model, year, color} = car
return (
<div className="shadow-md p-5 flex flex-col">
<div className="font-extrabold text-center
border-b-2">{brand} {model}</div>
<div>Year: {year}</div>
<div>Price: <span className="font-semibold
text- orange-600">{price}</span></div>
<div>Color: {color}</div>
</div>
)
}
export default Card
In the App.js file, I have just added a couple of classes to the wrapper div: grid grid-cols-3 my-3 gap-3. Once you get the hang of Tailwind CSS, you will be able to read them very easily. We make the div to a grid with three columns, and we add some y-padding and a grid-gap.
We have seen how easy it is to pass props to components, and once we can do that, the sky is the limit! Well, not quite. Props provide one-way communication, but in the majority of apps, you will have to deal with the state.
I will not delve into some of the very technical definitions of state. Since React’s job is to keep the UI in sync with the current situation of our app, we can stick to a more descriptive definition.
A state can be thought of as a set of data that represents the user interface (UI) at any given moment. In our case, the state could be a set of selected cars, which we would like to inquire about and save them for later by giving them stars or some follow icon. Forms can have different states depending on the types of inputs: text fields can be empty (waiting to be filled) or populated, checkboxes can be checked, or unchecked, and drop-down menus can be selected or not. You get the idea. The state is such an important topic in React (and, to be honest, in other UI frameworks and libraries) that entire books and conferences are dedicated to it. In this chapter, we will barely scratch the surface of how React Hooks help us to define and maintain state throughout our component’s life cycle, that is, while the component is alive.
In the early days of yore, you had to create React components by extending the JavaScript classes and maintain the state through a series of this calls that made working with the state a bit verbose and cumbersome. With the introduction of React Hooks, we have at our disposal several easy mechanisms for dealing with the state, from very simple ones to more complex ones. In the next section, we are going to take a look at a couple of React Hooks and learn how they can help us to write concise and maintainable code.
React Hooks, events, and state
A great definition of React or its components is that it is, essentially, a function that converts a state to a user interface – a React component is literally a function, as we have seen, and it takes props as arguments. The output of the function (the component, really!) is a JSX element. Essentially, React hooks are functional constructs that enable us to tap into the life cycle of a component and mess with its state.
Creating stateful variables with useState
The first, and probably the most fundamental hook, is the useState hook, which enables us to maintain a certain state throughout our component. Let’s say that we want to maintain some kind of state in our one-page app – we want to set a budget limit and how much money we are willing to spend, so the website doesn’t try to lure us into even looking at those cars that are just too expensive. We will make a simple textbox, set it to display just numeric values, and hook it up with a state variable that we will aptly name budget. I have made quite a few changes to the App.js file, but we will go over it line by line:
import Header from "./components/Header";
import Card from "./components/Card";
import {useState} from ‘react’
function App() {
   let data = [ ]
   let [budget, setBudget] = useState(4000)
    const onChangeHandler = (event)=>{
    setBudget(event.target.value)
  }

  return (
    <div className="App max-w-3xl mx-auto h-full">
     <Header/>
     <div className="border-2 border-yellow-500 my-5 p-
       3">Your current budget is:
      <span className="">{budget}</span></div>
      <div className="grid grid-cols-3 my-3 gap-3">
        {data.map(
          (el)=>{
            return (
              <Card key={el.id} car = {el} />
               )
          }
        )}
      </div>
      <div className="bg-gray-300 rounded-md p-3">
        <label htmlFor="budget">Budget:</label>
        <input type="number" onChange={onChangeHandler}
            id="budget" name="budget" min="300" max="10000"
                step="100" value={budget}></input>
      </div>
    </div>
  );
}
export default App;
Let’s see what we did here. First, we imported the useState hook from React. The useState hook, probably the simplest of them all, returns two values – a variable (which can be anything we want – an array or an object) and a function that sets the value for this state variable. Although you can use any legal JavaScript name, it is a good convention to use the name of the variable – in our case, budget – and the same name, prepended with set: setBudget. That’s all there is to it! With this simple line of code, we have told React to set up a state unit called budget and to set up a setter. The argument of the useState() call is the initial value. In our case, we have set it to be 4,000 Euros:
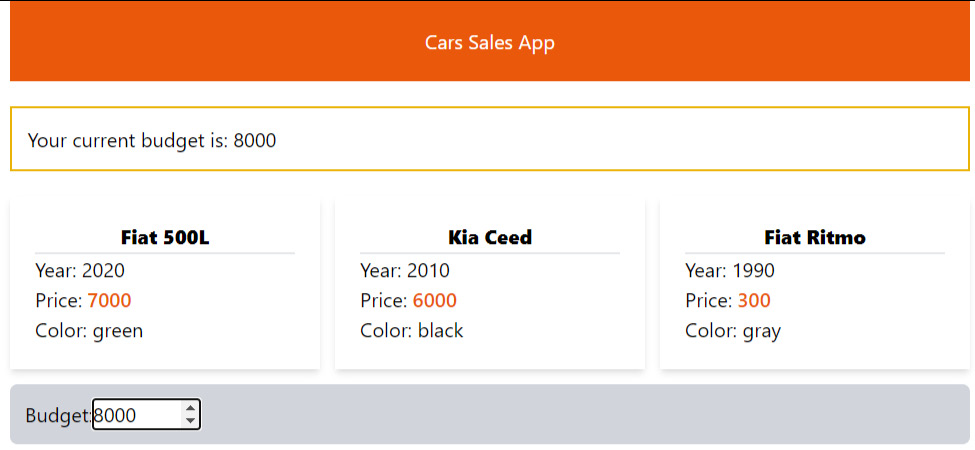
Figure 4.3 – Our minimal React Tailwind page
Now we are free to use this state variable across the page. Note that we placed the useState call inside the App functional component – if you try to place it elsewhere, it will not work: hooks tap into the life cycle of components from the inside of the bodies of the functions defining the components themselves.
Moving down to the bottom of the component, we can see that we added a simple textbox. We set it to only display numeric values with HTML, and we added an onchange handler.
This is a good moment to mention that React uses the so-called SyntheticEvent – a wrapper around the browser’s native events that enables React to achieve cross-browser compatibility. The documentation is very straightforward, and you can find it on the React website: https://reactjs.org/docs/events.html. Once you have remembered a couple of differences (the events are using camelCase, rather than lowercase, and you must pass them a function in JSX), you will be writing event handlers in no time.
Back to our App.js file. We added an onChange event to the textbox and set it to be handled by a function – we called it onChangeHandler.
This onChangeHandler could hardly get any simpler: it just takes the current value of the textbox (target.value, just like the original DOM events; remember, it’s just a wrapper) and sets our budget state to this value using our useState call defined just above the function. Finally, we added a div element just below the Header component that uses this budget value and displays it. That’s it – we added a state variable to our app – the root component. We can set it and get it, and we are displaying it on the page!
Now let us try another thing. We have the user entering their budget and displaying it on the page. Wouldn’t it be nice if we could somehow differentiate between cars that fit said budget and those that do not? To get this to work, we will need to set our small data sample that is currently hardcoded to be a state variable itself, and then we could just filter it and display only those within our price range.
I will not go through the code for this, but you can find it in this book’s GitHub repository. The procedure would be to set a new state variable that holds an array of cars satisfying the condition that their price is less than or equal to our budget (hint: JavaScript filtering arrays) and then just add setDisplayedCars to the budget event handler.
At this point, I must encourage you to dive into the excellent React.js documentation and learn more about the useState hook and its big brother, the useReducer hook. This is a hook that might be thought of as a generalization of the useState hook and that is best suited when you have to deal with numerous pieces of state that are interconnected, so managing them with many simple useState hooks could end up being tedious and difficult to maintain.
Now I am going to delete the contents of our App.js file, leaving only the empty Tailwind-styled canvas and the header:
import Header from "./components/Header";
function App() {
  return (
    <div className="App max-w-3xl mx-auto h-full">
     <Header/>
    </div>
  );
}
export default App;
You have seen how the useState hook enables you to add a stateful variable in a very simple and straightforward way and how to manipulate the state through regular events.
Now it is time to see how we can get our data from our efficient FastAPI backend into our beautiful React.js frontend. We will get to know another hook: useEffect.
Communicate with APIs using useEffect
We have already seen how React and its components transform the state and the data into a user interface. We will do all the fun stuff of connecting our MongoDB layer to FastAPI and then powering a React frontend in the following chapter. Here, we will use a free mock rest API. However, we do need to address the problem of accessing external data and the management of external events in general. “External” with regards to what, you might wonder?
Well, we have seen that React and its mighty hooks are centered around the task of synchronizing the UI to the state and the data. Components can contain other components, and together, they form what is known as a component tree, which is then constantly compared to the current state. React does all of this coordination work – what should be rendered, updated, and more.
Events that are outside the flow of the React data flow process are called side effects. Some side effects might be setting or getting data values in local storage or session storage (maybe we want to save the data of logged-in users’ until the next session), measuring the dimensions of some DOM element (for instance, we want to display different layouts for different browser sizes), and most notably, getting or fetching data from an external system, maybe in the form of a REST API call.
When working with React, one thing to always bear in mind is that it works in a continuous data flow, with an underlying system constantly scanning for updates and ready to re-render components that it deems in need of an update. We will illustrate this with a simple example. We are working on our Cars Sales application, and we need to list all the users that were kind (and smart enough!) and registered an account.
The task at hand is a simple and common one. We have a dedicated page – it will probably live in a URL called /users or something similar, and it should be populated with the data (think of a JavaScript array of objects) from an external API. This API will be powered by FastAPI, but for now, we will use a readymade mock solution called Regres.
The GET call we need to make should be directed toward the URL, https://reqres.in/api/users.
We already understand how to make components, provide them props, and set their state, so that shouldn’t be a problem. But what are we going to do about loading data from an external API? We’ll just use something such as Fetch or Axios, right? Like we were using a normal plain JavaScript app. Let’s give it a try:
- Modify the App.js in a way that includes a standard fetch call to the API, including the json method to get the data to a console:
import Header from "./components/Header";
function App() {
fetch('https://reqres.in/api/users')
.then(response=>response.json())
.then(json=>console.log(json))
return (
<div className="App max-w-3xl mx-auto h-full">
<Header/>
</div>
);
}
export default App;
Our app will continue to be blank with an orange header, but if you take a look at the console in Chrome, you will see that we are actually getting our users back, six of them. So, we just need to put them in a state variable, and we should be good to go, right?
- Let’s add a state variable and a corresponding set method by using our old friend, the useState hook (warning: the following code is wrong, and it will bomb your browser and, potentially, get you into trouble with your API provider!):
import {useState} from 'react'
import Header from "./components/Header";
function App() {
let [users, setUsers] = useState([])
fetch('https://reqres.in/api/users')
.then(response=>response.json())
.then(json=>setUsers(json['data']))
return (
<div className="App max-w-3xl mx-auto h-full">
<Header/>
<ul>
{users.map(
(el)=>{
return (
<li>{el.email}</li>
)
}
)}
</ul>
</div>
);
}
export default App;
The preceding code just won’t run, or it will run but not in the way that you might expect. If you manage to open the developer’s console in Chrome, you will see that the page is constantly making requests to our poor API server, flooding it in the process. Why is that?
I found this problem very illustrative of the way React works, and once you get the hang of it, it will begin to make sense. The problem is located at the top of the App function. We declared a state variable with useState, and then we naively proceeded to set its value after a fetch call to our external API. After firing the setUsers method, React noticed that there is a change of a state variable, so a re-render is in order. Then, React just calls the function again, re-encounters the fetch call, sets the value of a state variable, and… you get it. We are in an infinite loop.
The useEffect hook is meant for cases like this – interacting with the world outside of our React app in a safe and controlled way.
- The syntax of the hook is quite simple, import it directly from React, and then call it inside our component with the following form:
useEffect(()=>{
console.log("This just happened!")
},[])
Note that useEffect takes in two arguments – the first is a function that will execute after every render, and the second one is an array of dependencies in which we list all the values that we want to monitor for a change. If any of these values change, the function declared as the first argument will run (again).
- Armed with this knowledge, we can turn to our App component and try something like this:
import {useState, useEffect} from 'react'
import Header from "./components/Header";
function App() {
let [users, setUsers] = useState([])
useEffect(()=>{
fetch('https://reqres.in/api/users')
.then(response=>response.json())
.then(json=>setUsers(json['data']))
},[])
return (
<div className="App max-w-3xl mx-auto h-full">
<Header/>
<ul>
{users.map(
(el)=>{
return (
<li key={el.id}>{el.email}</li>
)
}
)}
</ul>
</div>
);
}
export default App;
Like some kind of magic, the page seems to display our data just the way we wanted it – a list of user emails, for a total of six (our API will not give us more than that, but it is more than enough for our purposes). Add after this:
You might be wondering why we passed an empty array to our useEffect function. Simply put, this array - also known as a dependency array - allows us to control when the useEffect will fire. In our case, we provided an empty dependency array so the useEffect hook function will fire off only once, after the initial render. If we provided a state variable, controlled via a useState hook to the array, useEffect would fire every time that provided state variable changed.
The React documentation on the subject is a very useful read: https://reactjs.org/docs/hooks-reference.html#conditionally-firing-an-effect
Now, since we want to showcase our dependency array, we can make use of the fact that our REST API of choice offers us two pages of users: https://reqres.in/api/users?page=2.
- We can make another state variable, an integer, to monitor the page we are currently viewing, and we can make a simple button with a state handler. The handler function will make use of ES6’s ternary operator – if the state is equal to 1 set it to 0 and vice versa:

Figure 4.4 – Displaying users from an external API
The code for adding the toggle – logic is straightforward:
import Header from "./components/Header";
import {useState, useEffect} from 'react'
function App() {
let [users, setUsers] = useState([])
let [page, setPage] = useState(1)
useEffect(()=>{
fetch(`https://reqres.in/api/users?page=${page}`)
.then(response=>response.json())
.then(json=>setUsers(json['data']))
},[page])
return (
<div className="App max-w-3xl mx-auto h-full">
<Header/>
<button className="border border-gray-500 rounded-md
p-2 m-5" onClick={()=>{page===1?setPage(2):
setPage(1)}}>Toggle users</button>
<ul>
{users&&users.map(el=>{
return (
<li key={el.id}>{el.email}</li>
)
})}
</ul>
</div>
);
}
export default App;
We also made sure to short-circuit the users’ array variable and the JSX mapping logic, and added the page variable to the useEffect function’s dependency array – this way the function will execute every time there is a page number change, or toggle.
Note that in the book’s repository this application is separated and called Users, in order to preserve all the code form both apps.
Finally, useEffect only fires when the contents of the dependency array change, and in our case, that is the page variable. Now, clicking on the button fetches us the first or second page of the users, and no API calls are made in between, except for the initial fetch that follows immediately after the first component render.
Like with useState, there are much more subtleties involved. For example, we can provide a cleanup function at the bottom of the useEffect body to make sure that any long-lasting effects are removed and so on, but this should give you a basic idea of how to handle actions that reach out to an external API.
There are several other hooks that you will want to use in your projects – the useMemo hook for memoizing values of a function helps us to avoid unnecessary repeated costly function calls. Additionally, useContext allows React to cover an entire area of components and pass values directly without having to pass them through several components that might not actually need it (prop drilling). We can even create our own hooks and abstract functionality that can be reused in several places of the app, ensuring better maintainability and less repetition. In the upcoming chapters, we will use a couple of hooks in order to achieve the desired functionality elegantly and simply.
In conclusion, a personal note – I tried to learn React while there were no hooks around, and I must be honest, I did not like it. The state management with class components and life cycle methods just did not sit well with me, and I admit that, probably, my background and lack of classical Computer Science training played a role in that. With the entrance of hooks, the whole ecosystem just became much clearer and cleaner, and the mapping of business logic to UIs is much more streamlined and, well, logical. I can only suggest that you take some time and dive into the hooks system, it will be worth it, I promise!
You now have the knowledge that is necessary to set and get states in your components or apps and to communicate with external API services in a predictable and controllable way, while crafting clean and simple code. Just using React and its hooks can give you web developer superpowers, but there is a whole world of packages and modules built around React that is just as important as the core libraries.
Exploring React Router and other goodies
So far, we have only created a couple of single-page apps that are really single pages – we haven’t touched some advanced functionalities, and they do not even qualify as apps. However, single-page apps are not limited to a single URL – if you navigate to your Gmail account, you will see that the URL does, in fact, change with every action that you might take. While there are several solutions that enable us to achieve routing in Single-Page Applications (SPAs), React Router is the de facto standard solution, and it is a well-tested, mature package that has recently had a major update (version 6).
The underlying idea of a frontend page router is that it enables us to render different components on the same page depending on the route that is loaded. For instance, the /about route would cause the app to load a component called About.js in the main App component, removing other, previously loaded components and so on. In its latest version, React Router has made some breaking changes, but the logic is unaltered. The package provides us with a basic structure – BrowserRouter – which is used to wrap our entire root App component. We will create a basic router for our cars application in the next chapter, but here, I just want to convey the idea and the principles that lie underneath.
React itself is so popular and omnipresent that it has created an impressive ecosystem around itself. I have already mentioned that, besides Tailwind, you can use virtually any UI or CSS framework either directly or through some optimized React version, such as Bootstrap, or more reacty such as Ant design. We can enhance our user experience with subtle animations through React Motion, and we can speed up the development of forms with some excellent form libraries such as Formik or React Hook Form. For complex state problems, Redux is the most popular and widely adopted industry standard, but there are many smaller or specialized libraries for local and global state management.
In this book, in our cars application, we will make a couple of charts, and we will see why data visualization specialists are turning to React. For instance, the combination of React Hooks and D3.js enables us to make virtually everything achievable with D3.js (and that’s a lot), while making data management easier through React. Bear in mind that we have barely scratched the surface of what is possible to achieve with React, and this chapter is really meant just to get you started and whet your appetite.
Summary
We made it through a short and atypical introduction to the world’s most popular user interface library – React.js. I tried to cover the absolute basics and point the reader in a certain direction, rather than trying to elaborate on topics that require separate chapters or entire books. I have covered the topics that I believe are enough to get started.
We have seen what JSX is and why it is so convenient for developers. We introduced the basic building blocks of React, functional components, and the basic rules that must be followed when designing them. I have introduced two fundamental React Hooks that, when combined, allow you to begin building basic user interfaces, maintain and change state in the components and interact with external APIs.
Finally, I mentioned some of the React libraries that will make your life easier when developing custom applications – they all have excellent documentation and are updated frequently, so covering them in depth would defy the purpose of this chapter.
In the next chapter, we will use some of this basic knowledge and use React to create a simple but fully functional and dynamic for our application.