Chapter 7: Digital Forensic Artifacts and Their Main Sources
We've already learned a lot about human-operated ransomware attacks in general – common tactics, techniques, and procedures leveraged by threat actors, as well as how to collect actionable cyber threat intelligence to speed up our investigations. So, it's high time we focused on the investigation itself.
If you are reading this book, I'm almost sure you've heard about Locard's exchange principle. Want a reminder? Well, alright – the principle is that the perpetrator of a crime will bring something into the crime scene and leave with something from it, and that both can be used as forensic evidence. Sounds familiar, right?
We can bring this principle to our real-life experience and observe that ransomware affiliates bring their tools, including the ransomware itself, and most likely exfiltrate a good amount of sensitive data.
We already know that the human-operated ransomware attack life cycle is quite complex, so how can we determine which techniques were used by the threat actors at various stages? The answer is – digital forensics!
In this chapter, we'll look at various sources of digital forensic artifacts, which can help incident responders to reconstruct a ransomware attack. Digital forensics allows us to uncover, discover, and recover data points that can help mitigate a cyber attack or risk.
We'll focus on the following sources:
- Volatile memory collection and analysis
- Non-volatile data collection
- Master file table
- Prefetch files
- LNK files
- Jump lists
- System Resource Usage Monitor
- Web browsers
- Windows Registry
- Windows event logs
- Other log sources
Volatile memory collection and analysis
As many threat actors leverage various living-off-the-land techniques, volatile memory analysis may provide key artifacts an incident responder needs to properly reconstruct techniques. Such techniques can sometimes help threat actors to fly under the radar of the security stack.
As volatile data is commonly stored within the Random Access Memory (RAM) of a device, usually it involves leveraging memory dumping techniques.
There are a bunch of tools that can be used to dump volatile memory. Here are some of them:
- AccessData FTK Imager (https://accessdata.com/product-download/ftk-imager-version-4-5)
- Belkasoft RAM Capturer (https://belkasoft.com/ram-capturer)
- Magnet RAM Capturer (https://www.magnetforensics.com/resources/magnet-ram-capture/)
The main thing you must remember is to never copy acquisition tools and the resulting memory dump to the same device you are dumping it from. Use an external drive or a network share. Why? Because you can easily overwrite potential sources of digital evidence!
Here's an example of memory acquisition with help of AccessData FTK Imager:

Figure 7.1 – Acquiring memory with AccessData FTK Imager
Once you created a memory dump, it's ready to be analyzed. A very common tool for memory dumps analysis is Volatility – an open source framework for memory forensics.
Currently, there are two versions of the tool:
- Volatility 2 (https://www.volatilityfoundation.org/releases)
- Volatility 3 (https://www.volatilityfoundation.org/releases-vol3)
Both versions require at least some command shell skills, but as both of them have robust documentation, a bit of practice may help you to overcome any skills shortage quickly.
Another tool worth mentioning is Volatility Workbench by PassMark software, which is actually a Graphical User Interface (GUI) for Volatility. So, if you don't like command shell for some reason, this tool may be a good alternative:
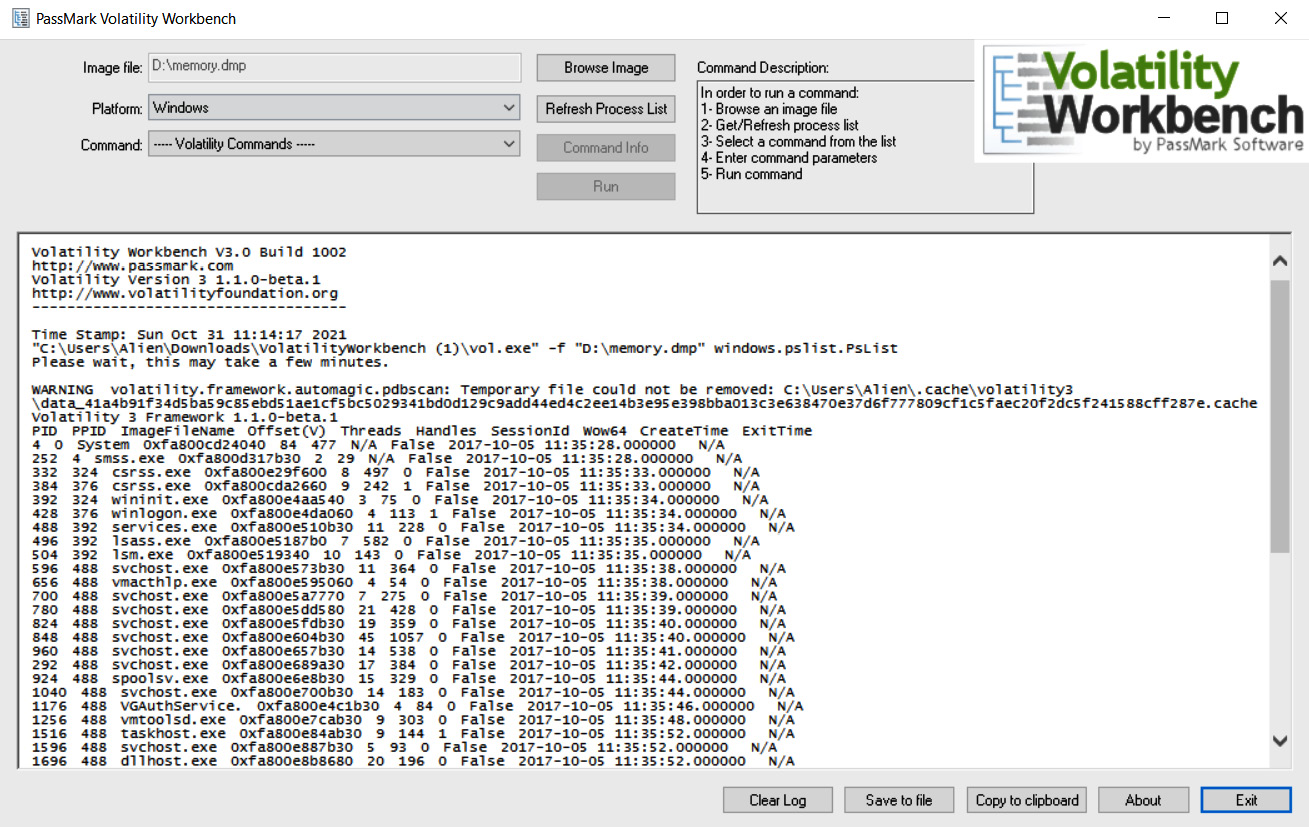
Figure 7.2 – Running the Volatility plugin via PassMark Volatility Workbench
Memory dump analysis may reveal a lot of attack-related artifacts, which may be later transformed into valuable IoCs, so the threats can be detected enterprise-wide.
There are versions of PassMark Volatility Workbench for both Volatility 2 and Volatility 3. Both versions can be downloaded from https://www.osforensics.com/tools/volatility-workbench.html.
Of course, in some cases, dumping memory may not be the best idea. In the beginning, you may not be sure which hosts to focus on and dumping memory for further analysis from hundreds of machines may be a very time-consuming and ineffective strategy.
There are tools that enable an incident responder to perform live analysis. Do you remember Process Hacker? Yes, this same tool can be leveraged by defenders to triage volatile data, including running processes, their command lines, and, of course, network connections, just to name a few. Here's an example of using Process Hacker for live analysis:
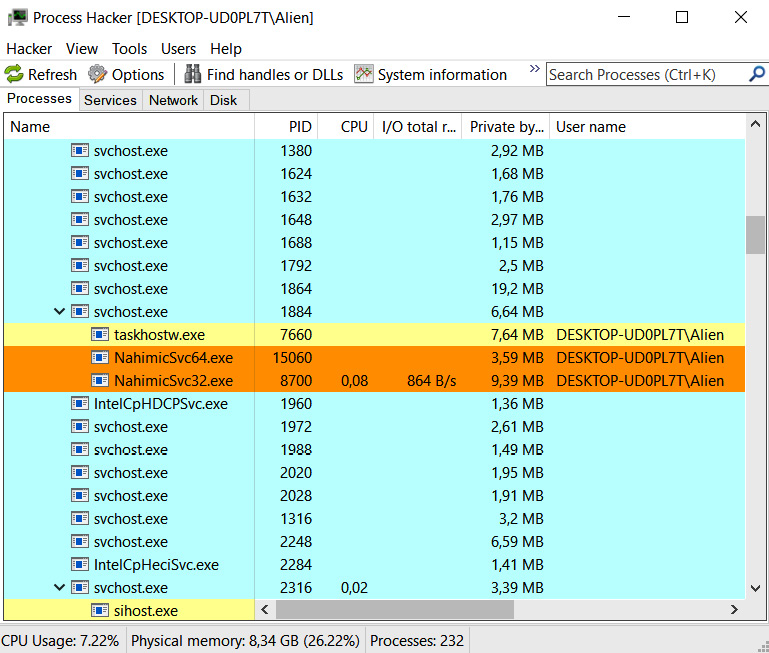
Figure 7.3 – Triaging running processes with Process Hacker
Process Hacker is available for download at https://processhacker.sourceforge.io/downloads.php.
It may be surprising, but volatile memory artifacts may be found not only in memory dumps. There are a few system files containing memory remnants as well:
- pagefile.sys – This file is located in the root of the system drive (usually C:) and is used to store page-size blocks of memory, which are not used currently, so it extends the size of physical memory using the drive space. This file can't be analyzed using Volatility, but still there are tools capable of aiding incident responders with analysis, for example, page_brute (https://github.com/matonis/page_brute).
- hiberfil.sys – This is a Windows hibernation file, which is stored in the system root as well and is used to save the machine state in case of hibernation. This file can be converted using the imagecopy Volatility plugin, and then analyzed like a regular memory dump using the same tool.
As we have started to talk about filesystem artifacts, let's move forward and look at how this can help us to investigate human-operated ransomware attacks. But first, let's learn how to collect non-volatile data – the data that will be available even if the system is powered down.
Non-volatile data collection
Before we dive into the various sources of non-volatile data sources, let's learn how to collect data sources. Of course, you must have heard about forensic images – bit stream copies of digital media. Yes, in some cases, we still create such copies; for example, for the initially compromised host, which may contain lots of various artifacts related to the threat actors' activities. Such images may be created with AccessData FTK Imager:
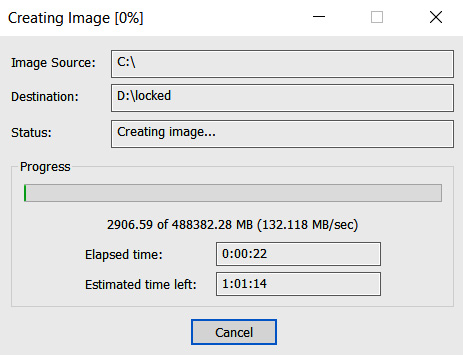
Figure 7.4 – Creating a bit stream image with AccessData FTK Imager
But, in many cases, you have quite a lot of compromised hosts, so creating images of every system may be quite a daunting task. Instead, you may want to create a triage image – it will contain a number of files as well as some additional data, such as information on network connections.
A pretty good tool for collecting triage data is Live Response Collection (https://www.brimorlabs.com/Tools/LiveResponseCollection-Cedarpelta.zip) by Brian Moran:
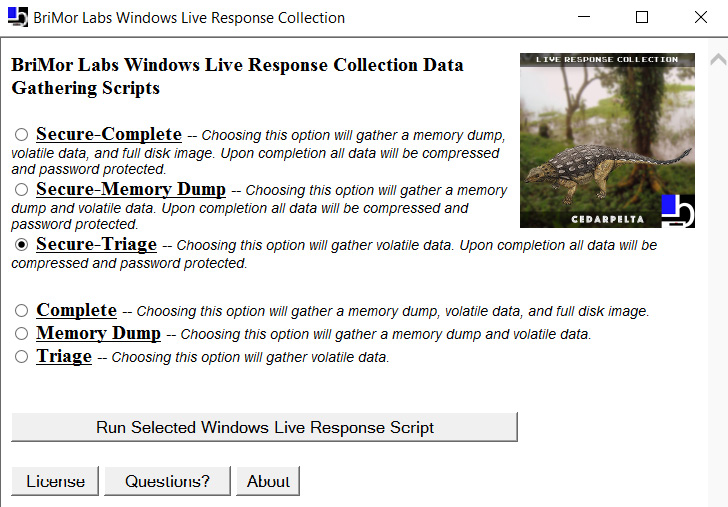
Figure 7.5 – Creating a triage image with Live Response Collection
An interesting fact is that you can collect not only the triage data with this tool, but also acquire memory and even create bit stream images! Just don't forget to run it from an external drive or a network share.
However, even such an approach may not be acceptable, and you may need data collection that is even more targeted. Here comes Kroll Artifact Parser and Extractor (KAPE) – it allows incident responders to perform very targeted and lightweight collections. Since it has both GUI and command-line versions, it can easily run even enterprise-wide:
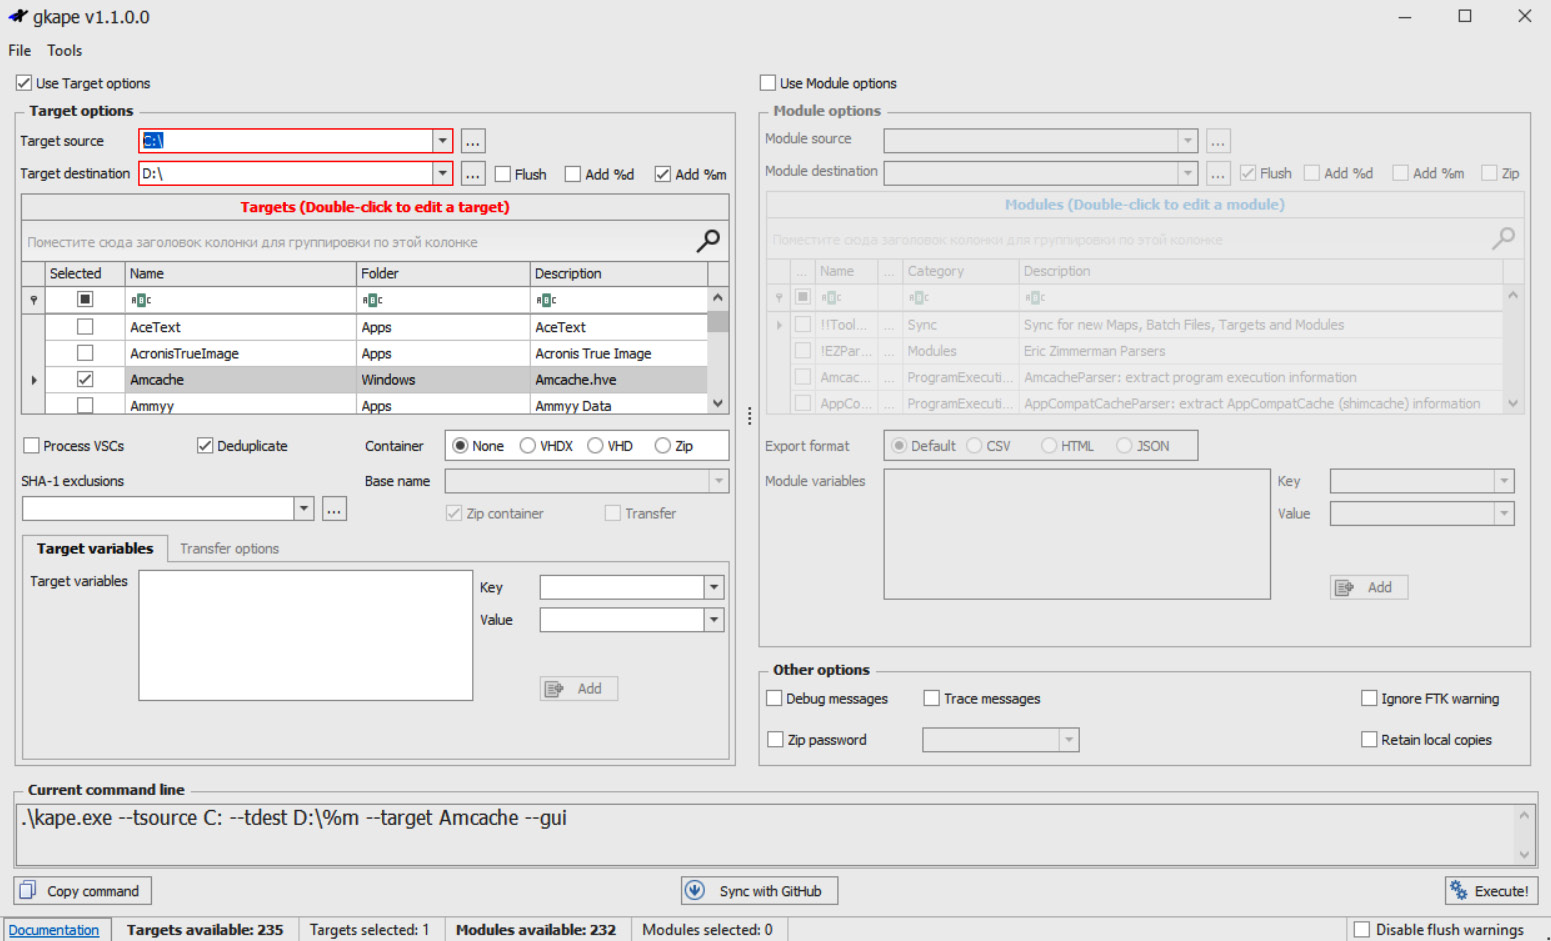
Figure 7.6 – Targeted collection with KAPE
What's more, KAPE isn't about collection only, you can also use it for processing automation! There are agent-based solutions as well that are capable of performing live data collection, including open source. A good example is Velociraptor (https://github.com/Velocidex/velociraptor).
Many EDR/XDR solutions also have the capability to collect forensic artifacts. For example, let's look at the data collection options of Group-IB Threat Hunting Framework Huntpoint:
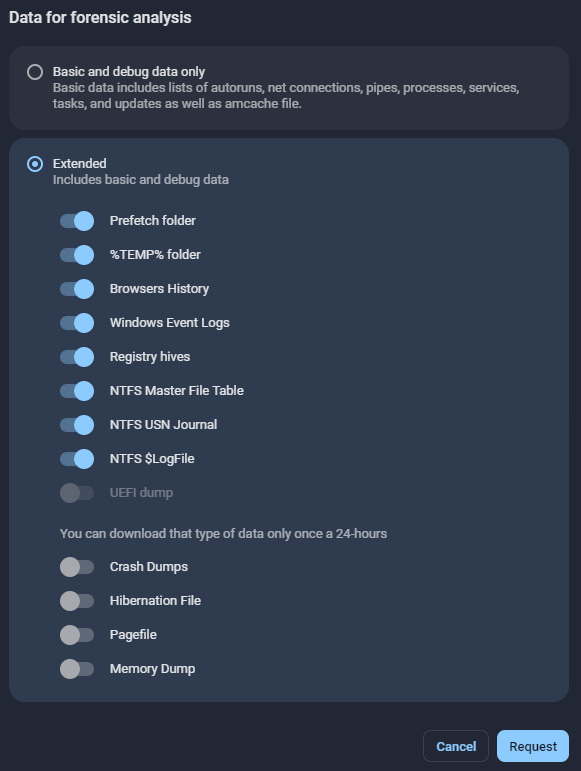
Figure 7.7 – Forensic data collection options of Group-IB Threat Hunting Framework Huntpoint
EDR/XDR solutions themselves can be very good sources of forensic artifacts, as they constantly collect information about running processes, network connections, file and registry modifications, and so on. As you can see, there are quite a few options and approaches for both volatile and non-volatile data collection. Let's move forward and look at various digital forensic artifacts sources.
Master file table
A filesystem contains a lot of different artifacts that can help us in our investigation process. Furthermore, Windows Registry and various logs are also part of the filesystem, but as they are quite complex, we're going to look at them separately.
The most common filesystem type you'll face during your ransomware attacks investigations is the New Technology File System (NTFS). Currently, this is the most common filesystem for Windows, which as you already know, is the main target of ransomware affiliates. Despite the fact that there is an increased interest in Linux systems, usually the threat actors get there through Windows infrastructure compromise, so we'll focus on this operating system.
As incident responders, we're very interested in metadata analysis, so let's dive into one of the core components of NTFS – the Master File Table (MFT). It contains information about filenames, locations, sizes, and, of course, their timestamps. We can use the information extracted from an MFT to build timelines that can help us recover information about the files that were created and even used by the threat actors.
This information can be extracted from $MFT metafile. Metafiles, including the file in question, that is, $MFT, can be extracted using various digital forensic tools. An example of such a tool is AccessData FTK Imager:
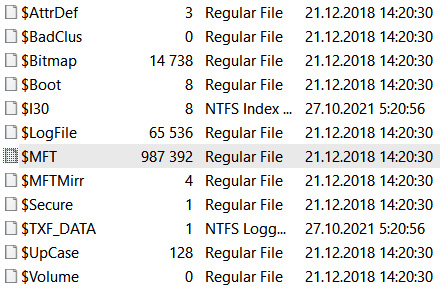
Figure 7.8 – $MFT and other NTFS metafiles as seen in AccessData FTK Imager
I'm not going to bore you with NTFS internals, as there are a lot of good sources of this information. So, if you are interested in an in-depth understanding, just refer to them. A good example is File System Forensic Analysis by Brian Carrier: https://www.amazon.com/System-Forensic-Analysis-Brian-Carrier/dp/0321268172.
Now, what's next after you have extracted the $MFT metafile? There are two ways – browse it directly, or first parse it and then analyze the parsed data.
This is where I should start referencing Eric Zimmerman – 2019 Digital Forensic Investigator of the Year and SANS Instructor – and his award-winning set of free tools for digital forensic analysis. The tools are available at https://ericzimmerman.github.io/#!index.md.
If you prefer to browse $MFT directly, there's an option for you – MFTExplorer. Unfortunately, such browsers are not very fast, so I would recommend parsing it first. Of course, there's a tool for this as well – MFTECmd.
Using this tool, you can easily convert data from $MFT to an easily readable Comma-Separated Values (CSV) file, which is ready to be analyzed with any of your favorite tools, such as Microsoft Excel. Another tool you can use is in Eric Zimmerman's toolkit – Timeline Explorer. Here's an example of how parsed $MFT file looks in Timeline Explorer:
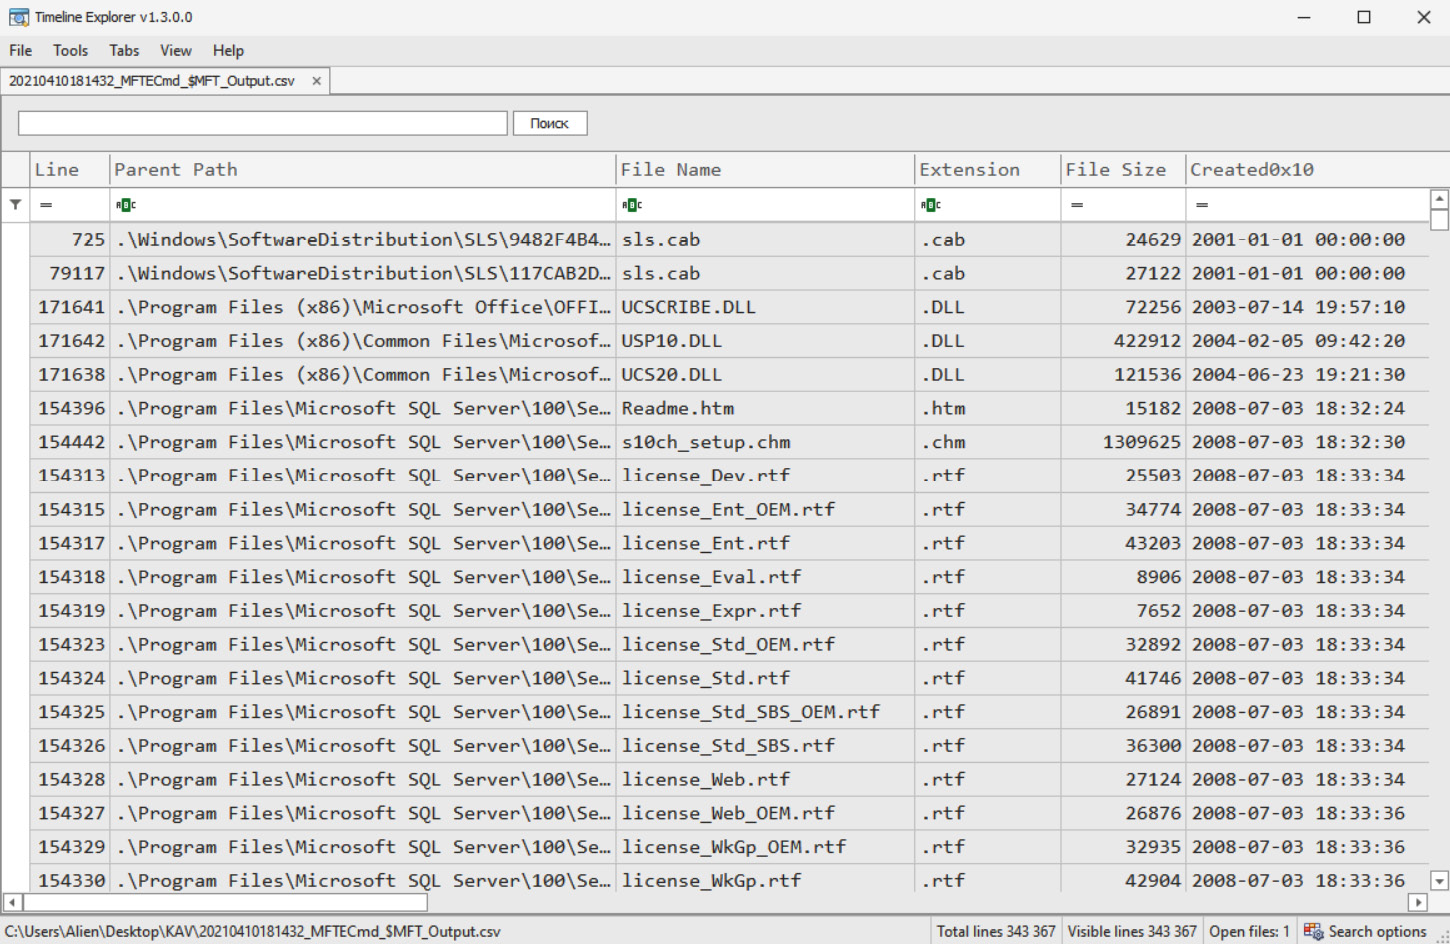
Figure 7.9 – Parsed $MFT opened in Timeline Explorer
Timeline Explorer can help you to choose the columns you want to focus on. It also has robust filtering capabilities, so you can easily reduce the noise.
There are many useful sources of artifacts the Windows operating system can offer an incident responder. Let's start with those helping us collect evidence of execution. We'll discuss prefetch files first.
Prefetch files
Prefetch files are located under C:WindowPrefetch and are used to increase system performance by preloading code pages of commonly used applications.
These files have a .pf extension and contain program execution timestamps and the number of runs, as well as a referenced folders and files list.
Prefetch files can be parsed with PECmd:
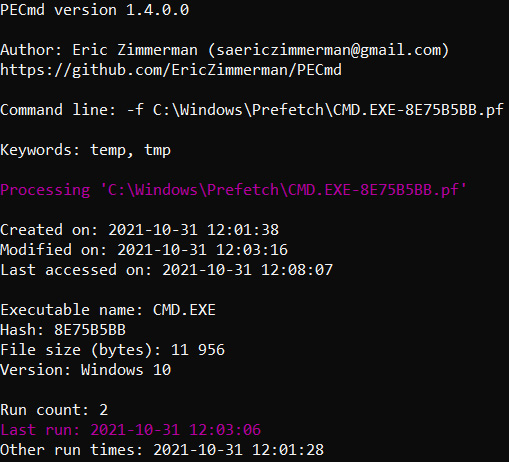
Figure 7.10 – A part of PECmd output
Of course, prefetch files are not the only source of evidence of execution and more will be discussed in the Windows Registry and Windows event logs sections.
Now let's look at some artifacts of file access – LNK files and jump lists.
LNK files
LNK files are automatically created by the Windows operating system once a user (or an attacker) opens a local or a remote file. These files can be found under the following locations:
- C:\%USERPROFILE%AppDataRoamingMicrosoftWindowsRecent
- C:\%USERPROFILE%AppDataRoamingMicrosoftOfficeRecent
Among other data, such files contain the timestamps both for the LNK itself and the file it points to. It is the file that was opened (and may be deleted already, by the way).
Again, there's a tool for parsing such files, LECmd:

Figure 7.11 – A part of LECmd output
As you can see in the screenshot, here we have evidence that the threat actors dumped LSASS – a very common technique for credentials access.
Let's look at another similar filesystem source of digital forensic artifacts – jump lists.
Jump lists
Jump lists are a feature of the Windows taskbar that allow users to see a list of recently accessed items. Of course, this feature can also be used by digital forensic analysts and incident responders to examine the list of recently accessed files.
These files can be found at C:\%USERPROFILE%AppDataRoamingMicrosoftWindowsRecentAutomaticDestinations.
There's a GUI tool for browsing the contents of such files – JumpList Explorer:
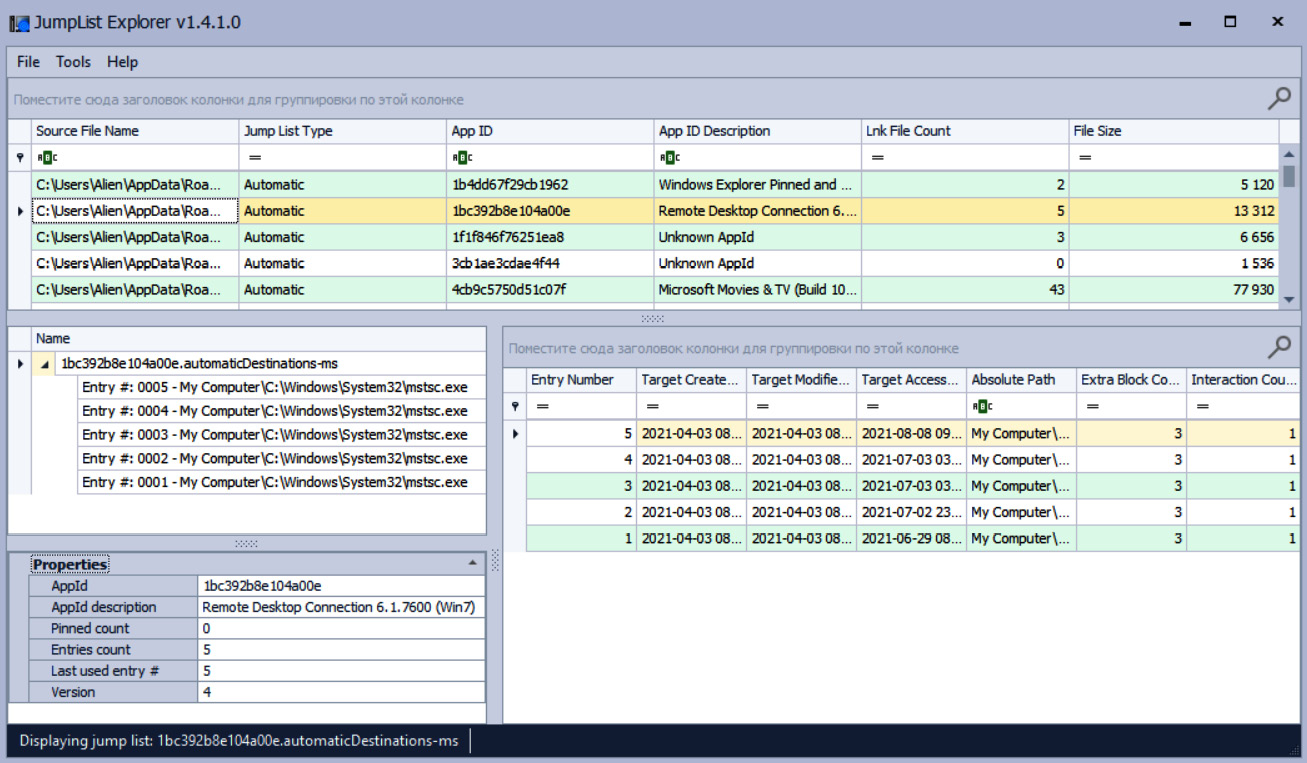
Figure 7.12 – Browsing jump lists with JumpList Explorer
As you can see in the preceding screenshot, jump lists contain information not only about accessed files, but also, for example, about hosts accessed via RDP! It's extremely useful when we are investigating lateral movement.
But what about data exfiltration? Let's look at System Resource Usage Monitor (SRUM)!
SRUM
This Windows feature is used to monitor system performance and can provide an incident responder with information on how much data was sent/received per application per hour, which is crucial for data exfiltration investigations.
The database with SRUM data is located at C:WindowsSystem32SRU.
To parse it properly, you may also need the SOFTWARE registry file, located under C:WindowsSystem32config.
Both of these files can be parsed with help of SrumECmd. The resulting files can be browsed with Timeline Explorer:
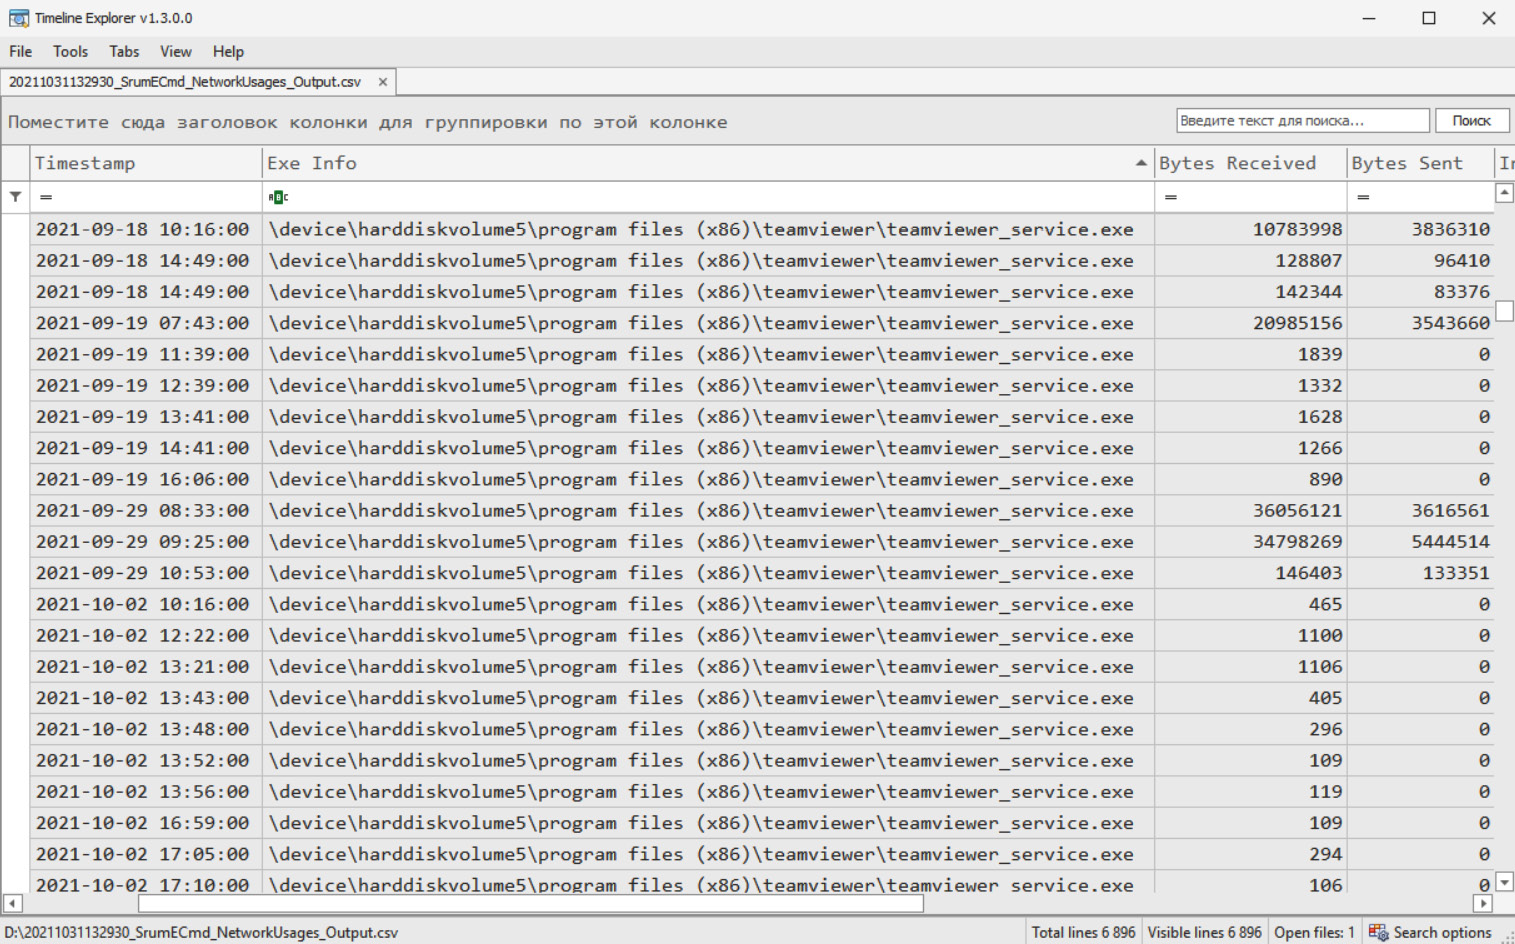
Figure 7.13 – Browsing parsed SRUM data with Timeline Explorer
What else do threat actors use for data exfiltration and lateral tool transfer? Web browsers, of course!
Web browsers
Web browsers are commonly used both by regular users, who are potential victims of spear-phishing attacks, and threat actors, who usually use them for downloading additional tooling and data exfiltration.
Let's focus on three main browsers – Microsoft Edge, Google Chrome, and Mozilla Firefox.
The main source of browser-related evidence is, of course, the history. Browsing history analysis may reveal locations from which the ransomware affiliates downloaded their tooling or, for example, uploaded collected data. Usually, this data is stored in SQLite databases, which can be found here:
- Microsoft Edge: C:Users\%USERNAME%AppDataLocalMicrosoftEdgeUser DataDefaultHistory
- Google Chrome: C:Users\%USERNAME%AppDataLocalGoogleChromeUser DataDefaultHistory
- Mozilla Firefox: C:Users\%USERPNAME%AppDataRoamingMozillaFirefoxProfiles<random text>.defaultplaces.sqlite
As these are SQLite databases, they can be analyzed either manually using, for example, DB Browser for SQLite (https://sqlitebrowser.org/dl/), or parsed with specialized browser forensics tools, for example, BrowsingHistoryView (https://www.nirsoft.net/utils/browsing_history_view.html):
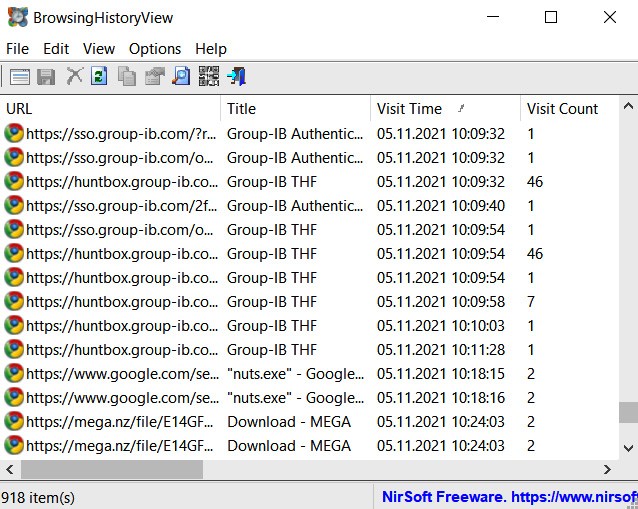
Figure 7.14 – Web history parsed with BrowsingHistoryView
Of course, browsing history isn't the only useful forensic artifact. Others include cookies and the cache.
Cookies allow web browsers to track and save information about each user's session, so the browser can also reveal information about which websites were visited. This information is also stored in SQLite databases:
- Microsoft Edge: C:Users\%USERNAME%AppDataLocalMicrosoftEdgeUser DataDefaultCookies
- Google Chrome: C:Users\%USERNAME%AppDataLocalGoogleChromeUser DataDefaultCookies
- Mozilla Firefox: C:Users\%USERNAME%AppDataRoamingMozillaFirefoxProfiles<randomtext>.defaultcookies.sqlite
The last browser-related artifact I want to mention is the cache. These are web page components saved (or cached) locally so that the page loads faster once visited next time.
Here are the locations of such files for each browser:
- Microsoft Edge: C:Users\%USERNAME%AppDataLocalMicrosoftEdgeUser DataDefaultCache
- Google Chrome: C:Users\%USERNAME%AppDataLocalGoogleChromeUser DataDefaultCache
- Mozilla Firefox: C:Users\%USERNAME%AppDataRoamingMozillaFirefoxProfiles<randomtext>.defaultCache
There are multiple tools capable of interpreting data stored in cache files. Some of them are ChromeCacheView (https://www.nirsoft.net/utils/chrome_cache_view.html), MozillaCacheView (https://www.nirsoft.net/utils/mozilla_cache_viewer.html), and many more.
Now, let's move forward and look at another source of digital forensic artifacts – Windows Registry.
Windows Registry
Windows Registry is a hierarchical database that stores various configuration settings, and, of course, a lot of valuable information about program execution and user activities.
Let's start with Registry-related file locations. The first three files I want to mention are SAM, SYSTEM, and SOFTWARE. These files are located under C:WindowsSystem32config.
The next two files are NTUSER.DAT and USRCLASS.DAT. There's a copy of both files in every user profile, so the first file is located under C:Users\%USERNAME%, and the second under C:Users\%USERNAME%AppDataLocalMicrosoftWindows.
One more important file, Amcache.hve, is located under C:WindowsAppCompatPrograms.
The last registry file I want to mention is Syscache.hve, which is located under the C:System Volume Information folder. It's not very common and is available only in Windows 7 and Windows Server 2008 R2 installations, but it can still be very useful, as it contains SHA1 hashes for executed binaries.
Now, let's look at the most common sources of evidence of execution you can find during Windows registry file analysis:
- UserAssist (NTUSER.DATSoftwareMicrosoftWindowsCurrentversionExplorerUserAssist{GUID}Count): This contains information about GUI-based programs run by the user and includes information about run count and last execution date and time.
- ShimCache (SYSTEMCurrentControlSetControlSession ManagerAppCompatCache): This contains information about executed programs, including their paths, size, and last modification dates.
- Amcache (Amcache.hveRootFile{Volume GUID}#######): This contains information about executed programs, including their paths, SHA1 hashes, and first execution timestamps.
Of course, execution artifacts are not the only digital forensic artifacts you can extract from Windows Registry. Another notable example is artifacts that contain evidence of recently accessed files and folders. Let's look at some of the most common examples:
- Most Recently Used (MRU) (NTUSER.DATSoftwareMicrosoftWindowsCurrentVersionExplorerComDlg32LastVisitedPidlMRU): This contains lists of recently accessed files based on their extensions.
- Recent files (NTUSER.DATSoftwareMicrosoftWindowsCurrentVersionExplorerRecentDocs): This acts as another source of information on recently accessed files.
- Shell bags (USRCLASS.DATLocal SettingsSoftwareMicrosoftWindowsShellBags): This contains the list of recently accessed folders, including network shares and removable devices.
These are just a few examples of valuable artifacts that can be found in Windows Registry. Others include various persistence mechanisms, remote access artifacts, and more.
There are various approaches to registry analysis. For example, you may prefer to analyze it manually, focusing on keyword searches generated based on indicators of compromise you may have. For example, you can use Registry Explorer (https://f001.backblazeb2.com/file/EricZimmermanTools/RegistryExplorer.zip) – another great tool by Eric Zimmerman – which will allow you to look at both extracted registry files and live registry, including the deleted keys and values:
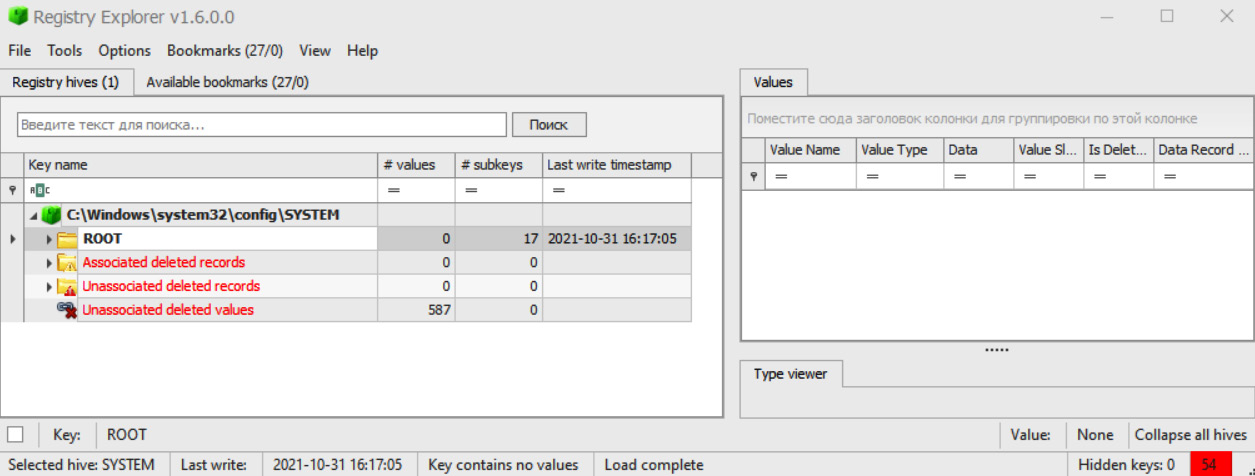
Figure 7.15 – SYSTEM registry file from a live system opened in Registry Explorer
Despite the fact I recommended this tool for manual analysis, it has a bunch of plugins for parsing common artifacts as well.
Another great tool for registry analysis worth mentioning is RegRipper (https://github.com/keydet89/RegRipper3.0) by Harlan Carvey. It has both GUI and command-line versions and has various plugins for parsing registry artifacts. Furthermore, you can write additional plugins yourself!
Now, let's look at the next valuable source of digital forensic artifacts – Windows event logs.
Windows event logs
Event logging is a built-in mechanism for documenting various events related to the Windows operating system and various applications. It can be an extremely valuable source of evidence related to a human-operated ransomware attack as well.
In some cases, the threat actors may remove such logs to cover their traces, but even this may be a good indicator that the host was compromised.
By default, these log files are located under C:WindowsSystem32winevtLogs and have the .evtx extension. Here are a few examples of these files:
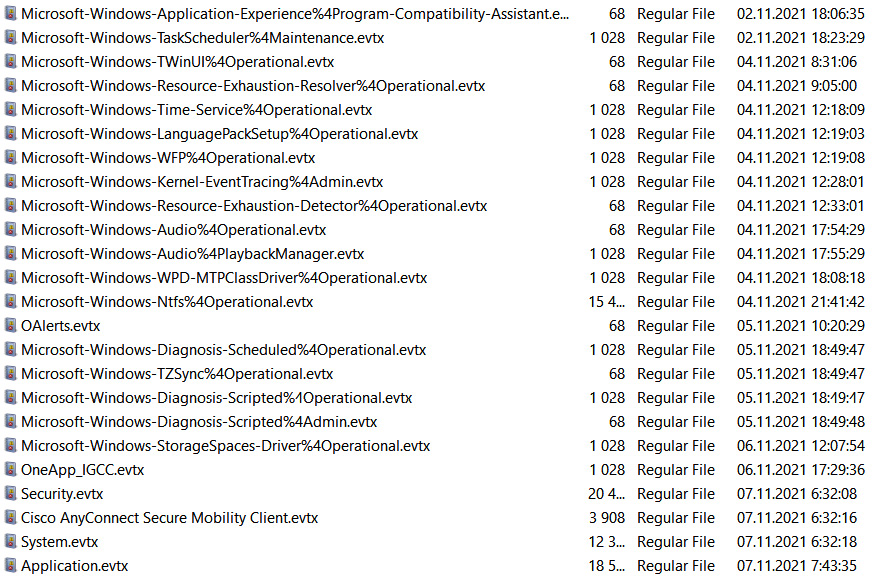
Figure 7.16 – Windows event log files listed in AccessData FTK Imager
Windows event logs can also be collected by implementing a SIEM (it's a very good idea to make sure the correct logs are captured) or EDR/XDR solution.
Let's look at some commonly used log files and event IDs:
- Security:
- 4624 – A logon to a system has occurred.
- 4625 – A failed logon attempt.
- 4720 – A user account was created.
- 4732 – A member was added to a security-enabled local group.
- System:
- Windows PowerShell:
- Microsoft-Windows-TerminalServices-LocalSessionManager/Operational:
- OAlerts:
- Microsoft-Windows-TaskScheduler/Operational:
- Microsoft-Windows-Windows-Defender/Operational:
It's not the complete list but, as you can see, there are quite a few useful events that may be of great help in our incident response engagements.
Windows event logging isn't the only source of logs. Let's look at other sources that can be of potential interest to us.
Other log sources
Let's finish this chapter by listing a few additional log sources that may play a critical role in your investigation:
- Anti-virus software logs – As you already know, ransomware affiliates may use quite a few tools, so at least some of them will be detected by anti-virus software. These logs may provide you with a few good pivot points.
- Firewall logs – These logs may provide you with great insights into network connections, including malicious connections. These are an extremely valuable source of forensic data, especially if they store data for a long time period, and you have at least some network indicators of compromise.
- VPN logs – These are some of the common vectors of obtaining initial access to the network. So, they can also reveal some information about the threat actors' network infrastructure. GeoIP analysis may be quite useful. Is it common for your client's employees to connect to the network from Russia?
- Proxy server logs – Again, if you have some network indicators or just want to hunt for anomalies, check whether a proxy server is available.
- Web server logs – Do you still remember about web shells? If you suspect ransomware affiliates used a web shell to maintain the initial foothold, make sure you've checked web server logs.
- Mail server logs – Such servers may also be vulnerable; just remember Conti affiliates, who used ProxyLogon to gain the initial access. In this case, mail server logs may also be quite helpful.
That's it. Now that you have quite a good knowledge of various digital forensic artifacts sources, you are ready to jump to the most interesting part – the investigation itself.
Summary
In this chapter, we have looked at the most common sources of digital forensic artifacts that can help incident responders in the investigation of human-operated ransomware attacks.
We not only looked through some common relevant filesystems, registries, and log locations and sources, but also learned how to collect both volatile and non-volatile information, as well as how to parse collected data so it's converted to a human-readable format ready for in-depth forensic analysis.
Now you are ready to dive into more practical tasks – real attack reconstruction of human-operated ransomware attacks based on various digital forensic artifacts.
In the next chapter, we'll look at a few initial access scenarios, use our acquired knowledge to understand how ransomware affiliates maintained the initial foothold, and start performing post-exploitation activities.