
Chapter 15: Recognition with Vision Framework
The Vision framework has been available to developers for a few years now. Apple has been introducing better and better features for it, from text recognition to image recognition. On iOS 14, Vision comes with more improvements to text recognition and other existing functions, but it also allows developers to perform two different actions: hand and body pose recognition. The possibilities that these new features open up for developers are limitless! Just think about gym apps, yoga apps, health apps, and so on.
In this chapter, we are going to learn about the basics of the Vision framework and how to use the new advancements in text recognition. We will also learn about the new hand landmark recognition, building a demo app that can detect the tips of the four fingers and the thumb. The chapter code bundle also provides a similar example demonstrating body pose recognition. We will discuss these topics in the following sections:
- Introduction to the Vision framework
- Recognizing text in images
- Recognizing hand landmarks in real time
By the end of this chapter, you will be able to work with the Vision framework with total confidence, being able to apply the techniques explained in this chapter to implement any type of recognition that Vision provides, from the recognition of text in images to the recognition of hand and body poses in videos.
Technical requirements
The code bundle for this chapter includes a starter project called HandDetection_start and a couple of playground files named Vision.playground and RecognitionPerformance_start.playground. It also contains a completed example for body pose detection named BodyPoseDetection_completed. You can find them in the code bundle repository:
https://github.com/PacktPublishing/Mastering-iOS-14-Programming-4th-Edition
Introduction to the Vision framework
Since the beginning of the App Store, there have been many apps that use the camera to build great functionalities using image and video recognition. Think of the bank apps that can now scan a check or a credit card so that the user doesn't need to input all the numbers. There are networking apps that can take a picture of a business card and extract the relevant information. Even the Photos app from your iPhone can detect faces in your photographs and classify them.
The Vision framework provides developers with a robust set of features to make it easier than ever to achieve these functionalities: from text and image recognition to barcode detection, face landmarks analysis, and now, with iOS 14, hand and body pose recognition.
Vision also allows the use of Core ML models to allow developers to enhance object classification and detection in their apps. Vision has been available since iOS 11 and macOS 10.13.
There are several concepts in Vision that are common to any type of detection (text detection, image detection, barcode detection, and so on), including the VNRequest, VNRequestHandler, and VNObservation entities:
- VNRequest is the task that we want to perform. For example, VNDetectAnimalRequest would be used to detect animals in a picture.
- VNRequestHandler is how we want to detect. It lets us define a completion handler where we can play around with the results and shape them in the way that we need.
- VNObservation encapsulates the results.
Let's look at an example that combines all these concepts and shows how Vision can easily help us to detect text inside an image. Open the playground named Vision.playground. This example code is grabbing an image from a specific URL and trying to extract/detect any text on it. The image being used is this one:

Figure 15.01 – Example image to extract text with Vision
If we try to extract text from this image, we should get results such as Swift Data Structure and Algorithms, or the name of the authors, or the description below the title. Let's review the code in the playground:
import Vision
let imageUrl = URL(string: "http://marioeguiluz.com/img/portfolio/Swift%20Data%20Structures%20and%20Algorithms%20Mario%20Eguiluz.jpg")!
// 1. Create a new image-request handler.
let requestHandler = VNImageRequestHandler(url: imageUrl, options: [:])
// 2. Create a new request to recognize text.
let request = VNRecognizeTextRequest { (request, error) in
guard let observations = request.results as? [VNRecognizedTextObservation] else { return }
let recognizedStrings = observations.compactMap { observation in
// Return the string of the top VNRecognizedText instance.
return observation.topCandidates(1).first?.string
}
// Process the recognized strings.
print(recognizedStrings)
}
// 3. Select .accurate or .fast levels
request.recognitionLevel = .accurate
do {
// 4. Perform the text-recognition request.
try requestHandler.perform([request])
} catch {
print("Unable to perform the requests: (error).")
}
Let's go through the numbered comments:
- First, we are creating a VNImageRequestHandler instance with a given image URL. We instantiate this handler to perform Vision requests on an image. Remember that we need to call perform(_:) later on to launch the analysis.
- Now we create a request(VNRecognizeTextRequest) instance that we will perform on the requestHandler instance instantiated previously. You can perform multiple requests on a requestHandler instance. We define a block of code to be executed when the request finishes. In this block, we are extracting the observations from the request results (VNRecognizedTextObservation instances). These observations will contain potential outcomes for the analyzed text from the image (VNRecognizedText instances). We print topCandidate from each observation, which should be the best match according to the Vision parameters.
- We can specify the recognition level for the request. In this example, we are using .accurate (the alternative is .fast). We will see later the results with .fast and when to use one or the other.
- Finally, we are performing the request on the requestHandler instance to execute everything with the perform(_:) method.
If you execute the code, the console in the playground will display the following:
["Erik Azar, Mario Eguiluz", "Swift Data", "Structure and", "Algorithms", "Master the most common algorithms and data structures,", "and learn how to implement them efficiently using the most", "up-to-date features of Swift", "Packt>"]
Those seem to be great results, right? If you recheck the image, we are extracting the correct text from it! The author names, the title (per line), the description, and more! Seems to be a great result! But have you noticed that when you execute the playground, it takes a while to finish? This is because we are using the .accurate option. Let's see what happens if we use .fast instead. Change it in the playground code:
// 3. Select .accurate or .fast levels
request.recognitionLevel = .fast
The output is as follows:
["Swift Data", "Structure and", "Algorithms", "upto4atefeaturesofSwift3", "Packt>", "ErfkAz•r. M•rb Eguluz", "ml5tertket(w4VIthMsarodats5tr&KtUre", "learnItolpIettmeffK1WttIY5lt1fft", "LIJJ"]
This time, the analysis can be done faster, but as you can see, the results are far worse for what we wanted (we wanted to detect the text properly!). Why should anyone prefer speed over accuracy? Well, for some apps, speed is critical and it is fine to sacrifice some accuracy for it. Think of real-time camera-based translations or applying real-time filters to take photos. In these scenarios, you need fast processing. We will discuss this further later in the chapter.
This playground example should help you to have a grasp of the incredible potential that Vision contains. Just with a few lines of code, we were able to process and extract the text of an image with no issues or complex operations. Vision allows developers to do amazing things. Let's dive deeper into it in the following sections, starting with a more detailed look at text detection for images.
Recognizing text in images
The Vision framework has been improving its detection of text in images since its first iteration. In this section, we are going to learn some state-of-the-art techniques to obtain the best results on iOS 14.
We saw in the previous section that text detection in Vision can happen in two different ways, as defined by the value of recognitionLevel that we specify in the request: .fast and .accurate. Let's see the differences:
- Fast recognition: This uses character recognition to detect text character by character within a bounding box. It is optimized for real-time recognition and uses a smaller memory footprint than .accurate. It doesn't handle rotated text or different fonts as well as the .accurate method.
- Accurate recognition: This uses a neural network to detect strings and full lines, and then recognizes the words and sentences. By using a neural network and identifying words, the framework can detect or correct observations for certain characters that are difficult to extract. It takes more time than .fast but is more accurate (of course!). It works in the same way that our brain recognizes words. If you read the word "m0untain," your brain can extract "mountain" from it, and it knows that the 0 (zero) stands for an o. If you use .fast, which recognizes character by character, the 0 (zero) would still be a 0 (zero) in your results, because no context is taken into account.
In both cases, after the initial recognition phase is finished, results are passed into a traditional natural language processor for language processing, and the outcome of that is the results (observations). This whole process happens exclusively on the device.
So, when should anyone use .fast, you might wonder. Well, there are scenarios in which it is more convenient than .accurate:
- To read codes or barcodes quickly
- When user interactivity is a crucial aspect, so you want a fast response from the text detection
To demonstrate the differences between the recognition levels, let's analyze the same image using different techniques. You will also learn some useful tricks that you can apply to your projects. Follow the steps given here:
- Go ahead and open the playground named RecognitionPerformance_start.playground. The code is roughly the same as what we tried in the previous section.
The only difference is that the image that we are using now contains a 4-digit number that represents the serial number of the book:

Figure 15.02 – Book cover with a serial number (1015) below the author names
If you pay close attention to the number font, you will see that it might be tricky for a computer to tell whether some digits are numbers or letters. This has been done on purpose. In this example, we are going to test the capabilities of Vision.
- Go ahead and execute the playground code. The console output should look like this:
["Erik Azar, Mario Eguiluz", "1015", "Swift Data", "Structure and", "Algorithms", "Master the most common algorithms and data structures,", "and learn how to implement them efficiently using the most", "up-to-date features of Swift", "Packt>"]
1.9300079345703125 seconds
We have successfully retrieved the serial number of the book: 1015. The code is also taking a measure of how long it takes to finish the text-recognition process. In our case, it was 1.93 seconds (this can differ from computer to computer and also between executions). Can we do better than that? Let's try out some techniques that will help us to improve this processing time while keeping the same accuracy. We are going to start with the region of interest.
Region of interest
Sometimes, when we are analyzing an image with Vision, we don't need to process the whole image. For example, if we are processing a specific type of form where we know in advance that the first name always goes at the top of the document, we may want to just process that area. Processing the whole form would only waste time and resources if we just need a specific area.
Let's assume that in the previous example (the book cover), the serial number that we want to extract is always in the top-left area. How can we speed up the 1.93-seconds processing time? We can do so by defining a region of interest. Defining a region of interest will tell Vision to only process that area and avoid the rest of the image. That will result in a faster processing time.
regionOfInterest is a CGRect property of VNRequest:
- It defines a rectangular area in which the request will be performed.
- The rectangle is normalized to the dimensions of the image, meaning that the width and height of the region of interest go from 0 to 1.
- The origin of the rectangle is in the bottom-left corner of the image, which is (0,0). The top-right corner will be (1,1).
- The default value is {{0,0},{1,1}}, which covers everything from the bottom-left corner (0,0) to the top-right corner, with width 1 and height 1: the whole image.
In the following figure, you can see the region of interest that we need to define to capture the serial number (1015):

Figure 15.03 – Region of interest
Let's add that region to the code from the previous section:
- In the ScanPerformance_start.playground project, add the following code just after setting recoginitionLevel to .accurate:
request.regionOfInterest = CGRect(x: 0, y: 0.8, width: 0.7, height: 0.2)
- Now launch the playground and check the result in the console:
["Erik Azar, Mario Eguiluz", "1015"]
1.2314139604568481 seconds
There are a couple of differences when comparing these results to the previous ones:
- We are no longer extracting that much text. Now that we are defining a region of interest, we just extract the words/digits that are contained in that area.
- We reduced the processing time from 1.93 seconds to 1.23 seconds. That is 36% faster.
- Let's now try to reduce the region of interest to catch just the serial number. Modify the region to the following:
request.regionOfInterest = CGRect(x: 0, y: 0.8, width: 0.3, height: 0.1)
- Launch the playground. Now the console output is as follows:
["1015"]
0.8156689405441284 seconds
Great! If we have to work with the results now, we don't need to do extra work to discard values that we don't need. We reduced the region of interest to pinpoint the exact string that we needed and saved some processing time.
At this point, why don't we try to use .fast for recognitionLevel instead of .accurate, if what we want is speed? Let's see what happens.
- Modify this line to use .fast:
request.recognitionLevel = .fast
- Save and execute. Check the console output:
["Iois"]
0.5968900661468506 seconds
You can see how this time, the processing time has been made shorter again, but the result is not accurate at all. Instead of detecting 1015, we have wrongly obtained Iois.
However, there is a common way to fix this situation in scenarios where we have domain knowledge. In our case, we know that the processed characters should be numbers only. Therefore, we can adjust the output from Vision to improve the results and fix misclassifications. For example, see the following adjustments:
- The character "I" can be "1."
- The character "o" can be "0."
- The character "s" can be "5."
Let's implement this in the code:
- At the very end of the playground file, add the following method:
extension Character {
func transformToDigit() -> Character {
let conversionTable = [
"s": "5",
"S": "5",
"o": "0",
"O": "0",
"i": "1",
"I": "1"
]
var current = String(self)
if let alternativeChar = conversionTable[current] {
current = alternativeChar
}
return current.first!
}
}
We are extending the Character class by adding a new method named transformToDigit(). This new method is going to help us to improve potential misclassifications. Note how in the method itself, we have a table of letter characters that relate to a similarly shaped number. What we are doing is just transforming those letters into the corresponding digits.
- Let's use it now. Below the print(recognizedStrings) line, add the following code:
if let serialNumber = recognizedStrings.first {
let serialNumberDigits = serialNumber.map { $0.transformToDigit() }
print(serialNumberDigits)
}
We are getting the result of the Vision process; in our case, it was "Iois", and for each character, we are applying to it our new transformToDigit() method.
- Execute the code, and you will see the following result in the console:
["Iois"]
["1", "0", "1", "5"]
0.5978780269622803 seconds
That looks great! Note how the "Iois" result is now looking much better when transformed to "1" "0" "1" "5". Also, note how the processing time didn't increase that much; this operation is relatively easy to compute.
Now let's summarize what we have done in this section and the improvements we made in each step. We started by processing a whole image and using the .accurate recognition level, and that took us 1.93 seconds. Then, we applied a region of interest to just process part of the image that we were interested in, reducing the processing time to 1.23 seconds. After that, we changed from .accurate to .fast. This move reduced the processing time to 0.59 seconds, but the results were incorrect. Finally, we implemented an easy algorithm to improve the results and make them as good as with the .accurate level. So, in the end, we got perfect results and a processing time of 0.59 seconds rather than 1.93!
In the next section, you will learn about one of the new features of iOS14, hand detection.
Recognizing hand landmarks in real time
One of the additions to Vision in iOS 14 is hand detection. This new feature to detect hands in images and video allows developers to find with great detail the positions of the wrist and the individual fingers in a video frame or photo.
In this section, we are going to explain the basics behind hand detection, and we will demonstrate how it works with a sample project. Let's start with the hand landmarks that we will be able to recognize.
Understanding hand landmarks
There are 21 landmarks that we will be able to detect in a hand:
- 4 in the thumb
- 4 in each finger (16 in total)
- 1 in the wrist
As you can see, Vision differentiates between finger and thumb. In both the finger and thumb, there are 4 points of interest. The following figure shows how these landmarks are distributed:
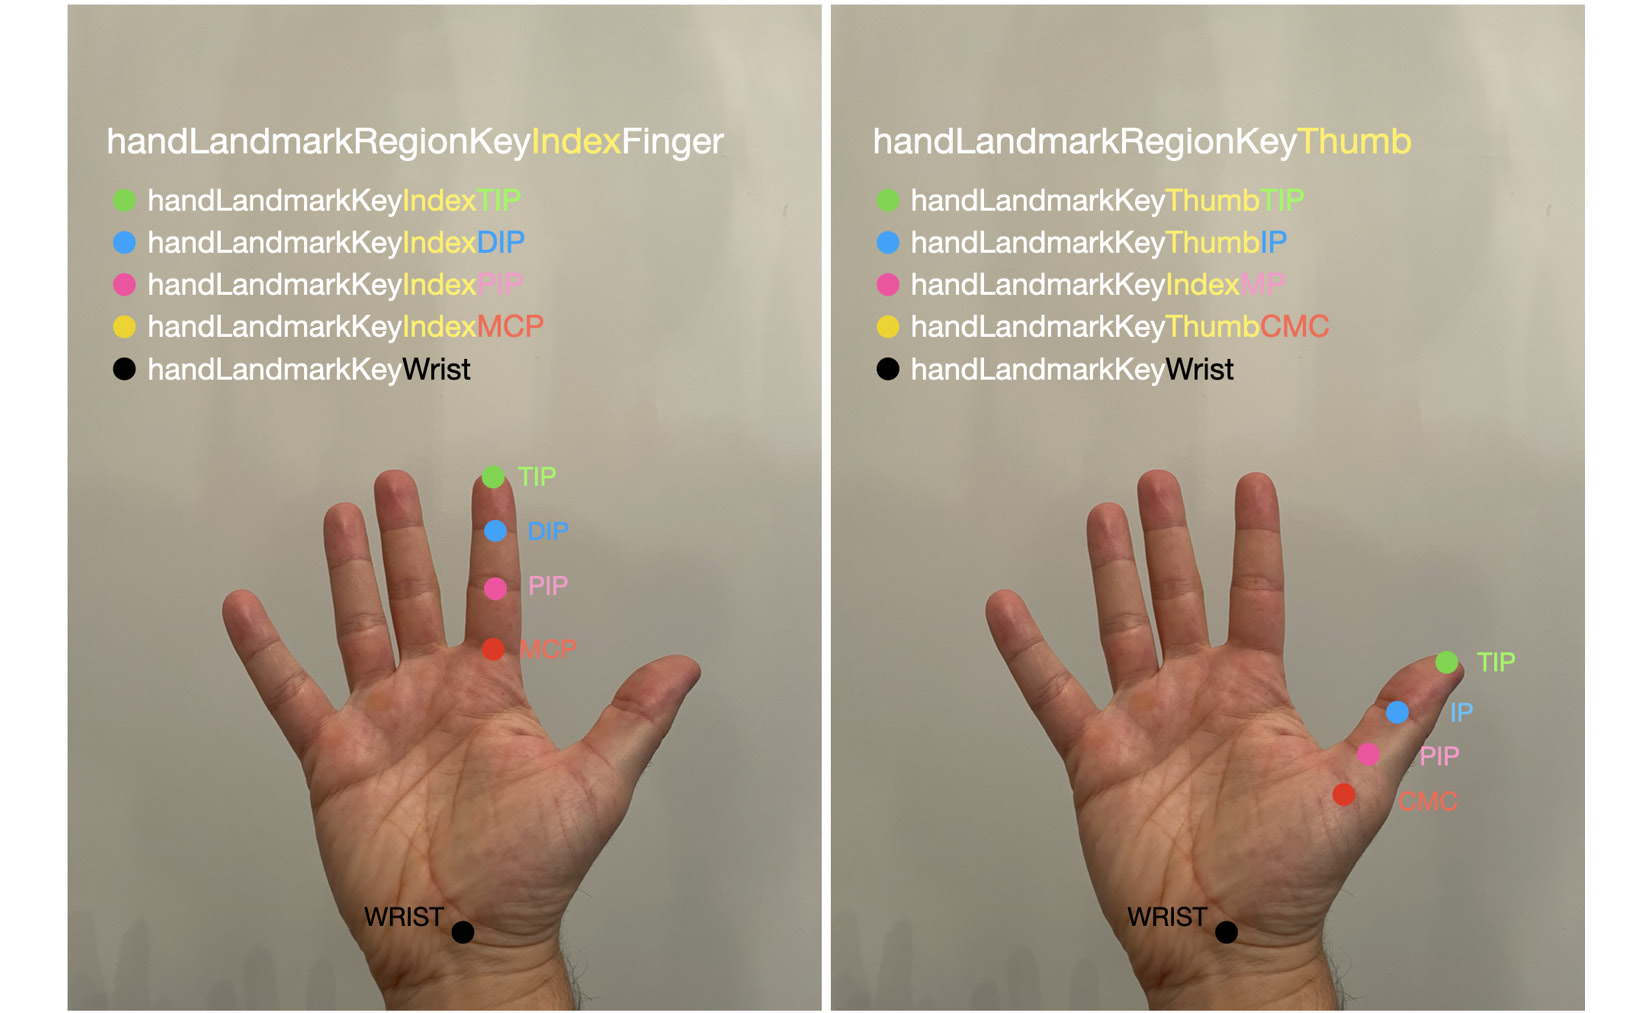
Figure 15.04 – Finger and thumb landmarks
Note how there is also a landmark in the middle of the wrist.
For the four fingers, we can access each of them individually using the following keys:
- littleFinger
- middleFinger
- ringFinger
- indexFinger
Inside each of them, we can access the four different landmarks:
- TIP
- DIP
- PIP
- MCP
Note how for the thumb, these names are slightly different (TIP, IP, PIP, and CMC). In the example code that we will build later in this section, we will demonstrate how to use these points and each of the fingers plus the thumb.
Vision is capable of detecting more than just one hand at a time. We can specify the maximum amount of hands that we want to detect. This parameter will have an impact on the performance of our detection. Use maximumHandCount to set the limit.
For performance and accuracy, it is also better if the hand is not near the edges of the frame, if the light conditions are good, and if the hands are perpendicular to the camera angle (so the whole hand is visible, not just the edge of it). Also, take into account that feet can be recognized as hands sometimes, so avoid mixing them.
That is enough theory; let's jump straight into a code example! We will build a demo app that will be able to detect hand landmarks using the front video camera of a phone and will display an overlay on the detected points.
Implementing hand detection
In this section, we are going to implement a demo app that will be able to detect hand landmarks using the front video camera of a phone.
The code bundle of this project contains the initial project and also the final result. Go ahead and open the project named HandDetection_start.
The project contains two main files: A UIView instance named CameraView.swift and a UIViewController instance called CameraViewController.swift.
The view contains helper methods to draw points on coordinates. It will serve as an overlay to draw on top of the camera feed. Just know that the showPoints(_ points: [CGPoint], colour: UIColor) method will allow us to draw an array of CGPoint structs into the overlay on top of the video camera feed.
The view controller will be the centerpiece of the example and is where we are going to implement the relevant code to perform the hand detection. Go ahead and open the CameraViewController.swift file. Let's examine the code skeleton that we will fill out step by step.
At the top of the file, we are defining four properties:
- The Vision hand detection request: handPoseRequest: VNDetectHumanHandPoseRequest. We will apply this request at the top of the video stream, to detect hand landmarks in each frame. If we detect any, we will display some points in the overlay to show them.
- The properties to work with the front video queue, the overlay, and the video stream: videoDataOutputQueue, cameraView, and cameraFeedSession.
With the viewDidAppear and viewWillDisappear methods, we are starting/creating and stopping AVCaptureSession for the camera.
And finally, in the next four methods, we have four TODO comments, which we are going to implement one by one to create this app. Let's summarize the TODO tasks that we are going to perform:
- TODO 1: Detect one hand only.
- TODO 2: Create a video session.
- TODO 3: Perform hand detection on the video session.
- TODO 4: Process and display detected points.
We are going to implement these four tasks in the following subsections.
Detecting hands
Vision can do more than detect one hand at a time. The more hands we ask it to detect, the more it will impact performance. In our example, we only want to detect one hand. By setting maximumHandCount to 1 on the request, we will improve performance.
Let's start by adding this code below // TODO 1:
// TODO 1: Detect one hand only.
handPoseRequest.maximumHandCount = 1
Now, let's create a video session to capture the video stream from the front video camera of the device.
Creating a video session
For the second task, we are going to fill out the code inside the setupAVSession() method. Go ahead and paste the following code inside the method:
// TODO 2: Create video session
// 1 - Front camera as input
guard let videoDevice = AVCaptureDevice.default(.builtInWideAngleCamera, for: .video, position: .front) else {
fatalError("No front camera.")
}
// 2- Capture input from the camera
guard let deviceInput = try? AVCaptureDeviceInput(device: videoDevice) else {
fatalError("No video device input.")
}
First, we are creating a videoDevice: AVCaptureDevice instance by querying for the video front camera (if it exists!) with this:
guard let videoDevice = AVCaptureDevice.default(.builtInWideAngleCamera, for: .video, position: .front) else {
fatalError("No front camera.")
}
Then, we use that videoDevice to generate a deviceInput: AVCaptureDeviceInput instance, which will be the video device used for the stream, with the following code:
guard let deviceInput = try? AVCaptureDeviceInput(device: videoDevice) else {
fatalError("No video device input.")
}
let session = AVCaptureSession()
session.beginConfiguration()
session.sessionPreset = AVCaptureSession.Preset.high
// Add video input to session
guard session.canAddInput(deviceInput) else {
fatalError("Could not add video device input to the session")
}
session.addInput(deviceInput)
let dataOutput = AVCaptureVideoDataOutput()
if session.canAddOutput(dataOutput) {
session.addOutput(dataOutput)
// Add a video data output.
dataOutput.alwaysDiscardsLateVideoFrames = true
dataOutput.videoSettings = [kCVPixelBufferPixelFormatTypeKey as String: Int(kCVPixelFormatType_420YpCbCr8BiPlanarFullRange)]
dataOutput.setSampleBufferDelegate(self, queue: videoDataOutputQueue)
} else {
fatalError("Could not add video data output to the session")
}
session.commitConfiguration()
cameraFeedSession = session
After creating the videoDevice instance, we are creating a new session: AVCaptureSession instance. With the session created, we assign videoDevice as the input and create and configure an output to handle the video stream. We assign the class itself as dataOutput AVCaptureVideoDataOutputSampleBufferDelegate by calling this:
dataOutput.setSampleBufferDelegate(self, queue: videoDataOutputQueue)
This means that when the front video camera captures new frames, our session will handle them and send them to our delegate method, which we are going to implement in the next step (TODO 3).
Performing hand detection in the video session
Now that we have set up and configured a video session, it is time to handle every frame as it comes and tries to detect any hands and their landmarks! We need to implement the captureOutput(_ output: AVCaptureOutput, didOutput sampleBuffer: CMSampleBuffer, from connection: AVCaptureConnection) method.
Under the // TODO 3: Perform hand detection on the video session line, add this code:
var thumbTip: CGPoint?
var indexTip: CGPoint?
var ringTip: CGPoint?
var middleTip: CGPoint?
var littleTip: CGPoint?
We want to detect the tip of the four fingers (index, ring, middle, and little) and the thumb. So, we are creating five variables of type CGPoint to store their coordinates, if they are found.
Just after these new lines, add the following code:
let handler = VNImageRequestHandler(cmSampleBuffer: sampleBuffer, orientation: .up, options: [:])
do {
try handler.perform([handPoseRequest])
guard let observation = handPoseRequest.results?.first else {
return
}
// Get observation points
} catch {
cameraFeedSession?.stopRunning()
fatalError(error.localizedDescription)
}
With this code, we are asking Vision to execute handPoseRequest over sampleBuffer (the video stream). Then, we guard (using guard) against the case in which we don't detect any observations (so that if there is no hand in the video frame, we just stop at this point).
But if the guard doesn't trigger, it means that we have some hand landmarks and we need to process them. Add the following code just after the // Get observation points line:
let thumbPoints = try observation.recognizedPoints(.thumb)
let indexFingerPoints = try observation.recognizedPoints(.indexFinger)
let ringFingerPoints = try observation.recognizedPoints(.ringFinger)
let middleFingerPoints = try observation.recognizedPoints(.middleFinger)
let littleFingerPoints = try observation.recognizedPoints(.littleFinger)
guard let littleTipPoint = littleFingerPoints[.littleTip], let middleTipPoint = middleFingerPoints[.middleTip], let ringTipPoint = ringFingerPoints[.ringTip], let indexTipPoint = indexFingerPoints[.indexTip], let thumbTipPoint = thumbPoints[.thumbTip] else {
return
}
Now we are extracting from the observation any instances of recognizedPoints() that are related to the thumb and the four fingers. Note that we use try to do this operation because a result is not guaranteed. With the extracted recognized points, we later unwrap the TIP point of each finger and thumb with the guard statement.
At this point, we should have five variables with the coordinates of the TIP point of each finger plus the thumb.
Although we already have the five coordinates that we are looking for, we still need to perform an extra step. Vision coordinates are different from AVFoundation ones. Let's transform them; add the following code just after the last guard statement:
thumbTip = CGPoint(x: thumbTipPoint.location.x, y: 1 - thumbTipPoint.location.y)
indexTip = CGPoint(x: indexTipPoint.location.x, y: 1 - indexTipPoint.location.y)
ringTip = CGPoint(x: ringTipPoint.location.x, y: 1 - ringTipPoint.location.y)
middleTip = CGPoint(x: middleTipPoint.location.x, y: 1 - middleTipPoint.location.y)
littleTip = CGPoint(x: littleTipPoint.location.x, y: 1 - littleTipPoint.location.y)
As you can see, the x coordinate is the same in both systems, but the y coordinate is different. In Vision, the bottom-left corner is the (0,0). So, we just need to subtract the y coordinate of the Vision point to 1 to get a result on the AVFoundation system.
Great! At this point, we have the hand landmarks detection system up and running, with a result in the form of AVFoundation CGPoint coordinates. The last step is to draw those points!
Add the following code after the catch block (outside of it), just at the end of the func captureOutput(…) method:
DispatchQueue.main.sync {
self.processPoints([thumbTip, indexTip, ringTip, middleTip, littleTip])
}
We are calling the processPoints(…) method inside the main thread because we want it to work on the UI, so we ensure that everything works perfectly by dispatching this work into the correct thread. Let's implement the processPoints(…) method next.
Processing and displaying detected points
After the hand landmarks have been detected inside the captureOutput(…) method, we now want to draw them into the camera overlay. Replace the empty implementation of processPoints(…) with this one:
func processPoints(_ fingerTips: [CGPoint?]) {
// Convert points from AVFoundation coordinates to UIKit // coordinates.
let previewLayer = cameraView.previewLayer
let convertedPoints = fingerTips
.compactMap {$0}
.compactMap {previewLayer.layerPointConverted(fromCaptureDevicePoint: $0)}
// Display converted points in the overlay
cameraView.showPoints(convertedPoints, color: .red)
}
Remember how we are using CGPoints converted to AVFoundation coordinates? Now we want to convert those points into the UIKit preview layer. We are performing map over them, and finally, we are calling the cameraView helper method showPoints to display them.
Everything is now in place! It is time to build and run the application. You will see the selfie camera triggering, and if you point it at your hand, the tips of your fingers and thumb should be overlayed with red dots. Give it a try and you should get something like the following:

Figure 15.05 – TIP detection
However, this approach still has some issues! Try this: let the app detect your hand, and then remove the hand from the camera's view – the red dots are still on the overlay! They are not cleaned up when no hand is detected.
This has an easy fix. The reason for it is that inside the captureOutput(…) method, we are not always executing the processPoints(…) method. There are times (the guard statements) where we return without calling it. The solution is to wrap the processPoints(…) block into a defer, moving it to the beginning of the code, just after we define the five properties to store the coordinates of each tip. It should look like this:
public func captureOutput(_ output: AVCaptureOutput, didOutput sampleBuffer: CMSampleBuffer, from connection: AVCaptureConnection) {
var thumbTip: CGPoint?
var indexTip: CGPoint?
var ringTip: CGPoint?
var middleTip: CGPoint?
var littleTip: CGPoint?
defer {
DispatchQueue.main.sync {
self.processPoints([thumbTip, indexTip, ringTip, middleTip, littleTip])
}
}
…
}
The highlighted code is the part that we have wrapped into a defer (so it will always execute before returning the method). Execute the app again, and you will notice that when there is no hand on the screen, the red dots will not be there either! We are calling processPoints with empty values, so nothing is being drawn. With this last step, we have a working example of hand landmark detection up and running! Congratulations!
Body pose detection
Vision also provides body pose detection on iOS 14. Body pose detection is quite similar to hand detection, so we are not going to give a step-by-step demo of it. But the code bundle of this book contains an example app similar to the one in this section but for body pose detection. You can check out the project named BodyPoseDetection_completed and see the little differences that it has from the hand detection project.
In this section, we have learned about the new Vision methods to detect hand landmarks and how to detect hand landmarks using the video stream of a phone as input (instead of just detecting a hand in a static image). We also provided a similar demo that can be used for body pose detection. Let's jump into the summary to finish the chapter.
Summary
We started this chapter by learning about the basic building blocks of every Vision feature: how to use a VNRequest instance, its corresponding VNRequestHandler instances, and the resulting VNObservation instances.
After learning the basics, we applied them to text recognition. We compared different recognition levels by using .fast and .accurate. We also learned about regions of interest and how they can affect the performance of Vision requests. Finally, we improved our results in text recognition by applying domain knowledge, fixing potential errors and misreads from Vision.
Finally, we learned about the new hand landmarks recognition capability. But this time, we also learned how to apply Vision requests to real-time video streams. We were able to detect hand landmarks in a video feed from a device's front camera and display an overlay to show the results. This chapter also provided a similar example that could be applied to body pose recognition.
In the next chapter, we will learn about a brand new feature of iOS 14: widgets!