Chapter 7: Flexible Code with Protocols, Generics, and Extensions
Seasoned programmers will (or should) know the core concepts of object-oriented programming (OOP). It's been around for a while, and it has shaped the way many of us develop and think about software. But a relatively new paradigm on the scene comes in the form of protocols with protocol-oriented programming (POP). Not intended as a replacement for OOP, POP has gained a lot of traction over the years, especially with the Swift community.
In this chapter, we'll learn everything we need to know about POP, from standard implementation to associated types and then onto generics. By the end of this chapter, you'll be extremely confident with not only implementing POP in your app, but also understanding what it has to offer.
The following topics will be covered in this chapter:
- Understanding and implementing protocols
- Getting the best out of extensions
- Adding flexibility with generics
Technical requirements
For this chapter, you'll need to download Xcode version 11.4 or above from Apple's App Store.
You'll also need to be running the latest version of macOS (Catalina or above). Simply search for Xcode in the App Store and select and download the latest version. Launch Xcode and follow any additional installation instructions that your system may prompt you with. Once Xcode has fully launched, you're ready to go.
Download the sample code from the following GitHub link: https://github.com/PacktPublishing/Mastering-iOS-14-Programming-4th-Edition/tree/master/Chapter%207%20-%20Playground/Protocols.playground
Understanding and implementing protocols
Swift and UIKit have protocols at the core of their design. You might have noticed this when you were implementing custom UIViewController transitions, or when you worked on a table view or collection view. When you implement these features, you create objects that function as delegates for the transitions, table views, and collection views and conform them to specific protocols. When you worked on view controller transitions in Chapter 5, Immersing Your Users with Animation, we also implemented an NSObject subclass that conformed to UIViewControllerAnimatedTransitioning.
With that said, let's take a deeper look at how we would handle creating and designing our own protocols to use in our Swift app.
Defining your own protocols
Protocols are not confined to delegate behavior only. Defining a protocol is very similar to defining a class, struct, or enum. The main difference is that a protocol does not implement or store any values on its own. It acts as a contract between whoever calls an object that conforms to a protocol and the object that claims to conform to the protocol.
Let's take a look at this by writing some code, we'll create a new playground in order to do this.
Let's implement a simple protocol that defines the expectations for any object that claims to be a pet. The protocol will be called the PetType protocol. Protocols defined in UIKit and the Swift standard library use either Type, Ing, or Able as a suffix to indicate that the protocol defines a behavior rather than a concrete type. You should try to follow this convention as much as possible because it makes your code easier to understand for other developers:
protocol PetType {
var name: String { get }
var age: Int { get set }
static var latinName: String { get }
func sleep()
The definition for PetType states that any object that claims to be PetType must have a get-only variable (a constant) called name, an age that can be changed because it specifies both get and set, a sleep() method that makes the pet rest, and finally, a static variable that describes the Latin name of PetType.
Whenever you define that a protocol requires a certain variable to exist, you must also specify whether the variable should be gettable, settable, or both. If you specify that a certain method must be implemented, you write the method just as you usually would, but you stop at the first curly bracket. You only write down the method signature.
A protocol can also require that the implementer has a static variable or method. This is convenient in the case of PetType because the Latin name of a pet does not necessarily belong to a specific pet, but to the entire species that the pet belongs to, so implementing this as a property of the type rather than the instance makes a lot of sense.
To demonstrate how powerful a small protocol such as PetType can be, you will implement two pets: a cat and a dog. You'll also write a function that takes any pet and then makes them take a nap by calling the sleep() method.
An OOP approach to this protocol could be to create a class called Pet, and then create two subclasses, Cat and Dog. A sleep() method would take an instance of Pet, and it would look a bit like this:
func sleep(pet: Pet) {
pet.sleep()
}
Don't get me wrong, the preceding object-oriented approach works and on such a small scale, no real problems will occur.
However, when the inheritance hierarchy grows, you typically end up with base classes that contain methods that are only relevant to a couple of subclasses. Alternatively, you will find yourself unable to add certain functionalities to a certain class because the inheritance hierarchy gets in the way after a while.
Let's see what it looks like when you use the PetType protocol to solve this challenge without using inheritance at all:
struct Cat: PetType {
let name: String
var age: Int
static let latinName: String = 'Felis catus'
func sleep() {
print('Cat: Zzzz')
}
}
struct Dog: PetType {
let name: String
var age: Int
static let latinName: String = 'Canis familiaris'
func sleep() {
print('Dog: Zzzz')
}
}
func nap(pet: PetType) {
pet.sleep()
}
We just managed to implement a single method that can take both the Cat and Dog objects and makes them take a nap.
Instead of checking for a type, the code checks that the pet that is passed in conforms to the PetType protocol, and if it does, its sleep() method can be called because the protocol dictates that any PetType instance must implement a sleep() method. This brings us to the next topic of this chapter: checking for traits instead of types.
Checking for traits instead of types
In classic OOP, you often create superclasses and subclasses to group together objects with similar capabilities. If you roughly model a group of felines in the animal kingdom with classes, you end up with a diagram that looks like this:
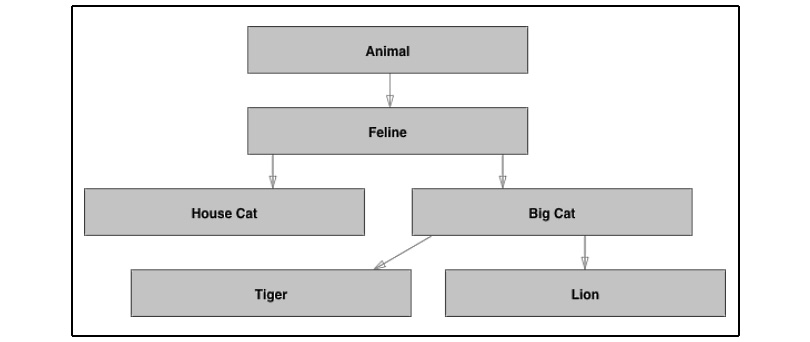
Figure 7.1 – Object-orientated flow
If you try to model more animals, you will find that it's a complex task because some animals share a whole bunch of traits, although they are quite far apart from each other in the class diagram.
One example would be that both cats and dogs are typically kept as pets. This means that they should optionally have an owner and maybe a home. But cats and dogs aren't the only animals kept as pets because fish, guinea pigs, rabbits, and even snakes are kept as pets.
It would be tough to figure out a sensible way to restructure your class hierarchy in such a way that you don't have to redundantly add owners and homes to every pet in the hierarchy because it would be impossible to add these properties to the right classes selectively.
This problem gets even worse when you write a function or method that prints a pet's home. You would either have to make that function accept any animal or write a separate implementation of the same function for each type that has the properties you're looking for. Neither of these approaches makes sense because you don't want to write the same function over and over again with just a different class for the parameter. Even if you choose to do this and you end up with a method that prints an animal's home address that accepts a Fish instance, passing an instance of GreatWhiteShark to a function called printHomeAddress() doesn't make a lot of sense either, because sharks typically don't have home addresses. Of course, the solution to this problem is to use protocols.
In the situation described in the previous section, objects were mostly defined by what they are, not by what they do. We care about the fact that an animal is part of a particular family or type, not about whether it lives on land. You can't differentiate between animals that can fly and animals that can't because not all birds can fly.
Inheritance isn't compatible with this way of thinking. Imagine a definition for a Pigeon struct that looks like this:
struct Pigeon: Bird, FlyingType, OmnivoreType, Domesticatable
Since Pigeon is a struct, you know that Bird isn't a struct or class—it's a protocol that defines a couple of requirements about what it means to be a bird.
The Pigeon struct also conforms to the FlyingType, OmnivoreType, and Domesticatable protocols. Each of these protocols tells you something about Pigeon regarding its capabilities or traits. The definition explains what a pigeon is and does instead of merely communicating that it inherits from a certain type of bird.
For example, almost all birds can fly, but there are some exceptions to the rule. You could model this with classes, but this approach is tedious and might be inflexible, depending on your needs and how your code evolves.
Setting the Pigeon struct up with protocols is powerful; you can now write a printHomeAddress() function and set it up so that it accepts any object that conforms to Domesticatable:
protocol Domesticatable {
var homeAddress: String? { get }
}
func printHomeAddress(animal: Domesticatable) {
if let address = animal.homeAddress {
print(address)
}
}
The Domesticatable protocol requires an optional homeAddress property. Not every animal that can be domesticated actually is.
For example, think about the pigeon; some pigeons are kept as pets, but most aren't. This also applies to cats and dogs, because not every cat or dog has a home.
This approach is powerful, but shifting your mind from an object-oriented mindset, where you think of an inheritance hierarchy, to a protocol-oriented mindset, where you focus on traits instead of inheritance, isn't easy.
Let's expand the example code a bit more by defining OmnivoreType, HerbivoreType, and CarnivoreType. These types will represent the three main types of eaters in the animal kingdom. You can make use of inheritance inside of these protocols because OmnivoreType is both HerbivoreType and CarnivoreType, so you can make OmnivoreType inherit from both of these protocols:
protocol Domesticatable {
var homeAddress: String? { get }
}
protocol HerbivoreType {
var favoritePlant: String { get }
}
protocol CarnivoreType {
var favoriteMeat: String { get }
}
protocol OmnivoreType: HerbivoreType, CarnivoreType { }
Composing two protocols into one like you did in the preceding example is powerful, but be careful when you do this.
You don't want to create a crazy inheritance graph like you would when you do OOP; you just learned that inheritance could be wildly complex and inflexible.
Imagine writing two new functions, one to print a carnivore's favorite meat and one to print a herbivore's favorite plant. Those functions would look like this:
func printFavoriteMeat(forAnimal animal: CarnivoreType) {
print(animal.favoriteMeat)
}
func printFavoritePlant(forAnimal animal: HerbivoreType) {
print(animal.favoritePlant)
}
The preceding code might be exactly what you would write yourself. However, neither of these methods accepts OmnivoreType. This is perfectly fine because OmnivoreType inherits from HerbivoreType and CarnivoreType.
This works in the same way that you're used to in classical OOP, with the main exception being that OmnivoreType inherits from multiple protocols instead of just one.
This means that the printFavoritePlant() function accepts a Pigeon instance as its argument because Pigeon conforms to OmnivoreType, which inherits from HerbivoreType.
Using protocols to compose your objects like this can drastically simplify your code. Instead of thinking about complex inheritance structures, you can compose your objects with protocols that define certain traits. The beauty of this is that it makes defining new objects relatively easy.
Imagine that a new type of animal is discovered, one that can fly, swim, and lives on land. This weird new species would be really hard to add to an inheritance-based architecture since it doesn't fit in with other animals.
When using protocols, you could add conformance to the FlyingType, LandType, and SwimmingType protocols and you'd be all set. Any methods or functions that take a LandType animal as an argument will happily accept your new animal since it conforms to the LandType protocol.
Getting the hang of this way of thinking isn't simple, and it will require some practice. But any time you're getting ready to create a superclass or subclass, ask yourself why. If you're trying to encapsulate a certain trait in that class, try using a protocol.
This will train you to think differently about your objects, and before you know it, your code will be cleaner, more readable, and more flexible, using protocols and checking for traits instead of taking action based on what an object is.
As you've seen, a protocol doesn't need to have a lot of requirements; sometimes one or two are enough to convey the right meaning. Don't hesitate to create protocols with just a single property or method; as your projects grow over time and your requirements change, you will thank yourself for doing so.
Extending your protocols with default behavior
The previous examples have mainly used variables as the requirements for protocols. One slight downside of protocols is that they can result in a bit of code duplication.
For example, every object that is HerbivoreType has a favoriteMeat variable. This means that you have to duplicate this variable in every object that conforms to HerbivoreType. Usually, you want as little code repetition as possible, and repeating a variable over and over again might seem like a step backward.
Even though it's nice if you don't have to declare the same property over and over again, there's a certain danger in not doing this. If your app grows to a large size, you won't remember every class, subclass, and superclass all of the time. This means that changing or removing a specific property can have undesired side-effects in other classes.
Declaring the same properties on every object that conforms to a certain protocol isn't that big a deal; it usually takes just a few lines of code to do this. However, protocols can also require certain methods to be present on objects that conform to them.
Declaring them over and over again can be cumbersome, especially if the implementation is the same for most objects. Luckily, you can make use of protocol extensions to implement a certain degree of default functionality.
To explore protocol extensions, let's move the printHomeAddress() function into the Domesticatable protocol so all Domesticatable objects can print their own home addresses. The first approach you can take is to immediately define the method on a protocol extension without adding it to the protocol's requirements:
extension Domesticatable {
func printHomeAddress() {
if let address = homeAddress {
print(address)
}
}
}
By defining the printHomeAddress() method in the protocol extension, every object that conforms to Domesticatable has the following method available without having to implement it with the object itself:
let pidgeon = Pigeon(favoriteMeat: 'Insects',
favoritePlant: 'Seeds',
homeAddress: 'Greater Manchester, England')
pidgeon.printHomeAddress()
This technique is very convenient if you want to implement default behavior that's associated with a protocol.
You didn't even have to add the printHomeAddress() method as a requirement to the protocol. However, this approach will give you some strange results if you're not careful. The following snippet shows an example of such odd results by adding a custom implementation of printHomeAddress() to the Pigeon struct:
struct Pigeon: Bird, FlyingType, OmnivoreType, Domesticatable {
let favoriteMeat: String
let favoritePlant: String
let homeAddress: String?
func printHomeAddress() {
if let address = homeAddress {
print('address: (address.uppercased())')
}
}
}
When you call myPigeon.printHomeAddress(), the custom implementation is used to print the address. However, if you define a function, such as printAddress(animal:), that takes a Domesticatable object as its parameter, the default implementation provided by the protocol is used.
This happens because printHomeAddress() isn't a requirement of the protocol. Therefore, if you call printHomeAddress() on a Domesticatable object, the implementation from the protocol extension is used. If you use the same snippet as in the preceding section, but change the Domesticatable protocol as shown in the following code, both calls to printHomeAddress() print the same thing, that is, the custom implementation in the Pigeon struct:
protocol Domesticatable {
var homeAddress: String? { get }
func printHomeAddress()
}
This behavior is likely to be unexpected in most cases, so it's usually a good idea to define all methods you use in the protocol requirements unless you're absolutely sure you want the behavior you just saw.
Protocol extensions can't hold stored properties. This means that you can't add your variables to the protocol to provide a default implementation for them. Even though extensions can't hold stored properties, there are situations where you can still add a computed property to a protocol extension to avoid duplicating the same variable in multiple places. Let's take a look at an example:
protocol Domesticatable {
var homeAddress: String? { get }
var hasHomeAddress: Bool { get }
func printHomeAddress()
}
extension Domesticatable {
var hasHomeAddress: Bool {
return homeAddress != nil
}
func printHomeAddress() {
if let address = homeAddress {
print(address)
}
}
}
If you want to be able to check whether a Domesticatable has a home address, you can add a requirement for a Bool value, hasHomeAddress. If the homeAddress property is set, hasHomeAddress should be true. Otherwise, it should be false.
This property is computed in the protocol extension, so you don't have to add this property to all Domesticatable objects. In this case, it makes a lot of sense to use a computed property because the way its value is computed should most likely be the same across all Domesticatable objects.
Implementing default behaviors in protocol extensions makes the protocol-oriented approach we've seen before even more powerful; you can essentially mimic a feature called multiple inheritance without all the downsides of subclassing.
Simply adding conformance to a protocol can add all kinds of functionality to your objects, and if the protocol extensions allow it, you won't need to add anything else to your code. Let's see how you can make protocols and extensions even more powerful with associated types.
Improving your protocols with associated types
One more awesome aspect of protocol-oriented programming is the use of associated types. An associated type is a generic, non-existing type that can be used in your protocol like any type that does exist.
The real type of this generic is determined by the compiler based on the context it's used in. This description is abstract, and you might not immediately understand why or how an associated type can benefit your protocols. After all, aren't protocols themselves a very flexible way to make several unrelated objects fit certain criteria based on the protocols they conform to?
To illustrate and discover the use of associated types, you will expand your animal kingdom a bit. What you should do is give the herbivores an eat method and an array to keep track of the plants they've eaten, as follows:
protocol HerbivoreType {
var plantsEaten: [PlantType] { get set }
mutating func eat(plant: PlantType)
}
extension HerbivoreType {
mutating func eat(plant: PlantType) {
plantsEaten.append(plant)
}
}
This code looks fine at first sight. An herbivore eats plants, and this is established by this protocol. The PlantType protocol is defined as follows:
protocol PlantType {
var latinName: String { get }
}
Let's define two different plant types and an animal that will be used to demonstrate the problem with the preceding code:
struct Grass: PlantType{ var latinName = 'Poaceae'
}
struct Pine: PlantType{ var latinName = 'Pinus'
}
struct Cow: HerbivoreType {
var plantsEaten = [PlantType]()
}
There shouldn't be a big surprise here. Let's continue with creating a Cow instance and feed it Pine:
var cow = Cow()
let pine = Pine()
cow.eat(plant: pine)
This doesn't really make sense. Cows don't eat pines; they eat grass! We need some way to limit this cow's food intake because this approach isn't going to work.
Currently, you can feed HerbivoreType animals anything that's considered a plant. You need some way to limit the types of food your cows are given. In this case, you should restrict FoodType to Grass only, without having to define the eat(plant:) method for every plant type you might want to feed a HerbivoreType.
The problem you're facing now is that all HerbivoreType animals mainly eat one plant type, and not all plant types are a good fit for all herbivores. This is where associated types are a great solution. An associated type for the HerbivoreType protocol can constrain the PlantType that a certain herbivore can eat to a single type that is defined by HerbivoreType. Let's see what this looks like:
protocol HerbivoreType {
associatedtype Plant: PlantType
var plantsEaten: [Plant] { get set }
mutating func eat(plant: Plant)
}
extension HerbivoreType {
mutating func eat(plant: Plant) {
print('eating a (plant.latinName)')
plantsEaten.append(plant)
}
}
The first highlighted line associates the generic Plant type, which doesn't exist as a real type, with the protocol. A constraint has been added to Plant to ensure that it's a PlantType.
The second highlighted line demonstrates how the Plant associated type is used as a PlantType. The plant type itself is merely an alias for any type that conforms to PlantType and is used as the type of object we use for plantsEaten and the eat methods. Let's redefine the Cow struct to see this associated type in action:
struct Cow: HerbivoreType {
var plantsEaten = [Grass]()
}
Instead of making plantsEaten a PlantType array, it's now defined as an array of Grass. In the protocol and the definition, the type of plant is now Grass.
The compiler understands this because the plantsEaten array is defined as [Grass]. Let's define a second HerbivoreType that eats a different type of PlantType:
struct Carrot: PlantType {
let latinName = 'Daucus carota'
}
struct Rabbit: HerbivoreType {
var plantsEaten = [Carrot]()
}
If you try to feed a cow some carrots, or if you attempt to feed the rabbit a pine, the compiler will throw errors. The reason for this is that the associated type constraint allows you to define the type of Plant in each struct separately.
One side note about associated types is that it's not always possible for the compiler to correctly infer the real type for an associated type. In our current example, this would happen if we didn't have the plantsEaten array in the protocol.
The solution would be to define a typealias on types that conform to HerbivoreType so that the compiler understands which type Plant represents:
protocol HerbivoreType {
associatedtype Plant: PlantType
var plantsEaten: [Plant] { get set }
mutating func eat(plant: Plant)
}
Associated types can be really powerful when used correctly, but sometimes using them can also cause you a lot of headaches because of the amount of inferring the compiler has to do.
If you forget a few tiny steps, the compiler can quickly lose track of what you're trying to do, and the error messages aren't always the most unambiguous messages.
Keep this in mind when you're using associated types, and try to make sure that you're as explicit as possible about the type you're looking to be associated with.
Sometimes, adding a type alias to give the compiler a helping hand is better than trying to get the compiler to infer everything on its own correctly.
This type of flexibility is not limited to protocols. You can also add generic properties to functions, classes, structs, and enums. Let's see how this works and how it can make your code extremely flexible.
Adding flexibility with generics
Programming with generics is not always easy, but it does make your code extremely flexible. When you use something such as generics, you are always making a trade-off between the simplicity of your program and the flexibility of your code. Sometimes it's worth it to introduce a little bit of complexity to allow your code to be written in otherwise impossible ways.
For instance, consider the Cow struct you saw before. To specify the generic associated type on the HerbivoreType protocol, a type alias was added to the Cow struct. Now imagine that not all cows like to eat grass. Maybe some cows prefer flowers, corn, or something else. You would not be able to express this using the type alias.
To represent a case where you might want to use a different PlantType for every cow instance, you can add a generic to the Cow itself. The following snippet shows how you can do this:
struct Cow<Plant: PlantType>: HerbivoreType {
var plantsEaten = [Plant]()
}
Between < and >, the generic type name is specified as Plant. This generic is constrained to the PlantType type.
This means that any type that will act as Plant has to conform to PlantType. The protocol will see that Cow has a generic Plant type now, so there is no need to add a type alias. When you create an instance of Cow, you can now pass every instance its own PlantType:
let grassCow = Cow<Grass>()
let flowerCow = Cow<Flower>()
Applying generics to instances like this is more common than you might think. An Array instance uses generics to determine what kind of elements it contains. The following two lines of code are identical in functionality:
let strings = [String]()
let strings = Array<String>()
The first line uses a convenient syntax to create an array of strings. The second line uses the Array initializer and explicitly specifies the type of element it will contain.
Sometimes, you might find yourself writing a function or method that can benefit from a generic argument or return type. An excellent example of a generic function is map. With map, you can transform an array of items into an array of different items. You can define your own simple version of map as follows:
func simpleMap<T, U>(_ input: [T], transform: (T) -> U) -> [U] {
var output = [U]()
for item in input {
output.append(transform(item))
}
return output
}
Here, simpleMap(_:transform:) has two generic types, T and U. These names are common placeholders for generics, so they make it clear to anybody reading this code that they are about to deal with generics.
In this sample, the function expects an input of [T], which you can read as an array of something. It also expects a closure that takes an argument, T, and returns U.
You can interpret this as the closure taking an element out of that array of something, and it transforms it into something else.
The function finally returns an array of [U], or in other words, an array of something else.
You would use simpleMap(_:transform:) as follows:
let result = simpleMap([1, 2, 3]) { item in
return item * 2
}
print(result) // [2, 4, 6]
Generics are not always easy to understand, and it's okay if they take you a little while to get used to it. They are a powerful and complex topic that we could write many more pages about.
The best way to get into them is to use them, practice with them, and read as much as you can about them. For now, you should have more than enough to think about and play with.
Note that generics are not limited to structs and functions. You can also add generics to your enums and classes in the same way you add them to a struct.
Summary
In this chapter, you saw how you can leverage the power of protocols to work with an object's traits or capabilities, rather than just using its class as the only way of measuring its capabilities. Then, you saw how protocols can be extended to implement a default functionality. This enables you to compose powerful types by merely adding protocol conformance, instead of creating a subclass.
You also saw how protocol extensions behave depending on your protocol requirements, and that it's wise to have anything that's in the protocol extension defined as a protocol requirement. This makes the protocol behavior more predictable.
Finally, you learned how associated types work and how they can take your protocols to the next level by adding generic types to your protocols that can be tweaked for every type that conforms to your protocol. You even saw how you can apply generics to other objects, such as functions and structs.
The concepts shown in this chapter are pretty advanced, sophisticated, and powerful. To truly master their use, you'll need to train yourself to think regarding traits instead of an inheritance hierarchy.
Once you've mastered this, you can experiment with protocol extensions and generic types. It's okay if you don't fully understand these topics right off the bat; they're completely different and new ways of thinking for most programmers with OOP experience.
Now that we've explored some of the theory behind protocols and value types, in the next chapter, you will learn how you can put this new knowledge to use by shortly revisiting the Contacts app from our previous chapters to improve the code you wrote there.