
Chapter 17: Using Augmented Reality
One of the major features that Apple shipped as part of iOS 11 was ARKit. ARKit enables developers to create amazing Augmented Reality (AR) experiences with only a minimal amount of code. Apple has continuously worked on improving ARKit, resulting in the release of ARKit 2 at WWDC 2018, ARKit 3 at WWDC 2019, and ARKit 4 at WWDC 2020.
In this chapter, you will learn what ARKit is, how it works, what you can do with it, and how you can implement an AR art gallery that uses several ARKit features, such as image tracking. We will also learn about some basic concepts from SpriteKit and SceneKit.
This chapter covers the following topics:
- Understanding ARKit
- Using ARKit Quick Look
- Exploring SpriteKit
- Exploring SceneKit
- Implementing an AR gallery
By the end of this chapter, you will be able to integrate ARKit into your apps and implement your own ARKit experiences.
Understanding ARKit
In this section, we will learn about Augmented Reality (AR) and ARKit. Augmented Reality (AR) is a topic that has captured the interest of app developers and designers for a long time now. Implementing an excellent AR experience had not been easy though, and many applications haven't lived up to the hype. Small details such as lighting and detecting walls, floors, and other objects have always been extremely complicated to implement and getting these details wrong has a negative impact on the quality of an AR experience.
Augmented reality apps usually have at least some of the following features:
- They show a camera view.
- Content is shown as an overlay in the camera view.
- Content responds appropriately to the device's movement.
- Content is attached to a specific location in the world.
Even though this list of features is simple, they aren't all trivial to implement. An AR experience relies heavily on reading the motion sensors from the device, as well as using image analysis to determine exactly how a user is moving and to learn what a 3D map of the world should look like.
ARKit is Apple's way of giving developers the power to create great AR experiences. ARKit takes care of all the motion and image analysis to make sure you can focus on designing and implementing great content rather than getting slowed down by the intricate details involved in building an AR app.
Unfortunately, ARKit comes with a hefty hardware requirement for the devices that can run ARKit apps. Only devices with Apple's A9 chip or newer can run ARKit. This means that any device older than the iPhone 6s or the first iPad Pro cannot run ARKit apps.
In the following sections, we will start by understanding how ARKit renders content on the device and how it tracks the physical environment around it in order to deliver the best AR experience.
Understanding how ARKit renders content
ARKit itself only takes care of the massive calculations related to keeping track of the physical world the user is in. To render content in an ARKit app, you must use one of the following three rendering tools:
- SpriteKit
- SceneKit
- Metal
Later in this chapter, you will have a quick look at SpriteKit and SceneKit, and you will ultimately implement your AR gallery using SceneKit. If you already have experience with any of the available rendering techniques, you should feel right at home when using ARKit.
Implementing ARKit in your app is not limited to manually rendering the contents you want to show in AR. In iOS 12, Apple has added a feature called ARKit Quick Look. You can implement a special view controller in your app that takes care of placing a 3D model you supply in a scene. This is ideal if you're implementing a feature that allows users to preview products or other objects in the real world.
Understanding how ARKit tracks the physical environment
To understand how ARKit renders content, it's essential that you understand how ARKit makes sense of the physical environment a user is in. When you implement an AR experience, you use an ARKit session. An ARKit session is represented by an instance of ARSession. Every ARSession uses an instance of ARSessionConfiguration to describe the tracking that it should do in the environment. The following diagram depicts the relationship between all objects involved in an ARKit session:
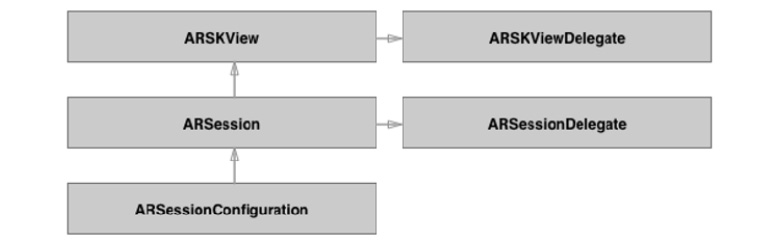
Figure 17.1 – ARKit session components
The preceding diagram shows how the session configuration is passed to the session. The session is then passed to a view that is responsible for rendering the scene. If you use SpriteKit to render the scene, the view is an instance of ARSKView. When you use SceneKit, this would be an instance of ARSCNView. Both the view and session have a delegate that will be informed about certain events that can occur during an ARKit session. You will learn more about these delegates later when you implement your AR gallery.
There are several different tracking options that you can configure on a session. One of the most basic tracking configurations is AROrientationTrackingConfiguration. This configuration only tracks the device's orientation, so not the user's movement in the environment. This kind of tracking monitors the device using three degrees of freedom. To be more specific, this tracking tracks the device's x, y, and z orientation. This kind of tracking is perfect if you're implementing something such as a 3D video where the user's movements can be ignored.
A more complex tracking configuration is ARWorldTrackingConfiguration, also known as world tracking. This type of configuration tracks the user's movements as well as the device's orientation. This means that a user can walk around an AR object to see it from all different sides. World tracking uses the device's motion sensors to determine the user's movements and the device's orientation. This is very accurate for short and small movements, but not accurate enough to track movements over long periods of time and distances. To make sure the AR experience remains as precise as possible, world tracking also performs some advanced computer vision tasks to analyze the camera feed to determine the user's location in an environment.
In addition to tracking the user's movements, world tracking also uses computer vision to make sense of the environment that the AR session exists in. By detecting certain points of interest in the camera feed, world tracking can compare and analyze the position of these points in relation to the user's motion to determine the distances and sizes of objects. This technique also allows world tracking to detect walls and floors, for instance.
The world tracking configuration stores everything it learns about the environment in an ARWorldMap. This map contains all ARAnchor instances that represent different objects and points of interest that exist in the session.
There are several other special tracking types that you can use in your app. For instance, you can use ARFaceTrackingConfiguration on devices with a TrueDepth camera to track a user's face. This kind of tracking is perfect if you want to recreate Apple's Animoji feature that was added to the iPhone X and newer in iOS 12.
You can also configure your session so it automatically detects certain objects or images in a scene. To implement this, you can use ARObjectScanningConfiguration to scan for specific items or ARImageTrackingConfiguration to identify still images.
In this section, you have learned the basics of AR and ARKit, how ARKit renders content on the device, and how it tracks the physical environment around it. Before you get your hands dirty with implementing an ARKit session, let's explore the new ARKit Quick Look feature to see how simple it is for you to allow users of your app to preview items in AR.
Using ARKit Quick Look
In this section, we will learn about ARKit Quick Look, a feature from Apple that allows users to preview virtual 3D or AR models with the camera of their device.
One of the great benefits that AR brings to end users is that it is now possible to preview certain objects in the real world. For instance, when you buy a new sofa, you might want to see what it looks like in the real world. Of course, it was possible to implement features such as this in iOS 11 using ARKit, and many developers have, but it wasn't as easy as it could be.
iOS users can preview content using a feature called Quick Look. Quick Look can be used to preview certain types of content without having to launch any specific applications. This is convenient for users because they can quickly determine whether a particular document is the document they are looking for by previewing it in Quick Look.
In iOS 12, Apple added the USDZ file format to the content types that can be previewed using Quick Look. Apple's USDZ format is a 3D file format based on Pixar's USD format that is used to represent 3D objects. Using Quick Look for 3D models is not just available in apps; ARKit Quick Look can also be integrated on the web. Developers can use a special HTML tag on their web pages to link to a USDZ and Safari will display the model in an ARKit Quick Look view controller.
Before you implement your AR gallery, it's a good idea to get a feel for how AR works on iOS by implementing the ARKit Quick Look view controller to show one of the models that Apple provides at https://developer.apple.com/arkit/gallery/. To download a model you like, all you need to do is navigate to this page on your Mac and click on an image. The USDZ file should start downloading automatically.
TIP
Navigate to the ARKit gallery on a device that supports ARKit and tap on one of the models to see what ARKit Quick Look in Safari looks like.
In this section, we explained what Quick Look is. Now let's use it inside our own app in the next section.
Implementing the ARKit Quick Look view controller
After obtaining a USDZ file from Apple's gallery, also make sure to capture the image that belongs to this file. Taking a screenshot of the model should be fine for testing purposes. Make sure to prepare your image in the different required sizes by scaling your screenshot up to two and three times the size of your screenshot.
Create a new project in Xcode and pick a name for your project. The sample project in this book's code bundle is called ARQuickLook. Add your prepared image to the Assets.xcassets file. Also, drag your USDZ file into Xcode and make sure to add it to the app target by checking your app's checkbox when importing the file:
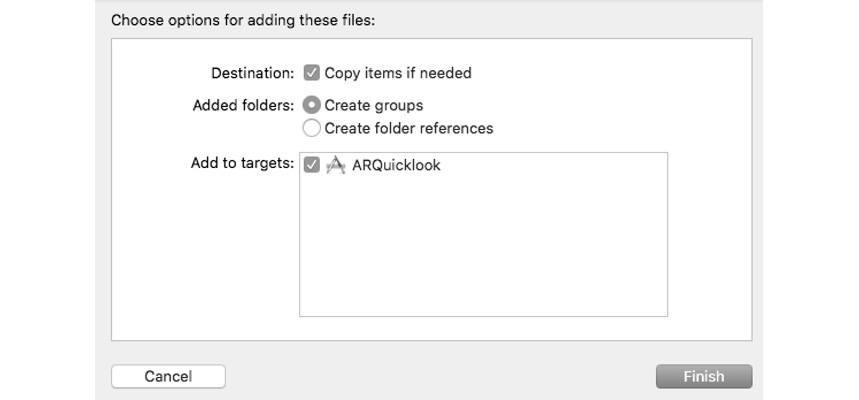
Figure 17.2 – Importing the USDZ model
Next, open the storyboard file and drag an image view to the view controller. Add the proper constraints to the image so it's centered in the view controller and give it a width and height of 200 points. Make sure to check the User Interaction Enabled checkbox in Attributes Inspector and set your model image as the image for the image view.
After doing this, open ViewController.swift, add @IBOutlet for the image view, and connect the image in the storyboard to this outlet. If the details regarding outlets are a little bit fuzzy right now, refer to the sample project in the code bundle for a refresher. The image view in the sample project uses an outlet called guitarImage.
The next steps to implement Quick Look for the USDZ model are to add a tap gesture recognizer to the image view and then trigger the Quick Look view controller when a user taps on the image.
Quick Look uses delegation to object one or more items that it should preview from a data source. It also uses a delegate to obtain the source view from which the Quick Look preview should animate. This flow applies to all kinds of files that you can preview using Quick Look.
To begin implementing Quick Look, you must import the QuickLook framework. Add the following import statement to the top of ViewController.swift:
import QuickLook
Next, set up the tap-gesture recognizer for the image by adding the following code to viewDidLoad():
let tapGesture = UITapGestureRecognizer(target: self,
action: #selector(presentQuicklook))
guitarImage.addGestureRecognizer(tapGesture)
The next step is to implement presentQuicklook(). This method will create a Quick Look view controller, set the delegate and data source, and then present the Quick Look view controller to the user. Add the following implementation for this method to the ViewController class:
@objc func presentQuicklook() {
let previewViewController = QLPreviewController()
previewViewController.dataSource = self
previewViewController.delegate = self
present(previewViewController, animated: true,
completion: nil)
}
This implementation should not contain any surprises for you. QLPreviewController is a UIViewController subclass that is responsible for displaying the content it receives from its data source. It is presented in the same way you would present any other view controller, by calling present(_:animated:completion:).
The final step is to implement the data source and delegates. Add the following extensions to ViewController.swift:
extension ViewController: QLPreviewControllerDelegate {
func previewController(_ controller: QLPreviewController,
transitionViewFor item: QLPreviewItem) -> UIView? {
return guitarImage
}
}
extension ViewController: QLPreviewControllerDataSource {
func numberOfPreviewItems(in controller:
QLPreviewController) -> Int {
return 1
}
func previewController(_ controller: QLPreviewController,
previewItemAt index: Int) -> QLPreviewItem {
let fileUrl = Bundle.main.url(forResource:
"stratocaster", withExtension: "usdz")!
return fileUrl as QLPreviewItem
}
}
The first extension you added makes ViewController conform to QLPreviewControllerDelegate. When the preview controller is about to present the 3D model, it wants to know which view is the source for the transition that is about to happen. It's recommended to return the view that acts as a preview for the Quick Look action from this method. In this case, the preview is the image of the 3D model.
The second extension acts as the Quick Look data source. When you implement Quick Look for ARKit, you can only return a single item. So, when the preview controller asks for the number of items in the preview, you should always return 1. The second method in the data source provides the item that should be previewed in the preview controller. All you need to do here is obtain the file URL for the item you wish to preview. In the sample app, the Stratocaster model from Apple's gallery is used. If your model has a different name, make sure to use the correct filename.
After obtaining the URL that points to the image in the app bundle, it should be returned to the preview controller as a QLPreviewItem instance. Luckily, URL instances can be converted to QLPreviewItem instances automatically.
If you run your app now, you can tap on your image of the 3D model to begin previewing it. You can preview the image on its own, or you can choose to preview it in AR. If you tap this option, the preview controller will tell you to move your device around.
To make a mapping of the world around you, ARKit requires some samples of the environment. When you move your device around, make sure to not just tilt it, but physically move it. Doing this will help ARKit discover trackable features in your surroundings.
Once ARKit has enough data about your surroundings, you can place the 3D model in the environment, scale it by pinching, rotate it, and move it around in the space. Note that the model is placed on a flat surface such as a table or the floor automatically rather than awkwardly floating around:

Figure 17.3 – Move the device around the scene
Also note that ARKit applies very realistic lighting to your object. The visual data that ARKit gathers about the environment is used to create a lighting map that is applied to the 3D model to make it properly blend in with the context in which the object was placed:

Figure 17.4 – AR model placed in the real world
While playing around with ARKit like this is a lot of fun, it's even more fun to create your own AR experiences. Since ARKit supports several rendering techniques, such as SpriteKit and SceneKit, the next two sections will spend a little bit of time explaining the very basics of SpriteKit and SceneKit. You won't learn how to build complete games or worlds with these frameworks. Instead, you will learn just enough to get you started with implementing either rendering engine in an ARKit app.
Exploring SpriteKit
In this section, we are going to explore SpriteKit. SpriteKit is mostly used by developers to build two-dimensional games. SpriteKit has been around for quite some time already, and it has helped developers to create many successful games over the years. SpriteKit contains a full-blown physics simulation engine, and it can render many sprites at a time. A sprite represents a graphic in a game. A sprite could be an image for the player, but also a coin, an enemy, or even the floor that the player walks on. When sprites are mentioned in the context of SpriteKit, it is meant to refer to one of the nodes that are visible on the screen.
Because SpriteKit has a built-in physics engine, it can detect collisions between objects, apply forces to them, and more. This is pretty similar to what UIKit Dynamics is capable of.
To render content, SpriteKit uses scenes. These scenes can be considered levels or major building parts of a game. In the context of AR, you will find that you typically only need a single scene. A SpriteKit scene is responsible for updating the position and state of the scene. As a developer, you can hook into the rendering of frames through the update(_:) method of SKScene. This method is called every time SpriteKit is about to render a new frame for your game or ARKit scene. It is essential that this method's execution time is as short as possible, as slow implementation of the update(_:) method will cause frames to drop, which is considered bad. You should always aim to maintain a steady 60 frames per second. This means that the update(_:) method should always perform its work in less than 1/60th of a second.
To begin exploring SpriteKit, create a new project in Xcode and choose the Game template. Pick SpriteKit as the underlying game technology and give the project a name, for instance, SpriteKitDefault, as shown in the following screenshot:

Figure 17.5 – Creating a SpriteKit project
When Xcode generates this project for you, you should notice some new files that you haven't seen before:
- GameScene.sks
- Actions.sks
These two files are to SpriteKit games what storyboards are to regular apps. You can use these to set up all the nodes for your game scene or to set up reusable actions that you can attach to your nodes. We will not get into these files now as they are pretty specific to game development.
If you build and run the sample project that Xcode provides, you can tap the screen to make new sprite nodes appear on the screen. Each node performs a little animation before it disappears. This isn't very special in itself, but it does contain a lot of valuable information. For instance, it shows you how to add something to a scene and how to animate it. Let's see exactly how this project is set up so you can apply this knowledge if you wish to build an AR experience with SpriteKit at some point.
Creating a SpriteKit scene
SpriteKit games use a special type of view to render their contents. This special view is always an instance or subclass of SKView. If you want to use SpriteKit with ARKit, you should use ARSKView instead because that view implements some special AR-related behavior, such as rendering the camera feed.
The view itself usually doesn't do much work regarding managing the games or its child views. Instead, the SKScene that contains the view is responsible for doing this work. This is similar to how you usually work with view controllers in other apps.
When you have created a scene, you can tell an SKView to present the scene. From this moment on, your game is running. In the sample code for the game project you created earlier, the following lines take care of loading and presenting the scene:
if let scene = SKScene(fileNamed: "GameScene") {
scene.scaleMode = .aspectFill
view.presentScene(scene)
}
When you create your scenes, you can choose whether you want to use .sks files or create scenes programmatically.
When you open the GameScene.swift file that Xcode created for you, most of the code should be pretty self-explanatory. When the scene is added to a view, a couple of SKNode instances are created and configured. The most interesting lines of code in this file are the following:
spinnyNode.run(SKAction.repeatForever(SKAction.rotate(byAng
le: CGFloat(Double.pi), duration: 1)))
spinnyNode.run(SKAction.sequence([SKAction.wait(forDuration
: 0.5), SKAction.fadeOut(withDuration: 0.5),
SKAction.removeFromParent()]))
These lines set up an animation sequence for the spinning squares that get added when you tap the screen. In SpriteKit, actions are the preferred way to set up animations. You can group, chain, and combine actions to achieve pretty complicated effects. This is one of the many powerful tools that SpriteKit has to offer.
If you examine the code a little bit more, you'll find that copies of spinnyNode are created every time the user taps on the screen, moves their finger, or lifts their finger. Each interaction produces a slightly different copy of spinnyNode, so you can determine why spinnyNode was added to the scene by looking at its appearance.
Study this code, play around with it, and try to make sure that you grasp what it does. You don't have to become a SpriteKit expert by any means, but in this section, we have reviewed the basics of it so you can start using it. Let's have a look at how SceneKit works to prepare and implement your AR gallery.
Exploring SceneKit
If you're looking for a game framework that has excellent support for 3D games, SceneKit is a great candidate. SceneKit is Apple's framework for creating 3D games, and it is structured very similarly to how SpriteKit is set up.
Of course, SceneKit is entirely different from SpriteKit because it's used for 3D games rather than 2D games. Because of this, SceneKit also has very different ways of creating views and positioning them onscreen. For instance, when you want to create a simple object and place it on the screen, you will see terms such as geometry and materials. These terms should be familiar to game programmers, but if you're an AR enthusiast, you will probably have to get used to the terminology.
This section will walk you through setting up a straightforward SceneKit scene that closely resembles a part of the AR gallery you will implement later. This should provide you with enough information to begin experimenting with SceneKit.
Creating a basic SceneKit scene
To practice your SceneKit knowledge, create a new project and instead of choosing the Game template, pick the Single View Application template. Of course, you are free to explore the default project Xcode creates for you when you choose the Game template with SceneKit, but it's not terribly useful for the AR gallery.
After creating your project, open the main storyboard and look for a SceneKit view. Drag this view into the view controller. You should notice that the view you just added to the view controller has replaced the default view entirely. Because of this, the view property on ViewController will not be a regular UIView; it will be an instance of SCNView instead. This is the view that will be used to render the SceneKit scene in.
Add the following code to viewDidLoad() in ViewController.swift to cast the view property from UIView to SCNView:
guard let sceneView = self.view as? SCNView
else { return }
Now, remember to add import SceneKit to the top so that SCNView compiles.
Similar to how SpriteKit works, SceneKit uses a scene to render its nodes in. Create an instance of SCNScene right after guard in viewDidLoad(), as shown:
let scene = SCNScene()
sceneView.scene = scene
sceneView.allowsCameraControl = true
sceneView.showsStatistics = true
sceneView.backgroundColor = UIColor.black
The preceding code creates a simple scene that will be used to render all elements in. In addition to creating the scene, several debugging features are enabled to monitor the performance of the scene. Also, note that the allowsCameraControl property on the scene view is set to true. This will allow users to move a virtual camera around so they can explore the scene by swiping around in it.
Every SceneKit scene is viewed as if you're looking at it through a camera. You will need to add this camera to the scene yourself, and you must set it up appropriately for your purpose. The fact that SceneKit uses a camera is very convenient because the camera that you are going to set up in a second is replaced by the actual camera of a device when the scene is run with ARKit.
Add the following lines of code to viewDidLoad() to create and configure the camera:
let cameraNode = SCNNode()
cameraNode.camera = SCNCamera()
cameraNode.position = SCNVector3(x: 0, y: 0, z: 15)
scene.rootNode.addChildNode(cameraNode)
Setting up a basic camera isn't very complicated. All you need is an SCNNode to add the camera to and an SCNCamera that will be used to view your scene through. Note that the camera is positioned using an SCNVector3 object. All nodes in a SceneKit scene use this object to express their positions in 3D space.
In addition to using a simulated camera, SceneKit also simulates real lighting conditions. When you run your scene with ARKit, the lighting conditions will be automatically managed by ARKit, making your objects look as if they truly are part of the environment. When you create a plain scene, however, you will need to add the lights yourself. Add the following lines of code to implement some ambient lighting:
let ambientLightNode = SCNNode()
ambientLightNode.light = SCNLight()
ambientLightNode.light!.type = .ambient
ambientLightNode.light!.color = UIColor.orange
scene.rootNode.addChildNode(ambientLightNode)
You can add different types of lights to a SceneKit scene. You can use ambient light as this sample does, but you can also add directional lights that focus on a particular direction, spotlight, or light points that light in all directions.
Now that you have lighting and a camera in place, you can add an object to the scene. You can use several pre-made shapes, also known as geometries, in your scene. Alternatively, you could import an entire 3D model in your scene. If you take a look at the default SceneKit app that Xcode generates if you create a new project with the Game template, you can see that it imports a 3D model of an airplane.
In the AR gallery you will build later, the artwork is augmented with digital information signs that are attached to the piece of art they belong to. To practice building such a sign, you will add a rectangular shape, or plane, to your SceneKit scene and place some text on top of it.
Add the following code to create a simple white plane, a node that renders the plane, and add it to the scene:
let plane = SCNPlane(width: 15, height: 10)
plane.firstMaterial?.diffuse.contents = UIColor.white
plane.firstMaterial?.isDoubleSided = true
plane.cornerRadius = 0.3
let planeNode = SCNNode(geometry: plane)
planeNode.position = SCNVector3(x: 0, y: 0, z: -15)
scene.rootNode.addChildNode(planeNode)
If you were to build and run your app now, you would see a white square that is positioned in front of the camera. By swiping on the scene, you can make the camera move around the plane to view it from all possible sides. Note that the plane appears to be quite large even though it was only set to be 15 wide and 10 high. You might have guessed that these numbers represent points on the screen, just like in other apps. In SceneKit, there is no concept of points. All values for size and distance must be specified in meters. This means that everything you do is done relative to other objects or their real-world sizes. Using real sizes is essential when you take your SceneKit knowledge to ARKit.
To add some text to the plane you just created, use the following code:
let text = SCNText(string: "Hello, world!", extrusionDepth:
0)
text.font = UIFont.systemFont(ofSize: 2.3)
text.isWrapped = true
text.containerFrame = CGRect(x: -6.5, y: -4, width: 13,
height: 8)
text.firstMaterial?.diffuse.contents = UIColor.red
let textNode = SCNNode(geometry: text)
planeNode.addChildNode(textNode)
The preceding code creates a text geometry. Since all values in SceneKit are in meters, the text size will be a lot smaller than you would probably expect. To make sure the text is positioned properly in the plane, text wrapping is enabled, and a containerFrame is used to specify the bounds for the text. Since the origin for the text field will be in the center of the plane it is displayed on, the x and y positions are offset negatively from the center to make sure the text appears in the correct place. You can try to play around with this frame to see what happens. After configuring the text, it is added to a node, and the node is added to the plane node.
If you run your app now, you can see the Hello, World! text rendered on the white plane you created before. This sample is an excellent taste of what you're going to create next. Let's dive straight into building your AR gallery!
Implementing an Augmented Reality gallery
Creating an excellent AR experience has been made a lot simpler with the great features that exist in ARKit. However, there are still several things to keep in mind if you want to build an AR experience that users will love.
Certain conditions, such as lighting, the environment, and even what the user is doing, can have an impact on the AR experience. In this section, you will implement an AR gallery, and you will discover firsthand how ARKit is both amazingly awesome and sometimes a little bit fragile.
First, you'll set up a session in ARKit so you can implement image tracking to discover certain predefined images in the world, and you'll show some text above the found picture. Then, you'll implement another feature that allows users to place art from a gallery in the app in their own room.
If you want to follow along with the steps to implement the ARKit gallery, make sure to grab the ARGallery_start project from the book's code bundle. Before you move on to implementing the AR gallery, explore the starter project for a little bit. The user interface that is prepared contains an instance of ARSCNView; this is the view that will be used to render the AR experience. A collection view has been added in preparation for the user adding their own images to the gallery, and a view for error messages has been added to inform the user about certain things that might be wrong.
You'll find that the project is quite basic so far. All the existing code does is set up the collection view, and some code was added to handle errors during the AR session. Let's implement image tracking, shall we?
Adding image tracking
When you add image tracking to your ARKit app, it will continuously scan the environment for images that match the ones you added to your app. This feature is great if you want users to look for specific images in their environment so you can provide more information about them or as part of a scavenger hunt. But more elaborate implementations might exist as part of a textbook or magazine where scanning a particular page would cause the whole page to come alive as part of a unique experience.
Before you can implement the image tracking experience, you must prepare some images for your users to find in the app. Once the content is ready, you're ready to build the AR experience itself.
Preparing images for tracking
Adding images to your app that are eligible for image tracking is relatively straightforward. The most important part is that you pay close attention to the images you add to your app. It's up to you to make sure that the images you add are high-quality and well-saturated. ARKit will scan for special features in an image to try to match it, so it's important that your image has enough details, contrast, and colors. An image of a smooth gradient might look like a recognizable image to you, but it could be tough for ARKit to detect.
To add images to your project, go to the Assets.xcassets folder, click the + icon in the bottom-left corner, and select New AR Resource Group, as shown in the following screenshot:
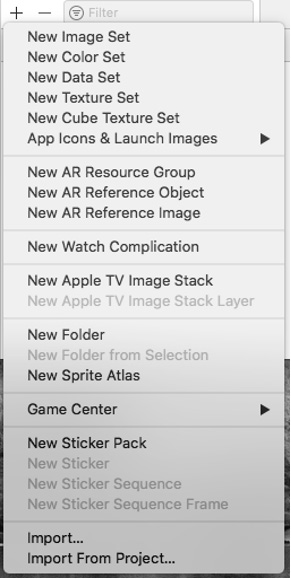
Figure 17.6 – Adding an AR resource
After adding a new resource group, you can drag images into the folder that was created. Each resource group will be loaded and monitored by ARKit all at once, so make sure you don't add too many images to a single resource group because that could negatively impact the performance of your app. Apple recommends you add up to about 25 images to a single resource group.
After you add an image to a resource group, Xcode will analyze the images and warn you if it thinks something is wrong with your image. Usually, Xcode will inform you as soon as you add a new image because ARKit requires the physical size of the image you want to detect to be known. So, if you're going to detect a specific painting or a page in a magazine, you must add the dimensions for these resources in centimeters as they exist in the real world.
The start project from the code bundle comes with a couple of prepared images that you can explore to see some examples of the kinds of images that you could use in your own apps.
Tip
If you want to have some content of your own, take photos of artwork or pictures that you have around the house or office. You can use the Measure app in iOS to measure the physical dimensions of the pictures and add them to your AR gallery project. Make sure that your pictures are well-saturated and free of any glare or reflections.
Once you have found and added some excellent content to use in your AR gallery, it's time to build the experience itself.
Building the image tracking experience
To implement image tracking, you will set up an ARSession that uses ARWorldTrackingConfiguration to detect images and track a user's movement through the environment. When one of the images you have prepared is discovered in the scene, an SCNPlane will be added above the picture with a short description of the picture itself.
Because ARKit uses the camera, your app must explicitly provide a reason for accessing the camera, so the user understands why your app needs permission to use their camera. Add the NSCameraUsageDescription key to the Info.plist file and add a short bit of text about why the gallery needs access to the camera.
If you open ViewController.swift, you will find a property called artDescriptions. Make sure to update this dictionary with the names of the images you added to the resource group and add a short description for each image.
Next, update viewDidLoad() so ViewController is set as the delegate for both ARSCNView and ARSession. Add the following lines of code to do this:
arKitScene.delegate = self
arKitScene.session.delegate = self
The scene delegate and session delegate are very similar. The session delegate provides very fine-grained control of the content that is displayed in the scene, and you'll usually use this protocol extensively if you build your own rendering. Since the AR gallery is rendered using SceneKit, the only reason to adopt ARSessionDelegate is to respond to changes in the session's tracking state.
All of the interesting methods that you should adopt are part of ARSCNViewDelegate. This delegate is used to respond to specific events, for instance, when new features are discovered in the scene or when new content has been added.
Currently, your AR gallery doesn't do much. You must configure the ARSession that is part of the scene to begin using ARKit. The best moment to set this all up is right before the view controller becomes visible. Therefore, you should do all of the remaining setup in viewWillAppear(_:). Add the following implementation for this method to ViewController:
override func viewWillAppear(_ animated: Bool) {
super.viewWillAppear(animated)
// 1
let imageSet = ARReferenceImage.referenceImages(
inGroupNamed: "Art", bundle: Bundle.main)!
// 2
let configuration = ARWorldTrackingConfiguration()
configuration.planeDetection = [.vertical, .horizontal]
configuration.detectionImages = imageSet
// 3
arKitScene.session.run(configuration, options: [])
}
The code is explained as follows:
- The first step in this method is to read the reference image from the app bundle. These are the images you added to Assets.xcassets.
- Next, ARWorldTrackingConfiguration is created, and it's configured to track both horizontal and vertical planes, as well as the reference images.
- Lastly, the configuration is passed to the session's run(_:options:) method.
If you run your app now, you should already be prompted for camera usage, and you should see the error-handling working. Try covering the camera with your hand, which should make an error message appear.
Keeping an AR session alive if a view isn't visible anymore is quite wasteful, so it's a good idea to pause the session if the app is closed or if the view controller that contains the AR scene becomes invisible. Add the following method to ViewController to achieve this:
override func viewWillDisappear(_ animated: Bool) {
super.viewWillDisappear(animated)
arKitScene.session.pause()
}
In the current setup, the AR session detects your images, but it does nothing to visualize this. When one of the images you added is identified, ARSCNViewDelegate is notified of this. To be specific, the renderer(_:didAdd:for:) method is called on the scene delegate when a new SCNNode is added to the view. For instance, when the AR session discovers a flat surface, it adds a node for ARPlaneAnchor, or when it detects one of the images you're tracking, a node for ARImageAnchor is added. Since this method can be called for different reasons, it's essential that you add logic to differentiate between the various reasons that could cause a new SCNNode to be added to the scene.
Because the AR gallery will implement several other features that could trigger the addition of a new node, you should separate the different actions you want to take for each different type of anchor into specialized methods. Add the following method to ARSCNViewDelegate to add the information plane next to a detected image:
func placeImageInfo(withNode node: SCNNode, for anchor:
ARImageAnchor) {
let referenceImage = anchor.referenceImage
// 1
let infoPlane = SCNPlane(width: 15, height: 10)
infoPlane.firstMaterial?.diffuse.contents = UIColor.white
infoPlane.firstMaterial?.transparency = 0.5
infoPlane.cornerRadius = 0.5
// 2
let infoNode = SCNNode(geometry: infoPlane)
infoNode.localTranslate(by: SCNVector3(0, 10, -
referenceImage.physicalSize.height / 2 + 0.5))
infoNode.eulerAngles.x = -.pi / 4
// 3
let textGeometry = SCNText(string:
artDescriptions[referenceImage.name ?? "flowers"],
extrusionDepth: 0.2)
textGeometry.firstMaterial?.diffuse.contents =
UIColor.red
textGeometry.font = UIFont.systemFont(ofSize: 1.3)
textGeometry.isWrapped = true
textGeometry.containerFrame = CGRect(x: -6.5, y: -4,
width: 13, height: 8)
let textNode = SCNNode(geometry: textGeometry)
// 4
node.addChildNode(infoNode)
infoNode.addChildNode(textNode)
}
The preceding code should look somewhat familiar to you. First, an instance of SCNPlane is created. Then, this plane is added to SCNNode. This node is translated slightly to position it above the detected image. This translation uses SCNVector3 so it can be translated into three dimensions. The node is also rotated a little bit to create a nice-looking effect.
Next, add the following implementation for renderer(_:didAdd:for:):
func renderer(_ renderer: SCNSceneRenderer, didAdd node:
SCNNode, for anchor: ARAnchor) {
if let imageAnchor = anchor as? ARImageAnchor {
placeImageInfo(withNode: node, for: imageAnchor)
}
}
This method checks whether the anchor that was discovered is an image anchor; if it is, placeImageInfo(withNode:for:) is called to display the information sign.
Go ahead and run your app now! When you find one of the images that you added to your resource group, an information box should appear on top of it, as shown in the following screenshot:

Figure 17.7 – AR box on top of the image
Pretty awesome, right? Let's take it one step further and allow users to position some of the pictures from the collection view wherever they want in the scene.
Placing your own content in 3D space
To spice up the AR gallery a little bit, it would be great to be able to add some new artwork to the environment. Using ARKit, doing this becomes relatively simple. There are a couple of gotchas to take into account when implementing a feature such as this, but overall, Apple did a great job making ARKit an accessible platform to work with for developers.
When a user taps on one of the images in the collection view at the bottom of the screen, the image they tapped should be added to the environment. If possible, the image should be attached to one of the walls surrounding the user. If this isn't possible, the image should still be added, except it will float in the middle of the space.
To build this feature, you should implement collectionView(_:didSelectItemAt:) since this method is called when a user taps on one of the items in a collection view. When this method is called, the code should take the current position of the user in the environment and then insert a new ARAnchor that corresponds to the location where the new item should be added.
Also, to detect nearby vertical planes, such as walls, some hit testing should be done to see whether a vertical plane exists in front of the user. Add the following implementation of collectionView(_:didSelectItemAt:):
func collectionView(_ collectionView: UICollectionView,
didSelectItemAt indexPath: IndexPath) {
//1
guard let camera =
arKitScene.session.currentFrame?.camera
else { return }
//2
let hitTestResult = arKitScene.hitTest(CGPoint(x: 0.5, y:
0.5), types: [.existingPlane])
let firstVerticalPlane = hitTestResult.first(where: {
result in
guard let planeAnchor = result.anchor as? ARPlaneAnchor
else { return false }
return planeAnchor.alignment == .vertical
})
//3
var translation = matrix_identity_float4x4
translation.columns.3.z = -
Float(firstVerticalPlane?.distance ?? -1)
let cameraTransform = camera.transform
let rotation = matrix_float4x4(cameraAdjustmentMatrix)
let transform = matrix_multiply(cameraTransform,
matrix_multiply(translation, rotation))
//4
let anchor = ARAnchor(transform: transform)
imageNodes[anchor.identifier] = UIImage(named:
images[indexPath.row])!
arKitScene.session.add(anchor: anchor)
storeWorldMap()
}
Even though there are only four steps in this snippet, a lot is going on. Let's review it:
- First, the camera is grabbed from the current frame in the AR session so it can be used later to determine the user's location in the scene.
- Next, a hit test is performed to see whether any planes were already detected in the scene. Since this hit test will return both vertical and horizontal planes, the results are filtered to find the very first vertical plane that was found in the hit test.
- Since the location of every ARAnchor is represented as a transformation from the world origin, the third step is to determine the transformation that should be applied to position the new artwork in the correct place. The world origin is the place where the AR session first became active. After creating a default translation, the z value for the translation is adjusted, so the object is added either in front of the user or against the nearest vertical plane. Next, the current position of the user is retrieved through the camera. The rotation for the camera will have to be adjusted in the next steps because the camera does not follow the device's orientation. This means that the camera will always assume that the x axis runs across the length of the device, starting at the top and moving downward toward the home indicator area. A computed property to determine how the rotation should be adjusted is already added to the AR gallery starter project.
- After setting up the correct transformation properties for the anchor, an instance of ARAnchor is created. The unique identifier and image that the user tapped are then stored in the imageNodes dictionary so the image can be added to the scene after the new anchor is registered on the scene.
To add the image to the scene, you should implement a helper method that will be called from rendered(_:didAdd:for:), similar to the helper method you added to show the information card for the image tracking feature. Add the following code to ViewController to implement this helper:
func placeCustomImage(_ image: UIImage, withNode node:
SCNNode) {
let plane = SCNPlane(width: image.size.width / 1000,
height: image.size.height / 1000)
plane.firstMaterial?.diffuse.contents = image
node.addChildNode(SCNNode(geometry: plane))
}
To make it easier to see whether an appropriate vertical plane exists, you can implement a helper method that visualizes the planes that the AR session discovers. Add the following code to the ViewController class to implement this helper:
func vizualise(_ node: SCNNode, for planeAnchor:
ARPlaneAnchor) {
let infoPlane = SCNPlane(width:
CGFloat(planeAnchor.extent.x), height:
CGFloat(planeAnchor.extent.z))
infoPlane.firstMaterial?.diffuse.contents =
UIColor.orange
infoPlane.firstMaterial?.transparency = 0.5
infoPlane.cornerRadius = 0.2
let infoNode = SCNNode(geometry: infoPlane)
infoNode.eulerAngles.x = -.pi / 2
node.addChildNode(infoNode)
}
The previous method takes a node and anchor to create a new SCNPlane, which is added to the exact position where the new plane anchor was discovered.
The final step in implementing this feature is to call the helper methods when needed. Update the implementation for renderer(_:didAdd:for:) as follows:
func renderer(_ renderer: SCNSceneRenderer, didAdd node:
SCNNode, for anchor: ARAnchor) {
if let imageAnchor = anchor as? ARImageAnchor {
placeImageInfo(withNode: node, for: imageAnchor)
} else if let customImage = imageNodes[anchor.identifier]
{
placeCustomImage(customImage, withNode: node)
} else if let planeAnchor = anchor as? ARPlaneAnchor {
vizualise(node, for: planeAnchor)
}
}
If you run your app now, you should see orange squares appear in areas where ARKit detected a flat surface. Note that ARKit needs textures and visual markers to work well. If you try to detect a solid white wall, it's unlikely that ARKit will properly recognize the wall due to a lack of textures. However, a brick wall or a wall that has wallpaper with some graphics on it should work well for this purpose.
The following screenshot shows an example where an image is attached to a wall, together with the plane indicator:
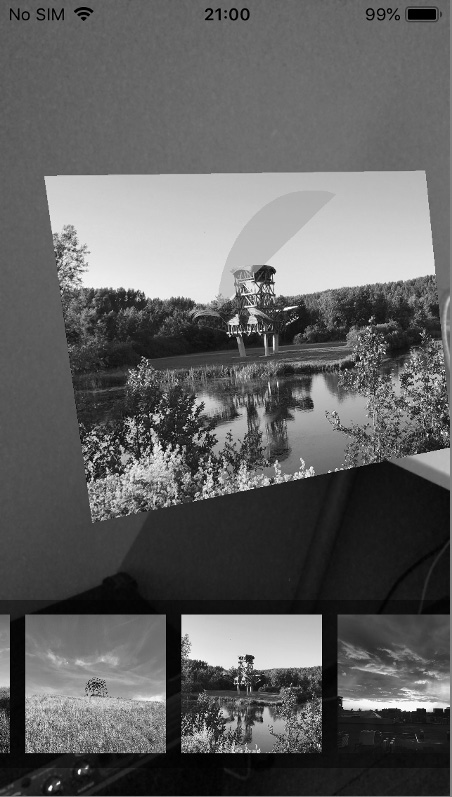
Figure 17.8 – Adding an image to an AR plane
This wraps up the implementation of your own personal AR gallery. There is still much to learn about the things you can do with AR, so make sure to keep on experimenting and learning so you can create amazing experiences for your users.
Summary
In this chapter, you learned a lot. You gained some insight into what AR is, the basic workings of AR, and what you can do with it. Then you learned about the components that make up an excellent AR experience, and you implemented your first small AR experience by adopting Quick Look in an app to preview AR content in a real AR session.
Then you explored different ways to render content in an AR scene. You took a quick look at SpriteKit and SceneKit and learned that SpriteKit is Apple's 2D game development framework. You also learned that SceneKit is Apple's 3D game framework, which makes it extremely well-suited for usage in an AR app.
Then you implemented an AR gallery that uses image tracking and plane detection and allows users to add their own content to their gallery. In the process of doing this, you saw that it's not always easy to get ARKit to work well. Bad lighting and other factors can make AR experiences less than ideal.
In the next chapter, you will create a macOS app with Catalyst.