Chapter 9: Fetching and Displaying Data from the Network
Most modern applications communicate with a web service. Some apps rely on them heavily, acting as a layer that merely reads data from the web and displays it in app form. Other apps use the web to retrieve and sync data to make it locally available, and others only use the web as backup storage. Of course, there are a lot more reasons to use data from the internet than the ones mentioned.
In this chapter, you will expand the MustC application, so it uses a web service to retrieve popularity ratings for the movies that family members have added as their favorites. These popularity ratings will be stored in the Core Data database and displayed together with the names of the movies.
In this chapter, you'll learn about the following topics:
- Fetching data from the web with URLSession
- Working with JSON in Swift
- Updating Core Data objects with fetched data
Technical requirements
The code bundle for this chapter includes a starter project called MustC. It also includes a playground file named URLSession.playground.
You will also need to generate an API key from https://www.themoviedb.org/. Create an account on their website and request an API key on your account page. Setting this up should only take a couple of minutes, and if you want to follow along with this chapter, you will need to have your own API key.
After you have created and validated your account on themoviedb.org, you can visit the following link to request an API key: https://www.themoviedb.org/settings/api/request.
The code for this chapter can be found here: https://github.com/PacktPublishing/Mastering-iOS-14-Programming-4th-Edition/tree/master/Chapter%209%20-%20Fetching%20from%20Network.
Fetching data from the web with URLSession
Retrieving data from the web is something that you will often do as an iOS professional. You won't just fetch data from a web service; you'll also send data back to it. For example, you might have to make an HTTP POST request as part of a login flow or to update a user's profile information. Over time, iOS has evolved quite a bit in the web requests department, making it easier to use web services in apps.
Important Note
HTTP (or HTTPS) is a protocol that almost all web traffic uses for communication between a client, such as an app, and a server. The HTTP protocol supports several methods that signal the request's intent. GET is used to retrieve information from a server. A POST request indicates the intention to push new content to a server, such as, for instance, when submitting a form.
When you want to perform a web request in iOS, you will typically use the URLSession class. The URLSession class makes asynchronous web requests on your behalf. This means that iOS loads data from the web on a background thread, ensuring that the user interface remains responsive throughout the entire request. If a web request is performed synchronously, the user interface is unresponsive for the duration of the network request because a thread can only do one thing at a time, so if it's waiting for a response from the network, it can't respond to touches or any other user input.
If your user has a slow internet connection, a request could take several seconds. You don't want the interface to freeze for several seconds. Even a couple of milliseconds will create a noticeable drop in its responsiveness and frame rate. This can be easily avoided by using URLSession to perform asynchronous network requests.
First, you will experiment with basic network requests in a playground. You can create a new playground or use the one provided in this book's code bundle. After you've seen the basics of URLSession, you'll implement a way to fetch movies from an open source movie database and put this implementation to use in the MustC app.
Understanding the basics of URLSession
Making network calls is one of the fundamental tasks of every app that needs to fetch, post, or modify remote data. It is one of the most common tasks that a developer faces every day. For this task, Apple provides developers with the URLSession class. The URLSession class helps developers to work with remote data easily and by coordinating a group of related network data-transfer tasks.
The following code snippet shows a sample network request that loads the https://apple.com home page:
import Foundation
let url = URL(string: 'https://apple.com')!
let task = URLSession.shared.dataTask(with: url) {
data, response, error in
if let data = data {
print(data)
}
if let response = response {
print(response)
}
if let error = error {
print(error)
}
}
This is an elementary example: a URL is created, and then the shared URLSession instance is used to create a new dataTask. This dataTask is an instance of URLSessionDataTask and allows you to load data from a remote server.
Alternatively, you could use a download task if you're downloading a file, or an upload task if you're uploading files to a web server. After creating the task, you must call resume on the task, because new tasks are always created in a suspended state.
If you run this sample in an empty playground, you'll find that the example doesn't work. Because the network request is made asynchronously, the playground finishes its execution before the network request is complete. To fix this, you should make sure that the playground runs indefinitely. Doing so will allow the network request to finish. Add the following lines to the top of the playground source file to enable this behavior:
import PlaygroundSupport
PlaygroundPage.current.needsIndefiniteExecution = true
Now that the playground runs indefinitely, you'll find that there isn't a lot of useful data printed to the console. In this case, you're not interested in the raw data, HTTP headers, or the fact that the error is nil. When you load data from a URL, you're often most interested in the response's body. The body of a response usually contains the string representation of the data you requested. In the case of the preceding example, the body is the HTML that makes up Apple's home page. Let's see how you can extract this HTML from the response. Replace the data task's completion callback with the following:
{ data, response, error in
guard let data = data, error == nil
else { return }
let responseString = String(data: data, encoding: .utf8)
print(responseString as Any)
}
The preceding callback closure makes sure that there are no errors returned by the web service and that there is data present. Then, the raw data is converted to a string, and that string is printed to the console. If you use this callback instead of the old one, you'll see the HTML for the Apple home page printed. Simple requests to a web server like the one you just saw are relatively simple to implement with URLSession.
If you need to customize your network request (for example, to add custom headers) rather than using the simple dataTask function with a URL, you need to create your own URLRequest instance, instead of letting URLSession do it. The example you saw is one where you let URLSession create the URLRequest on your behalf. This is fine if you want to perform a simple HTTP GET request with no custom headers, but if you're going to post data or include specific headers, you will need to have more control over the request that's used.
Let's take a look at what a GET request with some parameters and a custom header looks like. The following code uses an API key from https://www.themoviedb.org/. If you want to try this code example, create an account on their website and request an API key on your account page. Setting this up should only take a couple of minutes, and if you want to follow along with this chapter, you will need to have your own API key. After you have created and validated your account on themoviedb.org, you can visit the following link to request an API key: https://www.themoviedb.org/settings/api/request:
let api_key = 'YOUR_API_KEY_HERE'
var urlString = 'https://api.themoviedb.org/3/search/movie/'
urlString = urlString.appending('?api_key=(api_key)')
urlString = urlString.appending('&query=Swift')
let movieURL = URL(string: urlString)!
var urlRequest = URLRequest(url: movieURL)
urlRequest.httpMethod = 'GET'
urlRequest.setValue('application/json', forHTTPHeaderField: 'Accept')
let movieTask = URLSession.shared.dataTask(with: urlRequest) { data, response, error in
print(response as Any)
}
movieTask.resume()
The preceding code is a bit more complicated than the example you saw before. In this example, a more complex URL request is configured that includes some HTTP GET parameters. The httpMethod value for URLRequest is specified, and a custom header is provided to inform the receiver of this request about the type of response it would like to receive.
The flow for executing this URL request is the same as the one you saw earlier. However, the URL that is loaded responds with a JSON string instead of an HTML document. JSON is used by many APIs as the preferred format to pass data around on the web. In order to use this response, the raw data must be converted to a useful data structure. In this case, a dictionary will do. If you haven't seen or worked with JSON before, it's a good idea to take a step back and read up on the JSON data format because this chapter will continue under the assumption that you are at least somewhat familiar with JSON.
Working with JSON in Swift
The following snippet shows how you can convert raw data to a JSON dictionary. Working with JSON in Swift can be a little tedious at times, but overall, it's a generally good experience. Let's look at the following example:
guard let data = data, let json = try? JSONSerialization.jsonObject(with: data, options: []) else { return }
print(json)
The preceding snippet converts the raw data that is returned by a URL request to a JSON object. The print statement prints a readable version of the response data, but it's not quite ready to be used. Let's see how you gain access to the first available movie in the response.
If you look at the type of object returned by the jsonObject(with:options:) method, you'll see that it returns Any. This means that you must typecast the returned object to something you can work with, such as an array or a dictionary. When you inspect the JSON response that the API returned, for instance by using print to make it appear in the console as you did with Apple's home page HTML, you'll notice that there's a dictionary that has a key called results. The results object is an array of movies. In other words, it's an array of [String: Any], because every movie is a dictionary, where strings are the keys and the value can be a couple of different things, such as Strings, Int, or Booleans. With this information, you can access the first movie's title in the JSON response, as shown in the following code:
guard let data = data,
let json = try? JSONSerialization.jsonObject(with: data,
options: []),
let jsonDict = json as? [String: AnyObject],
let resultsArray = jsonDict['results'] as? [[String: Any]]
else { return }
let firstMovie = resultsArray[0]
let movieTitle = firstMovie['title'] as! String print(movieTitle)
Working with dictionaries to handle JSON isn't the best experience. Since the JSON object is of the AnyObject type and you need to typecast every element in the dictionary you want to access, there's a lot of boilerplate code you need to add.
Luckily, Swift has better ways to create instances of objects from the JSON data. The following example shows how you can quickly create an instance of a Movie struct without having to cast all the keys in the JSON dictionary to the correct types for the Movie struct.
First, let's define two structs, one for the Movie itself, and one for the response that contains the array of Movie instances:
struct MoviesResponse: Codable {
let results: [Movie]
}
struct Movie: Codable {
let id: Int
let title: String
let popularity: Float
}
Next, you can use the following snippet to quickly convert the raw data from a URL request to an instance of MoviesResponse, where all movies are converted to instances of the Movie struct:
let decoder = JSONDecoder()
guard let data = data,
let movies = try? decoder.decode(MoviesResponse.self, from: data) else { return }
print(movies.results[0].title)
You might notice that both MoviesResponse and Movie conform to the Codable protocol. The Codable protocol was introduced in Swift 4, and it allows you to easily encode and decode data objects. The only requirement is that all properties of a Codable object conform to the Codable protocol. A lot of built-in types, such as Array, String, Int, Float, and Dictionary, conform to Codable. Because of this, you can easily convert an encoded JSON object into a MoviesResponse instance that holds Movie instances.
By default, each property name should correspond to the key of the JSON response it is mapped to. However, sometimes you might want to customize this mapping. For instance, the poster_path property in the response we've been working with so far would be best mapped to a posterPath property on the Movie struct, according to the general Swift guidelines for property naming. The following example shows how you would tackle these circumstances:
struct Movie: Codable {
enum CodingKeys: String, CodingKey {
case id, title, popularity
case posterPath = 'poster_path'
}
let id: Int
let title: String
let popularity: Float
let posterPath: String?
}
By specifying a CodingKeys enum, you can override how the keys in the JSON response should be mapped to your Codable object. You must cover all keys that are mapped, including the ones you don't want to change. As you've seen, the Codable protocol provides powerful tools for working with data from the network. Custom key mapping makes this protocol even more powerful because it allows you to shape your objects exactly how you want them, instead of having the URL responses dictate the structure to you.
If the only conversion you need to apply in the coding keys is converting from snake case (poster_path) to camel case (posterPath), you don't have to specify the coding keys yourself. The JSONDecoder object can automatically apply this type of conversion when decoding data if you set its keyDecodingStrategy to .convertFromSnakeCase, as shown in the following code:
let decoder = JSONDecoder()
decoder.keyDecodingStrategy = .convertFromSnakeCase
By applying these lines of code, the decoder will automatically translate property names such as poster_path into the posterPath syntax. Try implementing this in your playground and remove CodingKeys from the Movie object to ensure your JSON decoding still works.
In this section, we have learned how to work with JSON data and how to decode it into our own entities. Now let's move on to storing the fetched data in the Core Data database.
Updating Core Data objects with fetched data
So far, the only thing you have stored in Core Data is movie names. You will expand this functionality by performing a lookup for a certain movie name through the movie database API. The fetched information will be used to display and store a popularity rating for the movies in the Core Data database.
A task such as this seems straightforward at first; you could come up with a flow such as the one shown in the following steps:
- The user indicates their favorite movie.
- The movie's popularity rating is fetched.
- The movie and its rating are stored in the database.
The user interface updates with the new movie. At first glance, this is a fine strategy; insert the data when you have it. However, it's important to consider that API calls are typically done asynchronously so the user interface stays responsive. More importantly, API calls can be really slow if your user doesn't have a good internet connection. This means that you would be updating the interface with some very noticeable lag if the preceding steps are executed one by one.
The following would be a much better approach to implement the feature at hand:
- The user indicates their favorite movie.
- The user stores the movie.
- Update the user interface with the new movie.
- Begin popularity fetching.
- Update the movie in the database.
- Update the user interface with the popularity.
This approach is somewhat more complex, but it will give the user a responsive experience. The user interface responds to new movies immediately by showing them, and then automatically updates as soon as new data is retrieved. Before you can fetch the data and update the models, the Core Data model must be modified in order to store the given movie's popularity rating.
Open the MustC project for this chapter (you can find it in the GitHub repository of the book). Then, open the Core Data model editor and select the Movie entity. All you have to do is to add a new property and name it popularity. Select the Double type for this property because popularity is stored as a decimal value. You have to make sure that this property is optional since you won't be able to provide a value for it straight away:

Figure 9.1 – Add the popularity attribute to the Movie entity
If you've worked with Core Data prior to when iOS 10 was released, this is the part where you expect to read about migrations and how you can orchestrate them.
However, for simple changes like this, we don't need to manually manage migrations. All you need to do is simply build and run your application to regenerate your model definitions, and for a simple change, such as the one we performed just now, Core Data will automatically manage the migration for us.
Important Note
If you want to support iOS versions earlier than 10, make sure you read up on Core Data migrations. Whenever you update your models, you have to make sure that your database can properly migrate from one model version to another. During development, this isn't extremely important: you just reinstall the app whenever your models change. However, app updates will crash on launch if the Core Data model isn't compatible with the previous model.
Now that the Core Data model is updated, let's figure out how to implement the flow that was described earlier.
Implementing the fetch logic
The asynchronous nature of network requests makes certain tasks, such as the one you're about to implement, quite complex. Usually, when you write code, its execution is very predictable. Your app typically runs line by line, sequentially, so any line that comes after the previous one can assume that the line before it has finished executing. This isn't the case with asynchronous code. Asynchronous code is taken off the main thread and runs separately from the rest of your code. This means that your asynchronous code might run in parallel with other code. In the case of a network request, the asynchronous code might execute seconds after the function that initiated the request.
This means that you need to figure out a way to update and save movies that were added as soon as the rating was retrieved. However, it's important that you're aware of the fact that it's not as straightforward as it may seem at first.
It's also important that you're aware of the fact that the code you're about to look at is executed on multiple threads. This means that even though all pieces of the code are defined in the same place, they are not executed sequentially. The callback for the network request is executed on a different thread than the code that initiated the network request. You have already learned that Core Data is not thread-safe. This means that you can't safely access a Core Data object on a different thread than the thread it was created on.
If this confuses you, that's okay. You're supposed to be a bit confused right now. Asynchronous programming is not easy and fooling you into thinking it is will cause frustration once you run into concurrency-related troubles (and you will). Whenever you work with callbacks, closures, and multiple threads, you should be aware that you're doing complex work that isn't straightforward.
Now that you understand that asynchronous code is hard, let's take a closer look at the feature you're about to implement. It's time to start implementing the network request that fetches popularity ratings for movies. You will abstract the fetching logic into a helper named MovieDBHelper. Go ahead and create a new Helper folder in Xcode and add a new Swift file called MovieDBHelper.swift to it.
Abstracting this logic into a helper has multiple advantages. One of them is simplicity; it will keep our view controller code nice and clean. Another advantage is flexibility. Let's say that you want to combine multiple rating websites, or a different API, or compute the popularity of movies based on the number of family members who added this same title to their list; it will be easier to implement since all the logic for ratings is in a single place.
Add the following skeleton implementation to the MovieDBHelper file:
struct MovieDBHelper {
typealias MovieDBCallback = (Double?) -> Void
let apiKey = 'YOUR_API_KEY_HERE'
func fetchRating(forMovie movie: String, callback: @escaping
MovieDBCallback) {
}
private func url(forMovie movie: String) -> URL? {
guard let query =
movie.addingPercentEncoding(withAllowedCharacters:
.urlHostAllowed) else { return nil }
var urlString =
'https://api.themoviedb.org/3/search/movie/'
urlString = urlString.appending('?api_key=(apiKey)')
urlString = urlString.appending('&query=(query)')
return URL(string: urlString)
}
}
The preceding code starts off with an interesting line:
typealias MovieDBCallback = (Double?) -> Void
This line specifies the type that's used for the callback closure that's called when the rating is fetched. This callback will receive an optional Double as its argument. If the network request fails for any reason, the Double will be nil. Otherwise, it contains the rating for the movie that the request was created for.
The snippet also contains a fetchRating dummy method that performs the fetch; you will implement this method soon. Finally, there's a url(forMovie movie: String) method that builds a URL. This method is private because it's only supposed to be used inside of the helper struct. Note that the movie is converted to a percent-encoded string. This is required because if your user were to add a movie with spaces in it, you would end up with an invalid URL if the spaces aren't properly encoded.
Before you implement fetchRating(forMovie:callback), add a new file named MovieDBResponse.swift to the Helper folder. This file will be used to define a struct that represents the response we expect to receive from api.themoviedb.org. Add the following implementation to this file:
struct MovieDBLookupResponse: Codable {
struct MovieDBMovie: Codable {
let popularity: Double?
}
let results: [MovieDBMovie]
}
The preceding code uses a nested struct to represent the movie objects that are part of the response. This is similar to what you saw in the playground example in the Fetching data from the web with URLSession section at the beginning of this chapter. Structuring the response this way makes the intent of this helper very obvious, which usually makes code easier to reason about. With this struct in place, replace the implementation of fetchRating(forMovie:callback) inside MovieDBHelper with the following:
func fetchRating(forMovie movie: String, callback: @escaping MovieDBCallback) {
guard let searchUrl = url(forMovie: movie) else {
callback(nil)
return
}
let task = URLSession.shared.dataTask(with: searchUrl) {
data, response, error in
var rating: Double? = nil
defer {
callback(rating)
}
let decoder = JSONDecoder()
guard error == nil,
let data = data,
let lookupResponse = try?
decoder.decode(MovieDBLookupResponse.self, from:
data),
let popularity =
lookupResponse.results.first?.popularity
else { return }
rating = popularity
}
task.resume()
}
This implementation looks very similar to what you experimented with earlier in the playground. The URL-building method is used to create a valid URL. If this fails, it makes no sense to attempt requesting the movie's rating, so the callback is called with a nil argument. This will inform the caller of this method that the execution is completed, and no result was retrieved.
Next, a new data task is created and resume() is called on this task to kick it off. There is an interesting aspect to how the callback for this data task is called, though. Let's take a look at the following lines of code:
var rating: Double? = nil
defer {
callback(rating)
}
A rating optional Double is created here, and it is given an initial value of nil. Then there's a defer block. The code inside of the defer block is called right before exiting the scope. In other words, it's executed right before the code returns from a function or closure.
Since this defer block is defined inside the callback for the data task, the callback for the fetchRating(forMovie:callback:) method is always called just before the data task callback is exited. This is convenient because all you must do is set the value for the rating to double, and you don't have to manually invoke the callback for each possible way the scope can be exited. This also applies when you return because of unmet requirements. For instance, if there is an error while calling the API, you don't need to invoke the callback. You can simply return from the closure, and the callback is called automatically. This strategy can also be applied if you instantiate or configure objects temporarily and you want to perform some clean-up when the method, function, or closure is done.
The rest of the code should be fairly straightforward since most of it is nearly identical to the code used in the playground. Now that you have the networking logic down, let's take a look at how to actually update the movie object with a popularity rating.
Updating a movie with a popularity rating
To update the movie object, you will implement the final step of the approach that was outlined earlier. You need to asynchronously fetch a rating from the movie database and then use that rating to update the movie. The following code should be added to MoviesViewController.swift, inside the saveMovie(withName name: String) method right after the familyMember.movies = NSSet(set: newFavorites line:
let helper = MovieDBHelper()
helper.fetchRating(forMovie: name) { rating in
guard let rating = rating else { return }
moc.persist {
movie.popularity = rating
}
}
You can see that the helper abstraction provides a nice interface for the view controller. You can simply use the helper and provide it a movie to fetch the rating for with a callback and you're all set. Abstracting code like this can make maintaining your code a lot more fun in the long run.
The most surprising thing in the preceding snippet is that moc.persist is called again inside of the helper callback. This must be done because this callback is actually executed long after the initial persist has finished. Actually, this callback isn't even executed on the same thread as the code it's surrounded by.
To see how your code fails if you don't properly persist your model, try replacing the moc.persist block in the rating retrieval callback with the following code:
movie.popularity = rating
do {
try moc.save()
moc.rollback()
}
If you add a new movie now, the rating will still be fetched. However, you will suddenly run into issues when reloading your table view. This is because the managed object context was saved on a background thread. This means that the notification that informs the table view about updates is also sent on a background thread. You could resolve the issue by pushing the reloadData() call onto the main thread as you've done before, but in this case, doing so would only make the problem worse. Your app might work fine for a while, but once your app grows in complexity, using the same managed object context in multiple threads will most certainly cause crashes. Therefore, it's important to always make sure that you access managed objects and their contexts on the correct thread by using a construct, such as the persist method we implemented for this app.
Now that you have looked at all the code involved, let's see what all this threading talk means in a more visual way.
Visualizing multiple threads
The following diagram will help you understand multiple threads:
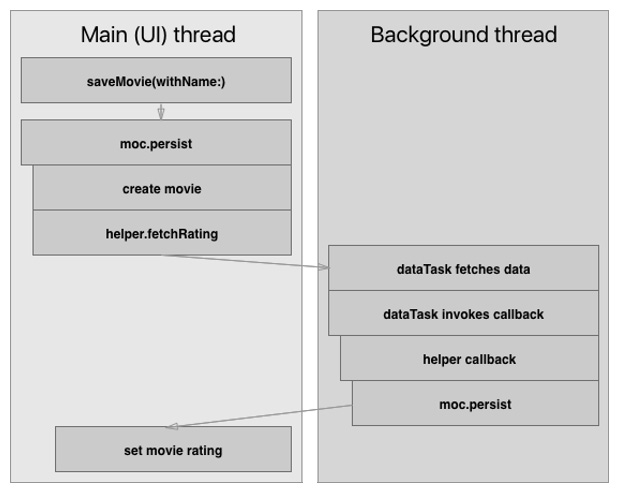
Figure 9.2 – Threads diagram
When saveMovie(withName:) is called, the execution is still on the main thread. The persistence block is opened, the movie is created, its name is set, a helper is created, and then fetchRating(forMovie:callback:) is called on the helper. This call itself is still on the main thread. However, the fetching of data is pushed to a background thread. This was discussed earlier when you experimented with fetching data in a playground.
The callback that's invoked by dataTask is called on the same background thread that the task itself is on. The code will do its thing with the JSON and finally, the callback that was passed to fetchRating(forMovie:callback:) is called. The code inside of this callback is executed on the background thread as well.
You can see that the set movie-rating step in the update flow is somehow pushed back to the main thread. This is because of the persist method that you added as an extension to the managed object context. The context uses the perform method internally to ensure that any code we execute inside of the persist block is executed on the thread the managed object context is on. Also, since the managed object context was created on the main thread, the movie rating will be set on the main thread.
Important Note
If you didn't set the movie rating on the same thread that the managed object belongs to, you would get errors and undefined behavior. Always make sure that you manipulate Core Data objects on the same thread as their managed object context.
Threading is a complex subject, but it's essential for building responsive applications. Network logic is a great example of why multithreading is important. If we didn't perform the networking on a separate thread, the interface would be unresponsive for the duration of the request. If you have other operations that might take a while in your app, consider moving them onto a background thread so they don't block the user interface.
All of the code is in place, and you have a better understanding of multithreading and how callbacks can be used in a multithreaded environment. Yet, if you build and run your app and add a new movie, the rating won't be displayed yet.
The following are the three reasons why this is happening:
- The table view cell that shows the movie isn't updated yet.
- The network request doesn't succeed because of App Transport Security.
- Updates to movie objects aren't observed yet.
Let's solve these issues in order, starting with the table view cell.
Adding the rating to the movie cell
Currently, the movie table view displays cells that have a title. UITableViewCell has a built-in option to display a title and a subtitle for a cell.
Open Main.storyboard and select the prototype cell for the movies. In the Attributes Inspector field, change the cell's style from basic to subtitle. This will allow you to use detailTextLabel on the table view cell. This is where we'll display the movie rating.
In MoviesViewController, add the following line to tableView(_:cellForRow:atIndexPath:), right after you set the cell's title:
cell.detailTextLabel?.text = 'Rating: (movie.popularity)'
This line will put the movie's popularity rating in a string and assign it as the text for the detail text label.
If you build and run your app now, all movies should have a popularity of 0.0. Let's fix this by resolving the networking issue.
Understanding App Transport Security
With iOS 9, Apple introduced App Transport Security (ATS). ATS makes applications safer and more secure by prohibiting the use of non-HTTPS resources. This is a great security feature, as it protects your users from a wide range of attacks that can be executed on regular HTTP connections.
If you paid close attention to the URL that's used to fetch movies, you may have noticed that the URL should be an HTTPS resource, so it should be fine to load this URL. However, the network requests are still blocked by ATS. Why is this?
Well, Apple has strict requirements. At the time of writing this book, the movie database uses the SHA-1 signing of certificates, whereas Apple requires SHA-2. Because of this, you will need to circumvent ATS for now. Your users should be safe regardless, since the movie database supports HTTPS, just not the version Apple considers to be secure enough.
To do this, open the Info.plist file and add a new dictionary key named App Transport Security Settings. In this dictionary, you will need an Exception Domains dictionary. Add a new dictionary key named themoviedb.org to this dictionary and add two Booleans to this dictionary. Both should have YES as their values, and they should be named NSIncludesSubdomains and NSTemporaryExceptionAllowsInsecureHTTPLoads. Refer to the following screenshot to make sure that you've set this up correctly:

Figure 9.3 – App Transport Security Settings
If you add a new movie to a family member now, nothing updates yet. However, if you go back to the family overview and then back to the family member, you'll see that the rating for the most recent movie is updated (make sure you choose a movie whose title is present on themoviedb.org). Great! Now, all you need to do is make sure that we observe the managed object context for updates to the movies, so they are reloaded if their rating changes.
Observing changes to movie ratings
You're already observing the managed object context for changes, but they are only processed if the family member that is shown on the current page has updated. This logic should be replaced so that it will reload the table view if either the family member or their favorite movies change. Update the managedObjectContextDidChange(_:) method in MoviesViewController.swift as follows:
@objc func managedObjectContextDidChange(notification: NSNotification) {
guard let userInfo = notification.userInfo else { return }
if let updatedObjects = userInfo[NSUpdatedObjectsKey] as?
Set<FamilyMember>,
let familyMember = self.familyMember,
updatedObjects.contains(familyMember) {
tableView.reloadData()
}
if let updatedObjects = userInfo[NSUpdatedObjectsKey] as?
Set<Movie> {
for object in updatedObjects {
if object.familyMember == familyMember {
tableView.reloadData()
break
}
}
}
}
Important Note
The logic for observing the family member hasn't changed; its conditions simply moved from the guard statement to an if statement. An extra if statement was added for the movies. If the updated object set is a list of movies, we loop through the movies and check whether one of the movies has the current family member as its family member. If so, the table is refreshed immediately, and the loop is exited.
It's important that the loop in the second if statement is set up like this because you might have just added a movie for family member A and then switched to family member B while the new movie for family member A was still loading its rating. Also, breaking out of the loop early ensures that you don't loop over any more objects than needed. All you want to do is refresh the table view if one of the current family members' favorite movies is updated.
Okay, now build and run your app to take it for a spin! You'll notice that everything works as you'd want it to right now. Adding new movies triggers a network request; as soon as it finishes, the UI is updated with the new rating. Sometimes, this update will be done in an instant, but it could take a short while if you have a slow internet connection. Great! That's it for this feature.
Summary
This chapter was all about adding a small, simple feature to an existing app. We added the ability to load real data from an API. You saw that networking is made pretty straightforward by Apple with URLSession and data tasks. You also learned that this class abstracts away some very complex behavior regarding multithreading, so your apps remain responsive while data is loaded from the network. Next, you implemented a helper struct for networking and updated the Core Data model to store ratings for movies. Once all this was done, you could finally see how multithreading worked in the context of this app. This wasn't everything we needed to do, though. You learned about ATS and how it keeps your users secure. You also learned that you sometimes need to circumvent ATS, and we covered how you can achieve this.
Even though the feature itself wasn't very complex, the concepts and theory involved could have been quite overwhelming. You suddenly had to deal with code that would be executed asynchronously in the future. And not just that. The code even used multiple threads to make sure that its performance was optimal. The concepts of multithreading and asynchronous programming are arguably two of the more complex aspects of programming. Practice them a lot and try to remember that any time you're passing around a closure, you could be writing some asynchronous code that gets executed on a different thread.
Now that the list of movies is updated with data from the web, let's take it one step further in the next chapter. You will learn how to make your app smarter by using CoreML and Vision Framework features.