Chapter 13: Working with the Combine Framework
With the launch of Combine, Apple provided developers with a new way of handling events in their code; a functional and declarative approach, where developers can implement streams and publisher/subscriber paradigms easily, without the need for external libraries. Centralizing event processing in your apps with the help of Combine makes your code easier to understand than using other traditional methods like nested closures or callbacks all around your code.
In this chapter, you will learn about the following topics:
- Understanding the Combine framework: We will review the basic components of the framework with code samples – publishers, subscribers, subjects, and operators.
- Combining publishers, subscribers, and operators: We will build a small feature in an example app mixing all these concepts together.
- Using operators to build error-proof streams: We will use flatMap and catch to create streams that can deal properly with errors in a real-world example app.
By the end of the chapter, you should be able to use Combine in multiple parts of your own apps to produce simple, effective, and easy to understand declarative code that will help your app's code be easy to understand, extend, and maintain.
Technical requirements
The code bundle for this chapter includes two starter projects called CombineExample_start and PublishersAndSubscribers_start. You can find them in the code bundle repository:
https://github.com/PacktPublishing/Mastering-iOS-14-Programming-4th-Edition
Understanding the Combine framework
Apple released the Combine framework in 2019, and they defined it as a framework that provides a declarative Swift API for processing values over time. There are publishers, which produce those values, and subscribers, which consume them. These values that change over time may represent different asynchronous events.
Let's see an overview of the Publisher and Subscriber protocol definitions to understand their key concepts in the following sections.
Understanding Publisher
As mentioned before, publishers are used in Combine to produce values over time. Let's dig into the Swift protocol that defines them to understand the key concepts. The Publisher definition in Swift looks as follows:
public protocol Publisher {
//1
associatedtype Output
//2
associatedtype Failure : Error
//3
public func subscribe<S>(_ subscriber: S) where S : Subscriber, Self.Failure == S.Failure, Self.Output == S.Input
}
Let's explain each numbered comment in more detail:
- Every Publisher instance has an associated type, Output. This defines the type of values that the publisher will generate over time.
- At the same time, the Publisher can also generate errors, and the associated type Failure is used to define the type of those errors. If a Publisher never generates errors, the Failure can be defined as type Never.
- Finally, a Publisher allows Subscriber entities to subscribe to it to receive the values that are being produced over time. Note that to generate a valid subscription, the publisher's Output type must match the subscriber's Input type. In the same way, the Failure type of both must match too.
The following figure shows a summary of the Publisher:

Figure 13.1 – Publisher summary
Now that we have an initial description of the critical concepts of a publisher, let's do the same with the Subscriber protocol.
Understanding Subscriber
We have seen that Publisher entities produce values over time. Now let's see how Subscriber entities can consume those values. Publisher and Subscriber work closely together in Combine, so let's see their internal details. The Subscriber protocol in Swift looks like this:
public protocol Subscriber : CustomCombineIdentifierConvertible {
//1
associatedtype Input
//2
associatedtype Failure : Error
//3
func receive(subscription: Subscription)
//4
func receive(_ input: Self.Input) -> Subscribers.Demand
//5
func receive(completion: Subscribers.Completion<Self.Failure>)
}
Again, let's review each numbered line:
- A Subscriber entity is going to receive values over time. The associated type Input defines the type of those values.
- At the same time, the Subscriber can also receive errors, and the associated type Failure is used to define the type of those errors. If a Subscriber never receives errors, the Failure can be defined as type Never.
- This method informs the Subscriber that the subscription to the Publisher is successful and it may start requesting elements.
- Informs the Subscriber that the Publisher has produced a new item.
- Some subscriptions may end over time. In those scenarios, this method is called to inform the Subscriber that it will not receive any more values. It allows us to execute a completion block before finishing.
The following figure shows a summary of the Subscriber:

Figure 13.2 – Subscriber summary
If we put together both Publisher and Subscriber figures, we have the following schema:

Figure 13.3 – Publisher and Subscriber schemas
Notice how the output-input and the failure types of the publisher and the subscriber must be equal.
Now that we have a basic idea of what a publisher and a subscriber look like, let's see how they communicate. There are three steps, pictured in the following figure:
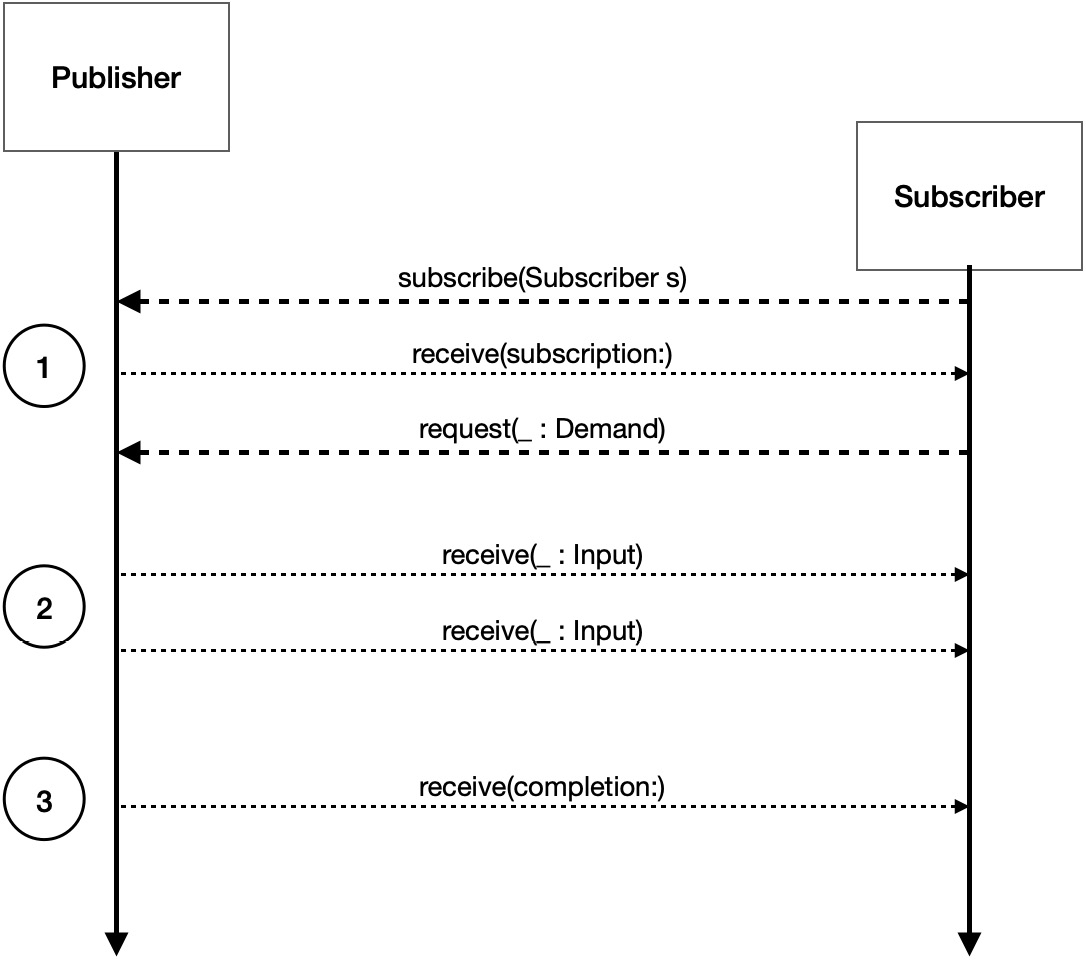
Figure 13.4 – Publisher and Subscriber communication process
The following list describes the process in more detail:
- In the first step, the Subscriber tells the Publisher that it wants to subscribe. The Publisher sends back a subscription. The Subscriber uses that subscription to start requesting elements. The subscriber can request from N to unlimited values.
- Now the Publisher is free to send those values over time. The Subscriber will receive those inputs.
- In subscriptions that are not expecting unlimited values, a completion event is sent to the Subscriber, so it is aware that the subscription is over.
Now we have a basic idea of what a publisher is and what a subscriber is. We also know the steps involved in their communication. That is enough theory! Here is a practical example of a single publisher sending the values of an array to a subscriber. You can open a new Xcode playground and try the following code:
import Cocoa
import Combine
//1
let publisher = [1,2,3,4].publisher
//2
let subscriber = publisher.sink { element in
print(element)
}
In the first comment, we create an array of integers from 1 to 4, and we use the convenience instance property publisher from the Sequence protocol to wrap it inside a new Publisher instance.
In the second comment, we use the method sink to attach a subscriber to the publisher, defining inside its completion block an action to perform over each value received over time.
If you execute this code, the output will be like this:
1
2
3
4
The initial array contained the numbers from 1 to 4, and that is what we printed. But what if we just want to print the even numbers? How can we transform the data between the producer and the subscriber? Luckily for us, Combine provides Operators to help us. Let's see more about them next.
Understanding Operators
An Operator is also a Publisher. It sits between a publisher and a subscriber. We say that an operator subscribes to a publisher ("upstream") and sends results to a subscriber ("downstream"). Operators can also be chained in sequence. In this section, we are going to review some operators with example code: filter, map, reduce, scan, combineLatest, merge, and zip.
Using filter
The filter operator is used to just remove values matching some condition out of the stream.
Let's see a fundamental example using the filter operator. Imagine that from the previous array ([1,2,3,4]), we only want to print the even numbers of the array. We do it as follows:
import Cocoa
import Combine
let publisher = [1,2,3,4].publisher
let subscriber = publisher
.filter { $0 % 2 == 0}
.sink { print($0) }
Note how the filter operator sits between the publisher and the subscriber, and defines a modification of the elements in a declarative way.
If you run this code, you will obtain the following result in the console:
2
4
Now let's see another example of how operators can be handy when working with Combine. Remember that the first rule of the subscriber and publisher is that the Input of the subscriber must be equal to the Output of the publisher. What happens when they are not equal? Well, operators can help us to transform the Output of a publisher to adapt it to the proper Input type of the subscriber. One of the operators that helps us is map.
Using map
The map operator helps us to apply a certain operation to every value of the stream, transforming it into a different type.
The following code uses the map operator to transform the Output of a publisher (int values) into the Input that our subscriber needs (User instances):
let publisher = [1,2,3,4].publisher
let subscriber = publisher
.map { return User(id: $0)}
.sink { print($0.description()) }
The map operator is transforming a stream of Int values [1,2,3,4] into a stream of User instances. When we use the sink, we can call the description() method of those users.
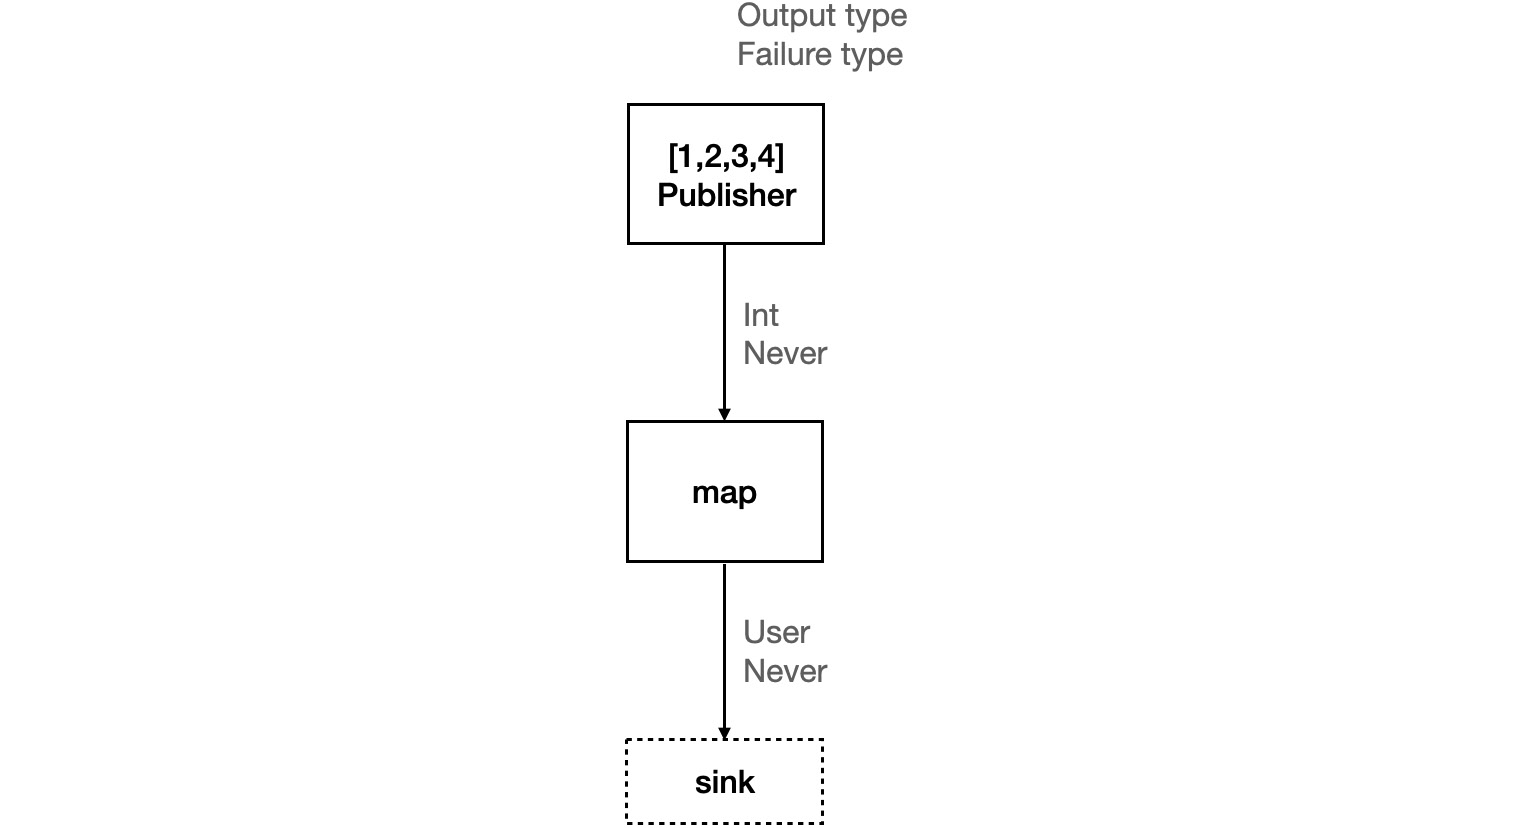
Figure 13.5 – Using map to transform outputs on the stream
The previous figure represents how map changes the Output type (while the Failure type, in this case, keeps being the same). When working with Combine, using this kind of graph (on a document or just in your mind) can be really helpful to work with the proper types at every step of the stream.
There are more operators available rather than just filter and map. Let's see other useful ones like reduce, scan, combineLatest, merge, and zip.
Using reduce
The reduce operator returns the result of combining all the values of the stream using a given operation to apply.
You can try out the following examples in an Xcode playground. Go ahead and check this example of reduce:
import Combine
let reduceExample = [1,2,3,4].publisher
.reduce(1, { $0 * $1 })
.sink(receiveValue: { print ("($0)", terminator: " ") })
If you execute this code, the output in the console is as follows:
24
If you have used the regular reduce function from the Swift standard library, the reduce version from Combine should be easy to understand. It works the same but using values that come from a publisher. What reduce does is apply an operation and accumulate the result for the next value, starting with a given value. In our example, 1, { $0 * $1 }, the first param is the initial value, hence 1, and the following param is the operation to perform: multiply the current value (stored as $0) by the next incoming value ($1), and keep it for the next iteration. So, if our input is [1,2,3,4] and our starting value is 1, what reduce is doing is 1 x 1 x 2 x 3 x 4 = 24. The next operator that we are going to explain is very similar to reduce. Let's jump into scan.
Using scan
An operator very much related to reduce is scan. The scan operator does exactly the same as reduce but it emits the result at each step. Check this code:
import Combine
let scanExample = [1,2,3,4].publisher
.scan(1, { $0 * $1 })
.sink(receiveValue: { print ("($0)", terminator: " ") })
Now, executing this will result in the following output:
1 2 6 24
As you can see, it is giving us the same final result as reduce (24), but scan emits a value in each step, not just at the end. So, with scan, we get the following values over time:
- 1x1 = 1
- 1x2 = 2
- 2x3 = 6
- 6x4 = 24
These operators (filter, map, reduce, and scan) helped us to transform the values coming from another publisher. But some operators combine multiple publishers' input into one single stream output. Let's see some of them: combineLatest, merge, and zip.
Using combineLatest
It is a publisher that combines the latest values from two other publishers. Both publishers must have the same failure type. The downstream subscriber will receive a tuple of the most recent elements from the upstream publishers when any of them emit a new value.
Try the following code in a playground:
import Combine
let chars = PassthroughSubject<String, Never>()
let numbers = PassthroughSubject<Int, Never>()
let cancellable = chars.combineLatest(numbers)
.sink { print("Result: ($0).") }
chars.send("a")
numbers.send(1)
chars.send("b")
chars.send("c")
numbers.send(2)
numbers.send(3)
The output on the console is as follows:
Result: ("a", 1).
Result: ("b", 1).
Result: ("c", 1).
Result: ("c", 2).
Result: ("c", 3).
Notice how we don't have any output until ("a", 1)., which means that combineLatest doesn't produce any output until all the inputs send an initial value. After that, it will produce a value every time an input sends a new value, sending the latest from each of the inputs.
There are also other versions of combineLatest to combine three or even four inputs, instead of just two: combineLatest3, combineLatest4.
What if we only want to have the latest output of any of the input publishers (meaning just a value, not a tuple)? For those cases, we can use merge.
Using merge
With merge, we will aggregate multiple input publishers into a single stream, and the output will be just the latest value from any of them. Check out this code in a playground:
import Combine
let oddNumbers = PassthroughSubject<Int, Never>()
let evenNumbers = PassthroughSubject<Int, Never>()
let cancellable = oddNumbers.merge(with: evenNumbers)
.sink { print("Result: ($0).") }
oddNumbers.send(1)
evenNumbers.send(2)
oddNumbers.send(3)
The output will be as follows:
Result: 1.
Result: 2.
Result: 3.
As you can see, the output is one value at a time, which differs from the tuple with all the latest values from all the inputs that we got with combineLatest.
There is another useful method to work with multiple publishers. Let's see what zip can do.
Using zip
zip is a publisher that emits a pair of elements when both input publishers have emitted a new value. Let's see how it differs from combineLatest with the same example. Execute the following code in a playground:
import Combine
let chars = PassthroughSubject<String, Never>()
let numbers = PassthroughSubject<Int, Never>()
let cancellable = chars.zip(numbers)
.sink { print("Result: ($0).") }
chars.send("a")
numbers.send(1)
// combineLatest output: (a,1)
// zip output: (a, 1)
chars.send("b")
// combineLatest output: (b,1)
// zip output: nothing
chars.send("c")
// combineLatest output: (c,1)
// zip output: nothing
numbers.send(2)
// combineLatest output: (c,2)
// zip output: (b,2)
numbers.send(3)
// combineLatest output: (c,3)
// zip output: (c,3)
Check out the comments under each line, representing what combineLatest and zip will output every given time. Notice how zip doesn't send a new pair of values downstream until both of the publishers have emitted a new value. And when that happens, it will send a tuple with the oldest non-emitted values of both of them. CombineLatest will use the most recent and will emit a tuple every time one of the publishers emits a single new value (it will not wait to have both publishers emitting!). That is the main difference.
With the basics about publisher, subscriber, and operator entities explained, let's see another useful entity in Combine in the next section: Subject.
Understanding Subject
As per the Apple documentation:
The definition is pretty straightforward. Subjects are like publishers, but they have a method, send(_:), which you can use to inject new elements into their stream. A single Subject allows multiple subscribers to be connected at the same time.
There are two types of built-in subjects: CurrentValueSubject and PassthroughSubject. Let's see the differences between them.
Working with CurrentValueSubject
This is a subject that holds an initial value. It broadcasts the current value every time it changes.
When a subscriber connects to a CurrentValueSubject, it will receive the current value, and the next ones when it changes. This means that a CurrentValueSubject has state. Here is an example (you can try this code in a playground):
import Combine
let currentValueSubject = CurrentValueSubject<String, Never>("first value")
let subscriber = currentValueSubject.sink { print("received: ($0)") }
currentValueSubject.send("second value")
If you execute this code, the output looks like this:
received: first value
received: second value
Here are the interesting bits:
- When we initialize the subject, we need to pass an initial value.
- When the subscriber subscribes, it gets the current value that is held in the subject. Note how in the console output, the subscriber has printed first value even though we subscribed to the subject after that value was generated.
- Every time we call send(_:), the subscribers get the next value.
Now, let's see the other built-in type of subject, PassthroughSubject.
Working with PassthroughSubject
The main difference between PassthroughSubject and CurrentValueSubject is that PassthroughSubject doesn't hold any state. Check the following code (you can try it out in a playground):
import Combine
let passthroughSubject = PassthroughSubject<String, Never>()
passthroughSubject.send("first value")
let subscriber = passthroughSubject.sink { print("received: ($0)")}
passthroughSubject.send("second value")
If you execute this code, here is the output:
received: second value
Notice how the subscriber is created after the first value is sent. This first value is not received, because there was no subscriber connected yet. However, the second value is displayed in the output because it was sent after the subscription was established.
We have seen the basic usage of Publisher, Subscriber, Operator, and Subject. Let's now create a bigger and more complex example to see how to apply Combine concepts to real-world apps.
Combining Publishers, Subscribers, and Operators
In this section, we are going to mix the concepts of the previous section altogether in a real-world example feature. Let's assume that we have an app that contains a newsletter, and we allow the users to subscribe to the newsletter by entering their email address, using two UITextFields: the Email and Repeat Email fields. Let's assume that in our business logic, we need to check that the email is correct, and we are going to do the following checks:
- Local check: We will ask users to repeat the email address twice, and both should be the same.
- Local check: The email should contain an "@".
- Local check: The email should be five characters long, at least.
- Remote check: We will also assume that we have a remote method to check in the backend that the email is unique, meaning it doesn't exist yet.
Once all these conditions match, we will enable a Sign-Up button in the user interface. We will use Combine to add all this business logic into an example app. Open the CombineExample_start project and launch it. You will see a screen where you can input an email address, and another UITextfield to repeat it. You will also see a Sign-up button, but it is always disabled (for now). Let's implement the business logic step by step to improve this. We are going to start by implementing the three local checks described in the list above. And we are going to use a handy Combine operator for this: combineLatest.
Open the ViewController.swift file. You will notice a couple of vars that are tagged with the property wrapper @Published:
@Published var initialEmail: String = ""
@Published var repeatedEmail: String = ""
What @Published is doing here is creating a Publisher from the property itself. So, every time initialEmail or repeatedEmail values change, they will get published to anyone subscribed to them. You can access the publisher of initialEmail by using $initialEmail (prefix a $ to the property name). Notice the two IBActions defined in the same class:
@IBAction func emailChanged(_ sender: UITextField) {
initialEmail = sender.text ?? ""
}
@IBAction func repeatedEmailChanged(_ sender: UITextField) {
repeatedEmail = sender.text ?? ""
}
By combining IBAction and @Published, we are creating a funnel in which every time the user types something in the initialEmail UITextField, it will get published through the $initialEmail publisher.
Why is this handy? Remember that according to the business logic defined above, we need to ensure that both initialEmail and repeatedEmail are equal. Now we have two publishers that will emit their value every time the user types in either of the two text fields. How can we combine those two values to compare them? The Combine framework has the perfect method for this: CombineLatest. Add the following vars to the ViewController.swift file:
var validatedEmail: AnyPublisher<String?, Never> {
return Publishers
.CombineLatest($initialEmail, $repeatedEmail) //1
.map { (email, repeatedEmail) -> String? in //2
guard email == repeatedEmail, email.contains("@"), email.count > 5 else { return nil }
return email
}
.eraseToAnyPublisher() //3
}
var cancellable: AnyCancellable? //4
Let's analyze the code comment by comment:
- First, we are using Publishers.CombineLatest to combine two different publishers into one: $initialEmail and $repeatedEmail. This will result in a new stream (publisher) of type Publishers.CombineLatest<Published<String>.Publisher, Published<String>.Publisher>. Don't let the long type scare you. It means "a publisher of two string publishers." The magic of CombineLatest is that if either of the two inputs changes, you will get the new value, but also the latest value that the other input had, which is very useful for cases like this.
- Second, we are applying the map operator over the "publisher of two string publishers." By using map, we are unwrapping the underlaying published strings to be able to use the string themselves and return a different result after working with them. Here is where we apply our business rules: If both emails are equal, they include an "@" and they are longer than five characters long, we return the email. Otherwise, we return nil. So, with map, we are transforming a stream output type into a new one, to adapt it to what we need.
- At this point, if we inspect the type of what we have, you will see this: Publishers.Map<Publishers.CombineLatest<Published<String>.Publisher, Published<String>.Publisher>, String?>. That is quite complex to read and use. But Combine provides us with a way to simplify this, because what is important is what is inside of the publisher itself, not all the wrappers around it. By using eraseToAnyPublisher, we are changing this type to just AnyPublisher<String?, Never>. This is much easier to understand and use (and if you want to publish it in an API, for example, it's much easier to digest by other developers).
- We create a cancellable property var to use it in the following piece of code.
This flow can be represented as follows
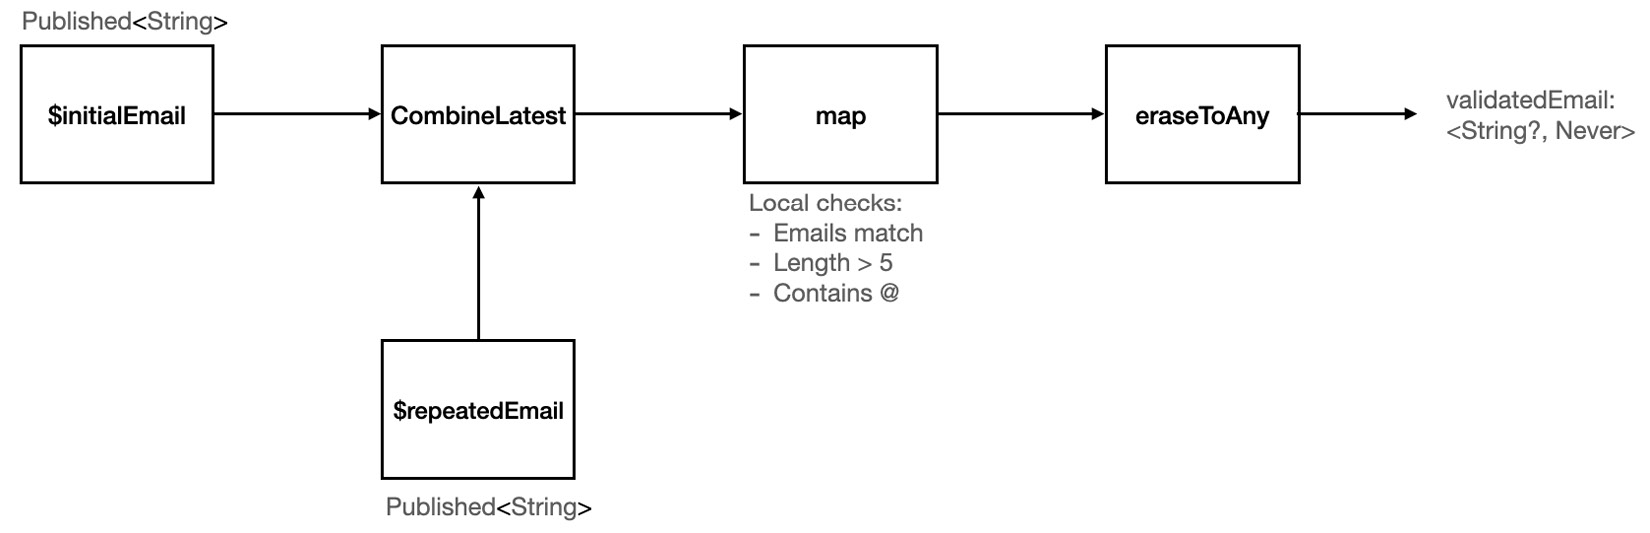
Figure 13.6 – validatedEmail stream
Now, add this line of code to the viewDidLoad() method:
cancellable = validatedEmail.sink { print($0) }
By calling sink, we are attaching a subscriber to the validatedEmail publisher, and we store it in our new var property cancellable. Every time we receive a new value, we will just print it into the console for testing purposes. Let's try it out! Execute the app and type any email address (in both fields) that fulfills all the conditions (for example, [email protected]).
When you type valid addresses, you will see it in the console. When the addresses are not valid, you will see nil.
We have seen a lot of new Combine concepts packed into very little code. Before continuing with our demo project, we are going to look at a quick summary of these new concepts:
- The @Published property wrapper: Allows us to create a Publisher from a property variable. We can access the publisher by prefixing $ to the name of the property. It only works on class properties, not on structs.
- Publishers.CombineLatest: Allows us to combine two publishers into a single one that will always push the latest value of each one when there is a change (or nil, if there wasn't a previous value).
- map: Allows us to transform the stream. We apply a map to a publisher with an Output type and we can transform it into a new, different Output.
- eraseToAnyPublisher: Allows us to erase complex types to work with easier AnyPublisher<Otutput, Failure> streams. This is very handy when publishing our classes as an API, for example.
After this little recap, we still have one feature pending to fulfill the list of requirements. We have implemented three local checks on the email addresses, but we still need to do the last one, which was this:
- Remote check: We will also assume that we have a remote method to check in the backend that the email is unique, meaning it doesn't exist yet.
In the ViewController.swift file, there is a dummy method named func emailAvailable(…). It just returns a completion block. This method is intended to represent a network call that returns True or False in the completion block according to whether the email already exists in the backend or not. For demo purposes, we are not going to implement the network call itself, just simulate the result.
Let's implement this feature with Combine. We are going to create a new publisher that will emit a Bool indicating whether the email that the user types exists in the backend or not, using a fake network call, emailAvailable(…). Add the following code to the ViewController.swift file:
var isNewEmail: AnyPublisher<Bool, Never> { //1
return $initialEmail //2
.debounce(for: 1, scheduler: RunLoop.main) //3
.removeDuplicates() //4
.flatMap { email in //5
return Future { promise in
self.emailAvailable(email) { available in
promise(.success(available))
}
}
}
.eraseToAnyPublisher()
}
There are a lot of new concepts here, so let's go through the numbered comments one by one:
- We are defining a new publisher, isNewEmail, of type <Bool, Never>. This publisher will help us to emit events that indicate whether the email that the user is typing exists in our database or not.
- To fetch any new value that the user types in the email field, we start by using the published property defined earlier in the $initialEmail section.
- Users can type/delete in text fields pretty fast. Our goal is to make a network call every time we receive a new value through the $initialEmail publisher (meaning every time the user is typing in the email field). That means that we will query the network a bit too much. The Combine .debounce method will help us to reduce the number of values we are processing. By using .debounce(1…), we specify that from all the values that we get from $initialEmail, we will only process a value every 1 second. The rest of the values will be discarded. This is very helpful when working with publishers that are connected to the user interface and the network (text fields, buttons, search bars, and so on).
- Another useful method is removeDuplicates(). If the user types "abc" and then deletes the "c" to quickly type the "c" back, we will make several calls. But if we use removeDuplicates(), we will avoid this unnecessary behavior.
- The fifth step is a bit more complicated. This is where we perform a network call. First, we have a .flatMap wrapping everything. This function transforms elements from a publisher into a new type of publisher. Inside the flatMap, we have a Future. A Future is a publisher that eventually emits a single value and then finishes (or fails). Inside the Future, we have a Promise: A Promise in Combine is a typealias for a closure that takes a Result. Now let's describe the whole process again, but from inside out: The network call emailAvailable returns a result in the form of promise.success(…). This Promise is wrapped in a Future, to become a publisher stream. That stream is a Future<Bool, Never> at this point. Now, we wrap everything with flatMap, so the upstream initialEmail: Published<String>.Publisher becomes AnyPublisher<Bool, Never> (with the help of eraseToAnyPublisher too).
Here is the full flow to generate isNewEmail:
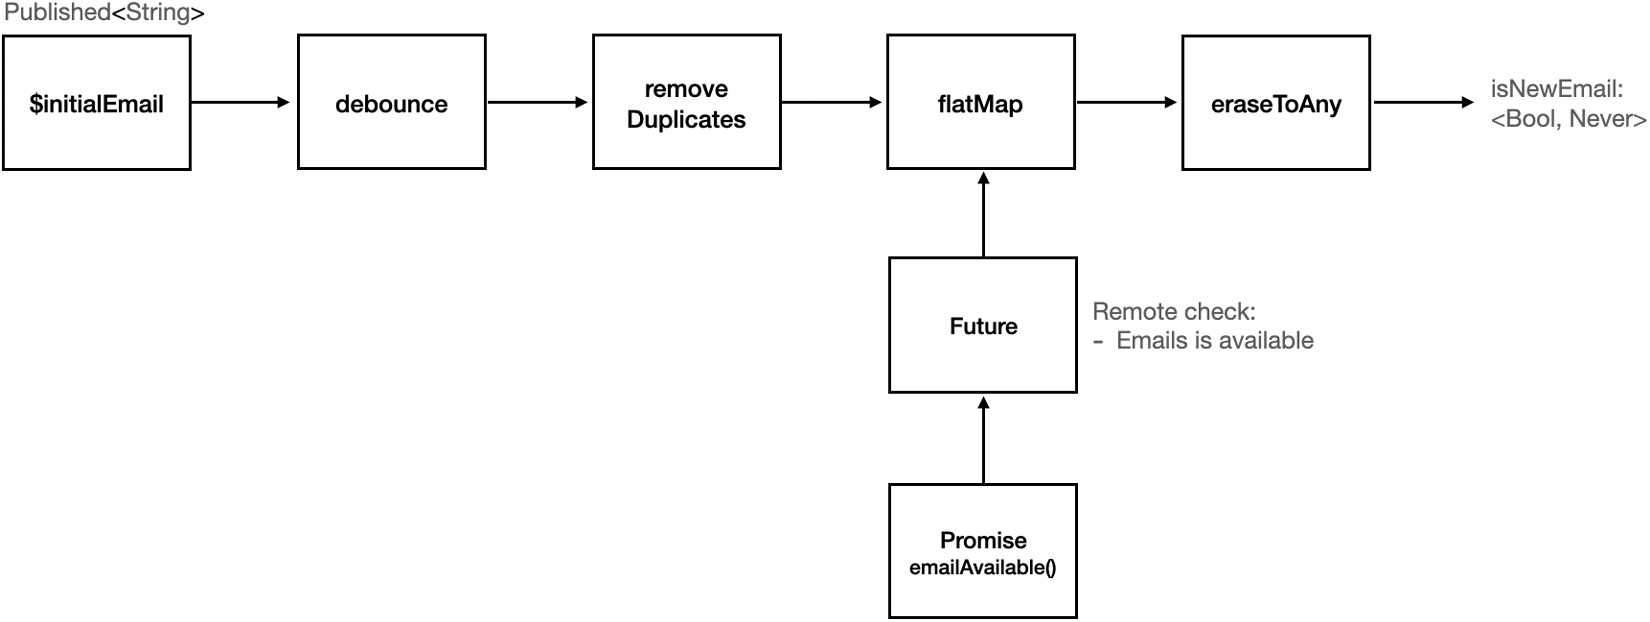
Figure 13.7 – isNewEmail stream
So, after all this chain of transformations, we have a publisher, isNewEmail, that will emit a Bool indicating whether an email address is unique or not in our backend every time (almost, except duplicates and debounced) the user types in the UI! That is pretty cool! And it's very useful for our business logic checks.
Our last step is going to be to combine the publisher of the local checks (validatedEmail) with the remote publisher (isNewEmail) to have a final output. The business logic required to enable the Sign-up button is that these publishers emit a valid email String and a True value, so all our conditions are met. What is the best way to combine the latest values of two different publishers and work with them? We just used it above! It is combineLatest. Add the following code to the ViewController.swift file:
var finalEmail: AnyPublisher<String?, Never> {
return Publishers.CombineLatest(validatedEmail, isNewEmail).map { (email, isNew) -> String? in
guard isNew else { return nil }
return email
}
.eraseToAnyPublisher()
}
As detailed in the preceding code, we are using CombineLatest to work with the latest values of two different publishers. From validatedEmail, we get a valid email or a nil value otherwise. From isNewEmail, we get a Bool indicating whether the email exists in the database or not. The result of this is a new publisher, finalEmail, of type <String?, Never>. See the flow in the next figure:
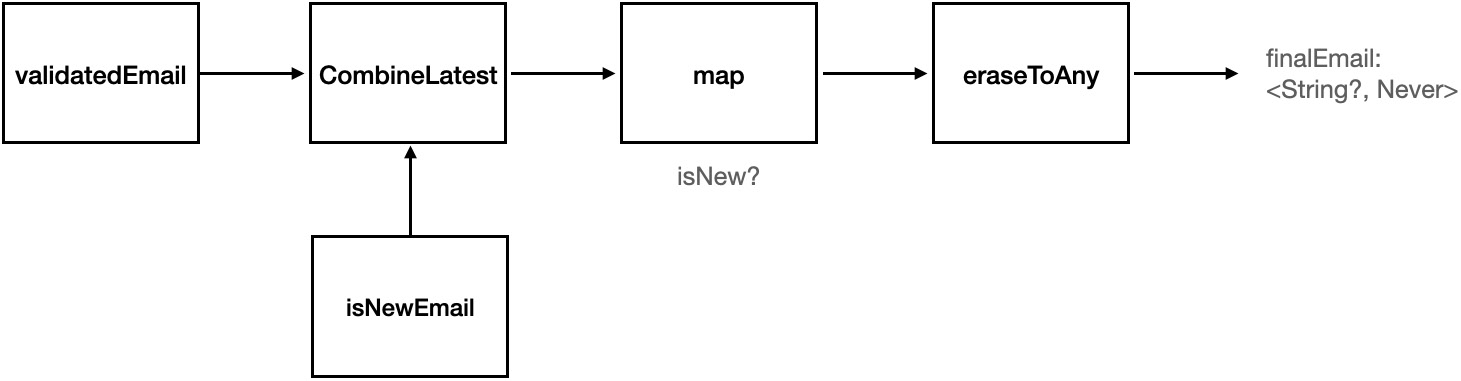
Figure 13.8 – finalEmail stream
Now, how can we enable and disable the Sign-up button using this new publisher? Add the following code inside the viewDidLoad function and let's explain it in detail:
signupButtonCancellable = finalEmail
.map { $0 != nil }
.receive(on: RunLoop.main)
.assign(to: .isEnabled, on: signupButton)
In this code, we start with the finalEmail publisher (<String?, Never>), we map over it, transforming the stream into <Bool, Never>, then we apply .receive to make sure we are executing this in the main thread (because we are handling the UI here, a UIButton). Finally, we assign the value inside the stream (<Bool>) to the signupButton isEnabled property! Check out the next figure, which details the steps of the stream:

Figure 13.9 – Assigning finalEmail to signUpButton
And that is it! Execute the app, and try it yourself: If you type some email address that matches all the conditions (like [email protected]), the Sign-up button will be enabled. Otherwise, it will be disabled.
In this section, we have learned about a lot of new Combine concepts and methods to combine different streams, transform outputs, modify the thread we are working on, handle user input, and so on. We used flatMap to transform elements of an upstream into a different type downstream. However, flatMap has more uses. One of them is to help streams recover from errors, with the help of catch. In the next section, we are going to see an example of how a stream can fail, and how to recover it using flatMap and catch.
Using Operators to build error-proof streams
For this section, go ahead and open the project in the code bundle named PublishersAndSubscribers_start. Take a look at the file ViewController.swift.
This file contains a User struct:
struct User: Codable {
let id: String
static var unknown: User {
return User(id: "-1")
}
}
The User struct is quite simple. It contains a String property id, and a static var named unknown that returns a User instance with id equal to -1. Apart from the User struct, the file contains the ViewController itself.
The view controller contains two methods:
- First, postNotification(): This just fires a notification in the Notification Center that contains a User instance with id equal to 123. The name of the notification is networkResult.
- Second, postNotificationThatFails(): This just fires a notification in the Notification Center that contains random data that is Base-64 encoded, not a User instance this time. The name of the notification is networkResult.
We will use Combine to consume these two notifications. Both methods represent a dummy network call, whose result is being sent through the Notification Center in this way. So, think of them as the network call response that you will fetch from your backend when trying to query for some object (a user in this case) and propagate to your app with notifications.
Now, let's try to call postNotification() and consume the result using Combine. In the viewDidLoad() method, call postNotification():
override func viewDidLoad() {
super.viewDidLoad()
postNotification()
}
Now let's create a publisher that emits values from the Notification Center and use the cancellable property to consume them as a subscriber. Change the viewDidLoad() method to this:
override func viewDidLoad() {
super.viewDidLoad()
//1
let publisher = NotificationCenter.default.publisher(for: Notification.Name("networkResult"))
//2
cancellable = publisher.sink { item in
print(item)
}
//3
postNotification()
}
Let's review the comments by lines:
- First, we are creating a publisher that emits any value from the Notification Center that arrives under the name networkResult. This matches the notification name we are sending in the postNotification() method.
- We are subscribing to the publisher created in the previous step, and we store the result in the cancellable property. We are using sink when creating the subscriber to define a completion block that will print to the console any value received.
- Finally, we post a notification.
If you execute this code and you check in the console, you should see this result:
name = networkResult, object = Optional(<7b226964 223a2231 3233227d>), userInfo = nil
This means that our stream worked! We have sent a notification, our publisher has forwarded it, and our subscriber has printed it into the console. As you can see on the console output, the notification has three properties: name, object, and userInfo. We want to unwrap what is inside the object attribute. So, let's modify our publisher with an operator to transform what our subscriber receives. Change the publisher code for this one:
let publisher = NotificationCenter.default.publisher(for: Notification.Name("networkResult"))
.map { notification in return notification.object as! Data }
Execute it and check the output in the console:
12 bytes
In this code, we are mapping over the notification value and sending the object content as Data. In the console output, you can see that our subscriber is receiving those bytes of data now, instead of the full notification. Great! The next step is going to be to transform these bytes of Data into a User instance. To do that, we need to decode the data. Combine has the perfect helper method for this. Change the publisher code to this:
let publisher = NotificationCenter.default.publisher(for: Notification.Name("networkResult"))
.map { notification in return notification.object as! Data }
.decode(type: User.self, decoder: JSONDecoder())
By adding the preceding highlighted line, we are using the Data from the map operation and decoding it into a User instance! All in a single line. But if you try to execute now, you will get a compile error in the subscriber sink line saying the following:
Referencing instance method 'sink(receiveValue:)' on 'Publisher' requires the types' Publishers.Decode<Publishers.Map<NotificationCenter.Publisher, JSONDecoder.Input>, User, JSONDecoder>.Failure' (aka 'Error') and 'Never' be equivalent
This means: If you inspect the method sink that we are using, you will discover that it requires the Failure type of the publisher that is consuming to be Never:
extension Publisher where Self.Failure == Never
After adding the decode line, our publisher no longer has a Never type as failure, because decode can produce errors. So, the compiler is telling you that the types don't match anymore. We need to do something that catches any error produced by decode and transforms that into a Never-failing operation. Combine has another useful operator that can help us in this scenario: catch. Change the publisher code into this new block:
let publisher = NotificationCenter.default.publisher(for: Notification.Name("networkResult"))
.map { notification in return notification.object as! Data }
.decode(type: User.self, decoder: JSONDecoder())
.catch {_ in
return Just(User.unknown)
}
Let's explain catch in more detail. catch will handle any error in the upstream, and instead of crashing the app, it will complete/finish the publisher that produced the error and replace it with a new publisher (that you must provide in the return block).
So in this scenario, if we get an error from the decode operation, our notification publisher will finish, and it will be replaced by Just(User.unknown). Just is a publisher that only emits one value and then completes. Check the next figure:
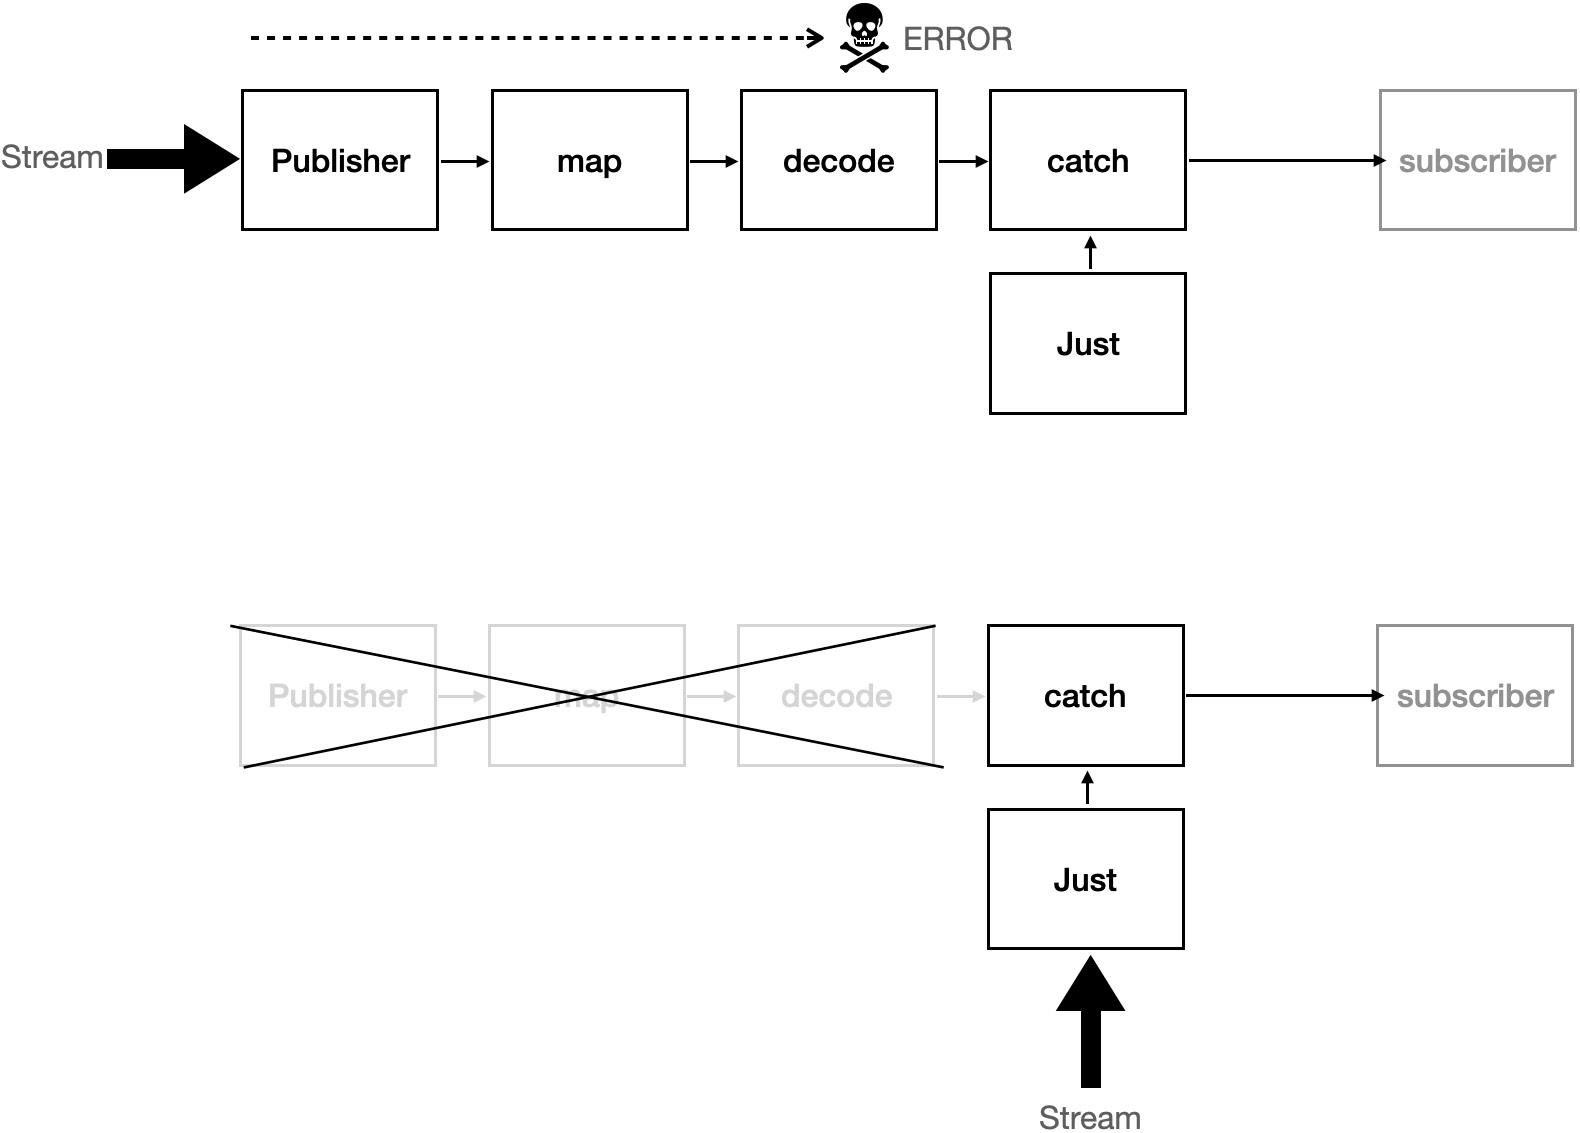
Figure 13.10 – Catch replaces the failed stream with a new one
The top part of the previous figure shows the stream when an error happens in the decode stage and catch enters into action. In the bottom part of the figure, you can see how catch drops the initial publisher and replaces it with the one defined in the catch block (a Just publisher in this case).
Let's try out what will happen if we provide a value that will produce an error in the decode stage. At the end of the viewDidLoad(), just after postNotification(), add this line:
postNotificationThatFails()
So, we are now sending two notifications, one with user data inside, and the other with a random string. The second should fail on the decode step. Execute the app; you will see this output:
User(id: "123")
User(id: "-1")
That is great! The first notification got decoded and transformed into a proper user. The second failed to be decoded, but our catch block recovered the stream with a new publisher that passed an unknown User struct to the receiver.
However, there is a problem with our solution. Add this line after postNotificationThatFails(), at the end of the viewDidLoad() method:
postNotification()
So now we are sending three notifications: first a regular one, then one that fails, then another regular one. Execute the app and notice the output:
User(id: "123")
User(id: "-1")
What is the issue here? The issue is that we only received two values, even though there are three notifications being sent! What is the problem then? The problem is that our catch block is replacing the failed stream with a Just publisher. As said before, a Just publisher only sends one value and then completes. Any value sent after the failure will be lost.
Let's improve this solution so we can keep processing values after recovering from an error with the catch block. Replace the publisher block with the following one:
let publisher = NotificationCenter.default.publisher(for: Notification.Name("networkResult"))
.map { notification in return notification.object as! Data }
.flatMap { data in
return Just(data)
.decode(type: User.self, decoder: JSONDecoder())
.catch {_ in
return Just(User.unknown)
}
}
In the preceding highlighted code, you can see that we have wrapped the decode and catch block in a flatMap + Just block. Check in the following figure the differences before and after the change:

Figure 13.11 – Flow before and after flatMap
Notice in the new code how, inside the flatMap, we are now creating a new second flow for every new value with this piece of code:
.flatMap { data in
return Just(data)
.decode(type: User.self, decoder: JSONDecoder())
.catch {_ in
return Just(User.unknown)
}
}
This is important because it means that when there is an error, and the catch replaces the stream with the Just(User.unknown) publisher, it will not replace the original stream; it will just replace the stream that we are creating for this specific element inside the flatMap. This means that for the next element that arrives from the Notification Center, we still have the main publisher working. Execute the app now and see the following results in the console:
User(id: "123")
User(id: "-1")
User(id: "123")
That is great! Not only are we handling the errors, we still process new elements that arrive after!
In this section, you have seen how to use flatMap and catch to make your streams error-proof. Let's wrap up the chapter now in the summary.
Summary
In this chapter, we have learned about the basics of Combine: what a publisher is, what a subscriber is, why we need operators, which ones are more useful, and how all these elements chain together to help us.
We have built two different apps to demonstrate how Combine can help in our apps, from processing user interface events, decoding, and applying business rules, to creating error-proof streams and methods to recover from operations that fail. Combine provides us with a lot of built-in functionalities that will make our code easy to read and maintain.
In the next chapter, we are going to learn about one of the new features of iOS 14: App Clips.