Chapter 20: Submitting Your App to the App Store
Possibly the most exciting part of the development cycle is getting your app into the hands of some real users. The first step in doing so is usually to send out a beta version of your app so you can get feedback and gather some data about how your app is performing before you submit it to the App Store and release your app to the world. Once you're satisfied with the results of your beta test, you must submit your app to Apple so they can review it before your app is released to the App Store.
In this chapter, you'll learn all about packing up your app and submitting it to Apple's App Store Connect portal. Using App Store Connect, you can start beta testing your app, and you can also submit it to Apple for review. App Store Connect is also used to manage your app's App Store description, keywords, promotional images, and more. This chapter will show you how to fill out all the information for your app correctly. You will go through the following steps in this chapter:
- Adding your application to App Store Connect
- Packaging and uploading your app for beta testing
- Preparing your app for launch
These steps closely resemble the process you'll go through when you're ready to launch your app. Let's get right to it, shall we?
Adding your application to App Store Connect
The first thing you're going to want to do when you're ready to release your app is to register your app with App Store Connect. In this section, we are going to learn how to configure a new app in App Store Connect. To access App Store Connect, you must be enrolled in the Apple Developer program. You can do this through Apple's Developer portal at https://developer.apple.com. After purchasing your membership, you can log in to your App Store Connect account on https://appstoreconnect.apple.com using your Apple ID.
After logging in to your App Store Connect account, you are presented with a screen that has a few icons on it:
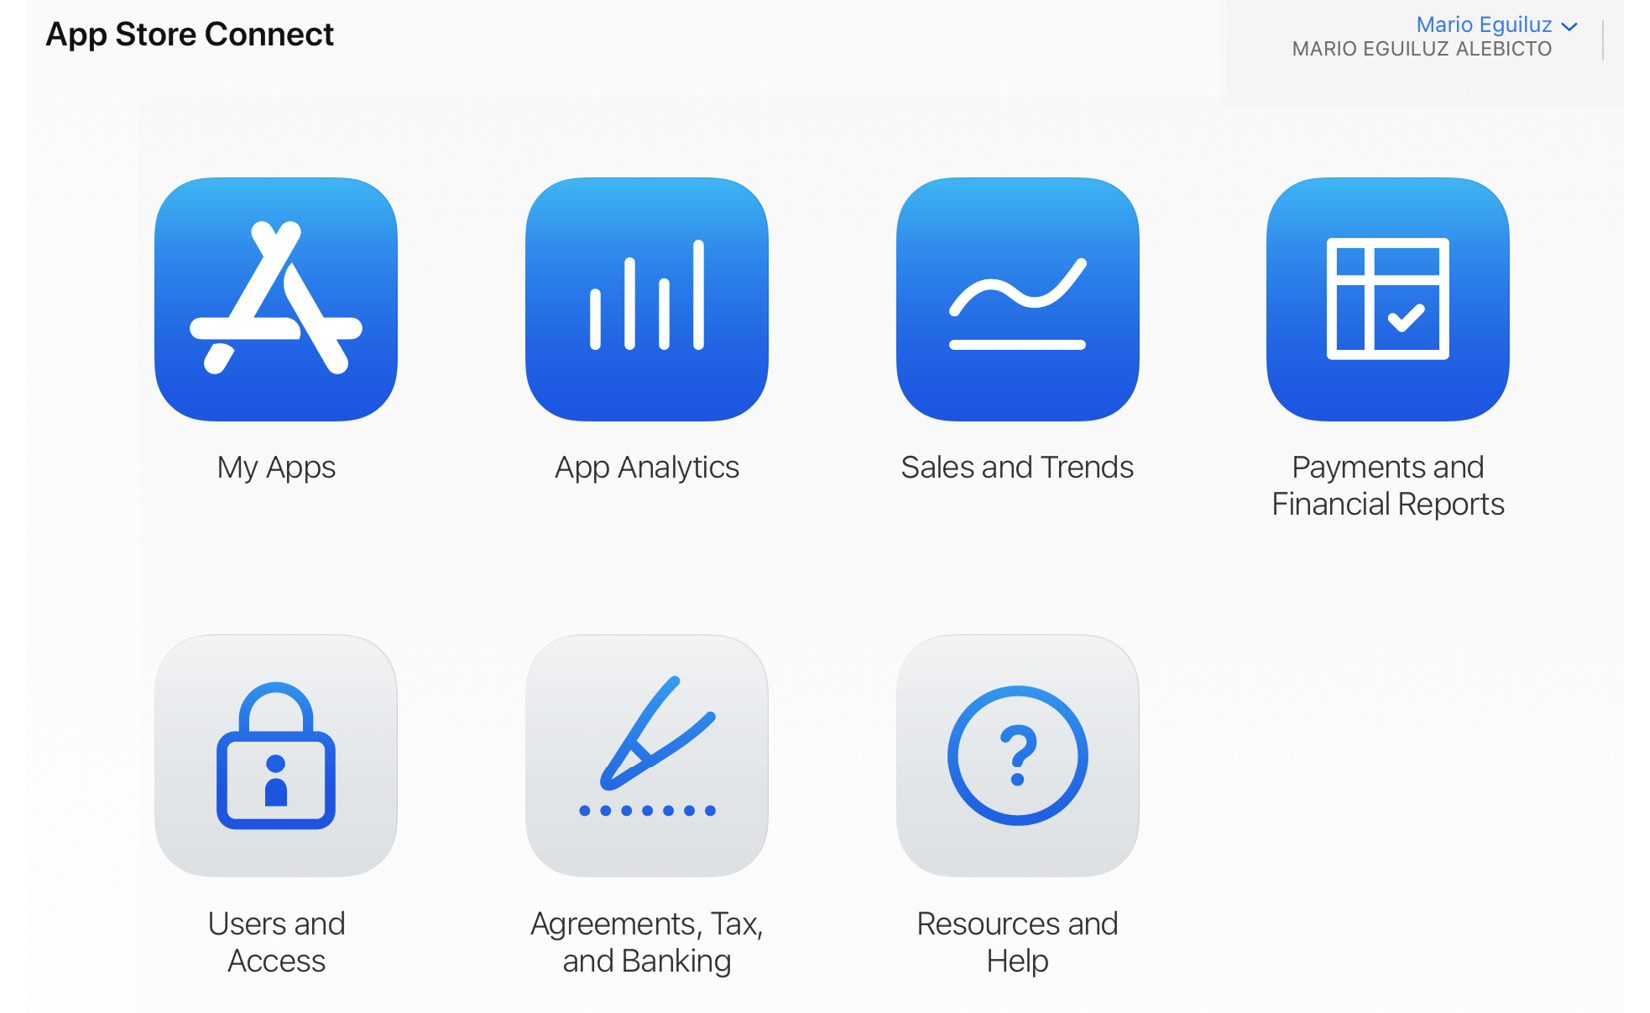
Figure 20.1 – App Store Connect dashboard
This screen is your portal to manage your App Store presence. From here, you can manage test users, track your app's downloads, monitor app usage, and more. But most importantly, it's where you create, upload, and publish your apps to Apple's beta distribution program, called TestFlight, and once you're done beta testing, to the App Store. Go ahead and peek around a bit; there won't be much to see yet, but it's good to familiarize yourself with the App Store Connect portal.
Let's create a new app in the App Store Connect portal. Follow these steps:
- The first step in getting your app out to your users is to navigate to the My Apps section. This section is where you'll find all the apps you have created and where you can add new apps. To add a new app, click the + icon in the top left and click New App:

Figure 20.2 – Creating a New App
- After clicking this, you're presented with a window in which you can fill out all the necessary information about your app. This is where you pick your app's name, select the platform on which it will be released, and a few more properties:
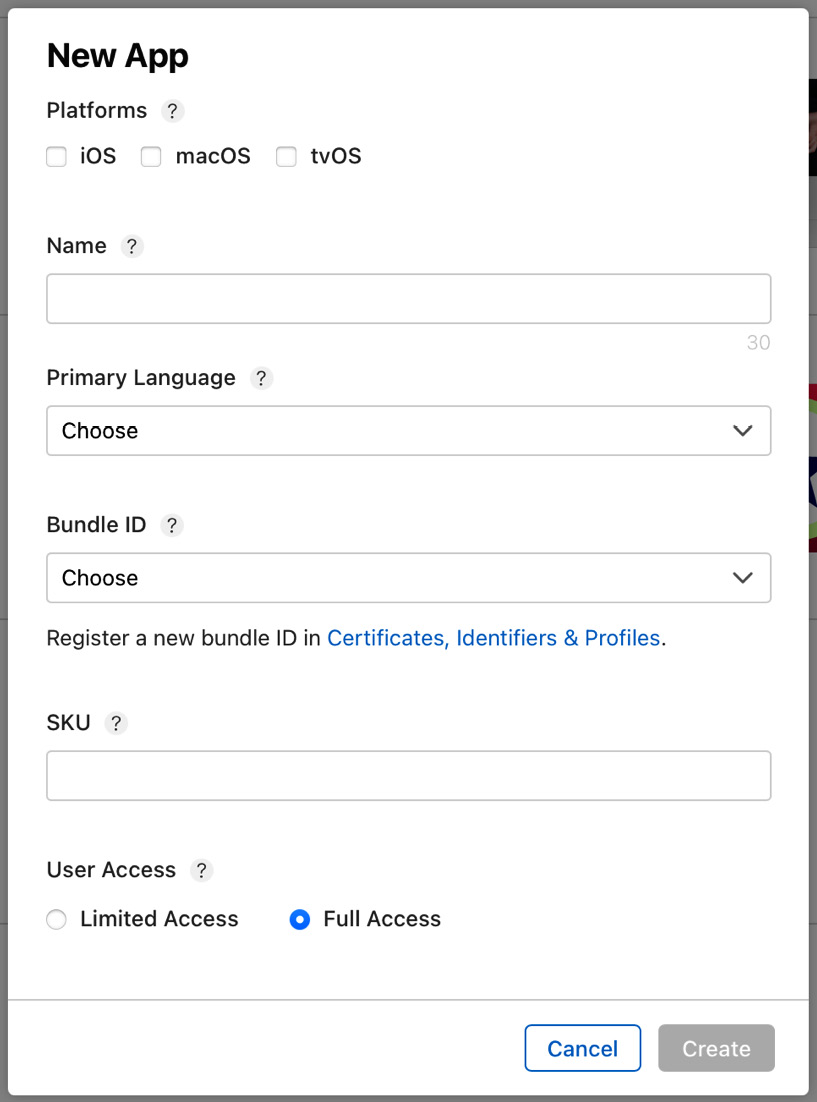
Figure 20.3 – New App parameters
The Bundle ID field is a drop-down menu that contains all of the app IDs that you have registered for your team in Apple's Developer portal. If you've been developing with the free-tier developer account up until the last minute, or you haven't used any special features such as push notifications or App Groups, it's possible that your app's Bundle ID is not in the drop-down menu.
If this is the case, you can manually register your Bundle ID in the Developer portal. Follow these steps:
- Navigate to https://developer.apple.com/ in your browser.
- Click the Account menu item. You can use the Account page to manage certificates, Bundle IDs, devices, and more. A lot of this is automatically taken care of by Xcode, but you'll occasionally find yourself in this portal. For example, let's look at how to manually register your app's Bundle ID:
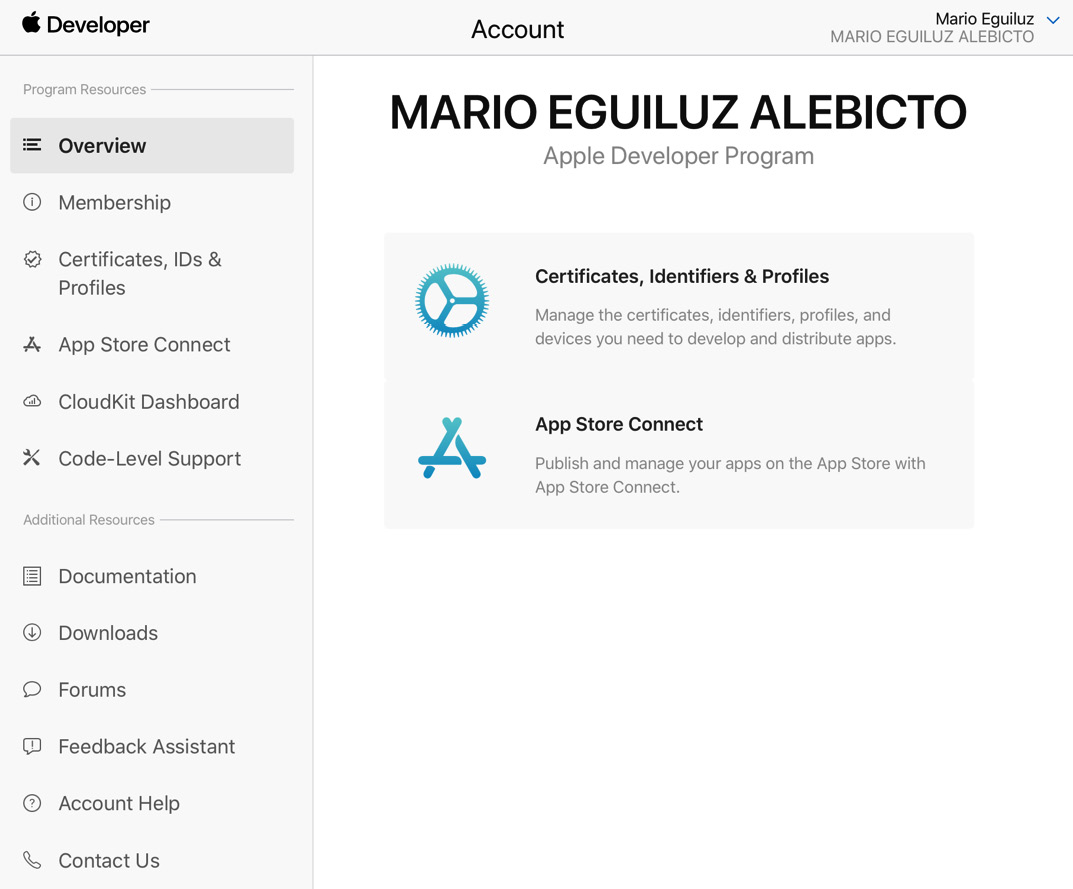
- To register your Bundle ID, click on the Certificates, IDs & Profiles item on the left-hand side of the page.
- On the Certificates, Identifiers & Profiles page, click Identifiers in the menu on the left-hand side. This will present you with a list of currently registered apps. Near the Identifiers heading at the top of the list, there's a blue + icon. Click this, then select App IDs and the App to add a new ID to your profile:
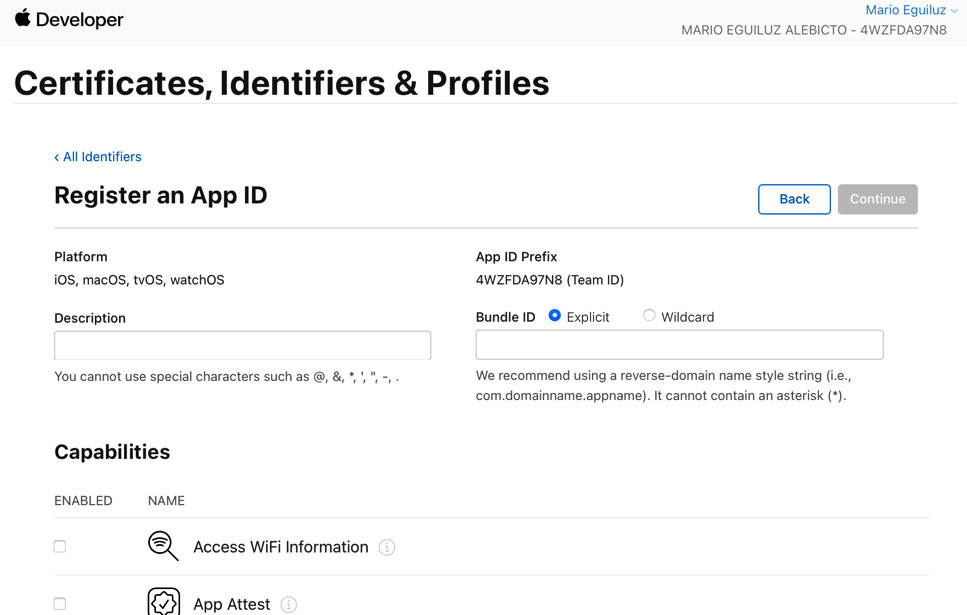
Figure 20.5 – Certifcates, Identifiers & Profiles
To add your Bundle ID, all you need to do is fill in the form fields. You'll want to use a descriptive name for your app name. It can be the same as the name you have set for your app in Xcode, but it can also be a different name; it doesn't have to match.
Make sure to select the Explicit App ID field and copy the Bundle ID from your Xcode project. It's important that you perfectly match this. If you don't do this, you'll run into issues later because your app can't be identified if the Bundle ID is incorrect.
Once you've done this, you can save your new ID. You don't have to select any capabilities since Xcode will automatically manage this for you when you enable or disable them in the Capabilities tab.
After manually registering your Bundle ID, you should be able to move back to App Store Connect, add a new app, and select your app's Bundle ID. After you've done this and you've created your app in the App Store Connect portal, have a look around in your app's settings. There are a lot of form fields that you can fill in. The first screen you'll see is the App Information screen. This is where you fill out the information about your app, assign it a localized name that appears in the App Store, and assign categories to your app:
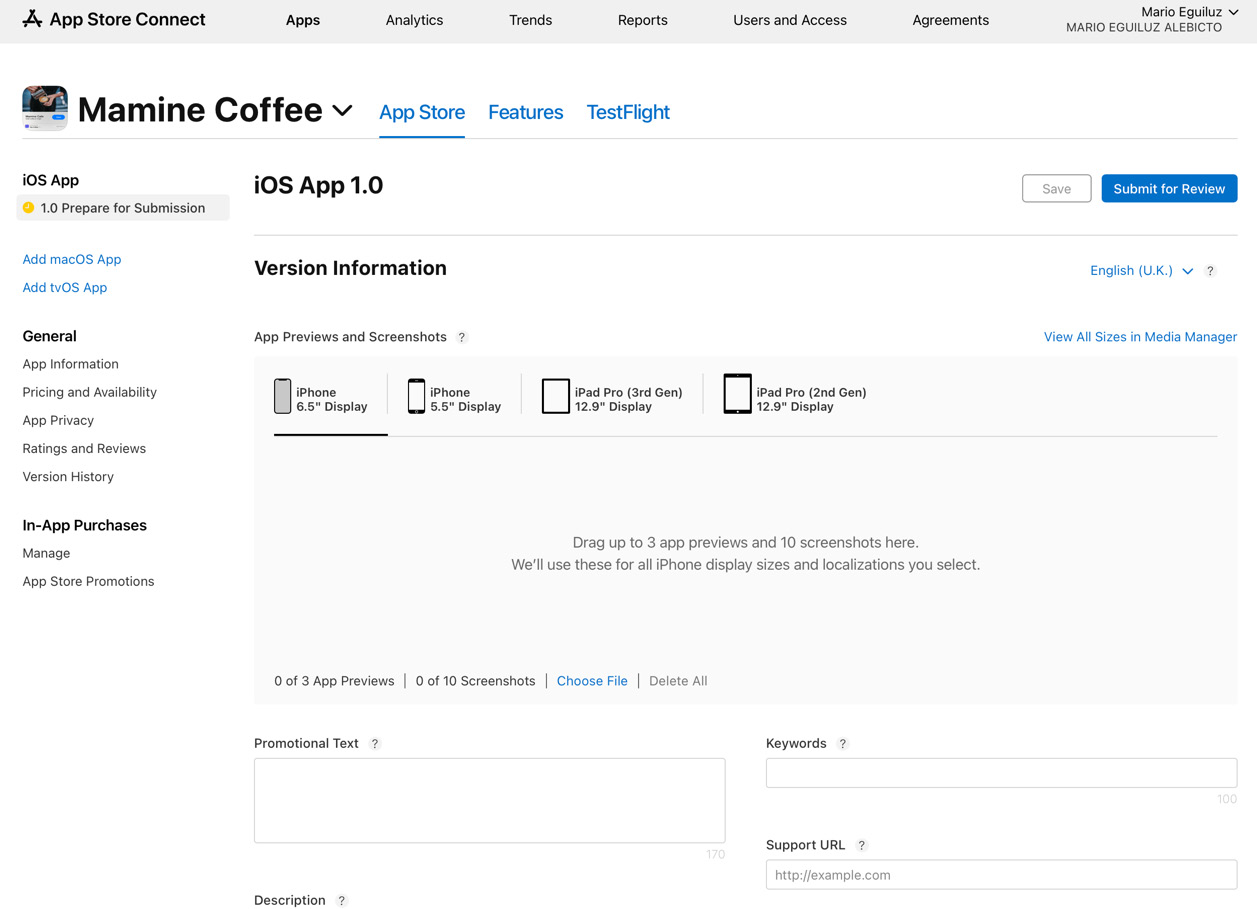
Figure 20.6 – App dashboard screen
Next, there's the Pricing and Availability screen. This is where you decide in which countries your app can be downloaded and also how much it costs. Lastly, there is the Prepare for Submission menu item.
Whenever you add a new version of your app, you should fill out the form fields on this screen, and there are quite a lot of them. The Prepare for Submission form is used to provide screenshots, keywords, a description for your app, privacy policies, and more. Go ahead and have a look at what's in there. Luckily, everything you have to fill in is pretty straightforward.
In this section, we have learned how to register a new app in App Store Connect and the process to generate a new Bundle ID. Once you have registered your app on App Store Connect, you can upload your app. To do this, you use Xcode to package up your app and send it off to App Store Connect. Let's see this in the next section.
Packaging and uploading your app for beta testing
To send your app out to beta testers and eventually real users, you must first archive your app using Xcode. Archiving your app will package up all contents, code, and assets. Follow these steps to archive your app:
- Select Generic iOS Device from the list of devices your app runs on in Xcode:

Figure 20.7 – Archiving the app
- With this build device selected, select Product | Archive from the top menu in Xcode. When you do this, a build will start that's a lot slower than usual. That's because Xcode is building your app in release mode so it is optimized and can run on any device.
- Once the archive is created, Xcode will automatically open the organizer panel for you. In this panel, you get an overview of all the apps and archives that you have created:
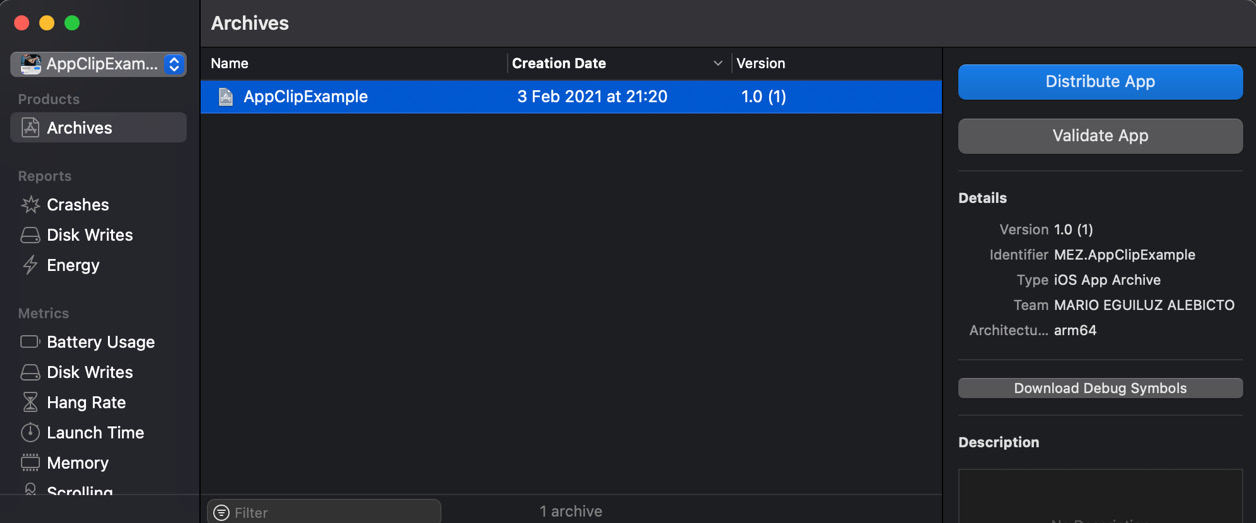
Figure 20.8 – Archive files
Before you archive your app, you should make sure that your app is ready for release. This means that you must add all of the required app icon assets to the Images.xcassets resource. If your app icon set is incomplete, your app will be rejected when you try to upload it to App Store Connect, and you'll have to generate your archive all over again.
- When you're ready to upload your build to App Store Connect to send it to your beta testers and eventually your users through the App Store, you should select your latest build and click the Upload to App Store button. A popup will appear to guide you through a couple of settings. You should use the default settings most of the time and click Next. Finally, your app will be verified based on metadata and uploaded to App Store Connect. If there are errors in your archive, such as missing assets or unsigned code, you'll learn about it through error messages in the upload popup window.
When your upload succeeds, you'll also be notified through the popup.
Once you've uploaded your build, you can go to the activity panel for your app in App Store Connect. You can see the builds uploaded under the TestFlight tab. If you have just uploaded a build, its status will be Processing. Sometimes this step takes a while, but usually no longer than a couple of hours:
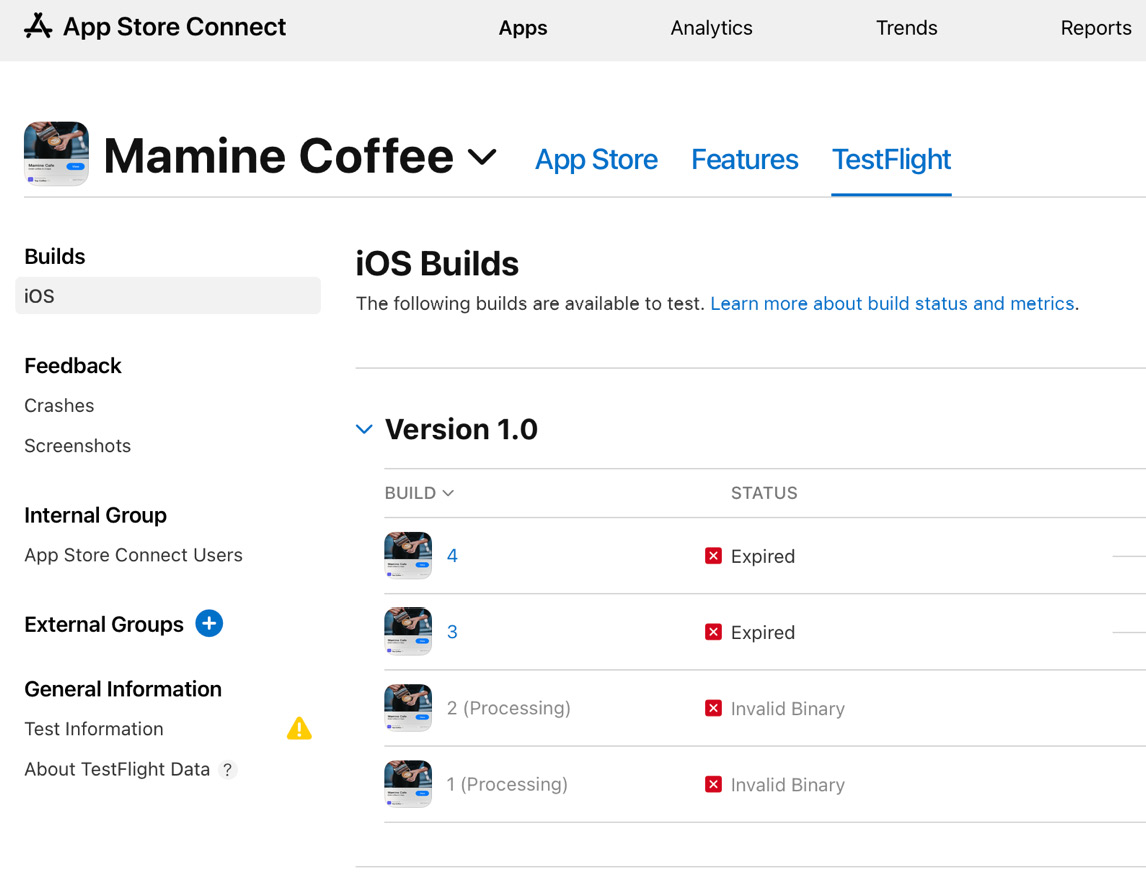
Figure 20.9 – Builds uploaded
While the app is processing, you can start to prepare your TestFlight settings. To do so, follow these steps:
- Select the TestFlight menu item and fill in the Test Information form. If you're rolling out your beta test internationally, you might want to provide information in multiple languages, but you don't have to.
- Next, select the Internal Testing menu item in the sidebar on the right. In this panel, you can select users that are added to your account for beta testing. This type of testing is often the first type of testing you do, and it's mostly intended for testing apps internally with members of your team or with close friends and family. You can add more internal users to your account through the Users and Roles section in App Store Connect.
- Once your app is processed, you'll receive an email, and you can select which version of your app should be used for internal testing:
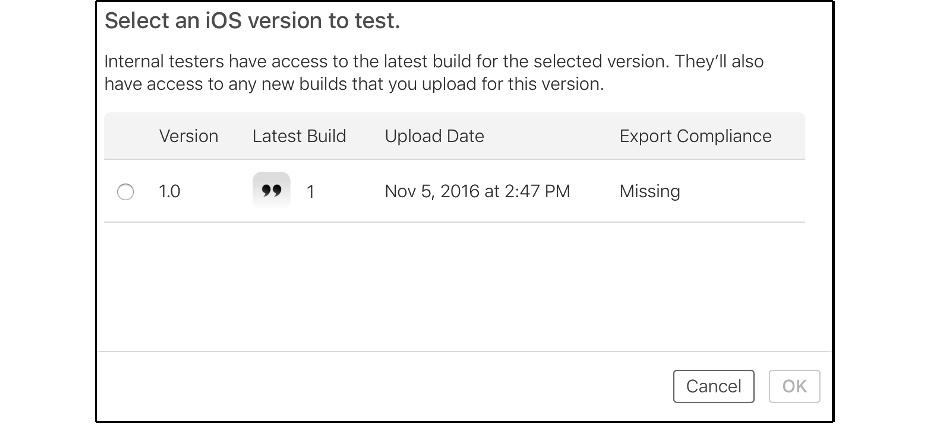
Figure 20.10 – Selecting the app version to test
Once you've added testers and you've selected a build to test, you can click the Start Testing button to send out a beta invite to your selected testers. They will receive an email that enables them to download your app through the TestFlight app for iOS.
- Once your internal testers are happy with your app, you can select some external beta testers for your app. External testers are typically people who aren't in your team or organization, such as existing users of your app or a selection of people from your app's target audience.
Setting up an external beta test is done identically to how you set up the internal test. You can even use the same build that you used for internal testing for external testing. However, external tests typically require a quick review by Apple before invites can be sent out. These reviews don't take long and passing the beta test review does not mean you'll also pass the App Store review.
This is all you need to know about setting up a beta test through TestFlight. When you're happy with the results of your beta test and your app has passed the real-world test, it's time for you to prepare to release your app into the wild through the App Store.
Preparing your app for launch
Moving from beta testing to releasing your app does not require much effort. You use the same version of your app as you've already exported and tested with your users. To be able to submit your app for review by Apple, you have to add more information about your app, and you should set up your App Store presence. Follow these steps:
- The first thing you should do is create a couple of screenshots of your app. You will add these screenshots to your App Store page, so they should look as good as possible because potential users will use screenshots to determine whether they want to buy or download your app. The simplest way to create screenshots is to take them on a 5.5-inch iPhone and a 12.9-inch iPad.
You can provide screenshots for every type of device that exists, but you must at least provide them for a 5.5-inch iPhone and a 12.9-inch iPad. You can use the Media Manager feature in App Store Connect to upload the large-sized media and have it scaled down for smaller devices:
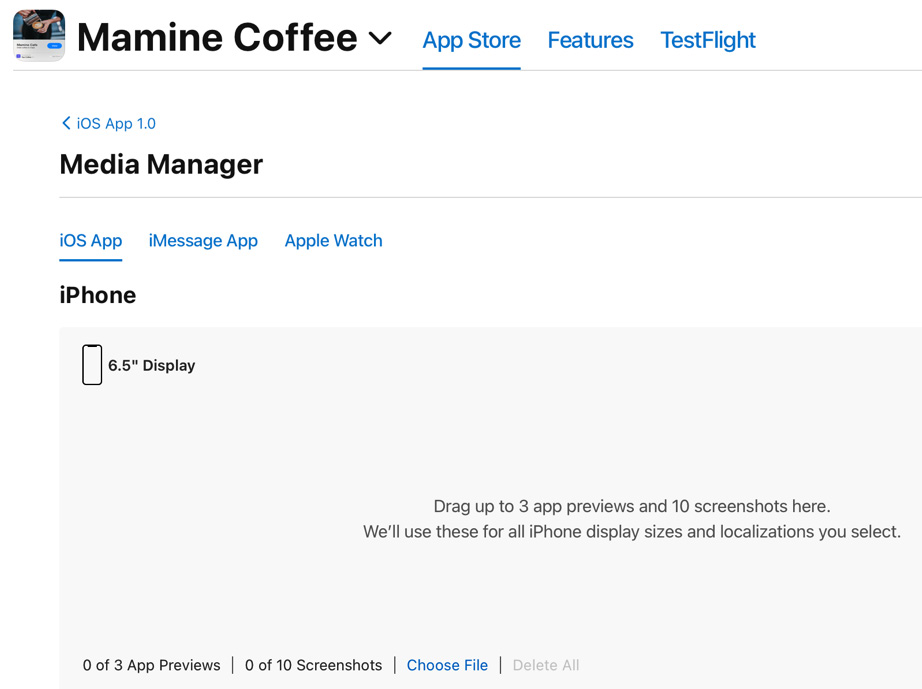
Figure 20.11 – Media Manager
- After submitting screenshots, you should also fill out a description and keywords for your application. Make sure that your app description is clear, concise, and convincing. You should always try to use as many keywords as you can. Apple uses your keywords to determine whether your app matches search queries from users.
Try to come up with synonyms or words you would look for when you'd search for an app that does what your app does.
If your app features an iMessage or Apple Watch app, you should upload screenshots for these apps as well. You can't provide separate keywords or descriptions for these extensions, but they will have their own image galleries in the App Store.
- The next step in the submission form is to select your app binary and provide some general information about the app and the person responsible for publishing the app. Usually, you'll want to choose the version of the app you've been beta testing up to the point of release.
- Lastly, you must provide some information to Apple about how your app should be reviewed. If your app requires a demo account, provide the credentials to the reviewer. If your app has been rejected before due to something being unclear, it's usually a good idea to clarify the past misunderstanding in the notes section. This has proven to help for some apps, resulting in accepted reviews at the first try rather than being rejected and providing explanations afterward. When everything is filled out, hit the Save button to store all of the information you just entered. Then, if you're satisfied with everything and ready to take the final leap toward releasing your app, press Submit for Review to initiate the review process.
Getting your app reviewed by Apple can take from just a single day to a couple of days or even longer. Once you have submitted your app, it's important that you patiently wait until you hear from Apple. Sending them queries about reviewing your app faster or asking them about the current status often yields no results, so there's no point in trying to push Apple for a review.
Information
If you do need to get your app reviewed and released fast and you have a legitimate reason, you can always apply for expedited review. If Apple agrees that a faster review will benefit not just you but also your users, your app could be reviewed in a matter of hours. Note that you should not abuse this. The more often you apply for an expedited review, the less likely Apple is to grant you an exception. Expedited reviews should only be requested in exceptional cases.
Well, time to get some cocoa, coffee, tea, or whatever you prefer to drink. You can now sit back for a while and wait while Apple reviews your app so you can release it to the App Store. Let's wrap up the chapter with a summary.
Summary
This final chapter covered preparing to release your app. You learned how to archive and export your app. You saw how to upload it to App Store Connect and how to distribute your app as a beta release. To wrap everything up, you saw how to submit your app for review by Apple to release it to the App Store. Releasing an app is exciting; you don't know how well your app will perform or whether people will enjoy using it. A good beta test will help a lot, you'll be able to spot bugs and usability issues, but there's nothing like having your app in the hands of actual users.
Most developers invest a lot of time and effort into building their apps, and you are one of them. You picked up this book and went from an iOS enthusiast to an iOS master who knows exactly how to build great apps that make use of iOS' newest and greatest features. When you're ready to launch your own app on the App Store, you'll learn how exciting and nerve-racking it can be to wait for Apple to review and hopefully approve your app. Maybe you get rejected on your first try; that's possible. Don't worry too much about it; even the biggest names get rejected sometimes, and often fixing the reason for the rejection isn't too complicated. Do make sure to read the App Store review guidelines before you submit; these guidelines give a pretty good indication about what you can and can't do in your apps.
Since this is the last chapter in this book, I would like to sincerely thank you for picking up this book and using it as one of the stepping stones toward becoming a master of iOS programming. I hope to have left you with the skills required to venture out on your own, read Apple's documentation, and build amazing applications. Thanks again, and if you've created something cool using this book, please feel free to reach out to me. I would love to see your application.