
Launchpad is an open source software hosting website for projects using Bazaar as the version control system. It has various additional components to facilitate collaboration, such as the following:
- Repository browsing: Viewing and browsing the files and directories of the project, including current and past revisions
- Milestone and release management: Defining milestones that can be targeted by bug fixes and new feature specifications
- Specifications tracking: Creating and editing new feature specifications together with the others
- Bug tracking: Creating bug reports, linking bugs to branches or commits, targeting bug fixes to milestone releases
- Answers: Tracking user support
- Translation management: Providing a collaborative interface to edit translations of the project files in multiple languages
Launchpad was designed to work with Bazaar, therefore no integration is necessary; Bazaar and Launchpad work well together out of the box.
Launchpad has an excellent online tour that walks you through the main features at https://launchpad.net/+tour/index.
In this section, we will focus mainly on Bazaar hosting, branch management, and bug-tracking features.
Having an account on Launchpad allows you to upload personal branches, host the codebase of open source projects, manage bugs, create teams and mailing lists, and so on.
In order to be able to perform write operations on branches hosted on Launchpad, such as commit and push, you must upload your SSH public keys to associate with your Launchpad account. Write operations by the bzr command or Bazaar Explorer can be authorized on Launchpad if your SSH public keys are correctly configured in your account details on Launchpad, and your Launchpad username is correctly set in your local Bazaar configuration.
To create an account, visit Launchpad at https://launchpad.net/, and follow the instructions on the screen:
Choosing a good and short username is important, because it will be part of the URLs of your personal branches, as follows:
lp:~USERNAME/PROJECT/BRANCH
When collaborating with others, you will often need to exchange branches and tell others about your branches. As such, you and your peers may have to type your username frequently, thus it is probably a good idea to choose something good and short.
Note
You can change your username later. However, if you use your Launchpad OpenID on other websites or services, keep in mind that changing your username will change your OpenID too, and thus you will lose access to those services. It's better to decide your username once and never change afterwards.
The homepage of your Launchpad account can be derived from your username, as follows:
https://launchpad.net/~USERNAME
At the top-right corner, there is a link named Change details, which takes you to a page where you can change your personal details and preferences:
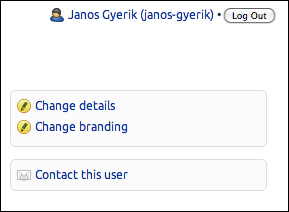
On your Launchpad home page, there are many settings that you can adjust by clicking on the pencil icons next to them. To edit your SSH public keys, click on the pencil icon next to the SSH keys setting.
Note
It is normal if Launchpad asks you to re-enter your username and password when editing SSH keys. This is an additional security measure to protect your account. If a malicious user can access this screen when you leave your computer unattended for a few minutes, he/she could register his/her own SSH keys and overwrite your branches and any other branches to which your account has permissions.
On the Change your SSH keys page, you can add and remove SSH public keys that are allowed to write to Bazaar branches linked to your account, such as your own branches and branches of other teams who invited you to work on their project. To authorize an SSH key, copy the public key content and paste it in the large textbox.
In GNU/Linux, Mac OS X, and similar systems (UNIX, FreeBSD), your SSH public key is usually in the file ~/.ssh/id_rsa.pub. If you don't have one already, the following help page explains very well how to create an SSH key:
https://help.launchpad.net/YourAccount/CreatingAnSSHKeyPair
In Windows, you can use puttygen.exe to generate keys, which is part of the PuTTY tool, and you can download it from the following URL:
http://www.chiark.greenend.org.uk/~sgtatham/putty/download.html
However, when generating keys using PuTTY, you will have to convert your public key for it to be in a single-line format, as follows:
ssh-rsa AAAAB3NzaC1yc2EAAAABIwAAAQEAxZT0202gdMDSnlbbs0dNXZdil2aKyEgovnCUik7kMDeC2+aF46eHIrQGUhGfL3UmIdS61wFbvdG38c4yXmgi87yJbb9SlVl2OmDDvU9TI/emWL71JT0viRxRVlYP9vlOF+r3fqaSW76PIalLEuJJIol3Xwp/o9tPkc1Pqz40B7xJNGR8YVXBZci3WMX68yqk98Kqhp9KcLmzKArMjF9gslDmXakFQnJ9VFH6kGCMjKRq60DQpwnyqLzSlaX41mIjo7ZezWQIKZBKz3adw7u/rTqBMrctP2jxMHmLwg/slhOjL5jBZnWgFeEMCuxsexaaK8t+S7pAHe6kYp7AY06TJw==janos@axiom
The line has three parts, each separated by a single space:
The comment part of the key will be shown on your Launchpad home page, so that you can see at a glance the SSH keys you have authorized to access your account. For example, as follows:

For added security, whenever your SSH keys are edited, Launchpad sends a notification to your registered e-mail address.
In order to write to branches on Launchpad with the push and commit operations using the bzr command or Bazaar Explorer, you must tell Bazaar your Launchpad username. You can do that either with the bzr launchpad-login command, or its shorter alias bzr lp-login. When used without parameters, the command shows the currently configured Launchpad username:
$ bzr lp-login
No Launchpad user ID configured.
By default, it is not configured, of course. Specify the Launchpad username to set and save it in your user configuration:
$ bzr lp-login
bzrbuddy
The command verifies if the specified user exists on Launchpad, and if successful it updates the value of launchpad_username in your Bazaar configuration (~/.bazaar/bazaar.conf). Bazaar operations on Launchpad branches will check this configuration value to make the association between your actions and your Launchpad user.
To confirm that the Launchpad username was correctly set, you can run bzr lp-login again without parameters; it should simply print the username; for example:
$ bzr lp-login bzrbuddy
To confirm that your SSH keys and Launchpad user are correctly configured, you can run any operation on a Launchpad branch. For example, the info command on the official branch of the Bazaar project will provide the following output:
$ bzr info lp:bzr
Repository branch (format: 2a)
Location:
  shared repository: http://bazaar.launchpad.net/~bzr-pqm/bzr/bzr.dev/
  repository branch: http://bazaar.launchpad.net/~bzr-pqm/bzr/bzr.dev/

Related branches:
  parent branch: sftp://robertc@escudero/srv/www.bazaar-ng.org/rsync/bzr/bzr.pqm/
If you have not informed Bazaar about your Launchpad username, read-only operations would still work, but you would get a warning similar to the following:
You have not informed bzr of your Launchpad ID, and you must do this to
write to Launchpad or access private data.  See “bzr help launchpad-login".
If you have configured a username, Bazaar will try to authenticate using your SSH keys, even in the case of read-only operations, such as getting the info. Bazaar will look for your SSH key matching any of the public keys registered for your configured Launchpad username. If it cannot find a matching private key, the operation will fail. For example:
$ bzr lp-login bzrbook  # any user you don't own!
$ bzr info lp:bzr
Permission denied (publickey).
ConnectionReset reading response for 'BzrDir.open_2.1', retrying
Permission denied (publickey).
bzr: ERROR: Connection closed: Unexpected end of message. Please check connectivity and permissions, and report a bug if problems persist.
Using private keys works in the same way as when authenticating to an SSH server. If you have a working setup to log in to an SSH server, you don't need to perform any additional configuration for Launchpad.
Branches on Launchpad must belong to a user and a project. To upload branches that are not associated with any project, you can use a special project called +junk, which is designed exactly for this.
You can access the personal branches using URLs in the following format:
lp:~USERNAME/+junk/BRANCHNAME
Here, USERNAME is your Launchpad username and BRANCHNAME is any nickname you can pick for your branch when you create it.
Branches in the +junk project are commonly called personal branches, or sometimes non-project branches. Despite of the name as personal branches, these are not private; anybody can see your personal branches on your Launchpad home page, browse their content, and branch from them.
In the next examples, we will use the username bzrbuddy when demonstrating Bazaar operations on Launchpad branches. Replace it with your own Launchpad username when working with your branches.
You can upload a personal branch by using a push operation. As a test, let's create an empty branch and push it to Launchpad. For example:
$ bzr init /tmp/empty-sample
Created a standalone tree (format: 2a)
$ cd /tmp/empty-sample/
$ bzr push lp:~bzrbuddy/+junk/empty1
Created new branch.
Note that when you push a branch to Launchpad for the very first time, you will get a prompt to accept the host key of Launchpad as follows:
The authenticity of host 'bazaar.launchpad.net (91.189.95.84)' can't be established.
RSA key fingerprint is 9d:38:3a:63:b1:d5:6f:c4:44:67:53:49:2e:ee:fc:89.
Are you sure you want to continue connecting (yes/no)? yes
Warning: Permanently added 'bazaar.launchpad.net' (RSA) to the list of known hosts.
This is the same as when connecting to an SSH server for the very first time. After you say yes, the host key will be saved in your known hosts registry, and you won't be prompted for this again.
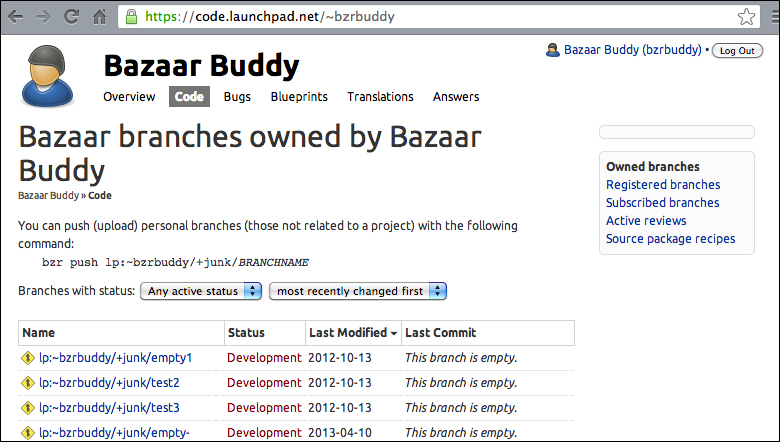
To confirm that the branch was created, visit your Launchpad home page and click on the Code tab, or use a direct URL; for example, https://code.launchpad.net/~bzrbuddy.
This page lists all of your branches:
Keep in mind that your personal branches are not private; anybody visiting your Launchpad home page can see them, browse their content, and branch from them.
Personal branches are a good way to store non-private branches temporarily, or to share with others, or just to play with Launchpad.
Personal branches on Launchpad work in the same way as any other remote branches. Since these branches are public, anybody can perform read-only operations on them, such as branch, checkout, merge, info, revno, and ls. For example:
$ bzr checkout lp:~bzrbuddy/+junk/empty1 /tmp/empty1-checkout
$ bzr branch lp:~bzrbuddy/+junk/empty1 /tmp/empty1-branch
Branched 0 revisions.
$ bzr ls lp:~bzrbuddy/+junk/empty1
$ bzr revno lp:~bzrbuddy/+junk/empty1
0
$ bzr log lp:~bzrbuddy/+junk/not-so-empty1
To delete branches, visit your Launchpad home page, click on the Code tab, then click on the branch you want to delete. On the detailed view of the branch, there is a toolbox at the right-hand side with the option to delete the branch:
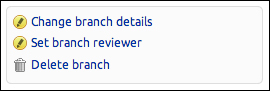
When you click on Delete branch, Launchpad will ask you for a confirmation.
Launchpad is designed to host entire projects with all their Bazaar branches. It is free for open source projects. There is an excellent documentation on hosting projects on Launchpad at https://help.launchpad.net/Code/QuickStart.
For the purposes of the book, we will cover only the absolute essentials, focusing on the points of integration with Bazaar.
While experimenting with the various features of Launchpad, it may be a good idea to use the Sandbox environment instead of the official site. There is a link to the Sandbox right at the front page of https://launchpad.net/, or you can visit it directly at https://qastaging.launchpad.net/.
The sandbox environment is a copy of the official site, with user accounts, projects and all other content copied over periodically. It is not safe to do any real work there because anything you enter will be erased or over-written at some point. However, it is perfect for experimenting without affecting your real users, teams, and projects.
Some of the examples use the official site, while others use the Sandbox. You can use this conversion table to convert between the URLs of the two sites:
|
Launchpad |
Sandbox |
|---|---|
|
|
|
|
|
|
|
|
|
|
|
|
To create a project on Launchpad, you must be logged in, visit the Launchpad front page (https://launchpad.net/), and click on the Register a project link:
The Register a project on Launchpad page asks you to enter various details about your project, which should be fairly straightforward; in any case, here are some additional remarks:
- URL: Choose the URL wisely, as it will be a part of all the branch URLs that you will create later for the project. Although it is possible to change the URL later, it can be extremely disruptive for your team and contributors. It is best to pick a good name once and never change it later.
- Licenses: If you are registering an open source project, you must specify the license.
After you complete the registration steps, the project will become available at the URL you specified. for example:
https://launchpad.net/bzrbook-examples
The last part of the URL, bzrbook-examples, is the project's Launchpad ID, and will appear in all the branch URLs related to the project.
You can upload branches for a project by pushing to a target URL in the following format:
lp:~USERNAME/PROJECTNAME/BRANCHNAME
For example:
$ bzr push lp:~bzrbuddy/bzrbook-examples/tmp2
Using default stacking branch /+branch-id/707963 at chroot-88678160:///~bzrbuddy/bzrbook-examples/
Created new stacked branch referring to /+branch-id/707963.
Since the Launchpad username is part of the branch URL, users effectively have their own namespace for storing branches. Naturally, you can only upload branches in a user's namespace if your SSH key is authorized in the configuration of the corresponding user.
A very important feature of Launchpad is that anybody can associate branches with a project by pushing to a URL where the PROJECTNAME part corresponds to the Launchpad ID of the project. In this way, anybody can contribute to a project, without having to obtain access permissions. Of course, whether the maintainers of the project will use the branch or ignore it is a different matter, and we will come back to that on the subject of merge proposals.
Note
In the output of the preceding push operation example, we created a new stacked branch. Stacked branches are another advanced space-saving technique of Bazaar, similar to shared repositories. It is beyond the scope of this chapter; we will explain it in Chapter 8, Using Advanced Features of Bazaar.
To view all the branches related to a project, visit the Code tab of the project's page. In case of the bzrbook-examples project, this corresponds to the following URL:
https://code.launchpad.net/bzrbook-examples
In the main part of the page, you can see the list of all the branches by all the contributors, with basic information about each branch, such as the URL, status, date of last modification, and the last commit message. For example:
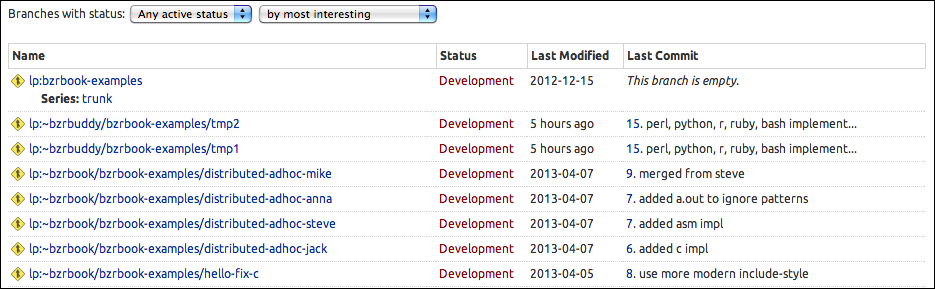
The preceding screenshot provides a list of branches. There are comboboxes to filter by status, and to sort by various criteria. You can also sort by clicking on the column headers.
The Code tab of a project shows all the branches related to the project.
The Code tab of your account shows all your branches regardless of the project.
Every project should have a development focus branch, which is accessible in the Bazaar project itself commands by a simplified URL in the following format:
lp:PROJECTNAME
For example, you can access the current development focus branch of Bazaar by the URL lp:bzr, or the MySQL project by lp:mysql, and so on.
The development focus branch is typically used as the starting point of new feature branches. When you start contributing to a project, ideally you should branch from the development focus branch, implement your improvement, and push your branch to Launchpad to make it visible by the maintainers of the project.
When a project doesn't have a focus branch yet, Launchpad reminds you to set it. For example, the Code tab of a newly created dummy project on the Sandbox site shows this when you have at least one branch, but you haven't designated a focus branch yet:
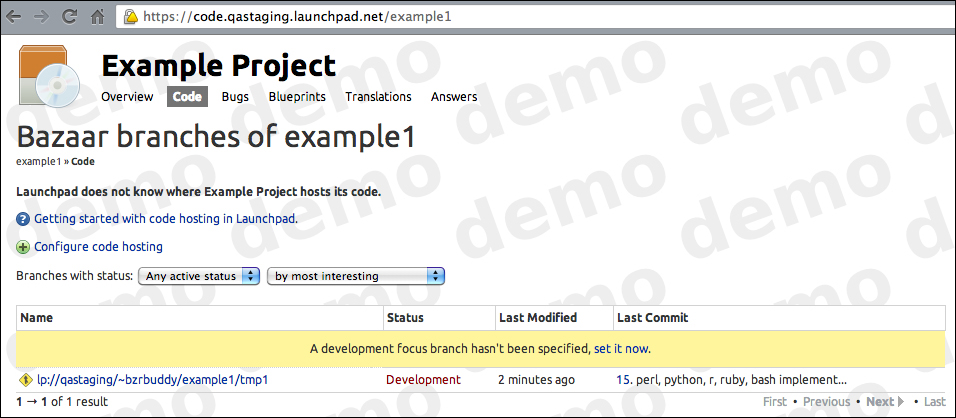
Near the top of the page, Launchpad tells us Launchpad does not know where Example Project hosts its code, and in the table with the list of branches, there is a warning message A development focus branch hasn't been specified, set it now.
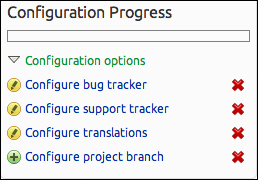
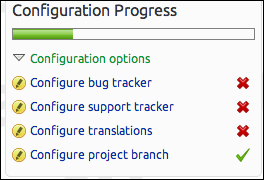
One way to set a focus branch is to click on the set it now link in the Code tab as shown in the preceding screenshot. Another way is on the Overview tab, by clicking on Configure project branch in the Configuration Progress box at the right-hand side of the page:
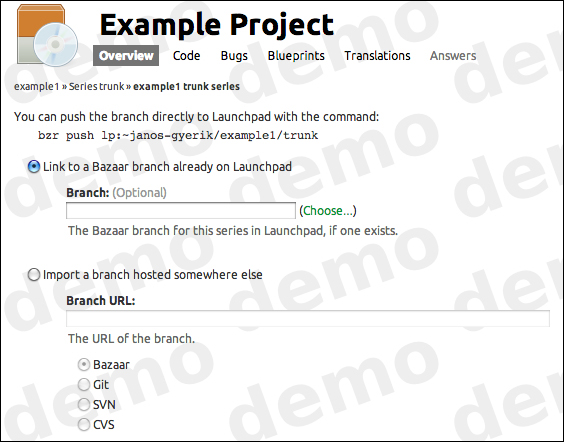
Both the ways lead to a page where you can specify an existing Launchpad branch, or even an external branch if it has a public URL that Launchpad can import from:
Finally, another easy alternative to set the focus branch is to push directly to the official URL of the project. For example, in this case lp:example1.
The official URL of the project is actually an alias to the configured focus branch. If you push to this URL, Bazaar creates the branch at the location lp:~USERNAME/PROJECTNAME/trunk, automatically using your configured Bazaar username, the name of the project, and trunk as the branch name. At the same time, the operation sets the official URL to point to the pushed location.
Although anybody can upload branches associated with a project by using the appropriate PROJECTNAME part in the URL of a push operation, only drivers of a project can set the focus branch or push to the lp:PROJECTNAME location. When you create a project on Launchpad, your account is automatically assigned as the driver of the project. You can confirm and change this setting on the Overview tab of the project.
Branches can also be grouped within so-called “series", which are usually associated with the different releases of the project that are maintained in parallel. For example, the Bazaar project itself has a separate series for all the supported releases, such as “2.5", “2.4", which are accessible by the URLs lp:bzr/2.5, lp:bzr/2.4, respectively.
You can register a series in the Overview tab of a project by using the Register a series link.
To view the details of a branch, find it in the list of branches in the Code tab of the project and click on the URL of the branch in the Name column. This is the home page of the branch, showing many important details and providing access to many important functions:
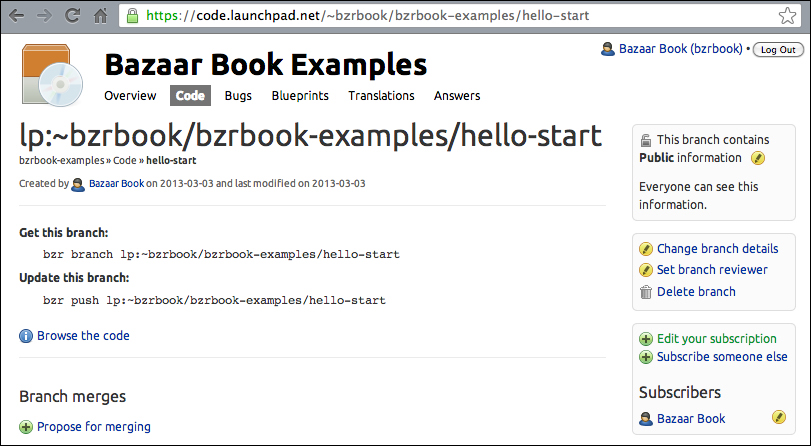
Near the top of the page is the basic information about the branch, such as its URL, the user who created it, and the time of creation.
You can take many important and interesting actions on this page:
- Click on Browse the code in the middle to view the files and directories of the branch
- Click on Change branch details at the right-hand side to edit the branch details
- Click on Delete branch at the right-hand side to delete the branch
- At the right-hand side, you can view and edit the list of users subscribed to notifications triggered by changes to the branch
- Click on Propose for merging to propose the branch to merge into another branch on Launchpad
- Click on Link a bug report to associate the branch with bugs registered on Launchpad
If you scroll further down, you can see the owner of the branch, the status of the branch, and recent revisions added to the branch.
Merge proposals are crucial in a distributed workflow. Since collaborators can only write to their own branches, the only way to get their work into the mainline or to other collaborator branches is to propose them for merging. Launchpad has excellent features to track merge proposals using a web interface.
We will demonstrate the process of merge proposals using the following example branches:
To propose a branch for merging, open the branch details page and click on Propose for merging.
In the form that appears, the only required field is Target Branch. Normally, the development focus branch is selected by default, but you can specify another branch by using the Other option.
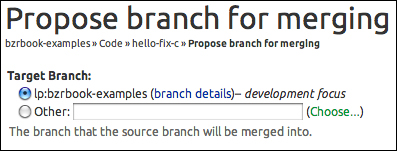
When you specify a branch, you must use the complete URL. If the branch is hosted on Launchpad, you can click on Choose... and search for branches by using a keyword in the name of the branch or in the name of the project:

The target branch does not have to be hosted on Launchpad. It can be any Bazaar branch that is accessible by Launchpad's servers. If you specify a foreign branch, Launchpad will schedule to import it, so it becomes available directly on Launchpad. The branch will be imported at lp:~USERNAME/PROJECTNAME/BRANCHNAME, where BRANCHNAME is derived from the end part of the foreign branch URL.
Ideally, you should fill the other fields too, most importantly the Description box to explain the changes in the proposed branch. You may also want to specify the commit message that should be used when the branch is merged after it is approved.
When ready, click on the Propose Merge button at the bottom of the page. This will trigger an e-mail notification sent to the specified reviewer, or by default to the project's maintainer, unless you deselected the Needs review box. The notification e-mail includes the locations of the source and target branches, and the differences of the two branches in a diff format.
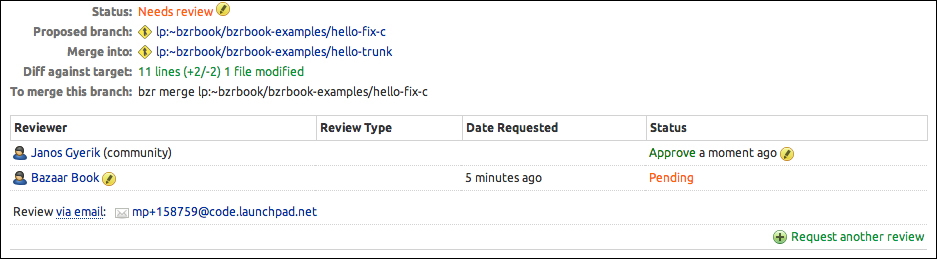
A merge proposal has its own dedicated page where you can view and edit its details.
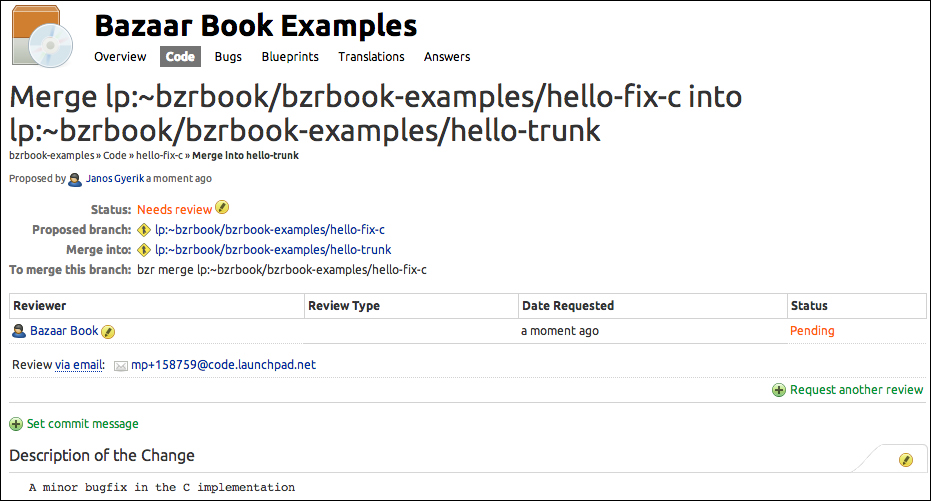
The following page appears right after submitting the merge proposal, or you can access it later from the branch details page:
Everything that you entered while creating the branch proposal can be changed here, except for the locations of the source and target branches.
The author and the reviewers of the branch can invite additional users to participate in the review process. The status of each review is tracked near the top of the page, where reviewers can make changes appropriately, until they ultimately approve or disapprove the change.
The author and the reviewers can enter their comments directly on this page, or by replying to any of the notification e-mails. In this way, they can discuss the details of a merge proposal, or ask the author for additional changes and fixes, until the merge proposal can be approved or disapproved.
There are two kinds of statuses of a merge proposal tracked on Launchpad—the status of reviews of the changes in the branch, and the status of the conclusion based on all the reviews.
There can be one or more Launchpad users assigned to review a merge proposal, and each one of them can take several actions, such as approve, disapprove, ask for more information, or point out things to fix.
In small projects, there is typically only one reviewer; in larger projects, it may make sense to have more. Any project member can invite more users to participate in the review process of a merge proposal.
Based on the result of all the reviews, the owner of the branch or the driver of the project can make the final conclusion whether to approve or disapprove the merge proposal. This final decision is indicated by the Status value near the top of the page, right above the table with the status of all the reviews:
The status of the merge can be changed in several ways:
- Perform the merge and push the updated target branch to Launchpad
- Click on Status and change it manually
- Use the e-mail interface with an appropriate command
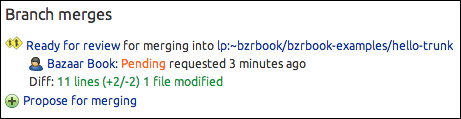
By performing the merge and pushing the updated target branch to Launchpad, the status of the merge is automatically updated to Merged to reflect this action. The merge proposal page gives a hint on how to perform the merge in this example:
To merge this branch: bzr merge lp:~bzrbook/bzrbook-examples/hello-fix-c
Assuming the merge proposal was approved by the reviewers and was well-tested, you can perform the merge by performing the following steps:
- Get the target branch by using
bzr branchorbzr checkout. - Merge the proposed branch by using the command given by Launchpad.
- Commit the merge with a good summary as a comment.
If you got the branch in the
first step using bzr branch, then you must push the branch to its parent by using bzr push :parent, in order to update the Launchpad. If you used bzr checkout in the first step, then Launchpad is automatically updated by the last commit. Either way, the end result is the same, and if you reload the merge proposal page, it should now show Merged as the value of Status.
Note that the other methods of changing the status Approved or Merged do not perform the merge. Changing the status in this way may be a good way to indicate to the team that the proposal has been approved, but you should not forget to perform the branch and push it to Launchpad.
Another easy way to change the status of merge proposals is by entering commands in an e-mail sent to a special e-mail address that is associated with the merge proposal and processed by Launchpad. This e-mail address is the one used by the notification e-mails sent from Launchpad about updates on the merge proposal, or you can find it on the merge proposal's page; in our current example, it is as follows:
Review via email: [email protected]
The commands must be entered on separated lines, and each line must start with a space. The following commands are supported:
review approve: This concludes the review and marks it as approvedreview disapprove: This concludes the review and marks it as disapprovedreview abstain: This abstains from decidingreview resubmit: This tells the collaborator to rework the change and resubmit the merge proposalreview needs-fixing: This tells the collaborator that some fixes are neededreview needs-info: This tells the collaborator that more information is neededmerge approved: This approves the merge proposalmerge rejected: This rejects the merge proposalreviewer NAME: This invites another Launchpad user to review the merge proposal
Other lines in the e-mail will be used as a comment message, appended to the page. You can find more details in the documentation at https://help.launchpad.net/Code/Review.
You can browse the contents of a branch by clicking on the Browse the code link on the branch details page. In the Files tab, you can see a list of files at the latest revision:
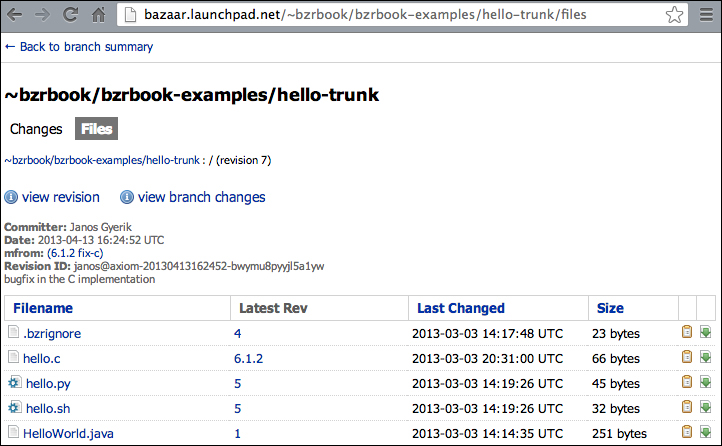
Above the list of files, you can see a detailed information about the revision, such as the committer, the date, and the commit message.
If you click on the Changes tab at the top, you will be able to see a list of changes in a somewhat similar way as the log viewer of Bazaar Explorer:
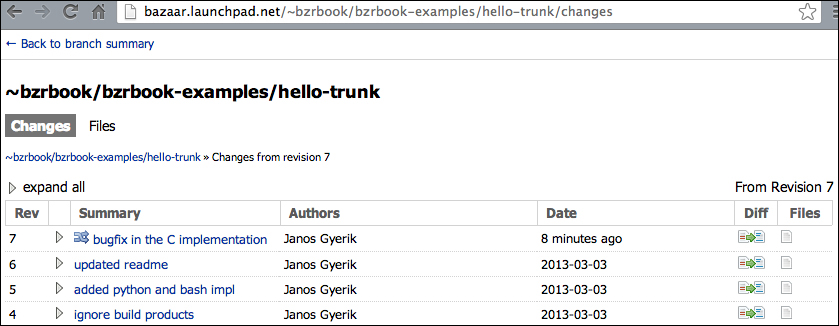
There are several other features available here:
- View the differences in a specific revision or in a file
- Download a revision as a diff or a tarball
- View the full content of any file
- List the revisions that changed a file
- View a file with each line annotated with revision information that changed it
The “browse code" pages on Launchpad are powered by a software called Loggerhead. You can find more information about it later in this chapter.
In order to use the bug tracking system of Launchpad, you must enable it in the configuration of the project, by using the Configure bug tracker link at the right-hand sidebar:
On the bug tracker configuration form, simply select Launchpad; the other fields are optional. When done with the editing, click on Change at the bottom.
Tip
Launchpad projects can work with external bug trackers too, such as Trac, Mantis, Bugzilla, and Redmine. The complete list of compatible bug trackers is maintained at https://help.launchpad.net/Bugs/RemoteTrackerCoverage.
On the Bugs tab, click on Report a bug and follow the instructions.
First, the page asks for the single-line summary of the bug, which will be the title of the bug showed in the listings. After this step, Launchpad will search for the existing bugs reported for the project and show the ones that might be similar. This is in order to reduce duplicate bug reports of the same issue.
On the next page, you can enter the description of the bug, as detailed as possible. You can enter details such as Status, Importance, Milestone, and Tags, and assign the bug to a particular user. Normally, these fields are better to leave for the maintainer of the project to enter. The default values are New and Undecided for Status and Importance, respectively.
There are a few additional tips that may be good to know when using Launchpad.
There is no user interface for these actions. If you are really sure you want to do this, the current official way is to create a question on the Launchpad project itself:
On your account page, you may have noticed a Karma value. By using Launchpad, you accumulate Karma points. The more active you are, the more Karma points you will collect. However, Karma points expire with inactivity. You can learn more about how Karma points work by clicking on the question mark icon next to it, or at the following URL: