Bumpmapping presents a way to increase a detail level without increasing the total polygon count. This technique relies on using normal maps applied to surfaces. Without this, each surface or polygon would have only one normal vector, and therefore, it would look like a flat surface. It uses the term mapping because in addition to the basic texture map, it uses another texture that represents a normal map. A normal map contains normal vectors in tangent space and can be encoded as simple RGB texture, where each color component represents a normal vector component. It makes the surface look rough with bumps.
Bumpmap textures usually consist of grayscale image, where dark areas represent lower regions and lighter areas represent a higher region. Such images need to be converted into colorful normal map. You can use NVidia Texture Tools for Adobe Photoshop or a normal map plugin for the GIMP image editor. There's even a free online tool to do such conversion called NormalMap Online and it's available at the GitHub page http://cpetry.github.io/NormalMap-Online/.
This recipe uses a slightly modified version of shaders from the previous recipe. While the vertex shader is almost the same, the fragment shader uses two texture units instead of one. The first one is used for texture map and the second one is used for normal map. Therefore, you'll need to set up two texture units as follows:
local texture_target = gl_enum.GL_TEXTURE_2D
gl.ActiveTexture(gl_enum.GL_TEXTURE0)
gl.BindTexture(texture_target, texture_map)

gl.ActiveTexture(gl_enum.GL_TEXTURE1)
gl.BindTexture(texture_target, normal_map)

-- textures
setUniform('i', 'diffuseTexture', 0)
setUniform('i', 'normalTexture', 1)
You'll also need to prepare lights in your scene. You can copy the light setup from the previous recipe about lighting basics.
You could try to apply a normal map as an ordinal texture, but soon you would've discovered certain artifacts in normal vector orientations. That's why you'll need to know triangle tangent vectors additionally to existing vertex attributes, such as a normal vector. These vectors describe the direction of the triangle plane. You'll need these vectors to apply vector correction in a normal map. Otherwise, the normal map would cause distortions and incorrect light reflections. You can supply tangent vectors for each vertex by the vertex buffer.
First you'll have to prepare the vertex buffer objects and vertex attributes to prepare all data for shaders:
local positionVBO = gl.GenBuffers(1)
local texcoordVBO = gl.GenBuffers(1)
local normalVBO = gl.GenBuffers(1)
local tangentVBO = gl.GenBuffers(1)
local vertex_array_object = gl.GenVertexArrays(1)

-- vertex coordinates
gl.BindBuffer(gl_enum.GL_ARRAY_BUFFER, positionVBO)
gl.BufferData(gl_enum.GL_ARRAY_BUFFER, vertexPositions, gl_enum.GL_STATIC_DRAW)
-- texture coordinates
gl.BindBuffer(gl_enum.GL_ARRAY_BUFFER, texcoordVBO)
gl.BufferData(gl_enum.GL_ARRAY_BUFFER, texcoords, gl_enum.GL_STATIC_DRAW)
-- normal vector coordinates
gl.BindBuffer(gl_enum.GL_ARRAY_BUFFER, normalVBO)
gl.BufferData(gl_enum.GL_ARRAY_BUFFER, normals, gl_enum.GL_STATIC_DRAW)
-- tangent vector coordinates
gl.BindBuffer(gl_enum.GL_ARRAY_BUFFER, tangentVBO)
gl.BufferData(gl_enum.GL_ARRAY_BUFFER, tangents, gl_enum.GL_STATIC_DRAW)

-- setup vertex attributes
gl.BindVertexArray(vertex_array_object[1])

-- vertex position
gl.BindBuffer(gl_enum.GL_ARRAY_BUFFER, positionVBO)
gl.VertexAttribPointer(0, 3, false, 0)

-- vertex texture coordinates
gl.BindBuffer(gl_enum.GL_ARRAY_BUFFER, texcoordVBO)
gl.VertexAttribPointer(1, 2, false, 0)

-- vertex normal vector
gl.BindBuffer(gl_enum.GL_ARRAY_BUFFER, normalVBO)
gl.VertexAttribPointer(2, 3, false, 0)

-- vertex tangent vector
gl.BindBuffer(gl_enum.GL_ARRAY_BUFFER, tangentVBO)
gl.VertexAttribPointer(3, 4, false, 0)
You can get vertex positions, texture coordinates, and normal vectors easily. The difficult part is obtaining tangent vector.
Let's assume that you define each polygon with a triangle. Therefore, each triangle has three points: A, B, and C as shown in the following diagram:

There are two vectors U and V that describe a plane defined by triangle points. You can compute these two vectors with the following code:
local U = {
  x = C.x - A.x,
  y = C.y - A.y,
  z = C.x - A.z
}
local V = {
  x = B.x - A.x,
  y = B.y - A.y,
  z = B.x - A.z
}
You'll need to do the same with texture coordinates as well. Texture coordinate vectors will use letters S and T:
local S = {
  x = C.tx - A.tx,
  y = C.ty - A.ty,
}
local T = {
  x = B.tx - A.tx,
  y = B.ty - A.ty,
}
Now that you have the U and V triangle edge vectors and texel direction vectors S and T, you can compute tangent and bi-tangent vectors with the following formula:
local r = 1/(S.x*T.y - S.y*T.x)
local tangent = {
  x = (T.y*U.x - S.y*V.x)*r,
  y = (T.y*U.y - S.y*V.y)*r,
  z = (T.y*U.z - S.y*V.z)*r
}
local bitangent = {
  x = (S.x*V.x - T.x*U.x)*r,
  y = (S.x*V.y - T.x*U.y)*r,
  z = (S.x*V.z - T.x*U.z)*r
}
Note that these tangent and bitangent vectors are related to the edge vectors and texture space vectors. You could use those vectors in normal mapping, but on certain occasions, you would get incorrect results. That's because these tangent space vectors aren't orthogonal or because they've got different orientation. You can solve these problems with Gram-Schmidt orthogonalization. For this operation, you'll need a normal vector N. The Gram-Schmidt orthogonalization formula looks like this:
You can rewrite it in the Lua language with the following code:
local NdotS = N.x*tangent.x + N.y*tangent.Y + N.z*tangent.z
local tangentOrthogonal = {
  x = tangent.X - N.x*NdotS,
  y = tangent.y - N.y*NdotS,
  z = tangent.z - N.z*NdotS,
}
Now you're left with determining the triangle winding direction. Winding direction defines the order of triangle vertices. A visual representation of this triangle is regarded to be the front face. The back face of the triangle uses the opposite winding direction of vertices. The winding direction helps to determine the direction of the orthogonal tangent vector in the final step. The invalid (opposite) direction of the tangent vector would reverse a texture on the triangle.
In most cases, you'll be using counterclockwise winding, but this can differ if you're using triangle strips, where the triangle winding alternates and this can pose a problem. You can obtain winding direction from the following formula:
You'll need to rewrite this formula into the Lua language:
local NcrossS = {
  x = N.y * tangent.z - N.z * tangent.y,
  y = N.x * tangent.z - N.z * tangent.x,
  z = N.x * tangent.y - N.y * tangent.x,
}
local winding = NcrossS.x * bitangent.x + NcrossS.y * bitangent.y + NcrossS.z * bitangent.z
The last step in producing tangent vectors is to include the winding information in the tangent vector itself. You can store this information in the fourth element w of the tangent vector:
tangentOrthogonal.w = (winding < 0) and 1 or -1
Do note that this tangent vector has four elements: x, y, z, and w. The last one is used in the vertex shader to correct TBN matrix orientation. Fortunately, you only have to compute tangent vectors once.
To produce a bumpmapping effect, you can reuse the shader code introduced in previous samples with a few changes.
The vertex shader code will need to include another vertex attribute that will contain the tangent vector for each vertex. You can do this by including this vertex layout specification code:
layout (location = 4) in vec4 VertexTangent;
After this step, you'll have to compute the so-called TBN matrix with the size of 3 x 3 elements. This matrix contains three columns, where the first contains the tangent vector, the second contains the bitangent vector and the last one contains the normal vector. This matrix represents a new vector space and is often known as the tangent space. The TBN matrix will be used in the fragment shader to correct the normal vector orientation. To build a TBN matrix, you'll need to know the bitangent vector as well. Fortunately, you can compute the bitangent vector from normal and tangent vectors. A bitangent vector is perpendicular to normal and tangent vectors. Note that it's important to adjust the vector orientation in this matrix to correspond with your coordinate system. OpenGL uses this coordinate system by default:
To produce the TBN matrix, you'll use the following code:
outData.tbn = mat3(
  normalize((objMatrix * vec4(VertexTangent.xyz, 0.0)).xyz),
  normalize((objMatrix * vec4(cross(VertexNormal, VertexTangent.xyz)* VertexTangent.w, 0.0)).xyz),
  normalize((objMatrix * vec4(VertexNormal.xyz, 0.0)).xyz)
);
The TBN matrix will be passed to the fragment shader by the modified VertexData structure:
out VertexData {
  vec2 texCoord;
  vec3 position;
  mat3 tbn;
} outData;
The final vertex shader code would be as follows:
#version 330

struct cameraState{
  mat4 perspective;
  mat4 position;
};

struct positionState{
  mat4 position;
};

layout (location = 0) in vec3 VertexPosition;
layout (location = 1) in vec3 VertexNormal;
layout (location = 2) in vec2 VertexTexCoord;
layout (location = 3) in vec4 VertexTangent;

out VertexData {
  vec2 texCoord;
  vec3 position;
  mat3 tbn;
} outData;

uniform cameraState camera;
uniform positionState object;

void main(){
  mat4 objMatrix = object.position;
  vec4 vertexPos = objMatrix * vec4(VertexPosition.xyz, 1.0);

  gl_Position = camera.perspective * camera.position * objMatrix * vec4(VertexPosition.xyz, 1.0);
  outData.texCoord = vec2(VertexTexCoord.st);
  outData.position = vertexPos.xyz;

  outData.tbn = mat3(
    normalize((objMatrix * vec4(VertexTangent.xyz, 0.0)).xyz),
    normalize((objMatrix * vec4(cross(VertexNormal, VertexTangent.xyz)*VertexTangent.w, 0.0)).xyz),
    normalize((objMatrix * vec4(VertexNormal.xyz, 0.0)).xyz)
  );
}First, you'll need to modify the fragment shader code to include the TBN matrix from the vertex shader:
in VertexData {
  vec2 texCoord;
  vec3 position;
  mat3 tbn;
} inData;
Now, you can read the normal map texel value from the normalTexture texture unit:
vec3 normalTexel = texture(normalTexture, inData.texCoord.st).xyz;
The normalTexel vector contains raw values of the normal vector from the normal map texture for the current texel. It means that all values are now in the range (0,1), which is the color component range in OpenGL as well. You need to convert these values into range (-1,1), so you can use them to produce a valid normal vector. You can do this with the following formula:
normalTexel = 2*normalTexel.xyz - vec3(1.0);
In addition to this conversion, you can apply the vector orientation correction by multiplying the normalTexel vector with the vec3 vector.
normalTexel *= vec3(1, 1, 1);
Values in the vector multiplier are related to normal map values. Normal maps aren't standardized, so you'll need to find out what kind of normal map suits you the best. The normal maps that are generated from bumpmaps are usually fine. However, they are not very accurate for more complex 3D models. Such an example might be a 3D model with a low polygon count while using a normal map to define fine details. This is usually the result of using the sculpting tool in the Blender application. Fortunately, you can use the normal map baking tool to generate accurate normal maps from the sculpture.
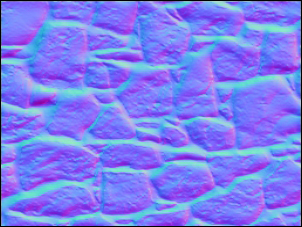
Remember to always set up correct mapping of normal vector coordinates to color channels in a normal map. In most cases, normal maps use the blue color to represent the facing vector as you can see in the following screenshot:
After all these steps, you can produce the final per-texel normal vector by converting the normalTexel vector into world space:
vec3 perTexelNormal = inData.tbn * normalize(normalTexel);
This vector can be used instead of the per-vertex normal vector in the processLighting function.
In the end, the fragment shader code would look like this:
#version 330
struct lightState {
vec4 position;
vec4 diffuse;
vec4 specular;
float constantAttenuation, linearAttenuation, quadraticAttenuation;
float spotCutoff, spotExponent;
vec3 spotDirection;
};
struct materialState {
vec4 ambient;
vec4 diffuse;
vec4 specular;
float shininess;
};
struct cameraState{
mat4 perspective;
mat4 translation;
mat4 rotation;
};
uniform sampler2D diffuseTexture;
uniform sampler2D normalTexture;
uniform cameraState camera;
uniform materialState material;
uniform vec4 sceneAmbient;
uniform int totalLights;
uniform lightState lights[8];
in VertexData {
vec2 texCoord;
vec3 normal;
vec3 position;
} inData;
layout(location = 0) out vec4 diffuseColor;
vec4 processLighting(in materialState material, in vec3 surface, in vec3 normalDirection){
...
}
void main() {
//local copy of material
materialState localMaterial = material;
//texture texel
vec4 texel = texture(diffuseTexture, inData.texCoord.st);
localMaterial.diffuse *= texel;
//normalmap texel
vec3 normalTexel = texture(normalTexture, inData.texCoord.st).xyz;
//normalize range
normalTexel = (2*normalTexel.xyz - vec3(1.0));
//change normal vector orientation
normalTexel *= vec3(-1, -1, 1);
//convert normal map vector into world space
vec3 perTexelNormal = inData.tbn * normalize(normalTexel);
diffuseColor = processLighting(
localMaterial,
inData.position,
normalize(perTexelNormal)
);
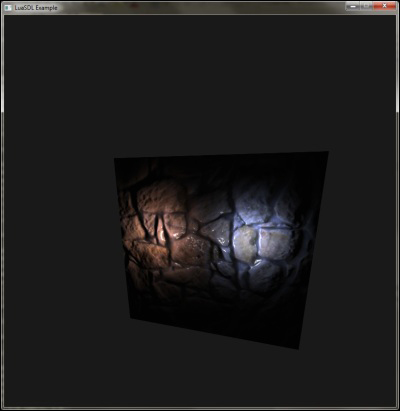
}The result of the applied normal map on a 3D cube with a texture can be seen in the following screenshot:
Bumpmapping affects the normal vector direction at each point of the polygon. Without it, normal vectors would use only linear interpolation between vertices and the surface would look smooth.
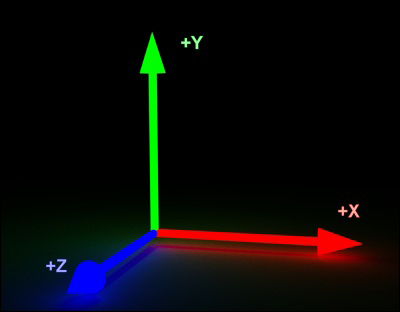
A normal map is usually represented by a 2D texture, where each pixel contains an encoded normal vector. A normal vector consists of three axes: x, y, and z, while in a normal texture map, they are mapped to R, G, and B color channels. A perfectly flat normal map would have a bluish look. That's because every pixel would use (128,128,255) RGB colors, which also means it will use a normal vector with XYZ coordinates (0,0,1).
The difficult part is to use these normal map values to produce a usable normal vector. You can't directly use a normal map as a simple texture because each polygon would have the same normal vectors. It would be as if all polygons were facing you, which is rare. Therefore, you'll need to rotate these normal vectors so that the normal vector (0,0,1) on the normal map would be the same as the normal vector of the polygon. You can achieve this by using the matrix multiplication on the vector from the normal map. This matrix will contain the tangent, bitangent, and normal vector values. Each one corresponds to the axis of the local coordinate system on each polygon:
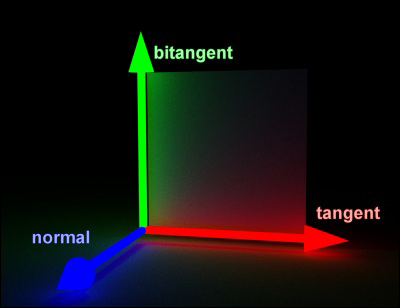
Therefore, this matrix is often called a TBN matrix:

After multiplication with a normal vector from the normal map texture, you'll get the correct normal vector, which can be used with the lighting function.
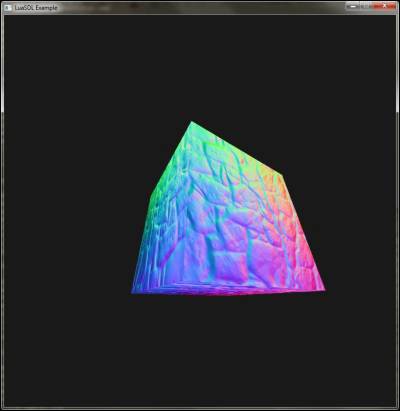
There's a simple way to debug normal vectors by using the perTexelNormal vector in place of the output color:
diffuseColor = vec4((normalize(perTexelNormal)+1.0)/2.0, 1);
Note that you'll need to adjust the value range of the vector because the normal vector can contain negative values and it would more often than not be black.
In this case, the blue color represents the facing direction, the red one is directed to the right, and the green one goes to the top: