
OpenGL offers the use of 1D, 2D, and 3D textures. 2D textures are the most commonly used, even in 3D games. Support for 3D textures was introduced with OpenGL 1.2. A 3D texture can be thought as a layered 2D texture. 1D textures can be used in situations where the texture doesn't change along one dimension, for example, a rainbow.
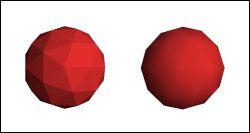
OpenGL, by default, doesn't use any textures. All polygons are rendered with solid color, defined by colors on the vertices. This method of rendering is called Flat shading. Optionally, these vertex colors can be interpolated with so-called Smooth shading or Gouraud shading. The difference between these two modes becomes apparent with vertex lighting as you can see in the following figure:
To use textures, you'll need to toggle the texturing state with the gl.Enable function. There are altogether three states for texturing—GL_TEXTURE_1D, GL_TEXTURE_2D, and GL_TEXTURE_3D. Each one allows you to use a certain type of texture. You can also disable texturing with the gl.Disable function. This might be desirable when drawing a wireframe around an object.
Texture creation consists of four steps:
- Generating the texture object.
- Binding the texture to a texture target.
- Setting up texture parameters (optional, but recommended).
- Uploading the desired content to a texture object.
First of all, you'll need to get a valid texture object. You can get it with the gl.GenTextures function, which will return a Lua table with texture identifiers. This function has only one parameter that specifies how many texture objects you want to create:
local textures = gl.GenTextures(1)
local texture_id = textures[1]
The preceding code extracts the texture object identifier in the second line. This identifier will be used in later steps.
The next step is to decide what kind of texture you'll be using. There are three kinds of textures to choose from—GL_TEXTURE_1D, GL_TEXTURE_2D, and GL_TEXTURE_3D. This choice will affect the texturing target name in subsequent instructions.
With the texturing target name, you can bind the texture object to the current texturing unit with the gl.BindTexture function. The first parameter of this function is the texture target name and the second is the texture object identifier. The Lua code for this step might look like this:
gl.BindTexture(GL_TEXTURE_2D, texture_id)
With the texture object bound, you can set up the texture parameter. This step isn't necessary, but the default texture parameters can lead to unpredictable behavior and bad texture quality. Therefore, you should use the gl.TexParameter function. Actually, there are two versions of this function. The first one is called gl.TexParameteri, which only accepts integer values. Then, there is the second gl.TextParameter function that accepts the float number. With this texture parameter setting, you can set up texture wrapping/tiling and texture filtering. The example of texture parameters' setting is shown as follows:
gl.TexParameteri(GL_TEXTURE_2D, GL_TEXTURE_WRAP_S, GL_CLAMP_TO_EDGE)
gl.TexParameteri(GL_TEXTURE_2D, GL_TEXTURE_WRAP_T, GL_CLAMP_TO_EDGE)
gl.TexParameteri(GL_TEXTURE_2D, GL_TEXTURE_MIN_FILTER, GL_LINEAR)
gl.TexParameteri(GL_TEXTURE_2D, GL_TEXTURE_MAG_FILTER, GL_LINEAR)
This will set the texture to wrap on both dimensions, which are specified by the s and t coordinates. The s coordinate is usually the horizontal and the t coordinate is regarded as vertical. There is also an r coordinate which is used on 3D textures as the depth coordinate. The other two parameters, GL_TEXTURE_MIN_FILTER and GL_TEXTURE_MAG_FILTER, correspond to the texture filtering method used on texture minifying and texture magnifying. The minifying filter is used when the surface area is greater than the texture and the magnifying filter is used on smaller surface areas. This is most notable on 3D scenes, where the textured object might move towards or away from the viewing camera.
The following table contains the available values for these parameters:
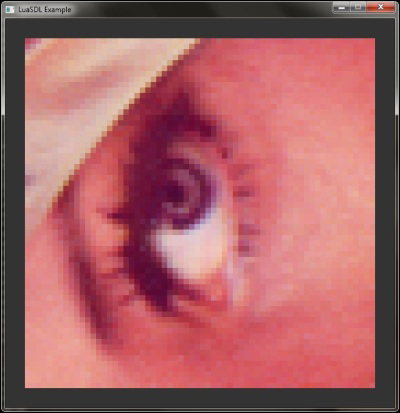
The difference between the nearest and linear texture filtering can be seen in the following two screenshots:
An example of the nearest texture filtering is as follows:
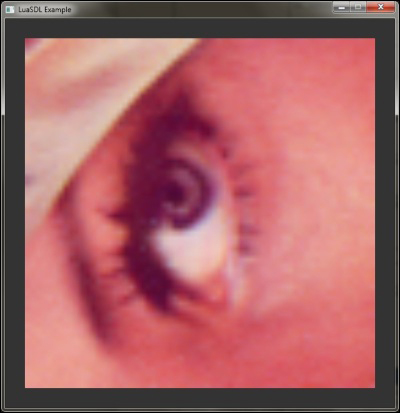
An example of the linear texture filtering is as follows:
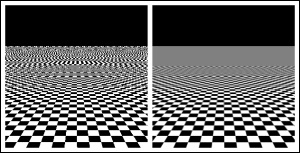
These two methods suffer from the moiré pattern effect when used on the 3D scene when the surface goes into distance. To resolve this issue, mipmapping can be used. Mipmapping represents a method of down sampling the texture into smaller versions. The original texture version is used when the surface is close enough. As the surface is farther, the smaller versions of the texture are used. This can be regarded as a simple form of level of detail automation. Fortunately, graphic cards can generate mipmaps automatically if you choose mipmap filtering. The following figure shows the scene without mipmapping on the left and with mipmapping on the right-hand side:
Finally, you can set the size, pixel format, and content of the texture. To do this, you need to call either the gl.TexImage1D, gl.TexImage2D or gl.TexImage3D function. These functions will submit the texture into the graphic card and reserve the corresponding space in memory for the texture. This example shows the usage of the 2D version, which is the most commonly used:
local texture_target = GL_TEXTURE_2D
local mipmap_level = 0
local internal_format = GL_RGBA
local width = surface.w
local height = surface.h
local border = 0
local format = GL_RGBA
local data = surface.pixels
gl.TexImage2D(texture_target, mipmap_levels, internal_format, width, height, border, format, data)
A texture target should correspond to the gl.TexImage version; although, a different texture target can be used to convert, for example, from 1D image to 2D image. The mipmap-level parameter will set the original level of detail for mipmapping. The internal format specifies how the image will be stored in the graphical memory. The Border parameter creates a border around the texture. The border color can be changed with the GL_TEXTURE_BORDER_COLOR texture parameter. The Format parameter specifies the input image format. This is usually GL_RGB or GL_RGBA if you're using an image with the alpha channel. The last parameter contains the texture data. This parameter can also be 0, which means that nothing will be stored in this texture. This is useful if you're going to generate the texture on-the-fly.
Note that the gl.TexImage function will reserve memory space with each call and it's not suitable to update texture content!
The last thing to do is to free the texturing target with the following line of code:
gl.BindTexture(texture_target, 0)
This means that you won't be doing anything with the texture. The zero value is reserved for the default texture in OpenGL. This technique is often called texture unbinding.
OpenGL always uses numeric identification of the texture object. As a result of this, manipulation with OpenGL objects is much simpler and portable.
Internally, OpenGL doesn't care if a certain portion of the memory is used by a 2D texture or vertex buffer. This gives the programmer much flexibility and it's also very dangerous at the same time. Therefore, always try to be consistent with the use of OpenGL objects.
The internal format parameter of gl.TexImage can be supplied with a number of channels or with one of the many internal formats OpenGL supports. The most notable formats are GL_RGB, GL_RGBA, GL_LUMINANCE, or GL_INTENSITY. The last two formats are often used with grayscale images.
The data parameter refers to the pointer value which LuaGL interconnects with light user data type. You can use this fact to easily supply an array of pixels or any other data.
If you need to update the existing texture or just a portion of it, you can use the gl.TexSubImage function. There are three versions of this function for each texture target, which are gl.TexSubImage1D, gl.TexSubImage2D, and gl.TexSubImage3D. These functions have the following specifications:
gl.TexSubImage1D(texture_target, mipmap_level, xoffset, width, format, data)
gl.TexSubImage2D(texture_target, mipmap_level, xoffset, yoffset, width, height, format, data)
gl.TexSubImage3D(texture_target, mipmap_level, xoffset, yoffset, zoffset, width, height, depth, format, data)
With these functions, you can also set the offsets for each dimension. Notice that these functions don't do any texture resizing. Image resizing must be done on a surface level with the SDL.GFX_zoomSurface function. The function specification looks like this:
SDL.GFX_zoomSurface(surface, x_zoom_factor, y_zoom_factor, antialiasing)
This function will return a new surface object. Zoom factors smaller than 1 will cause the resulting image to be smaller in that direction and factors greater than 1 will stretch the image. You can also turn on antialiasing, which makes the resulting image nicer. Antialiasing is a method of reducing visible artefacts that usually occur during image resizing.
Functions such as gl.TexImage and gl.TexSubImage support a zero value in their data parameter. This is a special case when OpenGL allows you to copy the texture into another.
The following screenshot shows the modification of the existing surface with gl.TexSubImage2D:
