
The camera view is affected by the projection matrix. The projection matrix allows you to set up the camera position, rotation and the size of visible space.
Games mostly use two modes of camera projection. The first one is the orthogonal mode, which can be used to draw 2D scenes on the screen. This mode doesn't use the perspective camera, so the object's distance doesn't affect its size. On the other hand, the perspective mode causes farther objects to be visibly smaller than the nearer objects.
This recipe will assume that the current screen dimensions are stored in the variables screen_width and screen_height. These variables might change their values when you resize the application window or change the screen resolution. You might want to update these variables on resize event.
Camera space operations are divided into two parts. The first one shows how to use orthogonal projection for 2D screen elements and the second one will refer to perspective projection, which is used primarily for 3D scenes.
The orthogonal mode is used commonly with UI elements, which are on the 2D surface of the screen. It causes parallel projection. This mode can be applied with the gl.Ortho function, which will set up the projection matrix. The following code shows you how to use this function properly:
local left, right = 0, screen_width
local top, bottom = 0, screen_height
local near, far = -1, 1
gl.MatrixMode(gl_enum.GL_PROJECTION)
gl.LoadIdentity()
gl.Ortho(left, right, bottom, top, near, far)
This will cause a change to the coordinate system. The vertex coordinate (0,0) will be positioned on the top-left corner of the screen. The bottom-right corner will correspond to the coordinate (screen_width,screen_height). Remember that you don't have to change the size of the orthogonal view with every change of the window size. The size of the orthogonal projection can be viewed as a grid where you divide the screen into even parts. If you need to divide the screen space into 10 x 10 even parts, you'll be using the following code:
gl.Ortho(0,10, 10, 0, -1, 1)
This perspective mode is commonly used in 3D graphics, where you need to do perspective correction, move or rotate the camera, and change the field of view (FOV). To keep things simple, you can use the OpenGL utility library function gl.Perspective, which has the following specification:
gl.Perspective(fov, screen_aspect_ratio, zNear, zFar)
The first parameter fov defines the field of view in the Y direction in degrees. The screen aspect ratio is a ratio of the screen width to the screen height. The last two parameters zNear and zFar specify the position of the near and far clipping plane. Both the values must be positive numbers. Precision of the depth buffer is affected by the zNear and zFar ratio, which is defined as the zFar value divided by zNear. The greater the ratio, the greater will be the bits of depth buffer that are lost.
You can apply matrix transformation on the camera as well. With this, you can achieve camera movement, rotation, and scaling.
The whole process of transformation from 3D space to 2D space is based on matrix multiplications. Transformation matrices are presented as a state in OpenGL. This means once you set up a certain transformation matrix, it will be used until you change it. This recipe won't cover matrix transformations in detail as this is a subject for the whole book. A visual representation of the whole transformation process can be seen in the following diagram:

The OpenGL function, gl.Frustum, presents a simple way to compute the transformation matrix for perspective corrections, which is important in realistic 3D scenes. It defines the viewing volume for the current scene and has the following specification:
gl.Frustum(left, right, bottom, top, near, far)
The first four parameters define a size of the viewable portion on the screen. The last two parameters are used to define the viewing distance.
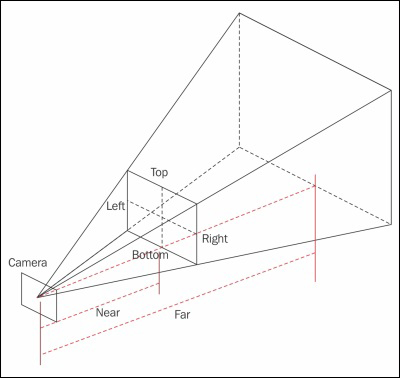
As you can see, this function is very similar to the gl.Ortho function in terms of parameters. However, instead of using screen edges, this function uses clipping planes. For a better understanding, see the following diagram:
The following code shows how the gl.Perspective function works in relation to the gl.Frustum function. As you can see, the gl.Perspective function is actually a shortcut that computes positions of clipping planes and submits them directly to the gl.Frustum function:
function computeFrustum(fov, screen_aspect_ratio, zNear, zFar)
  -- tangent value refers to the half of the size of
  -- viewable screen portion
  local tangent = math.tan(math.rad(fov/2))
  local bottom = tangent*zNear
  local top = -bottom
  local right = bottom*screen_aspect_ratio
  local left = -right
  return left, right, bottom, top, zNear, zFar
end
The result of this function can be used directly on the gl.Frustum function.
You can use the gl.Viewport function to select the screen area that will be used for rendering. You can use this function to do split screen rendering.