
Sometimes you'll need to draw only a part of the window content inside the closed region. In this case, you could have used the scissor test to define the rectangular region. Pixels would be drawn only inside this region. The downside of this approach would be that this region is strictly rectangular and each side of the region would be parallel with the corresponding screen side.
In this recipe, you'll learn how to use stencil test, which provides a more general solution to this problem. Stencil test defines a bit mask with any shape.
Before getting started, make sure you have the stencil buffer available on your graphic card. Nowadays, almost any graphic card allows you to use stencil buffer with at least 8 bits per pixel depth. This will provide enough space to draw 255 masked layers of windows.
Be sure to initialize the stencil buffer before setting up the graphic mode with this code:
SDL.SDL_GL_SetAttribute(SDL.SDL_GL_STENCIL_SIZE, 8)
Note that the LuaSDL library doesn't use the stencil buffer by default.
To enable content slipping inside a window, you'll have to modify the window drawing function:
local stencilEnabled = false

gui.window = function(def)
  -- ...existing code of window object closure
  -- window content clipping
  obj.clip = def.clip
  -- model-view matrix for children elements
  obj.childMatrix = function(...)
    local outerMatrices = {...}
    local localMatrix = modelViewMatrix
    local scaleMatrix = S(def.width or 1, def.height or 1, 1)

    for _, m in ipairs(outerMatrices) do
      localMatrix = localMatrix * m
    end
    return localMatrix * scaleMatrix.inv()
  end
  -- modified window drawing function
  obj.draw = function(parentData)
    if obj.enabled then
      local parentData = parentData or {}
      local parentStencilValue = parentData.stencilValue or 0x00
      local parentStencilMask = parentData.stencilMask or 0xFF
      local currentStencilValue = parentStencilValue
      local currentStencilMask = parentStencilMask

      -- apply shader program for GUI if it's not already used
      if obj.visible then
        if obj.clip then
          if not stencilEnabled then
            gl.Enable(gl_enum.GL_STENCIL_TEST)
            stencilEnabled = true
          end
          currentStencilValue = currentStencilValue + 1
          if currentStencilValue == 1 then
           gl.StencilOp(
              gl_enum.GL_REPLACE,
              gl_enum.GL_REPLACE,
              gl_enum.GL_REPLACE)
            gl.StencilFunc(
              gl_enum.GL_ALWAYS,
              currentStencilValue,
              currentStencilMask)
         else
            gl.StencilOp(
              gl_enum.GL_KEEP,
              gl_enum.GL_KEEP,
              gl_enum.GL_INCR)
            gl.StencilFunc(
              gl_enum.GL_EQUAL,
              parentStencilValue,
              parentStencilMask)
          end
          gl.StencilMask(0xFF)
        end
        -- draw window with current model-view matrix
        -- ...window rendering code...
        --[[ disable further writes to stencil buffer
             and allow children elements to be rendered
        --]]
        if obj.clip then
          gl.StencilOp(
            gl_enum.GL_KEEP,
            gl_enum.GL_KEEP,
            gl_enum.GL_KEEP)
          gl.StencilFunc(
            gl_enum.GL_EQUAL,
            currentStencilValue,
            currentStencilMask)
          gl.StencilMask(0x00)
        end

        -- call custom drawing function
        callSignal('draw', obj.childMatrix())

        for _, child in ipairs(children) do
          child.draw({
            stencilValue = currentStencilValue,
            stencilMask = currentStencilMask,
          })
        end
        -- revert previous state of stencil buffer
        if obj.clip then
          gl.StencilOp(
            gl_enum.GL_KEEP,
            gl_enum.GL_KEEP,
            gl_enum.GL_KEEP)
          gl.StencilFunc(
            gl_enum.GL_EQUAL,
            parentStencilValue,
            parentStencilMask)
        end
        if stencilEnabled and currentStencilValue == 1 then
          gl.Disable(gl_enum.GL_STENCIL_TEST)
          stencilEnabled = false
        end
      end
    end
  end

  -- prepare model-view matrix before first use
  obj.update()
  return obj
end
There's one more thing left to do. You'll have to clear the stencil buffer before rendering the next frame. Otherwise, the stencil test will have unexpected results. Before clearing the stencil buffer, you'll need to set the current stencil bit mask to a 0xFF value:
gl.StencilMask(0xFF)
gl.Clear(gl_enum.GL_STENCIL_BUFFER_BIT)
gl.StencilMask(0x00)
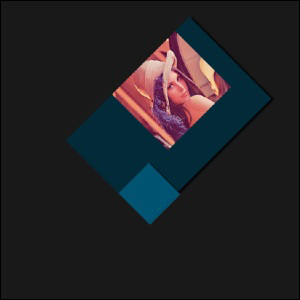
The following screenshot shows the result of the window content clipping on the scene with one main window and two inner windows:
Masking with the stencil buffer usually consists of drawing a mask shape followed by object rendering. In this case, you can use a rendered window to produce a mask at the same time. Every window that applies clipping has its own stencil buffer value that represents the mask level.
The stencil test uses a reference value for testing, as well as for writing into the stencil buffer. This is set by the gl.StencilFunc function, where the first parameter presents a comparator function, the second is a reference value, and the third one is a bit mask. The behavior of the stencil test is set by the gl.StencilOp function, where this first parameter sets an action if the stencil test fails. The second parameter presents the operation if the depth buffer test fails, and the third one influences the operation if both the depth test and stencil test pass. Keep in mind that you can't write to the stencil buffer directly. Writing to the stencil buffer uses a bit mask defined by the gl.StencilMask function. This is also used when clearing the content of the stencil buffer. The stencil test affects rendering only if the GL_STENCIL_TEST flag is set.
This recipe uses the following approach. The stencil test is turned on the first window with content clipping. In this stage, the stencil test always passes so the first mask with value 1 is rendered into the stencil buffer. Every following window uses a different configuration, where, in the first step, OpenGL tests which parts of the window will be visible. In the next step, values in the stencil buffer that correspond to all the visible parts of the window are incremented by one. This procedure is repeated for each child window that has the clipping enabled.
Keep in mind that the stencil buffer clamps values to prevent the value overflow. Therefore, the maximum depth of the clipping is 255 with an 8-bit stencil buffer.
The following screenshot shows the content of a stencil buffer to get a better idea of how it works. The black color represents the stencil buffer value of 0, the gray color has a value of 1, and the white parts have a value of 2:

As you may have noticed, the sample code in this recipe calls the custom drawing function with the signal draw. This signal also receives a single parameter that contains the model-view matrix applicable for child elements. It can be used to draw more complex windows such as buttons with captions or edit boxes.