
Joints present a way of two or more connected objects with a certain type of constraint. The Box2D library offers several types of joints between objects. This type of object connection is useful when simulating arms, wheels, or more complex objects such as cars, robots, and so on.
You'll need at least two dynamic objects to use joints. This recipe will use two rectangular bodies that will be used with various types of joint connections. To make things easier, the following sample code offers a simple function that prepares a rectangular body that will be used many times in this recipe:
local makeBox = function(position, size, angle)
  local size = size * box2dScalingFactor
  local bodyDef = box2d.BodyDef()
  bodyDef.type = 'dynamic'
  bodyDef.position = position * box2dScalingFactor
  bodyDef.angle = math.rad(a)

  local body = world.createBody(bodyDef)
  local box = box2d.PolygonShape()
  box.setAsBox(size.x, size.y)

  local fixtureDef = box2d.FixtureDef()
  fixtureDef.shape = box
  fixtureDef.density = 0.1
  fixtureDef.friction = 0.3
  fixtureDef.restitution = 0.2
  body.createFixture(fixtureDef)
  return body
end
Now, you can create two rectangular bodies that will be used for each joint type:
local bodyA = makeBox(Vec2(0, 50), Vec2(2, 2))
local bodyB = makeBox(Vec2(10, 50), Vec2(2, 2))
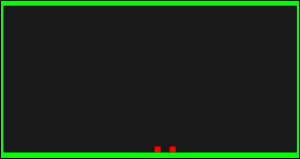
The following screenshot shows a scene with two red boxes next to each other. There are four static green walls around the scene to keep the red boxes inside. This scene will be used as a base for each type of joint between those two red boxes.
The Box2D library offers 11 types of joints. Each creation of a joint is preceded by the joint definition object that is used in a similar fashion to the BodyDef and FixtureDef
objects.
The following sections will show you how to prepare the joint definition object and use it to create respective Joint objects.
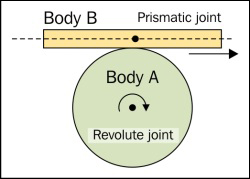
This type of joint is one of the most used joints in games mainly because of its versatility. You can use it to simulate arms, worms, trap doors, and many others.
First, prepare the joint definition object. Revolute joint types use RevoluteJointDef:
local anchorA = Vec2(5, 0)
local anchorB = Vec2(0, 0)

local jd = box2d.RevoluteJointDef()
jd.bodyA = bodyA
jd.bodyB = bodyB
jd.collideConnected = false
jd.localAnchorA = anchorA
jd.localAnchorB = anchorB
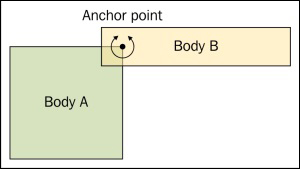
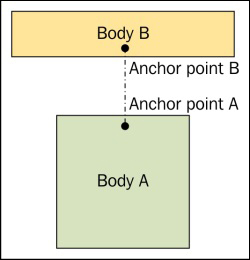
This is the simplest form of the definition object for revolute joint types. Note that this joint uses one anchor point for each body. The anchor point uses relative coordinates from the origin point of the body and defines a local point of rotation axis.
Now you can create the RevoluteJoint object by calling the createJoint function on the World object:
local joint = world.createJoint(jd)
local revolute_joint = box2d.RevoluteJoint(joint)
After you create the revolute joint, it tries to merge anchor points into one. Also, notice that there's the box2d.RevoluteJoint constructor used to actually convert generic joint type to RevoluteJoint. You only have to show this if you want to change joint properties over time.
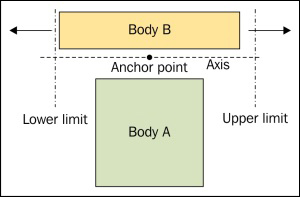
You can define limits for angular motion such as the maximum angle and minimum angle:
jd.enableLimit = true
jd.lowerAngle = math.rad(-45)
jd.upperAngle = math.rad(45)
The revolute joint can be used as a motor joint if you wish, where speed uses rad/s units:
jd.enableMotor = true
jd.motorSpeed = math.pi*2
jd.maxMotorTorque = 10
Motor should always have a reasonable limit for torque defined by the
maxMotorTorque property. This property uses N*m units.
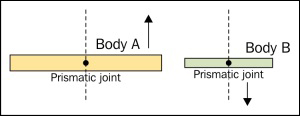
The prismatic or slider joint is used commonly for elevators, moving platforms, sliding doors, and pistons. This joint fixes the angle between two bodies and moves them along a specified axis.
Joint definition for the prismatic joint can look like the following:
local anchorA = Vec2(5, 0)
local anchorB = Vec2(0, 0)
local axisA = Vec2(1,0)

local jd = box2d.PrismaticJointDef()
jd.bodyA = bodyA
jd.bodyB = bodyB
jd.collideConnected = false
jd.localAnchorA = anchorA
jd.localAnchorB = anchorB
jd.lowerTranslation = -10
jd.upperTranslation = 10
jd.enableLimit = true
jd.axisA = axisA
There are additional parameters for this joint. You can motorize this joint with these three parameters:
jd.enableMotor = true
jd.maxMotorForce = 1
jd.motorSpeed = math.pi/4
You can create the PrismaticJoint object with the createJoint function in the World object:
local joint = world.createJoint(jd)
local prismatic_joint = box2d.PrismaticJoint(joint)
This joint uses anchor points for each body object, as well as axis vector for translation movement. You can set up additional constrains to limit translation movement by using the lowerTranslation, upperTranslation, and enableLimit properties.
The movement axis is set by the axisA property and its position is set by the anchor point of the first body.
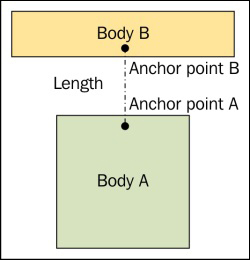
The distance joint is used when you need to maintain a constant distance between two bodies or anchor points, to be precise.
Definition for this type of joint can look like the following code:
local anchorA = Vec2(5, 0)
local anchorB = Vec2(0, 0)
local distance = 20

local jd = box2d.DistanceJointDef()
jd.bodyA = bodyA
jd.bodyB = bodyB
jd.collideConnected = false
jd.localAnchorA = anchorA
jd.localAnchorB = anchorB
jd.length = distance
This joint can behave like a spring to a certain measure. You can set this with these two properties—frequencyHz and dampingRatio:
jd.frequencyHz =5
jd.dampingRatio = 0.8
The DistanceJoint object is created with the createJoint function in the World object:
local joint = world.createJoint(jd)
local distance_joint = box2d.DistanceJoint(joint)
The rope joint works in a very similar fashion to the distance joint with one exception. Instead of maintaining a constant distance from the other object, this one uses the maximum distance constraints. As the name suggests, the rope joint is great for rope simulation like in the Tarzan movie:
The RopeJoint definition looks like the following code:
local anchorA = Vec2(5, 0)
local anchorB = Vec2(0, 0)
local max_length = 20

local jd = box2d.RopeJointDef()
jd.bodyA = bodyA
jd.bodyB = bodyB
jd.collideConnected = false
jd.localAnchorA = anchorA
jd.localAnchorB = anchorB
jd.maxLength = max_length
The only difference between the DinstanceJointDef object is in the maxLength property. This will set the length of a rope.
The rope joint is created with the following code:
local joint = world.createJoint(jd)
local rope_joint = box2d.RopeJoint(joint)
The weld joint is the simplest type of joint that connects two bodies. It is very similar to the distance joint, but it locks the body rotation as well. With this joint, two bodies behave as if they are one body. Therefore, bodies keep the same orientation and constant distance.
You can define this joint with the following lines of code:
local anchorA = Vec2(5, 0)
local anchorB = Vec2(0, 0)
local referenceAngle = 0

local jd = box2d.DistanceJointDef()
jd.bodyA = bodyA
jd.bodyB = bodyB
jd.collideConnected = false
jd.localAnchorA = anchorA
jd.localAnchorB = anchorB
-- mass-spring-damper frequency
jd.frequencyHz = 0
jd.dampingRatio = 0
jd.referenceAngle = referenceAngle
The weld joint can have a certain amount of stiffness set by the frequencyHz and dampingRatio properties. You can disable damping completely by setting dampingRatio to 0. Another thing is the referenceAngle property. This one is used to set the initial angle between two bodies. Usually, this angle is set to zero, which means that bodies manage the angle as they did before the joint application.
You can create the
WeldJoint object with the following two lines:
local joint = world.createJoint(jd)
local weld_joint = box2d.WeldJoint(joint)
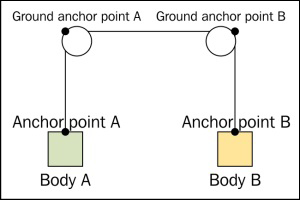
The pulley is a special type of joint where two bodies are attached to a virtual rope and this rope hangs in the air. This can be useful to simulate various traps or hanging platforms.
The following sample code contains the definition for the pulley joint. Notice that you can set the pulley ratio to simulate, block, and tackle:
local anchorA = Vec2(0, 0)
local anchorB = Vec2(0, 0)
local groundAnchorA = Vec2(-10, 40)
local groundAnchorB = Vec2(10, 40)
local lengthA = 20
local lengthB = 20
local ratio = 1

local jd = box2d.PulleyJointDef()
jd.bodyA = bodyA
jd.bodyB = bodyB
jd.collideConnected = false
jd.localAnchorA = anchorA
jd.localAnchorB = anchor
jd.groundAnchorA = groundAnchorA
jd.groundAnchorB = groundAnchorB
jd.lengthA = lengthA
jd.lengthB = lengthB
jd.ratio = ratio
In this situation, each body is attached to the rope at a local anchor point. The rope hangs at one or two places in the air, set by the ground anchor point. Be sure to set up the rope length at each side. It's recommended to place static objects around the ground anchor point to prevent bodies from being pulled out of the pulley. In reality, this can't happen but it can cause inconsistencies in the pulley simulation.
The pulley joint is created after the createJoint function call in the World object:
local joint = world.createJoint(jd)
local pulley_joint = box2d.PulleyJoint(joint)
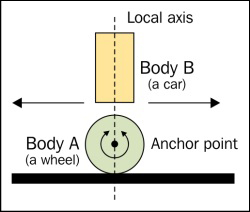
The wheel joint is a renamed version of the so-called line joint that was used in earlier versions of the Box2D library. This one behaves like a combination of the prismatic joint for spring and shock absorber and the revolute joint for a wheel. It is commonly used when simulating cars.
You can define the wheel joint with the following code:
local anchorA = Vec2(0, 0)
local anchorB = Vec2(0, -5)
local axisA = Vec2(0, 1)

local jd = box2d.WheelJointDef()
jd.bodyA = bodyA
jd.bodyB = bodyB
jd.collideConnected = false
jd.localAnchorA = anchorA
jd.localAnchorB = anchorB
jd.axisA = axisA
You can set a hardness of wheel hinge with the frequencyHz and dampingRatio properties:
jd.frequencyHz = 5
jd.dampingRatio = 0.8
Now you can use this joint definition to create the WheelJoint object:
local joint = world.createJoint(jd)
local wheel_joint = box2d.WheelJoint(joint)
The wheel joint can rotate a wheel by itself. You'll just have to set the motor parameters and enable the motor by setting the enableMotor property:
-- one rotation over 4 seconds
wheel_joint.motorSpeed = math.pi/4
-- max torque is 10 N×m
wheel_joint.maxMotorTorque = 10
wheel_joint.enableMotor = true
After this, you can easily notice that the wheel is slowly rotating.
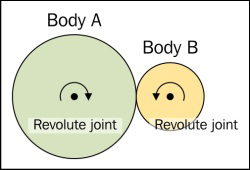
The gear joint connects the other two joints to the virtual gear. However, this type of joint works only with revolute and prismatic joints. There are three possible variations: two revolute joints, two prismatic joints, and one revolute with the prismatic joint. In any case, the gear joint uses a ratio to measure the movement of the other joint. This is the type of joint that can be used, for example, on cog-wheels, platforms on wheels, or hydraulic lifts. You can see these three scenes in the following three diagram.
The first one shows a scene with cog-wheels:
The second one illustrates a platform on wheels:
The last one contains a scene with hydraulic lifts:
The gear joint definition will look like this:
local jd = box2d.GearJointDef()
jd.bodyA = bodyA
jd.bodyB = bodyB
jd.collideConnected = false
jd.joint1 = revolute_joint1
jd.joint2 = revolute_joint2
jd.ratio = 1
Keep in mind that movable objects should always be set in the bodyB property for each of these two joints: joint1 and joint2. Otherwise, it won't be moving objects you expected.
You can change the movement direction of the other object with a negative ratio.
Now you can finalize this joint by calling the createJoint function in the World object:
local joint = world.createJoint(jd)
local gear_joint = box2d.GearJoint(joint)
Sometimes you need to control the movement of the body relative to the other body. The motor joint is designed exactly for this task. This can be used to push the body to always be next to another object at a certain relative position. You can use this to create interactive popups or icons that hover above the player's head.

You can define the motor joint with the following code:
local jd = box2d.MotorJointDef()
jd.bodyA = bodyA
jd.bodyB = bodyB
jd.collideConnected = true
jd.linearOffset = Vec(0, 5)
jd.angularOffset = 0
jd.maxForce = 1
jd.maxTorque = 1
jd.correctionFactor = 0.3
As you can there, there are many options to set. For instance, you can set a relative position with the linearOffset property. You can also set a relative angle with the property angularOffset so the object will try to be at a certain angle relative to the other one. Sometimes, you might want to slow down hovering over the object. To do this, you can experiment with different values for the maxForce and maxTorque properties. The final option you can use is correctionFactor, which sets the measure of how much will hovering object try to accommodate with a new position.
The MotorJoint object can be finalized with the following two lines:
local joint = world.createJoint(jd)
local motor_joint = box2d.MotorJoint(joint)
This type of joint works in a similar way to the MotorJoint object, but instead of using the relative position to the other object, this one uses world coordinates.
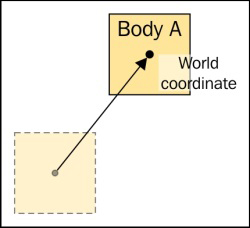
The MouseJoint object is used primarily in the Box2D TestBed application to test out the model situations with various objects and constraints. Even when this joint isn't included in the Box2D documentation, you can certainly find its use for special cases. For instance, if you've got a space simulator game, you can move your ship by clicking with your mouse button somewhere in the space. The ship will slowly follow the destination specified in the world coordinates.
The MouseJoint object definition can look like the following code:
local target_x = 0
local target_y = 0

local jd = box2d.MotorJointDef()
jd.bodyA = bodyA
jd.bodyB = bodyB
jd.collideConnected = true
jd.target = Vec(target_x, target_y)
jd.maxForce = 1
jd.frequencyHz = 5
jd.dampingRatio = 0.7
Target coordinates use world space coordinates and they are set in the target property. You can maximize the speed of the ship by changing the maxForce property. You can take a measure of the movement elasticity with the frequencyHz and dampingRatio properties.
The MouseJoint object is created with the following code:
local joint = world.createJoint(jd)
local mouse_joint = box2d.MouseJoint(joint)
The friction joint is used mostly as the name suggests, to add friction to the movement at certain places. For instance, it you're making a platform game, the player can sometimes jump from heights. If you've implemented a fall damage, this type of joint can come in handy. You can create special landing platforms that add friction to the player's falling movement, and therefore, save them from breaking their bones. Other examples of use can be found in the wind simulation where the friction joint slows down the player when running.
The friction joint can be defined as follows:
local anchorA = Vec2(0, 0)
local anchorB = Vec2(0, 0)
local max_force = 0.8
local max_torque = 0.9

local jd = box2d.FrictionJointDef()
jd.bodyA = bodyA
jd.bodyB = bodyB
jd.collideConnected = false
jd.localAnchorA = anchorA
jd.localAnchorB = anchorB
jd.maxForce = max_force
jd.maxTorque = max_torque
Greater values of maxForce and maxTorque have a greater damping effect on objects. Do note that anchor points might not have any significant effect on the friction of movement.
You can complete the friction joint with the following two lines:
local joint = world.createJoint(jd)
local friction_joint = box2d.FrictionJoint(joint)
The Box2D objects usually have three degrees of movement freedom; these are horizontal movement, vertical movement, and rotation around the z axis (out of your screen's direction). This might not be desirable for certain cases. Joints limit object movement specifically to used joint types.
However, these movement constraints might not always be exact mainly due to computational and rounding errors. Even with these inaccuracies, you should be fine as long as you're not doing 100 percent physically correct simulations or using inappropriate values for world scaling.
Each joint is created in two steps. First, you have to create a joint definition, and after this step you can use this joint definition as many times as you desire. The last step is joint creation with the createJoint function in the World object.
The joint object needs to be contained within your Lua environment because the Joint object can be garbage collected when unused. After this process, your Joint object will no longer exist. It's better to put the Joint object into the Lua table, which will keep the Joint object alive. This table should exist at least until the scene finishes.