Unsurprisingly, the View layer is primarily made of objects called views and the base class for all the views in SproutCore is SC.View. SC.View provides the machinery needed to render and update the views' elements. As part of the advanced display requirements of modern apps, SC.View also provides support for hardware accelerated cross browser animations and for being themed, both of which we will look at later.
First, let's look at how to arrange views to create a UI. In SproutCore, views are defined in a tree structure such as the DOM tree structure, where each view has zero or more child views accessible through the childViews property and has one parent view accessible through the parentView property. Each view has a parent view, except for the topmost view in a tree, which is where SC.Pane comes in.
SC.Pane is a special subclass of SC.View that resides at the top of a view tree and is the only type of view that can append and remove itself directly from the DOM. SproutCore provides several pre-built panes for us to use such as SC.MainPane, SC.PanelPane, SC.AlertPane, SC.SheetPane, SC.PickerPane, SC.MenuPane, and SC.PalettePane. As you can tell by the names, most of these panes act as accessory panes to the main interface. The exception to this is the SC.MainPane, which acts as the main interface pane. Every SproutCore application should have one main pane attached, which will house the main views for the current application state.
Let's look at an example of a basic SproutCore pane and the view hierarchy. The following is a sample wireframe of a pane we want to create:
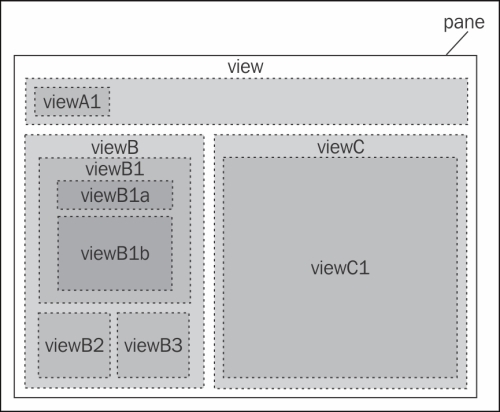
Whether we think of each box as an HTML div or a SproutCore view does not matter as the resulting structure is identical. In order to define all of these views in SproutCore, we arrange the code to match the same hierarchy ('view' contains 'viewA', 'viewB', and 'viewC'; 'viewA' contains 'viewA1'; and so on).
For example:
var pane = SC.Pane.create({
  childViews: ['view'],

  view: SC.View.extend({
    childViews: ['viewA', 'viewB', 'viewC'],

    viewA: SC.View.extend({
      childViews: ['viewA1'],

      viewA1: SC.View
    }),

    viewB: SC.View.extend({
      childViews: ['viewB1', 'viewB2', 'viewB3'],

      viewB1: SC.View.extend({
        childViews: ['viewB1a', 'viewB1b'],

        viewB1a: SC.View,

        viewB1b: SC.View
      }),

      viewB2: SC.View,

      viewB3: SC.View
    }),

    viewC: SC.View.extend({
      childViews: ['viewC1'],

      viewC1: SC.View
    })
  })

});
As you can see, the childViews array for each view contains the names of the children for that view, which are properties on the same view. As each view is created, it will look up all the named child views in childViews and create them too. As each child view is created, its parentView property will be set, thus connecting the entire tree.
Note
You will undoubtedly encounter examples of view trees using design and extend interchangeably. For all intensive purposes, these can be considered to be the same method. The design method is really just extend, along with indicating that the view should be loadable in a designer application for modification using a GUI tool. While work on an Integrated Development Environment (IDE) for SproutCore has progressed, no usable product exists yet. Therefore, the design method remains available till the time an IDE is completed.
We can then access any particular view using property paths. For example, to get viewB1, we would use the following code line:
var viewB1 = pane.getPath('view.viewB.viewB1'),And if we want to access viewB from within viewB1a, we would use the following code line:
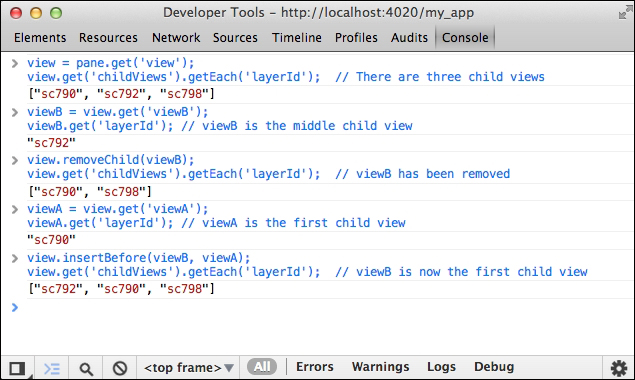
var view = this.getPath('parentView.parentView'),Finally, we can also dynamically modify the arrangement of views using the manipulation methods of SC.View: appendChild, insertBefore, removeChild, replaceChild, and replaceAllChildren. The following screenshot is an example of adding and removing child views dynamically using the previous pane: